- Innovative Methods of Terracing
- SALT Project (Sloping Agricultural Land Technology)
- How to Make and Use an A-Frame
- Book Review: Sembradores de Esperanza: Conservar para Cultivar y Vivir
- Book Review: Cuidemos Nuestra Tierra
INNOVATIVE METHODS OF TERRACING. I made a special trip to Haiti about a year ago to meet Victor Wynne and to see his interesting small farm in the mountains. After walking through eroded hillsides and unimpressive "fields," we suddenly came to a beautiful productive area that seemed like the Garden of Eden by contrast. Victor has experimented with better methods of terracing for some time, combining his training as an engineer and his love of plants. He has at least three distinct systems. He has written a description of one to share with our network, which follows.
 "There can be no viable long-term agricultural cropping or reforestation on hillside or mountain slopes, unless these slopes are first protected from soil erosion in heavy rainfalls. Protective measures to conserve soil must come first. The scheme which we have found to be entirely satisfactory consists not of terracing, but of digging trenches along level contours and using the material from the trenches to form elevated ridges for tree planting. The ridges are always made at right angles to the level contours. The work must always commence at a drainage divide and proceed downward. Otherwise runoff from above may destroy your work.
"The accompanying contour map of a section of hilly terrain illustrates the scheme. The level contours, shown by dashed lines, are laid out so that there is a 1.5 meter difference in elevation. This has been found to be a satisfactory spacing on most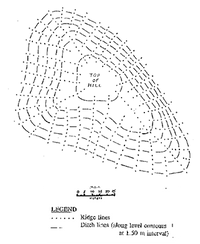 slopes for intercepting and temporarily holding runoff from heavy rains. In practice there is no need to make a map. A few level lines are staked out on the ground, starting just below the hill summit, at the stated 1.5 meter vertical elevation difference between them. A small inexpensive line-level hung onto a nylon string provides an easy way of laying out these level lines. With taller stakes readily visible, one chooses and marks the ridge lines roughly perpendicular to the direction of the trenches and spaced six or seven meters apart. This rather close spacing eliminates the necessity of any hauling of excavated ditch material, as all can be thrown by shovel from trenches to ridges. The ridges are represented on our contour map by the dotted lines. Trenches should be at least 30 cm in depth, and a minimum of 60 cm wide, with a level bottom. Of course, where the ridges are to be the trenches need not be dug out. Thus the trenches consist of short sections of ditch. Very careful leveling is less important than it would be for a long extended ditch.
"The hillside is now ready for agroforestry plantings. In general the ridges will be reserved for tree planting because of the greater soil depth. The rectangular plots between ridges and ditches can be used for annual cash or subsistence crops." He is having great success with Mimosa scabrella trees. This species might be the higher altitude equivalent of the leucaena. It is dying out where the roots encounter limestone. These trees are planted on the ridges with Andean blackberry plants growing on wires strung between the trees. He likes this berry because it produces year round. The juice he served from the berry was outstanding. Victor says it will only grow at higher elevations, over 4000 feet.
"Well, that is all there is to it. Simple isn't it?--but fully effective. So let's save our mountain soils!" For his complete description, plus my own description of two other distinctive methods he has been using, write for our Technical Note "Terracing on the Wynne Farm in Haiti."
SALT PROJECT (SLOPING AGRICULTURAL LAND TECHNOLOGY). The Mindanao Baptist Rural Life Center in the Philippines has done excellent work with farming sloping land. Harold Watson (the director), Ken Turner, and Peace Corps volunteer Joseph Profitt sent us a description of the technique. SALT has been used at the center since 1979. Its purpose is to protect hilly soil from erosion and to provide nutrients for plants.
First lay out the land in contour lines using an A-frame (see next article). Space the contour lines about 4-6 meters apart. Next 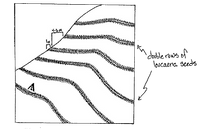 plow and harrow a 1 meter band along each contour until prepared for planting. Plant two rows of Leucaena leucocephala (or other species) on each band, during the rainy season, in furrows 0.5 meters apart and about 2.5 cm deep. If a large tree or stone is directly on the contour line, plant the double row around it, one row above and one below the obstacle. Soak the seed overnight in water to speed germination. [Ed: Many people place seeds in hot water then allow to soak without further heating over night.] Discard any seeds that float because they will not germinate. Plant seeds quite densely, about 1 cm apart; cover with fine soil and press down firmly. After germination, replant any spaces in the rows. Weed the seedlings until they are well established. To allow fast growth, seedlings can be gradually thinned out (every other tree) over a 3-4 year period. When the trees are large the final spacing should be 4-8 inches. This will require about 20 kilograms of seed per hectare, depending on the distance between the contour lines.
The leucaena can be left to grow until it becomes 4-5 meters high, at which time it will form a shade which will kill the grasses 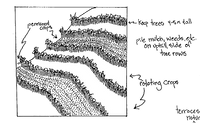 and eliminate the need for hand cutting to prepare for cultivation of the soil. If you must cultivate the land to plant crops in the 4-6 meter wide strips between the rows before the trees reach this height, you must plow alternately. In other words, one strip is plowed, the strip between the next higher two bands is left untouched, the next is plowed, etc. The unplowed strips will help hold soil that may wash down from above. When the leucaena is fully grown you can cultivate in every strip. Permanent crops such as coffee, bananas, and citrus can be set out at the same time as the leucaena seeds. The soil should not be plowed for these crops and only ring weeding should
 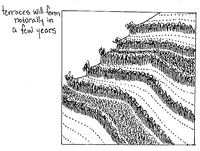 be used until the leucaena trees are large enough to hold the soil. Once a month cut down the continuously growing trees, but leave at least one meter of the stem. Pile the leaves and twigs at the base of your crops. This will provide both a mulch and nutrients. As you continue farming the land, gather excess straw, stalks, twigs, branches, leaves, rocks, and stones and pile them at the base of the trees on the uphill side as an erosion barrier. Over the years this will build up strong, permanent, naturally green and beautiful terraces--which will anchor your precious soil in its right place.
Every third strip is planted to a permanent crop such as fruit trees. The two intervening strips are planted to field crops like corn or cassava. The field crops should be rotated. For example, pineapple might be planted after beans have been harvested. If you want more information on this technique, contact ECHO for the 10-page illustrated Technical Note. The Center has many other demonstrations which integrate forestry, forages, animals, and home gardening techniques. They also sell seed of several species. Contact Mindanao Baptist Rural Life Center, P.O. Box 94, Davao City 8000, PHILIPPINES. [The fertilizer and mulch benefits of SALT are so great that a similar system is used even on flat land where erosion is not a problem. There it is called alley cropping.]
HOW TO MAKE AND USE AN A-FRAME. The A-frame is an accurate and extremely simple tool for measuring and marking level contours on a hillside field. You will need two straight and sturdy stakes or boards about 2 meters long and a third about 1 meter long, 3 nails, a string, and either a rock or bottle filled with rocks. A-frames are alongside the hoe and machete as essential tools on many mountain farms for preserving mountain soils.
 Nail the two long boards together at one end with a single nail. Leave the nail sticking out about half a centimeter so the string can be tied to it. Next nail the shorter board to the other two to make an "A", as shown in the drawing. Tie the string onto the nail and hang the plumb at the other end of the string so that it will swing freely, but below the horizontal board.
Next you need to find where the string will be touching the horizontal board when the two ends are on level ground. If you are certain that you have a level spot you can just make the mark where the string is resting. Rotate the A-frame 180 degrees and set it back on exactly the same spot. If the string is not on the same mark the location was not level. A method for any terrain is to drive two stakes about 10 centimeters wide into the ground, spaced so you can hold the A-frame with one leg on each stake. Mark where the plumb line touches the cross member, then rotate the frame 180 degrees and repeat. Place a large mark exactly half way between the two marks. This should be where the plumb line will touch the cross member when it is on level ground. To double check, drive the higher stake lower until the plumb line touches the mark, indicating that the frame is level. At this point you can rotate the frame 180 degrees and the plumb line will still contact the same mark.
To mark out a contour, place a stake into the ground at the starting point and put one leg of the A-frame next to the stake, on the uphill side. Locate the other leg of the A-frame where the plumb line crosses the level mark, then drive a stake by the leg, on the downhill side. This becomes the new starting stake. Continue in this way across the hillside. [This is based on a verbal description by Larry Sell in Honduras.]
There is nothing new under the sun. Someone sent us the book Ramesses the Great about ancient Egyptian civilizations. On page 140 is a picture of an A-frame. The caption said it is made from wood and limestone and was one of the tools selected for burial in the tomb of "the Servant in the Place of Truth Sennedjem."
SEMBRADORES DE ESPERANZA: CONSERVAR PARA CULTIVAR Y VIVIR, by Monika Hesse-Rodriguez. 252 pages, Spanish only. This exceptionally well-illustrated book arose from the experiences of agricultural transformation in mountainous southern Honduras. It details the practical techniques implemented to promote soil conservation in a community-oriented development program.
The author advocates a cautious and flexible approach to agricultural change, and the reader is constantly reminded that a successful method is one which works for an individual farmer in the family field. For that reason, the author presents many alternatives and ideas for site-specific adaptation. The introduction to the techniques used to conserve soil on sloping land, covers the theory, methods, advantages, and drawbacks of the following areas: the construction and multiple uses of an A-frame, many forms of terracing, vermiculture, agroforestry, green manures, low-tillage systems, intercropping, living fences, and windbreaks.
This book will be useful to community leaders and extension agents, who can benefit both from the insights into implementing agricultural change in a rural community as well as the various techniques discussed. The book constantly references the farmers' own experience, complete with testimonies from individuals about the use of each technique in his or her own field, clear photographs of over 30 unique applications of the conservation measures in farmers' plots, and questions for reflection in a group training course context. The reader can visualize the end results through numerous line drawings and photos throughout the text. The format would seem to be easily adapted for teaching and extension. The many illustrations make this a great book for non-Spanish speakers who want to work on their agricultural vocabulary.
Thanks to Judith Castro for sending a review copy. You can order a copy for US$5 (plus $5 postage, for up to 3 books) from Se¤or Juan Bautista Mej¡a, Servicio de Publicaciones del Obispado de Choluteca, Apdo 40, Choluteca, HONDURAS.
CUIDEMOS NUESTRA TIERRA: UNA VIDA MEJOR MEDIANTE EL APROVECHAMIENTO DE LOS RECURSOS EN EL CAMPO. Edited by Alberto de la Rosa and Werner Moosbrugger; 69 pages and full-color poster, Spanish only. This short book accompanies a large poster which depicts a mountainous campesino community with ecologically sound agricultural systems. Each page of the book amplifies one area of the poster scene and briefly defines the illustrated technique, explains its advantages and implementation, and suggests discussion questions and activities related to the topic. Among the 28 areas promoted are: soil improvement techniques, water system management, use of native crops, farm inventory, intercropping, school gardens, grazing and use of farm animals, and various erosion control measures.
The poster could be very useful in a classroom and serve as a reference for instruction on the environmental and economic advantages of integrating these ideas into village practices. The manual is not technical and serves primarily to explain the concepts attractively presented in the poster. The strong point of the book is that it positively outlines how the proposed techniques can address common problems of many campesino communities, offering other incidental benefits as well. The book (US$14) and poster (US$9) are available from Werner Moosbrugger, AA 100409, Bogot 10, COLOMBIA. Also available (for $12) is a brochure describing a simple way to solve the waste problems faced by poor urban communities. Prices include postage.