Where fuel is scarce, this easy-to-build fireless cooker can be a contribution to better cooking. It keeps food cooking with a small amount of heat stored in hot stones; loss of heat is prevented by a thick layer of insulating material around the pot.
Fireless cookers have been successfully used in many countries. Once the principle of operation, heat retention through insulation, is understood, the reader may develop plans that are better suited to local resources than those described here. In some countries, fireless cookers are built into the ground. In others, they are built from surplus tin cans, one can fitted into another tin can or box but separated by paper, sawdust, or other layers of insulation.
Materials
Outside container with lid, 37.5cm to 60cm (15" to 24") in diameter Inside container or well, at least 15cm (6") smaller in diameter and 15cm (6") shorter than outside container Cooking pot with lid Cloth for cushion, 1.2 square meters (1 1/2 square yards) 50 sheets newspaper or other insulation Cardboard Sand, .95 liter (4 cups) Cement, .95 liter (4 cups) Oilcloth for collar (optional), 0.4 square meters (1/2 square yard)
The outside container can be a wooden bucket, kerosene can, garbage can, packing crate, or even a hole in dry ground. The inside container or well can be a pail or can with a lid. It must allow for 7.5cm (3") of insulation between it and the outside container and should hold the stone and cooking pot without much vacant space.
Insulation can be made of shredded newspapers, wool cotton, sawdust, straw, rockwool, fiberglass, or other material. The insulation should be at least 7.5cm 3") thick on all sides, top and bottom. Be sure that it is very dry. The bottom layer of insulation must be strong enough to support the weight of the well, stone, and cooking pot. A natural stone carved to shape or a piece of concrete may be used for the heating stone. The cushion is a cloth sack, 7.5cm (3") thick, filled with shredded newspapers or other insulation. It should fit snugly in the outside container. The cooking pot must have a tight lid, and fit nicely into the well when the stone is in place. Be sure it can be removed easily when full of hot food.
Making the Fireless Cooker (See Figure 1)
Wash and dry the containers and lids.
Cut 10cm-wide strips of newspaper several layers thick. Roll each into a cylinder with a center hole no greater in diameter than a pencil. Pack these on end into the bottom of the outside container. They will support the well, stone, and pot.
Put the well in place. Pack insulation around it to within 1cm (1/2") of the top.
Make a cardboard collar covered with oilcloth. Though this is not necessary, it improves appearance and cleanliness.
Place about 2.5cm (1") of clean sand in the bottom of the well. This will prevent the hot stone from scorching the paper rolls and possibly causing a fire.
To make a concrete heating stone, place a 5cm-wide cardboard band or collar on heavy paper or board to form a circle the size of the stone desired. Mix .95 liter (4 cups) each of cement and sand (the sand should first be washed free of silt); then mix in enough water (about .35 liter or 1 1/2 cups) to form a stiff mush. Fill the collar, casting in a wire handle for lifting the hot stone. Let the stone stand for 48 hours, then remove the collar, place it in cold water, and boil for 30 minutes. Cool it slowly.
Using the Fireless Cooker
It is important to keep the cooking pot and well carefully washed and open, in the sunshine if possible, when not in use. The cooker's lid should be left partly open and the stone kept clean and dry.
It is not necessary to use much water when cooking in a fireless cooker for there is little loss by evaporation. Most foods should be brought to a boil and cooked for 4 to 5 minutes on another stove. The heating stone is heated and placed in the cooker. Then the covered cooking pot is set on the hot stone in the cooker and the lid is placed on the well. Cereal may be left in the cooker all night. Rice and cracked or whole wheat are especially good. Beans should be soaked over night, boiled for 5 minutes and then placed in the cooker for 4 to 5 hours. Dried fruit should be washed, soaked for an hour in 2 parts water to 1 part fruit, boiled for 5 minutes, then placed in the cooker for 4 hours.
Source:
Home Making Around the World, Washington, D.C.: U.S. Agency for International Development, 1963.
CHARCOAL OVEN
This simple charcoal-fired oven is made from two 5-gallon oil tin cans. With practice, all types of baking and roasting can be done effectively.
Tools and Materials
Tin snips Heavy knife Nail for scriber and punch Hammer Screwdriver Pliers Bricks and sand Metal bar, 20cm (7 5/8") long with square edge for bending tin 5-gallon cans (2) Tin (for shelf, top strip, and latch) Light rod, 50cm (19 5/8") long Light hinges with bolts (2 pairs) Stove bolts, 5mm x 13mm (3/16" x 1/2") (15)
How To Build the Charcoal Oven
Mark the two 5-gallon cans for cutting (see Figure 2), making sure that the
second can is marked the reverse of the first. Do not cut the corner that has a vertical seam: Besides being hard to cut, the seam will strengthen the oven. The material removed will be easier to make into doors if it is seamless.
Cut along the marks with a heavy knife, keeping the cut-out sections as undamaged as possible. Fold the edges of the oven-door openings back 1cm (3/8") (see Figure 2).
With the nail, punch 5mm (3/16") holes around the opening in the side of the can to be used for the left hand section of the oven (see Figure 2). Place the second can against the one just punched and mark the holes with the nail. Punch holes in the second can. Bolt the cans together, using 10 stove bolts.
Flatten sections cut from cans and mark for doors (see Figure 3). Using the tin
snips, cut doors to size and fold back the 1cm (3/8") edge (see Figure 4). Position
doors as shown in Figure 1, butting the edge of each door against the edge of
the opening to which it will be attached. Install hinges.
The door latch (see Figure 1) is made by folding a 6cm x 38cm (2 3/8" x 15") strip three times lengthwise, forming a piece 2cm (3/4") wide. An 8cm (3 1/4") piece is cut from the end of the folded strip to form hook--which is then bolted (use 2 bolts) to the center of the door on the right. The 30cm (11 3/4") piece is bolted loosely to the center of the door on the left. The unattached end is bent up to form a handle.
A triangular-shaped hole at the top of the doors where the two cans come together must be plugged to keep heat from escaping. This can be done by shaping a small piece of tin to fit the opening, with a tail that is inserted between the joined cans to hold it in place.
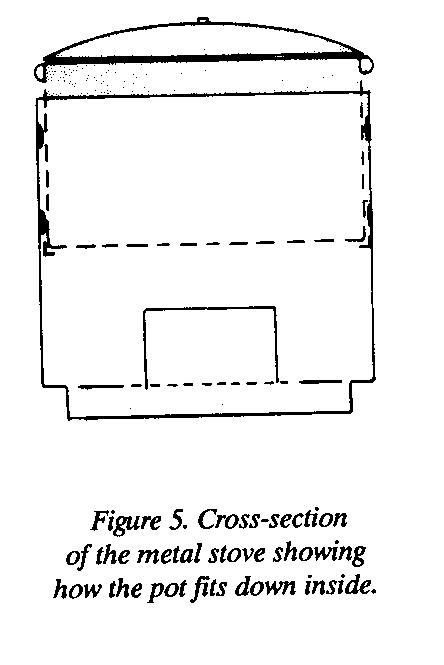
Construct shelf as shown in Figure 5 and install (see Figure 1). The shelf should
be bolted in place 15cm (5 7/8") from the floor of the oven (see Figure 5).
The oven should be cleaned thoroughly and heated at least once before use to burn out any remaining oil in the cans.
How to Use the Charcoal Oven
Place 1cm (3/8") of sand in the bottom of the oven and place the oven on bricks as in Figure 1. The oven can be removed until the charcoal starts to burn, then put in place.
A little time is required before the proper temperature is reached because the sand must first absorb and dissipate the heat. For very high baking temperatures, or to brown the top surface of baked goods, additional pieces of charcoal can be placed on top of the oven. An extra rim can be added to the top edge of cans for this purpose (see Figure 1).
Sources:
V.C. Pettit, United States Agency for International Development Dale Fritz, VITA Volunteer, Schenectady, New York
PORTABLE METAL COOKSTOVES
Loss of forest cover is a serious problem around the world, particularly in developing countries. In some of these countries, forest cover has decreased from over 60 percent to under 20 percent in just a few decades. One consequence of this loss of wood supply is that it is becoming increasingly difficult for people in these areas to obtain fuel to cook their food.
Improving the fuel efficiency of cookstoves is one way to reduce the drain on forests and the wood supply. Improved stoves can also reduce the cost of cooking fuel--an expense that consumes up to one third of the income for some families.
Principles of Energy-Efficient Stoves
Traditional stoves are generally of three types. The simplest is the three-stone design, where the cooking pot rests on stones over an open fire. The second type is the massive stove, made of clay and sand, that may hold several cook pots, but which takes a long time and much fuel to heat up. The third type is the lightweight portable stove made of sheet metal or ceramic.
The traditional portable stove has been studied intensively and modified to achieve a very high level of efficiency--40 to 50 percent, or more than twice the efficiency of traditional stoves. In addition, the portable stoves are easily mass produced by local artisans and find a ready market alongside more traditional goods.
In a stove, heat is transferred from the fire to the pot by the convective heat process. To get the most convective heat transfer--and hence fuel efficiency--it is necessary to pass the hot gases from the fire over as much of the surface of the cook pot as possible, and through as narrow a channel as possible (see Figure 1).
Narrower channels give higher convective heat transfer efficiencies, and thus reduce the overall size of the fire needed for cooking. But if the channel is too narrow, the fire may be choked off, and either smoke or die. Experimental work has shown that a channel between 4mm and 8mm wide (about 1/4 inch) is best.
If families already have their cook pots, then the stove(s) must be designed and built to fit the cook pots in order to obtain the narrow channels for the hot gases from the fire. This means that one should not design and build the cookstoves until the sizes of the cook pots have been measured. An alternative is to design a cookstove that can be efficient with a variety of pot sizes, using a selection of inserts provided with the stove so that the channel can be just right for a variety of pot diameters. It is recommended that a survey be made of the pot diameters in common use in the local area before the cookstove design is made final.
In order to sell fuel-efficient cookstoves, local artisans must not only be able to produce them, but people must want to buy them and must have the means to do so. In addition to determining the usual cook pot size in the market area, it is useful to ask potential customers what they want in a cookstove and how much they think they would be willing to pay. Market surveys in some countries show most people want a stove that can cook food quickly and use less fuel. The selling price of the stove described below is approximately US$3.00 (1987) in one West African country, a price people were willing to pay.
Cookstove Design
If you plan to make more than one or two cookstoves, it is best to make templates (patterns) for the stove parts first. The templates shown in Figures 2, 3, and 4
will produce stoves suitable for spherical or cylindrical cook pots. Templates may be made of cardboard, plywood, or, better yet, sheet metal.
The stove presented here requires some welding and the use of concrete reinforcing rod (re-rod) as the pot support. Other designs, equally efficient, may use rivets or hammered seams and pot supports made of the same material as the stove.
- The length of the template is given by
L = C + G + S + T
C is determined by the measure of the pot around its widest circumference. G is determined by the desired pot-to-wall gap, G = 2pi. For a gap of 4 mm, G = 2.5 cm; for 6 mm, G = 3.8; for 8 mm, G = 5.0 cm. A gap of four to six mm (3/16-1/4") is preferred. Increase it only if excessive smoke comes out the door or the heating rate is too slow. S is determined by the amount of overlap in the seam. It is preferable to weld the stove together end to end (thus S = 0) to prevent the creation of a small vertical channel by which the heat can by-pass the pot. If the seam is crosswelded or folded, typical values for S will be 1 cm. T is determined by the thickness of the metal used. One typically uses 1 mm (T = 0.3 cm) or 1.5 mm (T = 0.47 cm) thick metal. Thus, for a 90 cm circumference pot, a 4 mm gap, an end-to-end welded seam, and 1 mm thick metal we find:
L = 90 + 2.5 + 03 = 92.8 cm
- For spherical pots, template height H is determined by the sum of the airhole height (A), the grate-to-pot height (P), and the amount necessary to extend a few centimeters above the pot's maximum circumference when in place on the stove (T).
H = A + P + T
Typical values for A are 3 cm (1 13/16") and for P 0.4 of the pot diameter. For cylindrical pots the height T is typically 5 to 10 cm (2 to 4"). The best height T is determined more precisely by comparing the increased efficiency and reduced fuel use caused by the additional height versus the increased cost of the extra metal. Additional height can also be provided at the top and bottom of the template, typically 1 cm (3/8") each, to allow the edge to be folded over to protect against sharp edges and increase the stove's rigidity and strength.
- Stoves usually have four air holes, about 3 cm by 3 cm (1 13/16" by 1 13/16") each (A = 3 cm). Space them symmetrically, but far enough away from the door and the seams to avoid weakening the stove. Cut the airholes on two sides only so that when bent upward and inward they can act as supports for the grate. for larger pots or soft soil where the stove will sink in, larger airholes may be necessary. Alternatively, for soft soil conditions a ring-shaped platform can be cut and attached to the stove.
- Space pot supports evenly around the stove, but offset from the door and edges so as not to weaken them. The height P for the pot supports above the top of the air holes (where the rate will rest) is given roughly by
P = 0.4C/pi or 0.4D
where D is the pot diameter. The best distance will vary somewhat with the size of wood used locally, its moisture content, and other factors.
- The door size is somewhat arbitrary and is determined by the locally available wood size. Typical sizes for a 90 cm (35") circumference pot are 12 cm wide by 9 cm high (4 3/4" x 3 1/2"). Place the bottom of the door at the grate position-the top of the air holes. Make the top of the door several centimeters below the bottom of the pot so that the hot gases are guided up around the pot rather than out the door. If necessary, decrease the door height to ensure that it is below the bottom of the pot.
- The grate is a circle of sheet metal cut to fit snugly into the finished cylinder. Punch the center diameter with a 30 percent hole density of 1 cm (3/8") holes.
Producing the Cookstoves
The stoves can be produced in villages in nearly all countries by metal working artisans with modest skills.
Tools and Materials
Sheet metal shears Ball-peen hammer Hole punch Anvil Welder Sheet metal, approx. 1 mm (.04") thick (2 to 3 stoves per sq. meter) Heavy wire (for handle) Heat resistant paint (optional)
To produce stoves in quantity:
- Trace the template on a sheet of metal as many times as desired or as space permits.
- Cut each form out in outline. Cut the door, pot support holes, and strips for the airholes.
- Roll the metal into a cylinder. The cylinder should be as straight and smooth as possible.
- Cut out other components such as pot supports and stabilizers and put them into place.
- Cut the grate and punch the holes in it.
- Weld the stove together. Weld pot supports into place. Alternatively, fold all seams together. Hammer smooth.
- Place the grate in the stove, fold the tabs from the airholes inward and upward.
- Paint it with heat resistant paint where available.
- Add wire loop if desired to lift stove.
The finished stoves are shown in Figures 5 and 6.
Source: Sam Baldwin, VITA Volunteer, Princeton, New Jersey. OUTDOOR OVEN
An outdoor oven is easy to build and good for baking bread, potatoes, beans, cereals, cakes, and other foods.
Tools and Materials
Adobe blocks or brick: 35cm x 25cm x 10cm (14" x 10" x 4") Wood or metal for door and smoke hole covers Clay or cement for plastering
Lay bricks on the ground to make a base, 120cm x 120cm square and 30cm high (4' x 4' x 1'), on which to build the oven. After making the base, build the oven walls in an oval shape as shown in Figures 1 and 2. Lay the bricks flat and
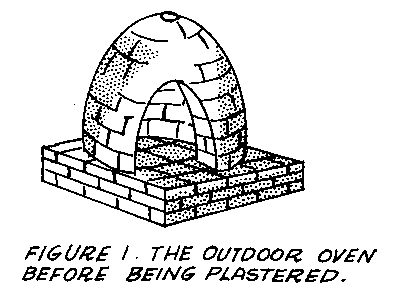
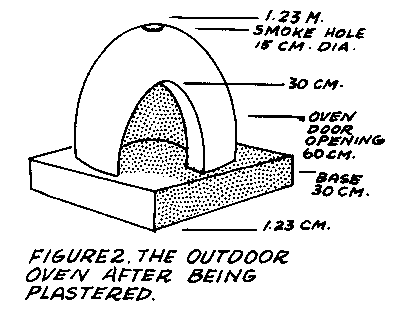
lengthwise starting from each side of the door opening, using the center of the square base as a guide. To form the dome shape and oval door opening, cut the corners of the bricks as you lay them. The inside space should be about 75cm (30") in diameter and 90cm (3') high. Leave a front opening for the oven door and a small opening at the top to let the smoke escape (see Figure 2).
Now make wooden or metal covers to fit tightly over the door opening and the smoke-hole (see Figure 3). These should be tight-fitting so that hot air will not
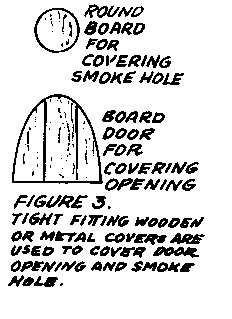
leave the oven when the openings are closed.
Plaster the inside and outside with a clay mixture or cement. The stove should be re-plastered at least once a year.
With the door and smoke-hole open, build a fire in the oven.
When the fire has burned to ashes, sweep out the ashes.
Put the food to be cooked inside the oven. Use trays or be sure the oven floor is very clean.
Cover the door opening and smokehole tightly.
Experience will teach how long food should be cooked. Bread, for example, can be expected to take an hour to an hour and a half.
This type of oven was used traditionally in many areas of Europe, the southwestern United States, and in villages throughout South Asia.
Source:
Home Making Around the World Washington, D.C.: U.S. Agency for International Development.