If you read about alternative sources of protein you will likely encounter many suggestions that insects could serve as a viable and ecologically friendly alternative to conventional animal protein (e.g., poultry, beef, pork, fish) (Adámková et al., 2017). Insects require less grain and produce less methane (a greenhouse gas) than traditional livestock (Rumpold and Schlüter, 2013). When I read just such an article, I began to wonder if insects could be a practical source of protein for people in the tropics. More specifically, I began to wonder if house crickets could be raised on a small scale as a sustainable protein source in urban settings, given the practical, regulatory, and social obstacles likely to be present in many cultures.
In order to investigate the question, I partnered with Henderson Cricket Farm and began to read about and experiment with growing crickets in my spare bedroom. I also asked my organization’s contacts in Nicaragua to investigate requirements for importing live crickets. We discovered a cricket protein producer in the neighboring country of Costa Rica, and are now in the process of establishing our own live colony there with hopes of one day exporting crickets to Nicaragua.
Cricket farming basics: a backyard farming perspective (Martin)
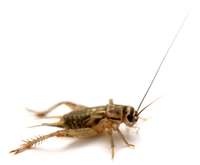
Figure 4. House cricket (Acheta domesticus) commonly raised for food. Source: Adobe stock image
Growing crickets at home is pretty easy. (You can see some of my experience on the website cricketcam.us.) Raising a few crickets at home helps develop skills for a larger-scale endeavor. Crickets are good climbers, so you need a container with slippery sides such as glass or slick plastic. Or, you can use almost any container with vertical sides if you place slick packing tape around the inside perimeter. A top with some screen is preferable to protect crickets from intruders. [Ed. The size of the container depends on how many crickets you want to grow. Adult crickets will eat smaller crickets, so you will want a separate space or bin for the small ones.]
Crickets need to be able to hide, so paper-based egg cartons or egg crates are an ideal habitat; almost any cardboard objects will work (e.g. empty toilet paper rolls). About half of the space inside the container should be devoted to such habitat.
Crickets are scavengers and will eat just about anything. Mine seem to particularly like dandelion leaves. For home-grown projects, a slice of bread is a good food source and ensures they get some grain. If you have vegetable peels, crickets will devour them. Remember, if someone is going to eat the crickets, be very careful not to feed them anything with poisons or chemicals such as might be found on unwashed vegetable peels.
Crickets need a water source, but they tend to drown themselves in standing water. A wet sponge, rag, or plain old cotton is a good medium. Do not use a pan of open water! [Ed. Here Martin has focused mostly on materials for backyard cricket farming. Basic steps are similar to those described in the next section by Collins.]
Cricket farming basics: a commercial perspective
(Collins)
Cricket farming is practiced in parts of Asia, Africa, and elsewhere (Adámková et al., 2017, Halloran et al., 2018, and Hanboonsong et al., 2013). The most common cricket used for human consumption is the house cricket (Acheta domesticus; Figure 4). The house cricket is thought to have originated in Southwest Asia, but is distributed globally and is commonly reared and marketed for fish bait and pet food. In the wild, its lifespan is approximately 10 to 12 weeks. In captive breeding environments, expect a life span of 8 to 10 weeks. Here I provide some requirements and steps for setting up a successful, small-scale cricket farm.
To be successful you will need a warm environment. Crickets grow best in temperatures of 27 to 32°C. In warmer climates, a heat source is not a concern. In cooler climates, auxiliary heat is a must. Crickets also need adequate ventilation, which can be provided by using fans to move air over the grow boxes.
Supplies needed
Here are the basic, minimum supplies needed for a system with three to four grow bins, sized to hold 8,000 to 10,000 crickets per grow bin. [Ed. Costs depend on choice of materials and are addressed in an ECHOcommunity Conversations post. There is room for creativity here.]
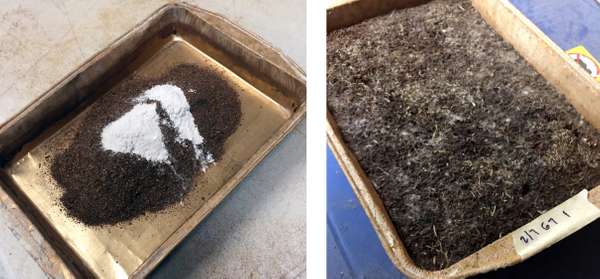
Figure 5. Cake pans with media added (coconut + lime shown in left photo) and with media that has been mixed (right). Source: Scott Martin
Egg laying media and containers
- Media for egg laying such as sterilized peat moss or coconut coir (Figure 5). If using coconut coir, add pulverized lime to adjust pH to within the optimal range (6.5 to 7.0).
- Pans (23 x 30 cm), with lids, to hold the egg-laying media. Puncture rows of small holes in the lids for ventilation. You will need up to six pans.
Bins and habitat
Bins can be made of wood, plastic, or cardboard (does not last as long as wood or plastic).
- A bin to incubate the egg pans and a bin to hatch the babies (nymphs) (Figure 6A). These bins are 90 to 120 cm long, 60 to 90 cm wide, and 90 cm deep.
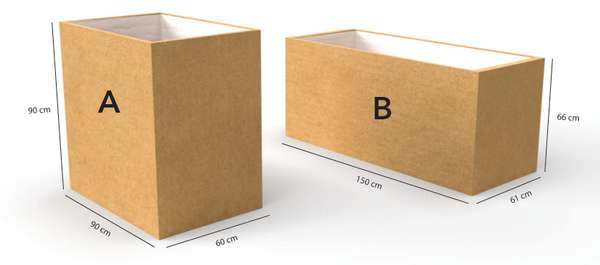
Figure 6. An incubator or hatching bin (A) and a grow bin (B) drawn to scale. Source: Cody Kiefer
- Three grow bins (Figure 6B), in which you will raise the crickets to size. These bins are 150 to 180 cm long, 61 to 66 cm wide, and 66 cm deep.
- Slippery material around the inside edges of the bins, to keep crickets from escaping. Options include clear packing tape (for plastic bins) or slick, acrylic paint (for wooden bins; you can overlay the paint with packing tape if needed).
- Housing space. Egg cartons/flats are commonly used. The cardboard tubes inside empty toilet paper or paper towel rolls also work. Depending on the thickness of the egg flats, you will need six for the hatching bin and 55 to 60 per grow bin. Restaurants may be a source of egg flats.
Food and water
- Water containers. I use water bottles with bases, similar to those used for chickens: four 1-L (or quart size) bottles for the incubator bin, two smaller (0.5-L) bottles for the hatching bin and each grow bin, and some rolled up paper towel or sponge.
- Feed trays (about 23 x 31 cm) with sides. These can be cardboard.
- If they are going to be used for human consumption, crickets grow best with a non-genetically modified, organic, grain-based feed source of 16% to18% protein. An example of this type of feed would be a finely ground chicken layer mash. A very fine grind—almost as fine as flour— is especially important for the early nymph stages. Feed daily, adjusting the amount of feed based on the age/size of the crickets. An above-mentioned bin of 5-week old crickets will consume about 900 g of feed every 24 hours. [Ed. Alternative feeds are explored in an ECHOcommunity Conversations post.]
From egg lay to adult maturity is 42 days, so house crickets are commercially produced on a 6-week cycle. To begin breeding, you need crickets that are at least 42 days old.
Basic steps in cricket farming
Below are the steps for a system involving three to four grow bins (as mentioned at the beginning of the supplies section):
-
Acquire adult crickets. To begin you will need approximately 8,000 to 10,000 adult crickets. Sourcing options include in-country cricket farms or pet stores in urban areas. Crickets are usually apportioned by volume in a graduated cylinder; a thousand crickets occupies 700 to 800 mL. Place these crickets in one of the grow bins. Add egg flats for living space, and provide fresh water and feed daily.
-
Prepare egg pans. Prepare up to six cake pans (determine how many by reading step 3). Fill each cake pan with 340 g of loose coconut coir, 57 g (2 oz) of lime and 473 mL (2 cups) of water. Mix well. Mixing is easier if you allow 15 to 20 minutes for the coir and lime to absorb water.
-
Set the egg pans in the bin with the adult crickets. The adult crickets will lay their eggs into the media in the pans, an event we call a “lay.” You can lay a batch of adult crickets up to three separate times. (I recommend only laying twice; after laying the adult crickets, they can be harvested for food.) For 8,000 to 10,000 adult crickets, you need two media-filled egg pans per lay. Make sure the bottom of the adult cricket bin is clean. For each lay, stack the two pans on top of each other, with pieces of wood in between the pans to provide about 1.5 cm of air space between the two pans. Screen over the bin will help keep flies out, which can lead to maggots in media; screen reduces air flow but you may find it necessary.
For the first lay, leave the egg pans in with the adult crickets for 12 hours. By then, the crickets will have deposited numerous eggs into the substrate of the egg pans. Limiting the first lay to 12 hours prevents poor hatching due to overcrowding of eggs. I prefer placing the egg pans at night and taking them out the next morning. After the 12-hour lay, I gently shoo the adult crickets off the egg pans, write the date on a piece of tape on the side of each pan, and then move them to the incubator bin (see step 4). Writing the date on the egg pans avoids confusion as you periodically check each one prior to hatch day.
For the second lay, repeat this process 48 hours later with another set of egg pans. This time leave the adult crickets on the pans for 18 to 24 hours, to account for a weaker lay the second time around.
Before you choose to attempt a third lay, note that it is always much weaker as far as the number of eggs and the hatch rate, and you will see much greater die-off of the adult crickets. If you decide to go ahead, the third lay should start 48 hours after the second lay and should be left in the grow bin for 24 hours. As with the first two lays, remove any crickets still on the egg pans and proceed to the next step.
-

Figure 7. An incubator bin with a covering. Note the uncovered gap on either end, for air flow. Source: Cody Kiefer
Transfer egg pans to the incubator bin. The incubator bin should have four to five 1-L filled water bottles (with bases, as explained in the list of supplies) to provide adequate humidity. You should also place a cardboard covering over the incubator bin, with 10 to 15 cm of non-covered space on either end for air flow (Figure 7). Place lids with ventilation holes on the egg pans, to reduce evaporation but still allow for air flow. Leave each set of pans in the incubator bin for 7 days; then, on the 8th day, transfer them to the hatching bin.
-
Hatch eggs in the hatching bin. To set up the hatching bin, sprinkle some feed on the floor, and place egg flats and two filled 0.5-L waterers (with bases). Put rolled-up paper towel or sponge in the base of the waterers to keep the nymphs from drowning (maintain this practice until crickets are 3 weeks old). As the 7-day incubation period is completed for each lay, transfer any existing nymphs (from a previous lay) into the grow bins (step 6), and place the corresponding set of egg pans into the hatching bin. The crickets will start hatching and continue to hatch over the next day or two [Ed. The time it takes for eggs to hatch is influenced by temperature.] You will see the small crickets on the egg flats.
-
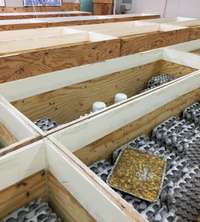
Figure 8. Grow bins at Henderson Cricket Farm. Note the egg crates for cricket housing inside the bins. Source: Scott Martin
Place nymphs into grow bins. To capture the nymphs, you will need a bucket and a graduated cylinder. Take the egg flats and shake them into the bucket. Transfer crickets from the bucket into the graduated cylinder. Then place them into grow bins (Figure 8) at a rate of 235 to 475 mL (1 to 2 cups) of crickets per grow bin, adjusting the amount up or down as needed (e.g., adjust downwards if overcrowding seems to be causing die-off). In 5 or 6 weeks, you will have two bins of adult crickets (approximately 8,000 to 10,000 per bin) to harvest as a food source, and one bin of crickets that will lay eggs to continue the cycle. NOTE: If your climate is such that you need to supply heat, cricket farmers often harvest crickets into small nursery bins, where they can be cared for in a small space (to minimize heating costs) prior to transferring them to grow bins.
Depending upon the size of your building, these steps can easily be scaled up to fill nine groups of three or four grow bins per group, providing a constant supply of adult crickets for consumption or sale.
Hopefully these guidelines will give you enough information to start a successful cricket farm. Growing crickets can be a fun and rewarding experience if you take the time to learn their habits and needs. There will be hiccups along the way, but with perseverance and dedication, anyone can become accomplished in the art of growing crickets.
Sourcing and regulatory considerations (Martin)
We have investigated starting a cricket farm in Nicaragua for humanitarian purposes. In doing so, we learned about regulations for importing crickets (Box 1). Importing insects from one country to another can be quite costly. Fortunately for us, there is a cricket protein company in the neighboring country of Costa Rica.
| Box 1. Regulations for importing crickets from the United States into Nicaragua. |
| In Nicaragua, two steps are required to import crickets. First, the species must be approved by the Nicaraguan government. The government charges USD 3,000 to investigate if a species is acceptable. We were fortunate that someone in Nicaragua had already applied for approval of house crickets. The second step is to obtain approval for a specific shipment. This requires a veterinarian to inspect and certify that the exporter’s crickets are free of diseases and pests. The veterinarian’s report must be certified by the USDA APHIS program. Nicaragua requires a physical letter of verification with an official seal. Any documents not in Spanish must be translated by an authorized translator, with the translation then verified by the Nicaraguan Embassy in Miami. A rough estimate of USA expenses for approval of a very first shipment is USD 500. On top of that, Nicaragua requires USD 160 to approve the documents. |
You may find that house crickets, or other commonly-eaten cricket species, are already available in your area. Alternatives to house crickets include the tropical house cricket (Gryllodes sigillatus), the two-spotted field cricket (Gryllus bimaculatus), and the Jamaican field cricket (Gryllus assimilis). Locally-obtained crickets are more likely to be adapted to the conditions in your area.
Be sure that the insects you produce, and products made from them, are safe to eat. Clear regulatory guidance on this is often limited. Vandeweyer et al. (2018) suggested submerging crickets in hot water (60°C) to kill them, rinsing them in clean water, and then subjecting them to a heat treatment (e.g. submerging crickets in a kettle of water and bringing the water to a boil) as an effective way to eliminate pathogens. After the heat treatment, the crickets can be processed in various ways, such as freezing them or drying them in an oven. However you choose to process crickets, strive for cleanliness in all your protocols.
Social considerations (Martin)
I remember walking around a rural village in Nicaragua after Hurricane Mitch and seeing cow manure full of brown beans. Why? USAID was giving away brown beans, but the people did not consider them as food fit for human consumption. Any introduction of a new food requires an educational effort to teach what the food is and how it is used. The Spanish word for cricket is grillo, and I can recall women reacting to the word the same way my wife would react to the word “cockroach.” Fortunately, cricket flour looks like powder and has a pleasant, mild, nutty taste. If we succeed in introducing crickets to Nicaragua, we will have to teach people how to make and utilize cricket flour. For example, it could easily be added to tortillas to improve the nutrition level.
Concluding thoughts (Editor)
Introducing crickets for human consumption might be easiest in places where insects are already a part of peoples’ diets. Cricket farming, at home or on a larger scale, can be done with commonly available materials. If you are interested in raising crickets for food, we encourage you to follow Martin’s example of “learning by doing,” starting with a few bins. As Collins and Martin have done, share your insights with others. A good place to do that is in ECHOcommunity Conversations, where you can find input into questions already asked by ECHO staff.
References
Adámková, A., J. Mlˇcek, L. Kouřimská, M. Borkovcová, T. Bušina, M. Adámek, M. Bednáˇrová, and J. Krajsa. 2017. Nutritional potential of selected insect species reared on the island of Sumatra. International Journal of Environmental Research and Public Health 14(5):521.
Halloran, A., R. Caparros Megido, J. Oloo, T. Weigel, P. Nsevolo, and F. Francis. 2018. Comparative aspects of cricket farming in Thailand, Cambodia, Lao People’s Democratic Republic, Democratic Republic of Congo and Kenya. Journal of Insects as Food and Feed 4:101-114.
Hanboonsong Y., T. Jamjanya, and P.B. Durst. 2013. Six-legged livestock: edible insect farming, collection and marketing in Thailand. FAO.
Rumpold, B.A. and O.K. Schlüter. 2013. Potential and challenges of insects as an innovative source for food and feed production. Innovative Food Science and Emerging Technologies 17:1-11
Vandeweyer, D., E. Wynants, S. Crauwels, C. Verreth, N. Viaene, J. Claes, B. Lievens, and L. Van Campenhout. 2018. Microbial dynamics during industrial tearing, processing, and storage of tropical house crickets (Gryllodes sigillatus) for human consumption. Applied and Environmental Microbiology 84(12): e00255-18.
Cite as:
Martin, J.S. 2020. Are Crickets a Practical Source of Protein in Tropical Countries?. ECHO Development Notes no. 148