INTRODUCTION
 Often the biggest challenge faced by a tropical farmer is not in the production of a crop but rather in the preservation of the crop. Farmers may want to preserve a crop for future consumption or for sale at a time when the market will offer a higher price.
Using a solar dehydrator is a simple, cost-effective way to preserve a variety of different crops. Dehydrating removes the moisture from food so that bacteria, yeast and mold cannot grow and spoil it.
Description
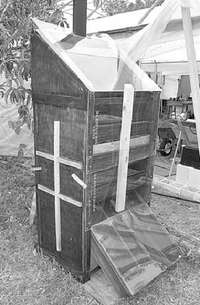
Plans for a number of different solar dryers are available. The solar dryer used at ECHO was constructed by combining several different designs and adjusting them so they would work with materials that were readily available.
The interior of the ECHO dryer reaches drying temperatures on sunny or semi-sunny days. Some dryers use fans at night after the temperature drops in order to keep the air flowing. We have dried flowers, fruit, vegetables and even fish in our dryer without the use of a fan, and have had no problem with rotting or spoilage in the dry season. We had a slight problem in the hot, rainy season.
MATERIALS USED
- 2 x 4 inch (5 x 10 cm) lumber for the frame of the dryer.
- Plywood for the side walls and back wall.
- Three separate sheets of clear plexiglass or clear film for the front.
- Wooden boards for drying racks.
- Plastic or metal mesh with holes smaller than the product to be dried, for lining the bottom of the racks.
- A flat rectangular piece of plastic or metal for the chimney (painted black). A metal stovepipe or a piece of PVC pipe would work as well.

Trays slide out for easy loading
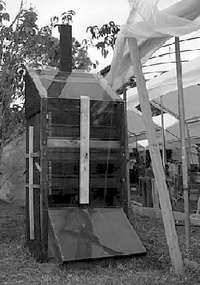
Front view of dryer

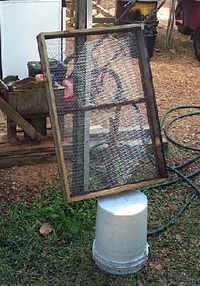
The drying rack.
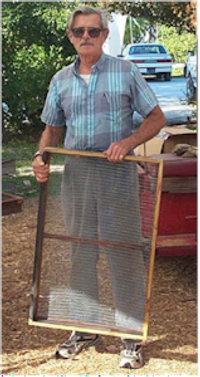
Charlie Forst holding drying rack.
For more information about solar dryers
Preservation of Fruits and Vegetables. Agrodok-series No. 3. Agromisa, Postbus 41, 6700 AA Wageningen, the Netherlands.
Solar Dryers: Their Role in Post-Harvest Processing. Commonwealth Science Council, Marlborough House, Pall Mall, London SW1Y 5HX.
Information about drying fruits and vegetables
(Reprinted with permission from the University of Georgia. Reynolds, Susan, (1997-05-01) Drying Fruits and Vegetables Athens, GA: University of Georgia, Cooperative Extension Service.)
Drying Fruits
Dried fruits are unique, tasty and nutritious. Begin by washing the fruit and coring it, if needed. For drying, fruits can be cut in half or sliced. Some can be left whole. See Table 2 below for specific directions for preparing each fruit.
Thin, uniform, peeled slices dry the fastest. The peel can be left on fruit, but the fruit will take longer to dry. Apples can be cored and sliced in rings, wedges or chips. Bananas can be sliced in coins, chips or sticks.
Fruits dried whole take the longest to dry. Before drying, skins need to be "checked" or cracked to speed drying. To "check" the fruit, place it in boiling water and then in cold water.
Because fruits contain sugar and are sticky, coat the drying trays with a very thin layer of oil before placing the fruit on the trays. [C.F.: oiling the metal is especially important with acidic fruits]. After the fruit dries for one to two hours, lift each piece gently and turn it.
Pretreating the fruit
Pretreatments prevent fruits from darkening. Many light-colored fruits, such as apples, darken rapidly when cut and exposed to air. If not pretreated, these fruits will continue to darken after they are dried.
For long-term storage of dried fruit, sulfuring or using a sulfite dip are the best pretreatments. However, sulfites remaining in the food after either of these treatments have been found to cause asthmatic reactions in a small portion of the asthmatic population. Thus, some people may want to use the alternative shorter-term pretreatments. If home-dried foods are eaten within a short time, there may be little difference in the long- and short-term pretreatments.
Sulfuring--Sulfuring is an old method of pretreating fruits. Sublimed sulfur is ignited and burned in an enclosed box with the fruit. The sulfur fumes penetrate the fruit and act as a pretreatment by retarding spoilage and darkening of the fruit. Fruits must be sulfured out-of-doors where there is adequate air circulation.
Sulfite Dip--Sulfite dips can achieve the same longterm anti-darkening effect as sulfuring, but more quickly and easily. Either sodium bisulfite, sodium sulfite or sodium meta-bisufite that are USP (food grade) or Reagent grade (pure) can be used. To locate these, check with your local pharmacy.
Directions for Use--Dissolve ¾ to 1½ teaspoons sodium bisulfite per quart of water. (If using sodium sulfite, use 1½ to 3 teaspoons. If using sodium meta-bisulfite, use 1 to 2 tablespoons.) Place the prepared fruit in the mixture and soak 5 minutes for slices, 15 minutes for halves. Remove fruit, rinse lightly under cold water and place on drying trays. Sulfited foods can be dried indoors or outdoors. (This solution can be used only once. Make a new one for the next batch.)
Ascorbic Acid--Ascorbic acid (vitamin C) mixed with water is a safe way to prevent fruit browning. However, its protection does not last as long as sulfuring or sulfiting. Ascorbic acid is available in the powdered or tablet form, from drugstores or grocery stores. One teaspoon of powdered ascorbic acid is equal to 3000 mg of ascorbic acid in tablet form. (If you buy 500 mg tablets, this would be six tablets). [C.F.: citric acid (sold as “lemon powder” works well, too).
Directions for Use--Mix 1 teaspoon of powdered ascorbic acid (or 3000 mg of ascorbic acid tablets, crushed) in 2 cups water. Place the fruit in the solution for 3 to 5 minutes. Remove fruit, drain well and place on dryer trays. After this solution is used twice, add more acid.
Fruit Juice Dip--A fruit juice that is high in vitamin C can also be used as a pretreatment, though it is not as effective as pure ascorbic acid. Juices high in vitamin C include orange, lemon, pineapple, grape and cranberry. Each juice adds it own color and flavor to the fruit.
Directions for Use--Place enough juice to cover fruit in a bowl. Add cut fruit. Soak 3 to 5 minutes, remove fruit, drain well and place on dryer trays. This solution may be used twice, before being replaced. (The used juice can be consumed.)
Honey Dip--Many store-bought dried fruits have been dipped in a honey solution. A similar dip can be made at home. Honey dipped fruit is much higher in calories. This is the method Charlie uses at ECHO.
Directions for Use--Mix ½ cup sugar with 1½ cups boiling water. Cool to lukewarm and add ½ cup honey. Place fruit in dip and soak 3 to 5 minutes. Remove fruit, drain well and place on dryer trays.
Syrup Blanching--Blanching fruit in syrup helps it retain color fairly well during drying and storage. The resulting product is similar to candied fruit. Fruits that can be syrup blanched include apples, apricots, figs, nectarines, peaches, pears, plums and prunes.
Directions for use--Combine 1 cup sugar, 1 cup light corn syrup and 2 cups water in a saucepot. Bring to a boil. Add 1 pound (1/2 kg) of prepared fruit and simmer 10 minutes. Remove from heat and let fruit stand in hot syrup for 30 minutes. Lift fruit out of syrup, rinse lightly in cold water, drain on paper toweling and place on dryer trays.
Steam Blanching--Steam blanching also helps retain color and slow oxidation. However, the flavor and texture of the fruit is changed.
Directions--Place several inches of water in a large saucepot with a tight-fitting lid. Heat to boiling. Place fruit not more than 2 inches deep, in a steamer pan or wire basket over boiling water. Cover tightly with lid and begin timing immediately. See Table 2 for blanching times. Check for even blanching, halfway through the blanching time. Some fruit may need to be stirred. When done, remove excess moisture using paper towels and place on dryer trays.
Drying the prepared fruit
Be sure to place the fruit in a single layer on the drying trays. The pieces should not touch or overlap. Dry until the food tests dry. Approximate drying times are given in Table 2. Food dries much faster at the end of the drying period, so watch it closely.
Determining dryness of fruits
Since dried fruits are generally eaten without being rehydrated, they should not be dehydrated until they become brittle. Most fruits should have about 20 percent moisture content when dried. To test for dryness, cut several cooled pieces in half. There should be no visible moisture and you should not be able to squeeze any moisture from the fruit. Some fruits may remain pliable, but are not sticky or tacky. If a piece is folded in half, it should not stick to itself. Berries should be dried until they rattle when shaken. After drying, cool fruit 30 to 60 minutes before packaging. Packaging food when warm could lead to sweating and moisture buildup. However, excessive delays in packaging could allow moisture to re-enter food.
Conditiong fruits
When dried fruit is taken from the dehydrator, the remaining moisture may not be distributed equally among the pieces because of their size or their location in the dehydrator. Conditioning is a process used to equalize the moisture and reduce the risk of mold growth.
To condition the fruit, take the dried fruit that has cooled and pack it loosely in plastic or glass jars. Seal the containers and let them stand for seven to ten days. The excess moisture in some pieces will be absorbed by the drier pieces. Shake the jars daily to separate the pieces and check the moisture condensation. If condensation develops in the jar, return the fruit to the dehydrator for more drying. After conditioning, package and store the fruit.
Drying Vegetables
Vegetables can also be preserved by drying. Because they contain less acid than fruits, vegetables are dried until they are brittle. At this stage, only 10% moisture remains and no microorganism can grow.
Preparing vegetables
To prepare vegetables for drying, wash in cool water to remove soil and chemical residues. Trim, peel, cut, slice or shred vegetables according to the directions for each vegetable on Table 3. Remove any fibrous or woody portions and core when necessary, removing all decayed and bruised areas. Keep pieces uniform in size so they will dry at the same rate. Prepare only as many as can be dried at one time.
Pretreating vegetables
Blanching is a necessary step in preparing vegetables for drying. By definition, blanching is the process of heating vegetables to a temperature high enough to destroy enzymes present in the tissue. Blanching stops the enzyme action which could cause loss of color and flavor during drying and storage. It also shortens the drying and rehydration time by relaxing the tissue walls so moisture can escape and later re-enter more rapidly.
Vegetables can be water blanched or steamed blanched. Water blanching usually results in a greater loss of nutrients, but it takes less time than steam blanching.
Water Blanching--Fill a large pot ⅔ full of water, cover and bring to a rolling boil. Place the vegetables in a wire basket or a colander and submerge them in the water. Cover and blanch according to directions for each vegetable in Table 3. If it takes longer than one minute for the water to come back to boiling, too many vegetables were added. Reduce the amount in the next batch.
Steam Blanching--Use a deep pot with a tight fitting lid and a wire basket, colander or sieve placed so the steam will circulate freely around the vegetables. Add water to the pot and bring to a rolling boil. Place the vegetables loosely in the basket no more than 2 inches deep. Place the basket of vegetables in the pot, making sure the water does not come in contact with the vegetables. Cover and steam according to the directions for each vegetable in Table 3.
Cooling and drying the prepared vegetables
After blanching, dip the vegetables briefly in cold water. When they feel only slightly hot to the touch, drain the vegetables by pouring them directly onto the drying tray held over the sink. Wipe the excess water from underneath the tray and arrange the vegetables in a single layer. Then place the tray immediately in the dehydrator. The heat left in the vegetables from blanching will cause the drying process to begin more quickly. Watch the vegetables closely at the end of the drying period. They dry much more quickly at the end and could scorch.
Determing dryness of vegetables
Vegetables should be dried until they are brittle or "crisp." Some vegetables would actually shatter if hit with a hammer. At this stage, they should contain about 10 percent moisture. Because they are so dry, they do not need conditioning like fruits.
Packaging and Storing Dried Foods
After foods are dried, cool them completely. Then package them in clean moisture-vapor-resistant containers. Glass jars, metal cans or freezer containers are good storage containers, if they have tight-fitting lids. Plastic freezer bags are acceptable, but they are not insect and rodent proof. Fruit that has been sulfured or sulfited should not touch metal. Place the fruit in a plastic bag before storing it in a metal can.
Dried food should be stored in a cool, dry, dark place. Most dried fruits can be stored for 1 year at 60°F, 6 months at 80°F. Dried vegetables have about half the shelf-life of fruits.
Using dried foods
Dried fruits can be eaten as is or reconstituted. Dried vegetables must be reconstituted. Once reconstituted, dried fruits or vegetables are treated as fresh. To reconstitute dried fruits or vegetables, add water to the fruit or vegetable and soak until the desired volume is restored. (See Table 1, Rehydrating Dried Food, for the amount of water to add and minimum soaking time.) Do not over-soak the food. Over-soaking produces loss of flavor and a mushy, water-logged texture.
For soups and stews, add the dehydrated vegetables, without rehydrating them. They will rehydrate as the soup or stew cooks. Also, leafy vegetables and tomatoes do not need soaking. Add enough water to cover and simmer until tender.
CAUTION! If soaking takes more than 2 hours, refrigerate the product for the remainder of the time.
| Table 1. Rehydrating dried food | ||
|
Product |
Water to Add to 1 Cup Dried Food (Cups) |
Minimum Soaking Time (Hours) |
|
Fruits* |
||
|
Apples |
1½ |
½ |
|
Pears |
1¾ |
1¼ |
|
Peaches |
2 |
1¼ |
|
Vegetables** |
||
|
Asparagus |
2¼ |
1½ |
|
Beans, lima |
2½ |
1½ |
|
Beans, green snap |
2½ |
1 |
|
Beets |
2¾ |
1½ |
|
Carrots |
2¼ |
1 |
|
Cabbage |
3 |
1 |
|
Corn |
2¼ |
½ |
|
Okra |
3 |
½ |
|
Onions |
2 |
¾ |
|
Peas |
2½ |
½ |
|
Pumpkin |
3 |
1 |
|
Squash |
1¾ |
1 |
|
Spinach |
1 |
½ |
|
Sweet Potatoes |
1½ |
½ |
|
Turnip Greens and other greens |
1 |
¾ |
|
*Fruits--Water is at room temperature. **Vegetables--Boiling water used. |
||
| Table 2. Drying fruits at home | ||||||
|
Pretreatment (Choose One) |
||||||
Blanch |
Drying Times |
|||||
Fruit |
Preparation |
Sulfur |
Steam
|
Syrup |
Other |
Dehydrator*(hours) |
|
Apples |
Peel and core, cut into slices or rings about 1/8 inch thick |
¾ |
3-5 min. depending on texture |
10 |
--ascorbic acid solution --ascorbic acid mixture --fruit juice dip --sulfite dip |
6-12 |
|
Apricots |
Pit and halve. May slice if desired. |
2 |
3-4 |
10 |
--ascorbic acid solution --ascorbic acid mixture --fruit juice dip --sulfite dip |
24-36** |
|
Bananas |
Use solid yellow or slightly brown-flecked bananas. Avoid bruised or overripe bananas. Peel and slice ¼-inch to 3/8-inch thick, crosswise or lengthwise. |
|
|
|
--honey dip --ascorbic acid solution --ascorbic acid mixture --fruit juice dip --sulfite dip |
8-10 |
|
Berries
Firm:
Soft: |
Wash and drain berries with waxy coating
(blueberries, cranberries, currants, gooseberries, huckleberries). (boysenberries, strawberries) |
|
|
|
--plunge into boiling water 15-30 seconds 'to "check" skins. Stop cooking action by placing fruit in ice water Drain on paper towels. --No treatment necessary. |
24-36 |
|
Cherries |
Stem, wash, drain and pit fully ripe cherries. Cut in half, chop, or leave whole. |
|
|
10 (for sour cherries) |
--Whole: dip in boiling water 30 seconds or more to check skins. --Cut and pitted: No treatment necessary. |
24-36 |
|
Citrus peel |
Peels of citron, grapefruit, kumquat, lime, lemon, tangelo, and tangerine can be dried. Thick-skinned navel orange peel dries better than thin-skinned Valencia peel. Wash thoroughly. Remove outer 1/6 to 1/8 inch of peel. Avoid white bitter pith. |
|
|
|
--No pretreatment |
8-12 |
|
Figs |
Select fully ripe fruit. Immature fruit may sour before drying. Wash or clean whole fruit with damp cloth. Leave small fruit whole, otherwise cut in half. |
1 (whole) |
|
|
--Whole: Dip in boiling water 30 seconds or more to check skins. Plunge in ice water to stop further cooking. Drain on paper towels. |
6-12** |
|
Grapes Seedless: With Seeds: |
Leave whole. Cut in half and remove seeds. |
|
|
|
--Whole: Dip in boiling water 30 seconds or more to check skin. Plunge in ice water to stop further cooking. Drain on paper towels. --Halves: No treatment necessary. |
12-20 |
|
Nectarines and Peaches |
When sulfuring, pit and halve; if desired, remove skins. For steam and syrup blanching, leave whole, then pit and halve. May also be sliced or quartered. |
2-3 (halves) 1 (slices) |
8 |
10 |
--ascorbic acid solution --ascorbic acid mixture --fruit juice dip --sulfiting |
36-48** |
|
Pears |
Cut in half and core. Peeling preferred. May also slice or quarter. |
5 (halves) 2 (slices) |
6 minutes (halves) |
10 |
--ascorbic acid solution --ascorbic acid mixture --fruit juice dip --sulfiting |
24-36** |
|
Persimmons |
Use firm fruit of long, soft varieties and ripe fruit of round drier varieties. Peel and slice using stainless steel knife. |
|
|
|
--may syrup blanch |
12-15** |
|
Pineapple |
Use fully ripe, fresh pineapple. Wash, peel and remove thorny eyes. Slice lengthwise and remove core. Cut in 1/2-inch slices, crosswise. |
|
|
|
No treatment necessary. |
24-36 |
|
Plums (Prunes) |
Leave whole or if sulfuring, halve the fruit. |
1 |
--dehydrator drying: rinse in hot tap water |
24-36** |
||
|
*Because of variations in air circulation, drying times could be up to twice as long. Drying times for sun drying could range from 2 to 6 days, depending on temperature and humidity. **Drying times are shorter for slices and other cuts of fruit. |
||||||
| Table 3. Drying vegetables at home. | ||||
Blanching Time |
Drying Time |
|||
Vegetable |
Preparation |
Steam(minutes) |
Water(minutes) |
Dehydrator *(hours) |
|
Artichokes--Globe |
Cut hearts into 1/8-inch strips. Heat in boiling solution of 3/4 cups water and 1 tablespoon lemon juice. |
|
6-8 |
4-6 |
|
Asparagus |
Wash thoroughly. Cut large tips in half. |
4-5 |
3½-4½ |
4-6 |
|
Beans, green |
Wash thoroughly. Cut in short pieces or lengthwise. (May freeze for 30 to 40 minutes after blanching for better texture.) |
2-2½ |
2 |
8-14 |
|
Beets |
Cook as usual. Cool; peel. Cut into shoestring strips 1/8-inch thick. |
Already cooked. No further blanching required. |
10-12 |
|
|
Broccoli |
Trim, cut as for serving. Wash thoroughly. Quarter stalks lengthwise. |
3-3½ |
2 |
12-15 |
|
Brussel Sprouts |
Cut in half lengthwise through stem. |
6-7 |
4½-5½ |
12-18 |
|
Cabbage |
Remove outer leaves; quarter and core. Cut into strips 1/8-inch thick |
2½-3** |
1½-2 |
10-12 |
|
Carrots |
Use only crisp, tender carrots. Wash thoroughly. Cut off roots and tops; preferably peel, cut in slices or strips 1/8-inch thick. |
3-3½ |
3½ |
10-12 |
|
Cauliflower |
Prepare as for serving. |
4-5 |
3-4 |
12-15 |
|
Celery |
Trim stalks. Wash stalks and leaves thoroughly. Slice stalks. |
2 |
2 |
10-16 |
|
Corn, cut |
Husk, trim and blanch until milk does not exude from kernel when cut. Cut the kernels from the cob after blanching. |
2-2½ |
1½ |
6-10 |
|
Eggplant |
Use the same directions as for summer squash. |
3½ |
3 |
12-14 |
|
Garlic |
Peel and finely chop garlic bulbs. No other pretreatment is needed. Odor is pungent. |
No blanching needed |
6-8 |
|
|
Greens (chard. Kale, turnip, spinach) |
Use only young tender leaves. Wash and trim very thoroughly. |
2-2½** |
1½ |
8-10 |
|
Horseradish |
Wash; remove small rootlets and stubs. Peel or scrape roots. Grate. |
None |
4-10 |
|
|
Mushrooms (WARNING, see footnote***) |
Scrub thoroughly. Discard any tough, woody stalks. Cut tender stalks into short sections. Do not peel small mushrooms or "buttons." Peel large mushrooms, slice. |
None |
8-10 |
|
|
Okra |
Wash, trim, slice crosswise in 1/8- to 1/4-inch disks. |
None |
8-10 |
|
|
Onions |
Wash, remove outer "paper shells." Remove tops and root ends, slice 1/8- to 1/4-inch thick. |
None |
3-9 |
|
|
Parsley |
Wash thoroughly. Separate clusters. Discard long or tough stems. |
None |
1-2 |
|
|
Peas, Green |
Shell |
3 |
2 |
8-10 |
|
Peppers and Pimientos |
Wash, stem, core. Remove "partitions." Cut into disks about ⅜ by ⅜ inch. |
None |
8-12 |
|
|
Potatoes |
Wash, peel. Cut into shoestring strips ¼-inch thick, or cut in slices 1/8-inch thick. |
6-8 |
5-6 |
8-12 |
|
Pumpkin and Hubbard Squash |
Cut or break into pieces. Remove seeds and cavity pulp. Cut into 1-inch wide strips. Peel rind. Cut strips crosswise into pieces about 1/8-inch thick. |
2½-3 |
1 |
10-16 |
|
Squash: Summer |
Wash, trim, cut into ¼-inch slices. |
2½-3 |
1½ |
10-12 |
|
Tomatoes, for stewing |
Steam or dip in boiling water to loosen skins. Chill in cold water. Peel. Cut into sections about 3/4-inch wide, or slice. Cut small pear or plum tomatoes in half. |
3 |
1 |
10-18 |
|
*Drying times could be up to twice as long, depending on air circulation. **Steam until wilted. ***WARNING: The toxins of poisonous varieties of mushrooms are not destroyed by drying or by cooking. Only an expert can differentiate between poisonous and edible varieties. |
||||
Cite this article as:
Dahlman, J. and C. Forst 2001. Solar Dehydrator. ECHO Technical Note no. 41.