The main purpose of this article is to create awareness of microcontrollers as a low-cost approach for real-time monitoring of environmental factors related to small-scale agriculture. The first section presents potential uses of data, such as air and soil temperature, which can be monitored using a range of technologies. For those interested in exploring the use of microcontrollers, there are additional ECHO resources including programming code for microcontroller projects undertaken at ECHO and a question and answer page on ECHOcommunity.org. We will do our best to respond to your questions
Usefulness of field monitoring
Small-scale farmers base their livelihoods on the productivity of small parcels of land, which is influenced by environmental factors like temperature, soil moisture, rainfall, sunlight, and humidity. Farmers and gardeners manage their crops and livestock based on these factors. Seasonal rainfall and soil moisture, for example, affect when farmers plant and irrigate. Through experience and up-close observation of their crops and soils, farmers develop a keen awareness of weather and soil conditions affecting crop performance. There is no substitute for this kind of innate knowledge in making daily management decisions.
Yet, the ability to precisely measure and monitor growing conditions can benefit smallholder agriculture in important ways. Farmers could utilize such data to help inform decision-making. Field data is also helpful for evaluating innovations or practices for their potential to improve crop production. Imagine a scenario in which a farmer field school is testing a new variety of maize. Considering how weather can vary from year to year, or even from one field to another, it would be helpful to track temperature and rainfall during the trial. That way everyone would know the exact conditions under which the new variety succeeded or failed. A technician or development worker assisting in the research could play a role in acquiring and setting up data collection devices in experimental plots. Table 1 lists a few other applications for monitoring environmental conditions.
| Monitoring parameter | Potential agricultural applications |
|---|---|
| Air temperature |
Crop production: 1) evaluating crop varieties for heat tolerance; 2) crop selection based on prevailing temperatures, 3) calculating growing degree days (heat units) 1 for predicting crop growth stages and making related management decisions Seed banking: evaluating the effectiveness of storage techniques (e.g., earthbag structures or burying seeds in airtight containers underground) to stabilize the temperature for extended seed life Poultry: monitoring conditions for newly hatched chicks or ducklings |
| Soil temperature and moisture |
Soil husbandry: 1) evaluating the effectiveness of crop residues or mulch in moderating against temperature extremes and preserving soil moisture; 2) determining the effectiveness of watering/irrigation practices |
| Rainfall |
General agriculture: 1) evaluating crops for drought tolerance; 2) deciding when to plant based on the amount of rain received and its effect on soil moisture; 3) deciding when to irrigate |
| Humidity |
Seed banking: 1) evaluating the effectiveness of desiccants and containers for keeping orthodox seeds dry; 2) monitoring storage spaces to prevent humidity levels from rising to levels favorable to mold Plant disease management: 1) anticipating times when disease incidence could be high; 2) evaluating when to plant so that grain/seeds mature when mold and fungal diseases are least likely to be a problem (this is related to rainfall as well) |
| Light |
Cover crop management: evaluating the extent to which cover crops shade the soil Agroforestry: evaluating the extent to which different trees or combinations of plants shade the understory |
Formula: GDD = ([maximum temperature + minimum temperature]/2) - minimum temperature for crop growth.
For example, let us say that on a given day temperatures reached a minimum of 25°C and a maximum of 32°C.
The crop for which we are calculating GDD stops growing if temperatures drop below a minimum of 10°C.
Therefore, the number of GDD for that day = ([32 + 25]/2) - 10 = 18.5. This is done for each day that the crop is grown, allowing you to track the cumulative number of GDD over the growing season.
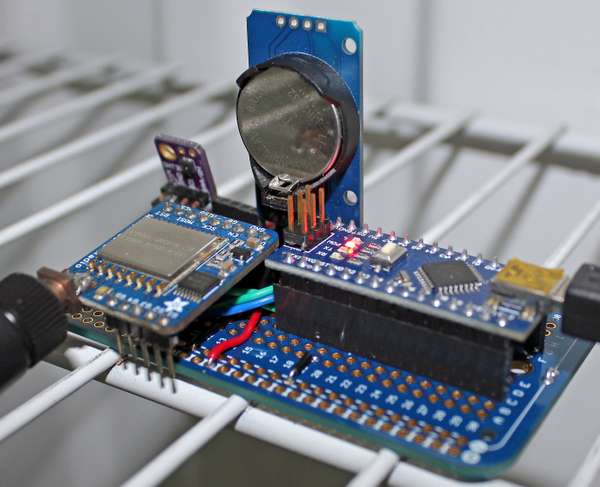
Figure 1. An Arduino® Nano microcontroller that monitors temperature and humidity in a seed storage room at ECHO. Source: Tim Motis
Automated monitoring of conditions affecting crops, seeds, and animals involves electronic measuring devices equipped with desired sensors. With growing usage of mobile phones, real-time data is increasingly achievable in low-resource settings. Even without internet access, it is possible to log and store data automatically. Perhaps the most significant barrier to farmers’ use of these technologies is the need for a computer for downloading data or uploading software. My hope, however, is to shed light on affordable technology that 1) is useful for conducting agricultural experiments; 2) makes data accessible to farmers; 3) can be used to monitor conditions in agricultural spaces such as seed banks (Figure 1); and that 4) farmers can potentially use (after prototyping and programing).
Proprietary versus open-source technology
Proprietary technologies are typically produced in factories with copyright restrictions on coding and design. As long as you install them properly, following included instruction manuals, they usually function as designed and take little time to install. The cost of proprietary loggers and weather stations, however, is often out of reach for small-scale farmers and those serving them. A research-grade weather station can easily cost 800USD or more. Even with warranties and company product support, product maintenance and replacement of damaged components is a challenge in many parts of the world. Additionally, products often require software updates and eventually become “outdated,” requiring the end user to purchase newer hardware.
This article focuses on open-source technology related to the Arduino® suite of microcontrollers. These technologies are based on open sharing of software and hardware design. Downsides of these technologies are that they require time to assemble and to develop software code that make them work. Programming, however, is simplified with freely available Arduino IDE software and firmware (programs) can be edited as needed for future modifications. Moreover, components are available through international websites such as AliExpress and Bangood and are easily replaceable. As far as cost, at this writing (March 2022), each of the microcontrollers mentioned in this article can be acquired for less than 10USD.
What does a microcontroller do?
Think of a microcontroller as a tiny computer that does specific tasks, like reading a sensor every hour. Once programmed, the microcontroller and any sensors connected to it can operate apart from a computer. The usefulness of microcontrollers goes beyond data logging. Microcontrollers can perform actions triggered by sensor readings. You could turn on a heat source if temperatures drop too low or turn on a solenoid valve if soil moisture levels indicate that water should be applied to a garden or field.
Use of microcontrollers at ECHO
My interest in microcontrollers started with a hobby of keeping fish and corals in a saltwater aquarium. I was “hooked” after discovering that I could use an Aruduino® Uno to automate light exposure and the addition of compounds (e.g., calcium) for coral growth. I soon realized that what I was learning was relevant for agricultural systems. I do not consider myself an electrician or computer programmer, but below are some of the devices that I have built at ECHO through my own independent learning and practice. Perhaps they will lead to ideas for your own applications.

Figure 2. Carbon dioxide sensor. Source: Tim Motis
Carbon dioxide sensor
As living things respire, they release carbon dioxide. Carbon dioxide release from soil serves as an overall indicator of soil microbial activity (Gyawali et al., 2019). An internet search for carbon dioxide sensors will result in a range of options. I am using the MH-Z14A sensor, which measures up to 5000 parts per million (ppm) carbon dioxide. The concentration of carbon dioxide in outdoor air is a little over 400 ppm. With the setup shown in figure 2, readings stay well under the measurable limit of 5000 ppm. Before taking measurements, we sieve the soil to exclude respiration of plant roots. The rate of carbon dioxide release from the soil will be higher for moist than dry soil, so we take steps, such as collecting soil samples at the same time, to ensure that all samples have the same moisture.
- They power the 3.3 volt microcontrollers I use most frequently (Arduino Pro Mini and Wemos Lolin ESP32).
- They are easily paired with inexpensive boost converters to power 5 volt microcontrollers; to find options online, use a search phrase like “DC-DC 3.7v to 5v boost converter step up module”
- They are rechargeable.
Other battery options include alkaline (non-rechargeable) and rechargeable nickel metal hydride (NiMH) double A batteries. Websites with information on the use of batteries include Sparkfun and Battery University.
Light meter
The meter in figure 3 measures light intensity from four sensors along a bar measuring approximately 1 m in length. Powered with a 3.7 volt battery, 2 it displays the average lux of the four sensors. We use it for measuring shade from trees or cover crops. In each plot we take a reading above (full sun) and below the crop canopy. From these readings we calculate percent shade. Full sunlight can exceed 100,000 lux (Ferrante and Mariani, 2018). The sensors I used only read up to 55,000 lux. This would be a problem if I wanted to know the absolute (actual) value of sunlight hitting the sensor. Since I only want to calculate percent shade, I placed the sensors in dark-colored glass bottles. With the bottles being dark enough to keep readings below 55,000, the lux readings continue to increase with increasing sunlight, allowing for calculation of percent shade even during the brightest time of day.

Figure 3. Light meter with lux sensors in dark glass bottles for measuring percentage shade. Source: Tim Motis
Weather stations
- Balance the two tipping buckets so each of them tips downward with the same volume of water. This is done by using a screwdriver to adjust the height of a screw under each bucket.
- Determine the volume of water per tip. Since 1 milliliter (ml) equals 1 cubic centimeter (cm), it works well to do this in ml. Slowly pour 100 ml of water into the rain gauge and count the tips. Do this three or four times and calculate the average number of tips per 100 ml of water. Let’s say you get 25 tips. 100 ml/tip divided by 25 tips = 4 ml/tip. 4 ml = 4 cubic cm.
- Calculate the catchment area in cm. The area of a square is length X width. That of a circle is pi (3.14) X the square of the radius (half the diameter). Let’s say your catchment area is 100 square cm.
- Rainfall height per tip = tip volume in cubic cm /catchment area in square cm. Rain height per tip, then, would be equal to the number you calculated in step 2 divided by that calculated in step 3. In this case, rain height per tip = 4/100, 0.04 cm of rain per tip.
- In the code you use to program your microcontroller, define 1 tip as 0.04 cm or the equivalent in mm or inches.
Rainfall is critical to plant and animal life and is an important weather parameter to measure on any experimental farm. The simplest and most reliable way to do this is to measure rain collected in a cylinder. 3 It is not always possible, however, to manually read and empty the gauge every day. There is also the issue of evaporation loss between readings, particularly in hot climates which can distort values. Automating the task of measuring rainfall addresses these problems and is commonly done with self-emptying tipping bucket rain gauges.
With a tipping bucket rain gauge, water is funneled to two small buckets on a horizontal axle. As the first bucket fills, the added weight causes it to tip downwards, positioning the second bucket under the funnel. This action repeats as it rains. With each tip, a magnet attached to the bucket assembly moves across a reed switch connected to a power source and a microcontroller. You can program the microcontroller to count the resulting pulses of electricity and then calculate rainfall based on the volume of one tipping bucket and the area of your rain collector.4
Tipping bucket rain gauges are usually just one component of weather stations that also measure other parameters such as air temperature and relative humidity. 5 While not necessarily cost prohibitive to purchase a weather station, they can be difficult to repair when components malfunction. By building your own, you can customize it with replaceable parts.
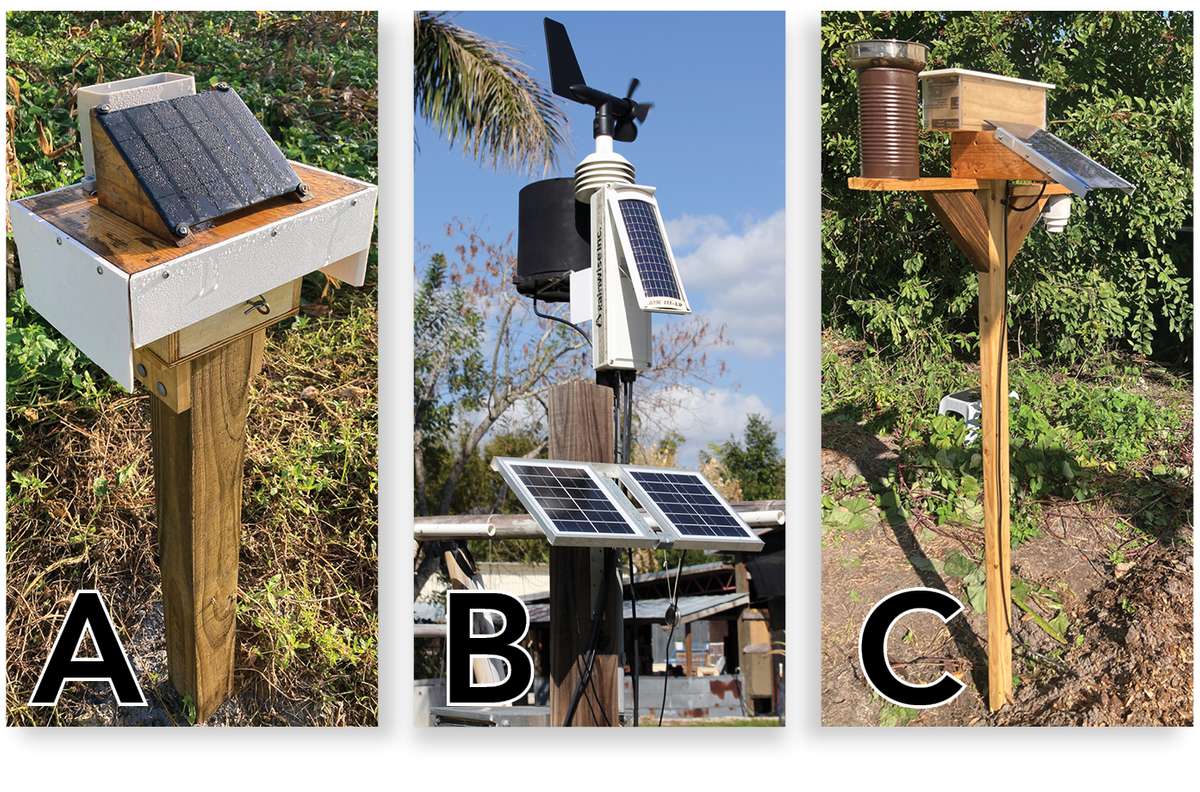
Figure 4. Solar-powered weather stations with manufactured (A and B) and homemade (C) rain sensors connected to microcontrollers. Source: Tim Motis
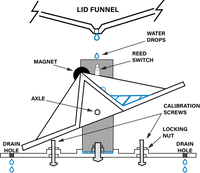
Figure 5. Diagram of tipping bucket rain gauge components. Source: Renee Gill adapted from https://www.instructables.com/Arduino-Weather-Station-Part3-Rain/
The first weather station I assembled measured rainfall with a Misol WH-SP-RG rain sensor (Figure 4A) commonly sold as a replacement part for home weather stations. Figure 4C shows a weather station I built for my garden with a rain gauge consisting of a metal funnel glued to the top of a tin can placed over tipping buckets made from a thin sheet of metal as described by Hampton (2016). The weather stations shown in figure 4 are powered with solar-charged 3.7 volt batteries, log data to a microSD card, and send data to the internet for monitoring via mobile phone. Through the process of testing and problem solving, I have found that missed readings with these weather stations are usually due to power (batteries run down with inadequate solar power) or mechanical issues (debris falling into the rain gauge and preventing movement of the tipping bucket). A manual gauge could serve as a backup rain gauge in the event a tipping bucket rain gauge (Figure 5) malfunctions.
Seed bank temperature and humidity monitor
Some of our seeds at ECHO in Florida are kept in a room cooled by a window air conditioner connected to a CoolBot controller. We needed a way to monitor temperature to ensure that the CoolBot is working properly. Using some of the same components used for weather stations, I was able to make a temperature and humidity monitor (Figure 1) that sends data to a receiving unit in an adjacent building where there is wireless internet connection. Interfaced with a website called IFTTT (If This Then That), the receiving unit sends an email alert if the temperature in the seed storage room gets above 16°C.
Examples of microcontrollers and sensors
Microcontrollers
In learning how to use microcontrollers, many people start with the Arduino Uno. It has a great deal of functionality. For battery-operated applications in the field, I prefer to use the smaller Arduino Pro Mini or Arduino Nano microcontrollers, which consume less power than the Uno. The Pro Mini and Nano are the two microcontrollers that I have had the most success with for tracking rainfall.
Another microcontroller that works well in the field is the Lolin ESP32. It is optimized for power from 3.7 volt lithium ion batteries. I use it to log soil temperature and moisture. Like the Pro Mini and Nano, you can prolong battery life by programming the microcontroller to operate in sleep mode between readings. It also has Bluetooth® and WiFi (internet) capability.
The Lolin ESP32 is better optimized for low power than the ESP8266, but I have found the ESP8266 to be useful for receiving data from other microcontrollers and sending that data to the internet.
A few factors to consider in selecting a microcontroller for your project are:
- Power supply needed
- Low-power options for battery-powered applications
- Whether or not you need WiFi or Bluetooth® capability
- Compatibility with sensors you plan to use; design is easiest if the operating voltage of the sensor and microcontroller are the same
All of the microcontrollers in table 2 are available through websites like AliExpress and Bangood that ship internationally. When purchasing a microcontroller, pay close attention to any other items you might need. These include the appropriate USB cable and, in the case of the Lolin 32, a wire connector to connect a battery power supply.
| A |  |
Arduino Uno |
| B | 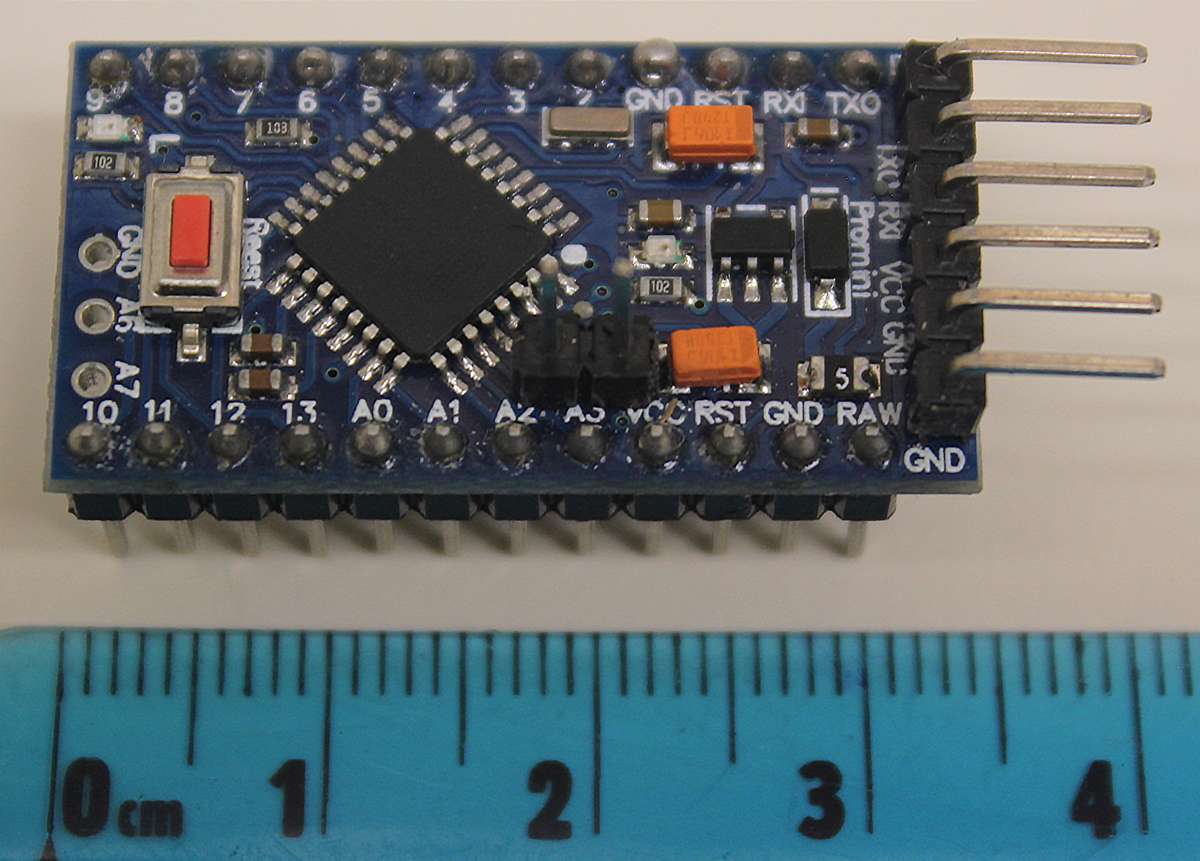 |
Arduino Pro Mini NOTES: The six pins on the right connect to what is called an FTDI adaptor (red component in bottom photo), which connects to a computer via USB (cable needed depends on the USB connector on the FTDI adaptor you purchase). |
| C | 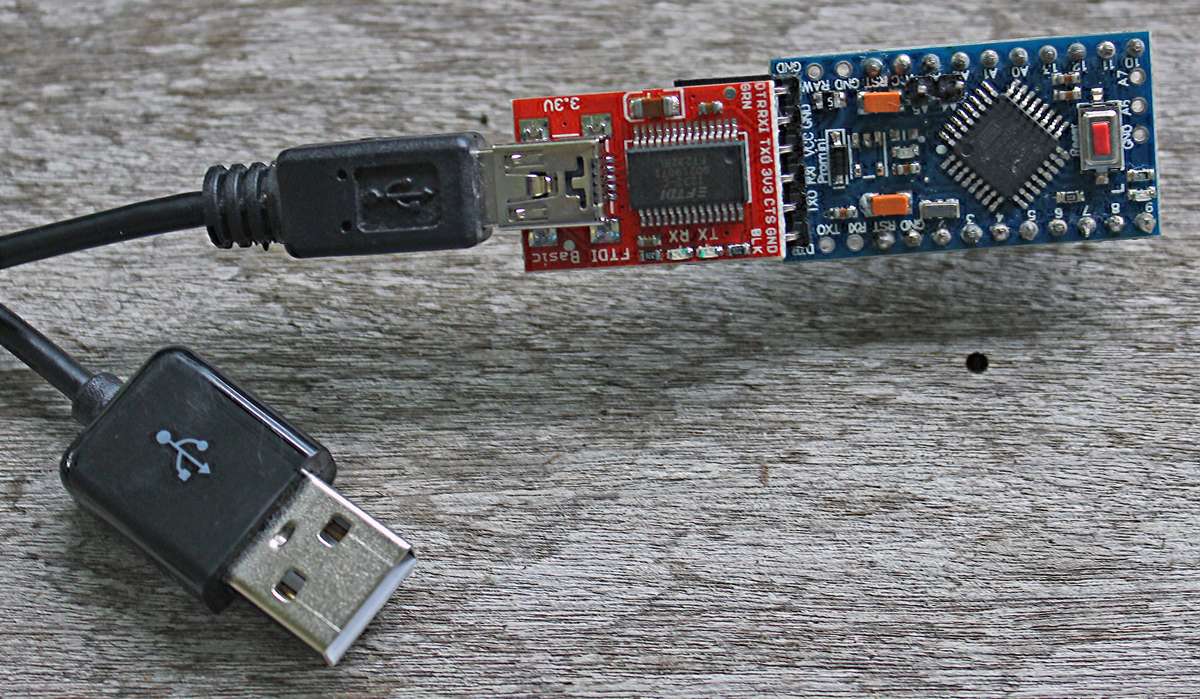 |
There is also a 16 megahertz version that operates at 5 volts. A similar microcontroller called the Arduino Nano (Figure 1) also operates at 5 volts and does not require the FTDI adaptor. |
| D | 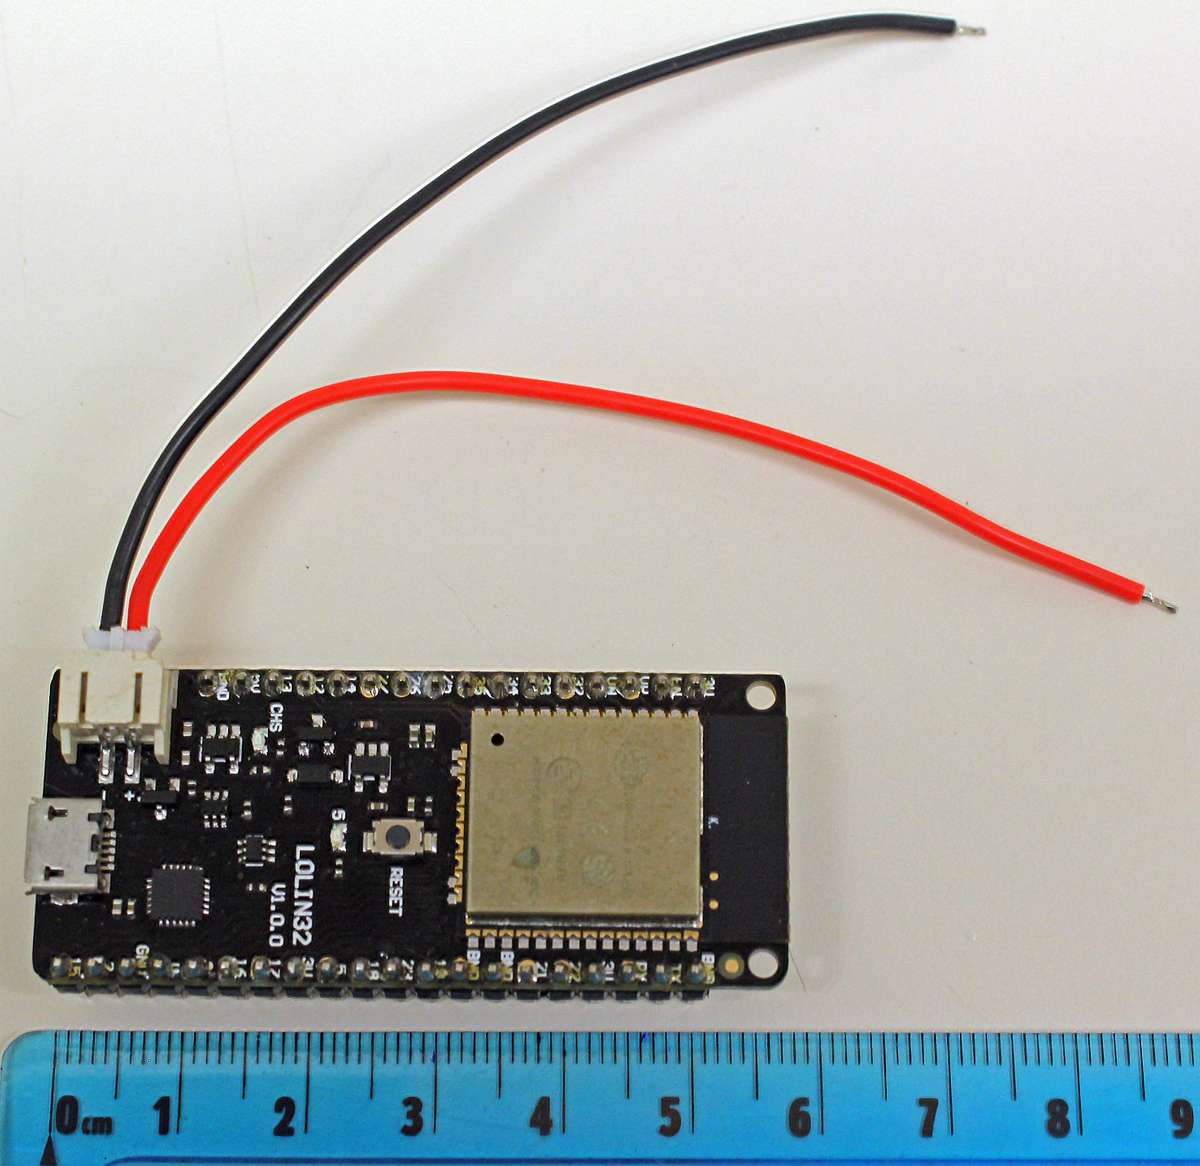 |
Lolin ESP32 NOTES:To power with a 3.7 volt lithium ion battery you need a PH-2, 2.0 mm connector, usually sold in packs. The photo to the left shows a connector with red and black wires |
| E | 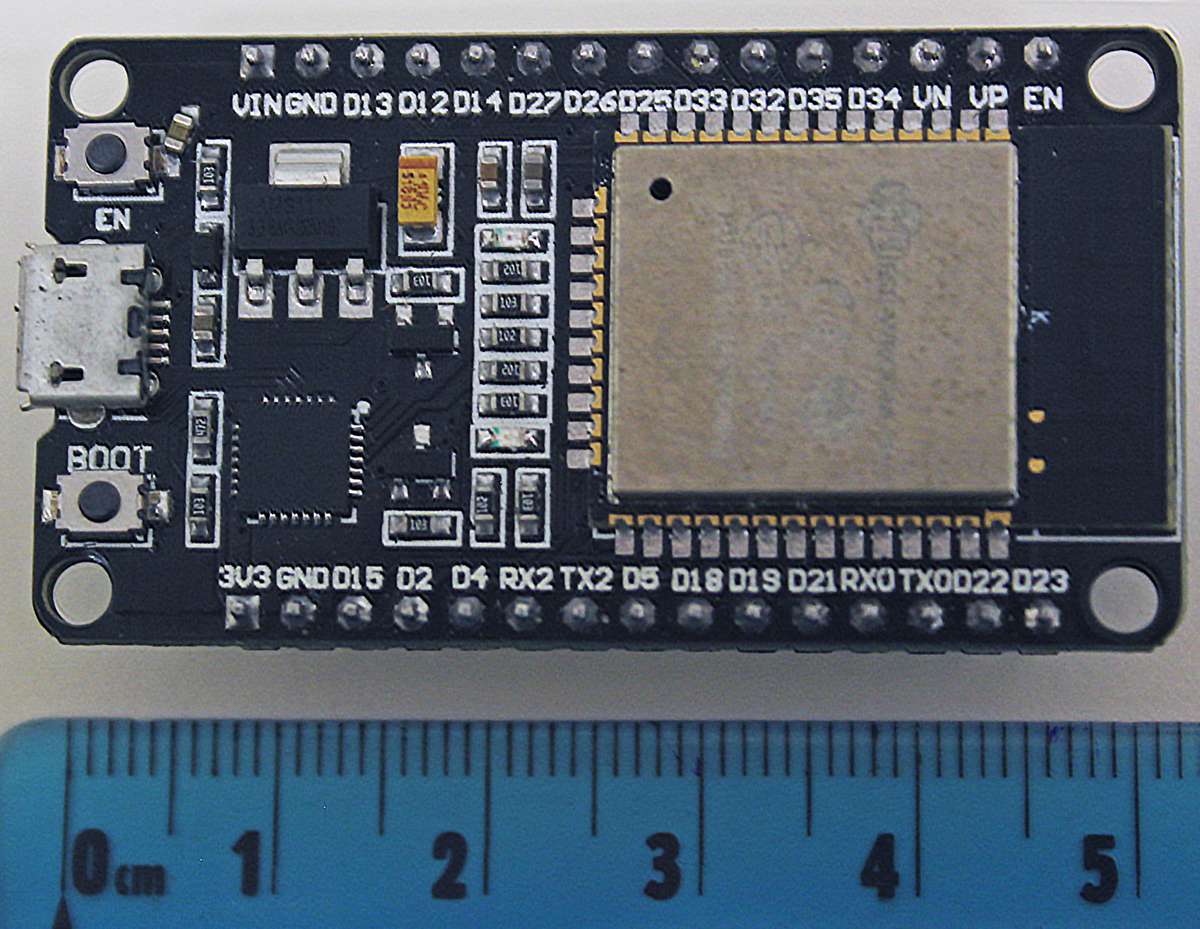 |
ESP8266 (Nodemcu 12-E) NOTE: Works `great for receiving data and transmitting it to a web server. |
| 1Costs in this table, obtained in 2022, could change over time. They do not include shipping, which could vary by country. By ordering from websites such as Amazon, you can receive items more quickly, but costs will be higher. | ||
Sensors
What do you want to measure? So far in this article, I have mentioned rainfall, temperature, humidity, soil moisture, and light. For just about any agricultural parameter, there is probably a sensor for it! Below are brief descriptions and suggestions for sensors I am familiar with.
Temperature and humidity
Many sensors measure both temperature and humidity. One of the simplest is the DHT22 sensor (Table 3A), available as a module that already has the required resistor. It works well for measuring temperature and humidity in a room or seed storage container. When placed outside, the humidity sensor tends to stay at 99.9% during the early morning hours, a problem caused by condensation on the sensor. For an outdoor weather station, I prefer a Sensirion SHT3X sensor (e.g., SHT31) in a plastic or ceramic enclosure. These can be found on AliExpress for 11USD. Shield the sensor from the sun, while maintaining air circulation around the sensor, to avoid overestimating the temperature (Tarara and Hoheisel, 2007); you can make your own radiation shield with small plates or bowls (Jakub_Nagy, 2017).
Soil temperature can be monitored with the waterproof version of the DS18B20 sensor (Table 3B). I bury them in the soil as is, but waterproofing could be optimized further by inserting them into a PVC pipe sunk into the ground.
Rainfall
To make your own rain gauge you need a reed switch, a small magnet, and a tipping bucket assembly. Look for what is called a normally open reed switch. A pack of 10 switches costs less than 1USD on AliExpress. Magnets can be as small as 2 mm wide, costing under 3USD on AliExpress. The tipping bucket assembly involves a little creative craftsmanship. You can use local materials to make the tipping buckets and a bracket to hold the buckets and reed switch in place. A simpler approach would be to buy a rain sensor or use one from an old weather station. Any tipping bucket rain sensor will work if you can access the two wires attached to the reed switch.
Soil moisture
Monitoring soil moisture helps you assess the impact of rainfall or irrigation. You will likely bury a soil moisture sensor at a depth where most of your crop’s feeder roots are located. Sensor readings will indicate whether water from a rainfall or irrigation event is sufficient to wet the soil at that depth. There are sensors based on resistance and capacitance. 6 To avoid corrosion, use a capacitive sensor like that shown in Table 3C.
Light
Table 3C shows a light sensor that measures visible light in a unit called lux. Not all visible light can be used by plants for photosynthesis; however, a lux reading does provide an indicator of light intensity at the time it is taken. Lux measurements can be used to assess the effectiveness of cover crops for shading the ground. Young seedlings in greenhouses and nurseries often require protection from full sun; lux readings can be helpful for estimating the amount of shade under shade cloth or shade-providing structures.
| A | 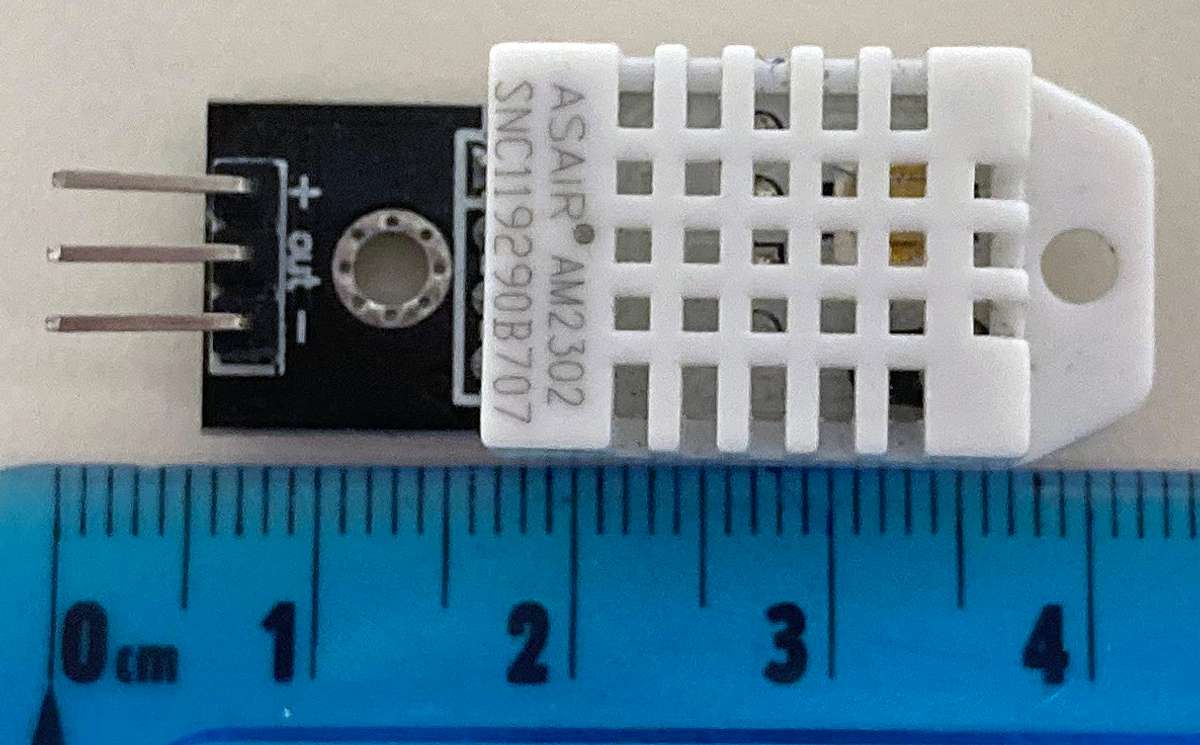 |
DHT22 temperature/humidity sensor NOTE: To avoid having to purchase and connect a required resistor, buy the sensor in module form (pictured left); the module will already have the resistor attached. |
| B | 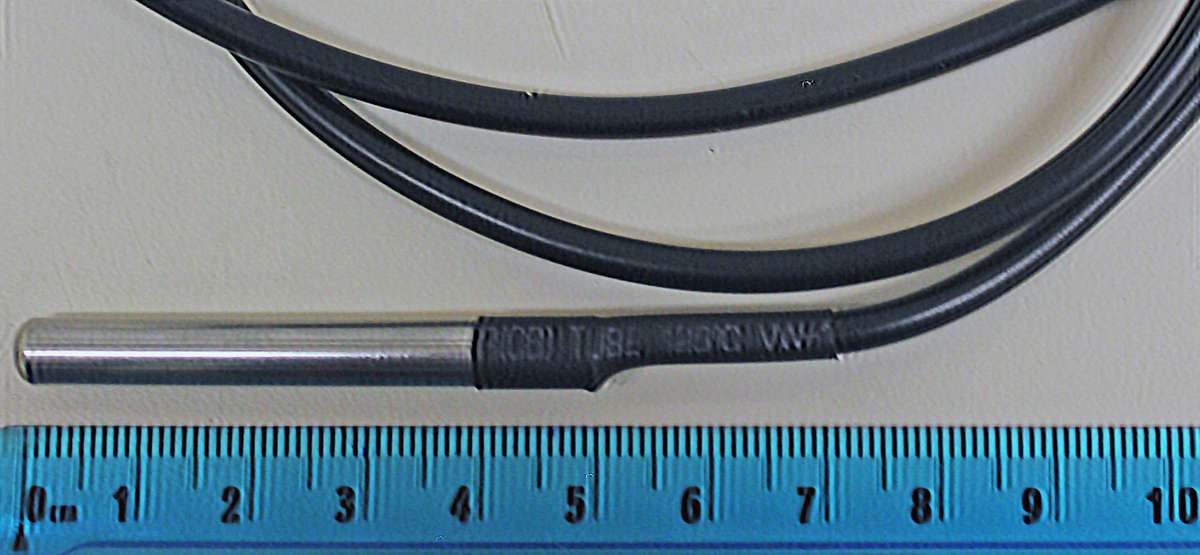 |
DS18B20 waterproof temperature sensor NOTE: The sensor requires a 4.7 kilo ohm resister; it can be purchased with a module that includes the resistor, thus, avoiding the need to purchase an external resistor. |
| C | 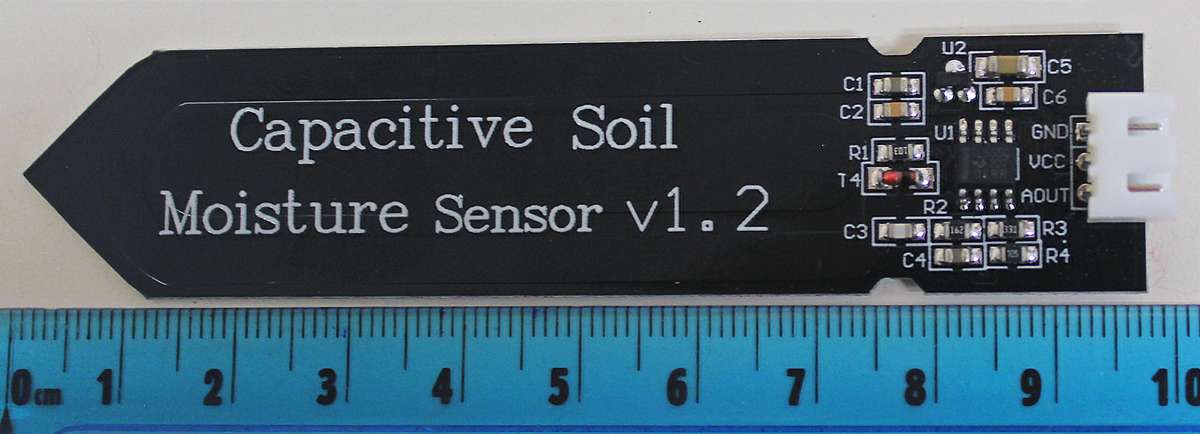 |
Soil moisture sensor NOTE: Protect the electronics at the top of the sensor from water/rain. I house these sensors in short sections of PVC pipe. |
| D | 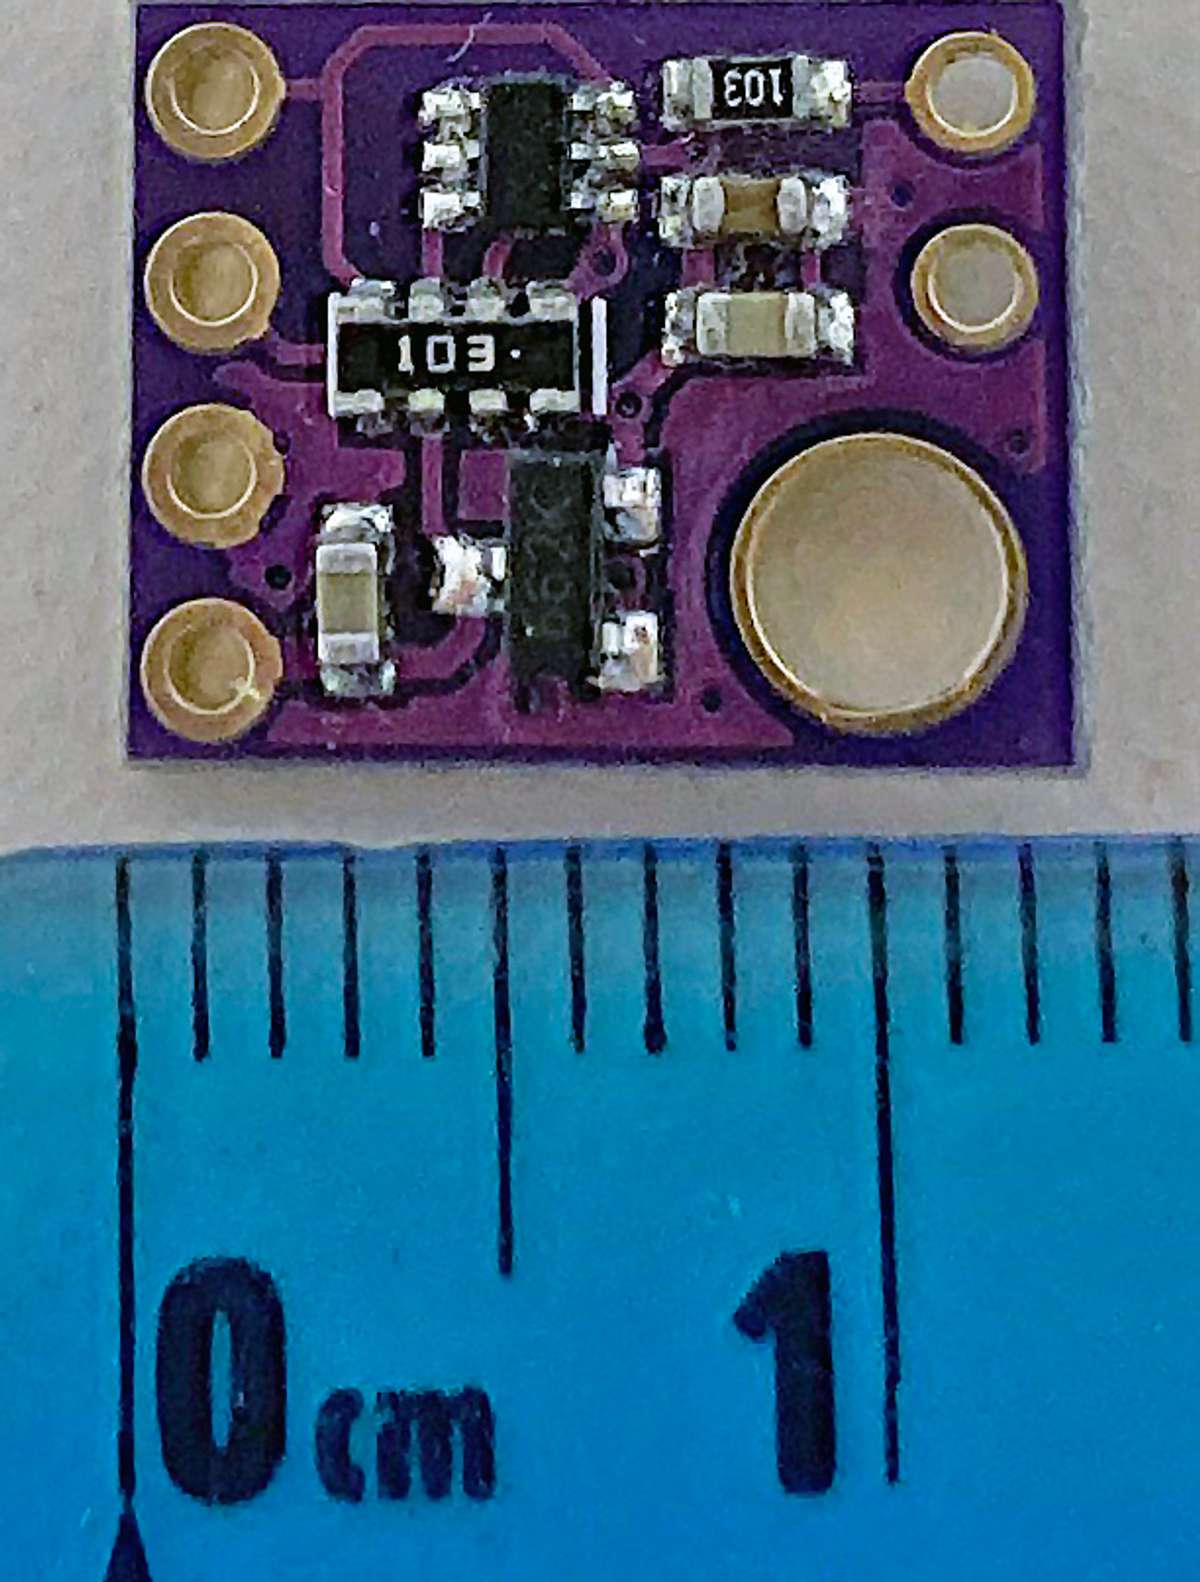 |
MAX44009 light (lux) sensor |
| 1Costs in this table, obtained in 2022, could change over time. They do not include shipping, which could vary by country. By ordering from websites such as Amazon, you can receive items more quickly, but costs will be higher. | ||
Supporting hardware
Other components are needed to make a microcontroller device perform desired functions. In a remote area, with no phone or WiFi signal, you can store readings (e.g., temperature) onto an SD card and then periodically transfer the data to a phone or computer. To track growing conditions over time, you will want to know the date and time of each reading. Storing time-stamped data on an SD card can easily be done by connecting microSD (Table 4A) and clock (Table 4B) modules to your microcontroller. Readings can also be displayed on a small screen (Table 4C).
Immediate, remote access to readings measured in the field helps with time-sensitive decision making. To monitor conditions in real time, I prefer LoRa (long range) radio transceivers (Table 4D) for low-power communication. A transceiver can transmit or receive data, allowing you to send data from one microcontroller to another. To do this you need a LoRa transceiver on each microcontroller. Incoming data from the field can be viewed on a display screen and/or posted online. Thingspeak and Adafrut IO are web-based platforms that allow you to view continuously updated graphs from field measurements on your phone or computer. The capacity of their free accounts is sufficient for most applications.
Supplying the correct voltage to a microcontroller requires other components. The microcontrollers mentioned in this article can be powered with 5 volts; those that operate at 3.3 volts have internal power regulators that convert 5 volts into 3.3 volts, as long as the regulator is not bypassed. An easy way to supply 5 volts to a microcontroller is to connect it with a USB cable to a 5 volt wall plug used to charge mobile phones. Battery power works best for outdoor devices. Table 4E shows a charge controller useful for integrating rechargeable batteries with solar power. If not already built into your solar panel, use a diode (an electrical component that allows electricity to flow in only one direction) to prevent battery power from flowing to the solar panel at night. Use a step-up voltage booster if the voltage of your power supply is less than what your microcontroller requires.
| A | 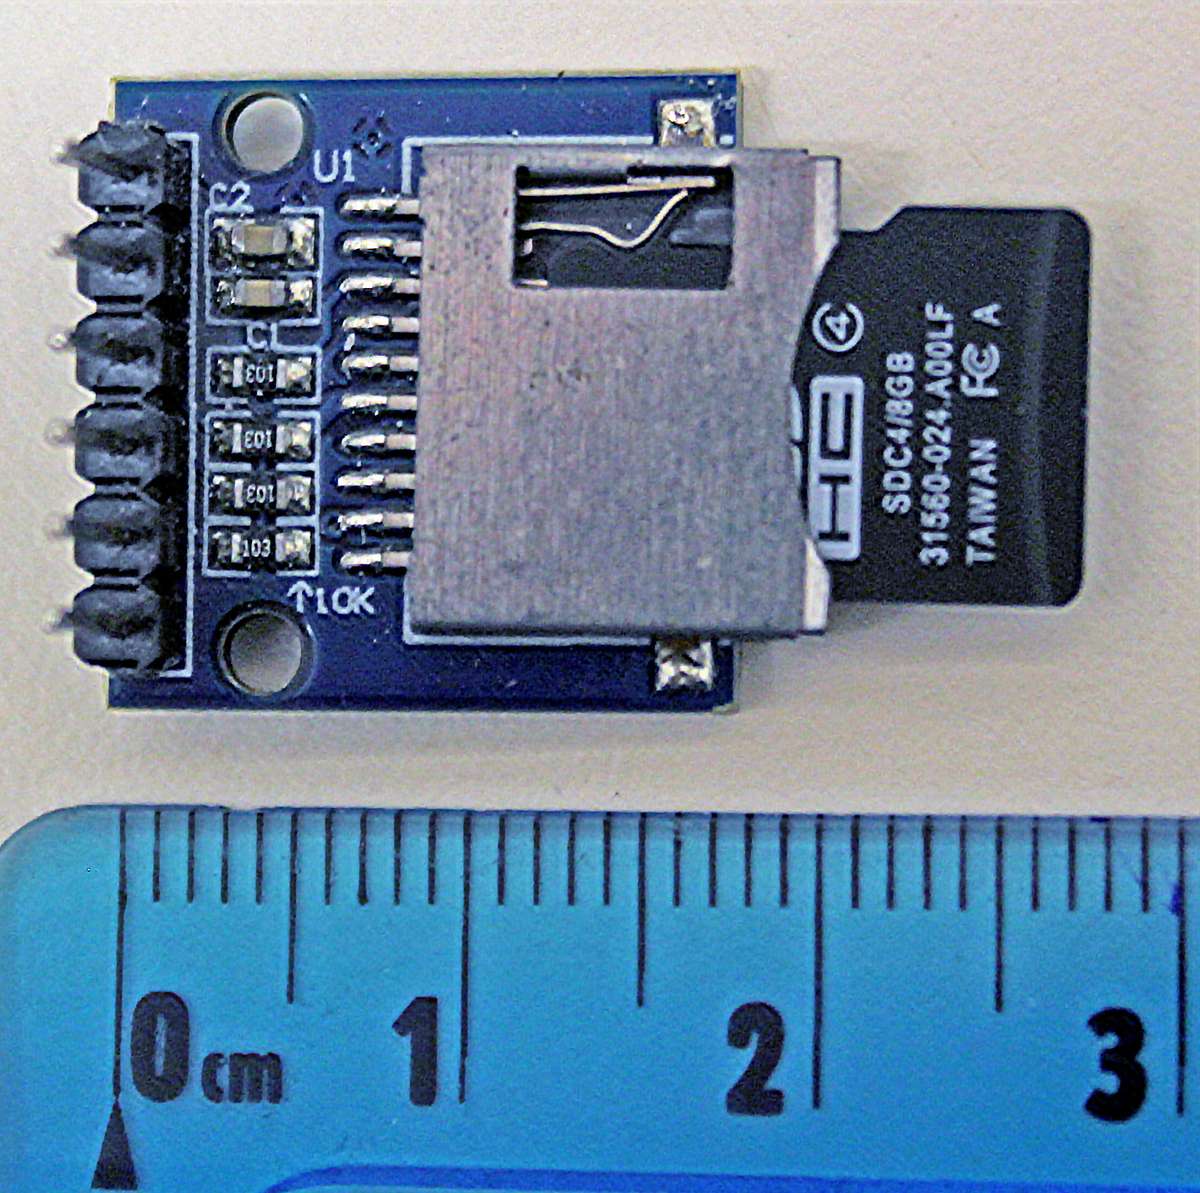 |
Micro SD card expansion module NOTE: If your microcontroller operates at 5 volts, use a micro SD card module that accepts 5 volts. |
| B |  |
Real time clock (DS3231) NOTE: Power the clock with a CR2032 or LIR2032 battery so that the time is retained even if power to the microcontroller is lost. |
| C | 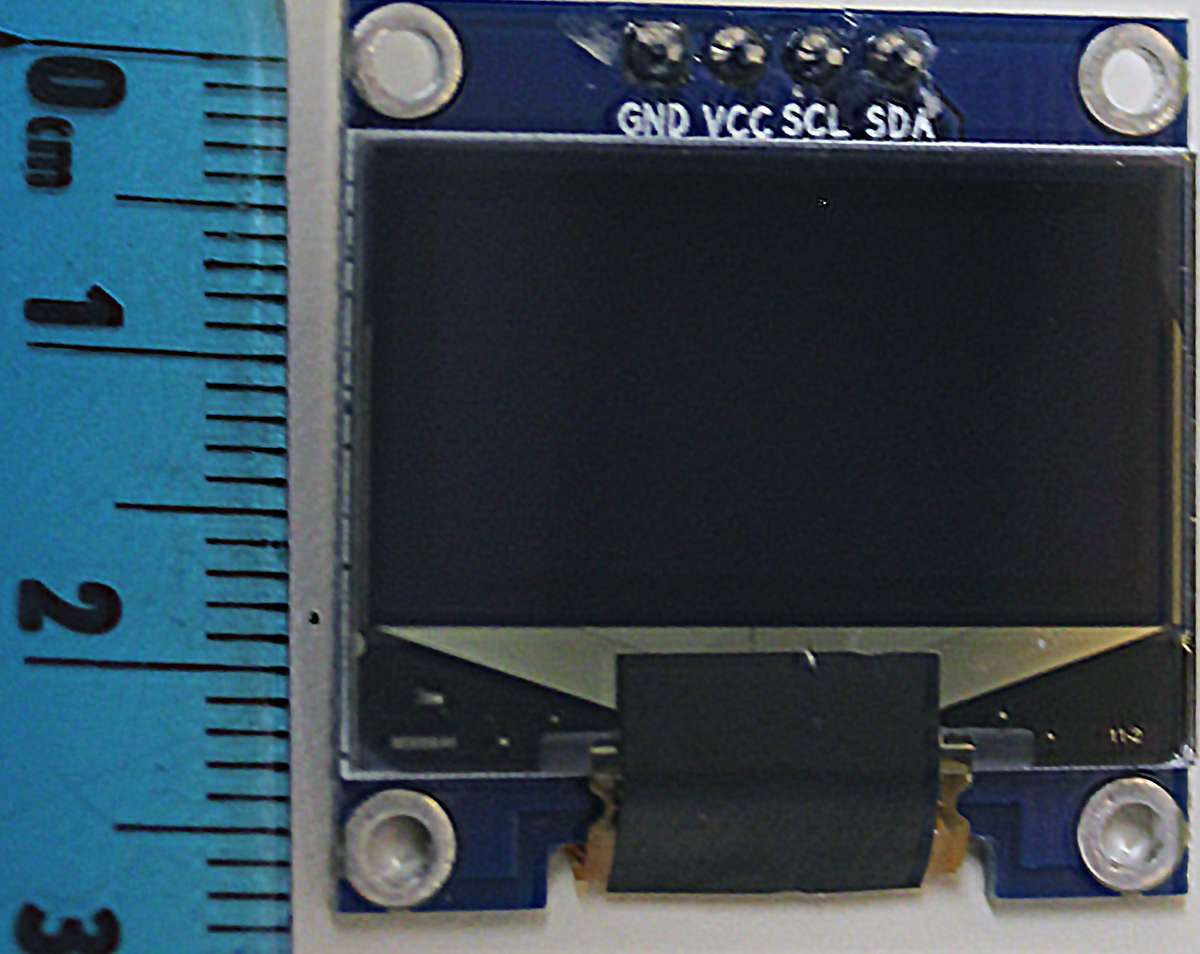 |
OLED display module NOTE: These come in varying sizes including 128 X 64 (pictured left) and 128 X 32 pixels. |
| D | 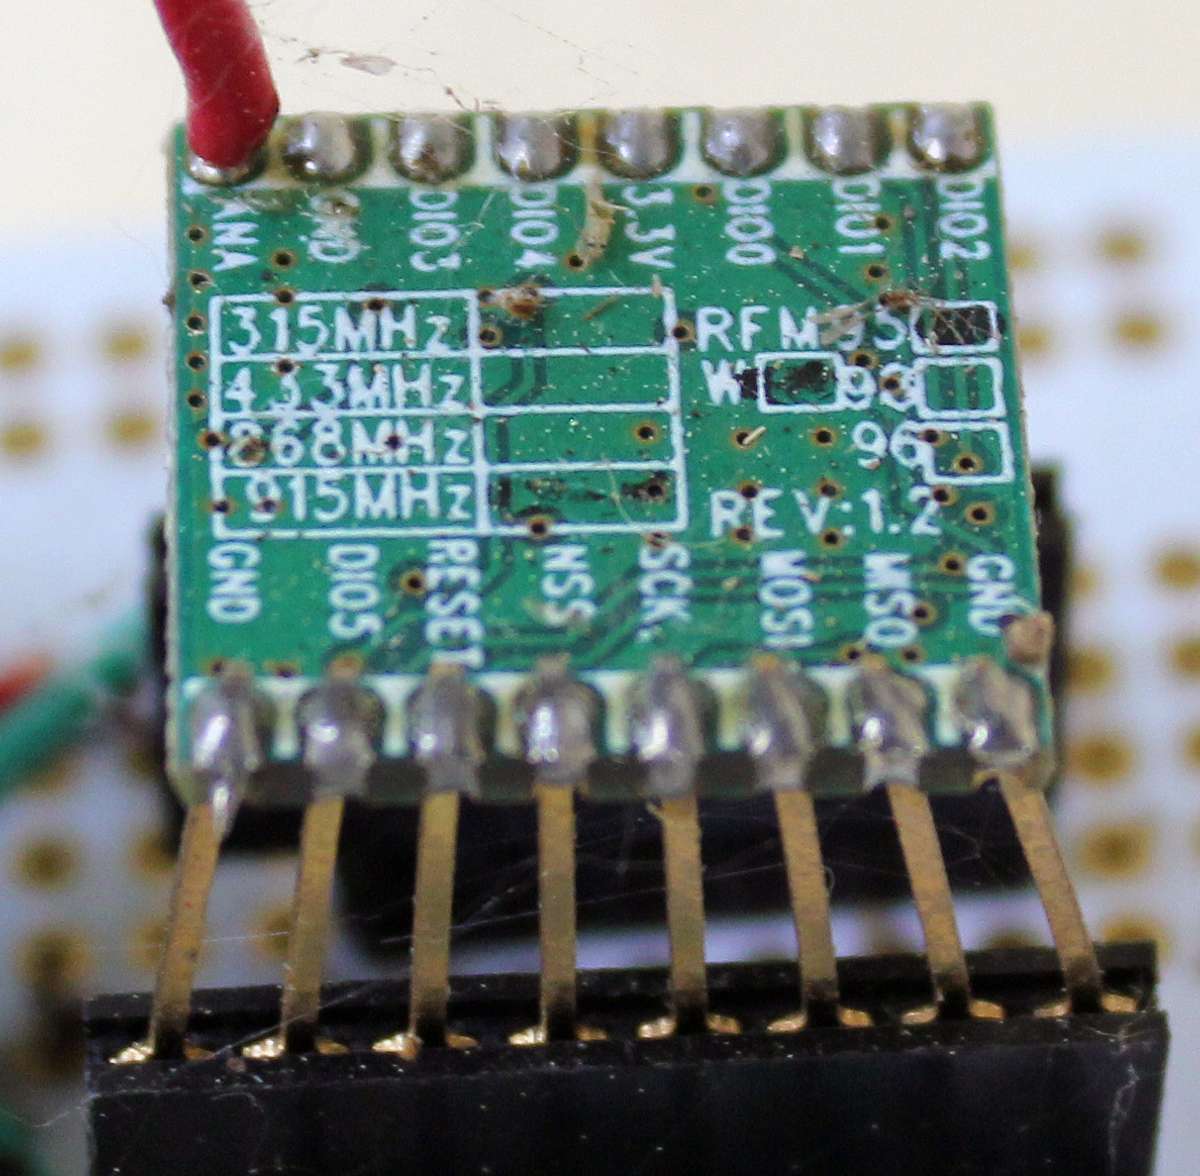 |
RFM95 LoRa transceiver NOTE: Suppliers such as Adafruit offer the transceiver as a module that is easier to work with and compatible with both 3.3 and 5 volt systems. |
| E | 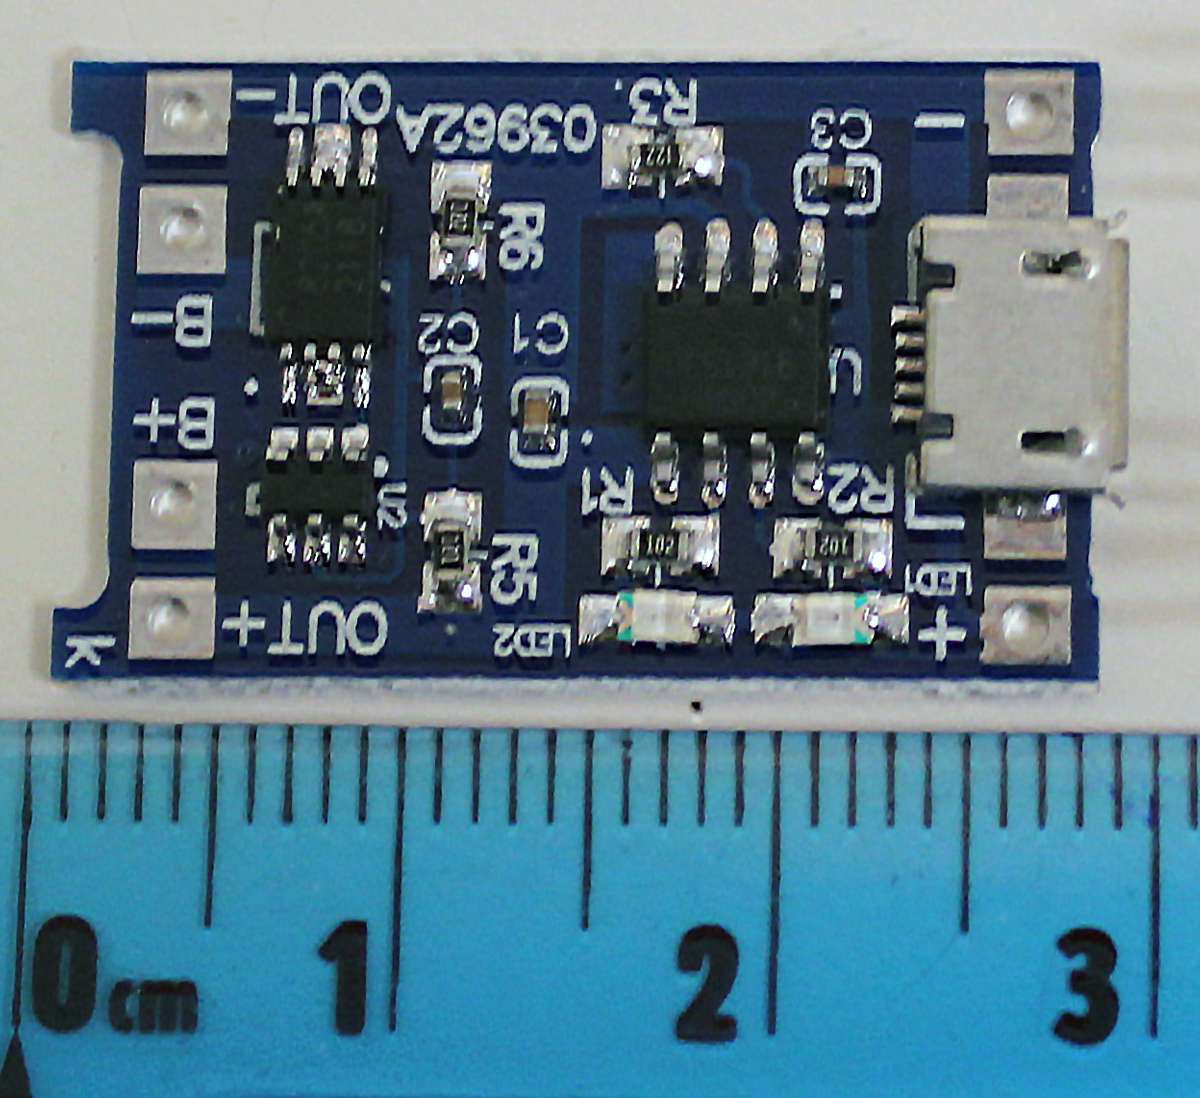 |
TP4056 lithium battery charger NOTE: Works well for charging rechargeable 3.7 volt lithium batteries (e.g., 18650 battery) with 6-volt solar panels. CAUTION: The TP4056 has built in overcharge protection. Nonetheless, take time to learn how to use batteries safely. |
| 1Costs in this table, obtained in 2022, could change over time. They do not include shipping, which could vary by country. By ordering from websites such as Amazon, you can receive items more quickly, but costs will be higher. | ||
Tips for getting started
Programming
Most microcontrollers come with a USB port. As mentioned earlier, purchase the right USB cable for your microcontroller; table 2 specifies the correct USB connector for the corresponding microcontrollers. Connect one end of the cable to a USB port on your computer and the other end to the USB connector on your microcontroller.
I use Arduino IDE software to program my microcontrollers. It is free of charge and is available for Windows, macOS, and Linux computer operating systems. Programs developed in Arduino software are called sketches. They are written in Arduino Programming Language (based on C++) and then uploaded to your microcontroller. Fortunately, you don’t have to be an expert programmer to come up with sketches for your projects. For everything I’ve built so far, I have found multiple tutorials and examples that not only explain how to connect sensors to microcontrollers, but also provide sketches with an explanation of how the programming code works. Go to the Getting Started page on the Arduino website to learn how to download the software and get started with programming.
My advice is to start small. Many people begin by learning how to blink a small LED light; Arduino starter kits often come with LEDs, connection wires, and other small parts. Get one sensor or function to work at a time. Save sketches that you have success with for future use. Small victories will lead to a growing body of code that becomes useful for later projects.
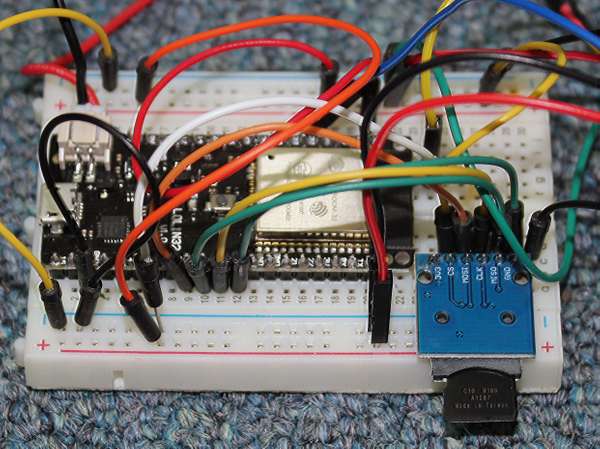
Figure 6. Solderless breadboard (white plastic base) and jumper wires (colored wires). Source: Tim Motis
Prototyping
Make sure your project will work before attempting to build something permanent. There are starter kits available for beginners. Look for one that has a few solderless breadboards and sets of pre-made jumper wires (Figure 6). A solderless breadboard is a plastic component with rows and columns of holes, marked by letters and numbers, into which you can insert pins and wires. No soldering 7 is needed. The pins and wires are held in place by metal strips inside the breadboard that connect rows and columns of holes.
Jumper wire is electrical wire for connecting components on a breadboard. You can make your own jumper wires with non-stranded, 22 AWG (AWG is a standardized unit for wire thickness) electrical wire and a wire stripper for removing the plastic sheath around the ends of each wire. Pre-made jumper wires, however, are easiest to use for quickly wiring and testing a breadboard circuit. They come in varying lengths with male and/or female connectors on the ends.
Fabricating
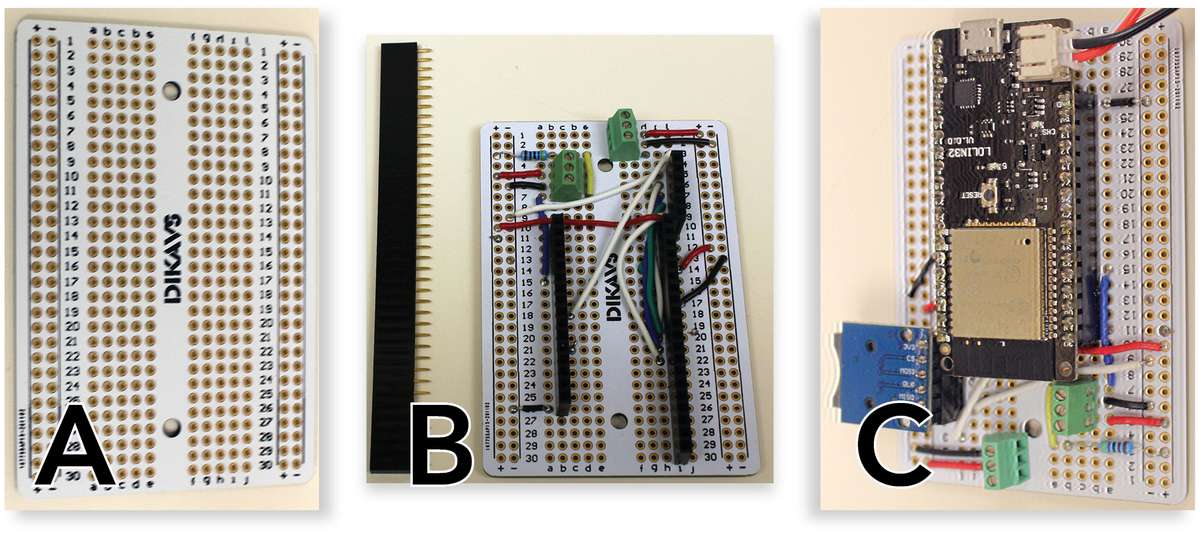
Figure 7. Perma-proto board before (A) and after soldering pin headers and wires (B), and plugging an ESP32 Lolin and MicroSD card module into female pin headers (C). The green components are screw terminals for connecting sensors to the micrcocontroller. Source: Tim Motis
The metal strips inside solderless breadboards work well for testing circuits, but wires can easily come loose. For more permanency, transfer your circuit to a perma-proto board (Figure 7A), a metal version of a solderless breadboard with the same layout of holes. This is done by soldering pin headers, wires, and any additional components to the board (Figure 7B). 8 With the appropriate pin header soldered to the board (female) and microcontroller (male), place the microcontroller onto the board as shown in Figure 7C. With this approach, you can easily take the microcontroller off the board to replace or reprogram it if needed. The same applies to supporting modules.
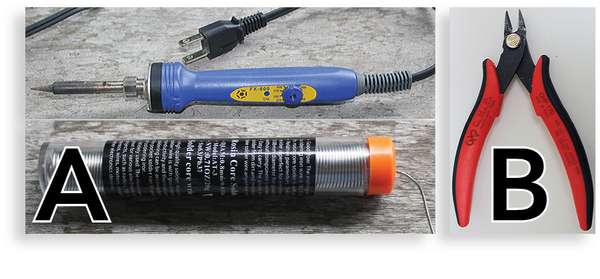
Figure 8. A soldering iron and solder (A) and wire snipping tool (B). Source: Tim Motis
Soldering, like anything else, takes some practice but is not difficult to learn. I use tape to hold components in place while soldering. You will need a soldering iron, and some solder (Figure 8A). Look for a soldering iron with replaceable tips and, preferably, adjustable temperature. Trim off excess wire with a snipping tool like that shown in Figure 8B.
When ready, you will need to install your project in its permanent location. Protect electronics from sun, heat, and water. Protection from these elements is particularly important in the tropics. I have found that microcontrollers placed in plastic containers exposed to the sun start to malfunction as flux (material used in solder to improve connectivity) in the solder spreads across connections. For that reason, I prefer placing components inside simple wooden boxes. Wood blocks the transfer of heat but needs protection from rain. Options for covering a wood box include aluminum foil and pieces of tin. Any holes for wires going to outside sensors should be drilled in the bottom of the box if possible, allowing any water leaking into the box to drain out.
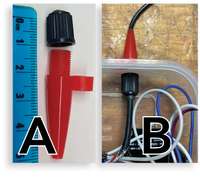
Figure 9. A commonly available air pump accessory in combination with a tire cap (A) to make a solid pass through for wires going outside a plastic container (B). Silicon glue or putty can be added to make it leak proof. Drill a hole through the tire cap and cut the tip of the air pump accessory to match the diameter of the wire. Source: Tim Motis
In addition to heat and rain, protect electronics from insects and rodents. Ants are not immediately destructive but will eventually cause problems. If ant baits fail, you could house your microcontroller project in an airtight container, such as a capped PVC pipe or Tupperware®, and then place everything inside a wood box or bury it underground. Figure 9 illustrates an example of an airtight container with an air pump accessory and tire valve cap to make a leak-proof connection for wires.
In some cases it makes sense to use small-diameter PVC pipe as conduit. Supply tubing for drip irrigation systems also works well. If your wires are too long to push through the tubing, try this:
- Find a non-stranded length of wire that is thick and stiff enough to push all the way through the drip tubing
- Solder one end of your sensor wire to one end of your push (thick) wire (Figure 10A)
- Insert the other (non-soldered) end of your push wire into one end of the tube and push it through the tube until the non-soldered end emerges out the other end of the tube
- Grasp the non-soldered end of the push wire and pull it along with the sensor wire through the tubing (Figure 10B)
- Once your sensor wire emerges, sever the push wire from the sensor wire
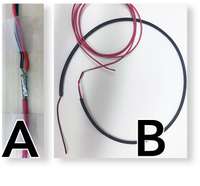
Figure 10. Sensor wire (A; top) soldered to one end of non-stranded wire (A; bottom) used to pull sensor wire through ¼ inch diameter drip irrigation supply tube (B). Source: Tim Motis
Conclusion
Microcontrollers offer an affordable means of monitoring environmental factors that influence plant and animal life. Select sensors with the specifications and appropriate level of accuracy for your application. With low-cost microcontrollers you can both monitor and even control environmental factors. Control of factors such as soil moisture and conditions in small spaces is accomplished by using sensed values to switch intervention measures on and off (e.g. irrigation valves, fans, and heat sources). Thus, there is potential to automate some tasks. Knowledge of electronics and computers helps, but you do not have to be an electrician or computer programmer to build useful devices. Over time, the availability of sensors and examples of useful microcontroller projects will likely increase, leading to more options. The References and Further Reading sections below will steer you to more information on this topic.
References
AlphaRomeo. 2011. Make a Rain Gauge. https://www.instructables.com/Make-a-Rain-Gauge/
Bagur, J. 2022. The Arduino Guide to Soldering. https://docs.arduino.cc/learn/electronics/soldering-basics
Ferrante, A. and L. Mariani. 2018. Agronomic management for enhancing plant tolerance to abiotic stresses: high and low values of temperature, light intensity, and relative humidity. Horticulturae 2018, 4(3) https://doi.org/10.3390/horticulturae4030021.
Gyawali, A.J., B.J. Lester, and R.D. Stewart. 2019. Talking SMAAC: A new tool to measure soil respiration and microbial activity. Frontiers in Earth Science 7:138 doi: 10.3389/feart.2019.00138
Hampton, C.R. 2016. Build a Wireless “Tipping Bucket” Rain Gauge, Part 1 – Assembling the Bucket. All About Circuits.
Hannan, J. Personal weather station for specialty crop management. Iowa State University Extension and Outreach. https://www.extension.iastate.edu/smallfarms/personal-weather-station-specialty-crop-management
Jakub_Nagy. 2017. DS18B20 Radiation shield. https://www.instructables.com/DS18B20-Radiation-Shield/
Tarara, J.M. and G. Hoheisel. 2007. Low-cost shielding to minimize radiation errors of temperature sensors in the field. HortScience horts 42, 6:1372-1379. https://doi.org/10.21273/HORTSCI.42.6.1372.
Further Reading
Suppliers that provide tutorials with microcontrollers and sensors
Weather stations
A video with information on how tipping bucket rain gauges work and how to improve accuracy by interfacing a reed switch with what is called a Schmitt trigger: https://www.youtube.com/watch?v=KHrTqdmYoAk&t=872s
Weather station that logs temperature and rainfall: https://github.com/DesiQuintans/sneesl-rain-logger (in the Firmware folder, click on the first file [01_Datalogger] for code that works well with Arduino Nano and Pro Mini microcontrollers])
Sample code for ECHO microcontroller projects: https://github.com/ECHOInternational/Microcontrollers
Soil moisture sensing with capacitive soil moisture sensors: Hrisko, J. 2020. Capacitive soil moisture sensor calibration with Arduino. Maker Portal. https://makersportal.com/blog/2020/5/26/capacitive-soil-moisture-calibration-with-arduino