This chicken compost system is adapted from the system taught by Geoff Lawton, permaculture consultant, designer, author, and teacher. Jordan was taught this system by Geoff Lawton in one of his Permaculture Design Courses and then brought it and adapted it to the context of the ECHO Global Farm in North Fort Myers, Florida.
Introduction
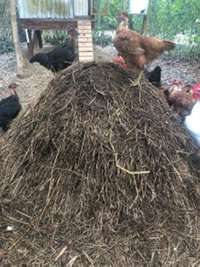
Figure 9. Chickens climbing on and scratching compost pile. Source: Chris Jordan
Farmers and agriculturalists know the value and benefits of making and using compost. However, thermophilic or “hot” 1 composting can be a labor and time intensive task that is abandoned when a small-scale farmer has competing demands. This chicken compost system was designed to reduce the labor demand on the farmer while still providing the soil building capacity of compost. The system also provides a new use for previous “waste,” such as food scraps, leaf litter, and other excess biomass. The concept is simple: utilize chickens’ excrement and instinctual scratching behavior to aid in the creation of soil at a rate comparable to other hot composting techniques. Carbon, a key ingredient in any compost pile, is stored under the roosting area or coop of the chickens where it passively collects droppings (a combination of both urine and manure).
Once the piles have been made, the chickens interact with the pile by climbing and scratching at it as they search for bugs, seeds, greens, and food scraps (Figure 9). This provides a few key benefits:
- It reduces the frequency a farmer has to rebuild (or turn) the compost pile.
- It adds a consistent high-nitrogen organic material that helps keep the compost in its ideal temperature range (50 to 70°C).
- It supplements feed requirements for the poultry, helping reduce livestock cost.
At the end of eight weeks, a farmer has two complete 1x1.5 m² compost piles that are ready to use.
Prerequisites
- 16 m² of enclosed space to confine chickens
- 10 to 12 chickens
- Carbon source (e.g. peanut shells or straw) that has been collecting chicken droppings for 6 to 8 weeks
- large animal manure
- 1x1.5 m wire cage
Instructions
In my experience, there is both an art and a science to making compost. The science of how composting works is well documented and is outside the scope of this document. The art of compost has more to do with the material and the proportions of material you use to make the pile. Unless you are planning on selling compost commercially, it is unlikely that you will have exact recipes, by weight or volume, for the three key ingredients needed to make a compost pile. Instead, you will utilize what material you have available when you first build your piles. The three key ingredients are:
- Carbon source (“browns” such as wood chips, straw, or other dried biomass)
- Nitrogen source (“greens” such as green plant biomass 2or food scraps)
- Manure source
I think it is reasonable to assume that most small-scale farmers will have many variables in their access to nitrogen, carbon, and manure sources. There may be consistent carbon and manure sources, but the greatest variable will likely be the nitrogen sources used. In my experience, biodiversity is key to making compost, a farmer shouldn’t rely on one or two sources of nitrogen but should use as many sources as possible. With that said, what follows are general proportions and guidelines that are helpful when getting started.
Start by gathering the required material for building two 1x1.5 m² compost piles. I would recommend using a combination of food scraps and high-nitrogen, green biomass. Manure from large animals such as goats and cows are excellent sources of manure, in addition to the chicken manure that is part of your carbon stock. To maintain adequate oxygen levels in the pile, it is best if the large animal manure is dry. A combination of manure sources would be ideal for increasing microbial diversity in your compost. Additionally, you’ll want to use a chipper/shredder to cut the “greens”, and possibly the “browns” into smaller pieces. Smaller pieces increase the rate of decomposition and makes rebuilding piles much easier.
When you have gathered your materials, you are ready to begin building. You’ll be building the pile in layers, starting with the 1/3 of your collected carbon source. Make a 1 m in diameter carbon circle on the ground. Next, add 1/3 of your nitrogen source on top in equal proportion. I recommend using your plant biomass first and saving your high nitrogen food scraps for the middle layers of the pile. Lastly, you’ll be adding the dry manure on top. The amount of dry manure you add at this point is at your discretion and will come with experience. Typically, you would add two to three shovels-full, enough for a generous sprinkling of manure to mostly cover your nitrogen source. Spray the pile with water long enough to saturate the top layer (Figure 10A). You will repeat this layering process gradually reducing the diameter, until you reach 1.5 m in height. When finished your pile (pile A) should have a "bell" shape to it (Figure 10B).
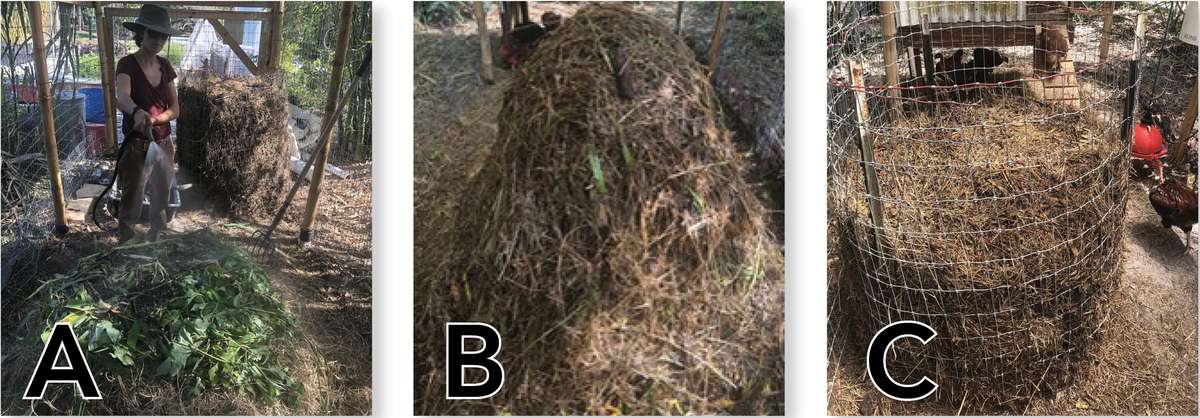
Figure 10. Wetting of pile at each complete layer (A). Completed pile for chickens to scratch and peck at (B) and an enclosed complete pile (C). Source: Chris Jordan
Repeat this process for the second pile (pile B) only this time, place a cage around the pile to limit the chickens’ access (Figure 10C). This allows one pile to stay at a consistent temperature (pile B) while maximizing the benefits the chickens provide on only one pile at a time.
Maintaining a pile
Once you have your two compost piles completed, you’ll be doing some daily and weekly maintenance until both piles are complete. A good indication of when a pile is complete is when 50 to 70% of the original material is broken down and no longer recognizable as to what it was when the pile was started. Another indication of when a pile is complete is when the temperature of the pile stabilizes and no longer gets hot after rebuilding.
Daily tasks
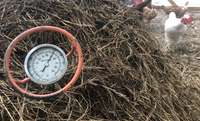
Figure 11. Composting thermometer. Source: Chris Jordan
Collect and record temperature data for each pile. The acceptable temperature range is between 50 to 70°C. A compost thermometer (Figure 11) is the easiest way to measure the temperature of the pile. Another way to approximate the temperature is to put a long piece of metal into the pile and leave it for 20 to 30 minutes. When you pull it out after that time, the portion of the metal that was in the pile should be hot to the touch. You should not be able to keep your hand on the metal for more than a second. If temperature readings indicate that the pile is too hot, rebuild the pile making sure to switch the material that is on the outside of the pile with the material in the center of the pile. If the pile is too cold, turn the pile and add a nitrogen source such as green plant material or food scraps.
Check moisture level for each pile and add water as needed. The ideal moisture level is determined by a simple squeeze test. When squeezing a handful of compost, 1 to 3 drops of water should drip out of your hand. If there is not enough water, add more until the pile reaches ideal moisture level.
Re-stack/dress the pile not in the cage (pile A) each morning to maintain the recommended height and shape.
Weekly tasks (Figure 12)
Each week you will move a compost pile either from the cage to the open ground or vice versa. When you are rebuilding the pile from one place to the other, it is important to move the center of the pile to the outside and to make the outside the center. This helps ensure that the biomass is breaking down at the same rate.
Remove the cage from Pile B and set it up in the vacant space closest to the coop.
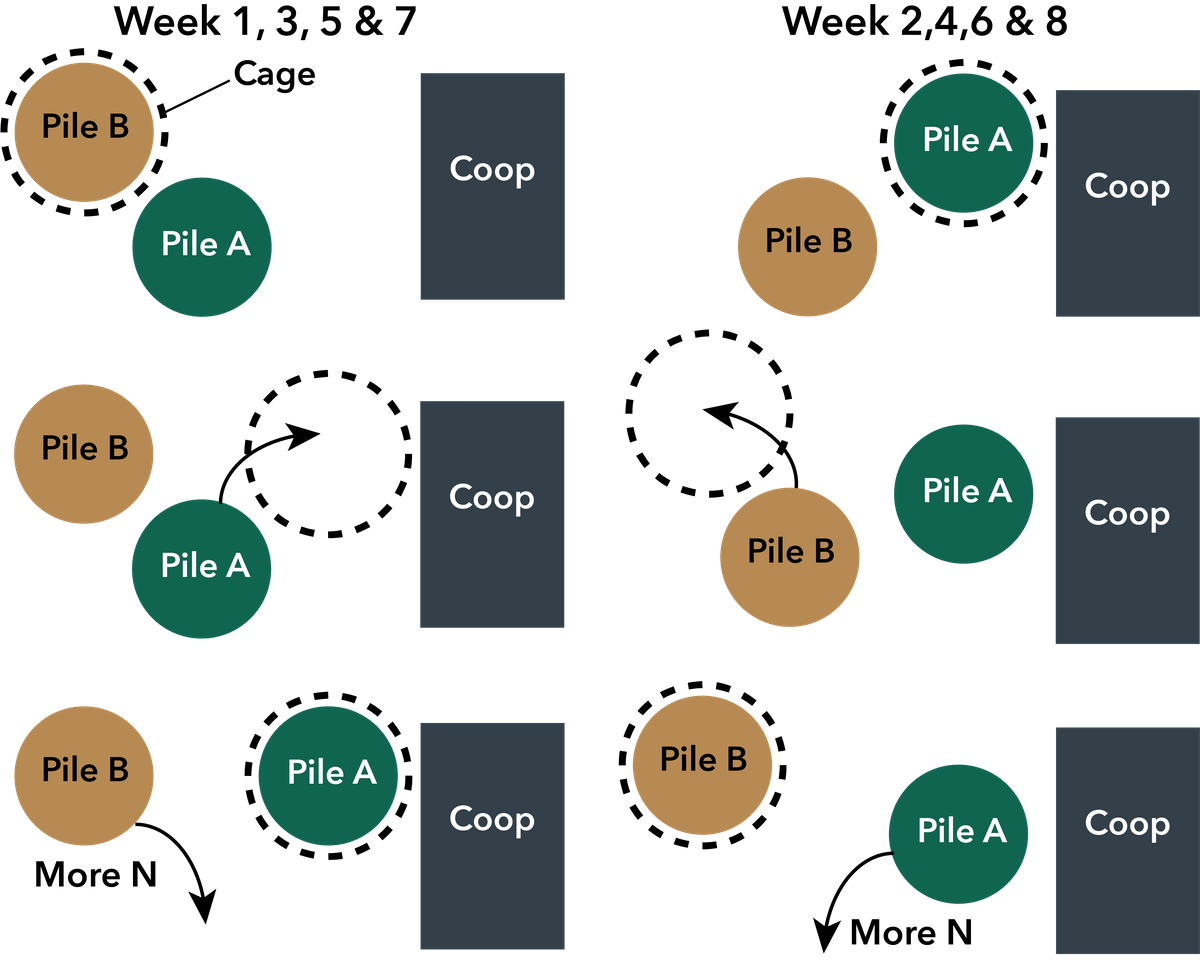
Figure 12. Schematic of weekly switching of piles. Source: Stacy Swartz
Transfer Pile A into the cage. Check the moisture content of the pile and add water if needed. For typical thermophilic composting, the pile should stay between 50 to 70°C for three days before rebuilding it but for this system you will rebuild every week regardless of whether the ideal temperature is reached. Weekly rebuilding is done to aerate the pile and avoid anaerobic activity.
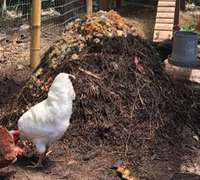
Figure 13. Adding food scraps while rebuilding a pile. Source: Chris Jordan
Rebuild Pile B adding food scraps (Figures 12 and 13) into the vacant space left by Pile A following the same guidelines above. Adding more nitrogen source helps increase microbial activity and heat the pile up
Cite As:
Jordan, C. adapted from G. Lawton. 2022. Chicken Compost System. ECHO Development Notes no. 156.
References
Blank, D. 2007. A Fresh Look at Life below the Surface. ECHO Development Notes no. 96.
Misra, R.V., R.N. Roy, and H. Hiraoka. 2003. On-farm composting methods. Food and Agriculture Organization of the United Nations, Rome.
Motis, T. 2017. Tithonia for green manure; Seed saving workshop. ECHO Development Notes no. 134.