A manual for drivers using pioneer roads and for novice mechanics who must depend upon their own resources in areas without extensive service facilities.
Volunteers in Technical Assistance 1600 Wilson Bloulevard, Suite 500 Arlington, Virginia 22209-8438 USA
Copyright [C] E. Christopher Cone, 1992
All rights reserved. No part of this publication may be reproduced or transmitted in any form or by any means, electronic or mechnical, including photocopy, recording, or any information storage and retrieval system without written permission of the publisher.
Published by Volunteers in Technical Assistance (VITA) 1600 Wilson Bloulevard, Suite 500 Arlington, Virginia 22209-8438 USA
Manufactured in the United States of America.
Library of Congress Cataloging-in-Publication Data
Cone, E. Christopher. Automotive operation and maintenance/ by E. Christopher Cone. [Revised Edition] Includes index. ISBN 0-86619-310-3 1. Automobiles--Maintenance and repair. 2. Automobile driving. I. Title. TL 152.C58 1992 926.28'72-dc20 90-49886 CIP
First printing, May 1973 Second printing, November 1973 Third printing, April 1974 Revisions and fourth printing, April 1975 Revisions and fifth printing, July 1992
DEDICATION
This book is dedicated to the memory of Fr. Joseph Bessom, OHC, a modern-day Christian saint whose love of Africa and its people sent me to live in its jungles and resulted in the writing of this book for VITA.
ACKNOWLEDGEMENTS
It would be fruitless to attempt to list all of the men and women who have contributed to the preparation of this book. They range from unlettered Africans with an inborn feeling for the capacity of a log bridge to engineers with the some of the largest corporations in the world. Special thanks should be made to my African instructors, James Tamba Kila, Stephen Boakai, Jaka Masambolahun, James Nyuma Dah, Moses Sivili Gelego, Andrew Kpehe Woiwor, and others. Appreciation is extended to the Order of the Holy Cross, which provided the "test track" for most of the material discussed in this book. Acknowledgement is also made of the assistance of several people at VITA, notably Terry Ladd and Gerri Forlenza, who worked on the first edition, and Patricia Mantey and Margaret Crouch, who prepared the current, revised version.
Special thanks go to VITA Volunteer John N. Amon of the Rochester Institute of Technology, who produced all new technical drawings for the fifth printing using Intergraphic MicroStation software, and Celia Jenkins and Jill Smith McClain, who assisted with the photographs.
The technical assistance of many vehicle manufacturers and their sales agents has contributed to the production of this book. Their aid has been invaluable in providing shop references concerning specific vehicles in the maintenance portion of this manual. E.C.C.
INTRODUCTION
This book is intended to fill a need found by the author at the start of his 30 years as a mechanic for a church mission in Liberia, West Africa. At that time the author could perhaps charitably be termed a mechanically inclined novice. Despite his lack of experience he found himself in charge of a substantial number of vehicles and a fair-sized electric generating station. It was largely through experiment and occasional disaster that much of the material for this book was assembled. It is presented here in the hope that it may save the reader from many of the same problems.
The intent is to offer suggestions to drivers or mechanics who operate in an area where service facilities and technical assistance are not readily available and they must be their own advisers on every problem that may arise. In the event that readers happen to have some service facilities at hand, they will find that they can skip over some sections of the manual.
This manual for the most part deals with four-wheel drive vehicles, since it can generally be expected that an area where no service facilities exist will be one with pioneer roads, which require the added traction of four-wheel drive. However, since FWD is the name of a manufacturer of heavy-duty, four-wheel drive trucks, it is inappropriate to use this abbreviation to indicate "four-wheel drive." The abbreviation FWD is also used to describe the growing number of cars with front-wheel drive and no power in the rear wheels. To avoid confusion, the term 4WD will be used here. Also, as a matter of convenience, the word "car" is taken as it is used in West Africa: to mean any sort of small or moderate size vehicle whether it be a sedan automobile, Jeep-type vehicle, or pickup truck.
On another matter of nomenclature, it should be noted that petroleum products are identified here by their U.S. names. Readers in other areas will have to translate according to local custom. This is a matter of some confusion; what the British call paraffin, for example, is known as kerosene in the United States, and paraffin to a U.S. reader means a translucent white wax.
The book is organized into several sections. An understanding of the organization should make it possible to find needed material quickly. The first section concerns operation of a car in an area served by pioneer roads. This section is intended to assist drivers with temporary repairs to the vehicle so that they can get home in the event of mechanical trouble.
The second section of the book is devoted to maintenance suggestions, which are intended for use in a frontier shop or repair center, no matter how ill-equipped it may be. This book should be used as a supplement to the vehicle's shop manual. For example, this book will help indicate when brakes need to be relined, but the shop manual will tell how to do it. Since a book of this type is worthless if material cannot be located when it is needed, a special effort has been made to prepare as complete an index as possible. Cross references will also be found throughout the text.
NOTE regarding metric and English measurements: For convenience both systems of measurement are used in this book. Where an equivalent is given as a "rule of thumb," however, it is not intended as an exact equivalent. For example, 35 miles per hour is shown as being equivalent to 55 kilometers per hour. A more exact figure would be 56.35 kilometers per hour, but this is cumbersome and not readily remembered.
A complete table of English and metric equivalents is included in Section 20.00.
TABLE OF CONTENTS
Major sections of this book are divided by section numbers. Section 6.00, for example, covers the entire range of "Winching and Towing." Within this large chapter are smaller sections; 6.01 concerns wire rope, and the following sections cover methods of splicing wire rope, storage of wire rope, etc.
In addition to arranging the book in this "outline" fashion, a complete index can be found in Section 21.00.
Acknowledgements
Introduction
1.00 Mechanical Emergencies While Driving
Loss of oil pressure; tire blowout; broken axle or drive shaft; boiling radiator; broken steering linkage; steering bent and ineffective; headlight failure at night; accelerator pedal stuck down; brake failure.
2.00 Operating on Pioneer Roads
Examining the vehicle; loading the vehicle; introduction to the cab; mechanical operation.
3.00 Avoiding Road Hazards
Four-wheel drive; traveling in convoy; tire chains; loss of traction; piled-up mud or solid obstacles; log bridges; capsizing; fording and wading; submerging.
4.00 Extricating the Vehicle
Stuck in mud or snow; hung up in mud or snow; hung up on a solid obstacle; log bridges; stuck while fording.
5.00 Procedures when Stranded
Leaving the vehicle; water supply; seeking help; vehicle submerged.
6.00 Winches and Towing
Wire rope; joining wire cable; storage of wire rope; types of rope; synthetic fiber ropes; knots for fiber rope; nylon towing straps; chain; joining chain; storage of chain; chain repairs; the winch; selecting a winch; installing a winch; winch drive systems; winch cable; use of the winch; anchoring the winch cable; winching safety; winding in the winch cable; block and tackle; recovery with a winch; winching from a bridge; removing a log under the car; lowering with the winch; using the winch for salvage; salvaging a capsized vehicle; salvaging a car from water; towing a derelict; attaching the tow cable; overcoming mechanical drag; towing a trailer; trailer hitches; extricating a stuck trailer.
7.00 Field Expedients
Capsizing and submerging accidents; drive train expedients; steering system expedients; brake system expedients; fuel system expedients; tire expedients; cooling system expedients; electrical expedients; problems in the primary circuit; ignition system expedients; engine expedients.
8.00 Check Lists
Cranking and starting trouble; engine will not crank; engine cranks, will not start; engine starts, then quits; low charge, dead battery; poor spark; low oil pressure; engine uses too much oil; steering problems; front tires worn; uneven tire wear; vibration in drive train; wheel bearings hot; steering troubles; brake trouble; brake pedal sinks to floor; brakes do not hold; brake pedal rises and brakes drag; brakes drag; car pulls to one side when braking; brakes grabbing; brake pedal does not return; clutch and gearshift problems; gearbox trouble; clutch trouble; rough running or conking out; engine short of power; engine conks out and will not restart; engine overheats, radiator boils; funny noises.
9.00 Tests and Testing Equipment
Cooling system tests; engine tests; clutch tests; drive train and steering tests; fuel system checks; brake tests; primary electrical tests; ignition tests; exhaust tests.
10.00 Shop Techniques
General shop hints; axles; differentials; wheel bearings; universal joints; fuel system; brakes; adjusting the brakes; bleeding the brakes; relining the brakes; the hand brake; electrical repairs; battery; voltage regulator; generator repairs; light system repairs; ignition repairs; steering repairs; tire and wheels; repairs to springs; repairs to shock absorbers; cooling system repairs; exhaust system repairs; engine repairs; valves; engine removal; miscellaneous engine repairs.
11.00 Body Repairs
Window glass; roof dents; chassis repairs.
12.00 A Shop Building
13.00 Diesel Engines
Diesel check list; diesel engine tests; diesel repairs.
14.00 Tools and Equipment
Tools for the car; shop tools; luxury tools and equipment; a generator; compressed air in the shop; welders; gas welders; electric arc welders; tools to make; homemade test equipment.
15.00 Vehicle Modifications
Storage facilities; body modifications.
16.00 Parts and Supplies
Supplies in the vehicle; supplies in the shop.
17.00 Storage Facilities
Fuel Storage.
18.00 Preventive Maintenance
Greasing; lubrication; tune-up procedure; radiator flush; miscellaneous maintenance; cold weather operation; periodic checks; check points; daily checks.
19.00 Selecting a Vehicle
Vehicle types and sizes; vehicle modifications; vehicle comparisons.
20.00 Miscellaneous Formulas
Engine displacement; weight on rear axles; pulley ratios; charts and measurements; water measurements; metric equivalents; torque values for nuts and bolts; battery electrolyte specific gravity; metric equivalents.
21.00 Definitions and Index
1.00 MECHANICAL EMERGENCIES WHILE DRIVING
While a discussion of the disasters that await the novice driver on a pioneer road may be a discouraging way to start a manual of this type, it is intended that readers examine this section before they must face any of these problems, so they can be fully prepared. This section is not concerned with such roadside problems as flat tires, dead batteries, or running out of fuel. By "mechanical emergencies" is meant the sort of trouble with the car that places its riders in danger through lack of control of the vehicle or the threat of major damage to the machinery. Many of the mechanical problems related here can be avoided through attention to the items summarized in Section 18.00 on preventive maintenance. Repairs to correct the problems listed here are described in Section 7.00: Field Expedients.
1.01 Loss of Oil Pressure
Since oil, under pressure, is required to lubricate the many moving parts of an engine, loss of this pressure is a major mechanical emergency. Stop the engine immediately, or it will in all likelihood be permanently damaged. Once the engine is safely stopped, look for the cause of the difficulty. Section 8.00 on check lists may be of assistance in this search.
1.02 Tire Blowout
At the slow speeds that are common on pioneer roads, tire failure may not be a serious problem. You will only hear a flopping noise and notice that the steering seems unresponsive. At high speeds, however, a blowout can spin the car out of control. The correct response to a blowout is to keep the foot off the brake pedal or accelerator and try to steer the car to a safe stop. If a front tire blows, the car will swerve toward the same side as the blown tire. Using the brake will often cause a spin. With the transmission in gear the engine will slow the car gradually, making it more likely that you will be able to hold the wheel and steer to a halt.
1.03 Broken Axle or Drive Shaft
A two-wheel drive car propelled by only one pair of wheels will stop if an axle or propeller shaft breaks; going up a hill it will roll back. In such a vehicle it is necessary to make repairs before the car can proceed.
A 4WD car can continue as long as either the front or rear wheels are functioning. If an axle shaft is broken in the rear end, for example, shift to 4WD and attempt to proceed using only front-wheel drive. If a propeller shaft is broken it should be removed before proceeding, or the stub end will flop around and may damage the underframe of the car.
1.04 Boiling Radiator
A boiling radiator is indicative of an overheated engine, which may be caused by any of a number of things as listed in Section 8.70 on check lists.
Do not shut off the engine if the radiator is boiling, for then all circulation of water, even though the water is overheated, will be cut off. Put the transmission in neutral and leave the engine idling. Very carefully open the radiator cap; live steam is likely to be forced out under pressure, so it is advisable to cover the cap with a thick rag for protection. With the engine still idling, slowly add enough water to fill the radiator. Allow the engine to continue idling until the temperature indicator returns to normal.
If opening the radiator cap reveals that the radiator is already full and additional water is not needed, the engine is probably being overworked and slower speeds and lower gears should be used. Alternatively, the thermostat may be blocked, preventing the flow of coolant through the engine.
1.05 Broken Steering Linkage
In the event of breakage of any part of the steering system, it will probably become impossible to steer the car, At low speed this may not be a crisis, but at high speed it may not be possible to avoid a crash. Stop the car as quickly as possible under such circumstances. The critical nature of the steering system makes frequent examination a prime safety consideration.
1.06 Steering Bent and Ineffective
If a car strikes a tree stump, rock, or other obstacle in such a way as to bend part of the steering linkage under the front end, the steering may become ineffective. The two front wheels may point toward each other, for example. You will usually be able to maintain enough control to stop safely.
1.07 Headlight Failure at Night
The obvious move in the event of headlight failure is to stop immediately. The well- prepared driver will have a flashlight with which to seek the difficulty.
1.08 Accelerator Pedal Stuck Down
Mechanical failure sometimes results in leaving the accelerator pedal down, rather than returning it when you release your foot. In this event the car will continue to move. If you cannot lift the pedal with the toe of the foot, shut off the ignition and brake to a stop.
1.09 Brake Failure
Before giving brakes up for lost, try pumping the pedal vigorously several times. This may provide enough pressure to stop the car. If it does not, several courses of action are open:
If the parking brake works, it can be used to stop the car.
If the parking brake does not work and if there is no steering lock incorporated in the ignition lock, you can shut off the ignition switch, leaving the transmission in gear. Engine friction will then slow the vehicle.
Alternatively, downshift to the car's lowest gear. This will bring the car gradually to a slow speed. When the ignition is then shut off, the car will stop.
There are also occasions when terrain may aid in stopping the car. A swampy section of road, for example, will serve this purpose, as will sand, deep snow, or an uphill grade.
2.00 OPERATING ON PIoNEER ROADS
Experience indicates that a number of factors contribute to successful operation on pioneer roads. Among these are a knowledge of the individual vehicle, the ability to load the car properly, and familiarity with the mechanical operation of the car. These various factors will be considered before any discussion of driving techniques.
2.01 Examining the Vehicle
Although it eventually becomes second nature, it is important to become familiar with your vehicle and to examine it carefully before starting on a trip.
Know which side the differentials are on, since they are usually not centered. The differential is the lowest point of the undercarriage on most cars. The driver can gain a few extra inches of clearance over a rock or stump by placing the car correctly over the obstacle, with the differential to the side. This allows the higher side of the axle to pass over the obstacle.
See whether there is a protective plate under the front end to guard the steering gear from obstacles. Such a plate is a good investment on a new vehicle. It usually extends from the underside of the radiator housing back to the crankcase, and on some cars covers the crankcase as well.
Know how wide the car is so that clearance between trees, rocks, or other obstacles can be accurately judged.
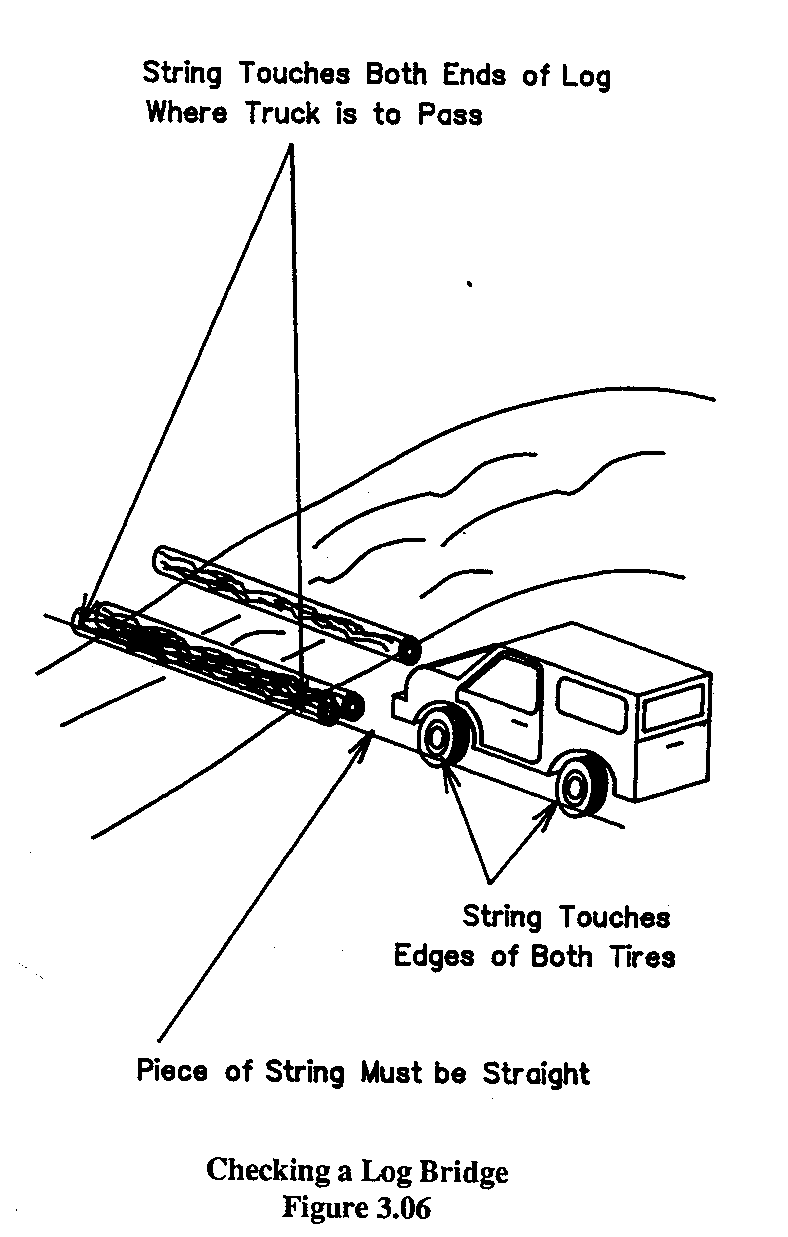
Know how far apart the tires are, especially in an area where log bridges are common. At first it is advisable to get out of the car when approaching a log bridge to be sure that you have estimated correctly before proceeding. (See Section 3.06.)
Know how high the top of the truck or the load is. This is important in relation to overhanging branches.
Beyond the dimensions of the vehicle, there are other mechanical details that should be examined before departing:
In areas with poor bridges, remove the cab doors if this is at all practical. The author and many of his friends have been saved from drowning by this simple expedient. If the cab has no roof, of course there is no need to remove the doors. On some vehicles it is possible to remove the top half of the door, leaving the lower half in place. Seat belts should be used to prevent the occupants from falling out of the car.
Be sure that the fuel tank is full before starting, even on a short journey. Even in familiar territory it is quite possible to get stuck and work all day to get free.
If there are racks for additional fuel or water cans, be sure that they are full before starting.
Check to see that oil, battery, radiator, power steering, and brake fluid reservoir are full.
See that the brake pedal does not feel spongy or sink to the floor, and that the hand brake will stop the car if necessary.
Be sure that there are enough spare tires to get where you are going, or have the tools and patches to make repairs on the road if necessary.
Examine the toolbox to see that it contains appropriate tools and spare parts.(See Section 14.10.)
2.02 Loading the Vehicle
The two most important factors in loading are the total weight of the load in relation to the capacity of the vehicle and the distribution of the load over the chassis.
The driver's manual for the vehicle will indicate the total load allowable. For a small car, the weight of the driver and any passengers may make up a large part of the total load. A full fuel tank may add 75 to 150 pounds (34 to 67 kilograms), and a spare five-gallon (19 liter) fuel can adds an additional 40 pounds (18 kilograms).
As a very rough rule of thumb for overloading, there should be some free movement between the axle and the chassis. The chassis should never rest upon the axle without any reserve in the springs.
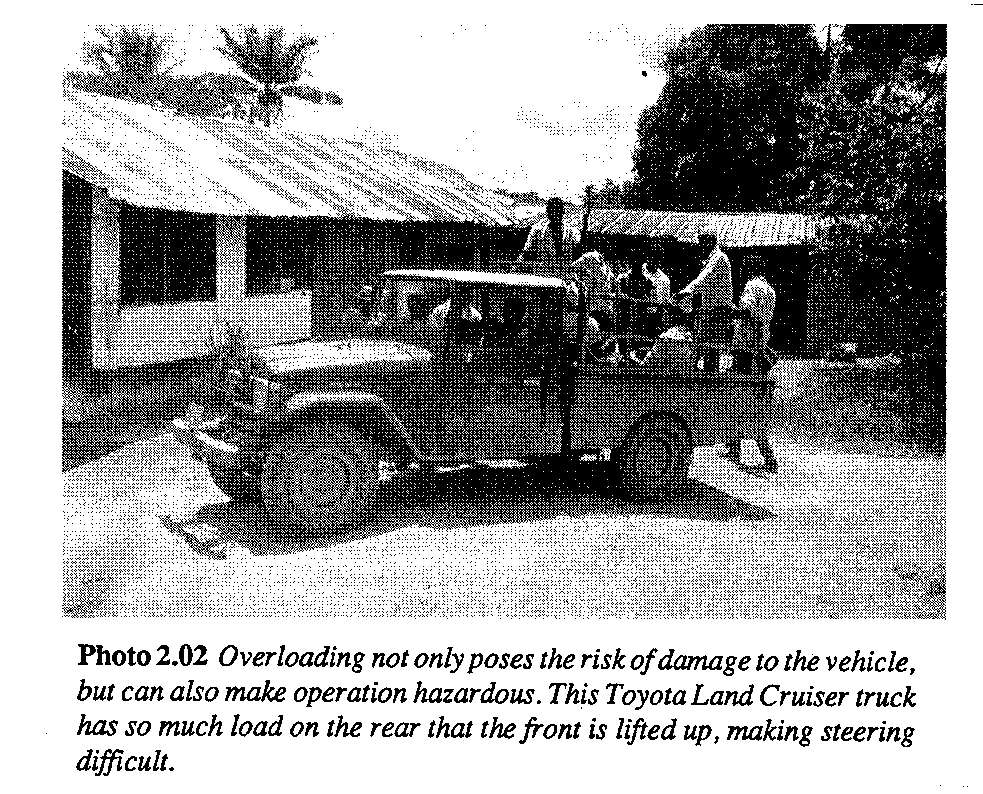
In balancing the load, spread the weight as evenly as possible between the front and rear axles. Concentrated weight on the front portion of the load box in a pickup truck, for example, may break the chassis even though the load does not exceed the maximum allowed in the driver's manual.
Weight placed halfway between the front and rear wheels will be supported equally by each axle. If all the weight is over the rear wheels, the rear springs and axle housing may be overloaded. If all the weight is concentrated behind the rear wheels, the front end will be lightened; it may even leave the ground, making steering impossible.
Formulas are presented in Section 20.00 for the mathematical calculation of the load on the rear wheels, although this is not necessary if common sense is used in load distribution.
If there is a choice of vehicles for a given load, use the one that will give the lowest center of gravity. That is, the one that will carry the load nearest to the ground. A pickup truck carries its load between the rear wheels, for example, while a stake body truck carries the load above the rear wheels. The result is that a pickup truck is more stable and less likely to capsize than a stake body truck of the same size.
Similarly, keep the heavy part of a load as low as possible in the truck. If the load is too high it will make the vehicle top-heavy. When a truck must of necessity be loaded so that it is top-heavy (for example, with a large machine), be very careful on roads with excessive crown or tilt to avoid capsizing the vehicle.
The load should not be allowed to hang out of the sides of the vehicle if this can possibly be avoided, since a hazard will be presented by trees, branches, buildings, and other vehicles.
After loading, be sure that the load is secure and cannot shift even if the car lurches severely. A load that shifts forward may injure the driver; if it shifts back it may fall out of the vehicle; if it shifts to the side the vehicle may be turned over. Tie the load to the car with ropes or ratchet straps with hooks on the ends, sold for this purpose. Tires that do not contain steel strands can be cut into long elastic straps with great strength for securing loads. Fastening the load tightly is especially important in the case of a small vehicle carrying a relatively large single unit such as a drum of fuel. A great deal of damage can be done by such a drum if it "gets loose" in the back of a pickup truck.
2.03 Introduction to the Cab
Before starting the engine, take a moment to familiarize yourself with the cab.
Many drivers believe that on pioneer roads speeds are so low that seat belts are not necessary. Experience will show, however, that they are a great asset. While there may be no danger of a collision in an area with very few cars, the seat belt can keep you from hitting your head on the cab roof on a rough road, or from falling out of the car if the doors have been removed.
One of the best safety rules for driving on rough roads is to keep the thumbs outside the rim of the steering wheel. Although unnatural at first, it soon becomes second nature, and if the steering wheel is wrenched away by striking an obstacle, the spokes cannot injure or dislocate your thumbs. This practice is not required on vehicles with power steering, but few true frontier vehicles are fitted with power steering, which adds to the complexity and cost and offers an unneeded opportunity for mechanical failure.
Hold the steering wheel with the hands in a position corresponding to the position of clock hands at ten minutes past ten. Two-handed steering is essential if roads are rough, and this position gives the best leverage for a turn in either direction.
In a snowy or rainy climate where the driver's feet will often be wet, remove the rubber pads from the pedals. The rubber will become very slippery when wet, making it hard to keep the feet on the pedals. (See Section 15.20.)
Although many cars advertise that three people can be accommodated in the front seat, it is much safer to carry only the driver and one passenger. This allows more room for the operation of the gear shift and the transfer case, and it is much easier for two people to get out of an endangered car in a hurry than it is for a third person sitting in the center of a bench seat.
2.04 Introduction to the Drive Train
Before starting off, a few words about the mechanics of the car are needed.
In an age where most sedans have automatic transmissions, many people are not familiar with the gear shift and clutch, or with their function. The gear shift is intended to allow the engine to operate at optimum speed regardless of the speed of the vehicle, since a gasoline engine develops very low power at low speeds. Thus in first gear the engine is turning rapidly but the wheels turn slowly; in top gear the engine and wheels are generally turning at the same speed.
The clutch separates the engine from the wheels for a moment so that the gears can be shifted. A clutch resembles two flat discs, one of which is connected to the engine and the other through the gearbox to the wheels. When the discs are separated, no power is transmitted to the wheels. When they are pressed together, the engine power is sent through the two discs to the wheels.
In order to shift from one gear to another, it is necessary to first depress the clutch pedal. This will disconnect the engine from the wheels so that the car is coasting freely. The shift can then be made, and the clutch released to apply power again. This process of clutching, shifting, and unclutching should not be hurried; the result is rapid clutch wear or even broken axles.
DOUBLE CLUTCHING is needed to shift from a high gear to a lower one. While synchromesh transmissions have made double clutching less critical and even unnecessary in some circumstances, the technique is still a great wear-saver for any gearbox. Double clutching allows the engine and the gearbox to be matched in speed before the gears are engaged. If this were not done, the gears would "crash," or grind against each other until they were meshed by force.
Double clutching is not at all difficult, but it does require some practice. It cannot be taught from a book, although some suggestions will be presented here for you to try in practice sessions.
Suppose it is necessary to shift from second gear down to first gear in order to slow the car going down a hill. With the car moving across the top of the hill in second gear, press the clutch down. Put the gearshift in neutral and let the clutch up. The engine is now connected to the gearbox, although the gearbox is in neutral and not transmitting any power to the wheels. Accelerate the engine until its speed approximates the speed at which it would be running if the car were in first gear. Then quickly press the clutch down, shift gently into first gear, and let the clutch up. If the estimate of engine speed is accurate, the spinning gears in the gearbox will be going at the same speed as the wheels, and will mesh without crashing.
Double clutching should become the natural way to get into a low gear when descending a bill. Use of the brakes will cause overheating and failure, possibly at a crucial time. In addition, braking on a slope can start the car sliding out of control. THE TRANSFER CASE is actually another gearshift added to the main gearbox to obtain even lower gear ratios. At these lower ratios the engine turns at high speed, thus developing peak power, while the wheels turn very slowly. In most 4WD cars the transfer case approximately doubles the overall gear ratio, meaning that the car travels only half as fast in low range as in high range.
The regular gearshift is used in the normal way in low range. If the vehicle can be accelerated to top gear in low range and you want to go faster, it is necessary to shift both levers. First shift the transfer case to high range, then put the gearshift into the appropriate gear. It may also be necessary to engage the front-wheel drive after shifting the transfer case. The whole shift may take so long that momentum will be lost, and the regular gearshift will probably have to be put into the first gear even though it is a lower ratio than top gear in low range.
2.05 Introduction to the Engine
For those who are not familiar with the basic principles of automotive engines, the following basic introduction may be useful:
Energy to move the car is derived from fuel, usually gasoline, which must be mixed with air to make it burn, and then must be burned in a controlled way so that the energy can be used.
Gasoline is stored in the fuel tank. From there it goes through tubing to a small pump, which forces it into the carburetor. At the same time, air is sucked through the air cleaner where dust and solid particles are removed, and into the carburetor. In the carburetor the fuel and air are mixed to a combustible vapor. This vapor is then sucked through the intake manifold to the engine itself. At the engine, the fuel vapor passes through a valve at the top of each cylinder, where it is sucked into the cylinder when the piston within it moves down, creating a vacuum inside the engine.
Some gasoline engines have no carburetor. Air is drawn into the cylinders by the action of the piston, and fuel is sprayed into the cylinders by injectors similar to those in a diesel engine. This "fuel injection" system is not commonly found on frontier vehicles because of its complexity and intolerance of poor fuel quality.
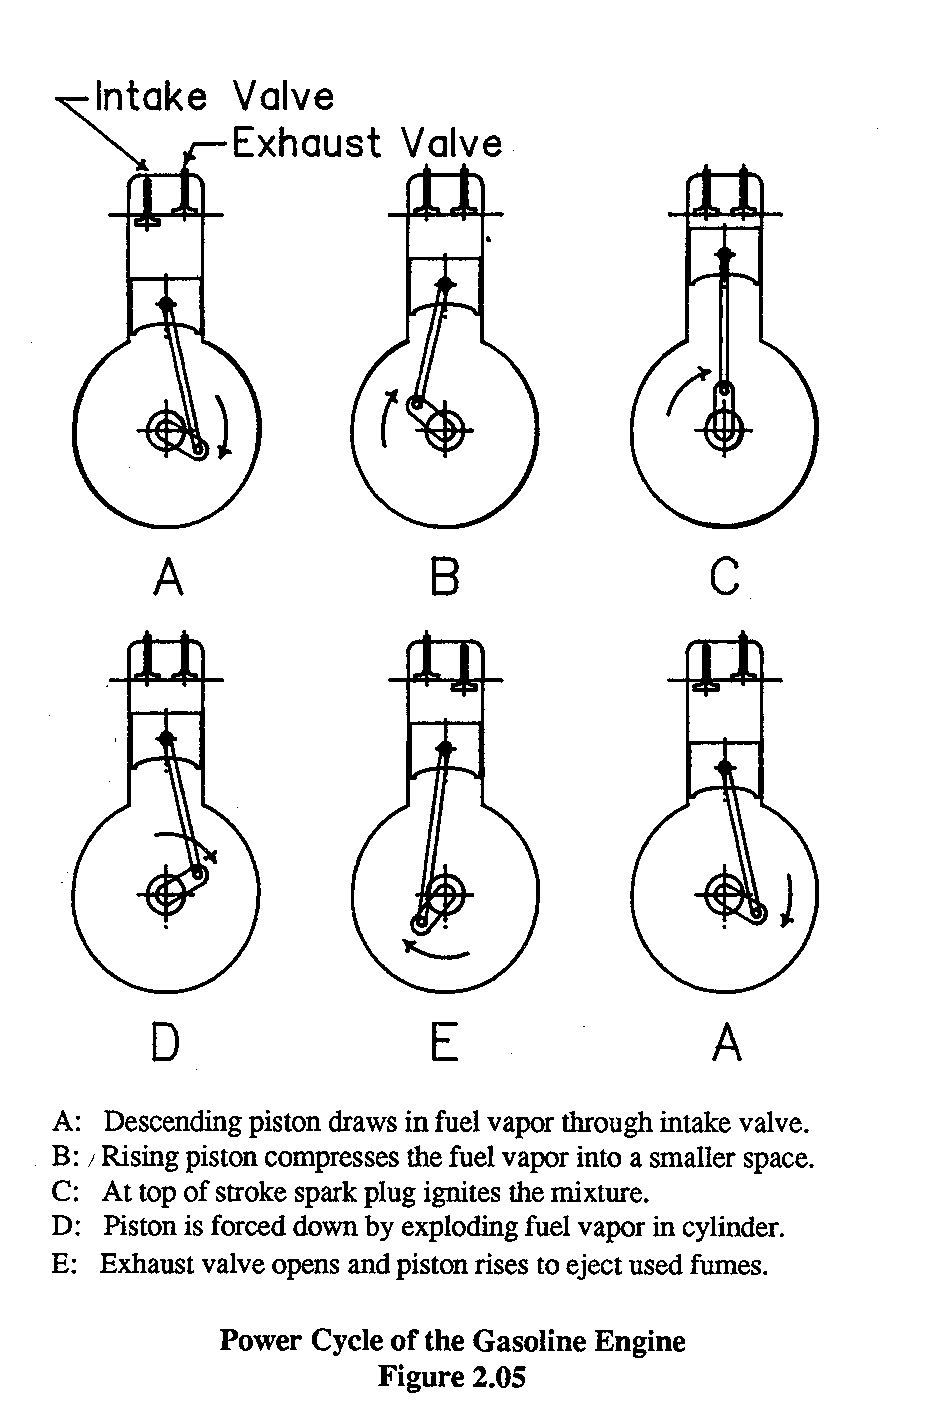
The engine operates on what is termed a four-stroke cycle. The four strokes are intake, compression, ignition (or power), and exhaust. On the intake stroke of a piston, the cylinder is filled with fuel vapor through the intake valve. As the piston reaches the bottom of the cylinder the intake valve closes, and the piston starts up again. The fuel vapor is thus compressed, cramming more energy into a smaller space. As the piston passes the top of its stroke, the space within the cylinder is smallest, and the fuel mixture is ignited by a spark from the spark plug. The fuel explodes violently, but since both valves are closed there is nowhere for the energy to go unless the piston is forced downward. This is the power stroke, and it is the energy of the explosion forcing the piston downward that turns the engine and makes the car go. The fourth stroke, exhaust, serves to force the used gases out the exhaust valve to clear the cylinder for the next cycle.
In order to keep this cycle moving, several extra parts are essential. The generator, which is turned by the engine, provides electric power to keep the battery charged for the operation of electric accessories such as headlights, windshield wipers, and the horn. The battery also provides power to the ignition system of the car; 12-volt power from the battery travels through the breaker points to the spark coil. There it is built up to a very high voltage, which is sent through the distributor to each spark plug at precisely the right time to ignite the fuel mixture at the top of the compression stoke.
The cooling system keeps the heat of the explosions inside the cylinders from damaging the engine. It consists of a radiator, fan, water pump, and a supply of cooling water which runs through little channels inside the engine block. The fan blows air through the radiator to keep it cool, and water flowing through the radiator is therefore also cooled as it circulates around its path through the engine, water pump and radiator.
There are several other accessories that are not strictly essential to the operation of the engine, but are useful or even vital parts of the car. The lights, windshield wipers, dashboard gauges, and speedometer fall into this category. The drive train has been discussed in Section 2.04, together with the principles of its operation.
Also essential, although not closely related to the work of the engine, are such frame parts as the chassis, upon which the car parts are mounted. On the chassis are the springs, which support the weight of the vehicle on the axles; the shock absorbers, which smooth out some of the road bumps; and the brake system, which stops the car. The steering system, also mounted on the chassis, is another separate entity that is essential to the operation of the car.
Each of these parts and systems is discussed in some detail in other section of this book. Refer to the index at the back of the book for a complete list of the various parts, their functions, and how to test and repair them when necessary.
3.00 AVOIDING ROAD HAZARDS
Having devoted some time to checking the vehicle, you can safely start on your journey. The difficult process of pulling a car out of a swamp or broken bridge, or removing it from a projecting rock or stump, can be eliminated by avoiding road hazards of this type. Knowing what to do in advance can save a great deal of time and effort.
The most common road hazards involve loss of traction, being hung up on the chassis, log bridge failures, capsizing, fording, and to a lesser extent, submerging. The following sections will illustrate in some detail how to avoid each type of problem.
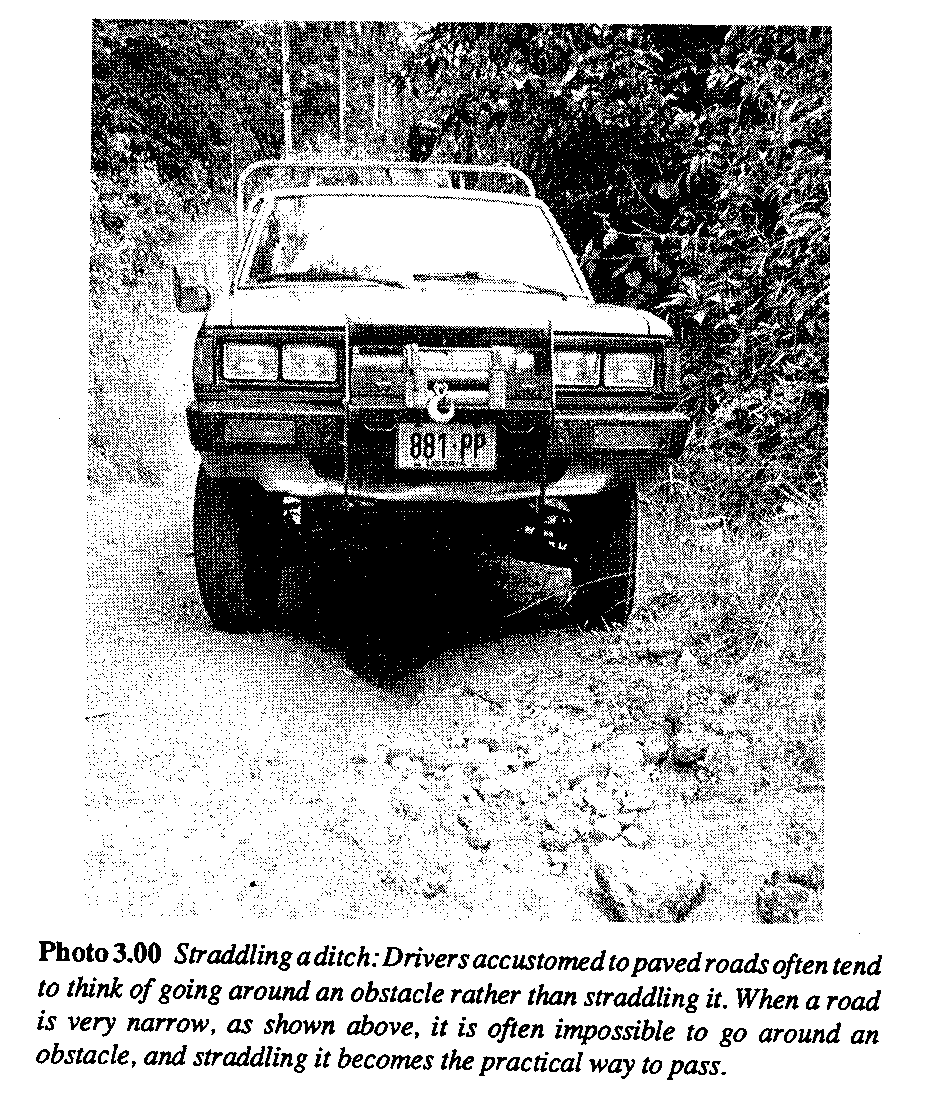
STRADDLING OBSTACLES such as potholes, rocks, and logs is a simple technique, and yet few drivers who are accustomed only to wide paved roads readily adapt to driving over an obstacle. All that is needed is a quick judgment of how large the obstacle is and whether the car will pass over it without falling in or getting hung up. If the car will pass, go over the obstacle rather than trying to pass around it. Going around an obstacle on a narrow pioneer road generally means going off the road, which is not usually a good practice.
RUTS AND GULLEYS can also be straddled in the same way. Often rain will wash a deep gully down the middle of the road or a hill, since that is the lowest part of the track. It is frequently safer to straddle this gulley than to go to one side of it and be forced off the road. Careful evaluation of a long gulley is necessary before starting over it, since it may widen farther along its course, trapping the car.
GRAVEL ROADS pose their own special problems. Although they are usually more passable in poor weather than dirt roads, the loose gravel is a hazard. Speed should be kept to 35 miles (55 kilometers) per hour or less because of the damage that can be done by flying gravel. When passing another car speed should be further reduced. In many areas it is common practice to cover the glass lenses of headlights with cardboard or heavy screening for daylight driving.
TAKING A HELPER is always good practice on a pioneer road. Even in a vehicle equipped with a winch, having another person with the driver makes it much easier to get the car out of trouble. A helper can make sure the car is lined up on a log bridge, can check to see that a suspicious rock will not hit the oil pan or steering gear, and perform similar duties. In many parts of the world it is possible to get such assistance in exchange for a ride.
DRIVING AT NIGHT should be avoided, especially in an unfamiliar area. When it is absolutely necessary, take a good flashlight in addition to any other necessary tools and supplies. If the car's lights seem very dim, check for mud or dust on the lenses. If allowed by law, it is often useful to add extra driving lights; they should be protected from branches and other obstacles.
A WORD ON BRAKES: Stopping the car with all four wheels locked up and not turning, although spectacular, is not the quickest way to stop. You also lose steering ability, since the front wheels can only be steered if they are turning. The best method, although it requires practice, is to use as much pressure on the brake pedal as the wheels can take without locking up. If they do skid, too much pressure is being applied.
When driving on mud or snow where traction is poor, continuous application of the brakes will send the car out of control. Under such conditions you can either steer or brake, and therefore must alternate between the two. Pumping the brakes is a good compromise: when the brakes are applied, the car slows but is unsteerable; when the brakes are released the car can be steered, but is not being slowed.
3.01 Four-Wheel Drive
The most common method of avoiding or overcoming road hazards is through the use of four-wheel drive. As the name indicates, this system provides power to all four wheels of the car, not just to the rear or front wheels as is generally the case with sedan-type automobiles. Any vehicle used for rugged driving is generally equipped with four-wheel drive.
When traction is a problem, such as driving on snow or mud, tire chains are commonly used. Tire chains, on the rear wheels or on all of the wheels, add significantly to tractive power on slippery roads. They are considered in Section 3.03. Improved traction can also be obtained with a limited-slip differential. This device is available on most cars as a factory option. It supplies power to the wheel with the best traction. While it does add to reliability, a limited-slip differential offers some special maintenance problems, and is therefore not a universally accepted device.
At least one vehicle, the German Unimog, provides differential locks that eliminate the slipping ability of the differential. As a result all power is transmitted to the tire with traction, even if only one tire has traction at the moment.
Four-wheel drive should be engaged only when it is needed. The practice of leaving a car in 4WD just because it might be necessary somewhere down the road greatly increases tire wear and may also damage the drive train. This is because all four tires are being moved under power, but the tires are not exactly the same size due to tire wear and differences in tread thickness and inflation pressure. The larger tire will go farther with a single revolution than the smaller one, and one of the two will have to be scuffed along to make up the difference between front and rear axle speeds. This scuffing wears away the tread, and if the road is hard and dry so that the tires cannot scuff, the drive train may be overworked and fail.
Experienced drivers will run in two-wheel drive until they see an obstacle ahead, then will shift to 4WD without stopping. Because the car is still moving at a good speed, the momentum may carry the car through the obstacle, with the help of the doubled traction that results from engaging the front wheel drive. Once past the obstacle, two-wheel drive can be resumed.
Some 4WD vehicles are equipped with constant four-wheel power supplied through a gearbox similar to a differential. This system allows for variations in tire size, eliminating dragging or scuffing and resulting tire damage. It also eliminates the need for a control lever to engage the front wheel drive. This system is more commonly found on luxury touring cars.
3.02 Traveling in Convoy
An excellent way to avoid getting stuck, or to simplify the process of extricating a stuck car, is to travel with two or more vehicles in a convoy. Each car can help the other, either pushing or pulling a stalled vehicle through difficult areas. If a car must travel on a poor road without a winch, having another car along with a winch is almost as good as having its own.
It is usually advisable to send the more experienced driver first when going in convoy in order to show the best way over or around obstacles. His chances of getting through a difficult area are improved by his experience, and if he passes and the following car does not, he can tow it through.
When different sizes of cars are traveling in the same group, the drivers should consider which one to send first. In deep snow, mud, or swamps, for example, the larger car should be sent through first. Its greater road clearance gives a better chance of getting through, and it can then tow the smaller car if it gets stuck. If the smaller car went first and got stuck, it would be necessary to pull it out backward (unless it had a winch) and then send the bigger car through.
On a bridge of questionable strength, send the small car first. A weak bridge may carry the smaller car where it would collapse under the larger one. The driver of the small car can evaluate the larger car's chances as he crosses.
3.03 Tire Chains
A great aid to getting through slippery areas is the use of tire chains. Chains are excellent in mud or snow, but provide a very rough ride on a smooth or hard road. They are a nuisance when they must be put on and taken off frequently to allow for alternating sections of good and poor road.
On very poor roads or where no roads exist, chains on all four wheels and the use of 4WD will provide a tremendous increase in tractive power. Tire chains should never be used on only two wheels if four-wheel drive is used. The difference in effective circumference of the tires with and without chains will cause tremendous strains to the car's drive train, which may damage the vehicle.
The best type of tire chains has V-shaped bars welded across the links that run around the driving surface of the tire. This bar gives both added strength and, more important, added traction.
The most important consideration for long life of tire chains is a good fit on the tire. The chain should be so tight that it cannot slip when the wheel turns. The springs or rubber circles used to pull the chains tight are not meant to hold loose chains in place. If necessary these spreaders can be supplemented with loops of inner tube rubber. To pull the chains tight, many drivers deflate the tire somewhat, fasten the chains as tight as they will go, and then inflate the tire to proper pressure. Another some what easier method is to put the chains on as tight as possible, then drive around a bit until they have "settled in." This should not take more than a few hundred feet (100 meters), then the chains can be pulled up again. It is surprising to see how much slack is left in the chains even though they were tight when applied. Similarly, it is good practice to stop periodically and check that the chains are tight while driving. They should never slap the fenders, exhaust pipe, or any other part of the car.
Driving with tire chains when they are not needed causes severe wear. If used on a hard-surfaced road, for example, the chains will soon be ruined by the friction and beating action.
3.04 Loss of Traction
Perhaps the most commonly faced hazard on pioneer roads is loss of traction. Slipping can be caused by mud, snow, ice, wet leaves, or similar surface conditions, or it can be related to another problem. For example, a car might be hung up on a rock and have the double problem of being anchored to the rock and having insufficient traction to pull off.
Driving on mud is very similar to driving on snow, except that mud offers much higher resistance to the passage of a wheel than snow does. In computing the rolling resistance, a measure of the retarding effect of a road surface to forward movement of a vehicle, the following formula is used:
(gross weight of vehicle, pounds or kgs) x (road factor) - 1,000 = rolling resistance (in lbs or kgs)
In this formula the following figures may be used for the "road factor":
good concrete road, 15 2 in (or 5 cm) of snow, 25 4 in (or 10 cm) of snow, 37 smooth dirt road, 25 sandy dirt road, 37 mud, 35 to 150, depending on type and depth soft sand, 60 to 150
Obviously in a practical situation a driver will not stop near a swamp and get our the calculator to figure what the rolling resistance will be. On a theoretical basis, however, from these figures it is evident that the resistance of mud is as much as six times as great as that of two inches (5 cm) of snow. To overcome the resistance, the driver will need to use lower gears or other tractive aids.
A little experience will indicate that different types of mud have different effects on the car. Some mud may be recognized by a distinctive color or appearance. The driver will learn to be prepared for deep, thick mud, a slippery hill, or some other difficulty solely by the appearance of the mud's surface.
To avoid getting stuck, a good basic rule is never to do anything suddenly while driving on a slippery surface. Brakes, accelerator, or steering, if suddenly applied, will usually result in a spin or slip. As a mental guide, it is often useful to pretend that there is a drinking cup sitting on the front of the car, full to the top with water. The goal is to drive the car without spilling a drop.
If the car does skid in mud or snow, keep off the brake pedal. It will only make the skid worse. Instead, gently press the accelerator and steer in the direction in which the car is sliding. This may not be the desired direction of travel, but as soon as the car is under control it can be slowed and turned.
In an area where loss of traction is a frequent problem, it is useful to carry a piece of burlap, canvas, or expanded metal to lay in front of a spinning tire. Planks are often used in the same way, but are less convenient to carry.
To avoid getting stuck in a swamp or mud hole it may be worth the effort required to cut leafy branches or sticks to throw in before attempting to cross. Branches, rocks, planks, sticks, sand, thick grass, or any other material that will increase traction may take less time to gather than would be required to pull the car out if it got stuck.
Inertia can be a great help in getting through a slippery area. If hills and swamps alternate, as is often the case, a driver can build up speed going downbill and drive into the swamp as fast as possible. The car will rapidly lose speed in the mud, but the inertia may carry it through. In any event, it will get farther than if the car had entered at slow speed. This method is rough on the car, and should never be used if a solid obstacle such as a rock or stump may be hidden in the mud, since it could rip the front end of the car apart. There is no way to get up any speed in an area where the hills are also slick, so under such circumstances this method is of no value.
STOPPING THE CAR can also be a problem where traction is low. Rather than use the brakes, which will generally cause the car to spin or slide, shift the transmission to a lower gear to slow down. If the car must be stopped, pump the brakes up and down.
ON A STEEP HILL with poor traction a car may slip downward with all four wheels locked. This may be forward, sideways, or backward, or the car may spin slowly around as it goes down. The same aids that are useful for moving will also help to stop: tire chains, leaves and branches on the road surface, etc. Another great help in such a situation is the "Block," which increases the area exposed
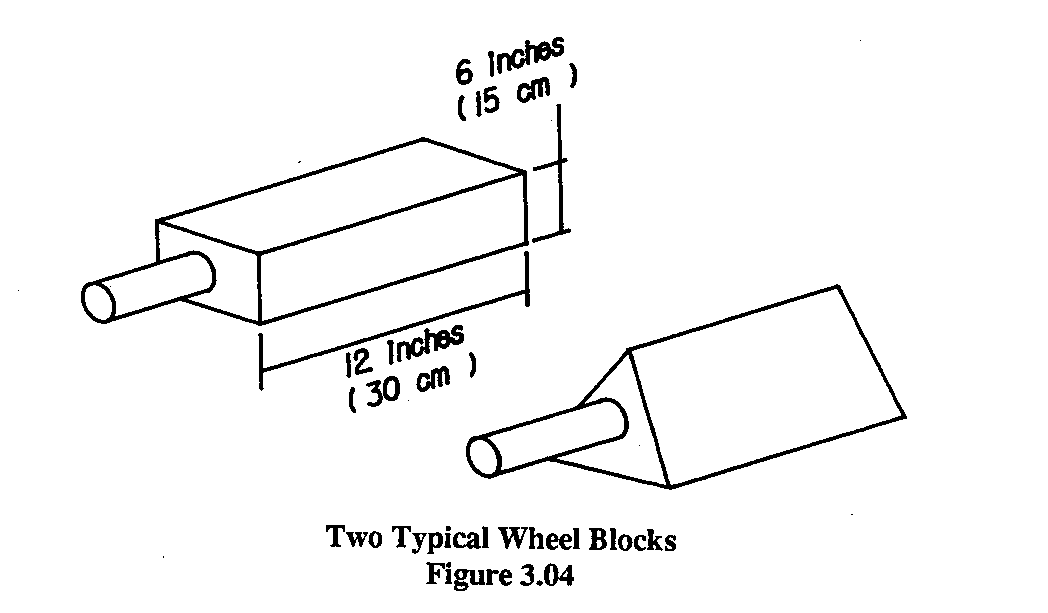
to the slippery surface. The Block is nothing more than a large piece of timber, perhaps with a handle cut into one end, which seems to be a universal piece of equipment for driving on a poor road. It may be called a chock or wedge, or any of a hundred names in other languages, but it is found in any part of the world where pavement has not yet reached--and some where it has.
3.05 Piled-Up Mud or Solid Obstacles
Another obstacle caused by mud is the retarding effect when the chassis of the car sinks deep enough to get hung up on the road surface. This is a special hazard for cars with small tires and, consequently, a low frame.
If there are no rocks or stumps in the mud, the inertia principle described in Section 3.04 can be used to carry the car though the deep mud, or at least well into it.
Asking the passengers to get out before a deep swamp will lighten the load, and may help to avoid getting stuck. There is much to be said for the universal driver's slogan, "Everybody get out and push!" Getting out decreases the load and raises the frame of the car; pushing increases the tractive effort. If the other vehicles using the road are of similar size to your own, it is usually best to stay in the ruts on a very muddy road. The mud in the ruts is likely to be packed somewhat by earlier passages.
To avoid getting hung up, especially in a small car, it may be better to get off the road altogether under some circumstances.
Avoiding getting stuck in deep snow may be somewhat different. Often the snow is piled higher than the hood of the car, so that the problem is not merely one of getting hung up on the chassis. It becomes necessary to push the car into the snow, and the traction may not be adequate. The snow must be removed in such a case. This is usually done with a plow or blower mounted on the front of the vehicle.
In snow less than two feet (1/2 meter) deep, the principles used for driving in mud apply.
Avoiding getting hung up on rocks, stumps, and other solid obstacles is more a matter of judgment than power. Usually such obstacles are large enough to prevent passage, and one cannot simply push through without damaging the car. Keeping the car moving, then, means going around such obstacles if the car cannot pass freely over them. If there is any doubt, always get out and check.
3.06 Log Bridges
Probably the most common type of bridge on a frontier road consists of parallel logs laid across the stream. Generally there are three logs. One is on one side of the bridge, and two are on the other side. Both large and small vehicles will use the single log on one side, the inner of the double logs is arranged to fit the smallest vehicle likely to use the road, and the outer log will accommodate larger vehicles.
Avoiding getting stuck on such a bridge is largely a matter of getting lined up straight before starting across. While experience may allow some drivers to charge across without slowing down, the novice will do better to stop and check first. By sighting along the line of the logs it will be possible to determine whether the tires are properly lined up. Some drivers carry a piece of string for lining up bridges. One end of the string is held at the far end of the bridge and the other end at the back tire of the car; it should line up with the entire length of the log and the front tire of the car as well. (See Figure 3.06),
When you are sure that the car is lined up, shift the car into 4WD, but not low range. Move across the bridge as quickly as possible, so that inertia may carry the front wheels across even if the rear ones slip off or the bridge collapses. In such an event, the front wheels will often be able to pull the car across if they have reached the other side.
Once practiced, the crossing of a bridge of this type becomes quite routine, and the driver will learn to judge from some distance a rotten log or one that may slip sideways. If the capacity of the bridge is in doubt, it is usually advisable to ask passengers to walk across, thus lightening the load on the bridge and perhaps sparing them a dunking.
When crossing a bridge while towing a trailer, bear in mind the added length of the combined vehicles and do not stop before the trailer is fully across the bridge. (See also Section 6.80 on driving with a trailer.)
One of the most common problems with log bridges, other than collapse due to rot or overloading, is the separation of the logs. This allows the tires to slip off of the logs, trapping the car. This can be prevented by proper bridge design, anchoring the logs with stakes or large rocks at the ends. A driver approaching a bridge that looks like its logs may separate can usually save time by fixing the bridge before trying to cross. If the logs do drop the car, the bridge will have to be repaired anyhow.
3.07 Capsizing
A driving trauma to which many drivers may be unaccustomed is tipping over. This may occur due to the road surface or the way in which the vehicle is loaded, or both.
A vehicle body style in which the load is carried high, such as a stake or platform body, is inherently less stable than one where the load is low, such as a pickup body. (See Section 2.02.) Luggage racks on the roof will add to the tendency to roll over.
Capsizing can also result from the angle of the road. On a slick hill with a drop at the edge, for example, try to keep the car away from the ditch. If two wheels on one side slip into the ditch, even though it may not be very deep, the car is likely to roll over. The inertia built up in sliding into the ditch will help to carry the car over onto its side.
Being unaccustomed to pioneer roads, some drivers feel insecure on them. If a car feels as though it is about to tip over, it is often helpful to get out and look at it from in front or behind. Generally it feels worse than it looks, and a quick check will reassure the driver.
Some drivers tie a length of string with a small weight on the end--a stone or washer, for example--to some convenient part of the dashboard where it can hang down freely. As the car starts to tip the driver becomes familiar with how great an angle between the string and the floor represents a danger point.
For the novice, it may even be worth tipping the car intentionally just to see how far it can go before capsizing. The learning experience may save a lot of grief and anxiety later. Fortunately speeds on pioneer roads are low, so that there is no great danger to life from capsizing. The most notable exception would be a mountain road, where a great drop may be involved.
Although this section has emphasized techniques to be used in avoiding capsizing, there is an important point to remember if capsizing is inevitable: Shut off the engine. As the car rolls over, oil will be drained away from the oil pump intake, the engine will get no lubrication, and it will risk freezing up. After capsizing, of course, the first concern is the physical safety of the occupants. After that, reference may be made to Section 7.00 on field expedients for advice on restoring the car.
3.08 Fording and Wading
Because of construction problems, many frontier roads may not have bridges over minor streams. Cars are expected to ford the water, which is not common practice in areas where paved roads are the norm. Getting stuck while fording presents extra problems, and extra care is warranted to avoid stalling.
If unfamiliar with a ford area, stop and get out for a check before driving through. Walk through the water if possible on the same route the car will follow. The bottom should be relatively firm and free of large rocks. There should be acceptable entrance and exit paths. The current must not be strong enough to carry the car off, and the water should not be too deep. The allowable depth will be governed by the size of the car. Knee deep or slightly more is usually the greatest depth that a small car such as a jeep or land rover will cross safely. A larger truck will be able to go proportionately deeper.
If the water will be deep enough to wet the fan blades, loosen the fan belt temporarily while crossing, so that the fan does not turn. This will keep the ignition system from getting sprayed and drowned. Of course, the fan belt must be tightened immediately after crossing the ford.
If the car has a clutch housing plug, as the Land Rover does, be sure it is in place before entering the water. This plug drains moisture from the clutch housing when it is removed, but the clutch would be "lubricated" by the water and the bearings would be corroded if the housing were full of water.
While fording, keep the left foot lightly on the brake pedal. This will keep water from getting between the brake shoes and the drums, which would lubricate the brakes and make them useless. Disc brakes, available on some 4WD cars, greatly reduce the problem of water lubrication.
Drive the car slowly through water, since high speed will result in water being thrown up by the wheels which will drown the ignition system and stall the car. A diesel-powered vehicle such as the Unimog or a diesel Land Rover offers the advantage of having no ignition system. It is consequently much more reliable for fording than a gasoline engine.
If current in the stream threatens to wash the car downstream, attach the winch cable to a tree on the other side before starting across. If there is no winch on the car, put a wire cable across the stream along the down-stream side of the ford area to act as a guide for the car. This cable should be securely anchored to trees or rocks on each side.
After completing the ford, check to see that the brakes are working. If they have become wet and are ineffective, hold the brake pedal down lightly while driving; the heat will dry the brake linings and restore stopping power.
If the fan belt gets wet while crossing it may slip and fail to cool the radiator or turn the generator. For a quick check, look at the ammeter. If it shows a discharge rather than a charge, the belt is probably slipping. Stop and dry the belt with a rag.
Fording with a trailer can be simplified by unhitching the trailer and sending the car across first, then towing the trailer across with a length of wire rope.
If the water is deep enough to cover the exhaust pipe, the pressure in the exhaust system may reduce engine power or stall the engine. Once the engine has stopped the water pressure will make it virtually impossible to restart, and the car will have to be towed out.
If a car is driven into water that is too deep, or where the bottom is unsatisfactory, it may stall or capsize or both. Stalling on land is of little consequence, but in water it may be a serious matter. Extra attention to fording is therefore worthwhile.
3.09 Submerging
Submerging accidents may result from a broken bridge, a ford that is too deep, or from slipping off an adjacent road into deep water. In all of these cases the accident can be avoided by the exercise of sufficient care.
As outlined in Section 2.01, it is well worth the trouble to remove the doors if a submerging accident is even a remote possibility. This simple expedient can be a real life-saver.
If submerging is inevitable, it is important to shut off the engine before it goes under water. This will prevent the pistons from drawing water into the cylinders and trying to compress it as they do the gas-air vapor. Water cannot be compressed, and the engine will be ruined in the attempt.
If there is time, it is advisable to shut off all electrical accessories that may be running: lights, radio, windshield wipers, electric fuel pump, etc.
See instruction in Sections 5.01 and 7.20 regarding recovery and restoration of a submerged vehicle.
Although most drivers would be reluctant to experiment, it is interesting to note that the classic Volkswagen "Beetle"--one of the most widely distributed vehicles on earth--will float in water for a short time if lightly loaded. Opening a door, however, lets the water in and sinks the car, so it is necessary to escape through a window.
4.00 EXTRICATING THE VEHICLE
No matter how carefully they may try to avoid hazards, even the best drivers will find that on some roads there are obstacles that cannot be passed by ordinary means and the car becomes stuck. This section presents a number of suggestions for getting out of difficulties involving mud, rocks, log bridges, and other hazards.
The first step when the vehicle is stuck is to consider what resources are available. The greatest asset is probably a winch. There are few problems that cannot be remedied with this all-purpose tool, since it can move the car without traction. The uses of the winch are so varied that an entire section (Section 6.00) has been devoted to its operation.
Even lacking a winch, however, there are many things that can be done to extricate a car before it is necessary to give up and send for help--if any is available.
A SHOVEL is a very basic tool, and should be a part of the equipment carried in the car if mud, sand, or snow must be crossed.
EXTRA JACKS provide tremendous power, although the travel they can provide is limited to a few inches in most cases.
PLANKS can be used as levers, hole fillers, mats to provide traction, etc. They make good platforms for jacks, which otherwise may slip and drop the car.
A BLOCK AND TACKLE can multiply a person's pulling power several times, and there are many types of ratchet hoists and similar devices that can be used to move a stuck vehicle in much the same way as a winch except that they are hand powered and do not have the speed of a winch.
ANIMALS are often overlooked as a source of rescue power. The kind of animals available will vary widely from one area to another, but any animal that can pull a plow should be capable of pulling a car if necessary. In areas where human labor is inexpensive and plentiful it is often possible to gather a group of people to haul on a towrope for a small fee, or even for no charge at all if motor vehicles are enough of a novelty.
WELD A HOOK onto a wheel for use in an emergency as a replacement for natural traction. Weld the hook in such a way that it would be inside the tire if a tire were fitted to the wheel. When stuck, jack up and remove the slipping wheel and replace it with the prepared wheel. Attach a rope to the hook on the wheel and attach the other end to a solid anchor such as tree or rock, in front of the car. Drive the car forward, letting the hook hold the rope and wind it onto the wheel like a winch. (See Figure 4.00a)

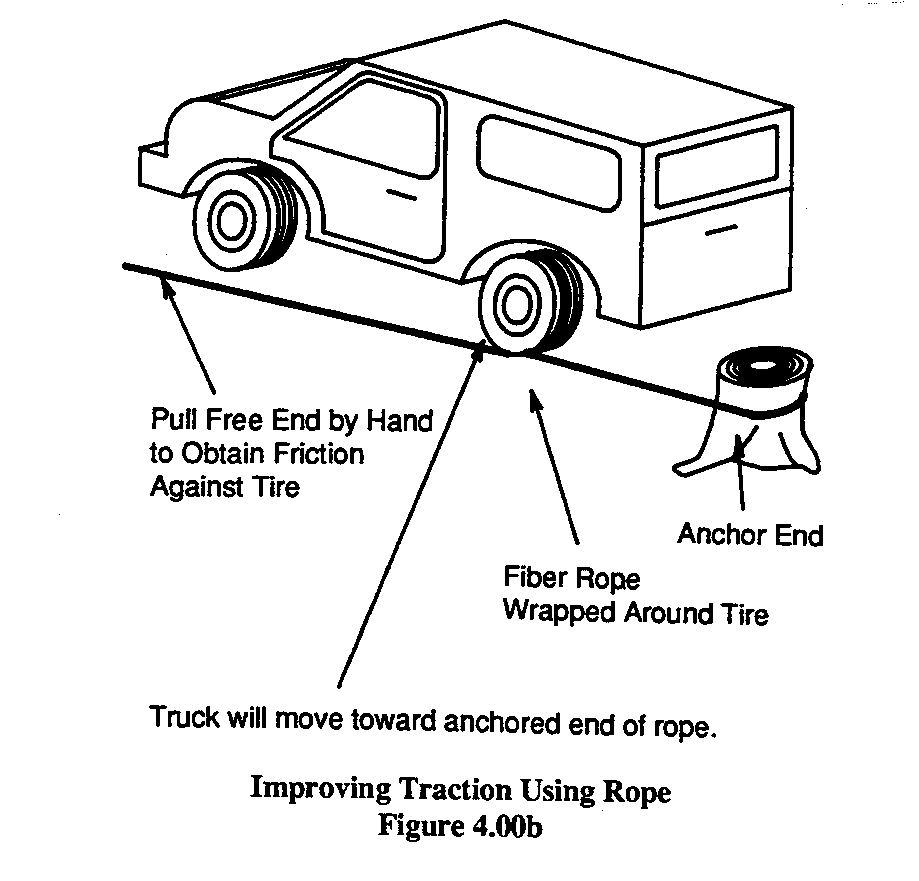
FIBER ROPE can often be wrapped around a tire in much the same manner. The trick is to drive the car along the length of the rope until it is out of the difficult area. With wide tires this is not difficult, and is a very satisfactory way of extricating the car. (See Figure 4.00b.)
A POOR PRACTICE is that of attaching a rope to the propeller shaft to get pulling power. The shaft was not meant to handle a pulling load from the side; it is intended only to transfer a twisting motion from the gearbox to the differential. The use of a propeller shaft in this way may bend the shaft or damage the universal joints.
STURDY VINES can often be used as ropes if not enough manufactured rope is available. Generally the vines should be twisted to separate the fibers at the point where a knot is to be made, or else the vine will break. In many tropical areas there are vines that will serve very well as towing cables, taking a surprising amount of strain without breaking. Residents of the area will probably know which vines are useful for this work.
TWO-WAY RADIO is not a resource in the same way as the other items listed here, but it is a great aid in many cases. With it advice can be sought, and if the car cannot be extricated the radio can be used to send for assistance. Where radio is in common use in this manner, everyone seems to make check calls on the hour, with resulting confusion and jammed frequencies. A much more satisfactory arrangement is to make check calls at some less common time, perhaps 20 minutes after the hour.
4.01 Stuck in Mud or Snow
Cars get stuck in mud or snow in two basic ways: They either lose traction on a slick surface or become bogged down when the frame is hung up. A combination of both is also common. This section considers the loss of traction.
Since 4WD increases traction and eliminates "dead" wheels, the problem of loss of traction is most commonly faced on a hill. In flat areas the 4WD will usually overcome lack of traction, especially if used with tire chains on all four wheels. A hill requires greater traction than flat ground.
If a car slips while trying to climb a hill, it may be useful to remove some of the load from the vehicle and make another attempt. As outlined in Section 3.05, there is a reason why most foreign drivers soon learn to say "Everybody get out and push!" in the local language. This method, though admittedly primitive, lightens the load and increases the traction.
Spinning the wheels in an effort to get out of a muddy or snowy spot will rarely do any good at all. The temptation is to use a heavy foot on the accelerator; it often seems that sheer power should get the car out. This is not the case, however. The spinning will soon overheat the tires, bonding the inner tubes to the tires, melting the inner tubes, or even setting fire to the tires. A little experimentation will reveal that the greatest traction is obtained by creeping the car out of such a spot as slowly as possible so that the wheels stick to the surface rather than spin.
Another technique of little value in an extended swamp, muddy hill, or snowy area is rocking the car back and forth, which may be done with the engine or by pushing it. While it may get the car out of the slippery spot if it is small, a 4WD car is not likely to get stuck in a small slippery spot. In a swamp, for example, it will take a great deal of rocking to get to the other side.
There are a number of useful methods that can be applied when stuck in snow or mud for lack of traction. They are presented here in no particular order, and should be selected in relation to the problem at hand.
A LIMITED SLIP DIFFERENTIAL may be aided in its work by lightly pressing the brake pedal with the left foot while operating the accelerator with the right foot. This will simulate traction for one of the wheels if both wheels on an axle are spinning. Then the special differential will be able to do its job of providing power to the wheel with better traction.
A SPINNING WHEEL on a car without a limited slip differential can often be slowed by lightly pressing the brake pedal, as outlined above.
MOMENTUM may help get a car through a slick spot. If stuck, back up as far as possible, then charge into the obstacle with as much speed as possible. Momentum may get the car through; it should at least move it a few feet more from where it had been. The process can then be repeated.
BRANCHES, brush, sand, boards, grass, rags, or anything else that might increase traction can be put in front of the wheels if the car can back up a bit. This improvement may be combined with the momentum method mentioned above to get the car moving again.
THE JACK can be used to lift the wheels if the car cannot move backward or forward. Raise a wheel and put in rocks, sticks, burlap, grass, branches, a truck tarpaulin, or anything else that may increase traction. Let the wheel down with the jack and repeat the process on the other wheels.
PATIENCE can be a virtue if the sun is shining on a car stuck in mud. Using a shovel, remove mud from around the vehicle, and let the sun dry the area sufficiently to allow the car to move. Often this may take some time, but the time would otherwise be spent in hard physical labor trying to get the car out, and it is much easier to wait for the sun to do the work.
MOVING WATER in a swampy area can also be used to carry mud away. It will be necessary to channel the water, using a shovel, so that it will move the mud from the area where the car is stuck. If the mud rests on a hard base it will probably soak up the water and make more mud, worsening the problem.
THE PARKING BRAKE can often be used to hold a spinning wheel so that the other wheel on that axle can be used to move the car. If the car has parking brakes on each rear wheel rather than a single brake on the transmission, fasten a rope to the wire cable that operates the brake on the spring wheel using a C-clamp or locking pliers. Pass the rope under the chassis, under the front of the car, and into the cab. Pull hard on the rope, possibly using a short lever such as a stick of wood or hammer handle, and this will pull the wire cable, setting the brake on one wheel. While holding the brake on, gently apply power. As the car begins to move, release the parking brake extension rope and drive out of the difficult area. (See Figure 4.01)

If this method cannot be used, almost any means can be tried to stop a wheel from spinning. Some suggestions include wedging the space between the spinning wheel and the body with a big plank, chaining the wheel to the chassis so it cannot turn, or jamming it with rocks under the fender. The other wheel on that axle will then get the power that was wasted on spinning, possibly moving the car. Of course, such wedging or other fastening must be removed as soon as the car is free or the wheel will be dragged and may halt the car.
All of these expedients are made unnecessary on the Mercedes-Benz Unimog, which has locks for both differentials. Both wheels on the axle lock together so that if either one gets traction it will move the Unimog, and the other won't spin.
4.02 Hung Up in Mud or Snow
The second major threat from mud or snow is snow deep enough in it to allow the chassis to become hung up. This creates so much drag on the car that the tires lose traction, and the car cannot proceed.
This difficulty is often more easily dealt with than that of pure loss of traction, since the driver is able to see the obstacle and can either remove it or go around it. Perhaps the most common method of extricating a car from deep snow or mud is to dig it out, thus removing the obstacle.
As outlined in Section 3.05, there are snow conditions in which it is unreasonable to expect a car to operate without a plow. If snow is two feet (1/2 meter) or less in depth, a 4WD car with chains should be able to get through.
If the front end is hung up in the snow or mud, try backing out. It may help to add some traction under the wheels using sand, gravel, sticks, leaves, grass, planks, or whatever else is at hand. Once off the obstacle, cut it down with shovels and try again.
If a snow drift threatens to block forward progress, the driver can try pushing ahead into the deep section, stopping before becoming hung up on the snow, then backing out and trying again. A short distance will be gained each time until the car breaks through the drift. Drivers who hit the drift at full speed generally get hung up before breaking through.
Removing part of the load is another useful expedient. It allows the frame to rise on the springs, since the springs are not so heavily loaded. This increase in ground clearance may make it possible to get the car out. It should at least make it easier to free the car. The axles may rise slightly as a result of reduced load on the tires, but will not rise as much as the chassis.
If the car cannot be backed up, it will be necessary to lift it over the obstacle. With a small car and a large number of people it may be possible to lift the car enough by hand to get off the obstacle. Otherwise jack up the wheels one by one and pack the space under them with logs, sticks, or planks. This will provide a raised roadway, albeit rather crude, on which the car can be driven over the trouble spot.
Once the car is moving again, use every means to keep it going. Momentum is a great aid to getting a car through deep snow or mud, and keeping a car moving slowly is much easier than getting it started from a dead stop. If the hazard is an extensive one, it may be advisable to drive with one side of the car off the road, up on the ridge of snow or mud, if the ridge is packed hard enough. Once moving, Sections 3.04 and 3.05 will provide some assistance on how to keep the car going.
4.03 Hung Up on a Solid Obstacle
Although similar to being hung up in mud or snow, the problem of getting stuck on a rock, stump, or other solid obstacle presents its own difficulties. The prime concern is to avoid damage to the car, since a rock can rip a hole in the crankcase or gas tank or cause damage to the steering or drive train.
It is not usually practical to pull a solid obstacle out from under the car, since the weight of the car is resting on it. If the car has a winch, it may be possible using the technique described in Section 6.52. The only alternative is to lift the car off the obstacle. The most common way of doing this is with a jack, lifting the car and placing logs or planks under the wheels to raise the chassis off the obstacle. It may only be necessary to raise one side of the car, particularly if the obstacle is off center.
4.04 Log Bridges
Getting stuck in a log bridge can mean either the inconvenience of having to extricate the car from between the logs or the major calamity of losing the car into the water. Difficulties involving submerging are discussed in Section 5.01.
If the tires are stuck between the logs of a bridge, spinning will rarely get them out. As explained in Section 4.01, the heat that results from the friction will only damage the tires. Much greater tractive power results if the wheels do not spin.
Often it may be possible for several people to lift a car upward and forward while it is driven off the bridge.
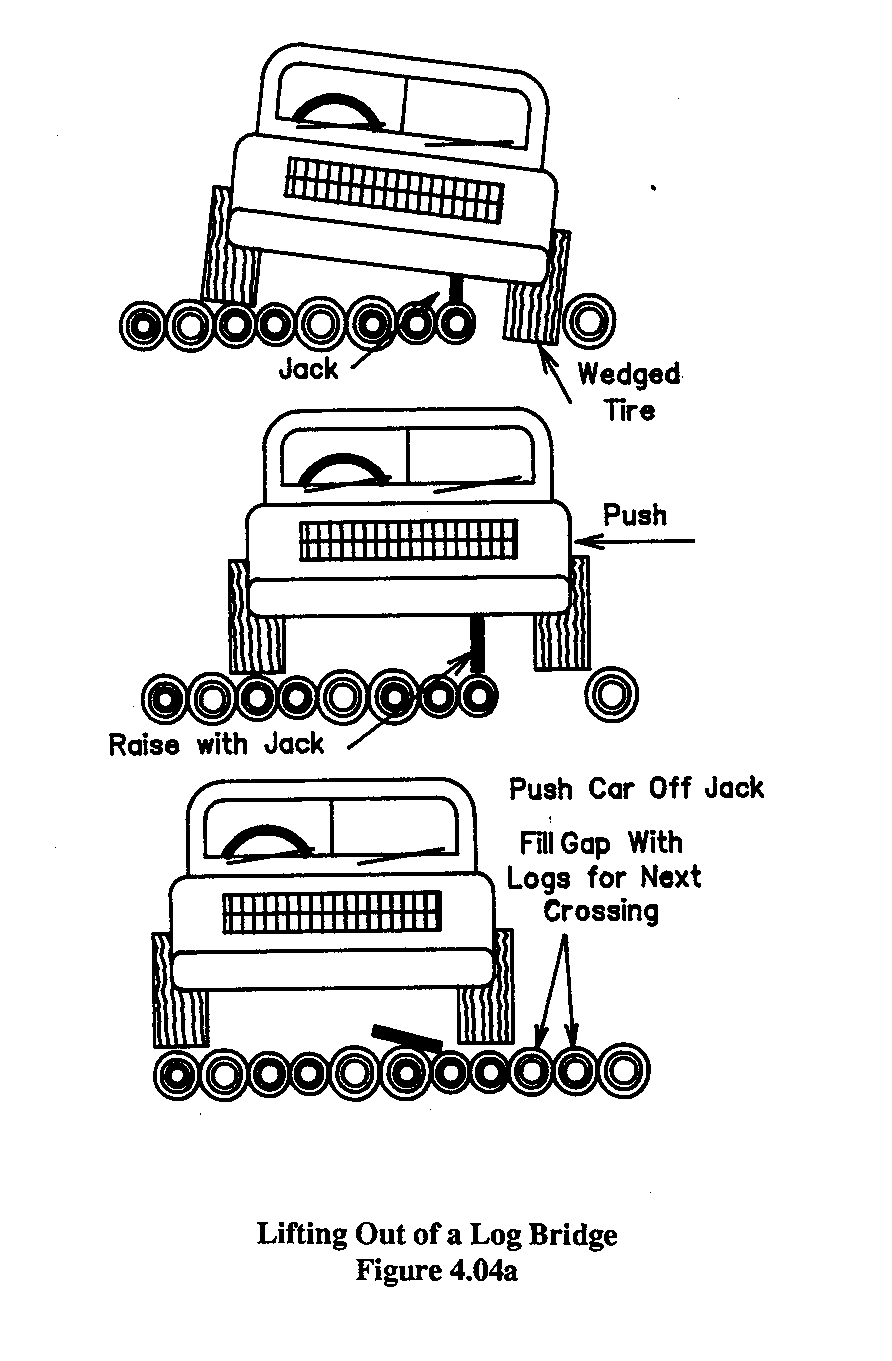
A jack can be used to lift the wheel from the space between the logs, and the car can then be intentionally pushed sideways off the jack, dropping the wheel onto a log. (See Figure 4.04a)
A plank can be used to fill the space between logs. The tire should be jacked up from the hole and the plank inserted under it to provide a temporary roadway. The tire is then lowered onto the plank and the car driven off the bridge.
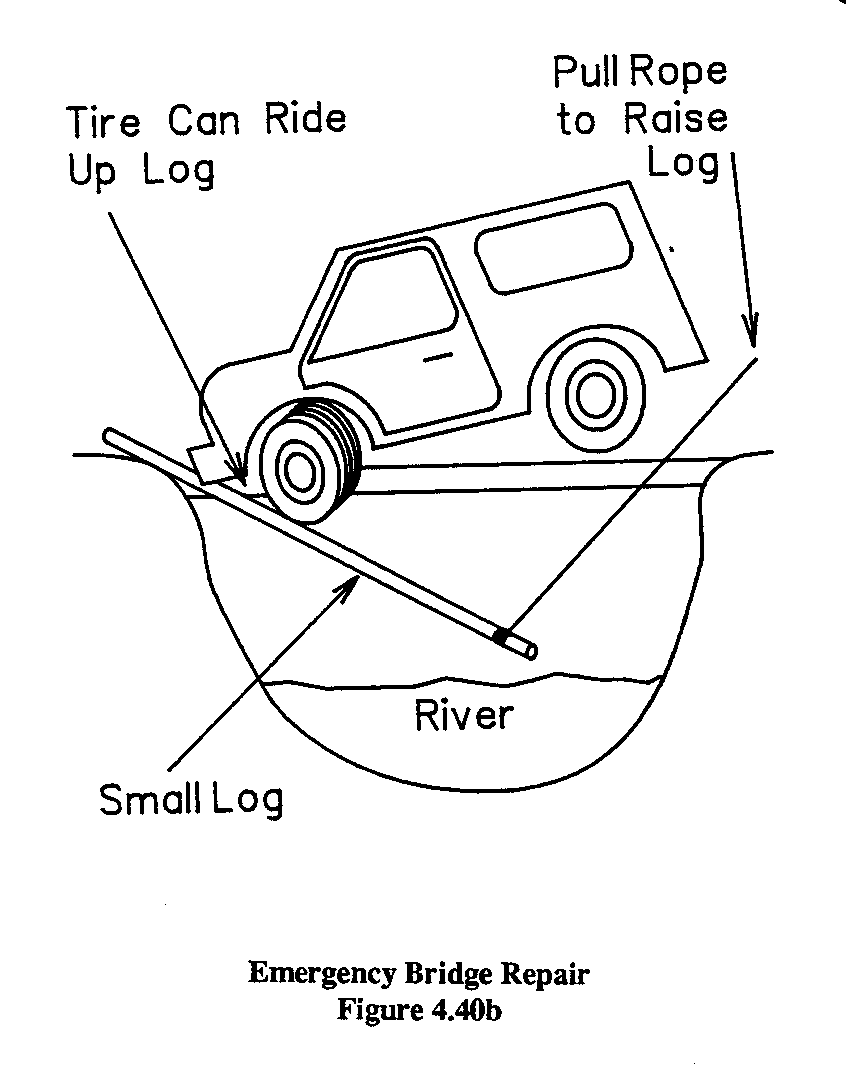
A small tree trunk or branch can be used as a ramp from below the bridge in some cases. Insert one end of the log, perhaps four inches (10 cm) in diameter, in between the separated logs in front of the stuck tire from the underside of the bridge. Push it forward as far as it will go, and then raise the free end from the river until it meets the tire. A rope can be used to haul the lower end of the log upward and secure it temporarily while the car is driven off. (See Figure 4.04b)
4.05 Fording
Being stuck while fording a stream is no different from being stuck elsewhere, with one principal exception: if the car is stuck with the engine or tailpipe under water, do not try to restart the engine once it has stopped. Pull the car out of the water with other power: people, another car, animals, etc.
Otherwise, all the expedients listed elsewhere in this section apply to a car stuck in water.
5.00 PROCEDURES WHEN STRANDED
In the event that none of the advice given in Sections 4.00 through 4.05 or any other attempts will extricate the vehicle, then it may be considered stranded, and additional assistance will be necessary. In this event one must either await the arrival of help or go and look for assistance.
There are many parts of the world where being stranded is a serious matter, due to intemperate weather, wild animals, lack of food or water, or simply the remoteness of the area. This book is not intended as a survival course, but there are several items to review in advance, before you find yourself stranded.
Because of the variety of supplies that may be needed in a vehicle used in a remote area, a complete section (Section 14. 10)has been devoted to this subject.
LEAVING THE CAR is generally not a good idea unless you (or a member of your party) are absolutely sure of where you are and where the nearest source of help is, and how to get there. In hot areas such as deserts the car provides shelter and shade, which are not available elsewhere. The best shelter in a desert will be found by digging a hole under the car.
In very cold climates the vehicle will provide shelter from wind, and the bulk of the car makes it more easily seen by potential rescuers than an individual person walking alone.
In any climate the car will provide shelter from animals. Even if the car has turned over, it is generally safer and more comfortable to sleep in it than on the ground. A check should be made to see that no gas is leaking to cause a fire hazard.
A WATER SUPPLY should be carried in the car in any area where drinking water is not readily found.
In a warm climate, if no water is available, a simple solar still can be constructed. Dig a hole about a foot deep and three feet in diameter and place a cup or other container in the middle of it. Lay a sheet of clear plastic over the hole and weight the edges with a ring of dirt to hold it in place. Into the center of the plastic drop a small stone so that the plastic points downward into the cup. Water will condense from the soil due to the heat of the sun, and will drop from the center of the plastic sheet into the cup. (See Figure 5.00)

In snow-covered areas, snow can be melted to provide drinking water. If there is no wood Or Other local fuel, consider putting a small amount of gasoline on a disposable air cleaner element and burning it. Snow can be contained in a hubcap or a tool box for heating over the fire.
WALK FOR HELP only along the road, if there is one, unless a member of the party is very familiar with the area. In general, even though the distance is greater, it is better to follow the road when searching for assistance. This is especially true if there are any other vehicles in the area that might use the same road or a connecting road.
SIGNALS can be made to attract attention, either by day or night. If people are known to be nearby, it may be possible to attract their attention by sounding the car horn.
In the daytime, a smoky fire will usually be seen from a distance of many miles on a calm day. Gasoline from the car can be used to start the fire. For fuel, either sticks or a tire can be used. Once a good fire has been made with dry sticks, green branches can be added to make smoke. If using a tire pick the worst one on the car, take it off the rim, and arrange a good pile of kindling to get it started. A tire is hard to ignite, and some rags soaked in gas or some other source of heat will be needed to start it burning. Once started, the fire will produce a great deal of thick black smoke.
At night, make a fire on high ground so that it can be seen.
5.01 Vehicle Submerged
If a car has become submerged in water it may be considered stranded, since the engine cannot be used to extricate it. The principal consideration will be getting all the occupants out and marking the location of the car. Then recovery operations can be arranged.
GETTING OUT of a submerged car is no trouble if the doors have been removed. If they have not, the water pressure will prevent them from being opened until the car has nearly filled with water. For this reason it will be necessary to escape through a window or wait until the car has nearly filled before opening a door. In a tightly built car this may take as much as several hours, although generally 10 or 15 minutes is a more average time.
LIFE PRESERVERS may be arranged for those who cannot swim if the car is some distance from land. In many 4WD cars the seat cushions are made of foam rubber, and will float. Empty or partially empty fuel cans are excellent floats, and a spare tire will float even while carrying the weight of the steel rim.
MARKING THE LOCATION may be important if the car is likely to be moved by current or will be hard to find for any other reason. Tie a rope or string to the car and attach the other end to a float for a marker.
ANCHOR THE CAR if it is in fast-moving water where it may be carried off by current. It can be tied with rope or cable to any secure anchor on the land such as a tree.
SALVAGE OPERATIONS become quite routine in some areas where bridges are not reliable, or where roads often follow waterways. In the Netherlands, for example, emergency crews have been formed whose sole job is the recovery of vehicles from canals.
A winch on a recovery vehicle can usually provide enough power to haul out a submerged car. Winching techniques for salvage are described in Section 6.40. If no winch is available, two or more vehicles may be needed to pull out the submerged car. The towing cable should be attached to front towing hooks on the submerged car, or to its front axle. If the car is not upright under the water, it will be much easier to right the vehicle while most of the weight is supported by the water rather than after it is on land. This can be done with cables to the salvage vehicles.
When the car has been brought near land and starts to rise above the surface of the water, it will be necessary to let any water drain out of it to lighten the load on the recovery vehicles. Open any doors or other water-retaining barriers to drain the car as completely as possible as it comes out of the water.
FLOATATION can be used when the submerged car cannot be dragged over a rocky bottom for fear of damaging it. To float the car, it is necessary to put containers of air inside the car, or attach them to the outside. The containers may be old inner tubes, oil drums, gas cans, or even plastic bags filled with air. The air displaces the heavier water, and raises the car to the surface.
An ordinary 55-gallon (200 liter) fuel drum will lift about 300 pounds (1 35 kg) if the water is pumped out of it. To use a drum or any similar container, first fill it with water so that it just barely floats, and arrange it in the submerged vehicle so that the filling hole is at the bottom. An Enginair pump, tire pump, the exhaust from the salvage vehicle (if the submerged car is not too deep), or any other source of air can be used to pump air into the drum. The bubbles will rise inside the drum, gradually moving the water out through the filling hole. When air bubbles have filled the drum they will start to pour out the filling hole, rising to the surface and indicating that the process is completed.
When enough containers have been put in or attached to the car and filled with air in this manner, the car will rise to the surface and can then be pulled to shore with a cable and recovered.
Section 7.10 on field expedients after submerging describes how to rehabilitate the car.
6.00 WINCHES AND TOWING
So many recovery processes use a winch, or towing by another vehicle, that the two have been grouped in this section. Suggestions for towing a trailer are also included.
The basic tool for all of these operations is the tow rope, which may be a natural or synthetic fiber rope or strap, wire cable, chain, or any combination of these.
6.01 Wire Rope
The most common form of tow cable or winch cable is wire rope. The basic advantage of this material over fiber rope such as manila is its great strength. In comparison to chain, wire rope offers lighter weight for the same strength. The following table illustrates the breaking strength of several common sizes of uncoated fiber core plow steel rope. (Galvanized cable is about 90 percent of this strength.)
Nominal Diameter Breaking Strength
1/4 inch (6.25 mm) 5,660 pounds ( 2,570 kg) 5/16 inch (8 mm) 8,780 pounds ( 3,980 kg) 3/8 inch (9.5 mm) 12,300 pounds ( 5,580 kg) 7/16 inch (11 mm) 16,400 pounds ( 7,440 kg) 1/2 inch (12.5 mm) 21,100 pounds ( 9,570 kg) 9/16 inch (14.25 mm) 26,300 pounds (11,930 kg) 5/8 inch (16 mm) 32,400 pounds (14,700 kg) 3/4 inch (19 mm) 46,200 pounds (20,950 kg) 7/8 inch (22.25 mm) 62,800 pounds (28,490 kg) 1 inch (25.5 mm) 81,900 pounds (37,150 kg)
It is evident from examination of this chart that even with relatively small cable the weight that can be supported will be in excess of the weight of the car. There is, therefore, no advantage to using very heavy wire cable in most cases. It is very difficult to work with, since it is hard to bend and join, and it is very heavy.
6.02 Joining Wire Cable
The greatest disadvantage of wire cable is the difficulty of joining one section to another. With fiber rope, this is easily done with a knot, but if a wire rope becomes knotted the strands will be kinked and weakened. Often a knot cannot be removed from wire rope if it has been strained. Also, a knot will jam in a winch mechanism and will keep the cable from lying flat.
The inability to use ordinary knots in wire rope need not be a handicap if the cables are prepared in advance. Every piece of cable should have either a hook or a loop in each end, never just a straight end.
HOOKS can be placed in wire rope for the greatest ease of attachment to another length of cable or to a car or tree. Hooks are available with holes through which the cable can be passed. The cable is then joined as described in succeeding paragraphs.
EYES can be made in the end of wire rope by splicing, but this is a very difficult and time consuming task. A much easier way is to use several U-bolts to secure the eye.
An excellent compromise between the spliced eye, with its tremendous strength, and an eye with U-bolts, which is very quick to make, is a folded eye. It is made by unraveling the end of the wire rope into two strands approximately equal in thickness. As the cable is unraveled it retains its form, leaving a channel where the other half had been. Unravel the cable for about three feet, then fold the ends around in opposite directions to form an eye. Carefully lay the strands back together again to complete the eye, then clamp the remaining pigtail of cable with a U-bolt or rope clip. (See Photo 6.02d.)
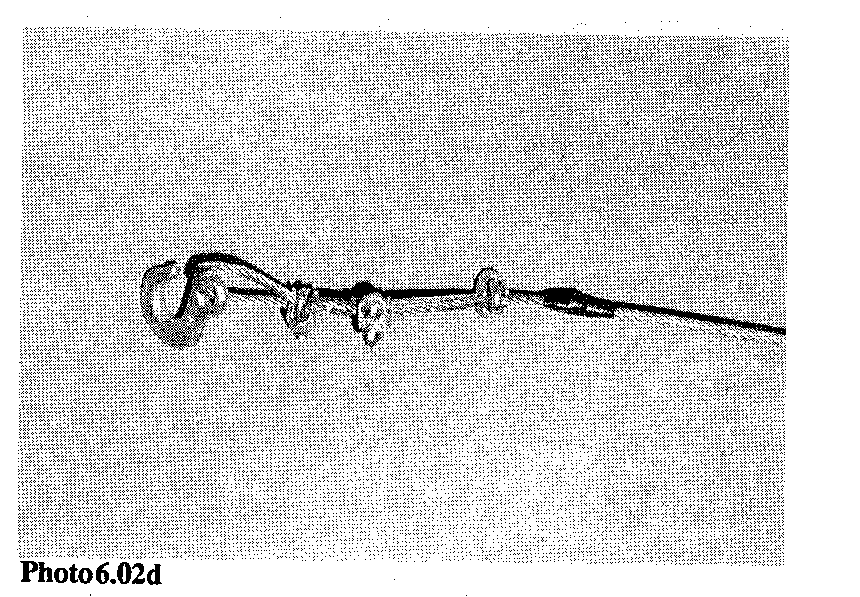
A hook can be placed in this type of eye by threading the two strands through the hole in the hook from the opposite directions before rejoining the two halves.
Short sections of wire cable, perhaps 8 feet (2.5 meters) to 15 feet (4.5 meters) in length, are much more valuable when traveling in convoy than a single great length. They save handling unneeded cable and can be readily stored.
TO JOIN LOOPS in the ends of cables that have no hooks, put one loop through the other, and then secure it with a heavy rod such as a tire iron, jack handle, wrench or some other convenient item. A long as a strain is maintained on the cable this joint will hold well. (See Figure 6.02.)
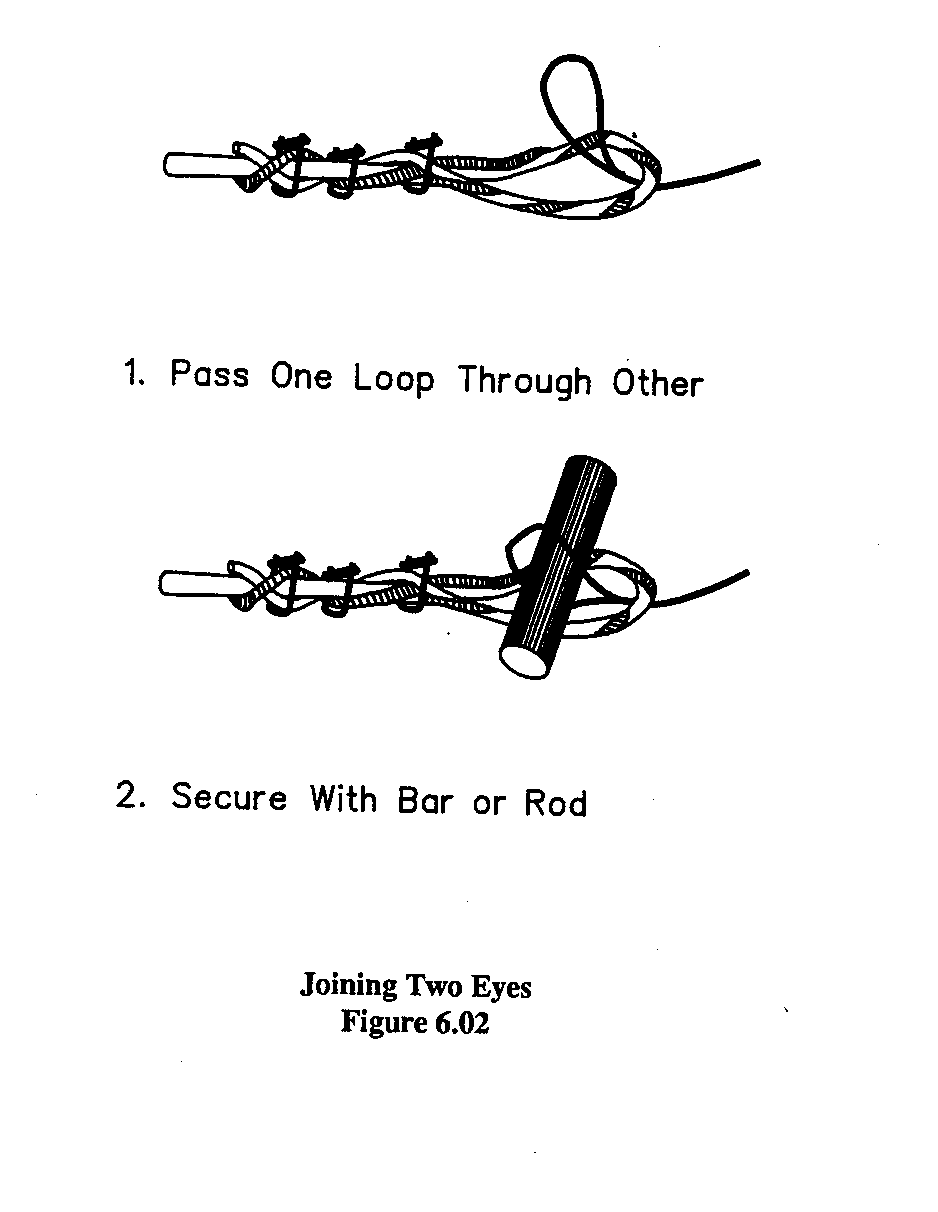
KINKED WIRE CABLE that has been pulled tight will be much weaker than the rest of the cable. Cut out the kinked section and make two shorter cables; there is no practical way of salvaging a kinked section of cable.
This series of photographs <see photos 6.02a & 6.02b> depicts a simple way to make a strong eye in the end
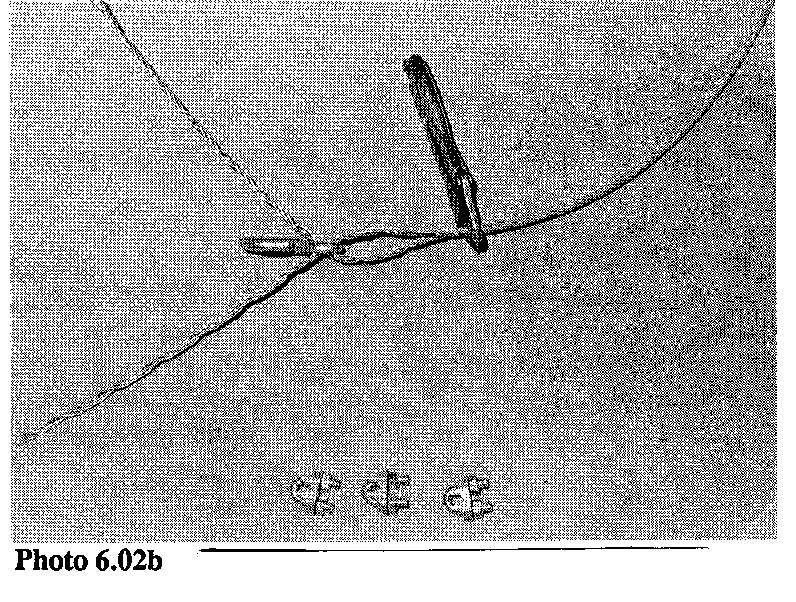
of a wire cable, such as a winch cable or towing line. First, locking pliers are placed on the cable to prevent it from unwinding too far. Then the cable is split into two relatively equal portions and unwound back to the pliers. A shown in Photo 6.02b, the portions of cable are then threaded through the eye of the hook, if one is to be used.
In the top photograph, the two segments of the cable have been mated together to form the eye. The remaining portion, above the pliers in Photo 6.02c, will be
mated to complete the re-forming of the cable. In photo 6.02d, U-clamps have
been installed and the end of the splice wrapped with tape to avoid injury from the spiny wires. Notice that one of the U-clamps is mounted on the eye, and the other two on the standing portion of the wire and the pigtail end. For light loads, one U-bolt may be sufficient.
6.03 Storage of Wire Rope
Since wire rope is not very flexible, storage often becomes a problem. On some
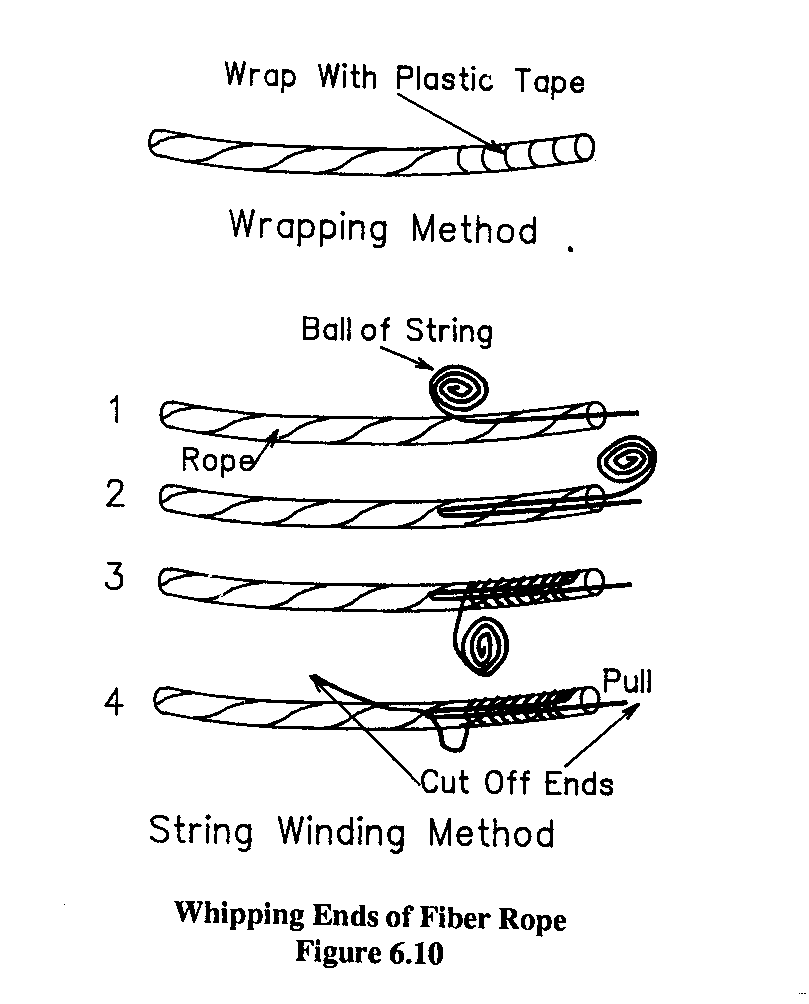
cars, the front bumper can be used for storage. On a Land-Rover or Toyota Land Cruiser, for example, a great length of wire rope can be wound in a figure 8
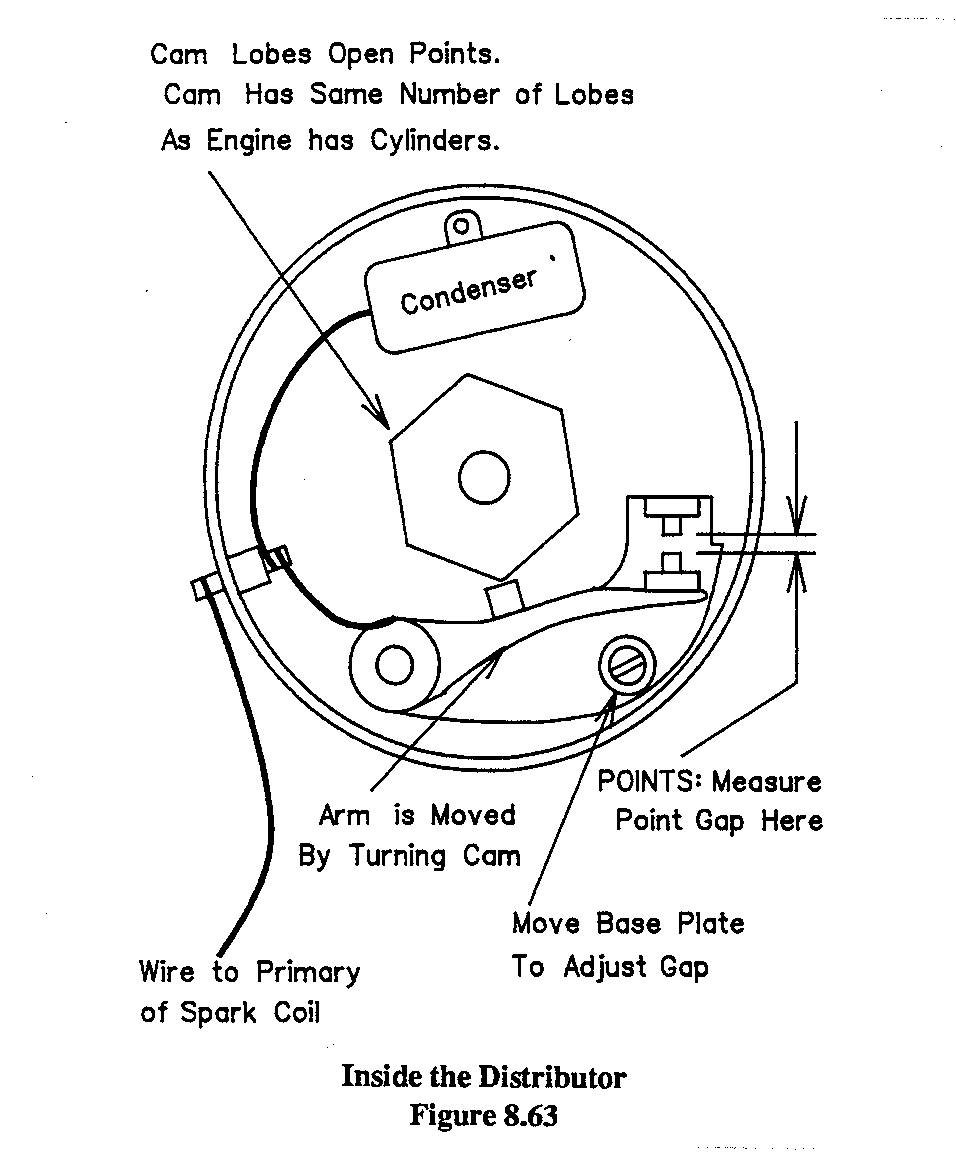
around the ends of the front bumper.
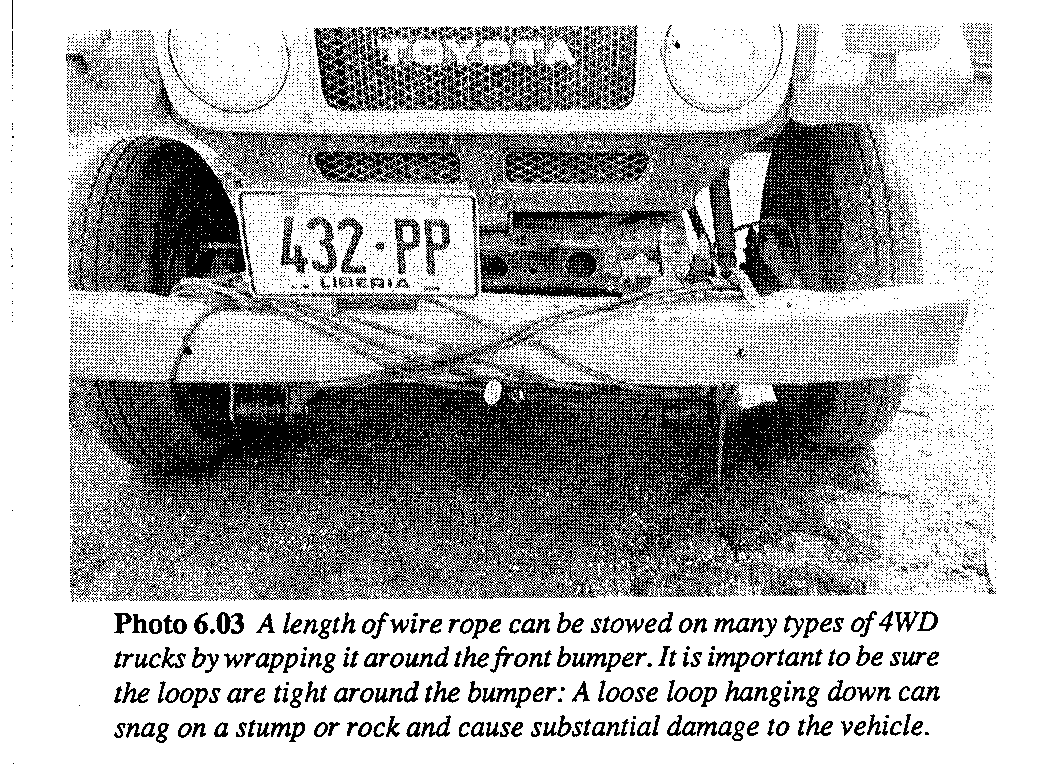
If cable is stored on the front bumper, be sure that it cannot hang down and get snagged on a rock or some other obstacle. The cable is very strong, and could do considerable damage to the car before the vehicle stopped or the obstacle was torn away.
Wire rope can also carried conveniently by wrapping around a wheel trim. On cars where space is provided for more than one spare tire, this may be a useful way to carry cable. On a truck with flat sides, two wheels can be attached so that wire rope can be wrapped around them in a figure 8. (See Figure 6.03)
On a Land-Rover, where the spare tire is carried on the hood, it is often convenient to wind a short cable around the spare tire. If the cable is not often needed in a Land-Rover station wagon, it can be wrapped around the backs of the rear seats, between the seats and the wall.
It is often convenient to carry cable on the cab roof. A light basket can be made from reinforcing rod to carry the cable, or a conventional cartop carrier may serve the purpose.
6.10 Types of Fiber Rope
The two basic types of rope are fiber rope and wire rope. The fiber rope may be subdivided into natural and synthetic fibers. Each offers distinct advantages for certain jobs.
MANILA ROPE is the best of the natural fiber ropes. The individual strands of fiber are long and strong, making a rope that has greater strength and durability than hemp, jute, sisal, or other materials sometimes used for rope. The following chart illustrates the maximum breaking strength of manila rope as supplied by one manufacturer.
Rope Diameter Breaking Strength 1/2 inch (12.5 mm) 2,600 pounds (1,180 kg) 5/8 inch (16 mm) 4,400 pounds 2,000 kg) 3/4 inch (19 mm) 5,400 pounds (2,450 kg) 1 inch (25.5 mm) 9,000 pounds (4,080 kg) 1 1/4 inch (31 mm) 13,500 pounds (6,120 kg)
In actual service, a rope should not be stressed to more than half of the breaking strength. If an emergency dictates that the rope must be stressed to near the breaking strength, it should be retired from strenuous service because of the danger that it may break with the next heavy pull. Similarly, any rope that has been knotted and pulled severely so that the imprint of the knot remains in the rope should be retired.
WHIPPING THE ENDS of a rope is the process of binding fibers so that they do not fray at the ends. If the fibers do start to fray, the rope will soon unravel, or come unwound. This makes it very difficult to tie the end of the rope, and weakens it substantially since the pull is not equal on each strand.An easy way to whip the ends of fiber rope is to wrap them in black plastic electrical tape. A better way is to use a piece of light string as described in the following steps: (See Figure 6.10.)
1. Leave a few inches (cm) of string hanging over the end of the rope and lay the string along the rope from the end back about two inches (5 cm). Hold it with the thumb of the left hand while supporting the rope in the palm of the hand.
2. Pull the main part of the string back beside the first strand, leaving a loop that is held by the thumb of the left hand.
3. Starting about an inch (2.5 cm) from the end of the rope, begin winding the string around the rope, spiraling toward the left thumb.
4. When the wrapping has nearly reached the loop, cut the string and pass the end of the spiral through the loop.
5. Pull on the free end of the string that was left hanging in step 1. This will draw the other end under the wrapping. When the end is about halfway into the wrapping, cut off both ends of the string and trim the rope to complete the job.
Braided rope, such as clothesline, can be prevented from fraying by dipping the ends in varnish or lacquer.
SPLICING an eye into the end of the rope is not difficult, and makes a permanent loop at the end for attaching the rope to a car, tree, or whatever is needed. While splicing is not a hard job, it requires practice and is beyond the scope of this book. One of the best ways to learn splicing is from a sailor or fisherman.
STORAGE of natural fiber ropes should be in a place where there is ventilation to prevent rot from moisture. Natural fiber rope should be dried before storing if it is damp or wet.
6.11 Synthetic Fiber Ropes
As a replacement for natural fiber ropes, synthetic fiber ropes have become very popular, and can be used for the same purposes. They are strong and light and resist rot. They can be used with a capstan winch, for towing, and other similar purposes.
NYLON ROPE was one of the first successful synthetic fiber ropes. Nylon makes a very strong rope with some stretch, which can take up the shock of towing a disabled vehicle. The cost of nylon rope is higher than manila, but it lasts longer and is less subject to abuse. In addition, it will float, and doesn't rot.
POLYPROPYLENE ROPE has recently become available in large sizes. It is stronger than nylon or manila, and so light that it will float, but it does not have as much stretch as nylon. The initial cost is about the same as manila. It is an excellent all-purpose rope for towing, anchoring, winching, and other heavy use. It is also available in small diameters for securing a load in a truck and similar purposes. Even the very small diameters will hold 500 to 1,000 pounds (225 to 450 kg).
WHIPPING THE ENDS of a synthetic rope is easily done with heat. Simply put the end of the rope in a flame, or press it against a hot ember from a wood or coal fire. The heat will fuse the fibers together.
SPLICING AN EYE in synthetic rope is just as useful as with natural fibers. The only difference is that a longer splice is needed because the fibers are more slippery than manila. Small diameters of synthetic rope are usually braided and cannot be spliced by ordinary methods; an eye must be tied in the end.
6.12 Knots for Fiber Ropes
One of the great advantages of fiber rope over wire rope is that it can be easily tied in knots. Probably the most useful knot for towing and winching is the bowline. This is for several reasons: it cannot jam, and no matter how hard it is stressed it can be easily opened; it will not slip up to make a smaller eye under strain; it can be used to join a rope to another rope or to an object such as a car or tree.
As with any knot, the only way to become familiar with it is through practice. Take a small piece of rope and tie this knot over and over again until it becomes second nature, and it loses its mystery. To tie a bowline, follow the accompanying diagrams and remember the little story that has helped novices learn this most useful knot for centuries: "Once upon a time there was a snake who lived in a hole near a tree. One day the snake awoke in his hole and decided to see what was going on outside. He stuck his head out of the hole, went around the tree, and, seeing nothing that interested him, went back down in his hole." The standing end of the rope is the tree; the free end is the snake. (See Figure 6.12)
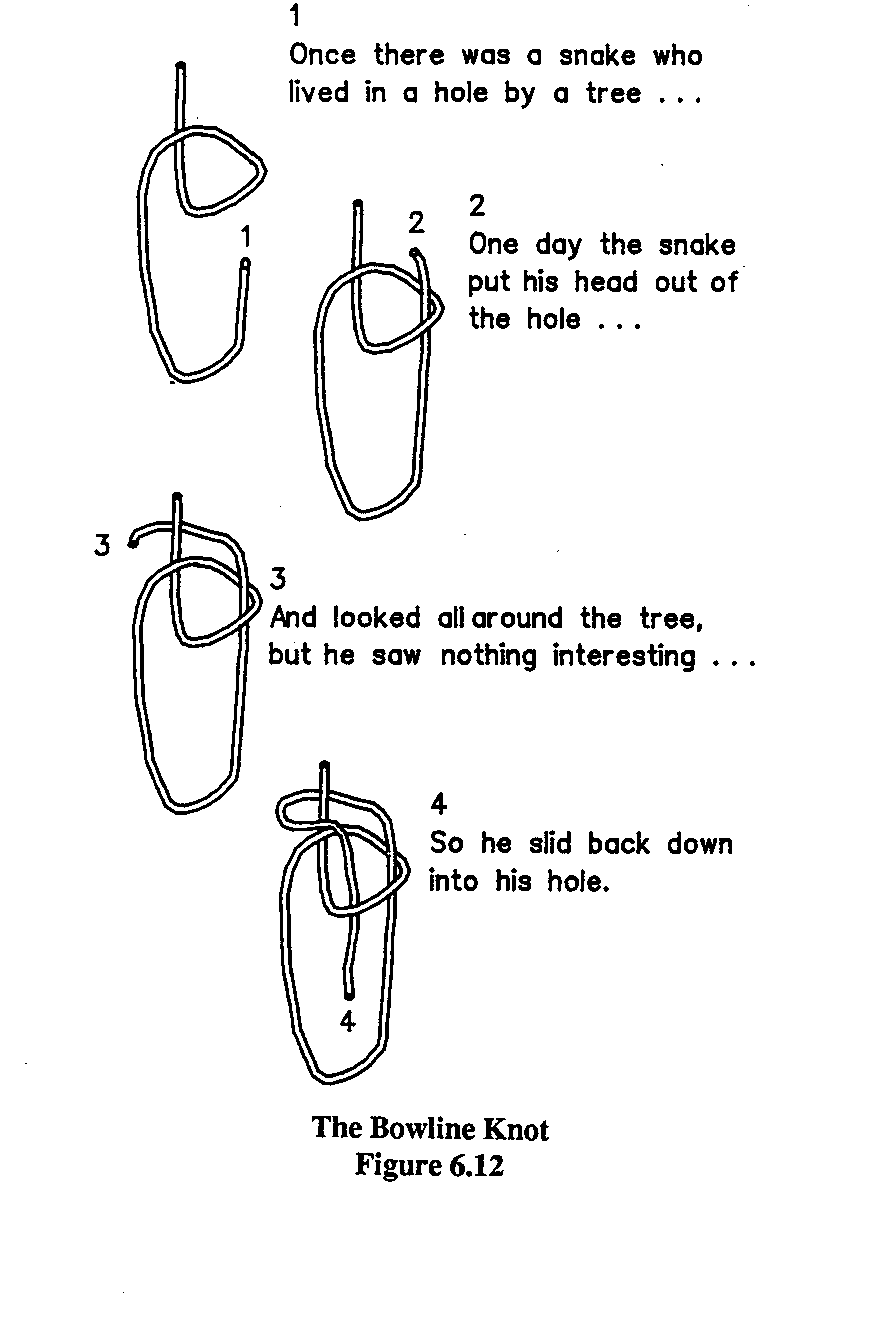
SQUARE KNOTS should never be used to join two ropes for towing, since pulling will jam them so tightly that they cannot be untied without damaging the rope.
TO JOIN TWO ROPES for towing, tie a bowline in the end of one rope, then tie an interlocking bowline in the other. In similar fashion, a bowline can be used to join fiber rope to wire rope, chain, or some other object.
If a fiber rope is tied to a sharp-edged object, such as a spring shackle or car bumper, it should be protected with a layer of rags, a piece of old tire, a piece of hose or some other padding. If a rope is to be used for this type of service as a regular thing, such as the end of a winch cable, it is preferable to attach a short length of chain to the end of the rope, and a hook on the end of the chain. The chain will make it possible to connect to any sharp-edged object without cutting.
TOWING with a fiber rope is more satisfactory than with wire rope or chain because it can stretch. This same advantage, however, means that the load must be applied gradually if the rope is not to be broken. This is not a serious problem with a winch, where drum speed is very low, but it should be remembered when towing a derelict or extricating a stuck vehicle.
6.13 Nylon Towing Straps
Commercially prepared nylon towing straps are available, consisting of a strong flat strap with forged steel hooks on each end. Generally about 20 feet (6 meters) in length, these straps are very compact when folded up and several can be carried in a small cloth bag. They are most useful for connecting a towing vehicle to a stuck vehicle, rather than with a winch. These straps are relatively inexpensive and are a worthwhile investment.
In contrast to a wire cable, the nylon towing strap has the ability to stretch. This gives the nylon strap two great advantages: First, the potential for damage to both the stuck and towing vehicles caused by the sudden exertion of a great deal of force is virtually eliminated. Second, there is tremendous potential energy in the stretched towing strap. The stuck vehicle thus has, in effect, two forces working to remove it: the tractive effort of the towing truck, and the potential energy stored in the stretched cable. This can double the pulling force on the stuck vehicle, in comparison to the use of wire cable, which can only transfer the tractive effort of the towing vehicle to the stuck vehicle.
Although the same effect is achieved if a nylon towing strap is used in conjunction with a winch, the stretching value is not as great. The best use of the towing strap is a direct connection between the chassis of the towing vehicle and the chassis of the stuck vehicle. The towing vehicle should pull on the towing strap until it is barely tight, then the towing car should make a maximum effort to jerk the stuck vehicle free. The combined tractive force and extension of the strap can be very effective. Several straps can be used for a longer reach by connecting them to each other. The stretching effect is cumulative and is therefore greatly increased by using two or three tow straps in series.
6.20 Chain
Chain offers greater ease of handling than wire rope, and greater strength than fiber rope. It is easy to handle and does not get kinked or jammed easily. It can be wrapped around an axle or bumper without damage, since the metal links will not be cut by sharp edges.
The principal disadvantages of chain are its heavy weight and the difficulty of joining one piece to another. It is also subject to rust.
6.21 Joining Chain
Since it is difficult or impossible to tie knots in chain, other methods must be used to join pieces together. The most convenient is to have a hook at each end of the chain.
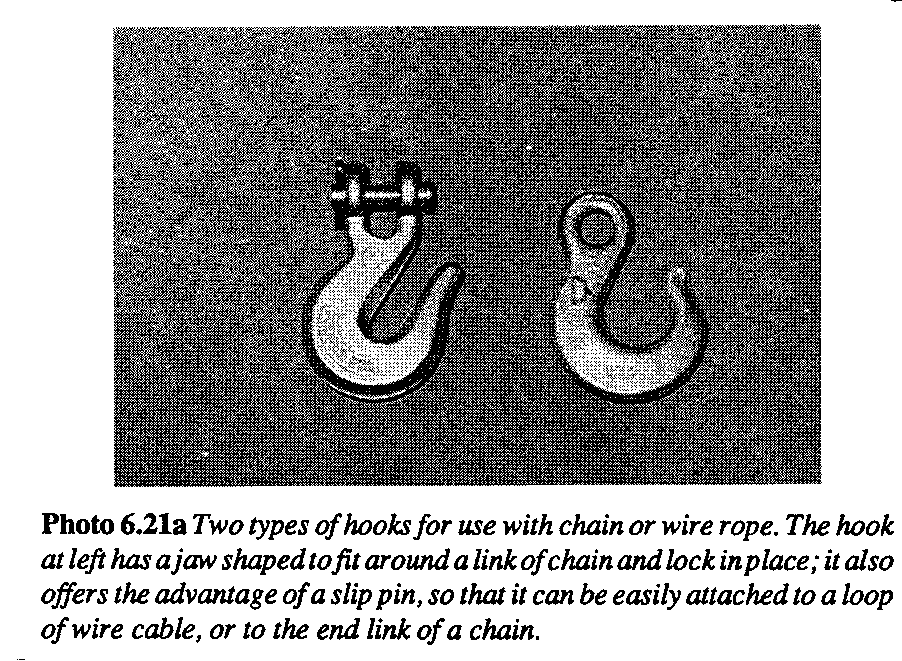
Hooks can be either the wide-mouth type, which will slip over links, or the narrow-mouth type--sometimes called snatch hooks--which are only wide enough to hold one link and will not slip over the next link. The snatch hook is often easier to get unfastened after towing or winching, since the hook does not slip under the car to the axle or other point of attachment.
Chain can be joined to a piece of wire rope to provide a tow cable of greater value then either element used alone. The ends should be made of short pieces of chain, perhaps three feet long, with a hook at the end. The main body of the tow cable should be made of wire rope. It is not possible to use chain on a capstan winch, since friction with the turning capstan would be insufficient to pull the chain. While it would theoretically be possible to use chain on a drum winch, the bulk would be much too great. The combination of chain and wire rope overcomes these disadvantages.
6.22 Storage of Chain
Chain, since it is very flexible, is easier to store than wire rope. Since it cannot rot, it avoids one of the big problems of natural fiber rope.
Chain can be carried in a cloth bag under the seat of a car, or in a tool box of the type that many 4WD cars have under the front seat.
If a spare tire is carried on the hood such as is often done with the Land-Rover chain can be carried in the depression at the center of the wheel. This should not be done in areas where the car is likely to capsize, since the chain will be needed after capsizing and may be under the car.
6.23 Repairs
The most satisfactory way to repair chain is by welding. A link is cut and spread enough to admit the other end of the broken portion, then closed and welded.
Split links are also available at very little cost for chain repairs. These are similar in appearance to regular links, except that they have been split lengthwise so that they can be opened. (See Figure 6.23a)
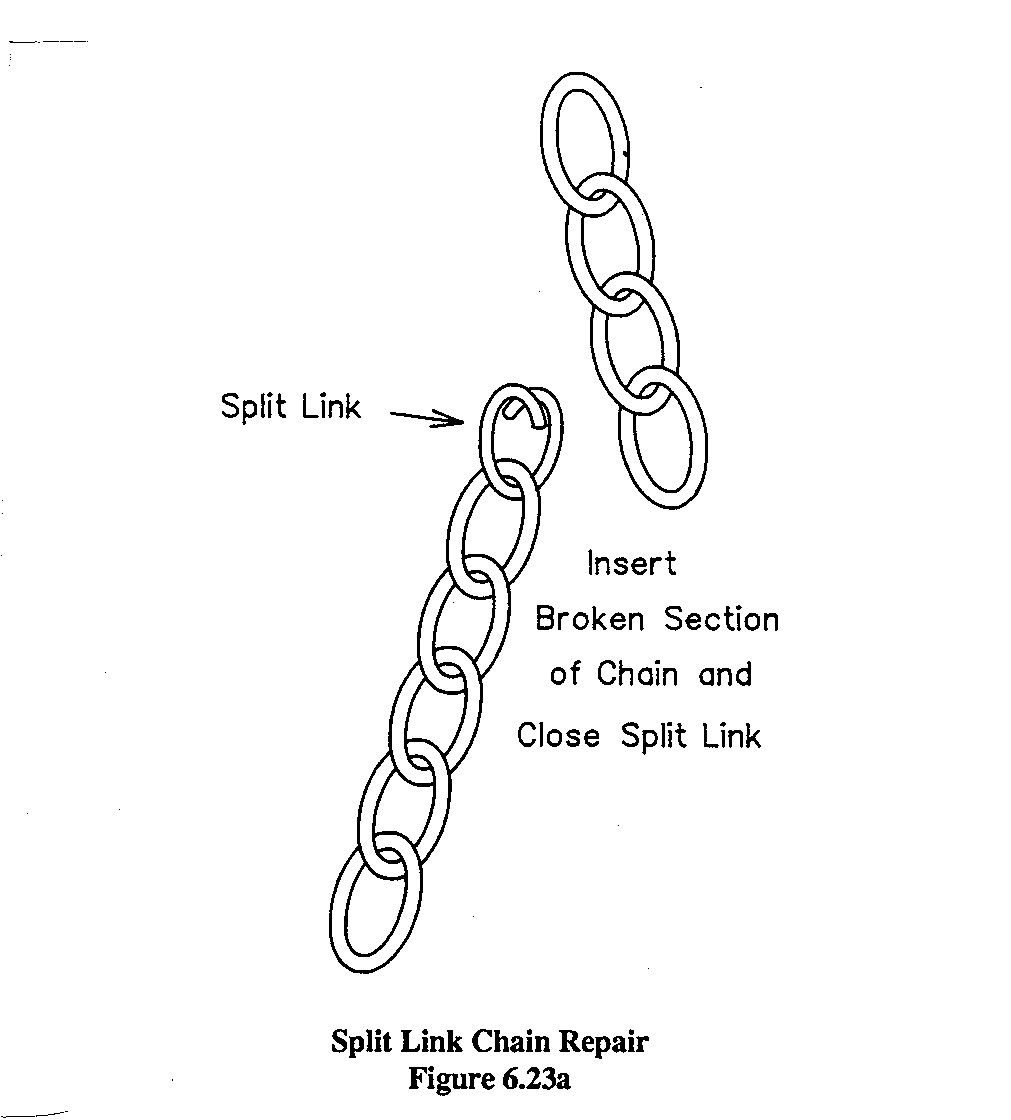
A bolt can be used to connect the ends of a broken chain, but the end product will not be as strong as a section of unbroken chain. (See Figure 6.23b)
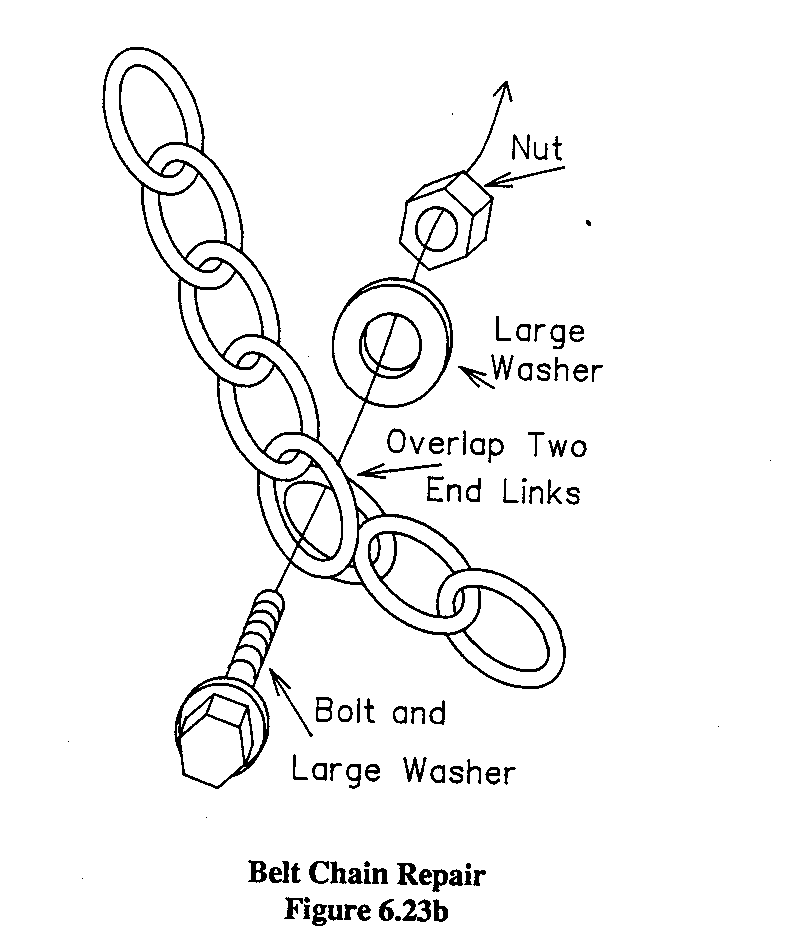
Probably the most common way of repairing chain is with a piece of wire passed through the ends of the two parts as many times as is practical. While this may serve as a field expedient, it should not be regarded as a permanent repair.
6.30 The Winch
The winch is probably the most useful single accessory item on a car used in difficult terrain. Where a car must normally depend on the traction of its wheels, the winch makes it possible to move the car without any traction whatever from the wheels.
Virtually any 4WD vehicle can be fitted with a winch on the front end. Many can also be provided with a winch at the rear for special purposes.
While a winch does represent a major investment, it should be remembered that it can be transferred to another car at some later date when the present vehicle is no longer useful.
6.31 Selecting a Winch
Many manufacturers offer only one model of which for a given vehicle. This removes the necessity for making a choice. In cases where several types are offered, the following points should be considered:
A WORM GEAR in the drive train of the winch will keep it from slipping backward when power is removed. The worm gear is usually used to drive the end of the drum on which the cable is wound. It consists of a threaded shaft similar to a very large bolt, which is turned by the power source. The threads engage teeth in a circular gear around the end of the cable drum. When the threaded shaft turns, the gear teeth are slowly "screwed" around to turn the drum.
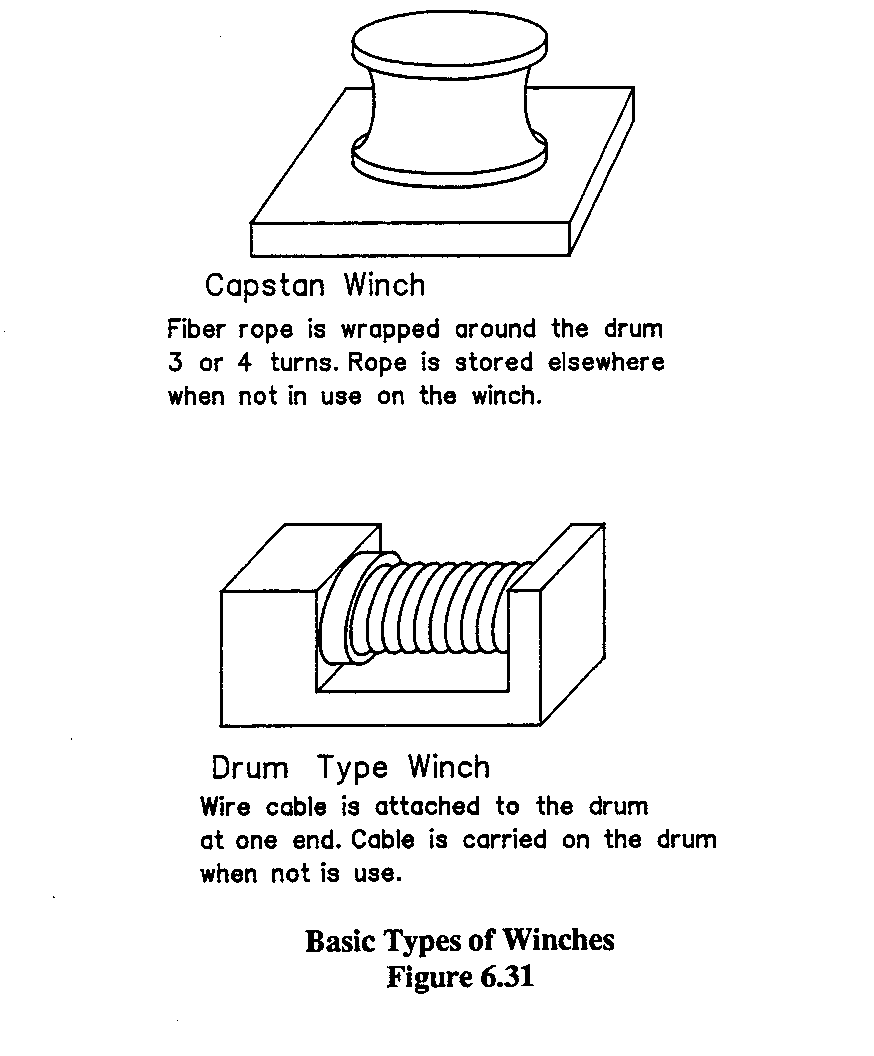
TWO BASIC TYPES of winch are in common use, the drum and capstan. The drum winch has a rotating drum to which one end of the cable is attached. As the drum turns it winds up the cable like a spool of thread. The capstan winch also has a rotating drum, but the rope is not attached. A few turns of fiber rope are made around the slowly turning drum, or capstan, and the free end held by the operator. Pulling on the free end increases the friction on the drum, and the rope begins to move toward the operator. When in use, the other end of the rope is attached to a tree or other fixed object. As the operator pulls the free end, the rope is wound along by the drum and pulls the car ahead.
The drum winch is the more popular arrangement, since it needs no attendant to hold the free end as a capstan winch does, and the cable is stored on the drum, eliminating the problem of where to keep it. A drum winch generally uses wire rope, which is stronger and smaller then the fiber rope used on capstan winches.
6.32 Installing a Winch
While it is possible to install a winch on a car in the field, it generally requires drilling the chassis and welding. For this reason it is better to get the winch installed at the factory on a new vehicle. An exception is the electric winch, which has no mechanical link to the engine and can be bolted or welded to the frame of the car with little difficulty.
The most common location for a winch is in the front bumper of a vehicle; it is also common to mount a winch under the rear of the pickup truck type body. The selection of mounting location should be based in part on the type of service and terrain. Front mounting is useful for vehicles on difficult terrain that will have to "rescue" themselves from problem areas where four-wheel drive cannot move the car. Rear mounting a winch is best for vehicles that will be responsible for the recovery of others, or will be used on relatively good roads.
Rear mounting provides better weight balance, putting the mass of the winch over the rear wheels. It can also be a great advantage when trailers are used to increase a truck's carrying capacity. The winch can be used to pull the trailer across a risky bridge after the truck has passed. Front mounting adds the weight of the winch to that of the engine which already weighs heavily on the front tires.
6.33 Winch Drive Systems
There are several different systems by which the power of the vehicle's engine is supplied to the rotating drum of the winch. In many cases a single manufacturer will offer several different drive options.
SHAFT DRIVE consists of a drive shaft from the front of the engine, usually off the same connection that drives the V-belt to the fan and generator. This shaft runs under the radiator to the front of the car where the winch is mounted, and the power continues through a small gearbox and shifting mechanism in the winch housing, and then to the drum. This type of winch is generally controlled from the front of the car.
In many cases the drive shaft comes from the front of the car's gearbox, with a control handle in the cab rather than on the winch itself. In this case the shaft extends under or beside the engine to the winch location. This arrangement has the advantage of being controlled from the driver's seat.
The winch need not necessarily be mounted on the front of the car, and when it is located at the rear the power generally comes from the gearbox. A shaft extends under the rear of the car to the winch. Any winch drive system that takes its power from the vehicle's transmission, and this would include most large trucks, has the advantage of being controlled by the driver from inside the cab. This arrangement is safer in the event of a broken cable, and allows the driver to regulate engine speed to control the pull on the cable.
HYDRAULIC WINCHES use a small hydraulic pump that is usually driven by a power takeoff on the vehicle transmission. This pump is connected with hoses to a hydraulic motor in a winch. This arrangement offers immense power. The Land Rover manual, for example, notes that the hydraulic winch fitted to that vehicle will move a fully loaded truck across a dry surface with its wheels locked. The hydraulic winch offers a built-in safety release to prevent overloading the system or the cable, and is controlled from inside the cab.
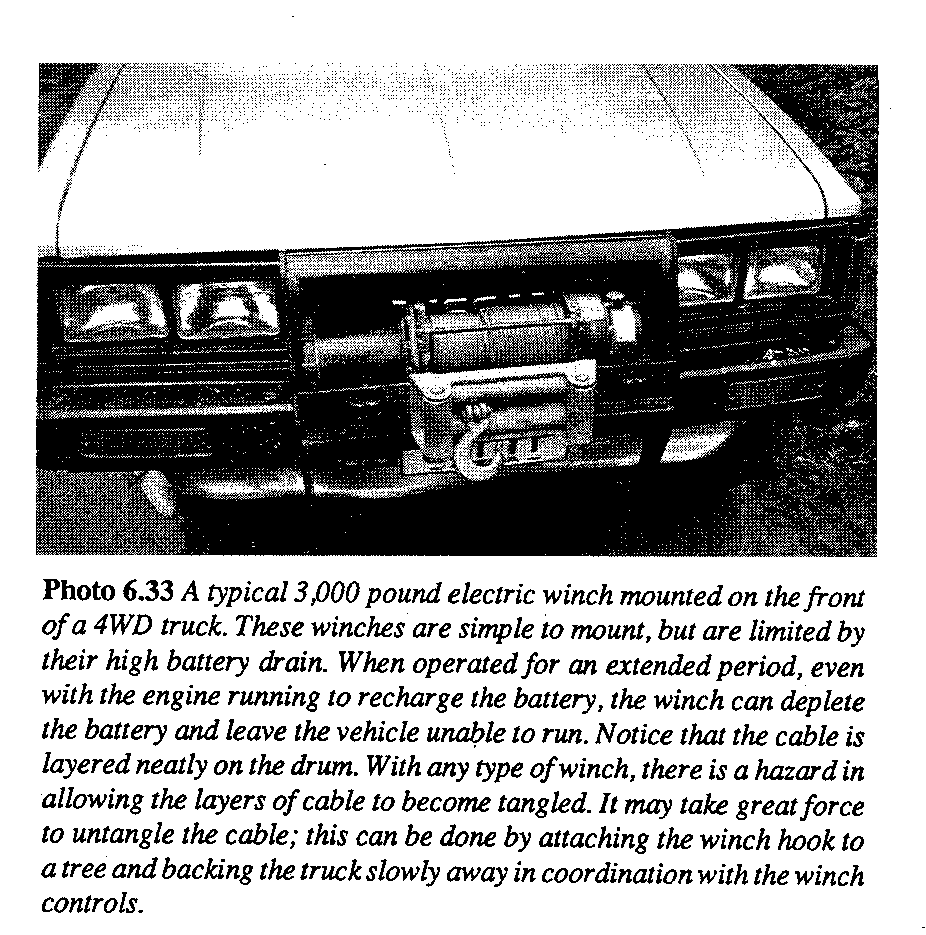
ELECTRIC WINCHES are generally available from surplus houses, as well as from equipment manufacturers. They are not usually installed by car manufacturers, but added later. The surplus types are made with special-purpose motors taken from aircraft motors and adapted to drive the winch. Others are specifically designed for this purpose. Since electric winches do not need a shaft to the engine, they can be adapted to most vehicles with little effort, and are easily installed. They are the easiest type to put in the field, and to move to a new car. They also offer the advantage of being operable when the engine is not running, such as when the car is stuck in deep water with the engine drowned--as long as the battery is in good condition. Models are available with a capacity up to 12,000 pounds (5,000 kg). They are relatively light in weight, and it is practical to put one on the front and one on the rear of a vehicle. The great disadvantage of the electric winch is its high electric current demand. Extended use of the winch will discharge the vehicle's battery, even if the engine is left running.
6.34 Winch Cable
The goal in selecting winch cable is to use the smallest diameter that will not break under the strain. Heavy cable is not very flexible and tends to bind on the winch drum. There is no sense in using cable that will hold more than the maximum pull that can be exerted by the winch. As an example, the standard cable supplied on the Ford Bronco is a 5/16 inch (8mm) diameter wire rope, 150 feet (45 meters) long. Uncoated plow steel rope of this size will hold more than 8,000 pounds (3,600 kg), certainly enough for a car whose gross weight is under 4,000 pounds (1,800 kg). (See Section 6.01.)
There is a common tendency to assume that the bigger a wire rope is, the better it is. This tendency should be avoided through realistic examination of the statistics on the car's weight and the strength of the cable in question.
6.40 Use of the Winch
Before discussing the use of the winch in recovery operations, it is well to note that this versatile device is useful for a great many other things. In logging and bridge building with logs, for example, the use of the winch cable makes it possible to haul logs out of areas where the car cannot go. The winch cable can haul a log across a stream from the other side, or across a swamp that would be impassable for the car.
The winch can be used for removing rotten logs from a bridge by lifting them straight up to loosen the ends; then the car can be backed away, towing the rotten log.
In towing a trailer, if the combined vehicle and trailer cannot get up a hill it is often possible to drive the car up alone, then haul the trailer up with the winch cable.
A vehicle fitted with a winch can lift its own front end for tire changes, service, and for mounting tire chains in the field. Simply fasten the end of the winch cable to an over-hanging tree branch and operate the winch until the front wheels are off the ground.
The winch may be used to lift heavy loads from another truck by running the cable through a pulley in a tree and down to the heavy load. If the load is to be put on a truck, for example, lift it with the winch, drive the carrying truck under it, and then lower it with the winch. To remove the load, lift it off with the winch and drive the truck out from under it. (See Figure 6.40a.)
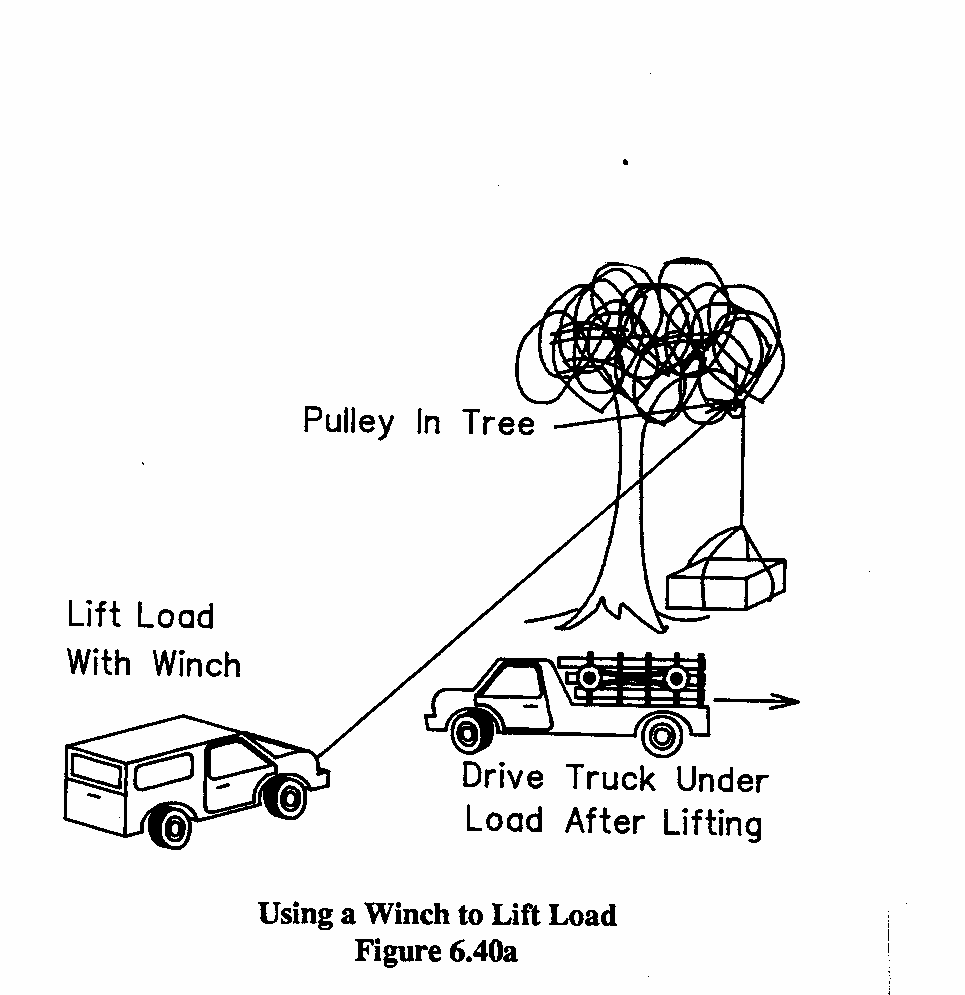
If the load is very heavy, it may drag the winching car ahead. In this event, secure the rear of the winching car to a tree or other anchor with a piece of cable.
While a similar technique can be used without a winch, simply backing up the car to pull on the cable, much more precise control is possible through the use of a winch with its slow drum speed.
To lift a load into or out of the vehicle on which the winch is mounted is more difficult, but is not impossible. Put a pulley straight ahead of the car or on a tree or some other anchor, and another pulley above the car. Run the winch cable to the load and back up the car. The load will rise; if it does not rise enough, wind in the winch; if it rises too much, pay out the winch. When the load is over the body of the vehicle, pay out cable to let it down. Reverse the procedure to remove a very heavy load. (See Figure 6.40b.)
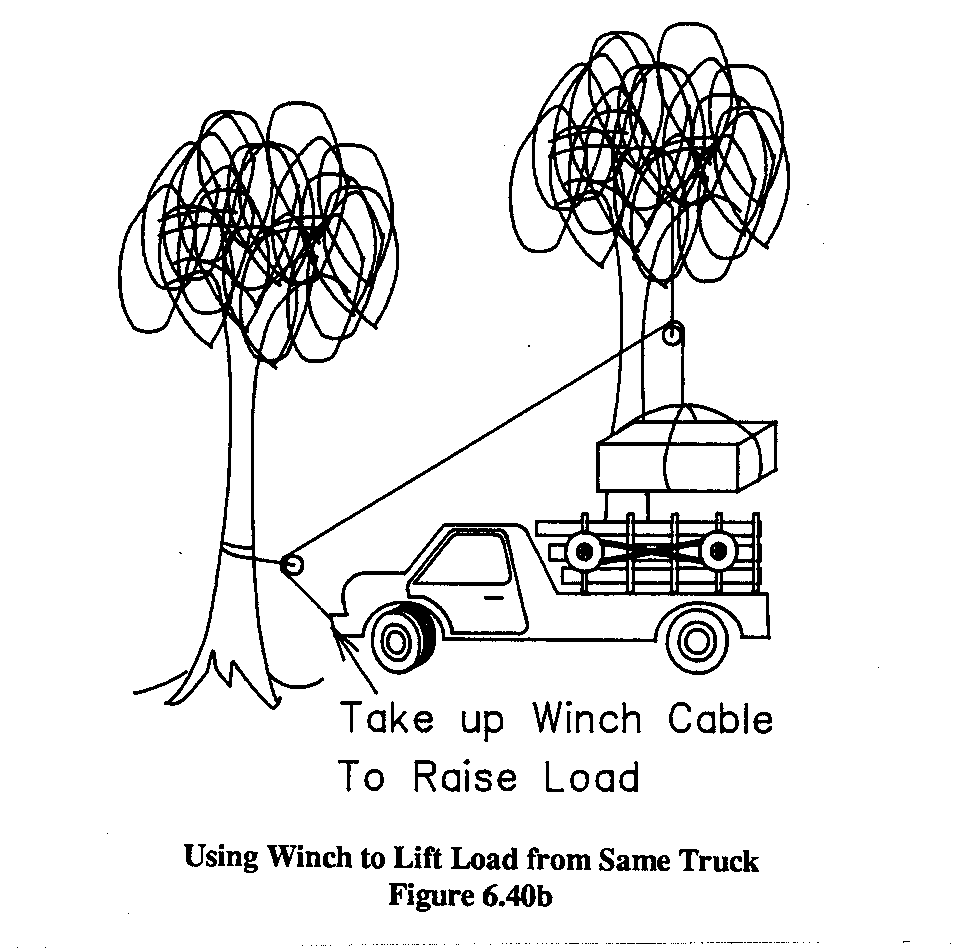
Where more than one car is under the same ownership, it is often practical to fit only half of the vehicles with winches if they are to be sent out in pairs. One winch will serve two cars nearly as well as if every car had its own winch.
Since the winch can be used in so many ways, it is well to experiment and practice with it in a safe environment before it is needed. A car that is knee deep in mud is not a practical place for experimenting, and in some cases, such as a broken bridge, it will be necessary to use the winch quickly to avoid disaster. This is not a good time for a first trial of the winch.
6.41 Anchoring the Winch Cable
The main purpose of a winch in recovery operations is to eliminate the need for wheel traction. It does this by making use of a fixed object--most commonly a tree or rock--as an anchor, and pulling against it. The pulling force can be considerable, so it is important to select the anchor with care. It is surprising how quickly the winch will rip out small trees and other insecure anchors.
An anchor may be a tree, rock, fallen log, or any one of a number of sturdy fixed objects. It may also be another car, located on relatively better ground than the stuck car. The anchor should be as nearly in line with the direction in which the car is to go as can be arranged. If the anchor is off to one side, the car will be pulled in that direction. If there is no suitable anchor in front of the car, check behind. It may be possible to get out backward by running the cable under the chassis and out the back.
On the road where there is no tree or other anchor straight ahead--or nearly straight ahead--a cable can be strung from one side of the road to the other across the road. (See Figure 6.41a).
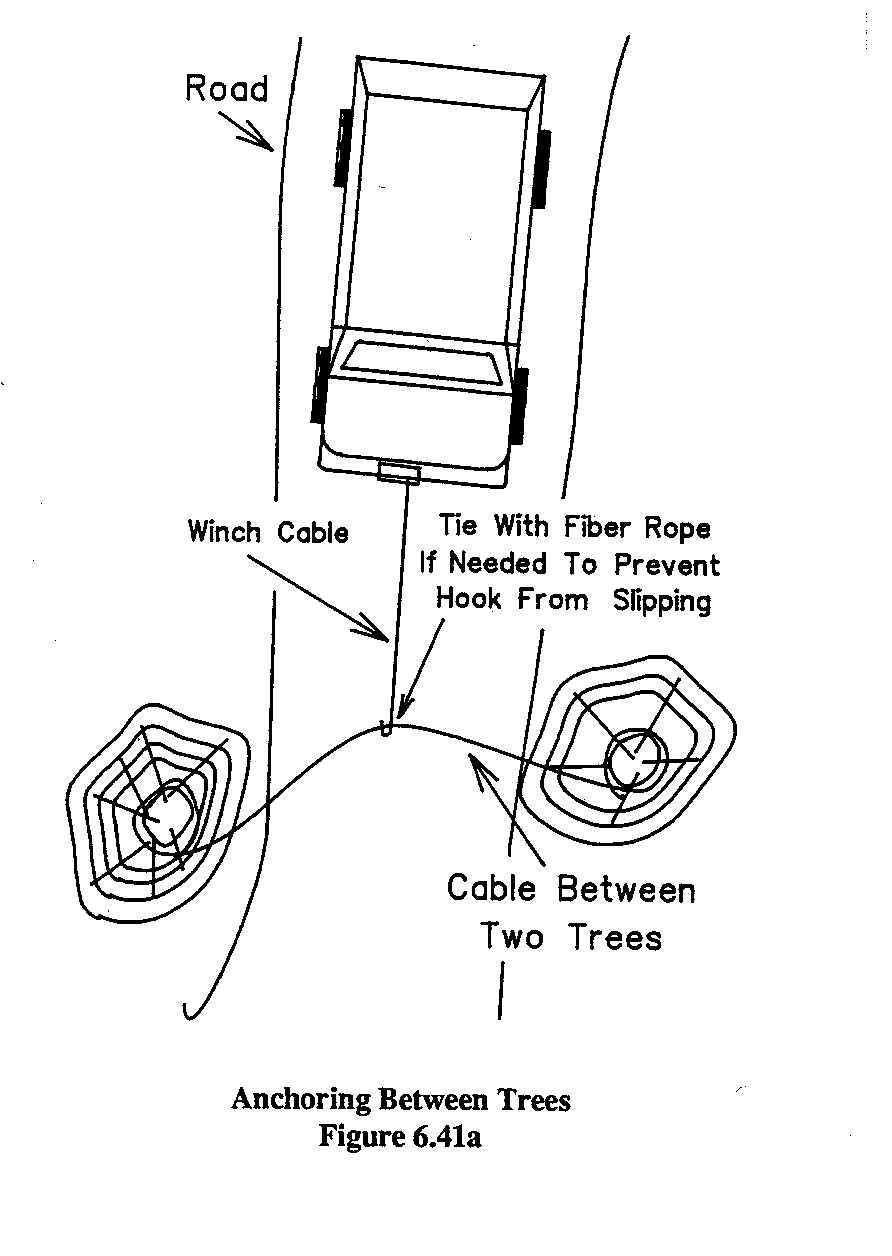
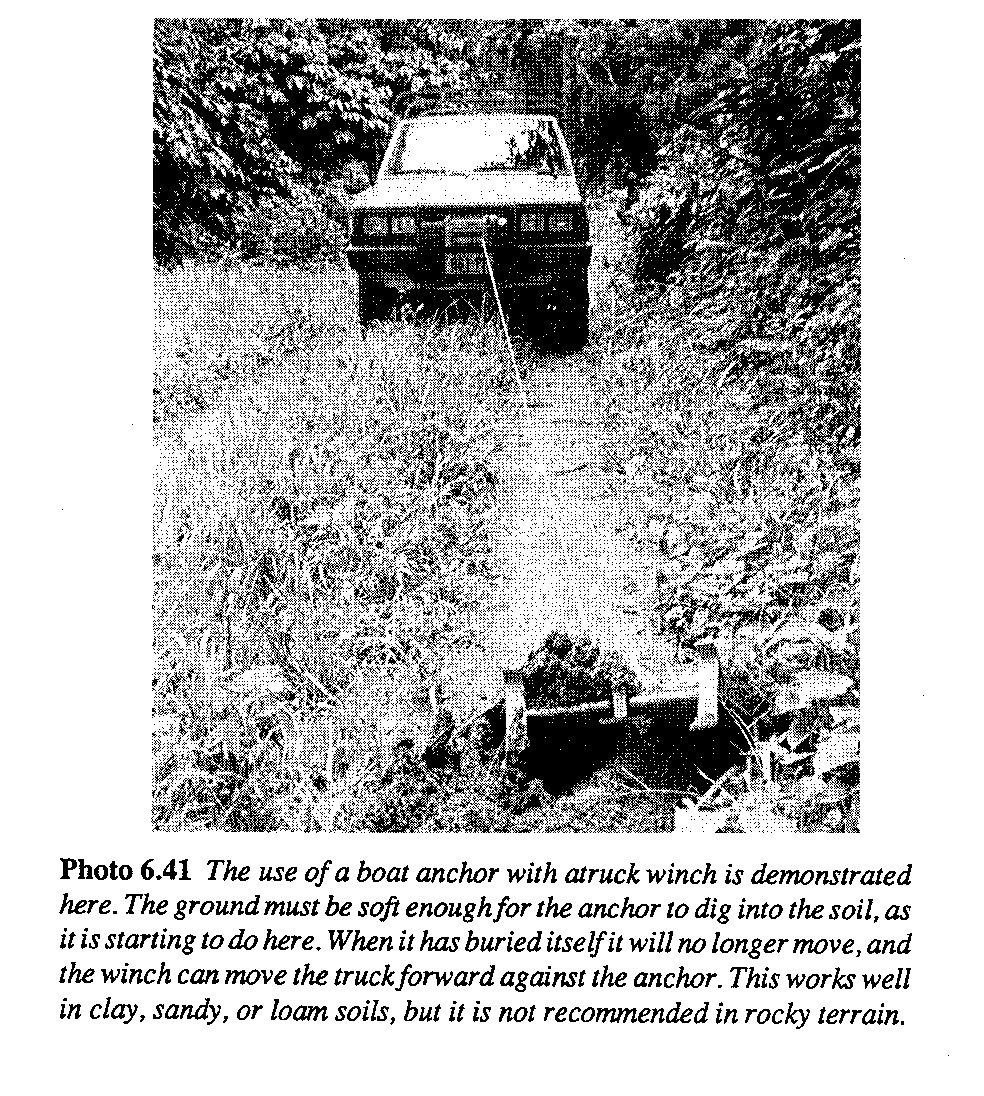
A BOAT ANCHOR may seem out of place in many parts of the world, but if trees are not common, or have been cleared from the roadside, a boat anchor works very well for a car. Simply carry the boat anchor ahead of the car, running out the full length of the winch cable so that the lift will not pull the anchor upward out of the ground. Start the anchor into the ground by jumping on it if necessary, although it will sink itself into soft dirt or mud and may disappear entirely in a swamp. When the winch is operated it will pull the anchor deeper into the dirt until the car starts to move out. If the anchor is stuck and hard to remove after the car had been freed, wind the winch cable onto the drum until the car is above the anchor, and it will then lift upward and out of the ground. The author has used a boat anchor with immense success and a great many curious stares in extricating stuck vehicles from thick mud.
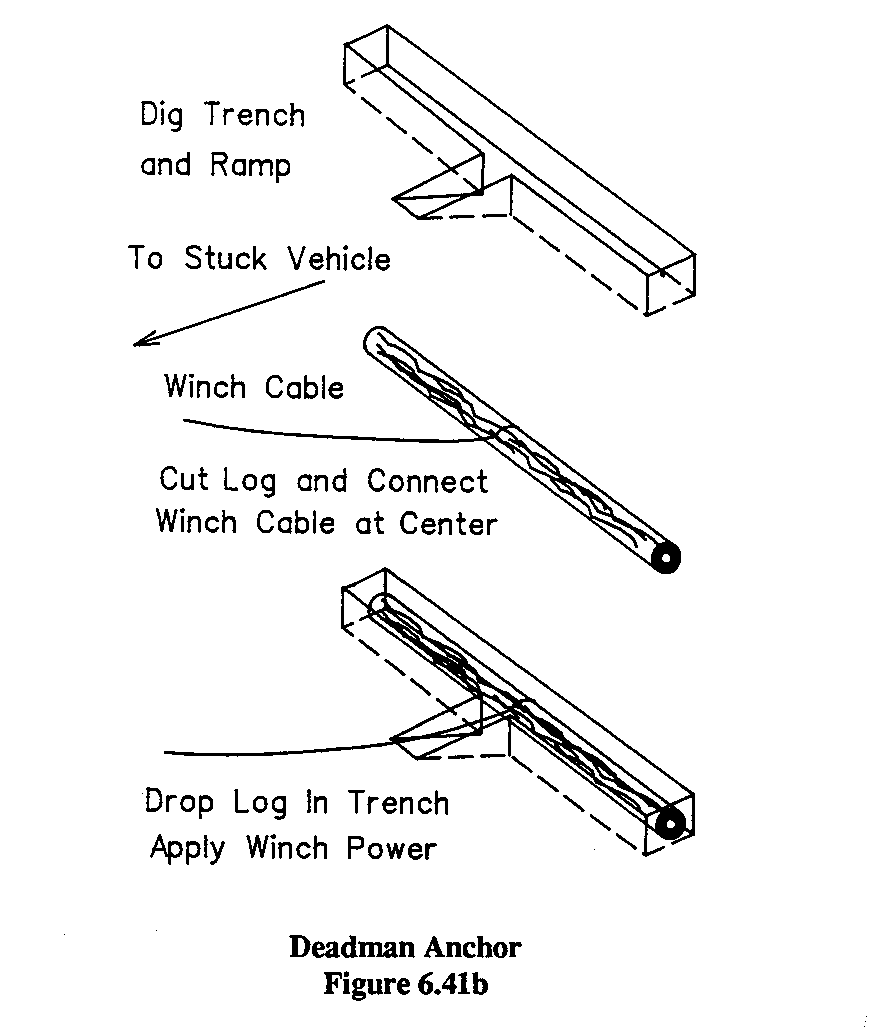
A DEADMAN is a type of anchor that provides great holding power, although somewhat difficult to build. In its simplest form, it is built in the following steps:
1. Dig a narrow trench in the middle of the road some distance in front of the stuck vehicle. It need be wide enough only to hold the winch cable. It should be about 8 feet (2.5 meters) or 10 feet (3 meters) long, with the end nearer the car tapered up to the ground level, and the far end perhaps a foot (30 cm) deep.
2. Dig a wider trench perpendicular to the first one to a depth of about a foot (30 cm). It should be wide enough to hold a log, and measure perhaps 4 feet (1 meter) long.
3. Cut out a log of suitable size to fit in the trench dug in step 2, and put the winch cable around the center of it. Drop it into the middle.
4. When the winch cable is taken up, the deadman will press against the sides of the trench, forming an anchor. In very soft ground, it may be necessary to dig deeper or use a longer log.
A deadman can be a semi-permanent installation in a spot in the road that for one reason or another cannot be repaired and at which cars can expect to be stuck. The deadman is built and buried so that a car can drive over it. A short length of cable is attached to the log and left sticking out of the ground where the car's winch cable can be attached to it. An installation of this type at the top of a difficult hill, for example, can save a great deal of frustration and time.
6.42 Winching Safety
When the winch cable has been successfully anchored, the actual recovery can begin. At this point it is well to remember the tremendous power exerted by the winch against the cable and the anchor--often in excess of the weight of the car. For this reason it is a good precaution to clear onlookers from the vicinity of the cable. If it should break, the winch will usually whip back under the frame of the car; the force is sufficient to cut off a leg.
The author's caution in this regard was repaid on one occasion when a heavily loaded winch cable broke off at the hook. The cable, recoiling back under the truck, cut through a heavy tire and destroyed it. Onlookers had been cleared from the area, however, so no one was injured.
The operator should also be mindful of what would happen to the car if the cable broke or the anchor were dislodged. Would the car be dropped into a dangerous predicament? Would it be released and fall back into a river? Would it capsize?
Although a broken cable is of no use no matter where it is broken, it should be noted that the most common place for a winch cable to break is at a kink or where it joins the hook or chain at the end. Any bend in a wire rope produces a weak spot that is usually the first to break.
6.43 Winding in the Winch Cable
Assuming the anchor holds and the cable does not break, the cable will be wound in and the car will be freed. The cable, as long as it is under strain, will usually wind flat on the drum without lumps or kinks. Where there is no load, after the vehicle has been pulled free, it is best to have an attendant see that the cable is wound neatly on the drum. If snarls and tangles do develop in the rope on the drum, they are often very difficult to remove. One method is to attach the end of the winch cable to a tree and back away, keeping tension on the cable and letting the drum turn freely so that the cable can pay out. Sometimes it is necessary, even with this method, to have an assistant with a crowbar or tire iron to help free the snarled cable.
When the winch is not in use, set the controls so that the drum will not spin freely, causing tangles. Sometimes it will be necessary to secure the end of the cable with a piece of heavy cord, or "baling wire."
6.44 Block and Tackle
A block and tackle can be used to increase the power of a winch. With such an arrangement, it is possible for a relatively small vehicle to move a much larger one that it is stuck. Bear in mind, however, that a great deal of cable will be needed, and the pulley blocks must be very sturdy. (See Figure 6.44)
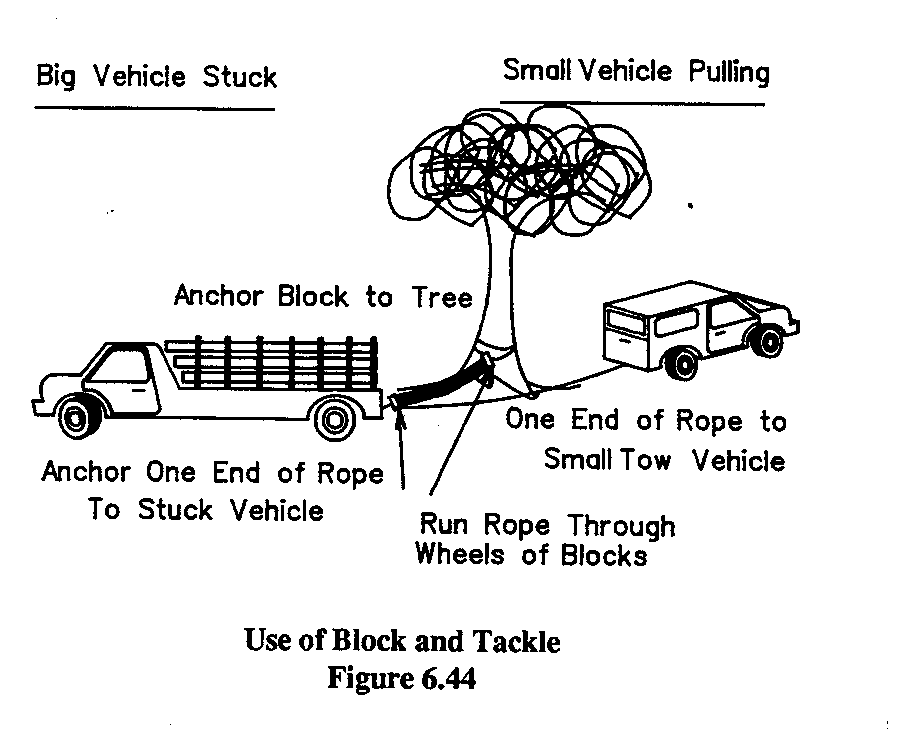
Similarly, a large single pulley can be used to change the direction of pull exerted by the winch. The pulley can, for example, be hung in a tree and the winch cable run through it to a stuck vehicle to exert an upward lift. Pulleys made for this purpose are available. They have hooks that swivel to the side, making it possible to drop the cable into the wheel without having to pull the whole length of the cable through. (See photos 6.44b and c.)
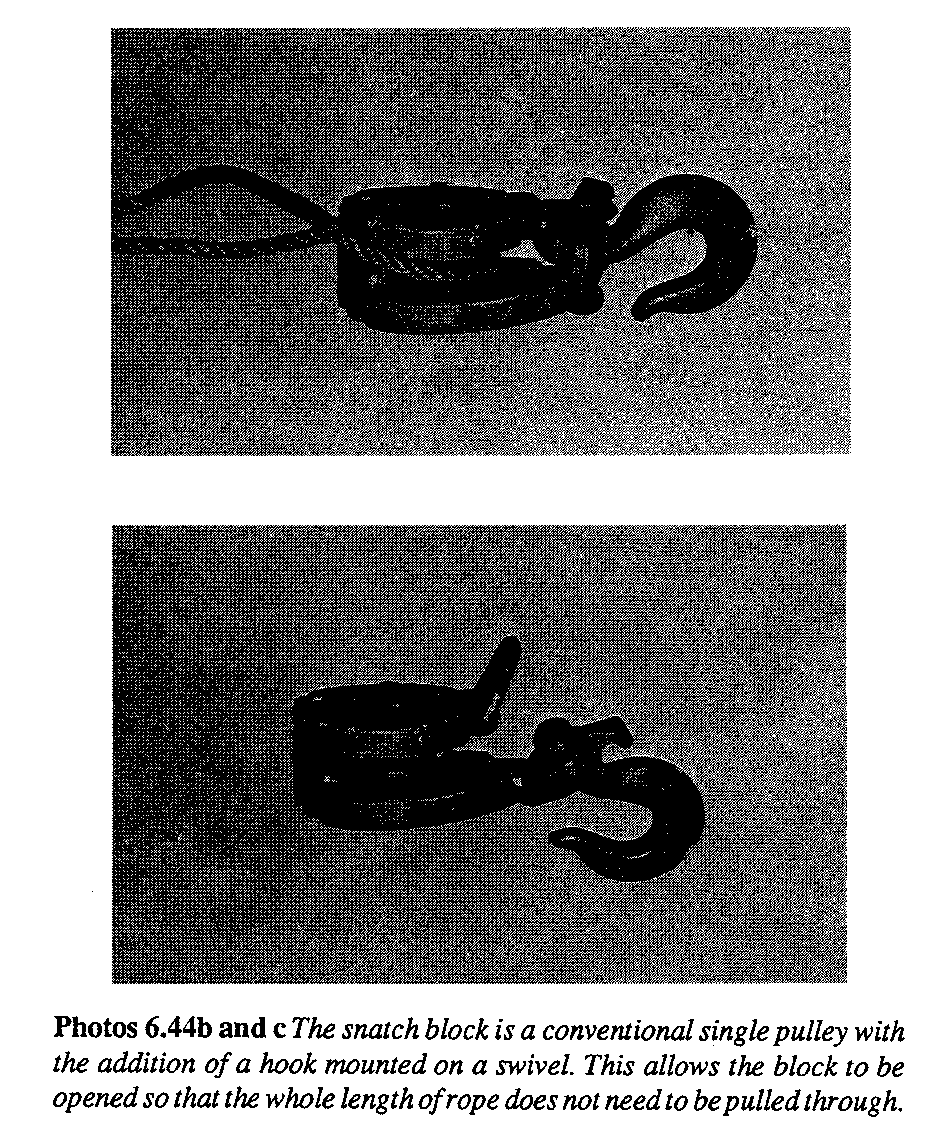
6.50 Recovery with a Winch
The two principal uses of a winch are for the recovery of the vehicle upon which the winch is mounted or for the salvage of other vehicles. This unit will discuss the first use.
ROCKY GROUND presents a great hazard to a vehicle. If a car is stuck in a rocky area and the winch must be used to pull it free, the operator must be certain that when the car moves forward it will not rip open the oil pan, differential, brake line, transmission housing, or some other part of the car.
MUDDY GROUND or light snow does not present the same hazard as rocks. In general it is safe to pull the car from mud or snow, since the usual cause of getting stuck in mud or snow is loss of traction. The winch, not needing any traction, overcomes this difficulty and can move the car. The only exception is mud or snow so deep that it is over the front of the car, in which case the winch may be overloaded by having to move all the accumulated mud or snow. In that event it will be necessary to dig out some of the mud or snow first.
WHEEL TRACTION can sometimes be added to the power of the winch to obtain extra pull to move the car, but in general this is not good practice. The winch should have sufficient power to move even a heavily loaded vehicle without assistance. If the wheels are used, when they get traction the vehicle will move ahead and overrun the cable. This will foul the cable on the drum or tangle it under the chassis and in the wheels. It is much better to let the winch do the work, pulling the car out and keeping the cable tight on the drum so that it winds evenly.
6.51 Winching from a Bridge
Usually the great force of the winch will be enough to move a car whose tires have become wedged in a log bridge, or which is hung up on the chassis on the logs. No special methods are needed.
In some cases it may be useful to get an upward lift at the front of the car to pull the tires out of the slot between logs. To do this, attach the winch cable as high as possible in a tree ahead of the car. The pull on the cable will then be upward, tending to lift the front of the car. If there is no tree in front of the car, anchor the winch hook in accordance with Section 6.4 1, and put a sturdy four-foot-long forked stick under the cable near the car. As the winch takes up the slack, the stick will be wedged between the cable and the ground, and the car will attempt to climb up the cable and, therefore, up the stick. (See Figure 6.51)

6.52 Removing a Log Under the Car
A frequent cause of getting stuck is running the car onto an unseen log or stick buried in mud. The car gets hung up on the log and cannot move ahead. Occasionally the same difficulty is encountered on a bridge made of many small sticks: one will come loose and catch the chassis of the car.
To remove the log or stick from under the car, assuming that the car cannot be pulled free, the winch must be used with a pulley to change the direction of the cable.
First, determine which way the log can be pulled out. For this example, assume that it can be removed from the front of the car; the same principles apply whether it is to a side or the rear.
Using a tow cable, attach the rear of the car to a tree or some suitable anchor so the car cannot move forward. Fasten a large towing pulley such as that discussed in Section 6.44 to a tree or other anchor in front of the car. Run the winch cable through this pulley and back to the log. When power is applied to the winch, it will take up the slack and then try to move the car forward, with the log as an anchor. Since the rear of the car is fastened, the winch will pull out the log. The operator must be careful not to damage the under frame of the car, and sometimes it may be necessary to jack up the vehicle before starting the operation. (See Figure 6.52)
6.53 Lowering with the Winch
In the same way that the winch overcomes the need for traction in moving the car forward, it can be used to replace wheel traction in slowing the car or halting it. On a very steep hill with a poor bridge at the bottom, for example, it will be necessary to stop the car at the edge of the bridge. If a slick road surface makes this impossible, the winch can be used.
Before descending the hill, run the winch cable under the chassis and out the back of the vehicle to an anchor. Engage the drum in reverse. Put the transmission for the wheels in neutral so that no power will be applied to them. Run the engine and engage the clutch to pay out cable, letting the car down the hill. Disengage the clutch to stop paying out cable, and the car will stop securely.
6.60 Using the Winch for Salvage
The basic principles of recovery of a vehicle with its own winch also apply to the use of a winch to salvage another vehicle. The basic difference is that the car upon which the winch is mounted must be regarded as an anchor as far as the stuck car is concerned. In many cases the friction of the winch car's tires against the ground will not be enough to keep it from sliding ahead when the winch is operated. In that event it will be necessary to anchor the winching car with a cable to the rear end.
WHEEL TRACTION, as described in Section 6.50, should not be used when salvaging another car with the winch. There is a great danger that the stuck car, once freed, will become tangled in the winch cable. An operator who has once had to free a jammed winch cable from the axle of a vehicle will not try it again; it may be necessary to cut the cable to get it out of the axle.
ATTACH THE CABLE carefully to the stuck vehicle. The winch exerts a tremendous amount of pressure, and will easily fold up a conventional bumper. If the car has no towing hitch, attach the winch cable to the axle housing, a spring shackle, or the chassis itself.
6.61 Salvaging a Capsized Vehicle
To right a capsized vehicle, the pull on the winch cable must come from the chassis side of the tipped car. This will tend to roll the car over onto its wheels. If the winch cannot be placed in a suitable location, use a pulley to direct the pull in the right direction.
Pass the cable over the vehicle and attach it as low as possible on the other side. Assume, for example, that the car has rolled over on the right side. The winch cable will come over the chassis, which is now vertical, and across the left side of the car, now on the top. It will then go down the top of the car to the ground. Dig a small hole until the cable can be passed through the cab window, and attach it to some sturdy part of the vehicle. If the window frame or the door pillar does not seem strong enough, cut a three-foot (1 meter) section of log to use for a brace across the window and attach the cable to that. If possible, pass the cable under the left side and attach it to the chassis. (See Figure 6.61)
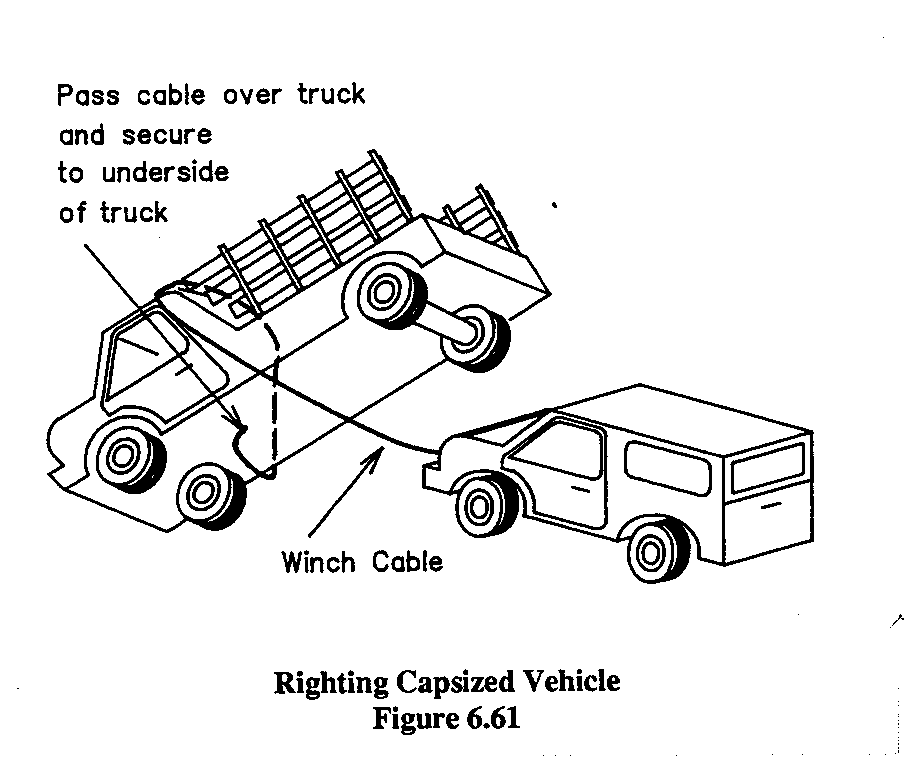
When the winch cable is tightened the pull will tend to turn the car over onto its wheels.
IN SLICK MUD or snow, the vehicle may tend to slide along on its side without standing up. This can be counteracted by running a cable under the car from the chassis to a tree on the opposite side from the winch. With the bottom of the car anchored to the tree, the winch will be able to exert enough force on the top to right the car.
6.62 Salvaging a Car from Water
Since water helps to support much of the weight of a submerged car, it can be of great assistance in helping to right a capsized vehicle. Before attempting to move a car forward when it had capsized under water, it is advisable to right it first. How this can done will depend upon the situation, but the basic procedure is the same as the one described in Section 6.61 above.
Once the car has been righted and can roll on its wheels under water, the winch cable can be attached to the front or rear of the car and it can be pulled out. If the river bank is steep or soft, it may be useful to run the winch cable through a pulley in a tree to get an upward pull as the car moves ahead.
In the case of a car that has been capsized in water with a rocky bottom, where the car could be damaged if it were towed, it should be floated free. See Section 5.01
6.70 Towing the Derelict
So many of the things that pertain to winching also are useful for towing that the two have been grouped together. In this section the problems of moving a car that is incapable of self-propulsion are considered. This assumes that the car is not stuck in mud or some other obstacle, and would be free to move if it were not mechanically damaged.
AN OLD TIRE is a great asset in towing. It takes up the shocks of starting, and softens the load on the tow cable, if one is used. A tire can be used by itself or in combination with a conventional tow cable.
One of the best ways to tow a derelict, and also one of the safest, is by connecting the rear of the towing car to the front of the derelict with a tire. Tie the tire tightly to each car so that there is no slack. When the towing car moves ahead, the tire will give slightly and then start to pull the derelict. The great advantage is that the tire will also cushion the shock of stopping the derelict. If the derelict has no brakes, the tire will serve to slow it at the same rate as the towing car, preventing damage to either vehicle. (See Figure 6.70)
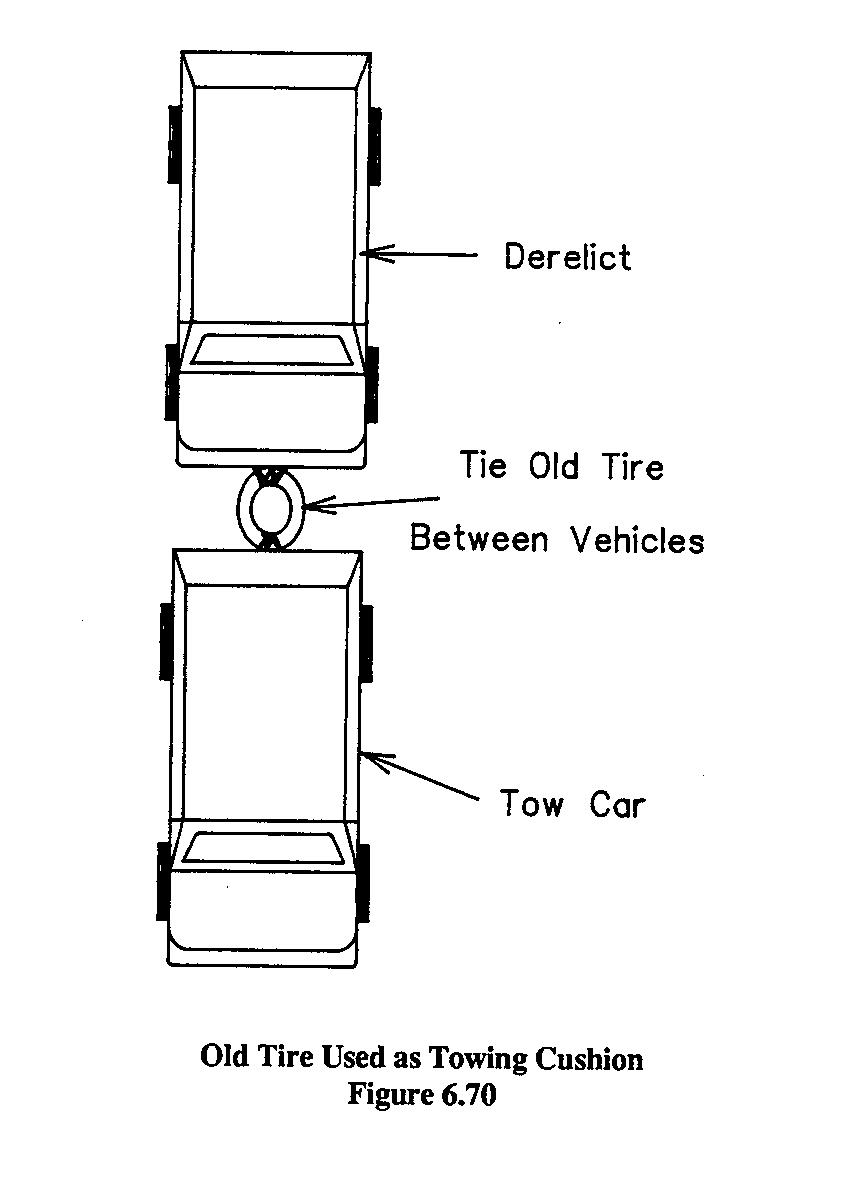
A car with no brakes should be towed with a rigid towing connection such as a tire. If a cable is used, the derelict will not be able to stop going downhill, and will crash into the rear of the towing car.
A PUSHER BOARD can be very useful on a car that is often used to retrieve derelicts, such as a garage tow truck. This is nothing more than a wide heavy board or piece of metal, perhaps a foot (30 cm) in width and as long as the car bumper. It is mounted in place of the front bumper and provides a convenient way to push a derelict. It is not a good idea to push a car over a long distance, however, since the driver of the pushing vehicle cannot see well. This is especially true in areas with poor roads, where the driver of the derelict is likely to be pushed against his will into a swamp, snowbank, or rotten bridge.
6.71 Attaching the Tow Cable
The point where the tow cable is to be attached to a car should be carefully selected, since the pull will be enough to cause damage to bumpers and other lightweight parts. Towing hooks can be obtained as options on virtually all 4WD cars, and are a worthwhile investment in areas where towing is often needed, or where a car is likely to get stuck and need to be pulled free. If the derelict has no towing hooks, attach the tow cable to a spring shackle, axle, or chassis. (For towing hook see Photo 15.20)
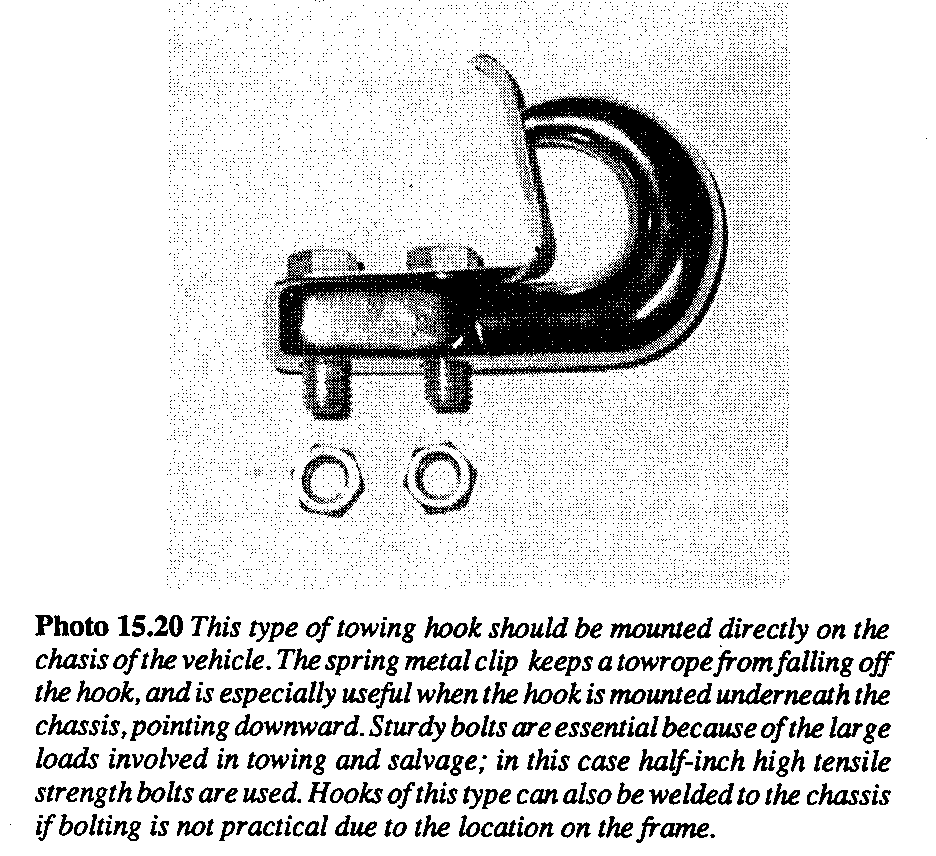
When a tow cable is to be used, as distinct from a tightly tied tire or a push board, a long cable is preferable to a short one. A long cable allows the driver of the derelict to see the obstacles immediately in front of him and steer away from them, and it gives him time to stop his car when the towing car stops. With a short cable the derelict may hit the rear of the towing car if the driver does not have enough time to react and stop.
Towing can be done with a chain, wire cable, natural fiber rope, or synthetic fiber rope or strap. Synthetic fiber has the advantage that it will stretch to take up the shock as the towing vehicle starts forward. Nylon is the best material for tow ropes and straps, combining great strength with elasticity.
6.72 Overcoming Mechanical Drag
If a derelict is to be towed, the wheels must turn freely. If they are locked to the engine through the drive train, it will be impossible to tow the car at all.
How this mechanical drag is overcome depends upon what part of the derelict is damaged.
ENGINE DAMAGE can be easily overcome by putting the gearshift in neutral and releasing the parking brake; the car will then be free to roll.
GEARBOX DAMAGE may or may not jam the gears. If the gears are not jammed, put the car in neutral and the wheels should turn freely. If the gears are jammed, try to free the transfer case and put it in neutral. This will also free the wheels so that they can turn. If the transfer case has been damaged, it will be necessary to unbolt and remove the the propeller shafts running to the differentials. This must be done in such a way that a stub end will not be left on the differential to cause damage as it turns.
DIFFERENTIAL DAMAGE, even to the outside casing, may jam the gears inside so that they will not turn. If this happens, the drive shafts must be taken out of the axle housing, at least on one side and maybe on both sides. This can only be done with a fully floating axle, where the axle shaft does not fasten to the wheel of the car.) If the front end differential is damaged and the car has hub locks, which are used to free the front wheels on good roads, unlocking them will free the wheels from the differential. It may then be possible to drive the derelict on the rear wheels; in any event it will be possible to tow it.
6.80 Towing a Trailer
A trailer offers a great many advantages when used in combination with a sturdy towing vehicle. A trailer can nearly double the capacity of a truck at extremely low expense. Special services can be provided by a trailer without the need to tie up a vehicle on a permanent basis. Examples are fire-fighting equipment, road service facilities, and educational and demonstration projects. Several such trailers can be prepared at moderate cost and can be towed by the same vehicle as needed.
As a fire engine, for example, a trailer can be equipped with a water tank, a pump driven by a small gasoline engine, and some hose. In an emergency, the trailer can be quickly hitched to the tow car and taken to the scene of the fire.
As a service trailer, the unit might include a combination welder and power generator driven by a gas engine, together with cabinets for tools and equipment for emergency road service.
An educational trailer might include video or slide projectors, books, and other materials. Or it might have samples of agricultural or other self-improvement projects arranged in a suitable display. Such a trailer can be towed to a village and left there for a time for study, then moved to the next site.
A trailer is impractical in areas where roads are nearly impassable for the towing car, since it reduces maneuverability. In general, if a towing car can pass a given area without great difficulty involving a lot of backing and jockeying, it should be possible to pull a trailer.
If there are short sections that are very difficult to pass, such as deep swamps or steep slick hills, it may be possible to send the tow car through first and then pull the trailer across with a winch or tow cable.
In extremely difficult areas, it is often possible to pull a trailer with a crawler tractor. The author has made a great many trips over distances of up to 50 miles with a trailer behind a Caterpillar tractor when seasonal rain made roads nearly impassable.
The cardinal rule of trailer operation is that absolutely nobody must ever be allowed to ride in the trailer when it is pulled by a car. (The only possible exception is when the trailer is pulled by a crawler tractor due to its slow speed. Trailers are subject to jackknifing on steep downward slopes, to becoming unhitched, to rolling over, and all sorts of other difficulties on bad roads. In many countries it is illegal to carry passengers in a trailer. Allowing a person to ride in the trailer is inviting disaster.
6.81 Trailer Hitches
The first consideration in operating with a trailer is how to hitch it to the towing vehicle. There are a great many types of hitches available, but the most satisfactory for a four-wheel drive vehicle is a ball hitch bolted or welded to the chassis. Such items as bumper hitches, axle hitches, and frame hitches are intended for use on passenger sedans for towing house trailers on good roads.
Some large trailers are towed with a bracket-and-pin hitch. The towing vehicle has a pin in a towing hitch at the rear, and this pin drops through a hole in a flat plate at the front of the trailer towing arm. While such a hitch is strong, it cannot turn as the car and trailer are twisted by the road, and may break under the strain. (See Figure 6.81a.)
A modification is the type of hitch in which the eye on the trailer is mounted on a sturdy swivel so that it can turn. This type of hitch is sometimes seen on heavy road-construction equipment, such as air compressors mounted on their own trailers. It overcomes the twist problem but is noisier than a ball hitch because the trailer towing plate or ring has some free movement on the towing car's pin. (See Figure6.81b.)
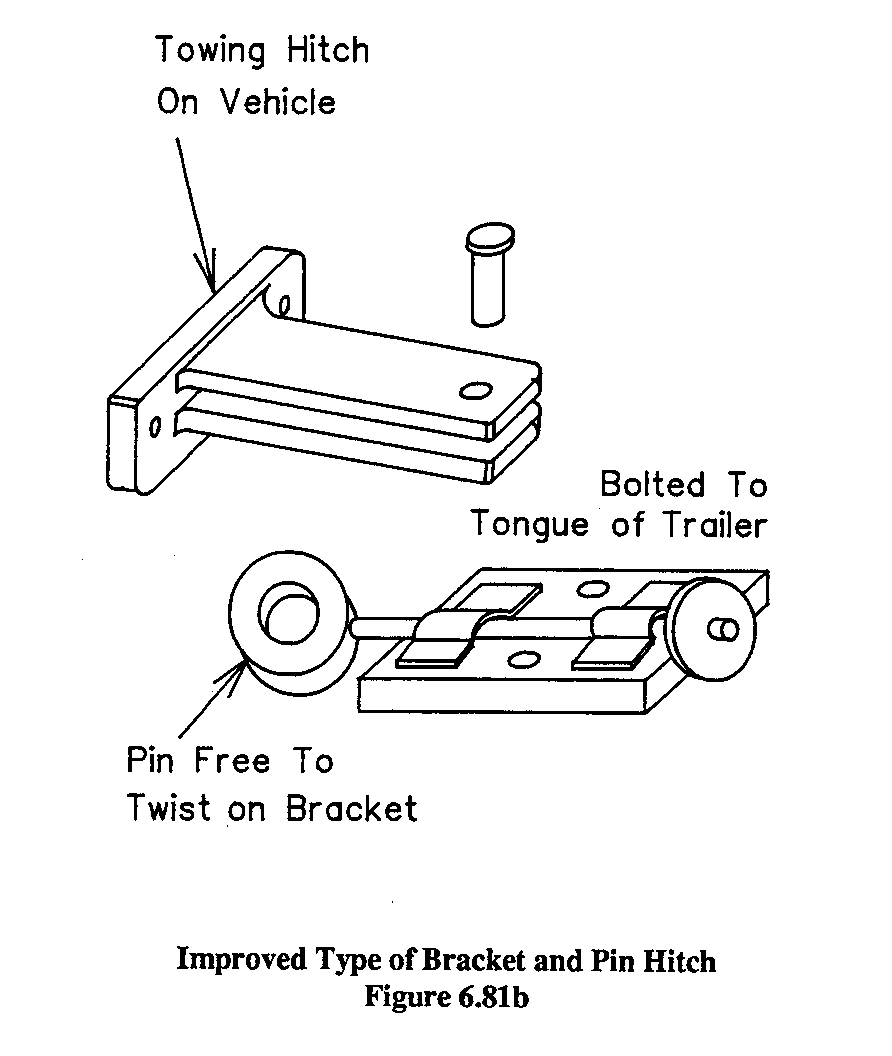
For a moderate size trailer, a ball hitch is by far the best arrangement, combining ease and security with the ability to swivel and twist freely.
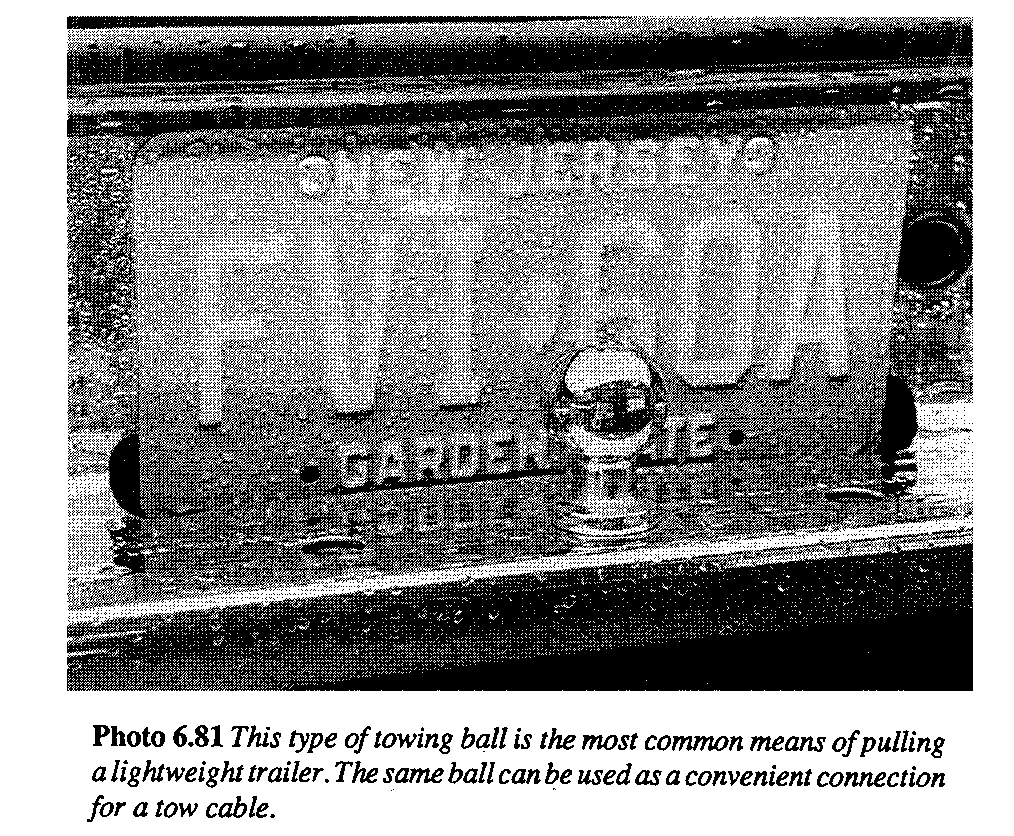
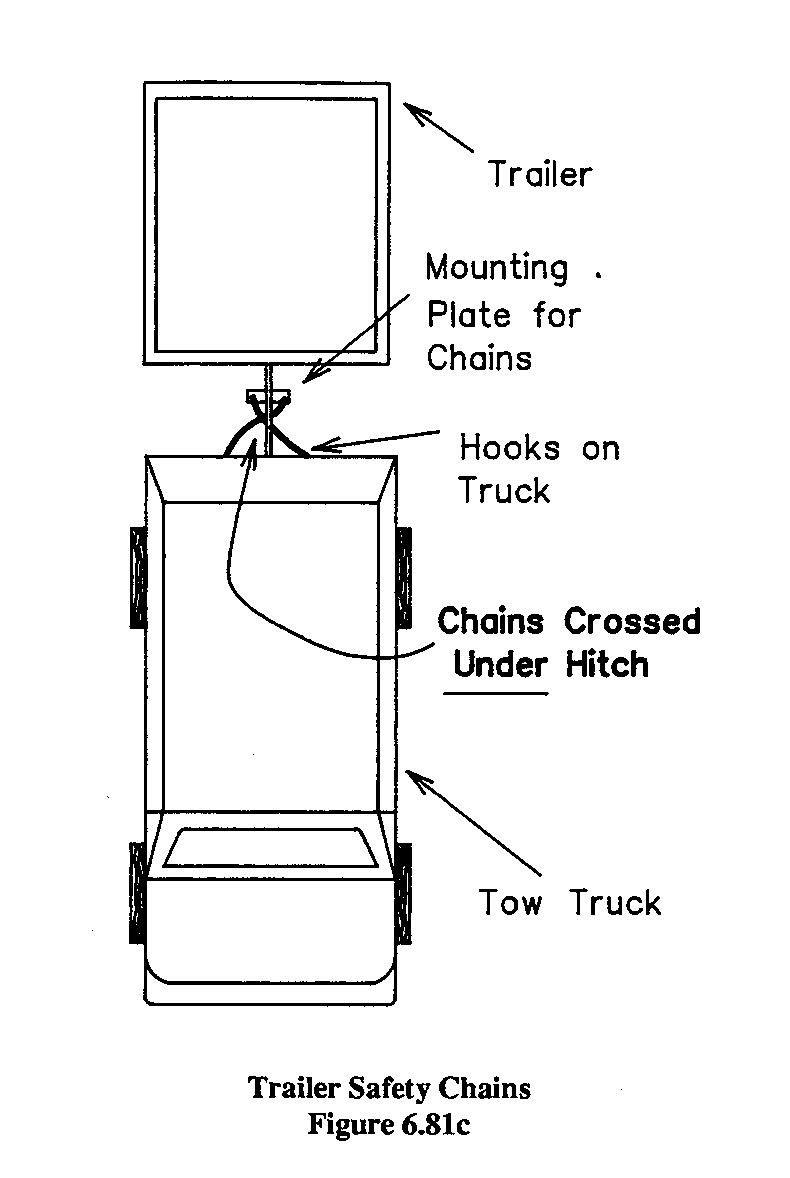
Safety chains are required by law in many countries and are a practical necessity regardless of legal specifications. Two safety chains should be attached to the front of the towing arm of the trailer, sometimes referred to as the tongue. These two chains should be crossed under the hitch and joined to the towing car. Thus arranged, the chains will cradle the hitch if it breaks and will keep the trailer from dragging on the ground. The chains, if not crossed under the hitch, would simply attach the trailer; if the hitch broke, the trailer tongue would fall to the ground and be dragged along by the chains until it met an obstacle which would either break the chains or rip them out of the back of the car.
Trailer brakes should be provided to assist the hitch in stopping the trailer if it weighs 1,500 pounds (675 kg) or more fully loaded. The brakes may be manual or automatic, and in most cases the manufacturer can supply a breakaway switch so that if the hitch breaks, the trailer brakes will be applied automatically.
6.82 Towing a Trailer
The first step in towing a trailer is the loading, which must be carefully done to avoid overloading any part of the combined tow car and trailer. The load should be balanced on the trailer so that the tongue presses downward with a weight of about 10 percent of the whole trailer. If the gross weight of the trailer is 1,500 pounds (675 kg), then the tongue weight on the tow car should be about 150 pounds (67 kg).
If the tongue weight is too great, it will put too much load on the towing car, if it is too light, or if the tongue rides up with the trailer weight all at the rear, it will lift up and may jump off the hitch.
BACKING UP is the most difficult part of trailer operation for most drivers to learn. There is no way to learn this procedure from a book, except to remember that the front wheels must be turned in what seems to be the wrong direction to turn the trailer when backing. The only answer is to take the vehicle with the trailer into a relatively unobstructed area and try it a few times. (See Figure 6.82a.)
GOING FORWARD is no trouble with a trailer. Just keep in mind the additional weight and length, particularly on a bridge or when making a tight turn.
JACKKNIFING is the term used to describe the "folding up" of a trailer and tow car when the trailer overruns the tow car and spins around beside it. This sometimes happens on a hill, where the trailer, without brakes, will slide down beside the car and twist around until the rear of the trailer is beside the cab door of the car. If this happens suddenly, the trailer tongue, hitch, or body, or the tow car hitch or body, may be badly damaged by the impact. (See Figure 6.82)
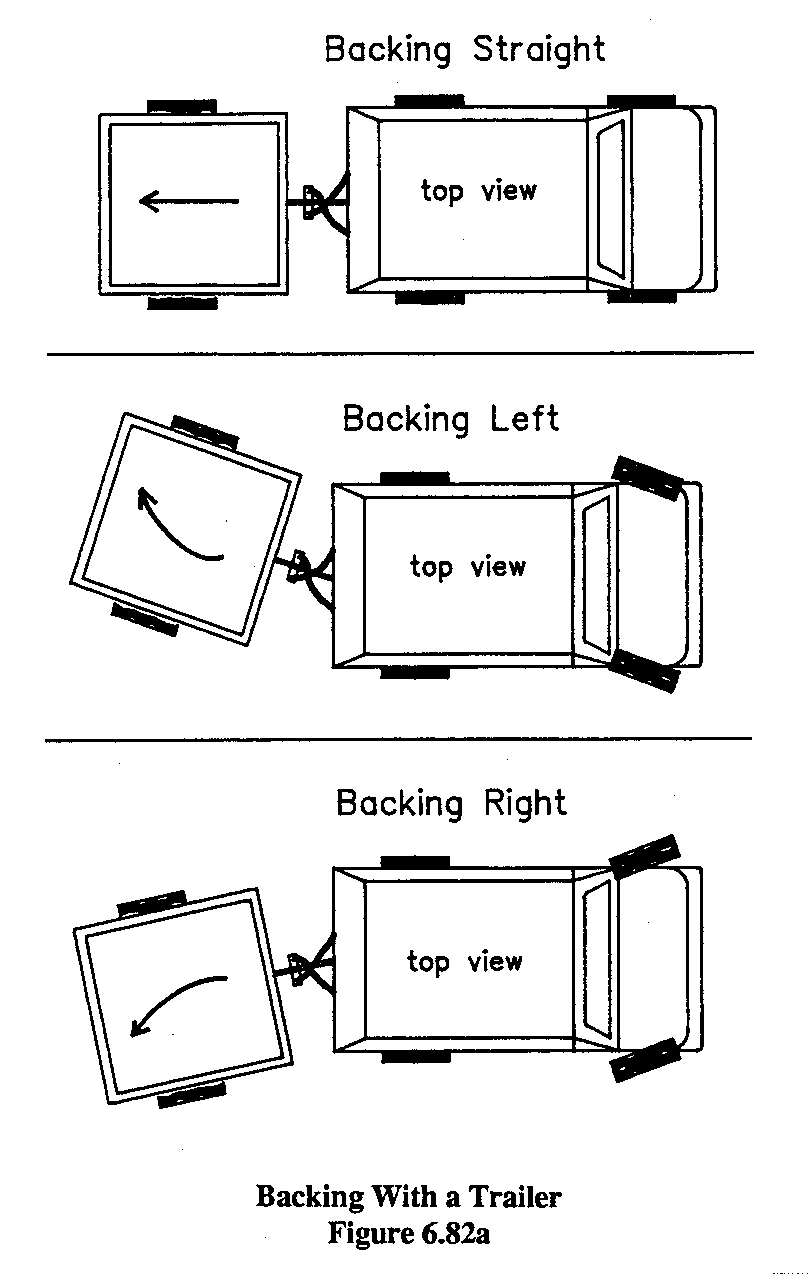
It may also happen if the towing vehicle is suddenly braked to a stop or hits something and stops quickly. The inertia of the trailer will carry it ahead, and it will jackknife to the side.
Jackknifing in its early stages can be halted in some cases by speeding up the tow car. This will snap the trailer back behind the car and another effort can be made to stop the two vehicles. It may also help to steer the car away from the side on which the trailer is jackknifing: If the trailer is coming around to the right side, swerve to the left to get the hitch in front of the center of gravity of the trailer.
Jackknifing is one of the best arguments for separate brakes on the trailer, since trailer brakes will generally prevent this trouble.
A flat tire on a trailer is often hard to detect, especially on a bad road where the trailer wanders a lot even with good tires. For this reason it is a good idea to get out and look at the trailer tires periodically. Some trailers have skids under the axle to support the weight of the trailer in the event of a flat tire, but these are not useful on poor roads because they get hung up on rocks and in mud.
6.83 Extricating a Stuck Trailer
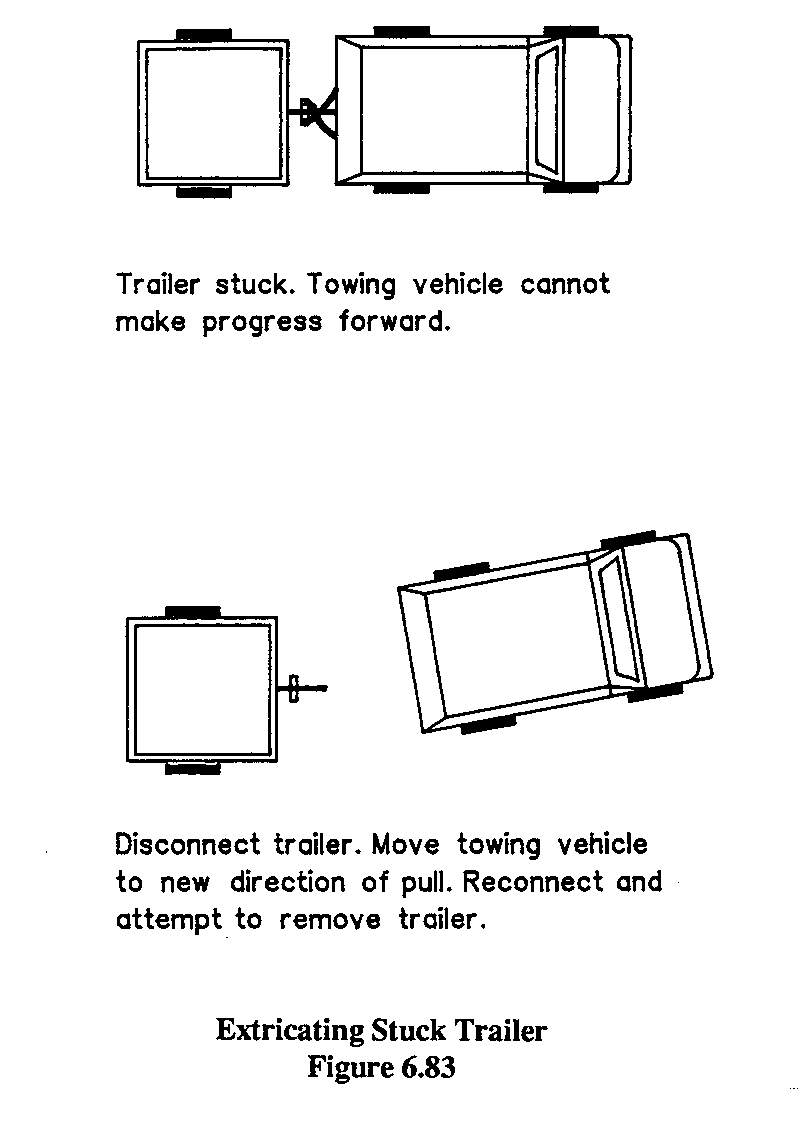
Getting stuck with a trailer attached to the car can offer some special problems. In general the easiest way to get free is to unhitch the trailer and get the car out, then pull the trailer out with a tow cable or the vehicle's winch.
If the trailer is stuck but the car is free, it is often possible to unhitch the car, move it to a different angle of approach to the trailer, and hitch it on for another try. The pull in a different direction may free the stack trailer.
If a car is frequently used to pull a trailer in a difficult area, it is often worthwhile to weld a ball hitch to the front of the car as well as the rear. The driver will find that there are many times when he can get the trailer out of a predicament if he can see what it is doing under strain. Vision of the trailer is greatly improved if it is attached to the front towing hitch. Putting the trailer in front of the car also makes it easier to back the trailer into a small or difficult spot.
In general, all the suggestions given in Sections 4.00 and 6.50 for extricating a stuck car will apply to the combination of a car and trailer. The principal difference is that the trailer wheels are "dead weight" and cannot provide any motive power, so all power must come from the towing vehicle.
7.00 FIELD EXPEDIENTS
When a car fails on the road, the first consideration is how to get it running again. In an area where service facilities are few or nonexistent, this is a matter of using one's imagination to devise some way to get the machinery operating. This section is not concerned with the beauty of a repair or even whether the manufacturer would approve the techniques; a field expedient is intended only as a means of getting the car moving again. Once the vehicle has reached its home base, it can be repaired by more conventional methods and restored to its original condition.
For convenience the section has been divided into units covering each major part of the car.
There are many field expedients which need not be categorized: They apply to various parts of the vehicle.
Bolts, nuts, and other parts can often be taken from other parts of the car if they are in short supply. If the flange on the propeller shaft comes apart and the bolts are lost, for example, replacements can be taken from the battery hold-down clamp, seat mountings, bumper brackets, or other places where they are not needed.
WHEEL LUG NUTS are occasionally lost in mud or snow. Even if an entire set is lost while changing a tire, no great damage is done. Take one nut from each of the other wheels. Even two nuts per wheel will serve in a pinch. It may be possible to take nuts from the spare tire mounting on some types of cars.
A BIT OF OIL to free a stuck nut or choke control can be taken from the dipstick in the crankcase. Just pull up the stick as though checking the oil level, and a few drops of oil will run off it.
A "FROZEN" NUT can stop progress on a field repair until it is removed. If there is dirt on the threads, clear it out with a wire brush, rag, or a piece of string wound around the bolt. If it is rusted on, apply a few drops of oil or Liquid Wrench, tap the nut with a hammer to work the lubricant into the space between the nut and the bolt, then remove the nut. Heat will also help to free a frozen nut by expanding it slightly. The heat might come from a road flare, or jack handle that has been heated in a small fire. If all else fails, greater leverage on the nut may be the answer, but it may also break off the bolt or stud. Try putting a piece of pipe on the wrench handle as an extension.
SMALL BROKEN SPRINGS can be replaced with a piece of old inner tube. This is an indispensable item in any toolbox that can be used for many purposes. It might replace the return spring on the accelerator pedal, for example.
A WORK LIGHT at night can be easily made by taking out a parking light, socket and all, from a fender. Chop off enough wire with it to reach the battery. When the repair has been made, put the light on the cab floor as a reminder to fix it when the car is back in the shop.
SOLDER can be improvised from a toothpaste tube or any similar disposable tube that is not plastic. (Although it seems unlikely that a stuck traveler needing solder would have a toothpaste tube with him, the suggestion is included on the theory that it could happen.)
A COTTER PIN can be replaced by a short piece of wire if necessary. If a cotter pin was used to secure an assembly that was taken apart during repairs, be sure to replace the pin or to put something in its place. Otherwise the nut, rod, or whatever was secured by the pin will work loose and fall off. Often a paper clip, safety pin, or nail will serve the purpose.
KEEPING THINGS CLEAN is difficult but important in making field repairs. Nuts with dirt in them will not go on again, and dirt in a brake, gas, or oil line can be a real disaster. Before starting to disassemble things, spread out a tarp, big rag, raincoat, seat cover, or even a big leaf to hold the parts as they come off. Laying them out in the order in which they were removed will make assembly much easier.
7.10 Capsizing and Submerging Accidents
CAPSIZING ACCIDENTS are not common in areas where roads are well maintained, but become quite routine in many parts of the world. Cars on frontier roads are usually going slowly when they tip over, so that no major body damage results. Many mechanical parts of the car are affected by capsizing, however, and should be examined before attempting to restart. The first problem, obviously, is to right the car; information on this procedure is presented in Section 6.61.
Next, check for spillage of battery water, crankcase oil, radiator water, fuel, and brake fluid. Clean off spills and refill if necessary. If no serious damage has been done to the body of the car, and if the engine looks normal, attempt to start the car. If it will not operate, see the check lists in Section 8.00.
After a SUBMERGING ACCIDENT there are other items to check. In general, a car that has been submerged for a short period can be salvaged with little trouble. The prime consideration is whether water was taken into the engine. If water is drawn into the cylinders the pistons will attempt to compress it; water cannot be compressed, and the engine will burst open or the crank arms or shaft will be badly damaged in the attempt.
If the car was submerged in salt water, wash it carefully with fresh water at the first opportunity to avoid corrosion.
It may be necessary to remove accumulated mud, silt, or sand from the body and the chassis before further work can be done.
After recovery and inspection for exterior damage, run through the following steps:
1. Drain, flush, and refill all fluids: gas, oil, brake fluid, transmission oil, differential oil, steering box oil, air cleaner oil, radiator water, etc.
2. Inspect the battery and replace if necessary. In salt water it will have been nearly short-circuited. The electrolyte may be contaminated by any submersion. In general it is not practical to flush out and restore a battery if it has been contaminated.
3. Inspect electrical parts; dry or replace as needed. This would include starter, generator, voltage regulator, spark coil, distributor, lamps, horn, connections on back of dashboard, etc.
4. Attempt to start the engine and move the car. If it does not function, see Section 8.00 on check lists.
7.20 Drive Train Expedients
CLUTCH SLIPPING may be due to oil on the clutch facing. As a temporary remedy, block the plates apart by holding the pedal down with a stick overnight. Sometimes the oil can be burned out by slipping the clutch under load. It may be useful to blow a gritty-type household cleanser such as Comet or Ajax into the clutch using a small hose inserted in the drain plug hole.
A DRAGGING CLUTCH that will not allow gearshifting is evidenced by the "grinding" of the gears even though the clutch pedal is pressed down. It may be possible to get home in one gear, usually second, by engaging the gear with the engine stopped and then starting the engine.
It is quite possible to drive without the clutch after starting the engine with the transmission in first gear. To shift up to a higher gear, hold the gearshift lightly and press it toward neutral. When the engine speed matches the road speed the gears will be spinning at the same speed and the transmission will drop into neutral without effort. Slow the engine to match road speed in the next higher gear and gently press the gearshift into the higher gear while using the accelerator to find the right engine speed. The same procedure will work in reverse order to shift to a lower gear.
OLD LAND ROVERS have a habit of hopping out of low range under load if they are not properly adjusted. To solve the problem temporarily, drop a large rock into the space between the transfer case lever and the toeboard of the cab.
7.30 Steering System Expedients
Minor steering problems do not require field expedients, since the car can be controlled.
BALL JOINT failure is fairly common in rough use. The joints at the ends of the tire rods come apart due to wear, rusting, or abrasive road materials in the joint. All of these should be detected in regular inspection. If they are not, the front wheels will either be free of each other or of the steering system. To repair, fit the ball back into the socket, jacking the wheels if necessary to get free movement. Then secure the joint with baling wire; the patch should be checked periodically on the way home.
BENT TIE RODS may be caused by hitting a stump or rock, and may throw the front wheels out of alignment so badly that the car cannot proceed. Straighten the bent rod as much as possible by tying it to a tree and backing up, or by using the jack or the winch for power.
A BENT CRANK ARM will turn fine in one direction but not at all the other way, or the car may only be able to go in circles. The tires will not be out of alignment, however. Straighten the arm with the jack placed against the chassis at any convenient point. It may be possible to put a plank or small log against the arm as a lever and pull the end up with the winch.
A BROKEN TIE ROD is rare, even in rough service. If one does break, other parts such as ball joints will probably be damaged. As a field expedient, straighten the rod as much as possible and put a stick inside the broken ends or wrap the break with the license plate or some other piece of sheet metal, securing with baling wire or radiator hose clamps. That will keep the rod straight, but the ends will fall out of the "splint." Fasten a length of wire or chain between the two ends of the rod to maintain the length. (See Figure 7.30.)
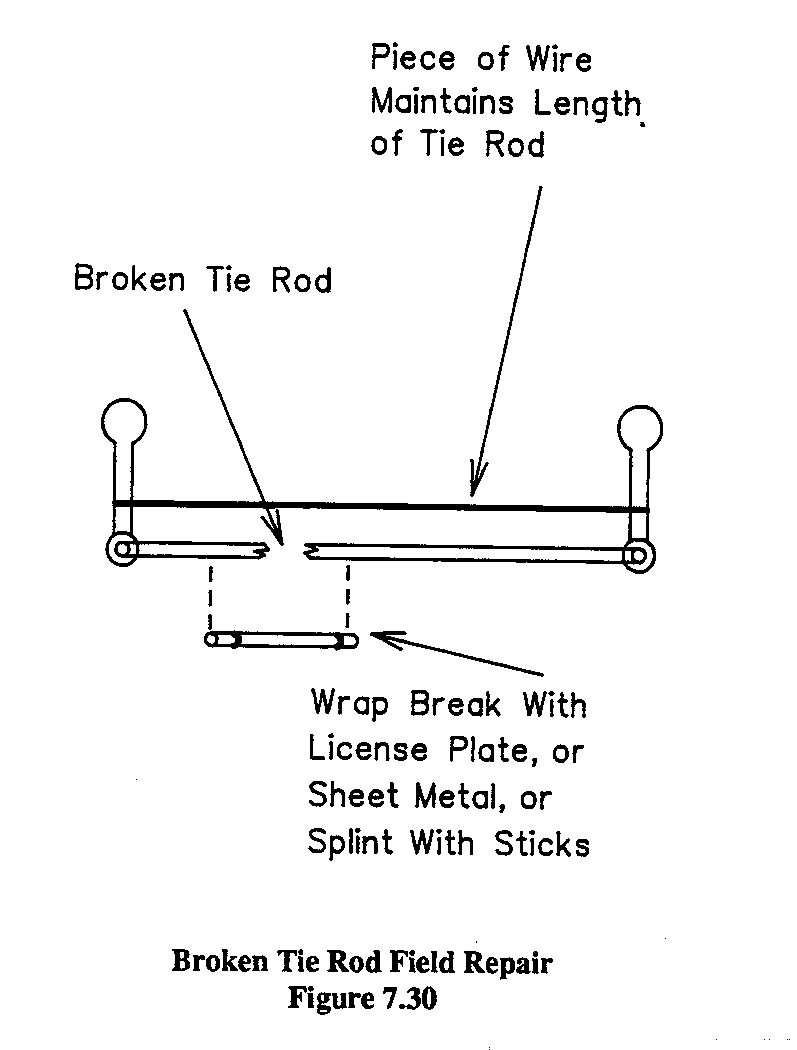
7.40 Brake System Expedients
PUMPING THE BRAKES indicates that they need adjustment. This can be done on the road if necessary, as detailed in Section 10.42.
BROKEN BRAKE LINE cannot be fixed with tape because of the high pressure. If the car has a split brake system with independent braking on two combinations of wheels, there is no problem. If it does not, close the broken line by mashing and folding the tubing with heavy pliers. The others will then work, though they may need to be bled or have fluid added.
A BROKEN BRAKE DRUM cannot be fixed in the field. To keep the brake from locking, fasten the pistons in place by wrapping them with wire. If the wire is not strong enough to hold them when the brakes are applied, pinch off the brake line to the affected wheel.
A SMALL HOLE in a brake line can sometimes be repaired by covering it with a patch cut from inner tube rubber and holding the patch in place with a worm-type hose clamp applied right over the leak. It will then be necessary to refill and bleed the system.
DRAGGING BRAKES will cause one or more wheels to get hot or even lock up. A poor grade of brake fluid, clogging of the master cylinder relief port, or contamination in the line may cause this problem. Bleed some fluid off at any wheel and see if the wheels turn freely. In the shop, be sure to flush out the whole brake system carefully and put in new brake fluid.
BRAKE FLUID should be carried in the toolbox of any car with a history of brake trouble. If none is available and the brakes are inoperative for lack of fluid, do not use water or oil as replacement. The author has driven a great many miles using locally distilled sugar-cane rum as brake fluid. The alcohol does not damage the brake tubing or the rubber parts of the system.
7.50 Fuel System Expedients
BROKEN FUEL LINES cannot generally be patched with adhesive or plastic tape because the gasoline dissolves the adhesive. If a joint must be patched with tape, clean the area carefully with a dry rag first. A worm clamp is a better patch, or cut the broken section and insert a short piece of tube or hose.
BROKEN GAS LINE can be replace with a piece of plastic tube. Cut out the broken section, and slip the plastic tube over the cut ends. Secure with hose clamps or a few turns of baling wire twisted tight.
CLOGGED FUEL LINES can be cleaned by blowing them out. Open joints in various sections of the line and blow the pipes and hoses out by mouth or with a tire pump.
After blowing the lines, they must be refilled with fuel. The fuel pump may not be able to do this, especially if the battery is weak and cannot crank the engine for a long period. There are several alternatives. Open the fuel filler cap and force air into the fuel tank by mouth, thus pushing the gas through the lines to the carburetor. Remove the fuel lines from carburetor inlet and suck on it with the mouth until gas appears in the glass cup of the fuel filter. Do this carefully, so you don't get the gasoline in your mouth.
On some cars, such as the Land Rover, there is a manual lever on the bottom of the fuel pump that makes it possible to pump fuel without cranking the engine. It is also possible to remove the air cleaner and pour a small amount of fuel directly into the carburetor, which will run the engine for a few moments and enable the pump to bring up a supply of fuel. These procedures for getting fuel to the carburetor will also work after a car has run out of gas and the tank has been refilled.
A CLOGGED FUEL FILTER of the in-line type can be bypassed if necessary by removing the filter and replacing it with a short piece of pipe, or by sticking a screwdriver right through the filter element to allow fuel to flow. This will, of course, allow foreign matter normally trapped in the filter to reach the carburetor.
THE GLASS SEDIMENT BOWL on some fuel pumps may be broken by a stone. It can be replaced by a small medicine jar of either glass or plastic. If the jar is too short to be secured by the clamp, put a few washers or a small stick between the clamp and the bottom of the jar to make up the difference. If the glass bowl is only cracked and not broken, it can be patched with laundry soap of the type usually sold in square bars or long bricks.
LEAKY GAS TANKS can be fixed with the same type of soap mentioned above. It does not dissolve in gasoline and can be worked and molded to fit the space. Such a repair, though crude, often lasts for years. Liquid Steel, if available, does the same job and makes an excellent semipermanent repair. It is easy to use and quick drying.
NO GAS can be caused by a clogged fuel line between the tank and the engine or a broken fuel pump. A simple field repair can get the vehicle home: Use a siphon to draw gas from a container into the carburetor directly, bypassing the fuel lines and the pump. Arrange a one-gallon can of fuel in or on the vehicle so that it is higher than the carburetor, perhaps on the hood in front of the windshield, on the roof, or inside where it can be held by a passenger. Disconnect the fuel line where it enters the carburetor. Use a length of plastic tubing to siphon gas out of the can, and when the flow is started, connect it directly to the carburetor. If there is no tubing in the toolbox, it can be "borrowed" from windshield washers or other nonessential equipment. The car will run until the temporary tank is empty.
WATER IN THE GAS will sink to the bottom of the tank, since it is heavier than gasoline. When water in the gas tank has reached the level of the fuel tube to the engine, water will be pumped to the engine. The engine will run erratically or stop completely. Remove the drain plug in the gas tank slowly and let the water drip out until gas starts to flow, then tighten it. Clear the water out of the fuel line and carburetor and the car will run.
A chamois can be used to separate gas and water: Pour the contaminated gasoline through the chamois and water will be held back while the gas passes. In areas where gasoline is often of poor quality, it is a good idea to filter all fuel in this manner. Many 4WD cars have fuel filters in the filler hose to the gas tank to keep out water and other debris.
7.60 Tire Expedients
JACKING a vehicle is a precarious operation and should be regarded as dangerous. Chock the wheels carefully so the car cannot roll while on the jack. Put the jack on a secure footing, using a plank if necessary. Put the lifting end against a flat surface where it will not slip off-the chassis itself or the flat part of the bottom spring leaf is excellent. Some jacks have curved top plates made to support the axle housing.
HAVING NO JACK is an inexcusable oversight, but such things do happen. If caught with a flat tire and no jack, block the axle up with a rock, log, toolbox, or some other support. Then dig a hole under the tire with a shovel until the tire can be removed and replaced. (See Figure 7.60a)
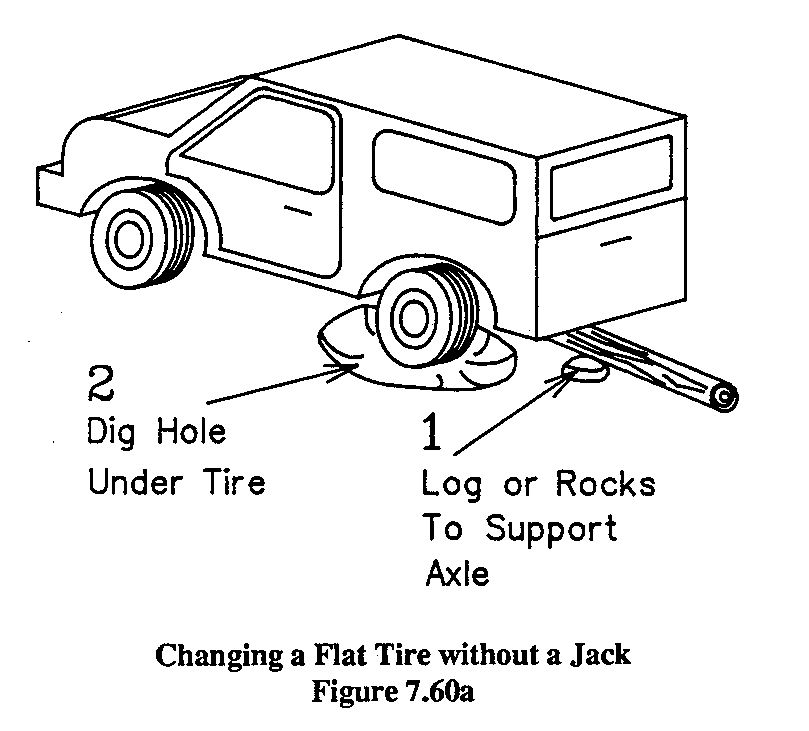
DRIVING ON A FLAT will ruin the tire. If there is no way to fix the tire, remove it and drive on the rim. The rim will be ruined in any event, and this way at least the tire will be saved. There is also the danger of fire if a flat tire is driven upon, since the continuous flexing builds up great heat.
CHANGING A TIRE is not a big project, but for those who have never had to do it, here is a quick outline. First try to get the car out of the flow of traffic, if there is any. Then: 1. Remove the spare tire from its mount and get out the jack and tools.
2. Turn the lug nuts on the wheel just enough to break them free. On some cars the studs may be marked L and R. Turn those marked L the "wrong" way--clockwise to loosen them.
3. Chock the wheels with stones, boards, etc., so the car cannot shift and fall off the jack. Too many drivers have been injured or killed because they overlooked this precaution. 4. Put the jack on a firm footing under the axle, chassis, spring leaf, or some other suitable lifting point. A frame or bumper jack should lift at points specified in the instructions from the car manufacturer. Jack up until the tire just clears the ground.
5. Loosen and remove the lug nuts, keeping them clean.
6. Remove the flat tire. It makes a convenient seat while working on the wheels.
7. Put the new tire in position, lining up the studs with the holes in the wheel. It may be necessary to jack the axle up some more to do this.
8. Put the lug nuts on and tighten with the wrench until the wheel starts to turn.
9. Lower the new tire to the ground with the jack.
- Tighten the nuts all the way, alternating from one side of the wheel to the other as shown in Figure 7.60b to avoid warping the wheel.
- Remove the chocks, stow the flat tire, jack, and tools.
TIRE REPAIRS are described in detail in Section 10.62 on shop procedures.
TIRE CHAINS break frequently in rough service. They are easily repaired in the same manner as tow chains. (See Section 6.23.) Specially designed repair links are also available in several shapes for tire chains. These can be applied with a large pair of pliers while on the road.
7.70 Cooling System Expedients
AN OVERHEATED ENGINE may be the result of overwork or lack of water. In any event, leave the engine running without a load so that it will continue to circulate what water there is. Try putting the transmission in neutral and running the engine at a fast idle for a few minutes; if there is enough coolant and the fan belt is not broken, the engine should cool off.
TO ADD WATER to a boiling radiator, leave the engine idling. Loosen the radiator cap very carefully with a large rag to protect the hands from the blast of steam. When steam has flowed out, take the cap off and slowly add water until full.
CARRYING WATER from a local source to the car is sometimes a problem in the field, even if a stream is nearby. Consider the use of hubcaps, a hat, the sleeve of a raincoat tied in a knot at the end, a large leaf formed into a cup, an air cleaner hose with one end plugged, a plastic bag, or a toolbox. Fuel from an extra five-gallon can could be emptied into the vehicle's fuel tank and the can used for water. In this case the can should be allowed to dry completely before being used again for gasoline.
IF THERE IS NO WATER available, almost any thin liquid can be used in the radiator in an emergency. Probably the most common substitute is urine, although flat beer or soft drinks are also useful. No gasoline or oil should ever be put in the radiator. The entire cooling system, including the engine block, should be well flushed as soon as possible.
BROKEN RADIATOR HOSE can be mended with plastic tape. Since high pressure will open the leak again, loosen the radiator cap so the system will not be pressurized.
RADIATOR LEAKS that can be seen can be mended. Dry the area around the leak and put on a thick coat of Liquid Steel to make an excellent repair. If Liquid Steel is not available, cut a dry stick and jam it into the hole; the stick will swell in the water and close the leak. If the hole is not visible, no great amount of water will leak out, and periodic filling will keep the car going until repairs can be made in the shop.
A BROKEN FAN BELT must be replaced immediately. Do not drive even a short distance without the fan belt, since the engine will overheat and may become badly damaged. Always carry a spare belt. A none is available, a few turns of nylon or polypropylene rope will serve. A nylon stocking, though not likely to be available, is an excellent substitute.
NO ANTIFREEZE for the radiator in moderately cold weather will not affect an engine that is running. In extremely cold weather, however, the radiator may fill with slush or even freeze. The engine will then overheat, but steam will be unable to escape through the radiator overflow if it is blocked by ice, and the engine block may burst. If an engine without antifreeze in the radiator must be stopped for a period long enough for the water to freeze, either operate it often enough to keep the water warm, or drain out all the water.
7.80 Electrical Expedients
Electrical problems can be divided into two broad categories: those involving the high voltage ignition circuit and those involving the low voltage starting, primary ignition, and accessory circuits.
7.81 Problems in the Primary Circuit
In most vehicles the primary electrical circuit has a voltage of 12 volts, although some older vehicles have six-volt systems and a few diesel-powered systems use 24 volts or more. Higher voltage is also common in large trucks.
A DEAD BATTERY is one of the most common complaints involving the primary electrical circuit. It is usually evidenced by failure to crank the engine. Before assuming that the battery is not charged, a careful check of its connections should be made. It is much more common to find that corroded terminals are impeding the power flow than to find that the battery has suddenly and unaccountably died.
To clean the terminals, remove them from the battery and scrape the insides of the connectors with a pocketknife until they are bright and clean. The posts on the battery should be cleaned with a knife or a piece of rough sandpaper. (Special wire brush tools are also available for this purpose.) Then replace the connector on the battery, tighten it in place, and attempt to start the vehicle. If it still will not start, check the heavy wires from the battery to the chassis or engine block, and from the battery to the starter or starter solenoid. The connections on these should also be clean and bright.
IF THE BATTERY IS DEAD, the car can be started in any one of a number of ways. Many 4WD cars are provided with a hand crank that may be used start the engine. Battery jumper cables will supply power to the dead battery from another vehicle. Or the car may be rolled or pushed to start the engine. Each of these methods is described in some detail below. Once the engine is started, the driver should resist the temptation to "floor" the accelerator pedal. It is more likely to stay running at a low speed.
JUMPER CABLES are heavy wires with clips on the ends used to connect the battery of one car to the battery of another without removing the batteries or their connecting cables. To use cables to start a car with a dead battery, drive a car with a good battery as close as possible to the dead one. Connect the positive terminal on one battery to the positive terminal on the other; the abbreviation POS or PLUS should be molded into the battery case near the proper terminal. In similar fashion join the two negative terminals. Start the car with the dead battery, and then remove the jumper cables.
CRANKING with a hand crank was the only way to start cars until the electric starter was invented, and is still a very satisfactory starting method. There must be enough power left in the battery to make a spark across the spark plug, so this method will not work with a totally dead battery. A diesel engine cannot generally be hand-cranked because of the high compression, but some diesels have a valve lifter control to open the cylinders. When the engine is being cranked the valves are held open. When the engine has been cranked up to as fast as the operator can turn it the valves are released and the engine starts.
A ROLLING START cranks the engine through the gearbox and wheels as the car is moved by gravity or some other source of momentum. Put the transmission in second or third gear and turn on the ignition key. Hold the clutch pedal down. Move the car by pushing it with another vehicle, pushing by hand, rolling down a hill, or any other means. When the car is moving, let the clutch up slowly and the engine will be cranked and should start. Never try to start a car by towing it, since it may charge forward when the engine starts, ramming the towing car.
The rolling start is perhaps the easiest of the three methods discussed for starting a car with a dead battery; many cars with doubtful batteries are left stopped on hills for this reason. Diesel engines may be started in the same way, and it is common to see heavy construction equipment parked on a hill to make use of gravity for a rolling start. It is very difficult to roll or push a car with tire chains, or one in mud or snow. A car with an automatic transmission should not be started by rolling. THE STARTER MOTOR may also be the cause of failure to start. On occasion the release mechanism, which separates the motor from the car's engine after it has been started, will fail to release. Or it may jam and not turn at all. Some 4WD cars have square end-shafts on the starter motor that can be held in a wrench so that the motor shaft can be moved to free it if it jams. On other vehicles, it is necessary to remove the starter motor.
A BLOWN FUSE will disable lights, windshield wipers, gauges, radio, horn, or other electrical appliances on the car. If there is no replacement fuse available, wrap the old blown fuse with a piece of tinfoil from a candy or cigarette package. The tinfoil will serve as a conductor, but should be replaced with a fuse of the proper rating as soon as possible. It might also be possible to take a fuse from a less useful circuit that is not needed at the time. The fuses are generally located on a plastic block on the fire wall, under the dashboard, in the glove compartment, or in some other accessible location. Some accessories, particularly those added after manufacture, such as a radio, tape player, extra lights, etc., may have a fuse installed in a plastic tube in the wire to the accessory.
TO FIND THE CAUSE of a blown fuse, connect a test lamp across the fuse terminals. The test lamp can be a special one made for the purpose, or it can be any small bulb taken from a lamp on the vehicle. The bulb will shine brightly as long as the fused circuit is "shorted," i.e., when the positive wire from the battery is connected to the negative wire without a load such as a lamp. When the source of the short circuit has been found and eliminated, the test light will glow dimly or not at all. (See Figure 9.70)

A FROZEN BATTERY is usually ruined, although it may be possible to save it by thawing it in a warm room and recharging. A battery that is fully charged will freeze at about 70 degrees below zero Celsius, but a completely discharged "dead" battery freezes at about zero degrees Celsius. Since few areas have temperatures as low as the freezing point of a well charged battery, the obvious answer to the problem of frozen batteries is to keep them fully charged. In some frigid areas it is common to use electric heaters for car batteries, or to remove them and carry them inside a heated building when not in service.
7.82 Ignition System Expedients
Probably the most frequent cause of failure of the high voltage ignition system is moisture on the wires. This may be caused by rain of splashed water from the road, or it may come from condensation on a foggy morning or when temperature conditions are right. If the wires from the spark coil to the distributor and from the distributor to the spark plugs are not in good condition, they may absorb moisture through pores or cracks, worsening the problem. If wet wiring is suspected, these wires should be carefully dried with an absorbent rag, as should the top of the spark coil, the outside and inside of the distributor cap, and the white porcelain insulators of the spark plugs.
If wet wiring is a frequent problem, the wires should be replaced with new slick-surfaced wires that will shed water. It is also possible to use a plastic varnish spray made for the purpose to provide a coating on the wires.
THE SPARK COIL may get wet and fail to function, especially on cars where the coil is mounted on the fire wall and subject to road spray. If it is not possible to move the coil, cover it with a plastic bag to protect it.
LEAKING POWER may escape from cracked wires or distributor cap, with the sparks quite visible to the naked eye. As a temporary repair, clean the affected area carefully and then apply black plastic electrical tape over the crack in several layers.
SPARK PLUGS may fail for any one of a number of reasons. If the engine runs roughly or not at all, and a spark plug is suspected of being the cause of the trouble, it can usually be at least partially restored by a thorough cleaning of the outside of the porcelain insulator and sandpapering and regapping the electrodes. Further advice on this will be found in Section 10.55.
If the spark voltage is weak and the plug will not fire properly, try closing the gap to about 0.010 inches (0.25 mm). This can be approximated closely enough by using a paper matchbook cover as a gauge. The voltage may be able to jump the smaller gap and get the car to the shop.
7.90 Engine Expedients
Relatively few things go wrong with engines in the field; it is more often the auxiliary equipment such as fuel lines, electrical devices, and other accessories that provide trouble. Real engine trouble can rarely be fixed in the field. A broken piston arm, for example, requires major repairs that are better handled in a clean shop.
A RIPPED CRANKCASE oil pan may be caused by a sharp rock or some other obstacle. If damage is relatively minor, a rip can often be fixed with soap in the same way as a gas tank. (See Section 7.50.) If the pan is pushed in it may be struck by the descending crank arms, causing additional damage. If this much damage to the crankcase is suspected, turn the engine by hand to see if it turns freely. If it does hit the pan, it will be necessary to remove the pan and straighten it somewhat before it can be used.
A RACING ENGINE is usually caused by a stuck accelerator pedal. After stopping the car, investigation will usually reveal that the return spring is broken or may have fallen off. It can be replaced by a piece of inner tube rubber until a correct replacement can be obtained; do not use the rubber for an extended period, however, for it will dry from the heat of the engine and break.
8.00 CHECK LISTS
It is senseless to open the hood of a disabled car in the hope of seeing what the trouble is. So many things that can go wrong with a car that it would be only by the greatest good fortune that such a casual inspection would find the fault. The check lists in this section are intended to replace hit-or-miss fumbling as a means of locating trouble. Items are listed according to obvious symptoms so that even if only a few outward signs are known the driver can attempt to locate the difficulty. In some cases it may be necessary to refer to Section 9.00 on testing procedures for further means of isolating the problem and making a precise diagnosis. Once the problem has been found, if further advice on repairs is needed it may be useful to refer to Section 7.00 on field expedients or Section 10.00 on shop techniques.
8.10 Cranking and Starting Trouble
Problems of this nature may be divided into two categories: the engine will not crank at all, or the engine cranks but will not start and run. Each of these is discussed separately.
In order to start a gas engine, it is necessary to turn it by some outside force, usually an electric starter motor or a hand crank. When the ignition and fuel systems start moving, they provide the necessary spark and fuel vapor in cylinders, and the engine will then operate by itself.
8.11 Engine Will Not Crank
Check the battery and its connections by trying to make a spark between the two terminals with a piece of wire or the handles of a pair of pliers. It should make a healthy spark. If not, the battery is weak or dead.
Bypass the starting relay or switch with a screwdriver blade or piece of heavy wire. If this is the inoperative element, the engine will be cranked through the temporary jumper wire.
The wires to the starter may be broken, loose, or corroded.
The grounding strap that connects the engine block to the car frame may be broken or corroded.
The starter engaging gear may be jammed.
Although rare, the engine itself may be jammed. Try to turn it with the crank or by rolling the car by hand while in gear. If it will not turn at all, remove all the spark plugs. If water squirts out of the spark plug holes when the engine is turned, the head gasket or block is leaking and major work is needed.
8.12 Engine Cranks, Will Not Start
The engine must have three things to run: fuel, air, and a spark to ignite the mixture. Most of these tests are designed to find which of these ingredients is missing. If all three can be brought together at approximately the right time, the engine will run. It may not run smoothly, but it will run.
AIR is the least likely of the three elements to be missing. Check to see that the air cleaner is not clogged. If there is a hose between the air cleaner and the carburetor, as is usually the case with oil bath air cleaners, see that it is free and not kinked. If in doubt, remove the air cleaner.
FUEL is not difficult to trace through the system from the gas tank to the carburetor. Be sure there is gas at every point: gas tank, fuel line, pump, filter, carburetor. Open the fuel line at several points and be sure that fuel flows out when the engine is cranked. Check to see that the vent hole in the gas tank filler cap is open, or the vacuum in the tank will stop the gas from flowing. The carburetor float valve could be stuck.
"FLOODING" the carburetor is caused by too much gas in relation to the amount of air. It is often caused by pumping the accelerator in an effort to get the engine started and can be detected by a smell of gas around the engine. Wait ten minutes for the surplus fuel to evaporate, and then try again to start the engine. If there is a manual choke, push it in to open the butterfly valve and get the maximum flow of air to the carburetor. To start under these circumstances, hold the accelerator pedal to the floor without pumping it and crank the engine until it starts.
WATER can prevent starting by contaminating the fuel or by leaking power from the ignition wiring. Examine the gas going into the carburetor to be sure it does not contain any water.
ELECTRICAL TROUBLES are perhaps the hardest to find because there are so many contributing factors and the electricity cannot be seen. If there seems to be air and fuel getting to the engine, check the following points: ignition wiring may be wet or cracked; the sparking voltage may be leaking from the distributor cap or the spark coil cap; the tops of the spark plugs may be wet or cracked.
To test the spark circuit, pull the wire from the center of the distributor and hold it about 1/4 of an inch (5 mm) from the engine block while cranking the engine, either with the starter or the hand crank. An alternate way of checking the coil is to open and close the breaker points by hand with the ignition key turned on. Using either method, there should be a spark from the center wire of the coil when it is held near the engine block. If there is no spark, check the coil, points, condenser, distributor, and the small primary wire between the coil and the distributor.
Check the distributor in the same way by holding a spark-plug wire near the engine block and looking for a spark while cranking the engine. If there is no spark be sure the distributor and wires are dry and check for damage. The inside of the distributor cap may be wet with condensation.
If there is still no spark, the primary voltage may be too low to give sparking power. Turn on the headlights and crank the engine with the starter motor. If the headlights get very dim or go out, the primary voltage is too low, probably because of a dead or weak battery.
Other problems may also block engine starting:
If the start motor spins but does not turn the engine, the starter engaging gear must be disassembled and cleaned carefully. The car can still be started by hand cranking or pushing.
If the car seems to run for the moment--the starter motor is cranking but stops when the ignition key returns to the operating position--check the resistor in the low-voltage wiring to the ignition coil. This resistor may be burned out and not passing any current. As a further check, try "jumping" it with a piece of wire. The resistor is usually in a small porcelain block on the fire wall.
A possible block in the air system may be caused by collapse of the inner layer of the air hose. The hose may appear perfect on both external and internal inspection, but under suction the liner may come loose from the coiled wire stiffener and thus block the hose.
8.13 Engine Starts, Then Quits
By far the most common cause of this complaint, especially in cold climates, is the choke, which may be adjusted incorrectly or not working at all. In addition, the fuel may be contaminated with water or dirt, or the fuel line may be blocked or partially blocked. (See also Section 8.60 on conking out and Section 10.31 on choke adjustment.)
8.14 Low Charge; Dead Battery
A slipping fan belt is the most common cause of a dead battery, aside from exceeding the useful life of the battery itself. If the belt is too loose, it will not turn the generator, and the battery will become discharged in normal use.
The generator or alternator itself may be loose on its mountings.
Check for an open circuit between the generator or alternator and the battery. All connections should be clean and tight. Remember that a large current must be carried by these connections.
The brushes on the generator may be stuck in their holders or worn, or the commutator glazed or burned so that the brushes do not make good contact.
The voltage regulator may need to be examined and tested.
Electrical accessories may have been left on when the battery was not charging, depleting the battery.
If failure to charge takes place after fording deep water, the problem is probably a wet fan belt. Water lubricates the belt and allows it to slip over the generator pulley.
8.15 Poor Spark Across Spark Plugs
If spark plugs are fouled with deposits, they may be of the wrong type for the engine. Check the owner's manual to determine the correct type.
Cracked porcelain insulators may indicate a spark plug that is running too hot. Another model is needed. Cracked insulators can also be caused by flying stones or other abuse.
Poor spark may result from water on the wiring or from poor supply voltage from the distributor and coil.
With magneto ignition (although this type is not common) it may be caused by stuck or broken magneto brushes.
The distributor arm may be stuck or sluggish in operation.
8.16 Engine Runs--Will Not Stop
An engine that runs after the ignition key has been turned off is described as "dieseling" since it is operating in the same way as a diesel engine without a spark system.
Carbon deposits inside the cylinder may be heated by fuel combustion and serve to ignite subsequent cycles of the engine.
A poor grade of fuel may also cause dieseling.
To overcome the problem temporarily, set the parking brake, engage the gearshift in any gear, and let up the clutch. With the car unable to move, the engine will be stalled.
8.20 Low Oil Pressure or No Pressure
Stop the engine immediately before permanent damage is done.
Check that there is sufficient oil in the crankcase.
The oil pump may be damaged.
The sump intake filter where oil enters the pump may be clogged.
Thin or diluted oil will cause low pressure.
The pressure gauge or indicator light may be wrong.
An oil line may be loose from its connections so that oil leaks out, or be pinched or clogged so that not enough oil can pass.
If oil pressure drops slowly over an extended period of months, it may be due to wearing in the bearings, allowing oil to leak out of the space between the shaft and the bearing.
If the crankcase breather cap is plugged, a vacuum in the crankcase may draw in fuel, diluting the oil and causing low pressure.
8.21 Engine Uses Too Much Oil
This is usually a matter of wear in the engine. The following points should be checked:
Manifold gasket may be broken or cracked.
Valve guides may be worn, especially the intake valve.
The cylinder head gasket may be broken or cracked, or the cylinder head may not be fastened securely.
The crankcase breather cap or the breather in the rocker arm cover may be clogged.
Engine bearings or pistons may be excessively worn.
On cars with a vacuum booster for the brakes, check to see that the pump diaphragm is not cracked or dried out.
8.30 Steering Problems, Alignment, Wheel, etc.
Since the operation of the brakes can affect steering, it may be useful to inspect the braking system in accordance with Section 8.40. The following sections deal with specific problems.
8.31 Front Tires Worn
Check tire pressure. Either too much or too little can affect steering.
Be sure wheels and tires are properly balanced if used at speeds over 30 mph (50 kph). At low speed balance is not usually a problem.
Brake drums may be out of round due to wear or damage.
Front wheel toe-in may need adjustment. (See Section 10.61 on steering alignment.)
8.32 Uneven Tire Wear
Frontier roads are hard on tires, and a set of tires may last a very short time compared to what would be expected on a paved road. If wear is uneven or irregular, however, the following items should be checked:
The tires may be out of balance, though this is rarely a problem on frontier roads. A wheel may be bent or damaged, or mounted loosely on the lugs.
Tires may be underinflated or overinflated.
Check to see that the axle is mounted straight. Sometimes the center pin in the leaf spring supporting the axle breaks, allowing the axle to shift.
The chassis may be out of line through overloading or road damage.
The springs should be checked for a broken main leaf.
8.33 Vibration in Drive Train
Examine universal joints in the drive train for broken cups, missing needle bearings, etc.
The propeller shaft may be bent or may be out of balance.
Bolted flanges in the drive train may be loose.
The splines on the drive shaft may be worn or damaged.
8.34 Wheel Bearings Hot
The brakes on the affected wheel may be dragging or may have dirt in them. (See Section 8.44.)
Bearings must have sufficient grease of good quality.
Bearings may be adjusted too tight.
Bearings may be damaged or broken.
8.35 Steering Troubles
Shimmying, swaying, wandering, hard steering, and other troubles may be caused by any of the following items: wrong tire pressure; loose or tight front wheel bearings; steering box loose from mountings; loose steering rods or joints; broken road spring or main leaf, chassis bent; brakes dragging; bent rear or front axle; worn shock absorbers; tires of unequal size; shock absorbers broken loose from mounting.
On cars with a hydraulic steering damper, such as the Volkswagen, shimmying may be caused by failure of this damper.
If the steering wheel is too hard to turn, check the following: a stick or other foreign object may be caught in the steering gear; the front wheels may not turn freely; the steering gearbox may need oil; gears or bearings in the steering gearbox may be jammed with grit; the bearing at the top of the steering column, inside the steering wheel, may be stuck.
If the steering wheel turns too freely, it is usually the result of wear. If the car suddenly ceases to steer properly, check the following: front wheels not aligned; tie rod loose or broken; check free movement between steering wheel and wheels; tie rod bent; ball joint loose or apart; tie rod connection to wheel housing loose or apart; cranking arm bent or loose.
8.40 Brake Trouble
Probably the most frequent complaint regarding brakes is that they do not stop the car. On frontier roads a driver is not usually particular about lesser difficulties because the speed is low and the road is rough enough that a minor pull to one side or some other trouble won't be noticed. Difficulties with brakes have been divided into several sections below.
8.41 Brake Pedal Sinks to Floor; Brakes Do Not Hold
This may be due to lack of brake fluid. Check the master cylinder, wheel cylinders, and connecting tubing for a break or leak.
Air in the system will allow the pedal to sink and give a spongy feeling. The same flag can be caused by rubber hoses in the brake system, which swell up under pressure, a plugged master cylinder cap vent, contaminated or poor grade brake fluid, a leak in the system, or the sealing cups in the master cylinder may be worn. The shoes may be so poorly adjusted that they do not reach the drums.
8.42 Brake Pedal Operates Properly; Brakes Do Not Hold
If the car has gone through water, the linings are probably wet. Hold the brake pedal down lightly while driving to heat the linings and dry them.
The linings may be of poor quality or may be glazed.
Brake fluid or oil may be on the shoes.
8.43 Brake Pedal Rises and Brakes Drag
The master cylinder compensating port is being blocked by dirt, a swollen primary cup, failure of the master cylinder piston to return fully, or improper adjustment of the pushrod. For all of these troubles, the master cylinder should be reconditioned.
The use of inferior brake fluid can cause this complaint. (Refer to Section 7.40.) 8.44 Brake Pedal Satisfactory; Brakes Drag
In this event the brakes will probably overheat. Check the following: Swollen rubber tube in brake line; dirt or gravel in drums; shoes adjusted too tight, touching drums; shoes not being returned after use due to weak brake shoe return springs; brake fluid tube mashed or restricted; linings too thick, touching drums.
8.45 Car Pulls to One Side When Braking
If the car pulls to one side it indicates that one of the brakes is not working properly. It could be on either side, depending on whether one brake is slipping or the opposite one is locking.
Brake fluid, oil, or water on a lining will cause it to slip.
Wheel cylinders may be mounted loosely so that they do not open the shoes enough, or open them unevenly.
Brake hose may be restricted or clogged. Brake drums may be so badly worn or scored that they do not hold properly.
All linings must be of the same material. If any brakes need relining, both wheels on the same axle must be relined at the same time.
8.46 Brakes Grabbing
See the suggestions listed under Section 8.45 above. In addition, check brake shoe adjustment and look for cracked drums. Brakes that are operating properly may seem to grab on slippery road surfaces if not used gently, particularly if only one or two tires can get traction.
8.47 Brake Pedal Does Not Return
If the pedal does not come up again after the brakes have been used check the pedal return spring; see that the master cylinder is mounted securely; and examine the clearance around the pedal shaft. Sometimes a rock or stick will jam in the pedal mechanism either above or below the floorboards.
8.50 Clutch and Gearshift Problems
Since the clutch and gearshift are used together, it is easy to confuse problems of one with the other. In checking a disabled vehicle, therefore, it is advisable to refer to both sections below.
8.51 Gearbox Trouble
GEARS DO NOT ENGAGE. Examine the clutch to see that it is releasing all the way and not dragging. The gears in the transmission may also need adjustment, though this is rare except when the gearbox has been disassembled.
GEARS DO NOT DISENGAGE. The same troubles as mentioned above under "Gears do not engage" should be checked. In addition, the splines on the gearbox shaft may be damaged.
SLIPS OUT OF GEAR. Several things can cause this problem. Check the following: shift fork bent so gears do not mesh fully; shift linkage out of adjustment; transmission splines worn; too much end play in transmission gear shaft; gears badly worn or damaged by lack of oil or the presence of dirt; bearings badly worn; synchronizer rings worn.
8.52 Clutch Trouble
CLUTCH SLIPPING may be caused by weak or broken pressure springs; pedal adjusted too tight with no free movement; worn clutch linings; pedal mechanism binding; oil on the linings; or the driver may be "riding the clutch"--inadvertently leaving the left foot on the clutch pedal and pressing it partially down--causing excessive wear and heating.
CLUTCH GRABBING may be caused by a release lever that is out of adjustment; oil on the linings; loose engine mountings; sticking clutch pedal caused by weak return spring or bent parts; clutch plate hub sticking on pinion shift because of rust, etc; broken or weak pressure springs; binding or worn operating levers.
CLUTCH CHATTERS. This is caused by three main factors: poor or loose engine mounts; uneven release of the pressure plate; and oil or grease on the clutch lining. If the clutch vibrates or shudders, look for worn propeller-shaft universal joints, a loose flywheel, bent splined shaft, or a bent driven plate.
CLUTCH DRAGS. If the clutch will not release properly, gear shifting is very difficult or even impossible. This may be caused by oil on the linings, poor lever or pedal adjustment, dirt in the clutch, bent clutch plate, a stuck withdrawal sleeve, or broken linings.
On a hydraulic clutch, also look for a shortage of fluid or the presence of air in the hydraulic system. This type of clutch is subject to many of the ailments of hydraulic brakes, including spongy pedal, sinking pedal, etc. (See Section 8.40 for similar conditions in brake systems.
8.60 Rough Running or Conking Out
An engine that runs roughly may suffer from any of a number of troubles. The difficulty may cause only a minor irregularity in the operation, or it may result in severe loss of power. In the most extreme case the engine will "conk out," or stop running completely.
8.61 Rough Running
The difficulty can be localized by observing when the rough running is worst: at idling speed, when the engine is loaded, when accelerating, etc.
MISFIRES UNDER LOAD. Check the following items: overheated spark plugs; dirty air cleaner; improper ignition timing; poor quality of fuel; spark plugs have incorrect gap; spark plugs are not the type specified for the engine.
MISFIRES UNDER ACCELERATION. Although this may be due to the spark jumping across a dirty or wet insulator to the engine block or other metal parts of the car, it is more commonly due to fuel problems. Look for water in the carburetor float bowl or fuel strainer. The idle mixture may be too rich. The air cleaner may be clogged and result in choking the engine. If electrical problems are suspected, check the breaker point setting, coil performance, and spark plug condition. The condenser may be damaged.
ENGINE KNOCKS. The two most common causes of knock, which is evidenced by a sound like loose marbles rattling around in the engine, are poor fuel and improper timing. Other difficulties related to this symptom are carbon deposits in the engine, improper carburetor adjustment, worn bearings, wrong valve timing, worn or damaged spark plugs, inoperative distributor advance mechanism, and the need for valve adjustment.
ENGINE BACKFIRES. The first thing to check is ignition timing. After that, try carburetor adjustment, valve timing, valve tappet clearance, loose timing chain, carbon deposits in the cylinders, weak valve springs or sticking valves, valves not sealing tightly, or valve stems and guides worn.
8.62 Engine Short of Power
Any of the items listed in Section 8.61 will affect engine power. In general, a shortage of power results in a drop in engine speed, a tendency for the engine to die under a normal load, and possible overheating.
Valves that are mistimed will work well with a light load but not with a heavy load. Worn valve stems or guides will cause a shortage of power and may be detected by looking for a change in engine speed when gasoline is squirted on the valve spring.
A hot exhaust manifold may indicate sticky valves or lack of sufficient clearance around the valves, restricting the flow of hot exhaust gases.
In adjusting the carburetor or looking for incorrect adjustment, remember that too lean a mixture will cause poor acceleration or even backfiring in the carburetor. Too rich a mixture causes sluggish pickup, makes the engine run in a "loping" manner, and may result in black smoke in the exhaust.
Poor compression may be caused by worn rings, valves, or cylinder head gasket. It may be detected with a compression meter.
If the muffler is clogged or constricted, the engine will lack power or may stop completely.
Other causes of lack of power, or what may seem to be lack of power, include dragging brakes, slipping clutch, leaks or restrictions in the fuel line, bad coil or condenser, ignition timing off.
Low compression may be caused by worn or scored cylinder walls, which will cause a bluish exhaust because of the high oil consumption. It may result from leaky or stuck valves, tight tappet adjustment, or a broken valve spring. Poor cylinder lubrication will reduce compression and also increase friction. If the cylinder head or block is cracked, the engine needs major repairs or must be discarded. Often this condition is indicated by the presence of water in the crankcase or a gurgling noise in the radiator as bubbles are forced into the cooling system by engine compression.
In an engine with four cylinders, the loss of one cylinder due to a cracked spark plug or leaking spark voltage will result in a great power drop. In a six or eight cylinder engine this loss will be less noticeable and may even go undetected.
8.63 Engine Conks Out
Any of the difficulties listed in Sections 8.61 and 8.62 may lead to "conking out": complete stoppage of the engine.
In trying to diagnose why an engine quits, notice how the stoppage takes place. If the engine chugs and sputters as it comes to a stop, the difficulty can probably be traced to the fuel system. If the engine stops suddenly without trying to keep going, electrical trouble is likely.
If the engine can be made to run at higher speeds but quits when idling, the idle speed may be adjusted too low.
ELECTRICAL TROUBLES that cause conking out include the following: bad spark plugs, coil, condenser, or points; ignition wires wet or cracked so that spark leaks out; loose circuit in primary circuit of ignition, possibly where wires go through a connector block on the fire wall; loose battery connections; loose wires in ignition circuit. A common complaint on some cars is breakage of the fine wire within the distributor that carries power from the primary winding of the spark coil to the inner plate of the distributor and flexes each time the distributor is advanced on acceleration. (See Figure 8.63.)
FUEL SYSTEM TROUBLES should be checked as follows: carburetor adjusted too lean or too rich; fuel has water in it; heat has caused vapor lock in the fuel lines, pump or float chamber of the carburetor; fuel line clogged; choke plate stuck shut; air cleaner clogged; dirt in the carburetor needle valve.
8.64 Engine Conks Out, Will Not Restart
In general, an engine that conks out due to some maladjustment can be restarted and run a bit before it conks out again. The running interval may be only a few seconds, but the engine is not totally dead. In the event that the engine is dead and will not restart, additional trouble must be suspected.
Be sure there is fuel in the tank and that it is getting to the carburetor. If the engine is seriously overheated, the pistons may have seized in the cylinders. The same thing may be caused by lack of oil.
In general the notes in Section 8.10 on starting troubles may be used if there has been no major damage to the engine.
8.70 Engine Overheats, Radiator Boils
The most common cause of an overheated cooling system is lack of sufficient water. Be sure the radiator is full of clean water. If the radiator is boiling, the greatest care must be exercised in opening the cap since steam or boiling water can shoot out with great force. Put a large rag over the cap and loosen it only slightly so that a little steam can escape. When no more steam escapes, cautiously open the cap a bit more until it is free. Keep well away from the open radiator while slowly pouring in water.
A car with an overheated or boiling cooling system should not be shut off; the engine should be left idling if at all possible until sufficient water has been added and the system has cooled.
Overheating may be caused by too lean a carburetor mixture, insufficient advance in the spark timing, low oil level, oil that is too thick, overloading the vehicle, dirty oil or a clogged crankcase sump filter, an air-flow obstruction on the outside of the radiator, choked or damaged exhaust pipe or muffler, loose fan belt, inoperative thermostat, damaged water pump, diluted or thin oil, slipping clutch, carbon deposits in the cylinders, or over loading the vehicle.
Since there are so many causes of overheating, it is useful to break down the list into a few symptoms.
HARD STARTING, poor operation at moderate speeds, and generally sluggish performance is probably caused by timing problems. Look for breaker arm wear, worn or damaged spark advance mechanism, or a loose distributor.
NOISY ENGINE and low oil pressure, together with overheating, indicate lubrication problems. Oil may be diluted or of the wrong grade. Sludge may have clogged the intake filter in the crankcase or a screen in the oil pump.
POOR OPERATION at normal speeds may be due to low fuel level in the carburetor bowl, caused by the float, or could result from dirt clogging the jets in the carburetor.
RAPID TEMPERATURE RISE when the car is started may indicate a slipping or broken fan belt, or the radiator may be covered with chaff, mud, leaves or some other foreign matter. If airflow is normal, the temperature rise may result from water pump problems, dirt in the engine water passages, or dirt or corrosion in the radiator tubes.
POOR VEHICLE PERFORMANCE, even though the engine seems to run properly, can probably be traced to the brakes or clutch, or may be due to overworking the engine with a heavy load.
8.80 Funny Noises
In some cases of engine or gearbox trouble, the difficulty can be located by the source of the noise. At times, however, the source of the noise is not apparent.. This section is intended to aid in identifying the problem by finding the source of the noise.
As a start toward isolating the noise, determine if it is the same whether the vehicle is moving or standing still. If it is the same, the problem is probably in the engine or clutch; if the noise changes when the car is not moving, or if it stops completely, the problem is more likely in the wheels, drive train, or body. Remember that some noises are caused by the road surface. Try the car on a different surface if this is suspected. For example, the sound made by tires with big lugs in the tread moving on certain types of road is virtually the same as the sound of worn gears in the differential.
ROARING UNDER THE HOOD is usually the result of exhaust gases escaping from the exhaust manifold or the pipe leading to the muffler. This sound may be quiet when the engine is idling and then increase greatly when the engine is laboring under a load.
A HIGH SQUEALING noise from under the hood, especially at high engine speeds, is usually caused by a glazed fan belt slipping over the pulleys or by a failing water pump.
SOUND OF RATTLING MARBLES when the engine load is increased, such as on a hill, is called "knocking." It may be caused by the use of a poor grade of gasoline or incorrect ignition timing.
SQUEAKING NOISES generally occur near the engine and are usually the result of a dry bearing. Check the bearing at the center of the fan to see if it is overheated. The generator shaft bearing may be hot as the result of too little oil. Squeaking can also be caused by worn generator brushes or by a loose fan belt.
PROPELLER SHAFT NOISES may come from worn spline joints, loose bolted flange joints, worn bearings in the differential or the gearbox, lack of grease in the universal joints, of worn or missing needles in the universal joint bearings.
AXLE NOISES can be localized somewhat by observing whether the noise occurs when the car is moving under power, coasting, or both. If it only makes noise under power, check the pinion bearings in the differential for excessive wear or grit. These bearings might also be adjusted too tight. If the noise is heard when coasting, the ring gear and the pinion may be adjusted too loosely; also check for wear or grit in the pinion bearings. If the noise is heard both under power and while coasting, check for a worn universal joint, damaged axle shaft bearing, loose or worn differential side bearings, worn pinion or ring gear teeth, pinion adjusted too deep into the ring gear, loose or worn wheel bearings, or grit in the pinion bearings.
FRONT WHEEL NOISE can result from loose wheel lugs or lug nuts, worn or broken front wheel bearings, a blister or bump on the tire, need for lubrication, or scored brake drums.
REAR WHEEL NOISE can usually be traced to loose wheel hub nuts, worn differential, loose brake backing plate, or warped or dragging brake shoes. Vehicles with a limited-slip differential are subject to a peculiar chattering noise from the rear end if the differential is filled with the wrong lubricant.
KLUNKING WHILE TURNING usually indicates something loose that bangs against the body of the car. Examples are a shock absorber mount broken off, a loose muffler or exhaust pipe, or such unlikely but common troubles as a beer can in the toolbox or a rock or marble in the pickup body rolling around. A solid klunk after a turn can also indicate excessive end play in the axle shafts.
A METALLIC BANGING NOISE when the car goes over a bump can indicate worn or missing shock absorber rubber bushings, worn rubber engine mounts, a broken spring, the radiator cap or gas filler cap hanging loose on its chain, a seat belt hanging out the door, or a vehicle so badly overloaded that the frame hits the axle.
GEARBOX NOISE can be traced to a worn speedometer gear, worn synchromesh wheels, worn primary bearings, or the wrong kind of oil. Lack of oil will result in noise, and the problem can also be worn gears in the transmission--especially if one speed in the transmission makes more noise than the others.
9.00 TESTS AND TESTING EQUIPMENT
While the check lists given in Section 8.00 will often localize a problem to the point where it can be identified and repaired, sometimes more positive tests are needed. In some cases, these can be conducted with materials at hand; other times certain elementary testing equipment is helpful.
9.10 Cooling System Tests
The thermostat can be tested by putting it in water on a stove and checking the temperature with a thermometer. It will be possible to see the thermostat open and close; the temperatures should conform to the car manual.
Oil in the radiator indicates that the block may be cracked or a gasket leaking. Test the compression of each cylinder with a commercial pressure gauge. The cylinders should test to within 20 pounds (1.5 kg/[cm.sup.2]) of each other; a cylinder with low compression indicates a leak. (See Section 9.20 for test method.)
If air or exhaust gas from the engine leaks into the cooling system, the water level in the radiator will rise and some water will be forced out the overflow tube from the radiator filler neck. When the engine is stopped, the water will return to its natural level and it will be necessary to add more water to the radiator. Air can be forced through a poor seal on the water pump, or exhaust gas can enter the cooling system through a leaking cylinder head gasket. To test for air or exhaust gas in the cooling system, run the engine until it is warm. Put the lower end of the radiator overflow hose into a bottle of water. Remove the regular cap from the radiator and replace it with a cover that only seals the top edge of the filter neck; a piece of old inner tube rubber held in place with a flat board pressed on the radiator by hand will serve the purpose, or an old radiator cap can be modified into a test cap by removal of the lower pressure ring that protrudes from the underside of the cap. If bubbles come from the overflow tube in the bottle of water, air or exhaust gas is getting into the cooling system.
Special tools are available for testing radiators, consisting of a hand-operated pump and a pressure gauge designed to fit over the radiator filler opening. The pump is used to build up pressure in the system so leaks can be located. The gauge indicates whether any pressure has been lost. Operating pressure in the cooling system gives much the same results, except that the mechanic must work on the radiator when it is dangerously hot and there is no pressure gauge to detect a slow leak. As an expedient, it may be possible to make a hole in the top of the radiator to connect a pressure gauge, which should indicate within one pound (0.1 kg) of the rating stamped on the cap. The hole must be sealed after the test. If the radiator does not achieve the proper pressure, the engine will overheat.
9.20 Engine Tests
VACUUM-GAUGE tests are made by putting a commercial vacuum gauge in the intake manifold. Some vehicles have connections for this purpose; on cars with vacuum-operated windshield wipers, the vacuum hose to the wipers can be used. On other cars it may be necessary to drill and tap the manifold; when this is done, it will be necessary to fit a plug to fill the hole for normal operation.
The gauge should indicate about 17-21 inches (43-53 cm) of vacuum while the engine is idling. When the throttle is suddenly opened and closed, the gauge will drop below 5 inches (12 cm), climb to about 25 inches (62 cm), and then return to normal.
A steady reading of less than 16 inches (40 cm) indicates a worn engine in need of overhaul. If the gauge is steady at low speeds but vibrates at high speed, weak valve springs should be suspected. If the needle vibrates at low speed and is steady at high speed, check for worn valve guides. If the gauge drops intermittently to about 4 inches (10 cm), a sticky or burned valve may be the problem.
A quick check for worn piston rings, as indicated by consistently low vacuum-gauge readings, is to put a spoonful of heavy oil into the suspected cylinder--or all the cylinders. This will temporarily alleviate the problem as the oil closes the leaks around the rings.
If the gauge reading is very low, look for a leak in the intake manifold or the carburetor. To find this leak, apply heavy oil (gearbox oil, for example) to the joints between the engine block and the intake manifold and to the carburetor joints. If the idle speed of the engine increases as the heavy oil is put on a joint, temporarily sealing it, that spot is leaking. In some cases the leak may be so big that the oil will be sucked in without any change in engine speed. A new gasket may be needed if tightening the bolts will not close the leak.
If the vacuum gauge floats up and down slowly over a range of about 4 or 5 inches (10-12 cm), the carburetor probably needs adjustment. If the range is only about 2 inches (5 cm) on the gauge, look for spark plugs that are gapped too closely.
WATER IN THE OIL is much the same as oil in the water (see Section 9.10) and indicates that the engine block is cracked or the head gasket is leaking. To confirm the presence of water in the oil, dip a few drops of oil from a hot engine with the dipstick and drop it onto the hot exhaust manifold. If it spreads and smokes away, there is no problem; if it spits and sizzles as the water boils out, a leak must be suspected.
THE AIR FILTER can be tested easily by removing it. Start the engine with the filter on and then remove it with the engine still running. If the engine increases speed without the filter, the filter should be replaced or cleaned.
COMPRESSION TEST requires a commercial compression gauge that measures the pressure of the air mixture in the cylinders. To make the test, remove the air cleaner. Block the throttle and choke fully open. Remove all the spark plugs. Put the compression gauge in each of the cylinders while cranking the engine for several turns and record the reading from each cylinder. The highest and lowest readings should be within 20 pounds (1.5 kg/[cm.sup.2]) of each other, and each cylinder should push the gauge up to at least 70 or 75 pounds (5 - 5.25 kg/[cm.sup.2]) on the first revolution.
Readings that are higher than specified by the manual indicate carbon deposits. Low compression on one cylinder indicates a leaky or burned valve. If the pressure climbs 10 to 20 pounds (0.7 - 1.5 kg/[cm.sup.2]) on each revolution and then slips down again, leaking piston rings should be suspected. This can be tested by putting a spoonful of oil in the cylinder and checking again. If this improves performance, the rings are probably worn; if it does not, the valves are stuck or worn.
If two adjacent cylinders have low readings, the head gasket is probably burned out between them.
9.30 Clutch Tests
SLIPPING CLUTCH can be found by parking the car with the front end against a large tree or by connecting the rear end to a tree with a sturdy cable. Start the engine and put the car in its lowest gear; let up the clutch as though to move the tree. The engine should stall as soon as the pedal comes up a little. If the pedal gets near the top of its movement before the engine stalls, it should be adjusted. If the engine never stalls, the clutch is slipping.
9.40 Drive Train and Steering Tests
To test an axle shaft for an invisible crack, clean it with gasoline and wipe it dry. Hang it up with a piece of wire or string and strike it with a hammer. Solvent and oil will be expelled from the crack by the vibrations.
To see whether it is the front or rear wheel bearings of a car that are making noise, put the vehicle in two-wheel drive and operate it. If the noise does not change when the car is under power or coasting, the front wheel bearings need work; if the noise is different from that heard in four-wheel drive, the rear wheel bearings are worn.
To test for a specific damaged wheel bearing, jack up the suspected wheel. With the brake off and the gearbox in neutral, spin the wheel by hand and listen for a grating sound.
BALL OR ROLLER BEARINGS can be tested after removal and careful washing. Dip the clean bearing in kerosene or diesel fuel for temporary lubrication. Support the inner ring with the fingers and spin the outer ring. It should turn freely and coast to a stop. If another washing doesn't remove the grit, the bearing should be replaced.
In checking a bearing, also look for split, cracked, or broken rings, broken balls or rollers, or broken separators. If the bearing has a bluish color, it has been overheated in the rings or raceway and should be discarded.
SHOCK ABSORBERS can be tested by sitting on the fender or bumper over the suspected shock absorber. Jump off and note whether the car rises and stays up or bounces. If it bounces, the shock absorber is probably worn.
Another test is to remove one end of the shock absorber from the mounting. Pull the shaft all the way out and then press it in. It should go in slowly and evenly, requiring substantial force to compress it.
STEERING PARTS should be checked with the front end of the vehicle off the ground on a jack stand or other support. If the steering wheel turns more easily than when the car is driving, the cause is probably a worn ball joint or steering knuckle. If steering is still hard with the wheels off the ground, disconnect the pitman arm from the drag link. This will indicate whether the problem lies between the steering wheel and the opened joint or beyond that point toward the wheels.
A BENT WHEEL will cause bad shimmying and can easily be tested. Jack up the suspected wheel until it just clears the ground. Spin the tire and lay a rock or brick beside it on the ground as a reference point. The tire should be the same distance from the brick all around its circumference.
9.50 Fuel System Checks
THE FILLER CAP must have a vent in it to prevent a vacuum from building up in the fuel tank as fuel is used by the engine. To test the cap, remove it and attempt to blow through it. The hole need not be large--even a tiny pinhole is adequate since the rate of fuel use is very slow. With some pollution-control systems, there is a valve in the fuel-tank cap that may make it impossible to blow through. If cap malfunction is suspected, try running with the cap loose to prevent vacuum buildup.
THE FUEL PUMP can be tested with a pressure gauge, which is often included on commercial vacuum gauges. The gauge should indicate 3 to 6 pounds (0.2-0.4 kg/[cm.sup.2]) of pressure for most vehicles. The gauge should be inserted by disconnecting the line between the fuel pump and carburetor and substituting the gauge for the carburetor.
Another check, which requires no special equipment, is to see how much gas the pump moves. Disconnect the carburetor line and let the hose from the fuel pump squirt into a bottle while cranking the engine with the starter motor. It should be able to move about a pint (0.5 liter) in 30 seconds.
9.60 Brake Tests
The simplest test of the brakes is to run the car and see whether the brakes are able to stop it properly.
If the brakes on one wheel are suspected of not working, jack up the wheel, spin it by hand, and apply the brake to see whether it stops.
9.70 Primary Electrical Tests
The electrical system can be divided into two parts: the primary system and the ignition, or secondary, system. The primary system includes all the lights, horn, battery, generator or alternator, and fuses.
BATTERY TESTS. To see if the battery is completely dead, try to make a spark across the terminals with a piece of wire or the handles of a pair of pliers. It should make a substantial spark.
An excellent battery test is to turn on the headlights and disconnect the center wire of the spark coil so the engine cannot start. Crank the engine with the starter motor. If the lights dim only slightly, the battery is satisfactory; if they go out or get very dim, the battery charge is low or there are corroded connections.
A hydrometer can also be used to test the battery. Remove the cap from cells on top of the battery and stick the hose into the liquid in the first cell while the rubber bulb is compressed. When the hose is in the liquid, slowly release the bulb to draw liquid into the tube. When the float in the tube is free of the bottom, read the specific gravity on the float itself. Most hydrometers compensate for temperature, but the difference is not enough to be significant in locating a defective cell or dead battery. If the specific gravity varies more than .025 or .050 between cells, the battery should be replaced. A chart of specific-gravity readings is provided in Section 20.10.
GENERATOR OR ALTERNATOR PROBLEMS are often confused with voltage regulator problems. To differentiate between the two, start the engine and set it at a fast idle. Test the voltage at the battery with a voltmeter; on a 12-volt battery, this charging voltage should be 14 or 15 volts. If you have no voltmeter, check the brilliance of the headlights with the engine off and with it running at a fast idle. If the lights are brighter with the engine running, the generator is probably all right.
As another test, assuming that the ammeter shows no charge to the battery, remove the wire leading to the "field" terminal on the voltage regulator. Run the engine at a fast idle and momentarily connect a piece of wire from the "field" terminal on the regulator to the "battery" terminal on the generator. If the ammeter indicates a charge, the generator is all right and the voltage regulator is at fault.
If the ammeter still shows no charge, the generator is not producing power and the regulator is probably all right.
GENERATOR TESTS include visual inspection for solder drops around the casing over the armature, indicating that the armature has been overheated. If so, it will probably have to be replaced. The commutator should be slightly purple; it should be smooth and without ridges. Slight ridges can be removed with sandpaper. The brushes should be free to slide in their holders so they meet the commutator firmly.
ALTERNATOR TESTS, for vehicles equipped with an alternator instead of a generator (see Section 10.53), require the use of a carbon-pile type meter. This is a combination voltmeter and ammeter using a special type of rheostat within the meter case. The connections for the meter vary from car to car, and the service manual should be consulted for the proper test method. In this test the alternator is not connected to the voltage regulator, and it is important to keep the engine speed low to avoid damage to the alternator. It is also essential to observe current polarity in these tests, following the service manual, or the diodes in the alternator may be ruined.
VOLTAGE REGULATOR is most easily tested by substitution: Replace the unit in question with an identical one known to be in good condition, either one taken from another vehicle or a new one.
FUSES may be blown, causing failure of certain electrical accessories. If it is not evident which fuse is blown, make a test light by arranging a panel light bulb with a socket and wire leads. Put one of the wire leads on each end of the fuse in question while it is still connected in the circuit. If the bulb lights, the fuse is blown; if the fuse is in good condition, it will short-circuit the light and the bulb will not shine. (See Figure 9.70a.)
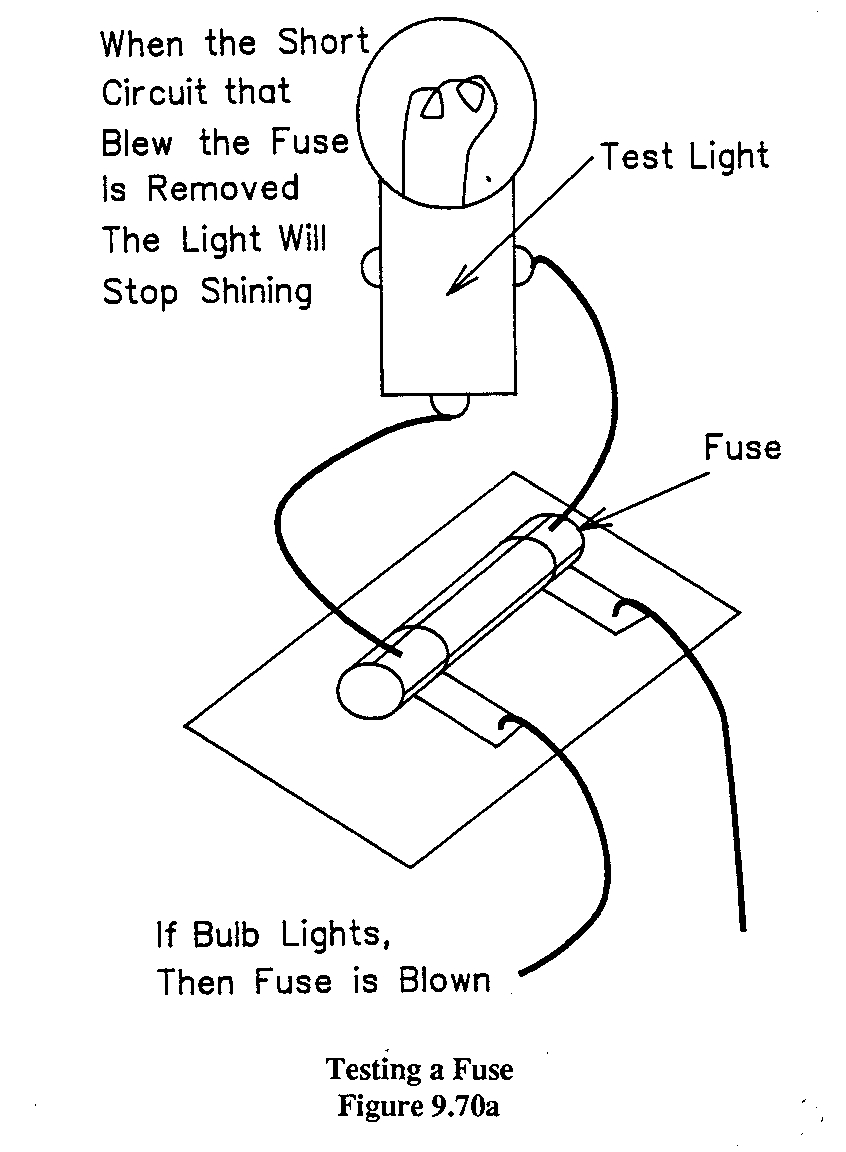
(See also Section 7.81.) If it is not possible to test a fuse in this manner, remove it from its holder. Put one wire from the test lamp on one end of the fuse and the other wire from the test lamp to the battery. When the other end of the fuse is placed on the other terminal of the battery, the current should flow through the fuse and light the bulb. (See Figure 9.70b)
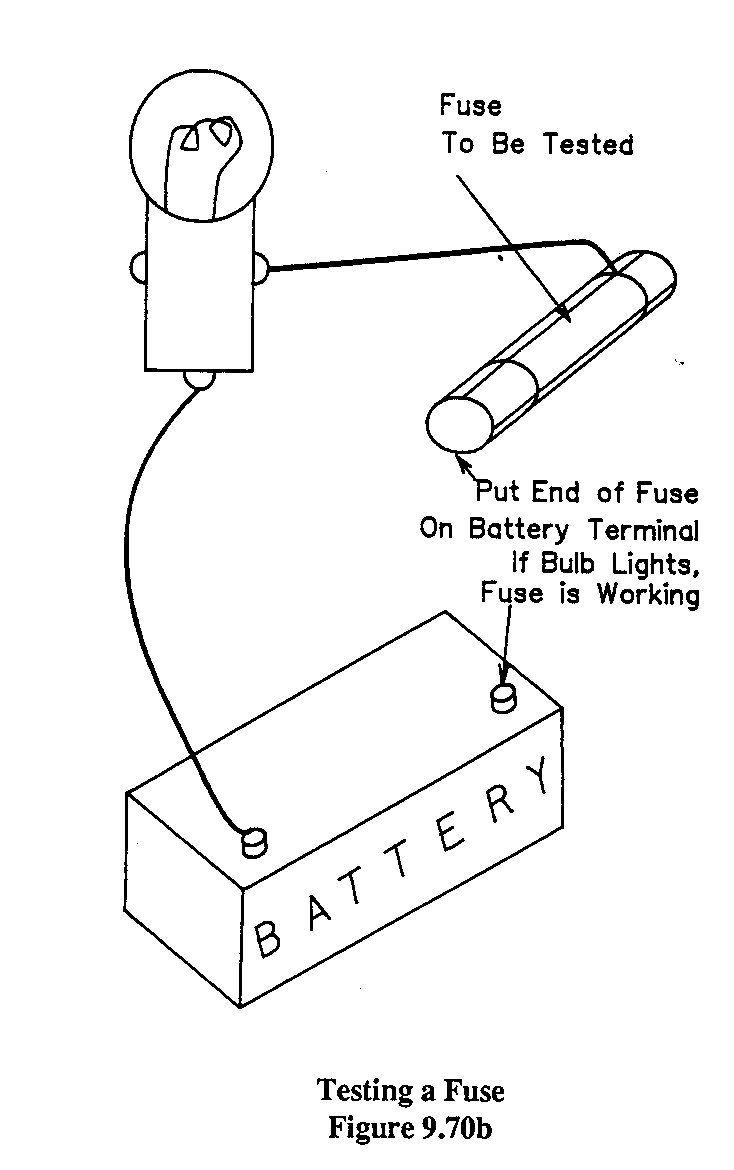
POLARITY OF THE BATTERY may differ in some cars. The British Land Rover, for example, has a positive ground, and most Japanese, German, and American-made vehicles have a negative ground. This polarity must be carefully observed, or the battery and possibly the generator or voltage regulator will be damaged. If the car is marked for positive ground, connect the positive pole of the battery to the frame of the car; on negative polarity, connect the negative pole of the battery to the chassis. If in doubt as to the polarity of a battery due to worn off markings, a potato can be used to find the plus and minus poles. Connect wires to each pole of the battery and push the other ends into the cut face of half a potato, about one-quarter inch (6 mm) apart. Bubbles will form around the negative wire. Do this in the shop and mark the poles before you get stuck somewhere without a potato in your tool box!
STARTER SWITCH. There are two basic types of starter switches in use: the solenoid type and the direct type. Most commonly, the ignition key operates a small relay, or solenoid, which controls the current to the starter motor. If this device is suspected of being defective, it can be bypassed with a screwdriver blade or the handles of a pair of pliers and the motor should crank. Similarly, if a direct switch such as that used in the early Land Rovers is suspected of being defective, it can be shorted with a screwdriver blade.
THE STARTER MOTOR is often thought to be at fault when a car will not start, but before working on the starter, check to see that the battery is well charged. Turn on the headlights and crank the starter motor. If the lights go out, the battery is weak or the connections are corroded between the battery, starting switch, and starting motor. If the lights get dim and the motor turns very slowly or not at all, the engine may be overloading the starter motor. See if the engine can be cranked by hand; if not, suspect heavy oil, tight bearings or pistons, or water in the cylinders. If it can be turned by hand but not by the starter motor, the motor may have worn bearings or a bent shaft.
If the lights are bright during the test but the engine is not being cranked, there is an open circuit: electricity is not reaching the starter motor. Check the starter switch as indicated above. If these measures fail, the starter motor itself should be examined for failure.
The starter motor, since it actually operates only a short time, does not often fail. The most common cause of starter failure is brushes that cannot reach the commutator, either because of wear or pitting. The brushes can sometimes be replaced without dismantling the motor. They must be replaced with new ones designed for the motor. If the commutator is pitted, it can be repaired in the same way as the generator commutator. Either of these problems will cause sparking between brushes and commutator.
9.80 Ignition Tests
NO SPARK can be caused by either the primary or ignition circuit of the car. To check the primary portion of the spark circuit, turn on the ignition switch and crank the engine by hand or by pushing the car very slowly while in gear. The ammeter should move up and down as the coil is alternately engaged and disengaged.
If it does not, the problem is usually a loose or dirty connection in the wiring between the battery, ignition switch, breaker points, and coil. The points may be so corroded or misaligned that they do not correct properly.
If the ammeter does move up and down as the engine is turned by hand, the primary circuit is functioning and the secondary circuits should be tested.
SPARK TEST may be easily accomplished by pulling off a spark-plug wire and cap and holding the end of the wire about one-quarter inch (6 mm) from the engine block. When the engine is cranked by the starter motor, there should be a strong spark between the wire and the block. If the spark plug cap is covered by a rubber boot, put a screwdriver inside the boot and wedge it into the cap as an extension of the conductor, then hold the screwdriver blade about one-quarter inch (6 mm) from the engine block.
SPARK PLUGS may be checked if they are suspected of causing rough running by removing the wire to one plug at a time and seeing whether it makes any difference in the operation. If removing a wire causes the engine to run even worse, the spark plug was contributing to engine operation. If removing the wire does not make any change, that spark plug was not operating and should be replaced or cleaned.
A further test of a spark plug is to remove it from the engine, being careful that no dirt falls in the open hole. Connect its wire and hold the metal base of the spark plug against the engine block. Crank the engine, and there should be a spark across the electrodes; if there is not, the plug is probably shorted.
SPARK PLUG COLOR can indicate a lot about the condition of the spark plug. Check the conical insulator around the electrode in the center of the base. It should be light brown. If it is white, the engine is too hot, the mixture is too lean, or the heat value of the spark plug is too low. If it is dry and black, the fuel is too rich, the engine is misfiring, or the heat value of the plug is too high. If it is black and wet, oil is seeping into the cylinder past the piston rings or valve guides.
THE DISTRIBUTOR may be easily checked in conjunction with the coil. First check the coil and breaker points by pulling the wire from the center terminal of the distributor. Hold it near the engine block and crank the engine, which should cause a regular pattern of sparks. If it does, a spark is going to the distributor. Now pull off one of the outside wires and replace the center one. Try the test again using the outside wire that had been connected to a spark plug. Again, there should be sparks from the distributor to the spark plug.
IGNITION CABLE sometimes becomes dried out, or the wire inside it may be broken. Even small leaks in the outside insulation may prevent starting or proper operation of the car. The easiest way to look for electrical leaks is to wait for night and then crank the engine in the dark, when escaping sparks can be seen. As a further test, connect a screwdriver's metal blade to the engine block with a piece of wire. The blade now acts as an extension of the ground potential. Move the blade along the suspected ignition wire or around the distributor cap to see if an open spark can be produced.
THE CONDENSER is inside the distributor, and it is sometimes hard to tell whether it is at fault or the coil is not working properly. For this reason it is usually replaced with the points as a routine measure.
As a check, disconnect the condenser and turn on the ignition but do not crank the engine. Open and close the breaker points by hand, and see whether a spark jumps across the point gap. If it does, the condenser should be suspected; if there is no spark, the coil is probably at fault.
IGNITION TIMING can be checked with a vacuum gauge. The highest readings of the gauge indicate the best timing, but to avoid engine-speed fluctuations, it is best to back off on the advance until the vacuum drops about one-quarter inch (6 mm).
Timing is more commonly checked with a timing lamp, a small neon bulb that is lit by the ignition voltage. This lamp should be connected between the "number one" spark plug and the ground terminal of the battery and the beam directed on the timing marks on the flywheel rim. As the engine runs, the flashes of light will make the timing marks appear to stand still. Changing the timing by turning the distributor will make the timing marks on the flywheel appear to move ahead or backward. Sometimes it is easier to see the timing marks if they are whitened with chalk or paint.
9.90 Exhaust Tests
LEAKING CARBON MONOXIDE can be a serious matter and should be remedied immediately. To check the exhaust system for a leak, squirt a small amount of oil or kerosene into the air intake with the engine running. Dark smoke will come out the exhaust pipe and will indicate any leaks. As an extra check, close the exhaust pipe with the hand momentarily, immediately after injecting the oil or kerosene. This will result in back pressure, which will make leaks more evident.
EXHAUST GAS COLOR is indicative of many engine conditions. Black smoke indicates the carburetor is set too rich, the inlet for the air filter is blocked, or the filter is dirty. It can also mean that the valve seats are defective, causing low compression.
Blue-gray exhaust color indicates oil consumption. This color is more easily detected if the engine is allowed to warm up first, then idled, and the accelerator pedal is then quickly pushed to the floor and released.
White exhaust color indicates water in the exhaust system, either from condensation in the muffler or a loose head gasket.
HOT EXHAUST MANIFOLD can indicate that the valve timing is wrong, the valves are not seating correctly, the valve springs are worn or broken, the manifold heat valve is stuck, or the exhaust line is partially blocked.
10.00 SHOP TECHNIQUES
The earlier sections of this manual describe road procedures and such diagnostic and repair work as could be undertaken in the field by the driver. This section considers information for the mechanic, although the driver and mechanic may well be the same person, and techniques that are better suited to shop work than field expedients.
The check lists can be used either in the field or in the shop, as very few of them require any special equipment. These are described in Section 8.00. Once the problem has been located, repairs can be made.
Most ordinary operations are described in the shop manual for each vehicle, and there is no need for duplication here. There are many useful suggestions that are not covered in the manuals, however, and some basic operations are assumed to be understood by the reader of the shop manual. Suggestions in this section are intended to be with the scope of a small shop with relatively simple tools, and to be undertaken by a mechanic without vast experience.
10.10 General Shop Hints
There are many suggestions regarding working practice, both for safety and convenience in the shop:
Do not wear finger rings while working. They cause short circuits in electrical wiring, and can get caught on things, damaging the ring or the finger.
If oil is spilled on the floor, clean it up promptly. Sawdust will soak it up, or sand can be used for this purpose.
Spilled gasoline is a fire hazard, and should be removed or allowed to evaporate before work continues.
These BASIC HINTS can be applied to any of several operations in the shop.
When removing a wheel, gear, or any other part that must be replaced in the same orientation to a shaft or another gear, mark the matching points with a dimple made with a punch. A marking pen can also be used, but be careful not to wash off the markings with gasoline.
To identify parts in storage or mark them with an order in which they were removed, use a marking pen.
When disassembling an unfamiliar machine, lay out the pieces on the floor or bench in the order they are removed. To reassemble, start at the end and work back.
To bend small tubing, put a section of spring inside it to keep it from collapsing. Tightly packed sand can also be used. To repair dented tubing, fill the bent section with small balls from a bearing and drive them in with a hammer, opening up the dented section.
Beating on the threaded portion of a stud or bolt with a hammer will damage the threads. Put a nut, or better, two nuts, at the end of the bolt and beat on the nut instead.
Similarly, the end of a shaft will "mushroom" if it is beaten. For this reason shafts usually are supplied with lathe centers left in them, so that a punch can be inserted in the center mark and the mechanic can hammer the punch instead of the shaft end. If the shaft is already mushroomed and must be repaired, it can be filed or ground down. If a lathe is available, it can be placed on the lathe and turned down.
A stuck bolt can be removed with Liquid Wrench, a type of penetrating oil. If the head is damaged, sometimes a pipe wrench with teeth will hold it. If a screw slot head is damaged, saw another with a hacksaw. If the threads are damaged, sometimes they can be restored with a small triangular file.
A broken bolt or stud can be removed with a bolt extractor. "Easy-Out" is the most common brand, and has become a term for the tool itself. A hole is drilled into the end of the broken bolt, and the bolt extractor is threaded into the hole. Since it has left hand threads, it will turn the bolt out when it has jammed in the drilled hole.
To remove a stud without damaging the threads with a pipe wrench, put a nut on the bolt so that it is flush with the top of the stud. Drill a small hole at the crack between the bolt and stud, parallel with the stud. Put a small pin in the hole, locking the nut to the stud. It is then possible to turn the nut with a wrench and remove the stud. (See Figure 10.10.)
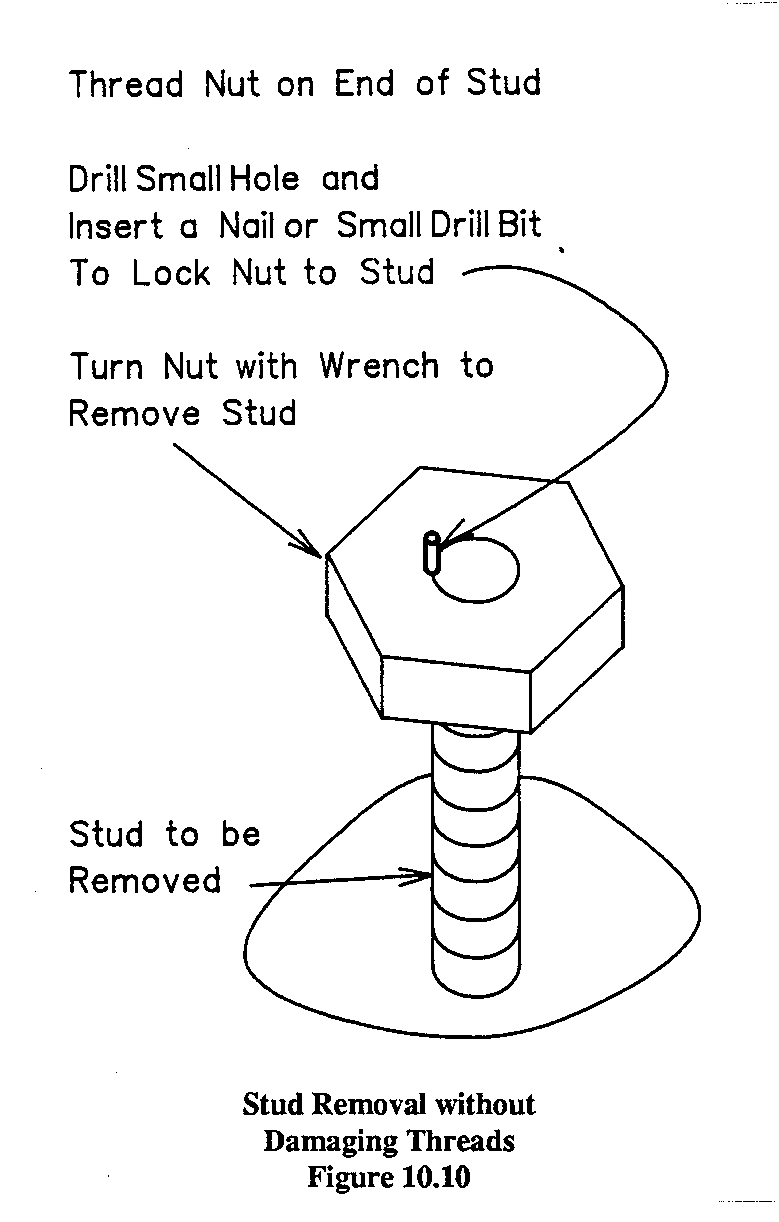
If a stud is not jammed too tightly it can sometimes be removed with two nuts. Screw one nut on the stud and then add the second. Holding one nut with a wrench, turn the other against it until they are locked together. Turn the lower nut to remove the stud.
To remove a rusted nut, drill several holes through one side, then split the nut with a cold chisel.
When cutting a bolt or other threaded rod, put a nut on before cutting. Then turn the nut off after cutting, and the nut will clean up the rough end of the cut bolt.
To remove a gasket in one piece, soak it with varnish remover for several minutes before trying to get it off. The remover may be applied with a brush or a rag. It is best to use a new gasket whenever a joint has been opened if possible, since once compressed the gasket cannot adequately fill the tiny holes in the metal, making a complete seal.
Where heat is not a factor, the plastic lid of a coffee container makes good gasket material.
To measure for a gasket, put the gasket paper over the opening and tap gently with a small hammer to mark the holes for bolts, the outer edge, or any other features that must be cut. Lift the gasket off and trim it with a knife or scissors.
Jacking up a car is easier if the jack is under the axle. A bumper jack, or a jack under the frame of the car, must lift the chassis first, then the springs will lift the axle.
A part that won't quite fit can often be made to fit by heating the larger portion and cooling the smaller one. A bearing that can't fit over a shaft, for example, can be heated in boiling water or a hot oven while the shaft is cooled with ice. The expansion will make enough difference in size to allow fitting.
To pack a bearing with grease, put some grease in a small plastic bag and throw in the bearing. Close off the end of the bag and knead it to pack the grease between the balls or rollers. The same bag may be kept in the shop and used again, since little grease is used each time.
In countries with frontier roads, vehicle bodies are usually spoiled before the engines. Save the engines on derelict cars and use them to operate generators, fire pumps, irrigation pumps, welding machines, agricultural machinery, compressors, or any of a hundred other machines.
10.20 Drive Train, Gear Boxes, Differentials
10.21 Axles
When an axle shaft is broken, it is often possible to guess which shaft broke. Put a screwdriver in the oil hole of the differential to jam the gears, then try to turn the wheels. The wheel that turns freely is the one with the broken axle.
To remove an axle shaft--one of the most common shop (and field) operations in the bush--jack up the end of the axle with the broken shaft so that the oil will run down to the differential. Remove the wheel and brake drum and the cap over the end of the axle. Unfasten the axle and pull out the shaft. If the other end is stuck inside, it may be possible to remove the axle shaft on the other side and push out the broken portion with a small diameter rod. Otherwise, the differential must be taken apart--a job best done in the shop.
10.22 Differentials
Dismantling a differential is not hard, but reassembly is sometimes more difficult. It is especially important to be sure that each part is clean before replacing it, since there is no way to flush dirt out once it is all assembled.
If replacing all or part of a differential, be sure the gear ratio is the same as the original. On a Toyota Land Cruiser, for example, the differential may have either a 3.70 or 4.11 reduction ratio.
In most 4WD cars the front and rear differentials are interchangeable. The rear one gets the most use, and if it is damaged it may be possible to switch with the front one.
A limited slip differential divides the torque equally between the two wheels, regardless of the road surface. This reduces slipping on mud or ice and results in greatly improved traction. This type of differential needs special lubricant.
10.23 Wheel Bearings
Assembling ball, roller, or needle bearings is often frustrating because the balls or rollers fall out. Use heavy grease to hold them in place during assembly.
Installing a roller or ball bearing should be done carefully, so that strain is not put on the side of the races. If the bearing is to fit over a shaft, press it on with the inner ring; if the bearing is to fit into a hole, press only on the outer ring. Do not beat on the bearing with a hammer, which will damage it. Use a wooden drift of a soft mallet if it is necessary to beat the bearing into place. It is sometimes possible to use heat to help seat a bearing, as described in Section 10.10.
10.24 Universal Joints
Before removing a universal joint, mark its relationship to the two shafts so that everything can be reassembled in the same way.
It is not difficult to get a U-joint apart if things are done in the right order. Wash the joint carefully, and remove the clips holding the bearing cups into the yokes. Support the joint and tap on the flange end yoke to drive the bearing cup through the spline shaft yoke. Pull this bearing cup out, being careful not to spill the bearings from the cup. Repeat this operation for the opposite side, and take the splined shaft yoke off. A brass or wood drift can then be used to drive out the other bearing cups. (See Figure 10.24.)
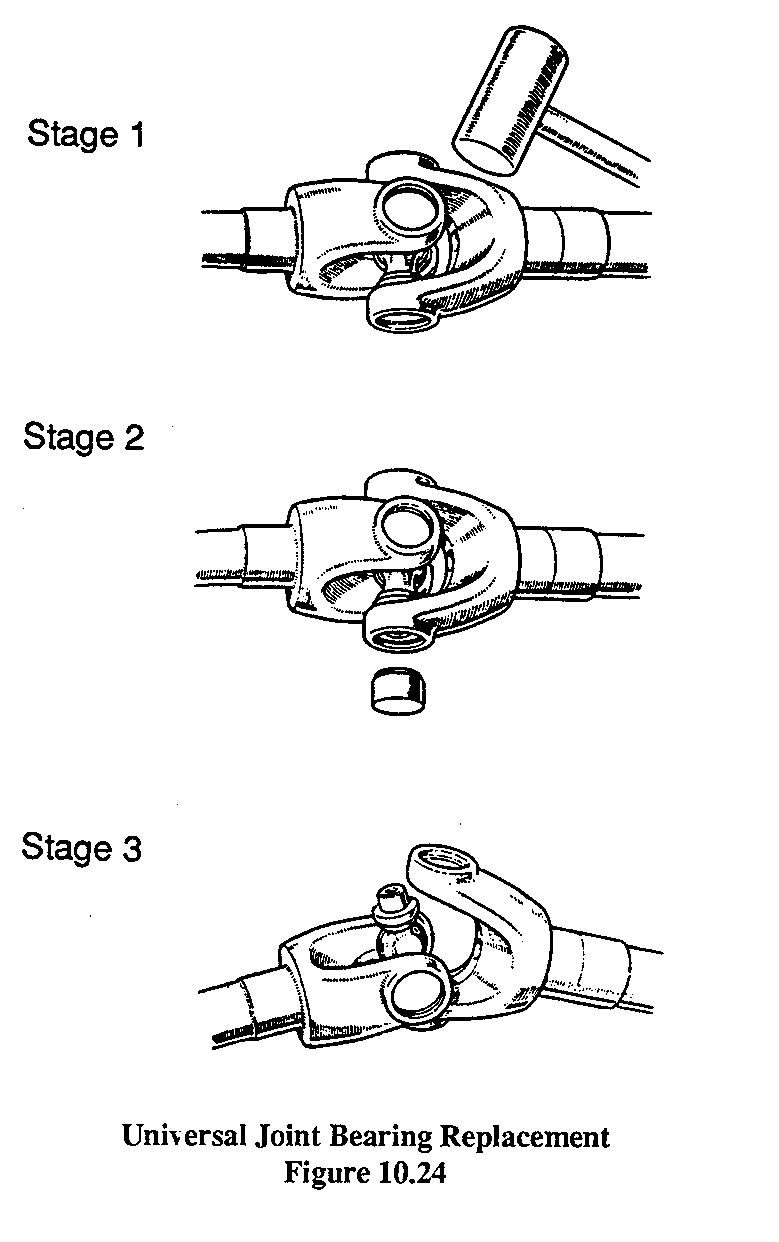
To get the U-joint back together: Assemble the needles in the cups, using grease to hold them in place. Put the spider journal into the flange yoke, put the bearing under the end of the spider journal and tap it into position. Put the retaining clip in position at the end of the cup to hold it. Put the next bearing cup under the end of the spider journal opposite the installed bearing and tap it into position. Replace the clip. Now put the cups on the other ends of the journal and install the clips. If there is a dust cover over the joint, replace it.
On some joints it is possible to put one bearing cup into each yoke on the bench, then fit the spider into it.
10.30 Fuel System
A leaky gas tank can often be fixed with Liquid Steel epoxy without removing the tank from the vehicle. The area around the leak should be clean and dry.
Soap will make a temporary patch in a leaking tank.
A leak can also be soldered or welded, but this operation is very risky because of the explosive gasoline vapor. The tank should be removed from the car and washed carefully with soapy water, inside and out. Fill the tank to the top with water to drive out the fumes. It may be possible to weld the tank with the water inside if the water is drained to below the level of the leak, which should be at the top of the tank.
To solder the tank, sandpaper all around the leak to clean it, and apply soldering flux. Heat the tank with a torch until the solder will melt on the tank, not merely from the heat of the torch. Flow solder over the leak, and allow it to cool slowly.
If the carburetor is removed it is a good idea to cover the opening so that loose material does not fall into the intake manifold and cylinders.
Carburetor adjustment can be accomplished with the vacuum gauge. Adjust the main jet by running the engine at 1,500 to 2,000 RPM, screw the needle valve in until the engine starts to falter, then adjust it outward until the highest vacuum is obtained. If there is an idle jet on the carburetor, adjust it while the car is running at a fast idle. Screw the valve in until the engine falters, and then out to the highest vacuum reading as above.
The carburetor can be cleaned with any number of commercial preparations, of which Gumout is the author's choice. Lacquer thinner is an acceptable substitute.
10.31 Adjusting the Choke
On cars with manual choke controls, no adjustment is necessary. The choke button, when pulled out on the dashboard, operates a cable that pulls the choke plate in the carburetor to reduce the air supply. To check it, remove the air cleaner and have a helper operate the button while observing the plate inside the barrel of the carburetor. It should move from fully open to fully closed.
An automatic choke is somewhat more complex. To check it, remove the air cleaner and press the accelerator to the floor with the engine cold. The choke plate should close over the carburetor barrel. When the engine is started the choke plate should open gradually until fully opened.
Do not put oil on the linkage for the choke. Joints should be cleaned with a commercial solvent such as Gumout, or with gasoline.
There are two basic types of automatic choke, both operated by engine heat. To adjust the type that is located behind a round cover plate on the side of the carburetor, the cover itself is turned. With the engine cold, loosen the retaining screws, rotate the cover one notch in the desired direction--leaner or richer--and tighten the cover.
The second type of automatic choke is set into a depression in the intake manifold. With the engine cold, remove the cover holding the choke control in place and gently remove the control mechanism. It will be marked to indicate which way to adjust for a richer or leaner mixture. Loosen the lock nut, change the adjustment, tighten the lock nut, and replace the control in the manifold.
On some older cars the automatic choke is operated by a spiral heat coil in the accelerator linkage to the carburetor. This coil turns a cam that holds the choke valve closed. As engine heat warms the metal coil, it slowly turns the cam to disengage it from the choke plate lever.
10.40 Brakes
Cleanliness is especially important with the braking system, and dirt in the system is a frequent cause of trouble. Before working on any part of the brake lines, cylinders, master cylinder, etc., clean it very carefully. Parts removed from the system should be washed in alcohol or brake fluid, not in gasoline or kerosene. If an air compressor is available, a blast of air will often clean the parts well without contamination.
A small-diameter plastic tube can be used to siphon brake fluid from a five-gallon can to a smaller container for use. The taste of brake fluid is very disagreeable and difficult to overcome, so it is best to siphon carefully.
10.41 Adjusting the Brakes
When the pedal goes down nearly to the floor before the brakes stop the car, they should be adjusted. It should never be necessary to pump the brakes.
Some 4WD vehicles have self-adjusting brakes. To adjust this type, drive the car slowly backward and apply the brakes firmly several times; then go forward and check operation. The excess pedal travel should have been eliminated.
On other vehicles the brakes are adjusted manually. They use a cam that forces the ends of the brake shoes apart when turned. To adjust the brakes, jack up a wheel and spin it by hand as if going forward. Turn the adjusting nut or star wheel until the shoe moves into contact with the drum and stops the wheel or drags it. Press the brake pedal sharply to center the shoes on the drum. Then back off on the adjustment until the shoe no longer rubs the drum. Repeat this operation on each wheel.
With either the self-adjusting or manually adjusted type, if the pedal still goes down too far, or if the shoe cannot be adjusted to reach the drum, new linings or new drums are needed. Disc brakes do not require adjustment but additional brake fluid may be needed to keep the reservoir full as the pads wear thin.
10.42 Bleeding the Brakes
Brake fluid is quite thick, and the bleeding operation must be carried out after the lines have been opened so that air can be removed from the system. If the brake pedal feels spongy there is probably air in the line, and bleeding should overcome the problem.
In bleeding the brakes, start with the wheel having the longest line to the master cylinder and work around to the shortest one. If the vehicle has power assisted brakes, the engine should not be operated while bleeding the brakes, and the reserve vacuum should be removed by applying the brakes several times before starting bleeding.
Two people are needed for the bleeding operation. Put about an inch (2.5 cm) of brake fluid in the bottom of a small glass jar, and put a piece of small-diameter rubber or plastic tubing into the fluid. Put the other end of the tube over the bleeding nipple on the wheel. There should be a tight fit over the rounded portion of the nipple. Loosen the nipple with a wrench. Have the assistant slowly pump the brake pedal to expel the air from the brake lines and the bleeding tube. Pump the brake pedal slowly until there are no bubbles coming out of the tube, refilling the brake fluid reservoir on the master cylinder if necessary. When no more bubbles appear, tighten the bleeding nipple and remove the tube. Repeat the operation on each wheel.
Never mix types of brake fluid. Use only the type specified by the vehicle manufacturer.
In some vehicles, hydraulic clutches must be bled in conjunction with the brakes. The shop manual will indicate whether this is necessary.
10.43 Relining the Brakes
A riveted lining should be replaced when the heads of the rivets are nearly exposed; a bonded lining should be replaced when there is about 1/16th of an inch (1.5 mm) of lining left. Sometimes a car operated in sand will have badly scored brakes, caused by sand getting between the drums and the linings. In such cases both the drum and the lining will have to be replaced.
To remove brake shoes for relining, remove the drum by taking off the wheel, removing the drum retaining screws, and pulling off the drum. Unhook the springs that return the brake shoes to the center, prying them off with a big screwdriver. Mark the springs so they can be replaced correctly. Remove the spring holding the shoe against the backing plate (if any). Spread the shoes apart at the top and remove them. The spring holding the bottom ends together can then be removed. (See Figure 10.43.)
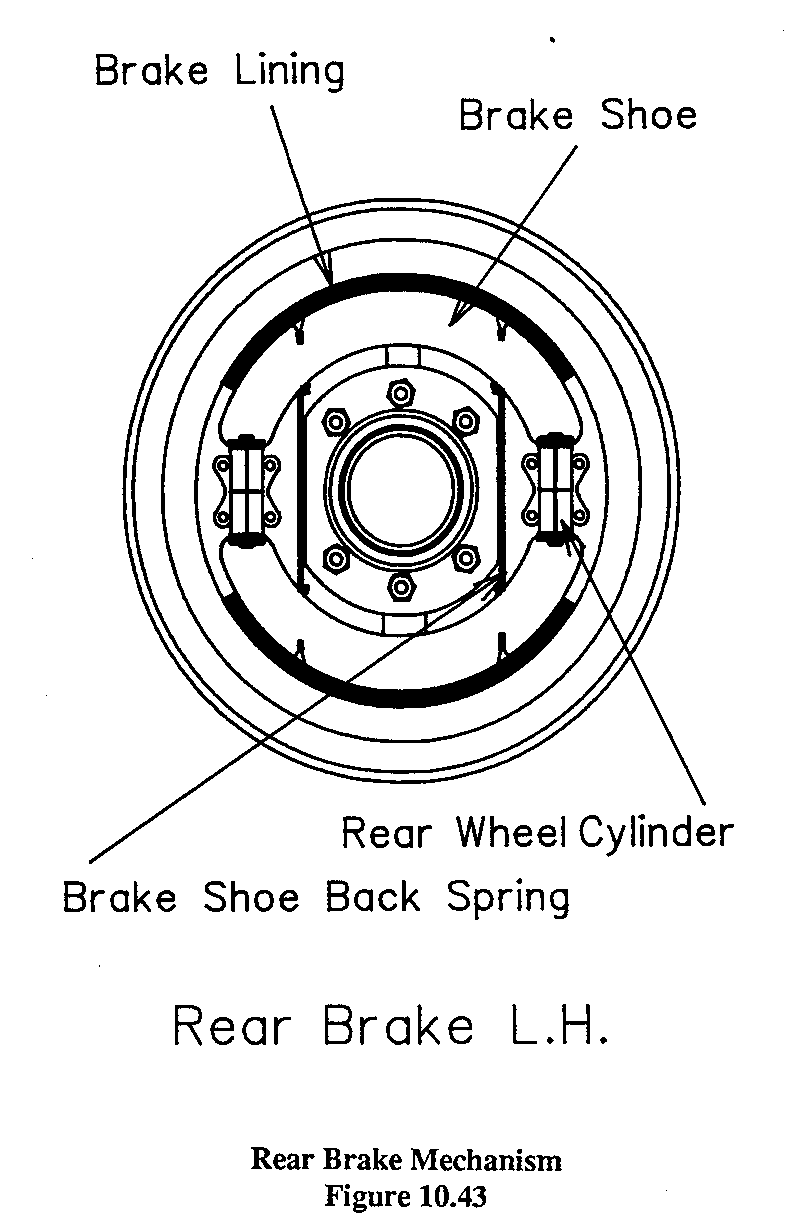
If the brake drums are badly worn, the shoes may get stuck in a groove. It may be necessary to slack the shoe adjustment in order to back the the shoes out of the groove before the drum can be removed.
If new shoes cannot reach worn drums, it is possible to obtain oversize linings. Another trick is to put a collar on the adjustment that spaces the shoes apart, using a short piece of pipe.
If the rubber parts of a brake cylinder are damaged, it is possible to get a cylinder rebuilding kit rather than replace the entire cylinder. It is much easier to put the rubber parts in place if they are lubricated with brake fluid.
After relining, a brake may drag if it is not possible to back off the adjustment enough to keep the shoe off the drum. If this is suspected, drive the car and then feel the wheel at the center for heat. Alternatively, jack up the wheel and try to spin it; it should rotate freely.
DISC BRAKES are more easily maintained than drum brakes. Two pads, one on each side of the revolving disc, apply pressure to stop the car. Although designs vary somewhat, the pads are generally replaced by one of two basic methods. On one type the pads are held in place by a heavy wire retainer; on the other type the metal housing around the pads must be removed. The brake pedal must not be pressed while the pads are being replaced or the pressure pistons will be forced out and it will be necessary to bleed the system. No adjustment is usually required on disc brakes although it may be necessary to add brake fluid to compensate for pad wear.
10.44 The Hand Brake
The hand brake should be kept in good condition so that it can be used to stop the car in an emergency. It is less subject to sudden failure than the hydraulic brake. Usually the hand brake uses a cable arrangement to pull the brake shoes in the wheels. (See Figure 10.44.)

Some cars, such as the Land Rover, have a drum brake on the drive shaft separate from the wheel brake system.
Repairs to the hand brake are usually limited to adjusting the free movement of the lever, since the linings rarely wear. Tension in a cable type brake is usually adjusted with a turnbuckle to remove slack. (See also Section 10.41.)
10.50 Electrical Repairs
10.51 Battery
Battery acid will ruin clothing or car upholstery. If it is spilled, neutralize it with ammonia or baking soda and wash with liberal amounts of water.
A dead battery can be charged with the car's generator or with a separate battery charger. A very satisfactory battery charger can be built with a small gas engine and a car generator, and the cost of operation is much lower using the vehicle's large engine.
It is not necessary to remove the battery from the car to charge it. When connecting the charger, however, it is essential that the proper polarity be observed: The positive charger wire must be connected to the positive post of the battery, and the negative charger wire to the negative battery post.
To quickly check if the battery is charging, look inside the filler holes for small bubbles of hydrogen gas released by the charging process. The explosive property of this gas is the reason why batteries should only be charged in a well-ventilated area.
In cold weather a battery will not take a charge well, and below 5 degrees Fahrenheit (-15[degrees] C) it becomes very hard to charge a battery.
10.52 Voltage Regulator
A battery that needs water frequently and is not leaking may be receiving an overcharge through the voltage regulator. The voltage regulator, as most shop manuals will indicate, is virtually impossible to repair without electronic testing equipment. Some adjustments can be made as described below, but usually the best answer to voltage regulator problems is a new regulator.
As a first check of a mechanical voltage regulator, disconnect the battery and hold down each relay. The contacts should close firmly with a very small space left between the armature and the coil core. (See Figure 10.52.)
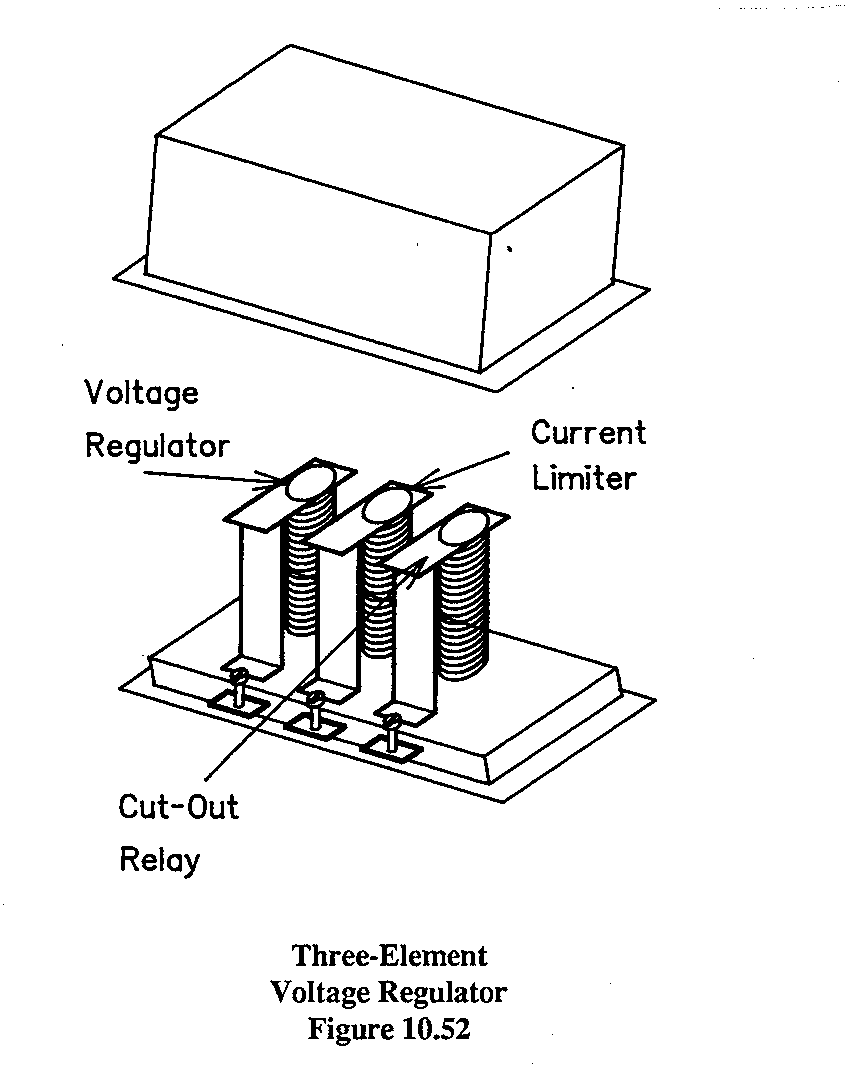
To adjust the closing voltage, connect the battery and put a DC voltmeter between the "Gen" and "Gnd" terminals on the relay. Raise the engine speed until the cutout relay closes, and note the voltage. If it is not as indicated in the shop manual, it can be adjusted. To raise the closing voltage, bend the relay armature spring post to stretch the spring. To lower the closing voltage, bend the post down to loosen the spring.
10.53 Generator and Alternator Repairs
Most difficulties with generators are caused by overloading or by foreign matter inside the generator housing. Overloading may result in enough heat in the generator to cause damage, but this is not a common problem. If the output of the generator is not enough to keep the battery charged, and if it is known that the voltage regulator is in good condition, the generator can be adjusted. The shop manual will provide instructions on this matter, which usually involves moving the third brush in the direction of rotation of the commutator.
If sand or grit gets into the generator, extensive damage may be done to the commutator. The best solution is to take the armature out of the generator and mount it in a lathe to turn down the commutator. If no lathe is available, one end of the shaft can be held in the chuck of an electric drill. If no power tools are available, leave the armature in place and put a piece of fine sandpaper between one of the brushes and the damaged commutator. Turn the generator shaft by operating the engine at low speed, and the sandpaper will clean the rough spots from the commutator.
When installing new brushes, which may be necessary when the generator does not indicate any output, put sandpaper around the commutator with the grit side facing outward against the brushes. Move the commutator back and forth slowly by hand, and the sandpaper will fit the brushes to the curve of the commutator segments.
Many cars use an alternator instead of a generator to provide electricity. The basic appearance and connections are the same, but an alternator is generally shorter and of larger diameter than a generator. An alternator generates alternating current (AC) which is then changed to direct current (DC) needed for the battery by a group of diodes. These diodes, looking like very small metal cans, are delicate and easily damaged by reversed polarity. In service, however, an alternator often lasts longer than a generator, and it has the advantage of providing charging current at low engine speed.
10.54 Light System Repairs
Trouble in the lighting system is usually indicated by a failure of the bulbs to shine. Equally straightforward, the solution to the problem is usually replacement of the affected bulb.
One suggestion for electrical work under the dashboard: The modern vehicle is so crowded with wiring under this area that it is a good idea to disconnect the battery before starting work. This will eliminate the possibility of blowing fuses or causing other damage by shorting terminals with a screwdriver or pliers.
An ailment of the lighting system that can cause a great deal of confusion and yet is very easy to find is the result of wires short circuiting to the frame of the vehicle. If no other cause can be found for blown fuses, or for lights working in the wrong combinations (such as the dome lighting coming on with the headlights), check for this possibility. The most common spot for such trouble is where wires go through the body panels. For example, check the hole where wires go through the back of the vehicle to the tail lights to see whether the edge of the sheet metal has cut through the insulation of the wire. Similar problems can be caused by a short circuit on a terminal block or a wire connector, possibly resulting from salt water, corrosion, or a bit of metal that must be removed.
10.55 Ignition Repairs
There are several elements in the ignition system, any one of which may need repair. In some cases, more than one element will need work, making it very difficult to locate the problem.
SPARK PLUGS must follow the recommendations of the shop manual. Five thread sizes are in common use: 7/8 inch, 1/2 inch, 18 mm, 14 mm, and 10 mm. The measurement is the outer diameter across the threads. Using these basic hole sizes, a vast variety of spark plug designs is available. The lower end of the shell should be even with the inner wall of the engine cylinder head. If the plug is too long, it will run hot. If it is too short it will be fouled by exhaust gas formed in the pocket. The length of the insulator tip below the insulator seat gasket determines the rate of heat flow from the center electrode to the cooling water in the engine, and therefore sets the "heat range" of the spark plug.
Spark plugs should be adjusted to the smallest gap recommended by the shop manual, so that as they wear, the gap will increase until it reaches the maximum allowed in the specifications. For example, if a gap of between .032 and .036 inches (0.8 mm and 0.9 mm) is specified by the manual, set the gap to.032 inches (0.8 mm).
To set the gap, bend only the side electrode. The center one will break easily if any attempt is made bend it. Bend the electrode down toward the center until the feeler gauge, set for the proper gap, just fits between the two electrodes. New spark plugs should be checked for proper gap, since they are rarely set correctly by the manufacturer.
When working with the spark plugs or the distributor, it is useful to mark the wires so they can be returned to the proper plugs. If they do become scrambled, they must be rearranged according to the firing order of the engine. This is usually marked on the engine block. On the 2.5 liter Land Rover engine, for example, the firing order is molded into the engine block casting: 1-3-4-2. This means that the front cylinder, number one, fires first. Then the third one back from the front, the fourth, and the second, in that order. (See Figures 10.55b, 10.55c, 10.55d.)
To replace a spark plug after service, screw it finger tight into the cylinder head until it meets the copper ring gasket. Tighten with a torque wrench (if available) to the tension specified in the shop manual. If no torque wrench is available, it can be improvised as shown in Section 14.50.
ELECTRONIC IGNITION is seldom found on vehicles used under frontier conditions. These systems substitute packaged units for the separate parts found in a conventional ignition system; some systems replace only a few components in the sealed unit, and others have an entire ignition "computer" that needs only a few outside connections to function. Since these systems are generally sealed off in a block of solid material, it is not practical to repair them. The only practical test method and repair is by replacing the module with one known to operate properly.
BREAKER POINTS are inside the distributor. Unlike spark plugs, they should be set at the high end of the recommended range, since the gaps decrease with wear.
The points should separate at or near the TDC (top dead center) mark on the flywheel, in accordance with the shop manual. If they open too early, or before TDC, the engine will not develop full power and may kick back when cranked. If they open too late, there will be only a sluggish response to opening the throttle and the engine will be underpowered.
The timing can be set with engine stopped or running. To set timing with the engine stopped, take the distributor cap off so the points are visible. Reference is made to the timing marks on the flywheel, turning the distributor housing so that the points open at the correct timing mark as described in the shop manual. At the same time it is necessary to set the gap between the points. Most cars provide a notch in the point frame into which a screwdriver can be inserted as a lever to move the fixed breaker point. Loosen the screw holding the point frame in place and adjust the gap with the points fully open. The feeler gauge, set to the correct gap thickness as shown in the shop manual, should fit snugly in between the points. Now recheck the timing, since the two adjustments interact.
A more accurate method is to use a timing light, which is inserted in the circuit to the "number one" spark plug. Disconnect and block the vacuum advance tube. Then start the engine, running at idle speed, and use the timing light to illuminate the marks on the flywheel. As the distributor is turned slightly one way or the other, the timing marks will appear to move forward or backward. On some cars these timing marks are very hard to see, and a dab of white paint or chalk will greatly improve visibility.
THE IGNITION COIL rarely needs repair, and when it does the only practical thing to do is to replace it. The coil should be replaced with an identical one if possible. If it is necessary to use a replacement of another type, be sure that it is correctly wired. The primary wires are usually marked as to polarity, and the "plus" side of the coil must be connected to the "plus" side of the car's wiring. If it is installed backward there will be low power and misfiring at high engine speeds.
THE IGNITION WIRING is often an unsuspected source of trouble. Unlike low voltage wiring, the wires to the spark plugs can "leak" electricity. Wet wiring will often stop an engine; if the spark plugs and the wires are dried with a soft rag the problem may be solved. If the wires are old and dried out, there may be some cracks from which power is leaking to the engine block or other metal located nearby. To check for this possibility, park the car in the dark and crank the engine, looking under the hood for sparks. A type of spray lacquer is available that will temporarily solve leaks in the wires; otherwise they should be replaced. THE CONDENSER inside the distributor is usually changed when new breaker points are installed. The condenser should be the type specified by the manufacturer, since the wrong type will affect engine power. If the condenser is too small, the moving arm of the breaker will develop a deposit and the fixed portion will have a crater. If the condenser is too large, the reverse will be true: a crater in the moving arm and a deposit on the fixed portion of the breaker.
THE IGNITION CIRCUIT is basically very simple, and can be traced with little difficulty when the elements are understood. From the battery, the power goes through the ignition switch to the "plus" side of the coil. The "minus" side of the coil is attached to the frame of the car. (On cars with positive grounding, however, this is reversed. The only such vehicle in common use is the Land Rover, on which the "plus" side of the battery is attached to the frame.) This connection to the frame of the car from the coil's "minus" side is made through the breaker points, which act as a switch. When the points are closed, the current flows through the coil, and when the points open, the current stops.
In the high-voltage circuit there are even fewer parts. The high voltage is produced by the buildup and collapse of power in the spark coil; from there it flows to the center of the distributor. Inside the distributor there is a moving switch, the rotor, which connects the center wire to each of the outside wires in turn as the rotor turns. The power then flows from the coil through the rotor and through a wire to a spark plug, where it jumps across the gap to the frame of the engine. (See Figure 10.55a.)
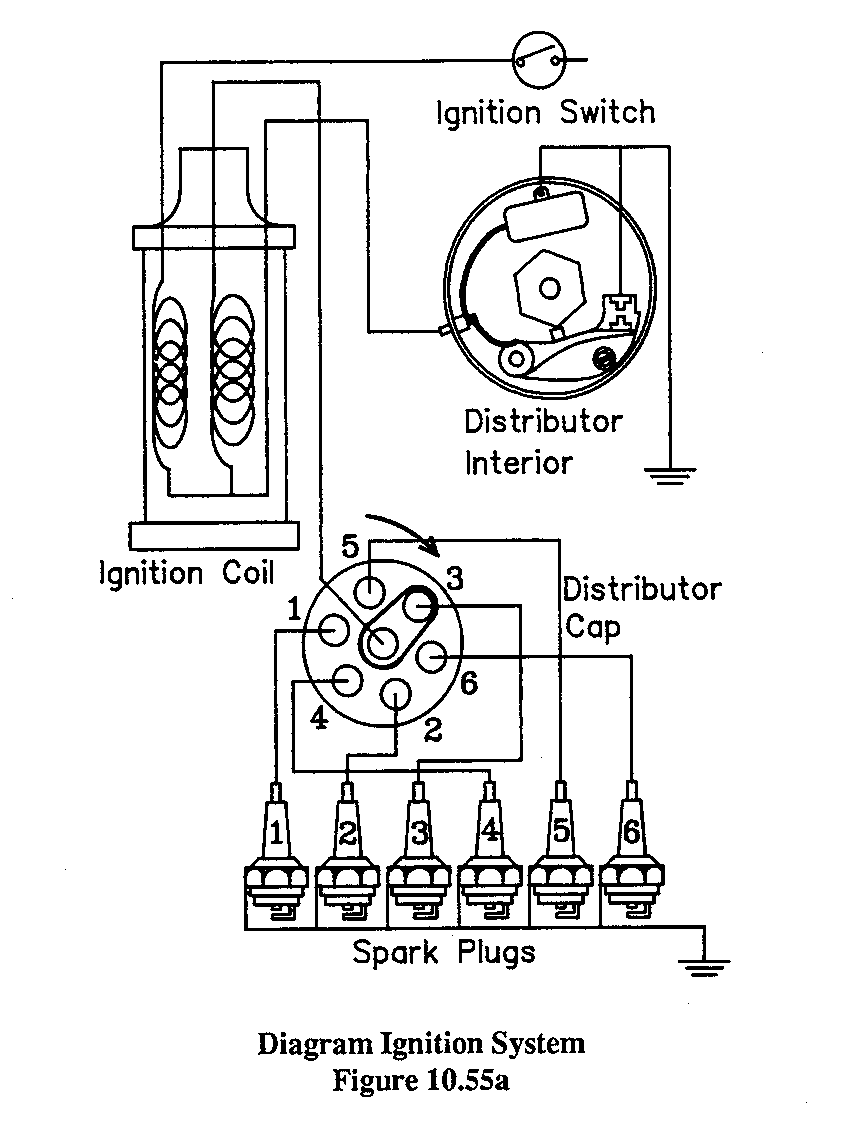
10.56 Starter Repairs
As indicated in Section 9.70, the starter does not often fail. Most repairs are identical to those for the generator.
In the event that the starter, engaging gear, or engine is jammed, the starter may be overheated in trying to turn. In extreme cases the windings on the armature may be damaged by heat. This condition is best detected by replacing the armature. A damaged armature winding cannot readily be repaired, and a new unit is generally needed.
The wires connecting segments of the field wiring, arranged around the inside of the cylindrical case, can also be damaged by heat, stones, and other foreign matter. They can be rejoined and taped securely.
The starter can be bench-tested for brief periods by connecting it to a suitable battery.
10.60 Repairs to Tires, Alignment, Steering, Springs, Etc.
10.61 Steering Repairs
Problems with steering are often the result of many small adjustments needing only minor work; their sum, however, is enough to make steering difficult. Perhaps the most common complaint with steering on four-wheel drive vehicles is shimmy, which may be caused by loose parts or by tires that are out of balance. Since 4WD vehicles on frontier roads are rarely driven at high speed, tire balance can often be ruled out.
Shimmy can often be corrected by going systematically through the steering system looking for loose connections. A frequent problem is looseness between the steering box and the chassis, but the same sort of looseness anywhere in the system can cause shimmy. In the event that this does not solve the problem, and tire balance is satisfactory, an easy solution is to purchase a steering damper. This is a device very much like a shock absorber which is attached to the tie rod, and works miracles for old 4WD cars.

WHEEL ALIGNMENT is very difficult to adjust properly without special equipment rarely found in a small shop. Some guidance can occasionally be had from patterns of tire wear, but on frontier roads the tires are usually ruptured before they are worn enough to show any pattern. For the same reason, however, there is not usually much need for concern for alignment on roads where speed is low. The wheels usually do not need alignment unless there is collision damage or a similar major problem.
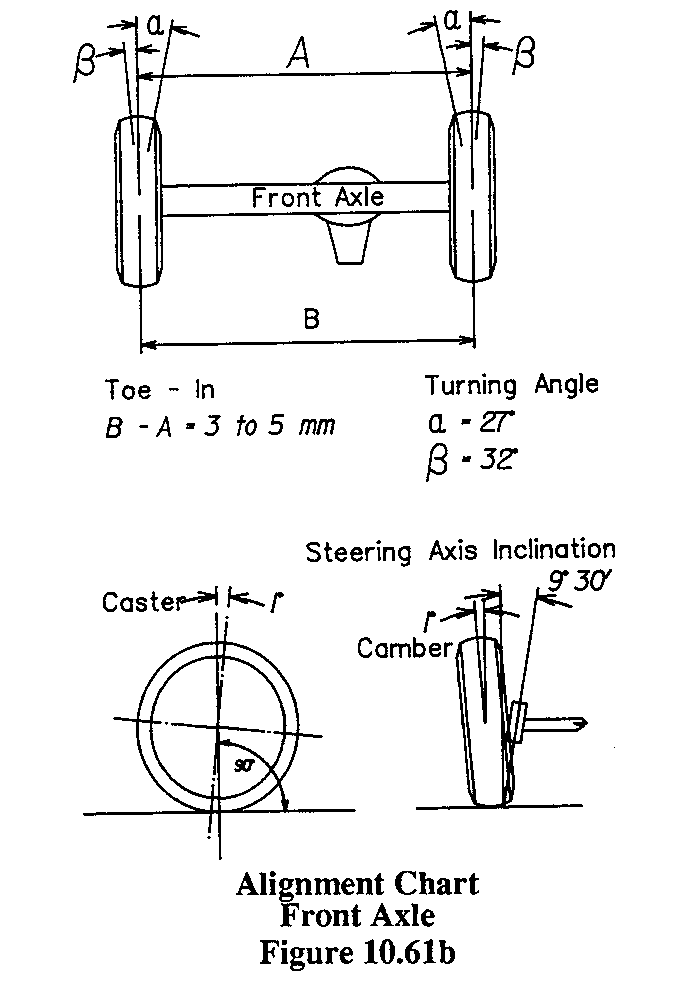
Three factors are involved in tire alignment: caster, camber, and toe-in. In a 2WD vehicle, caster is the inclination from vertical of the kingpin, compared with the road. A vehicle having ball joints instead of a kingpin measures caster by the angle that the ball joints are tilted to the front or rear. Tilt to the front is regarded as a negative caster; to the rear is positive. CAMBER is the angle at which the wheel is tilted to the side, that is, the angle between the centerline of the wheel and vertical. The most important factor as far as tire wear is concerned, is TOE-IN. This is the difference between the measurement at the front and at the back of the tires, from the center of one front tire to the center of the others.
TOE-IN ADJUSTMENT can be managed without complicated equipment, but it should be done carefully, since it is the greatest wear factor. Jack up the front end of the vehicle and support it securely. Spin the tires by hand and make a chalk line around the road surface by holding the chalk against the turning tire. Use a nail to scribe a very narrow line in this chalk, holding the nail firmly in a block of wood resting on the floor so it cannot shift. Drop a plumb bob or use a big carpenter's square to transfer the mark at the front of the tire to the floor, and then to do the same at the rear of the tire. Without touching the steering or moving the wheels, do the same for the other front tire. Measure the distance between the two front marks and the two rear marks. The difference is the toe-in. This should be adjusted in accordance with the shop manual by lengthening or shortening the tie rods.
Two notes on steering systems:
Ball joints in the steering rods can become rusted to the point where the ball slips out of the socket. In this condition the car cannot be steered, although often temporary repairs can be made with a piece of heavy wire. When checking the steering system, try to move the ball joints to be sure of their condition.
Some parts of the steering system are not interchangeable between left-hand and right-hand drive cars. The steering rod running from the steering wheel to the gearbox, for example, is not the same on both right-hand and left-hand drive vehicles, and if the wrong rod is used, the car will steer in reverse-going to the right when the steering wheel is turned to the left.
10.62 Tires and Wheels
Removal of the wheel from the car is described in Section 7.60.
To get the tire off the rim using hand tools, first be sure that all the air is out. The easiest way is to remove the core from the valve. Then free the tire from the steel wheel with a heavy hammer, or in extreme cases by laying the tire on the ground, placing a plank on the tire, and driving a car onto the plank to force the the tire down and away from the steel wheel. When the tire is free on both sides, stand on one portion of the tire so that it will fit into the depression at the center of the wheel. Pull the tire off the opposite side with a tire iron, then work it off the wheel all the way around. With one side of the tire free, the tube can be pulled out for repairs. If necessary, the other side of the tire can be removed in the same way. (See Figure 10.62a)
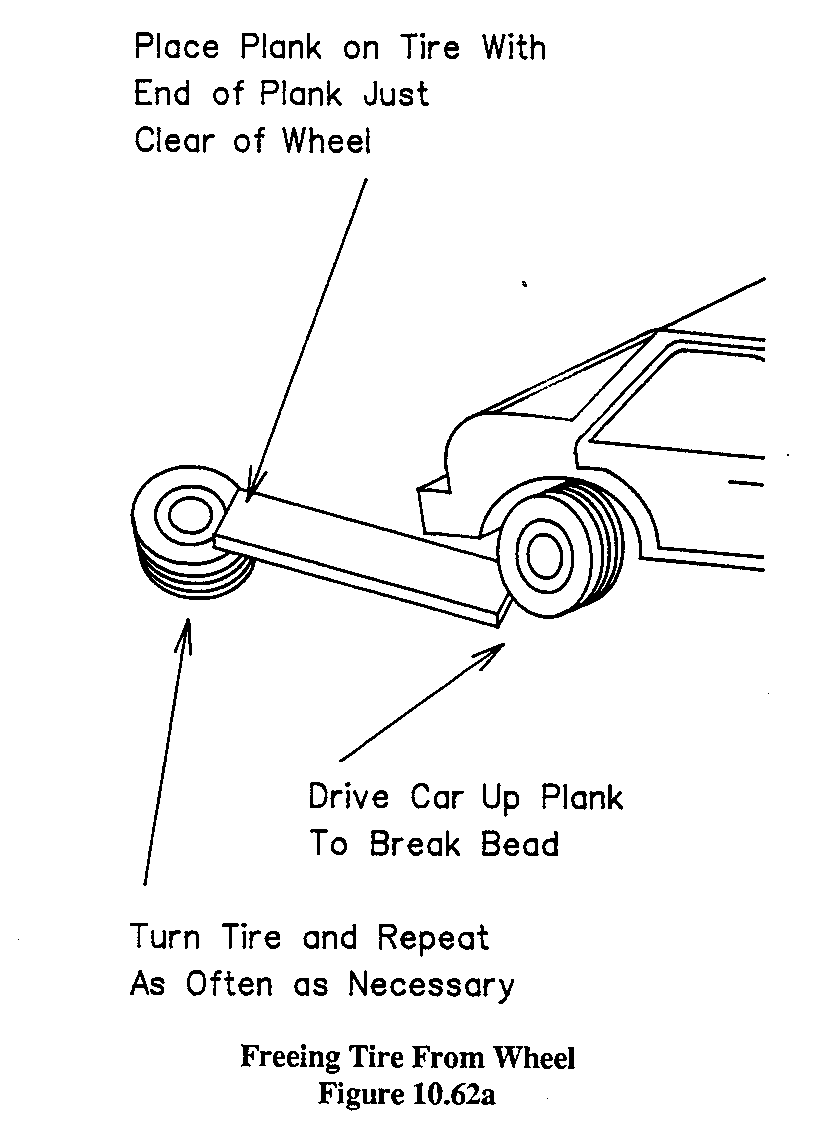
Some large tires are mounted on split rims. This type of wheel is made of two similar pieces bolted together. To remove the tire, deflate it and remove the bolts holding the sides together. The sides will then come apart, and the tire can be removed. When putting this type of wheel together, be sure that the tire is not pinched between the halves. There is usually a rubber protector flap between the tube and the wheel to eliminate this problem.
TUBE PATCHING is not a difficult job once the leak has been found. To locate the leak, inflate the tube and submerge it in a basin of water. Bubbles will indicate the location of the leak. The tub need not be big enough to hold the entire inflated tube, since one portion can be done at a time. A pond or brook can also be used for this purpose. If no leak can be found, check to be sure the valve is holding air. Put a short piece of hose over the valve and put the other end in a jar of water. If bubbles come out of the hose, air is leaking through the tire valve.
Two principal types of tube patches are hot and cold. The cold patch does not hold as well as the hot one, but in some areas it is more easily obtained. It consists of a small piece of rubber and some glue with which to attach it over the hole. To use this type of patch, clean the area around the leak carefully. Apply the cement to the area around the leak and to the patch. Let the cement dry, and then put another coat of cement on the patch and press it in place. Work out the bubbles by rolling the patch with a bottle or a round stick in the same manner as a baker making a pie crust.
A hot patch needs somewhat more specialized equipment, but the tools are not expensive and the results are better than with a cold patch. Scrub the area around the leak with a wire brush or with the small scraper provided with the patch kit. Peel off the white cover on one side of the patch and lay the patch against the leak with its metal backing facing outward. Clamp the patch in place with the small clamp provided with the kit and set fire to the patch with a match. The heat vulcanizes the rubber to the tube, making a permanent patch. After allowing to cool, remove the clamp.
Tubeless tires are not often used in 4WD vehicles. If such a tire is pressed sideways by a large rock or some other obstruction, or if it is pinched between the logs of a bridge, it is likely to come free from the wheel and leak air. Small leaks in tubeless tire can be repaired with plug patches sold for the purpose, sometimes without removing the tire from the wheel. In the event of a larger puncture, however, the tire must be discarded.
The author, faced with the lack of a vehicle when no tires were available, has "sewn" large rips in tire sidewalls using heavy wire. The wire, about 8 gauge, is inserted like staples through the sidewall from the inside of the tire. The outside ends are folded over to secure the wire. A tire boot or a piece of old inner tube should be placed inside the tire at the point of repair to prevent the wire from damaging the inflated tube. This type of repair cannot be recommended for high-speed travel, but it is a satisfactory salvage method for low speeds. It can often be used to restore to service a tire with a lot of useful tread if the sidewall has been ripped open by stones.
Old inner tubes should never be discarded, no manner how badly damaged. They can always be cut up to make tire patches, gaskets, or replacements for small springs.
REASSEMBLING THE TIRE on the wheel is not any harder than getting it off. Wire brush any rust or scale off the rim, and if there is time or need this is a good time to paint the rim. Apply a mixture of brake fluid and graphite to the bead of the tire--the portion that will touch the steel wheel. This makes it easier to get on and also easier to remove the next time.
Jam the wheel into one side of the tire opening, tipping the wheel so that the dropped center portion is against the bead of the tire. The tire irons can then be used to pull the rest of the bead around the wheel. Insert the tube, lubricating it with soapy water. Get the tube's filling valve through the hole in the wheel, and be sure that the tube will not be pinched between the tire and the wheel. Don't put the valve insert into the tube yet. The tire should be centered on the wheel and the tube inflated until the tire "pops" onto the rim. Remove the tire pump or the compressor and the tire will deflate; this will work out any folds or creases in the tube. Screw the valve insert into the tube and pump the tire up to proper pressure.
There are machines available that will accomplish the removal and replacement of tires and tubes in a matter of minutes. Some are manual; others use compressed air power. In a shop where tire changing is a frequent task these tools are a very worthwhile investment. Some manual models cost under $100 and save vast amounts of time and work.
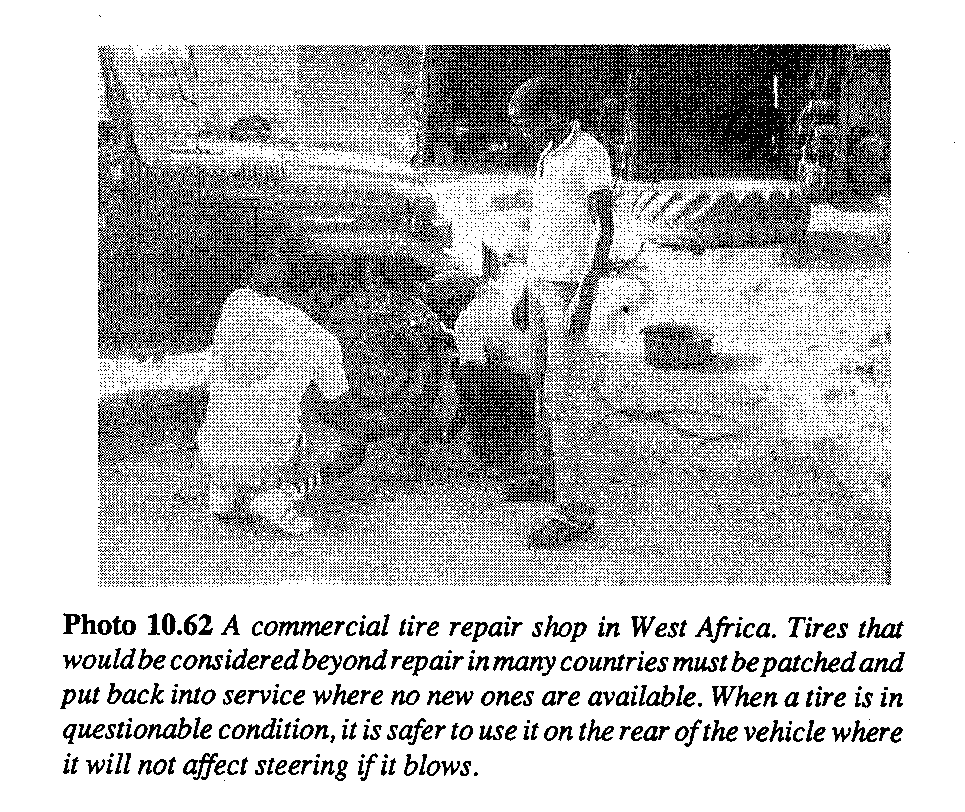
To seat TUBELESS TIRES on a wheel for inflating, tie a rope around the tire tread like a belt, and wind it up with a tire iron or a big screwdriver. The bead will spread apart and touch the wheel, making it possible to inflate the tire. It is almost impossible to inflate a tubeless tire with a hand or foot pump, since the pressure of the air inside the tire is used to seat the tire on the wheel. An air compressor or a small pump using air from the engine cylinder is a necessity with this type of tire. Fortunately, tubeless tires are rarely found on bush vehicles because of the difficulty of repairing them.
TIRES WITH V-LUGS should have the lugs pointing forward at the top of the wheel. This provides the best traction and makes the tires self-cleaning. The spare tire on a vehicle of this type, if it is to be substituted for a damaged tire for a substantial period, may need to be reversed on its wheel.
TO MOUNT THE WHEEL on the car, set it on the studs and put on the lug nuts finger-tight. These nuts must be pulled up tight or they will work off and ruin the studs, possibly dropping the tire in the process. To avoid warping the wheel when the nuts are tightened, move to a nut opposite the last one tightened rather than going around the wheel in order. (See diagram in Section 7.60.)
ROTATING TIRES is sometimes recommended by manufacturers, but on frontier roads it is of little value since the tires will most likely rupture before the time comes for rotation. (See Figure 10.62b.)
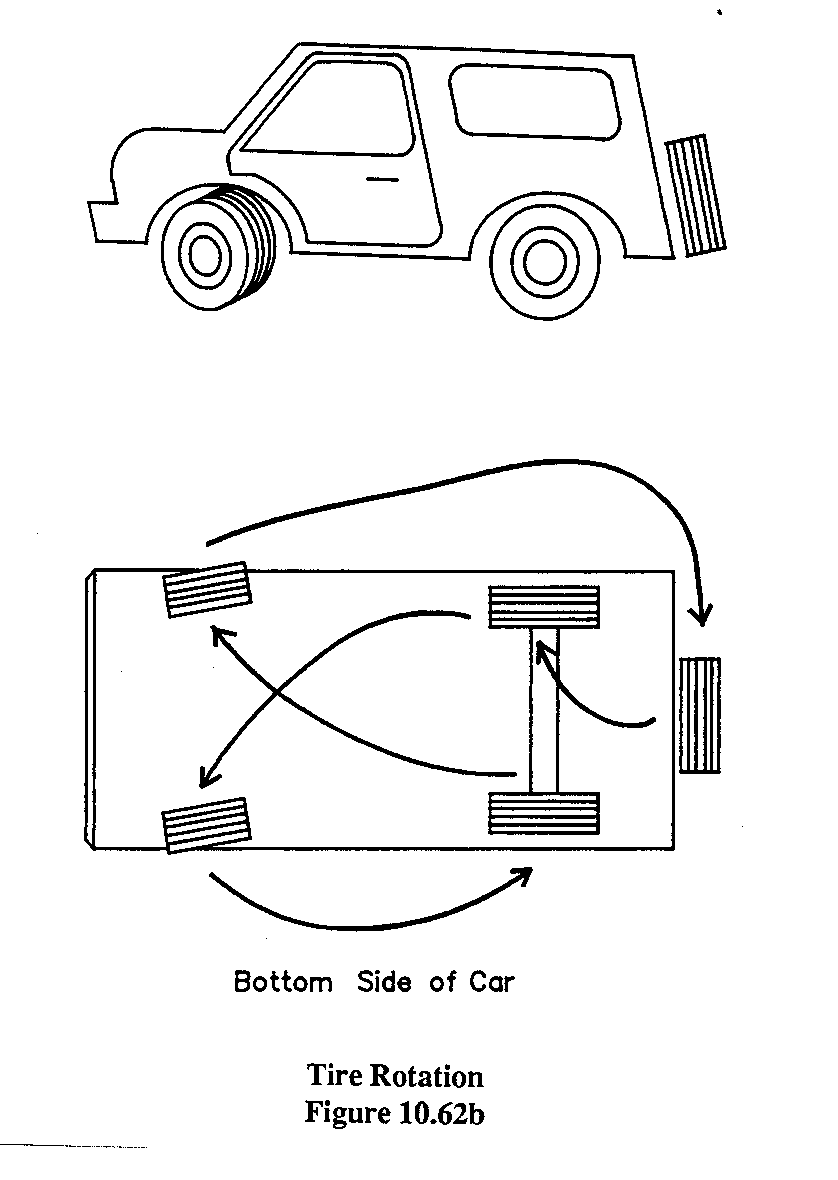
In addition, tire rotation schemes involve the spare tire, and vehicles on frontier roads usually require several spare tires. On roads where tire rotation is possible, the following is the usual order: right front to right rear, right rear to spare, spare to left front, left front to left rear, and left rear to right front. The easiest method for carrying out the switch is to mark each tire with chalk to indicate where it is to be mounted, then jack up the entire car and switch tires.
TIRE BALANCING can reduce front-end shimmy, but frontier roads are usually rough enough to offset any advantage of balancing. If balancing is to be done, it is most easily accomplished with a tool made for the purpose. If none is available, leave the wheel on the car, jack it up, and spin it by hand. Mark the bottom with a chalk mark when it comes to rest. If it consistently stops at the same point, it can be assumed that this is the heavy side, and the tire should be weighted on the other side. Attach wheel weights to the inside and outside of the wheel at the top, counterbalancing the off-center weight of the wheel and tire. Balancing by this method may result in some improvement in tire balance, but it is a poor substitute for a balancing level.
10.63 Repairs to Springs
To remove a broken leaf-type spring, jack the chassis until the tires are clear of the ground. Remove the nuts from the U-bolts that hold the spring to the axle, and the big bolts holding the ends of the spring to the chassis. The spring can then be removed. To take the springs apart, remove the tie bolt that goes through the center of the leaves, and they will separate.
To reassemble, put the leaves together with the center tie bolt, and put the spring in position under the car. Fasten the spring to the axle with the U-bolts, and connect one end of the spring to the chassis. To get the other end to line up with the holes in the shackle or the chassis, it may be necessary to put a jack under the axle and raise or lower it, flexing the spring. Leave the end bolts slightly loose, drive the car back and forth a bit to seat the springs, and then tighten the end bolts securely. This will prevent undue wear on the bushings that hold the spring in place.
COIL SPRINGS are not often found in 4WD vehicles intended for rough service. To remove a spring of this type for replacement, first take off the shock absorber if it is inside the coil. Then raise the chassis so the wheel hangs free, unbolt the spring, and remove it. Where coil springs are used in the front end of the vehicle, it will also be necessary to remove a control arm or stabilizer.
10.64 Repairs to Shock Absorbers
Shock absorbers, once damaged, cannot be repaired and must be replaced. If oil leaks from a shock absorber, for example, it should be replaced. The same is true if the shaft is bent or if there is some other damage.
To replace a shock absorber, simply unbolt it and take it off. Put the new one on in its place, using new rubber bushings if possible. On some cars the shock absorbers are held in place by studs and big cotter pins, but the principle is the same.
This is an easy job that makes a big difference in comfort.
10.70 Cooling System Repairs
THE FAN BELT is easily removed by loosening the generator mounting support, swinging the generator toward the engine block, and slipping the fan belt off and around the blade of the fan. Replace it by reversing this process, tightening so there is about 1/2 inch (1 cm) of movement between the pulleys.
It is necessary to use a pry bar of some sort to pull the generator away from the engine block when tightening the fan belt. If a new belt squeaks when the engine is started, apply belt dressing or soap as a lubricant. The new fan belt may stretch slightly, and should be checked for tightness after two or three hours of engine operating time.
LEAKS in the cooling system can be traced to white deposits around hose joints or in the radiator core. In hoses, tightening the clamps may cure the leak. In the radiator itself, there are commercial stop-leak preparations that will block small holes and fix the problem. If the car must be used while water is leaking, loosen the radiator cap to lower the pressure in the cooling system. Check the water level frequently.
If the radiator has a leak too large for stop-leak preparations to fix, the usual remedy is to solder the hole. The leak must first be located; often it is around the joint of the hose connection tube and the radiator body. Drain the radiator to allow it to be heated. Clean the area carefully with sandpaper, steel wool, or a wire brush, and heat it with a blowtorch or a large soldering iron. When hot enough, flow solder onto the radiator to cover the leak, and allow it to cool before filling with water.
10.71 Water Pump Repairs
Difficulty with the water pump is generally limited to failure of the bearing in the pump. This may be so severe that the impeller rubs against the inside of the pump housing, causing a shrill squeaking noise. The bearing cannot usually be replaced, so the whole pump must be replaced. To remove the pump for examination, drain the cooling system through the plug at the bottom of the radiator, take the fan belt off the pump pulley, and unbolt the pump. On most engines the fan is mounted on the front of the pump shaft, and must be removed to get the pump out of the space between the radiator and engine block.
The pump can be dismantled to look for evidence of bearing failure. A new pump is installed by reversing the removal process, using a new gasket between the pump and engine block to prevent leaking. The gasket may be sealed with a commercial compound if available.
10.80 Exhaust System Repairs
MUFFLER LEAKS must be fixed promptly, not only because of the annoyance of the noise, but because of the poisonous carbon monoxide that escapes from the muffler and may get into the cab of the vehicle. A small hole can be fixed by cleaning with sandpaper and applying Plastic Steel or a similar high-temperature epoxy compound. For a larger hole, clean the area and put on a patch made from a tin can, sealing it with Plastic Steel and securing it with wire. Self-tapping screws can also be used to secure the patch to the muffler if the muffler body is not badly rusted.
Removing a tailpipe or muffler that is badly rusted is more a matter of controlled destruction than removal. Jack up the chassis to get as much space between the rear axle and the body as possible. Then find the joint where disassembly is to be made and take it apart. Often this will involve a cold chisel and a hammer to cut off the damaged part of the system.
If a replacement muffler or pipe is not available, it is sometimes possible to make a substitute by welding together parts of an exhaust system from another type of vehicle. It is also possible to buy flexible exhaust line, which can be bent to fit any desired shape.
10.81 Emission Control Repairs
Although most vehicles sold for frontier service have only basic equipment and few frills, in recent years some countries have become aware of the growing problem of pollution of the atmosphere caused by cars, and are now requiring certain emission controls to reduce emissions. If not properly adjusted and maintained, they can greatly reduce fuel economy.
The PCV (positive crankcase ventilation) valve draws fumes from the crankcase into the carburetor for burning in the engine. It is usually a metal cylinder, about thumb-size, connected by a hose from the crankcase or rocker arm cover to the carburetor. To test, remove the end from the engine, run the engine slowly, and feel for a strong vacuum at the free end of the hose. When the PCV valve is shaken, there should be a clicking noise like a loose marble inside it. If it is defective it should be replaced. Most manufacturers specify replacement every two years. Sometimes the PCV valve can be restored by careful cleaning with a strong solvent like lacquer thinner or Gumout if no replacement is available. The hoses must also be clear and clean,
The air cleaner may have a small filter to clean air before it enters the crankcase as part of the PCV system. Metal mesh filters can be cleaned in gasoline; fiber type filters must be replaced. This type of filter is usually a small plastic device located inside the air cleaner, covering the end of the hose to the crankcase.
10.90 Engine Repairs
Most frontier vehicles fall apart before the engine becomes old enough to need extensive work, limiting the amount of engine work needed in a typical small shop. The springs break, frames split, and axle shafts are broken, but usually the engine and gear train do not wear out.
Precise tuning of the engine and exact adjustments for fuel economy are usually secondary to keeping the vehicle running.
In some cases, taking the engine apart will require some special tools. There are, however, many jobs that can. be done in a small shop with standard tools.
10.91 Valves
Valves must seat tightly to seal the cylinders, and failure to do so will cause major difficulties. Valves are made to seat properly by grinding them against the engine block with an abrasive compound.
The valves are located under the cylinder head, which must be removed for grinding. To remove the valve, compress the valve spring and remove the two small segments that hold the spring in place. Take out the valve from the head and inspect for warping, burning, or pitting. Put the valves in a numbered holder so they can be returned to the same places.
Place a small amount of grinding compound where the edge of the valve meets the engine block. Rotate the valve until a clean ring shows where the edge will seal. This is most easily done with a tool consisting of a stick with a rubber suction cup at the end. The suction cup is stuck to the flat face of the valve and the stick is then rotated back and forth between the palms of the hands to turn the valve and grind it. When the valve seats well, remove all the compound carefully, since any residue will cause rapid engine wear.
Compress the springs and put the small retainers back in place, adjust the tappets according to the shop manual, and the job is done.
To adjust the valve tappets, most engines have screw adjustments on the end of the rocker arm. To gain access to the adjustment, remove the rocker arm cover, which is bolted to the top of the engine. Turn the engine by hand until the valve to be adjusted is fully extended from the engine block. There should be a little space between the end of the valve and the end of the rocker arm. Loosen the retaining nut that holds the adjustment screw. Insert a feeler gauge of proper size between the end of the valve and the rocker arm. Turn the screw until the feeler gauge can just be moved in the gap. Holding the adjustment screw in place, tighten the retaining nut. Adjust each valve in this way. (See Figure 10.91 a.)
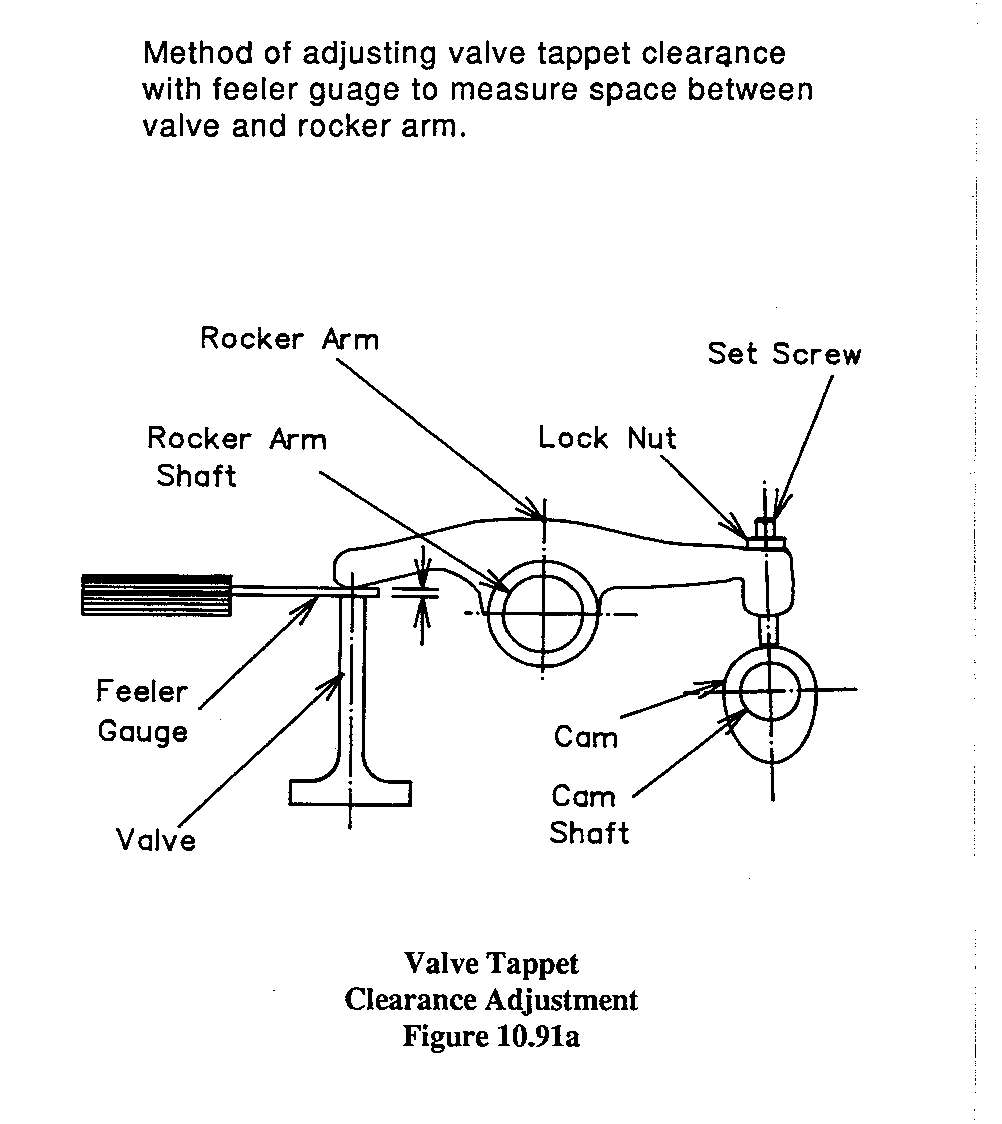
One method of compressing the valve springs is to squeeze them in a bench vise and secure them with two pieces of wire wrapped around the coils. When the keys have been put back in place, the wire can be cut and removed. (See Figure 10.91b.)
In a shop where valve grinding is done frequently, the purchase of a valve removal and installation tool may be worthwhile. This is a large clamp, resembling a C-clamp, that fits around the cylinder head to press the springs down, making it easier to remove the keys holding the valve in place. (See Figure 10.91c.)
10.92 Engine Removal
Sometimes when a vehicle is out of service because of major engine work, it is expedient to replace the engine with one from a wreck. If all vehicles from a fleet are of the same type, this process is made even easier. The process of removing an engine is largely devoted to disconnecting controls, cooling hoses, and fuel connections, and is not particularly difficult.
Start by taking off the hood; it may also be necessary to take off the fenders or radiator grille on some cars. Remove the battery lines to the starter motor and the ground line from the battery if it is attached to the engine block. Remove the air cleaner if it is separately located. Drain the radiator and disconnect its hoses from the engine block. Take off the fan to avoid damaging the radiator. Unbolt the exhaust manifold from the exhaust pipe. Remove heater hoses, if any. Disconnect the fuel line, accelerator linkage, choke linkage, wires from the generator, ignition wires, oil pressure gauge wire, and radiator thermometer wire. Lift the engine slightly with a hoist and disconnect it from the clutch or gearbox housing. In some cases it is easier to take the clutch out with the engine. Unbolt the engine mounts and lift out the engine.
Replacing the engine is a matter of reversing all the above steps.
10.93 Miscellaneous Engine Repairs
REPLACING PISTON RINGS is generally done as part of a general overhaul of an engine which might also include grinding valves and new bearings. The cylinder head must be removed and the oil pan taken off. Unbolt the lower ends of the piston cranking arms from the crankshaft and push the pistons out the top of the block, working on one at a time to keep them in order. Remove the old rings and clean the grooves in the piston walls. To put on the new rings, start with the bottom one first. Using thin strips such as pieces of tin cans or feeler gauge blades to keep the rings from going into the wrong grooves, expand the rings and guide them into the correct grooves. If there is no specially made ring compressing tool available, a worm-type hose clamp can be used to squeeze the rings and get them back into the cylinder bore. The rings must be compressed uniformly around the outside edge or they will bind and break when an attempt is made to push the piston back into the block. When the piston is in place the crank arm can be bolted on the crankshaft under the engine, replacing the bearings if needed.
REPLACING BEARINGS in an engine is not difficult and can often be done without removing the engine from the car. Since each engine is different, it is best to refer to the shop manual for the procedure. In general, it involves taking off the oil pan to expose the crankshaft and the cranking arms that connect the pistons to the crankshaft. The ends of these cranking arms are unbolted and new bearings put in place; new bearings are also slipped in around the crankshaft where it is mounted to the engine block.
After replacing bearings it is best to run the engine slowly for several hours, using power from another source to "run in" the new bearings. This is readily done by turning the newly repaired engine with another car, letting a turning wheel on the power car touch and turn a wheel on the repaired car to crank the engine. It can also be done by towing the car, although this can become tedious.
KNOCKING is the result of improper burning of fuel in the cylinders. In areas where gasoline is of poor quality, knocking is a common problem. It is indicated by a sound like that of loose marbles rolling around in the engine when a load is applied, such as climbing a hill. If the grade of gasoline is suspected, a better grade of fuel can be tried as an experiment. If no better fuel is available, the ignition timing should be slightly retarded until knocking is eliminated. Some cars include an adjustment on the distributor which can be turned to make minor changes in timing without loosening the entire distributor.
On an old engine with loose-fitting parts due to wear, knocking could be the result of worn crankshaft bearings or pistons that are loose in the cylinders. Bearings, as indicated above, can be renewed if the engine is dismantled. The reboring of cylinders and installation of cylinder liner sleeves or oversize pistons is generally a job for a well-equipped overhaul shop.
CRANKCASE OIL is saved in many parts of the world for use in latrines to help reduce odor. While effective, this practice cannot be condoned because it results in the contamination of ground water. A better use for this used oil is as a lubricant in saw mills, well pumps, manual two-man saws, chain saw blades, sugar-cane crushers, etc. It can also be used as fuel in specially designed ovens and pottery kilns.
10.94 Removing and Replacing Cylinder Head
To grind valves or replace piston rings it is necessary to remove the cylinder head--the upper part of the engine that covers the ends of the cylinders. First disconnect the spark plug wires. Remove the rocker arm cover from the top of the engine. Remove the nuts holding the cylinder head in place. Lift the head vertically to get it off the studs in the block.
To replace the head, be sure the cylinders and the mating surfaces are clean. Insert a new gasket, without any gasket compound, over the studs in the engine block. Place the cylinder head over the studs and put the nuts on finger-tight. The shop manual will indicate the proper sequence of tightening the nuts at the center of the head first, working outward toward the ends. Consult the torque table in Section 20.10 for approximate tightness required. (See Figure 10.94.)
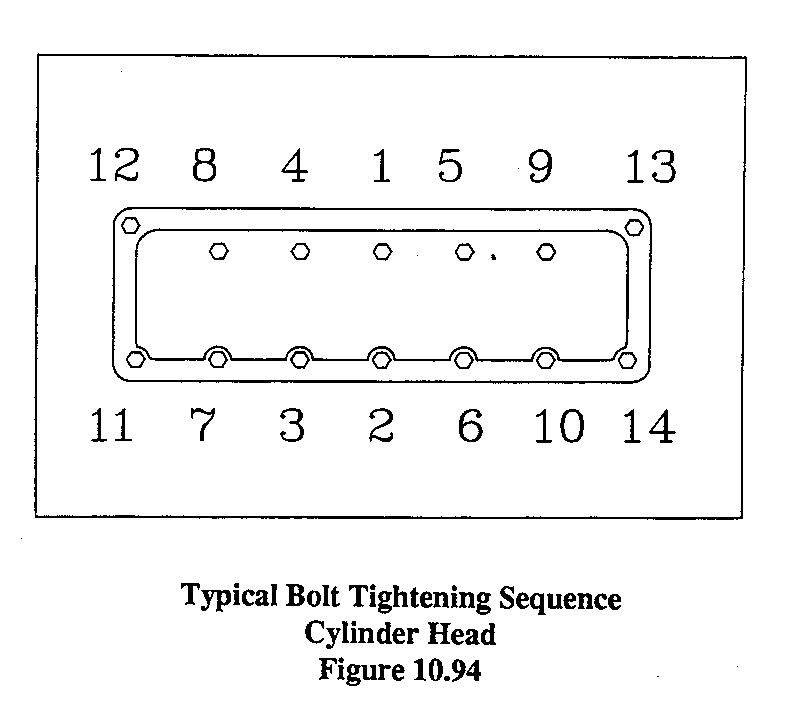
10.95 Removing Carbon
If tests indicate the presence of carbon deposits in the engine, remove the cylinder head as described in Section 10.94. Scrape the carbon from the cylinder head and the tops of the pistons. Be sure to remove all loose carbon and dirt before reassembly. The valves should also be ground as part of this operation. When replacing the cylinder head, use a new gasket if one can be obtained, and tighten the head bolts to the manufacturer's specifications.
11.00 BODY REPAIRS
Repairs to the body of a vehicle are usually for the sake of appearance, rather than function. Recognizing the modest equipment at many small shops, some manufacturers have attached fenders and doors with bolts, rather than welding or riveting, so that they can be removed for repairs. When body panels are flat, as is the case with the Toyota Land Cruiser or Stout and the Land Rover, it is possible to lay a damaged panel on the garage floor and beat it out more or less flat with a mallet. One of the principal advantages of having several vehicles of the same type is that bolted-on panels of this type can be exchanged, or taken from derelicts.
WINDOW GLASS cannot be repaired if broken, but a crack can be stopped before it spreads and affects the entire pane. To do this, chuck a piece of small-diameter copper tubing in the drill, and dip the end of it in a valve-grinding compound. Using light pressure on the drill, cut through the first layer of the glass. Since most windshields are made of laminated glass or plastic, this will usually stop the crack from spreading through the rest of the glass layer.
To replace window glass in a car, it must be set in with a rubber strip of some sort. In some cases a special tool is needed to put this strip together; usually the tool is illustrated in the shop manual, and it may be possible to improvise something similar. A great help in getting glass into the rubber gasket is to use dish washing liquid as a lubricant. Never use oil to lubricate rubber parts.
Glass or plastic panels may be fastened into metal track slides using an adhesive, such as silicone glue. Many 4WD vehicles use sliding windows of this type, rather that the roll-up type found in sedans.
ROOF DENTS in a car can often be removed by pushing an ice pick or similar pointed tool through the headliner inside the cab and carefully pushing the dent out. Some 4WD cars have no cab ceiling, making this trick unnecessary.
11.10 Chassis Repairs
If damage to the chassis is suspected but cannot be seen, measure the chassis and compare it to the shop manual. If no dimensions are available, measure the chassis diagonally and compare with the opposite measurement. Frame straightening is not usually possible in the small shop, but in some cases it may possible to use another vehicle as a source of power for this type of operation. The damaged car can be parked against a tree and another vehicle used to push the frame into line, or the damaged chassis might be cabled to a tree and another car used to pull on it.
A frame that is obviously broken is actually easier to fix than one that is only slightly out of line. Overloading a pickup truck, for example, will often break the chassis behind the cab. This type of break can be repaired if a welder is available by jacking the broken section until it is lined up with the chassis behind the cab and welding patches into it. The patches may be sections of the chassis of a derelict vehicle, or any other available material. If no welder is available, the patches can be bolted in place, but a welded joint is a great deal stronger.
To weld a split frame in a frame or a crack, open the crack up with a grinder or chisel so that it is an open "V" shape. This will allow the welder to reach inside of the metal, rather than merely lay a bead on the surface. It is also a good idea to drill a small hole at the end of the crack to keep it from spreading.
12.00 A SHOP BUILDING
While this manual is primarily concerned with repairs and operation of 4WD vehicles, a few words on repair facilities might the in order for persons who must organize their own repair facilities. If more than occasional service is undertaken, a small garage and workshop is practically a necessity. A roofed area is a great advantage in a rainy climate and also provides shade from the sun.
The building should be as comfortable as possible for the workers. In a cold climate, it should be heated if at all possible, since it is very difficult to perform operations with small parts if the hands are cold and stiff. In the tropics, leave die upper walls of the building open on all four sides for ventilation and to provide natural light.
A large part of the building should be devoted to parts storage. In most places die shop will be its own source of supply for most items. Salvaged parts must be categorized and saved for future use, and new parts must also be protected from dirt, rain, theft and other hazards. Parts should be stored in an orderly manner so that they can be found when needed. In general it is a good idea to keep any part, no matter how badly damaged, if the supply problem is difficult.
Often it will develop that a need is so urgent that it becomes practical to repair a broken part and use it again. Alternatively, even a badly smashed part may be used as raw materials for the forge, as a welded patch, or for some other purpose.
If several vehicles must be cared for, it is a great advantage to have a two-car garage. One vehicle can then be put in for extended service operations, and another can be brought inside for a quick job like an oil change or a new spark plug. It is also very convenient to be able to put vehicles side by side to exchange parts as a means of testing, or to use battery jumper cables.
In planning the size of a shop, remember that other people may bring in vehicles for repair in the future. These may be larger than your own cars. Space may also be needed, depending on the type of operation, for repairs to bicycles, sewing machines, typewriters, phonographs, clocks, and other mechanical devices.
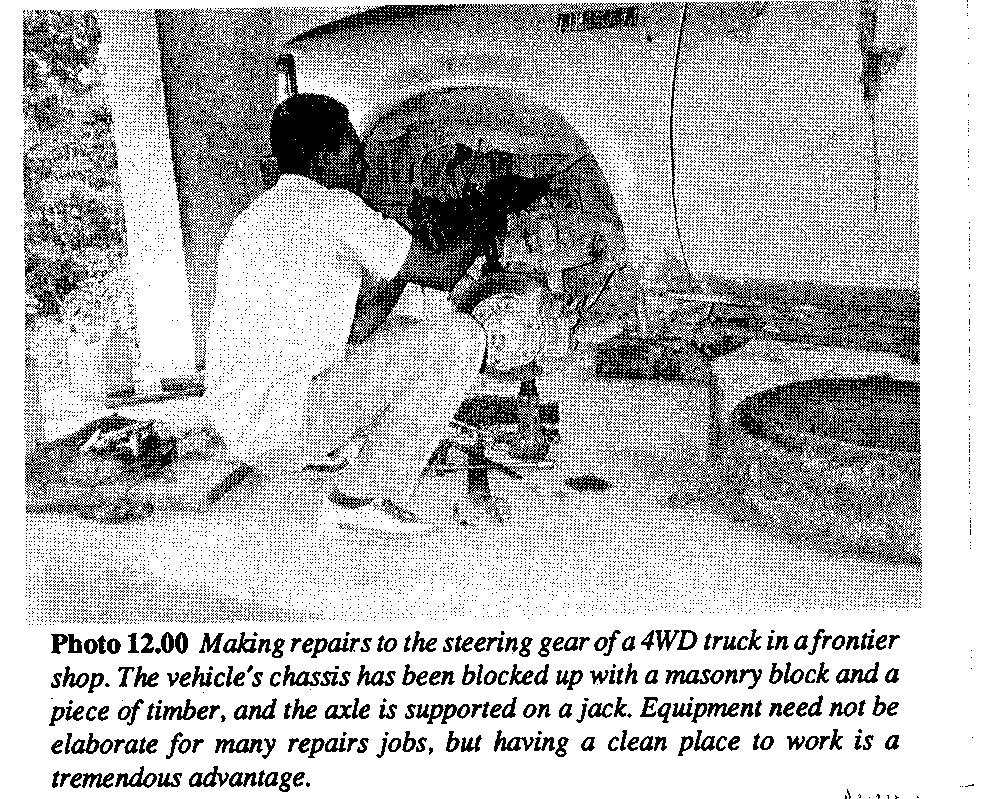
A shop where heavy work is contemplated should have an overhead hoist inside the building if this can possibly be arranged. It will save hours of work and money in the long run, although the cost of the hoist and track is considerable. A good hoist can be built by putting a sturdy log into the building over the repair area when the garage is being built. Any type of hoist can then be suspended from the log. If no hoist can be arranged in the building, a nearby tree might serve the purpose.
As power for the hoist, if a differential chain hoist or ratchet hoist is not available, it may be convenient to use a truck winch. The winch cable can be threaded through a pulley above the engine to be lifted, making a very satisfactory hoist. If no winch is available, a hoist can be made by an inventive welder using an old axle shaft as the drum for the rope and welding a large crank to the end, which can be turned by hand.
Electric power is a great asset in a shop, making it possible to use a wide variety of power tools. If a generator is to be provided as part of the shop operation, be sure that it is near enough to be convenient and far enough away to reduce noise. A very convenient arrangement is a generator on a trailer. The trailer can be parked outside the shop as a source of electric power, and when power is needed for work on the road the trailer can be towed to the site.
A grease pit is a real necessity in a shop unless there is an overhead hoist for the cars. Since such a lift is very rarely found in a small shop, a pit is much more common. If the pit is located in the side of a hill, with me end open, light will be admitted and access will be simplified. The pit should have concrete sides to support the car, but have a dirt bottom to soak up spilled oil and gasoline. The top of the pit can be covered with planks set into a recess if the garage space is needed when no repair work is in progress. If possible the pit should be ventilated, since gasoline vapors are heavier than air and will sink to the bottom of the pit.
To jack up a car that is parked over the pit, put a sturdy plank across the pit and use it as a support for the jack.
Degreasing is a difficult job in a small shop, since the most practical degreasing solvent is gasoline, which creates a high fire hazard and releases fumes that can be harmful if inhaled over long periods. One solution is to put a rub of gasoline in a separate building. Nonflammable degreasers are available, but they are not commonly found in frontier areas.
Shop mechanics will have to wash up and their clothing will also have to be cleaned. While gasoline can be used for this purpose, it is very drying to the skin. There are several excellent cleaning compounds that will clean the hands without damaging the skin. Boraxo is perhaps the best of the granular cleaners, and Dif is an excellent cream-type cleanser.
The waterless type of hand cleaner, such as Dif, is excellent to carry on the road. After changing a tire or making some other roadside repair, you can clean your hands with waterless cleanser and then wipe the grease and dirt off with a rag. The results are surprisingly good.
If there is no source of water in the shop, and if there is any rainfall in the area, build gutters on the roof and lead them to a drum. An excellent hot water supply can be arranged by lacing an old garden hose or black plastic pipe back and forth across the roof of a building in a hot climate. Even in moderate sunshine this will produce very hot water by noon.
In the shop, a tool cabinet or pegboard will be found more convenient than a toolbox. A handy arrangement is to put tools on hangers when they are not in use. The insides of the doors can be used for additional tool storage space. The tools should be located as near as possible to the work area.
Another necessity in a shop is a workbench. While some parts will be repaired on the vehicle, many smaller units will be removed and put on the bench for service. It is impractical to service these units on the floor and a bench is a real need. It doesn't need to be big or fancy; several planks securely fastened together will serve the purpose.
Fuel storage must be located separately from the shop for safety reasons.
13.00 DIESEL ENGINES
Diesel engines are offered as an alternative to gasoline engines in many 4WD vehicles, notably the Land Rover and the Unimog. A diesel engine can be expected to operate over a far longer period than a gasoline engine; double the gas engine's life is a realistic figure. A diesel engine is, therefore, a good investment in cases where roads are good enough to reduce wear on body parts. Otherwise, on bad roads, the body and running gear will be worn out long before the engine.
The diesel engine uses the heat of compression to ignite the fuel, and has no electrical ignition system. The engine cannot be drowned out while wading, and there are no points, coil, spark plugs, or distributor to malfunction. Since about 60 percent of vehicle failures in fleet operation are the result of electrical problems, the use of diesel engines can make a substantial contribution to improving the useful life of vehicles.
Diesel fuel is generally less expensive than gasoline, and the engine will travel farther on a given quantity of diesel fuel than a gas engine goes on the same amount of gasoline. The diesel fuel has a higher ignition temperature, and the danger of fire is greatly reduced.
The drawbacks of diesel power are the initial cost, the availability of diesel fuel, and the somewhat different mechanical training from that used for gasoline engine mechanics. Diesels are rarely seen in very cold climates because they are so difficult to start at low temperatures.
13.10 Diesel Check List
Section 8.00 of this book contains a check list for use with gasoline engines. Certain items are peculiar to the diesel engine, however, and a brief summary of these is presented below.
FAILURE TO START. Check that there is sufficient fuel. Be sure the fuel line is not blocked by a bubble of air; diesel fuel is thick and the fuel line must be bled in the same way as a brake line if the supply is interrupted. Be sure the correct grade of fuel is being used. If these simple remedies do not get the engine started, check for poor compression, a defective fuel pump, or blocked nozzles.
If a diesel engine is hard to start in cold weather, even when it has recently been run, the fault may be in the glow plugs. Check the tips of the glow plugs for carbon deposits that do not burn through in the relatively short application needed for a slightly warm engine. Also check the relay controlling power to the glow plugs; the relay contacts may be burned or pitted, reducing power to the glow plugs.
Failure to start in cold weather can also be due to congealed fuel. In some areas it is common practice to mix a small amount of more volatile fuel such as gasoline into the diesel fuel. Some diesel engines, particularly large ones, have a provision for introducing propane or butane directly into the intake manifold or the cylinders. A similar result can be achieved by dipping a rag in gasoline and draping it over the engine's air cleaner as a starting aid. Some drivers in very cold climates carry a spray bottle of the type used for window cleaning products filled with gasoline to be sprayed on the air cleaner. This practice involves considerable hazard if the bottle leaks or breaks, but it is much less costly than the commercially available spray cans of ether.
IRREGULAR RUNNING is caused by two principal factors: insufficient compression and poor fuel delivery.
Insufficient compression can be traced to scored or worn cylinders, worn piston rings, a damaged piston, stuck valve springs, or insufficient valve stem clearance. Poor compression is indicated by reduced cranking effort and by smoke coming out of the crankcase breather.
Poor fuel delivery may be due to a choked injector nozzle, stuck needle valve, injector spring incorrectly adjusted, leakage of fuel from the pipe line, malfunctioning fuel pump, air in the fuel line, a partly blocked fuel filter, broken fuel line, or poorly adjusted injection timing.
INTERMITTENT FIRING can be caused by any one of a long list of things: choked injection valve; dirt on the injection valve seat; partly choked fuel filter; fuel leakage between pump and cylinder, sticky injector valve; broken valve spring in fuel pump plunger; shortage of fuel supply to pump; broken pump tappet roller; incorrect injection timing; inlet or exhaust valve stuck open; broken or cracked valve; broken valve spring; air block in the fuel line; fuel leakage on the pump or injection valves; or distorted fuel injection valve.
LOSS OF POWER in a diesel engine is usually due to trouble in the fuel system if it comes suddenly. Check the injectors, fuel lines, fuel pump, and fuel filter.
If loss of power comes about gradually, check for loss of compression due to worn cylinders, pistons, or rings; defective valves; a cracked piston; or leaks at the injector joints or cylinder head. This problem can also be caused by excessive carbon deposits.
Incorrect injection timing can also cause loss of power. If the engine runs slow, timing should be checked.
Loss of power may also be due to excessive friction in the engine. This could be the result of a lubricating system failure, partly seized piston or bearing, bent rod or crankshaft. A simple check for excessive friction is to open the decompression valve and crank by hand; on an engine that does not have a decompression valve, remove the injectors to let the cylinders move without compression.
KNOCKING in a diesel engine is similar to that in a gasoline engine. It may be caused by injection timing that is too far advanced; idling speed too low; slackness in the journal big end or small end bearings; incorrect valve timing, causing the open valves to strike the pistons at the top of their strokes; loose flywheel key; sloppy pistons, due to excessive cylinder wear; or the use of a poor grade of fuel.
13.20 Diesel Engine Tests
Many problems in the diesel engine can be localized by examinating the exhaust gas. Blue smoke in the exhaust indicates dirt in the injector. A smoky exhaust can indicate injector trouble or fuel injection that is retarded too much. Black smoke indicates an over-rich fuel supply, possibly the result of a partly blocked air filter.
Fuel injection troubles are perhaps the most common form of diesel malfunction. Such troubles may be indicated by loss of power, irregular running or knocking, poor acceleration, smoky exhaust, or failure to operate at all. To locate the defective cylinder, disconnect fuel to each injector in turn; when the faulty cylinder is disconnected there will be no change in operation, but a good cylinder will cause the engine to lose power when it is disconnected. When the faulty cylinder has been found, the cause can usually be traced to a plugged or damaged injector nozzle, damaged or blocked fuel pipe line, or a blocked filter in the injection pump.
The injector can be tested by connecting its fuel supply with the nozzle in the open air. The spray should be symmetrical and finely atomized, and the valve should make a "grunting" noise. If the stream is irregular or one-sided, the nozzle is plugged. Other nozzle troubles include dirt between the nozzle valve and the seat, nozzle valve stuck in the guide, a cracked nozzle body, broken nozzle valve control spring, or incorrect spring compression.
13.30 Diesel Repairs
Most repairs to diesel engines are similar to those for gasoline engines. The principal differences are caused by the absence of an electrical ignition system and the much higher compression in the diesel engine. Because of the high compression, piston rings must be examined with some care.
Rather than timing the ignition, as is the case with the gasoline engine, the fuel injection must be timed on the diesel engine. This should be done carefully in accordance with the shop manual, since advancing the timing as little as one degree increases the bearing loading by about 60 pounds/[inch.sup.2] (4.2 kg/[cm.sup.2]) and does not materially affect horsepower. Most engines have the fuel injection 5 to 7 degrees before TDC. Retarding injection timing results in smoky exhaust, raises fuel consumption, and encourages carbon deposits in the engine.
As is the case with a gasoline engine, a diesel engine that has been taken apart and reassembled should be "run in" with an electric motor or some other source of power for several hours.
14.00 TOOLS AND EQUIPMENT
While there is little sense to buying tools that the mechanic does not know how to use, it is a lot cheaper to have the right tool for the job than to have to improvise. For these reasons the selection of the right tools for the car and for the shop is of considerable importance.
If there is anything worse than not having the right tool, it is having a poorly made tool that breaks or bends. Buy only reputable brands of tools. Although they cost more than cheap ones in the first place, they will outlast the cheap tools ten times over.
14.10 Tools for the Car
Carry a small collection of good tools in the car in any area where you must be your own mechanic. Some 4WD cars come with a factory-supplied tool roll, adequate for most roadside work. Others do not, and you must provide your own tools. This section presents a list of those tools that should be in the car, subject to special local needs and problems.
A good pocket knife is perhaps the first prerequisite, and should be in the pocket and not in the tool box.
The rest of the tools should be carried in a waterproof container such as an ammunition box if there is any problem of rusting, and should include: hand or engine operated tire pump; tire pressure gauge; hammer; cold chisel; locking pliers; ice pick; screwdriver; long-nose pliers; set of wrenches; lug wrench; tire irons; jumper cables; Phillips-head screwdriver; flashlight; tube patches; fan belt; baling wire; pieces of inner tube rubber; a "grampa's box" of assorted nuts, bolts, washers, cotter pins, bits of wire, etc.; sandpaper; rags; some small diameter clear plastic tubing; a container to carry water for the radiator; and a mat to lie on.
Other useful items are a block to hold wheels when jacking or if the brakes fail, and some sturdy planks to use in mending bridges, making a winch cable anchor, moving tree branches or rocks, and similar purposes.
14.20 Shop Tools
The selection of tools needed in the shop will depend largely upon the type of work to be done. The most valuable tool in any size shop is the vehicle's maintenance manual, which usually costs about US $25-$50, and is worth much more. Other tools should include the following, presented in no particular order: Feeler gauge; half-inch drive socket wrench set; 10-and 12-inch(25 and 30 cm) adjustable wrenches; tire irons; propane torch or blowtorch; a drill, electric if possible, and a selection of bits; hand or electric grindstone; drill sharpening jig; "Easy Out" removers for broken bolts; wire cutters; bolt cutters; locking pliers; long nose pliers; half-inch (15mm) reamer; ice pick; jacks and floor stands; a block and tackle; fine and coarse files; a hand or power operated wire brush; soldering iron, either electric or heated by a torch; various hammers; 12-inch (30 cm) pipe wrench; grease gun; metric wrenches if needed; battery hydrometer; clear plastic tubing; hacksaw; set of taps and dies; a gear puller set; marking pens; a soft-face body mallet; aircraft shears or tin snips; and a sturdy bench vise.
If electricity is available, an electric drill should be considered a necessity. The quarter inch (6 mm) variety is of little value for heavy work, and 3/8-inch (10 mm) or half-inch (12 mm) drills are much better. In addition to drilling, an electric drill can operate many accessories such as grinders, wire brushes, reamers, etc.
Keep an oily rag in a closed jar for use as a tool wiper, and clean all tools that have been used at the end of the day before putting them away.
14.30 Luxury Tools and Equipment
For a shop that is anticipating engine tuning work, extensive brake system repairs, or other specialized jobs, there are additional tools available that will reduce the amount of work needed. Depending on the job, any of the following might be valuable:
Compression gauge; timing light; vacuum gauge; valve setting tool; cylinder honing tool; valve lifter; piston ring expander; piston groove cutter and cleaner; piston ring compressor; distributor brush; spark-testing screwdriver with neon light in the handle; brake cylinder surfacing hone; valve refacer; valve seat reamer; valve grinder; clutch aligning tool; hand impact tool; torque wrench; body-work sets of mallets and forms of various shapes for bumping out dents; dent puller.
Where electricity is available, a whole range of tools is opened up. Among the more useful are a battery charger, drill press, grinder, power hacksaw, impact wrench, air compressor, lathe, tire-changing machine, and electric hoist. Electricity also makes it possible to have electric lighting in the shop, which makes work possible at any time without depending on sunlight.
The availability of electricity also makes the use of electric test equipment possible. Many test instruments are available, although they are beyond the level of technology anticipated by this book. Perhaps the most useful are the dwell-tachometer for adjusting the ignition system, the voltmeter, and the timing light. Both the voltmeter and the timing light are available in versions that do not require outside electric power.
14.31 A Generator
If no commercially available electricity is provided in the area, a small generator is usually a worthwhile investment. These units range from small one-cylinder gasoline powered machines up to huge diesels intended for continuous heavy-duty operation. For frequent service, a generator powered by a diesel engine will serve much longer than a gas-powered generator. Diesel-powered generators can be obtained in sizes as small as the Lister 3 KW sets. Small generators that can be mounted on the engine of a car are also available. Another useful combination is a generator that can be used to provide welding power.
14.32 Compressed Air in the Shop
An air compressor is a useful accessory, but not of primary importance in a small shop. The "Engine-Air" type of air pump, which is inserted in the spark plug hole of an engine, serves adequately for tire work and is very inexpensive.
An air compressor should be included in the design of a large shop that will handle many vehicles. It simplifies tire work and can be used to operate tire changing machines and impact wrenches. If there is no electricity, the compressor can be powered by a small gasoline or diesel engine of its own. If electricity is available at certain times of day, a large tank on the compressor will hold an adequate supply of air for many jobs when the power is off.
14.40 Welders
There are two basic types of welding: gas and electric. These are discussed separately below.
14.41 Gas Welders
The heat for gas welding is generated by burning acetylene gas with oxygen. This type of torch is portable, excellent for cutting metals, and relatively inexpensive. One problem in some areas is the matter of obtaining the necessary gases, or the chemical powder to produce the gases.
14.42 Electric Arc Welders
Electric welding is somewhat easier to do than gas welding, although cutting is not as readily accomplished. There are three basic types of electric welders: resistive, transformer, and generator.
The resistive type is usually cheap and not intended for continuous or heavy-duty work. It consists of a large resistor that draws current through the arc, and is really little more than a coil of Nichrome wire in a series with the welding tool.
The transformer type of welder operates where conventional AC power is available, either from power lines or a generator. It reduces line voltage, increasing the available current.
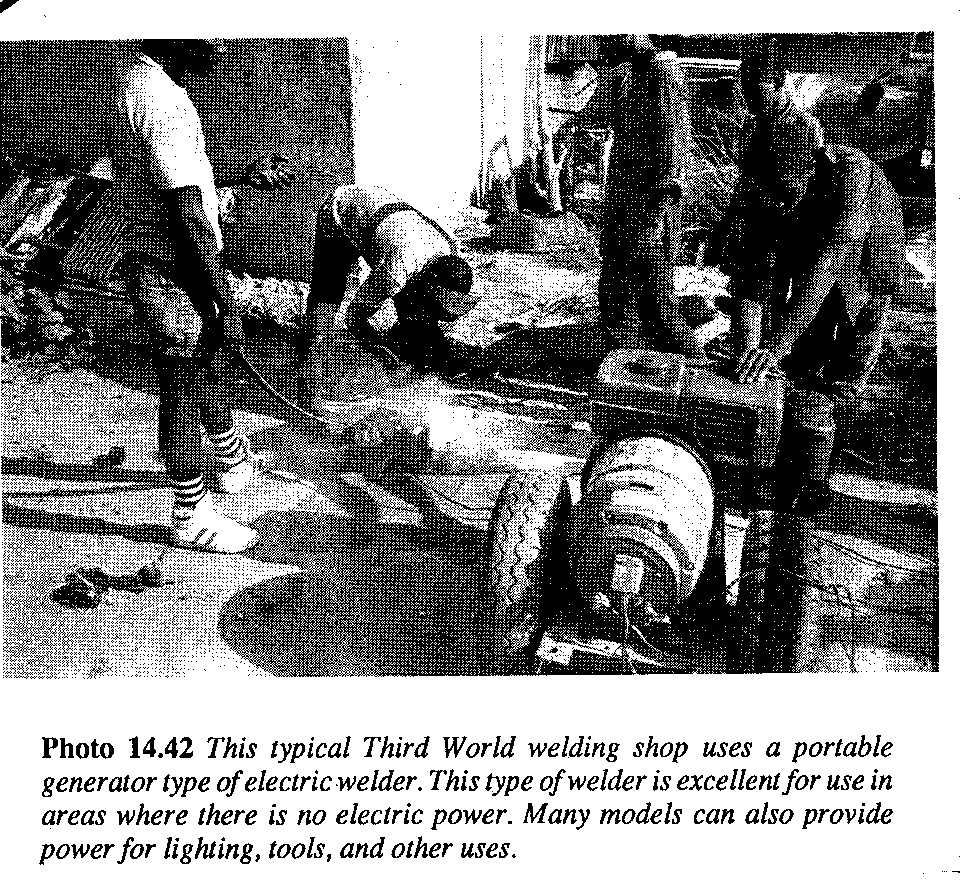
The generator type is driven by a small engine and can be used anywhere. An excellent welder can be made from a surplus aircraft generator, these units are available up to about 600 amperes, far more than will be needed for ordinary welding work. A generator of this type can be powered by a used Volkswagen engine or a similar power source.
If no professional guidance is available for instruction in welding, probably the best answer is a good book on the subject and a large pile of scrap metal with which to practice.
14.50 Tools to Make
The small shop must often depend on ingenuity to solve problems where specialized equipment cannot be procured. Many items can be improvised or built locally, saving money and time on the job for which they are designed. (See Figures 14.50a-14.50c.)
Reinforcing rods used to strengthen concrete structures are an excellent building material for many purposes. They can be welded easily and can be used to make towing rings, hooks, hoops for canvas truck tops, jack stands, and protective covers for steering gear or universal joints.
A torque wrench is needed for certain jobs, such as replacing the cylinder head. One can be improvised easily if the principle is understood. A torque of 50 foot-pounds, for example, means a 50-pound pull on the wrench, one foot along the handle from the nut or bolt It could also be a 25-pound pull at a distance of two feet, a 12 1/2-pound pull on a four-foot-long wrench, etc. Similar measures apply for the metric system.
To improvise the torque wrench, place a spring weight scale on the wrench handle. Pull on the scale until it registers the correct force for the distance from the work. If necessary on large nuts and bolts a piece of pipe can be use to extend the wrench handle.
An excellent forge can be made with the heater blower from a car. The blower should be arranged to blow a charcoal fire, which will heat the metal for bending.
Some commercial garages have degreasers for parts, but for the small shop this is not usually possible. To wash small parts, replace the bottom of a tin can with a wire screen. Put the parts in the can, and dunk it up and down in a slightly larger can filled with gasoline or other solvent.
Plastic bottles such as those used for dishwashing soap are excellent for dispensing oil, belt dressing, cutting oil, battery water, and other liquids in the shop.
A tire-changing rig can be made with a tripod type of bumper jack. Put the jack on the tire and put a piece of chain over the jack hook and through the center hole of the wheel. Put a crosspiece through the chain loop on the other side of the wheel, and when the jack is "raised" it will force the tripod legs down and break the bead of the tire away from the wheel. (See Figure 14.50b.)
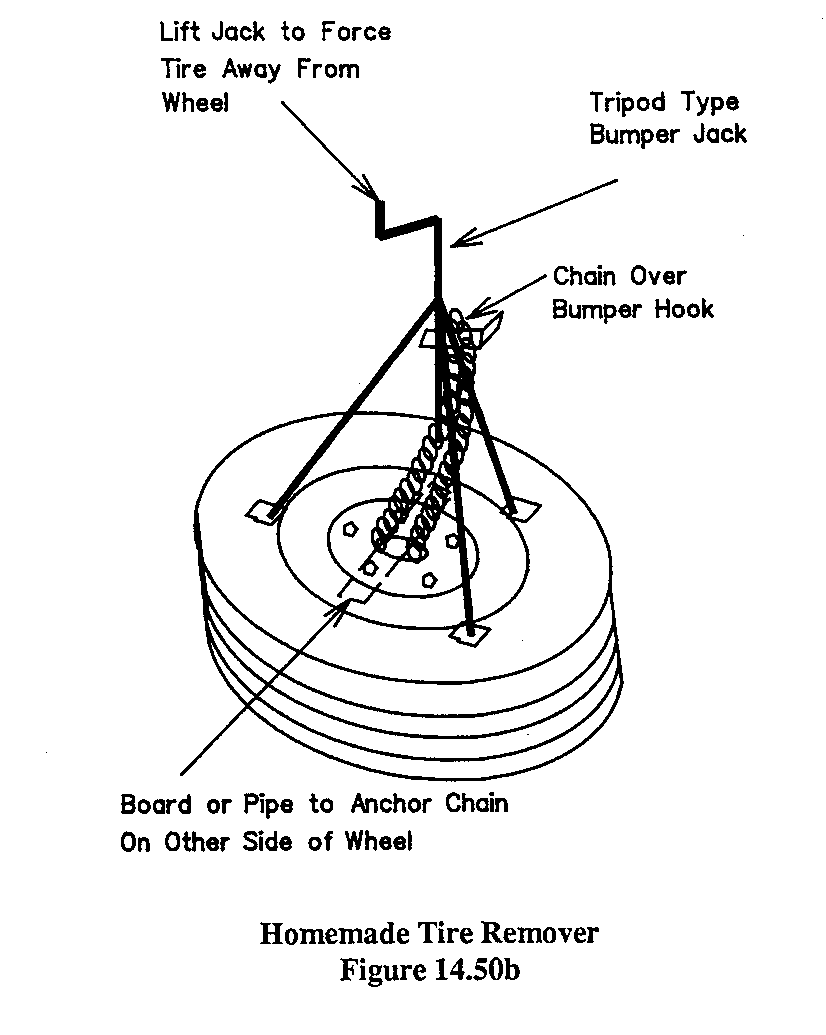
A shop hoist can be improvised from a pulley in a tree, using a winch or a car for the source of power. Alternately, a lifting hoist can be made with two lengths of steel beam or heavy timbers hinged at one end, and a hydraulic jack between them. When the jack is raised, the upper beam will rise, lifting the engine or transmission from the car.
14.51 Homemade Test Equipment
A HEAD GASKET TESTER can be made by soldering a tire valve into the bottom of a spark plug after removing the ceramic part. This can be used to pump air into a cylinder to see whether it leaks into the cooling water or out the edge of the head gasket.
A CYLINDER EXAMINER consists of a small instrument panel bulb soldered to wires so that it can be connected to the car's battery and lowered into the cylinder through the spark plug hole.
Homemade apparatus for brake bleeding and other operations will be found in the appropriate sections.
15.00 VEHICLE MODIFICATIONS
There are many ways in which a standard vehicle can be slightly altered to make it more useful under certain conditions. In some cases this can be accomplished with standard accessories available from the manufacturer; in other cases you can make the modifications yourself.
15.10 Storage Facilities
A cartop carrier provides useful additional load space, but it must be very sturdy since it will probably be beaten by branches, or bent if the car is rolled over. A rooftop rack should not be overloaded, since it will make the car top-heavy.
The LandRover has a space under the center seat for a power takeoff. If the space is not being used for this purpose, a tool box can be installed.
The space behind the seat in a pickup truck is excellent for carrying a shotgun, rifle, axe, or shovel. If a gun is to be carried in a dirty place, cover the end of the barrel to keep it clean.
Cleats can be bolted or welded to the outside of a pickup truck body to attach ropes holding the load into the truck. Similarly, rings or cleats can be put inside the body of a station wagon or carry all-type vehicle to be used to secure a load.
Better use can be made of a vehicle if pallets are made up for specialized purposes. These might be designed for a generator, welder, water pump, or other equipment, which would be put on or off the truck when needed.
A litter for a sick or injured person can be conveniently arranged in many station wagon or carryall-type vehicles by placing it across the seats and resting the front on the dashboard.
15.20 Body Modifications
In an area where vehicles are often stuck and must be pulled free, weld towing eyes to the front and rear of each vehicle's chassis rather than overload the spring shackles or other body parts.
Towing eyes may be made by bending a "U" of reinforcing rod and welding both ends to the chassis.
A small lamp can be arranged under the hood, making engine work on the road at night much easier. A portable lamp, with clips to attach it to the battery, is also very useful.
On vehicles having a plug on the clutch housing that must be installed before entering deep water, such as the Land Rover, take the storage bracket off the bottom of the car and put it on the dashboard. Then the driver can see if the plug is in the bracket or in the clutch housing.
In areas where water lies on the ground and splashes on the car's ignition system, make a sheet metal splash guard under the engine to keep water from getting on the wires.
If water in the gas is a frequent problem, fit a small valve to the bottom of the fuel tank. The water, being heavier, will sink to the bottom and can be drained off.
If the fuel supply is unreliable, it may be useful to replace a short section of the fuel line with clear plastic tubing so that the fuel supply can be observed in case of engine trouble. The tubing must be kept away from hot parts of the engine. Make an oil cooler from coils of a discarded refrigerator or air conditioner.
A car's foot pedals often become very slippery if they are wet. To reduce this problem, take off the rubber pads and use a welder to make a rough bead on the pedal surfaces. Alternatively, coat the metal surface with epoxy adhesive and sprinkle a generous amount of sand on it.
If universal joints are not covered by the manufacturer, covers should be made for cars used in sandy or muddy areas. A plastic bag taped in place can be used as a cover.
16.00 PARTS AND SUPPLIES
There is only a thin line between tools, parts, and supplies in many instances, but in general the term "parts and supplies" indicates items that are used up in the course of making repairs and must be replaced.
Supplies kept in the shop should include 16 or 14 gauge galvanized wire, usually called baling wire; Liquid Steel; pieces of inner tube; sandpaper; steel wool; plastic tape; hot tire patches; battery water; Liquid Wrench; penetrating oil; tire chains; wire rope; U-bolts; fan belts; brake fluid; gear oil; engine oil; antifreeze, if needed; replacement bulbs; tire valve cores; brake linings; spring leaves; spark plugs; ignition parts; Gumout carburetor cleaner; valve grinding compound; Formagasket; rivets; gasket cement and gasket paper; plastic bags; cotter pins; hose clamps; and a vast assortment of nuts, bolts, washers, etc.
Supplies carried in the car need not be so extensive but should include a can of gasoline, fan belt, distributor points, cap, condenser, rotor arm, spark plugs, plastic tape, fuses, bulbs, fuel pump diaphragm, radiator hose, plastic bags, hand cleaner, rags, brake fluid, inner tube rubber, baling wire, a can of engine oil, a chamois to filter gasoline, several jacks of various types, as many spare tires as may be needed, supplies for fixing flat tires with either hot or cold patches, and a flashlight.
In especially remote areas, take along a few cans of baked beans, Spam (processed meat), etc., for unexpected nights on the road. In addition, carry a five-gallon (20 liter) can of drinkable water.
17.00 STORAGE FACILITIES
The chief consumables used in a shop of any size include gasoline or diesel fuel, engine oil, water, grease, brake fluid, and gear oil. Each presents its own storage problem.
Engine and gear oil are much cheaper if purchased by the drum rather than in small cans. It is then more convenient to put the oil into gallon (4 liter) cans ready for use in the shop.
The storage of oil is not a great hazard since it is not likely to burn unless exposed to an open flame.
17.10 Fuel Storage
Because of the life and explosion hazard, it is best to keep gasoline in a separate building or shed. Fuel is usually purchased in 55-gallon (200-liter) steel drums, and if many such drums must be handled, it is convenient to get or build a small dolly for them. The gasoline can be pumped directly from the drums or put into five-gallon (20-liter) cans for easier portability. Gasoline should not be stored for great periods of time since the volatile elements that make engine starting easy tend to evaporate. When transferring gasoline from one container to another, a siphon can be used if there is no pump available. Use clear plastic tubing so that the gas can be seen through the hose, and you don't get gas in your mouth.
Sometimes when buying gasoline or diesel fuel from a stranger, it is advisable to test the contents of the drum. Insert a faucet in the bung hole of the drum and turn the drum so that the faucet is at the lowest point. Open the faucet and drain a quart (liter) into a clear glass jar, then inspect the jar for water or dirt.
18.00 PREVENTIVE MAINTENANCE
The parts of the car that most often are damaged in rough service are the drive train and running gear. Preventive maintenance can do a lot to extend the life of these parts, and of other parts of the vehicle as well.
Periodic service of the car is usually outlined in the shop manual or the owner's handbook. This service is intended to avoid trouble by replacing equipment that wears out, or replenishing supplies of oil or grease that are used up in normal service. To be sure that nothing on this list is overlooked, make a wall chart for the shop on which the mechanic can check off each item as it is completed. In difficult service conditions, use the number of engine hours as a guide to service rather than the miles traveled. A car stuck in a swamp, for example, may be run for hours without moving at all. Engine-hour meters based on engine revolutions or on a simple clock are available for most vehicles.
18.10 Greasing
The trend on modern vehicles is away from frequent greasing. Many parts of some cars are lubricated for the life of the vehicle and do not need to be greased at all. Check to see whether there are grease nipples on universal joints, the spline sections of the drive shafts, joints in the clutch or brake-pedal linkage, or the steering linkage. The shop manual will indicate where grease is necessary.
Greasing can be done with a cartridge-type grease gun or a conventional grease gun, or with a compressed air greaser. A cartridge is very tidy but costs quite a bit more than bulk grease. A conventional grease gun is loaded by hand and is the usual type found in the small shop. In a big shop it may be economical to use a greaser powered by compressed air.
Regardless of the tool used, force enough new grease into the nipple to push a small amount of old grease from the joint.
If a car is used in deep water, it is a good idea to grease it as soon as possible afterward.
To grease wheel bearings, remove the small cap at the center of the wheel. Remove the cotter pin and lock nut. Remove the adjusting nut. Pull off both wheel and bearing, protecting the bearing from dirt. Wash in kerosene and inspect carefully for damage or wear. Pack with grease (see Section 10.10) and replace. Turn the adjusting nut finger-tight and check that there is no wheel shimmy, then secure with the lock nut and cotter pin.
18.11 Lubrication
Some vehicles have lubrication points in inconvenient or unlikely places. Check the owner's manual to be sure that none of them are missed, since a dry joint or bearing will be ruined.
Two basic types of oil are needed: engine oil and gear oil. The engine oil, used in the crankcase, is usually SAE 30 or 40. Gear oil may be SAE 80, 90, 120, or even higher viscosities. The higher the SAE number, the thicker the oil.
DRAINING THE CRANKCASE is not a difficult job, but it must be done carefully. Run the engine to get the oil hot, or perform this operation right after the car has returned from a trip: Stop the engine, hold a pail under the oil-pan drain plug, and remove the plug. Oil will pour out; when it stops, put the plug back in. Some mechanics like to flush the crankcase with diesel fuel or kerosene, but do not run the engine for more than a few seconds with this lubricant. At certain intervals the oil filter must be removed and replaced, and then the crankcase should be filled with a new supply of the proper type of oil.
Oil is generally added to the crankcase either through a tube on the side of the engine, or by removing the breather cap or a solid cap on the rocker arm cover. Oil level in the crankcase is measured with a dipstick in a tube entering the engine block near the crankcase.
REPLACING THE FILTER involves the one-piece unit or the housing and inner disposable filter, depending on the type used on the particular vehicle. Where the whole unit is replaced, a new gasket should be used each time, and the filter should be turned only by hand to avoid bending its can with excess pressure.
In cold weather where the choke is used a lot, change the oil more often than the manual indicates, since the excess gas will drain into the crankcase and dilute the oil. Every 1,000 miles (1,500 km) is a good minimum interval.
Whenever the oil is changed, clean and re-oil the crankcase oil-filter breather cap, if the engine has one. This may be necessary more often in dusty or sandy areas. Service on the air filter will be indicated in the owner's manual.
GEAR OIL must be replenished at specified intervals, and on occasion the gearbox, steering box, knuckle joint housings, differentials, and transfer case must be drained and cleaned. Gear oil is thick and it is sometimes difficult to get it into the housings. One solution is to use a long piece of clear plastic tubing with a funnel in the top. Hold one end in the filler hole and pour the oil into the funnel, letting it run into the gear housing. Fill until oil reaches the bottom of the filler hole.
OTHER POINTS that need periodic oiling are the distributor, generator, and starter motor. Oil should not be put in the door locks since it will gum up the cylinders; use fine graphite lubricant instead. Oil can also be applied to door hinges, hood hinges, tailgates, and other moving parts.
18.12 Tune-up Procedure
A "tune-up" is intended to restore variable adjustments in the engine to as near ideal conditions as possible. This will restore lost power and make the engine run as well as possible without any major repairs. There is no special interval at which a tune-up should be performed; it is judged more by necessity. A good interval might be 2,500 miles (4,000 km), if there is no need sooner than that.
First, inspect the battery, engine oil, radiator water, and fan belt. Clean or replace the air cleaner and fuel filter.
For the actual tune-up operation, first adjust the distributor points and lubricate the cam and pivot. Check the ignition timing with a timing light if possible. Adjust the valve clearance. Test cylinder compression. Check, clean, and gap the spark plugs. Adjust the carburetor using a vacuum gauge if possible, then road test the car.
18.13 Radiator Flush
The radiator should be flushed periodically with clean water. In areas where the radiator water is not clean, this operation should be done every few months; otherwise an annual flush will serve.
An especially effective way to flush the cooling system is to disconnect the heater inlet hose at the block and let it serve as a drain. Remove the radiator cap and let water flow out there, too. Set the heater to "Hot." Connect the water supply hose to the heater inlet connection, which was cleared when the hose was removed in the first step. Water will flow through the engine block and the radiator in reverse, cleaning the inside passages.
Commercial products are available to flush the radiator, and instructions are supplied on the containers of this product.
After flushing the radiator and block, add a can of rust-inhibitor to the new supply of water. An inhibitor is included in most antifreeze solutions, where these are required because of low temperatures.
18.14 Miscellaneous Maintenance
Where gasoline is of poor quality or stored crudely, the fuel filter cup on the car's fuel pump should be cleaned weekly. On cars with fuel filters installed in the tubing between the fuel pump and carburetor, or as a part of the carburetor, it is sometimes necessary to replace the filter element. Such a filter is riot intended to be cleaned or restored.
The air filter should be cleaned as often as needed. In dusty or sandy conditions this may be every day; it should be done at least every 2,000 miles (3,000 km) even under good conditions.
On some cars the air cleaner is in a shallow metal pan on top of the carburetor and consists of a circular paper-core filter element. This element should be replaced but can be washed in gasoline as a temporary measure until a new one is available. When replacing the metal container, turn the securing nut only gently; if it is pulled too tight the carburetor can be distorted. The second type of air cleaner uses an oil bath in a vertical metal can and has no disposable element. This type should be washed clean in a solvent and new oil added. Usually the same viscosity as the crankcase oil is recommended by the shop manual.
To find items that will need attention, periodically start at the front of the car and check every accessible nut or bolt head for tightness. A check of this type will indicate which parts are working loose and need attention before major trouble develops.
Fill the battery with distilled water if it is available. Sometimes distilled water can be obtained from medical institutions where it is used for many purposes. If it is not available, use rainwater. The water should reach the ring at the bottom of the filler tube in each cell. Most batteries have six cells, producing a total of 12 volts.
Dead insects can be scrubbed from the front of the car using a solution of two tablespoons of baking soda dissolved in a quart (liter) of water.
Windshield wiper blades can be cleaned with a rag dampened with household ammonia.
18.15 Cold Weather Operation
Hot weather does not affect a car as adversely as cold weather does. Starting is the most difficult problem in cold weather because the battery is weakened by the cold and the engine oil has thickened. Very cold weather can reduce the battery capacity to as little as half of the warm weather power.
In very cold climates it is common to use heaters for the battery, radiator, oil system, or engine block to make it easier to crank the engine. Diesel engines are particularly troublesome in very cold weather because the fuel tends to become waxy and will not flow through the fuel lines to the engine. In such circumstances the fuel system must be warmed by an external heat source; this can be a risky procedure because of the danger of setting fire to the vehicle. Many diesel operators leave their engines running even though the vehicle is not in use rather than risk shutting it down and being unable to get it started again.
One way to keep the engine compartment somewhat warm is by making a kind of igloo over the front of the vehicle. First stick several thicknesses of cardboard vertically under the car below the fire wall to make a kind of wall across the width of the vehicle, isolating the engine compartment. Cover the hood with a tarp and then shovel snow over the tarp so that perhaps a foot of snow covers the entire engine compartment from the ground up around the sides and over the hood. The engine is now protected from the environment in much the same way as the occupants of an igloo. Experience indicates that this system can keep the enclosed air at around the freezing temperature, even though the ambient air outside may be -40[degrees] Celsius (-40[degrees] Fahrenheit). The better the cardboard seal is made, the less air will be exchanged between the outside and the engine compartment.
Even a fully charged battery at a temperature of -40[degrees] has essentially no power. Attempts to turn over a cold engine with such a weak battery will spoil the distributor points. Keeping the battery warm is perhaps the most important precaution in very cold weather. In an area with access to electricity, a light bulb can be used under the battery to keep it warm, and an electric heater can be installed in the vehicle to warm the engine block. A car battery has tremendous heat capacity, and it takes about 24 hours to bring it from -40[degrees] up to room temperature. The best precaution is therefore to keep it as warm as possible and not let it get thoroughly cold-soaked.
Another warming method is to use a kerosene lantern or two under a tarp. The cardboard wall and the tarp extending down to the ground is closed off with a few stones or planks or a wall of snow to make an air seal. The lanterns must be placed on a piece of board or plywood so they don't melt the snow and tip over. Lanterns give off a surprising amount of heat, enough to keep the crankcase oil thinned out and make starting possible.
The battery can be removed from a vehicle and taken into heated living quarters to give it more power to crank the engine. If the battery is above freezing temperature but the car is thoroughly "cold soaked," with the block and oil at the ambient temperature of, for example, -40[degrees], a small fire can be built under the oil pan to warm the crankcase oil. The flames must be kept small so they don't ignite any leaked oil. Twenty minutes or half an hour of flame should warm the engine sufficiently for the battery to crank it.
Although it is very tedious work at -40[degrees], the crankcase oil can be drained out of the engine and heated on a stove or fire and then poured back into the engine.
In any case, before attempting a battery start, hand crank the engine a number of times with the ignition switch off to loosen the residual thick oil enough so the battery and starter motor can have a chance of turning the engine.
A useful addition to the tool box in very cold climates is a can of starting ether. Sold in pressurized cans, ether is extremely volatile and will ignite before gasoline vapor does under difficult conditions. A two-second blast of ether directly into the carburetor will start the engine if it has any spark at all.
In similar fashion, a diesel engine can sometimes be started with a more volatile fuel. If a vehicle does not have provision for admitting propane or butane to the cylinders, try dipping a rag in gasoline and draping it over the air cleaner. The more volatile gasoline will be drawn into the cylinders and ignite more easily than the diesel fuel.
Tires become hard in cold weather and often develop flat spots on the bottom when parked, especially if the vehicle is heavily loaded. They will regain their elasticity after a few miles of driving.
Brake fluid should be changed once a year in very cold climates since it absorbs moisture and its viscosity increases in the cold.
18.20 Periodic Checks
Some routine checks must be performed at certain intervals. If one person is responsible for these checks, they are more certain to be carried out than if they are left to any of several drivers. In cases where many people use the same car, it is often useful to provide a short checklist to be filled out at the end of a trip. This should include places for the driver's comments on braking efficiency, how the engine runs, whether the steering is operating properly, etc.
A shop inspection record should include the date and car identification, the condition of each spark plug, compression readings for each cylinder, battery condition measured with a hydrometer, and any necessary notes on the clutch pedal, crankcase oil level, air cleaner, transmission oil, oil pressure, electrical wiring, fan belt tension, oil leaks, water leaks, and tire inflation.
18.21 Check Points
Check points are those parts of the car that should be examined periodically to see how much service life they have left.
The brushes on the generator must be replaced, for example, or they will damage the commutator when they wear out and allow the springs to press against the armature.
The universal joints should be examined and shaken vigorously to find any loose bearings or missing needles. Spline joints in the drive shaft should be tested in the same way.
Jack up the front wheels periodically and shake each front tire, holding it at top and bottom. If it is loose, the front wheel bearings need adjustment.
Steering tie-rod ball joints should be shaken to be sure they fit tightly. Remove the rubber boot covering the joint and be sure there is grease inside. If not, repack it with grease.
Check the oil level in the steering gearbox, in the axle joints for the steering knuckle in the front axle, in the differentials, and the transmission gearboxes.
Park the car on a clean, level concrete pad. Leave it overnight and next day look for oil spots indicating leaks. The leak is directly over the spot in most cases, unless the oil has run down a casing. The same test can be improved by using brown wrapping paper on the ground under the car.
Test the shock absorbers (see Section 9.40) and be sure the rubber bushings are in good condition.
Check the battery terminals for corrosion, and keep the top of the battery dry and clean. Corrosion limits current flow, resulting in slow cranking; moisture leaks power from the battery, discharging it.
The spark plugs should be removed and examined at least every 4,000 miles (6,000 km) and replaced very 12,000 miles (19,000 km)
Tire rotation has been discussed in Section 10.62. In general, there is little advantage to tire rotation on frontier roads. It is best to place the tires with the least wear on the front wheels since a blowout on the front end is more difficult to control than at the rear. Tires that are in good condition but have been worn bald can be retreaded, which can double tire mileage. In most cases on frontier roads, however, the casing will be damaged before the tire is worn.
Tire pressure should be checked by eye every day and with a pressure gauge if there is any reason to suspect low pressure. The frontier road usually does not have nails or broken bottles on it to cause a slow leak. Tires are a double-or-nothing proposition: either serviceable or blown.
18.30 Daily Checks
When a vehicle is used everyday, certain points should be checked every morning before the car is put into service:
Check the engine oil, brake fluid, and radiator water. All three are subject to damage and rupture, and a broken oil line, brake line, or radiator hose will put the car out of operation. Engine oil level is measured with a dipstick into the crankcase. Brake fluid level is checked inside the filler cap on top of the reservoir, usually located on the master cylinder. Radiator water is checked inside the radiator filler cap.
Examine the underframe for broken shock absorbers or mounts, broken springs, or loose parts in the steering gear.
Check the fuel filter cup on cars having this type of filter for water or dirt. If there is water in the gas, take off the cup and clean it. The cup is usually located under the fuel pump.
In a hot climate, check the battery water daily. (See Section 8.14.)
Be sure that the vehicle has a spare tire in useable condition. In many areas it will be necessary to carry several spare tires. In the author's experience, it was standard to carry six spare tires, in addition to the four on the vehicle, on certain trips.
Check to see that the necessary tools and supplies are in the car.
If extra gas or water cans are provided, be sure that they are full.
19.00 SELECTING A VEHICLE
The purchase of a new vehicle for use under frontier conditions is usually dictated by a major breakdown, collision, or loss due to submerging, theft, or some other cause. On occasion a decision may be made to buy a new vehicle as an addition to existing facilities or as a replacement for another car.
To determine whether it is economically practical to buy a new vehicle, take the operating and overhead cost and add the cost of the drop in resale or salvage value during the rest of the damaged vehicle's expected life. If the total is greater than the operating and fixed charges of a new car, it is economical to buy a new vehicle.
If several vehicles are owned or maintained jointly, it is usually preferable to replace them on a rotating basis, rather than all at once. If the average vehicle life is three years, one third of the fleet should be replaced each year. This will balance the load on the maintenance shop better than if all vehicles are replaced at once.
If one or more vehicles are of the same manufacture and there is no compelling reason to change, it is best to buy more cars of the same make. Parts can be switched for testing or to restore a vehicle to service, and mechanics will not have to learn a new car's problems. The great advantage of standardization on one make of vehicle is the reduction in the number of spare parts that must be kept in stock. Where parts facilities are remote, this results in a substantial saving and increased reliability.
In deciding what kind of car to get as a first vehicle, look at what is being used by other people in the area. If several cars of one type are in use in the area, it is likely that the experience of other drivers should be followed. An important consideration is parts availability; even a mediocre vehicle with available parts is better than a great vehicle that is down for lack of parts.
Although some organizations such as development agencies, religious missions, and government entities prefer to import vehicles from their own countries to the developing nations where they are working, this is generally not a useful practice. In the case of vehicles made in Japan, for example, those exported to the United States are materially different from those exported to West Africa. A vehicle made for sale in the United States or Europe will have much more complex equipment in the engine compartment to meet emissions and safety laws; it may have fuel injection controlled by a computer that cannot be readily fixed in the field as a simple carburetor could; it may have an electronic ignition in a sealed unit instead of a conventional coil and distributor; it may have electronic regulation of battery charging instead of a relay-type voltage regulator. Many of these refinements improve gas mileage and reduce emissions, but sacrifice simplicity of field repairs.
The top photo (19.00a) shows the relatively empty engine compartment of a Toyota Land Cruiser as sold in West Africa. The bottom photo (19.00b) shows
a Jeep sold in North America. The vehicles have similar in-line six-cylinder engines, but the Jeep is loaded with anti-pollution equipment, air conditioning, power steering, vacuum-assisted brakes, and other accessories. The Toyota is one of the best frontier vehicles available: It is simple for a novice mechanic to understand and maintain, and has few parts to break down. From the standpoint of maintenance, vehicles purchased in areas with complex safety and pollution requirements are not generally satisfactory for use in developing countries.
In considering the initial cost of a vehicle, one made for sale in North America or Europe will generally cost substantially more than one made for a developing country because of the additional equipment needed to meet safety and pollution standards. In many developing nations the number of vehicles is relatively small compared to Paris or New York, and emissions and safety standards may not be as serious a problem.
Although there may appear to be economic reasons for importing a U.S. or European vehicle that is donated to an agency, or patriotic reasons for using a car made in the country that sponsors a particular activity in a Third World country, these considerations will usually be of little value compared to the problems faced in getting parts, making repairs, and dealing with the complexities of unneeded charcoal cannisters, recirculation systems, and other devices.
With the need for parts in mind, select a vehicle with as few replaceable maintenance parts as possible. An oil-bath air cleaner requires no new paper filter element. A cup-type gas filter can be cleaned and reused while an in-line type is discarded and replaced. Oversize radiator, clutch, brakes, shock absorbers, and other components reduce the need for replacement of mechanical parts.
An excellent way to extend the value of a vehicle is with one or more trailers, as described in Section 6.80. Another inexpensive alternative is a two-wheel minibike for one person and a small load. Many of these vehicles have very fat low-pressure tires that will support the bike on very soft ground or snow.
In considering which vehicle to buy, check the availability of fuel suited to each vehicle. Don't get a vehicle with a high-compression engine requiring premium gasoline if only poor gas is available. The engines of most 4WD vehicles sold for use in frontier conditions can be tuned to run without knocking on low-octane gasoline.
Similarly, if you are considering a diesel-powered vehicle, be sure that suitable fuel is available throughout the area where it will be used. It is not enough to be able to buy fuel near the place where the vehicle will be kept; when it is used on a lengthy trip, fuel must be available along the way.
In considering the advisability of getting a 4WD truck as compared to a two-wheel drive, it will be found that the cost of 4WD is higher. In many parts of the world, however, it is necessary to pay this premium if the car is to be useful on the local roads.
Many 4WD vehicle manufacturers do not change models very often. In contrast to the annual changes made on many passenger sedans, the Jeep, Toyota Land Cruiser, and British Land Rover, for example, have rarely changed their basic designs. Depreciation is thus not a serious problem, and the buyer can plan to keep the vehicle for an extended period without regard to the resale value.
19.10 Vehicle Types and Sizes
Three basic decisions must be made before buying a new vehicle, although if the vehicle is a replacement for an existing one, it may be only a matter of duplicating the same features. First, what type of vehicle would be most useful? The choices include a passenger car, pickup truck, carryall, dump truck, stake body, tank truck, and a great many more. Second, what capacity is needed? Small, 4WD vehicles range in capacity from about 500pounds (225 kg) upward, and the larger two-axle trucks can carry several tons (2,500 kg). The matter of capacity is related to the third decision, that of terrain capability. A conventional two-wheel drive car cannot be expected to negotiate terrain that can be traveled by a 4WD vehicle. If greater load capacity is needed, perhaps a large truck with two rear axles and power on all six wheels will be required. If large capacity is needed but roads are not particularly difficult, a conventional truck with two powered rear axles and an unpowered front axle might serve the need at substantially less cost.
Among 4WD vehicles there are four general classes. The first are those developed from the U.S. Army Jeep of World War II. This group has grown to include many more "civilized" vehicles such as the Blazer, Jimmy, Bronco, Land Cruiser and Land Rover. The second group includes the small Japanese and U.S. pickup trucks such as the Toyota, Nissan, Mazda, Isuzu, and small-frame versions of the GMC, Chrysler, and Ford trucks. The third group is the standard size pickup trucks and carryalls, available from a wide variety of manufacturers such as Chevrolet, Ford, Toyota, Jeep, Dodge, Land Rover, Hyundai, Volvo, Bedford, and many others. The fourth group consists of
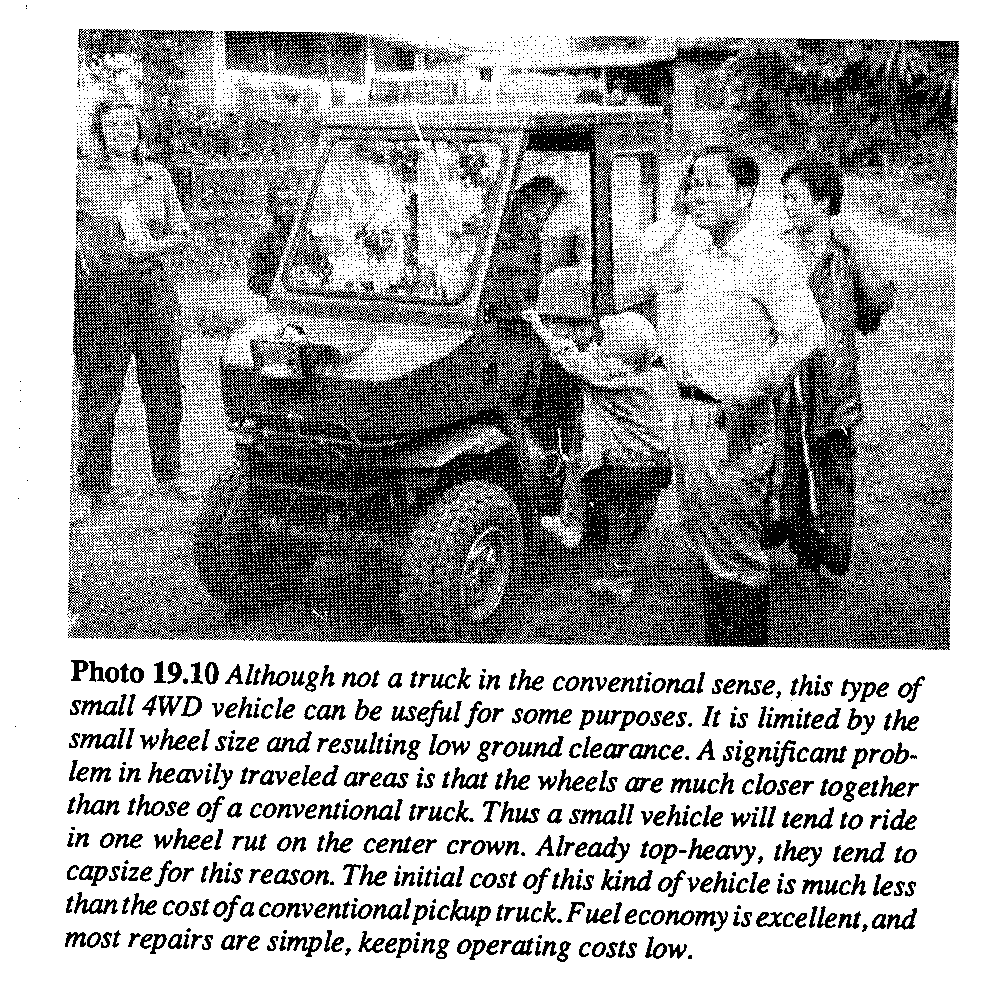
smaller vehicles intended primarily for recreational purposes, including the Bronco II, Mazda Navajo, Nissan Pathfinder, Toyota Four-Runner, Isuzu Rodeo and Trooper, and Suzuki Samurai. They are excellent for carrying personnel or light loads at reasonable cost, but despite what the manufacturers may say, they are not intended for strenuous service. STANDARD PICKUP TRUCKS are generally available in a much wider variety of engines, gear ratios, and weight capacities than the more specialized smaller vehicles. The pickup truck manufacturers are prepared to adapt their basic vehicles to suit the specific needs of many different purchasers, and in the process can virtually "custom build" an excellent truck for frontier roads at reasonable cost. With such builders as Ford and General Motors there are so many options available from the factory that it is difficult to get them all into a sales manual.
Pickup trucks need not be limited to the conventional pickup-style body. They are also available with stake bodies, which are excellent for carrying relatively light, bulky loads. A stake body is entirely above the tires, however, which means that the load must be lifted high onto the body, and it makes the vehicle top-heavy. Stake bodies often suffer damage early in their career as the sides get bent and broken by shifting loads.
Another body option worth considering is the double-cab pickup. These are available from most major manufacturers and make it possible to carry six people in the cab and still have a large load space at the rear.
CARRYALLS are built on a pickup truck frame but have a body like a large station wagon. Often overlooked, they offer many advantages as 4WD vehicles. They carry substantial loads and are easily converted from carrying people to carrying cargo, or a combination of both. Examples of larger vehicles of this type are the Chevrolet Suburban, Toyota Land Cruiser, and the long-wheelbase Land Rover. The same body style is available in smaller vehicles, including the Nissan Pathfinder, Isuzu Trooper, and Toyota Four-Runner.
Before looking into the larger weight classes of trucks, be sure that local bridges or ferries can carry them. In frontier areas the larger trucks are often not economically practical for the local residents and therefore the roads are not prepared for them.
It may also be difficult to get parts for a larger truck unless others are in use in the area.
In general, if the roads will support a larger vehicle and funds are available for its purchase and maintenance, it is better to get a truck that is somewhat larger than needed rather than an undersized one. This will reduce the tendency toward overloading the truck and will provide a reserve of power when stuck. In areas where fuel must be trucked in, for example, a small truck will use most of its cargo getting back to home base. A larger truck will use more fuel, but not in proportion to the much greater load capacity. The cargo capacity increases faster than the gas consumption.
FORWARD-CONTROL VEHICLES are those with the cab above the engine. In many respects they are similar to vans, although generally they have a platform or stake body. Larger trucks in this configuration are available from almost any manufacturer.
A forward-control vehicle is generally somewhat harder to service than a vehicle with a conventional hood over the engine. This is especially true with smaller vehicles, where the engine is difficult to reach; large trucks often have a hinged cab which eliminates this problem. There is also a psychological difference between driving a forward-control vehicle and a conventional one. There is no engine out in front for protection. Although visibility on bridges and other hazards is greatly improved, the driver gets a feeling of greater exposure to road hazards.
19.20 Vehicle Modifications
Most manufacturers offer a long list of options, including an oversize radiator, heavy-duty clutch, oversize springs and shock absorbers, locking front wheel hubs, oversize battery, extra lights, radio, heavy-duty air cleaner, towing hooks, trailer hitches, and a great many more. Also available on some vehicles are such luxuries as power brakes, air conditioners, oversize heaters, and fancy trim for the cab.
In some areas, specific accessories may be considered necessities. These might include a front winch, towing hitches, push plate on the front bumper, front-end skid plate, off cooler, or oversize radiator and oil cooler. Other useful options are a locking rear differential, auxiliary fuel tank, heavy-duty clutch, and helper springs.
Many of these options are surprisingly inexpensive. Heavy-duty springs and shock absorbers, for example, may add only $30 or $40 (U.S.) to the cost of the car; a locking differential may be about $50 more than the regular equipment. Depending on local conditions, they maybe worth much more than this in actual service.
Some accessories are of little value on a frontier road. Air conditioning, for example, is very comfortable in a tropical climate but presents so many maintenance problems that it is usually out of the question. Perhaps the most useless option on a 4WD vehicle is an automatic transmission, which offers the driver little control over the vehicle.
In planning which options to buy on a new car, remember that many accessories can be taken from one vehicle and put on another. Thus their value is not lost when an old car is sold or scrapped.
In wooded or jungle areas, it is best to avoid equipment that projects from the vehicle, such as mirrors, antennas and extra lights. These will soon be broken off by branches and vines. The same is true in areas where vehicles often capsize.
Among the options listed for pickup trucks and recreational vehicles by many manufacturers is a canvas top. While this type of cover is less expensive than the usual metal top, it is a poor investment. The canvas is soon ripped, exposing people and loads to rain and dust, and the cover is often damaged at high speeds by wind.
A rear bumper will often get snagged on bushes, especially if it curves around the side of the vehicle. More useful is the step type of rear bumper available on some pickup trucks, which is set inside the side walls of the body. The front bumper can be greatly improved by extending it into a pusher plate, either with a heavy plank or steel plate.
Tires are another option to be carefully considered. The larger tire sizes provide greater clearance under the vehicle, but tires are expensive and they wear quickly. In soft ground, wide tires provide a larger traction area, and high-flotation tires are available that will carry a loaded truck across loose sand. In areas where log bridges are used, wide tires run less risk of getting wedged between the logs than narrow tread tires. In general, tubeless tires are not used in frontier areas at all because they are difficult to repair when punctured or sliced. Seat belts are intended by the manufacturer to provide protection for the driver and passengers in the event of a collision. In many countries they are not required and are not supplied on new vehicles by the manufacturer. Under frontier conditions there may be no other vehicles with which to collide, but the seat belt is still an excellent device. It will keep you from hitting your head against the cab roof and lets you devote your attention to driving. Where cab doors are removed as insurance against drowning, seat belts keep people from falling out of the cab.
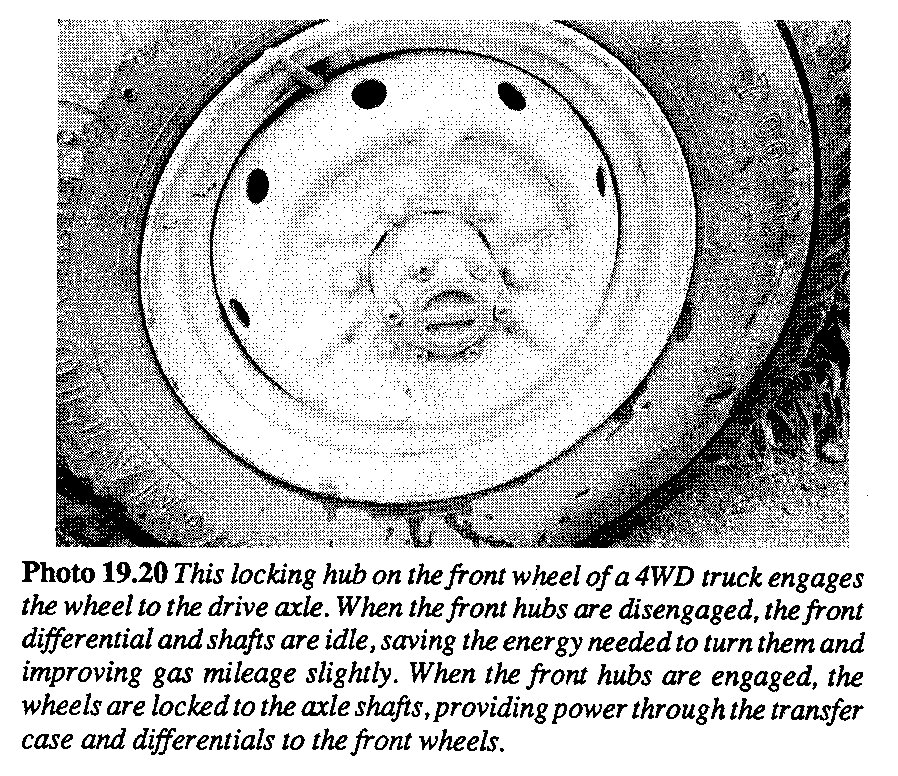
Locking hubs for the front wheels of 4WD cars disconnect the wheels from the ends of the axle shafts. This reduces drag because the front differential does not need to turn when the car is in two-wheel drive. Without unlocking the hubs, the forward motion of the vehicle and the resulting turning of the front wheels would turn the front axle shafts, the differential, and the front propeller shaft, even though the 4WD gearbox has been disengaged. If the vehicle is frequently used in two-wheel drive, locking hubs may be a worthwhile option; they improve gas mileage, reduce tire wear, and reduce wear on the front-drive train.
Somewhat similar are the so-called "automatic" front wheel hubs. These depend on a ratchet principle and will not engage if the vehicle is in reverse. Like the manual-type locking hubs, they can save a little fuel on a good road but are not really intended for continuous difficult service.
If four-wheel drive is frequently needed, locking hubs can be a nuisance or even a real problem. When slipping into a swampy area, for example, you don't have time to get out, set each of the front hubs to the "locked" position, and get back into the driver's seat. The delay may cause the vehicle to be seriously mired. Of course, locking hubs can be locked when the you leave the end of the good road and enter the difficult section, but in an unfamiliar area you may not be aware of the change. In general, the decision on whether to buy locking hubs should be based on the type of roads on which the vehicle will be used.
An oil-bath air cleaner is a worthwhile purchase if it is available as an option instead of a replaceable paper cleaner. An oil-bath air cleaner works better than the paper filter and can easily be cleaned in the shop without having to buy any new parts.
20.00 MISCELLANEOUS FORMULAS
Although not often needed, there are several formulas that are of occasional value to the mechanic.
Engine displacement in cubic inches=
[(engine bore in inches).sup.2] x 0.7854 x engine stroke in inches x number of cylinders
Weight on the rear axles may be computed using this formula:
R = W WB-D -------- WB
where R is the weight on the rear wheels W is the weight of the load WB is the width of vehicle wheelbase D is the distance from the center of the load to the center of the rear axle.
A formula for pulley ratios: SD = sd
where S is the RPM of the driven pulley D is the diameter of the driven pulley s is the RPM of the driving pulley d is diameter of the driving pulley
The same formula can also be used with gears or with chain-drive sprockets.
20.10 CHARTS AND MEASUREMENTS
There are so many measurements in use that a comparison table is often needed to determine fuel-tank capacities, radiator capacities, etc.
1 U.S. gallon = 8.33 pounds (of water) = 231 cubic inches = 0.133 cubic feet 1 Imperial gallon = 10.26 pounds (of water) = 2.77 cubic inches = 0.16 cubic feet 1 Imperial gallon = 1.2 U.S. gallons 1 cubic foot of water = 62.5 pounds = 7.48 U.S. gallons
Water Measurements
1 U.S. gallon= 1 quart= 1 pint=
pounds 8.338 2.084 1.042 ounces 133.527 33.381 16.690 grams 3792.03 945.507 472.753 cubic inches 231 57.75 28.875 cubic feet 0.1337 0.0334 0.017 fluid ounces 128 32 16 ml or cc 3782.03 945.507 472.753 liters 3.782 0.945 0.472
Torque Value for Nuts and Bolts
Thread diameter Pound inches Pound feet Min. Max. Min. Max.
1/4 inch 96 132 8 11 5/16 144 192 12 16 3/8 336 420 28 35 7/16 600 684 50 57 1/2 804 960 65 80
9/16 1320 1560 110 130 5/8 1656 1896 140 175 3/4 3300 3720 275 310 7/8 4320 5100 360 425 1 inch 6000 7200 500 600
Battery Electrolyte Specific Gravity
Temperature[degrees]F Full charge Full discharge
110 1.264 1.094 100 1.268 1.098 80 1.276 1.106 70 1.280 1.110 60 1.284 1.114 40 1.294 1.122
Comparison of Celcius and Fahrenheit Scales
[degrees]C [degrees]F [degrees]C [degrees]F [degrees]C [degrees]F
-40 -40 30 86 100 212 -30 -22 40 104 110 230 -20 -4 50 122 120 248 10 14 60 140 130 266 0 32 70 158 140 284 10 50 80 176 150 302 20 68 90 194 160 320
TEMPERATURE CONVERSION
This chart is useful for quick conversion from degrees Celsius (Centigrade) to degrees Fahrenheit, and vice versa. Although the chart is fast and handy, you must use the equations below if your answer has to be accurate to within one degree.
Equations:
Degrees Celsuis= 5/9 x (Degrees Fahrenheit - 32)
Degrees Fahrenheit = (1.8 x Degrees Celsius) + 32
Example:
This example may help to clarify the use of the equations:
72[degrees]F equals how many degrees Centigrade?
72[degrees]F = 5/9 (Degrees F - 32) 72[degrees]F = 5/9 (72 - 32) 72[degrees]F = 5/9 (40) 72 [degrees]F = 22.2 [degrees]C
Notice that the chart reads 22 [degrees] C, an error of about 0.2 [degrees]C.
WEIGHT CONVERSION
This chart converts pounds and ounces to kilograms and grams, or vice versa. For weights greater than 10 pounds, or more accurate results, use the tables on the next page or the equations below.
On the chart, notice that there are 16 divisions for each pound to represent ounces. There are 100 divisions only in the first kilogram, and each division represents 10 grams. The chart is accurate to about plus or minus 20 grams.
Equations:
1 ounce = 28.35 grams 1 pound = 0.4536 kilograms 1 gram = 0.03527 ounce 1 kg = 2.205 pounds
LENGTH CONVERSION
This chart is useful for quick conversion from meters and centimeters to feet and inches, or vice versa. For more accurate results and for distances greater than three meters, use the tables on the next page or the equations below.
This chart has metric divisions of one centimeter to three meters, and English units in inches and feet to 7 feet. It is accurate to about plus-or-minus one centimeter.
Example:
Suppose you wish to find how many inches are equal to 66 cm. On the "Centimeters into Inches" table, look down the left column to 60 cm and then right to the column headed 6 cm. This gives the result, 25.984 inches.
Equations:
1 inch = 2.54 cm 1 foot = 30.48 cm = 0.3048 m 1 yard = 91.44 cm = 0.9144 m 1 mile = 1.607 km = 5280 feet 1 cm = 0.3937 inches 1 m = 39.37 inches = 3.28 feet 1 km = 0.6214 miles = 1000 meters
Kilograms into Pounds kg. 0 1 2 3 4 5 6 7 8 9
0 lb. 2.20 4.41 6.61 8.82 11.02 13.23 15.43 17.64 19.84 10 22.05 24.25 26.46 28.66 30.86 33.07 35.27 37.48 39.68 41.89 20 44.09 46.30 48.50 50.71 52.91 55.12 57.32 59.53 61.73 63.93 30 66.14 68.34 70.55 72.75 74.96 77.16 79.37 81.57 83.78 85.98 40 88.19 90.39 92.59 94.80 97.00 99.21 101.41 103.62 105.82 108.03 50 110.23 112.44 114.64 116.85 119.05 121.25 123.46 125.66 127.87 130.07 60 132.28 134.48 136.69 138.89 141.10 143.30 145.51 147.71 149.91 152.12 70 154.32 156.53 158.73 160.94 163.14 165.35 167.55 169.76 171.96 174.17 80 176.37 178.58 180.78 182.98 185.19 187.39 189.60 191.80 194.01 196.21 90 198.42 200.62 202.83 205.03 207.24 209.44
211.64 213.85 216.05 218.26
Pounds into Kilograms lb. 0 1 2 3 4 5 6 7 8 9
0 kg. 0.454 0.907 1.361 1.814 2.268 2.722 3.175 3.629 4.082 10 4.536 4.990 5.443 5.897 6.350 6.804 7.257 7.711 8.165 8.618 20 9.072 9.525 9.979 10.433 10.886 11.340 11.793 12.247 12.701 13.154 30 13.608 14.061 14.515 14.969 15.422 15.876 16.329 16.783 17.237 17.690 40 18.144 18.597 19.051 19.504 19.958 20.412 20.865 21.319 21.772 22.226 50 22.680 23.133 23.587 24.040 24.494 24.948 25.401 12.855 26.308 26.762 60 27.216 27.669 28.123 28.576 29.030 24.484 29.937 30.391 30.844 31.298 70 31.751 32.205 32.659 33.112 33.566 34.019 34.473 34.927 35.380 35.834 80 36.287 36.741 37.195 37.648 38.102 38.555 39.009 39.463 39.916 40.370 90 40.823 41.277 41.730 42.184 42.638 43.091
43.545 43.998 44.452 44.906
LENGTH CONVERSION
This chart is useful for quick conversion from meters and centimeters to feet and inches, or vice versa. For more accurate results and for distances greater than three meters, use the tables on the next page or the equations below.
This chart has metric divisions of one centimeter to three meters, and English units in inches and feet to 7 feet. It is accurate to about plus-or-minus one centimeter.
Example:
Suppose you wish to find how many inches are equal to 66 cm. On the "Centimeters into Inches" table, look down the left column to 60 cm and then right to the column headed 6 cm. This gives the result, 25.984 inches.
Equations:
1 inch = 2.54 cm 1 foot = 30.48 cm = 0.3048 m 1 yard = 91.44 cm = 0.9144 m 1 mile = 1.607 km = 5280 feet 1 cm = 0.3937 inches 1 m = 39.37 inches = 3.28 feet 1 km = 0.6214 miles = 1000 meters
Inches into Centimeters
inches 0 1 2 3 4 5 6 7 8 9
0 cm. 2.54 5.08 7.62 10.16 12.70 15.24 17.78 20.32 22.86 10 25.40 27.94 30.48 33.02 35.56 38.10 40.64 43.18 45.72 48.26 20 50.80 53.34 55.88 58.42 60.96 63.50 66.04 68.58 71.12 73.66 30 76.20 78.74 81.28 93.82 86.36 88.90 91.44 93.98 96.52 99.06 40 101.60 104.14 106.68 109.22 111.76 114.30 116.84 119.38 121.92 124.46 50 127.00 129.54 132.08 134.62 137.16 139.70 142.24 144.78 147.32 149.86 60 152.40 154.94 157.48 160.02 162.56 165.10 167.64 170.18 172.72 175.26 70 177.80 180.34 182.88 185.42 187.96 190.50 193.04 195.58 198.12 200.66 80 203.20 205.74 208.28 210.82 213.36 215.90 218.44 220.98 223.52 226.06 90
228.60 231.14 233.68 236.22 238.76 241.30 243.84 246.38 248.92 251.46
Centimeters into Inches cm. 0 1 2 3 4 5 6 7 8 9
0 inches 0.394 0.787 1.181 1.575 1.969 2.362 2.756 3.150 3.543 10 3.937 4.331 4.724 5.118 5.512 5.906 6.299 6.693 7.037 7.480 20 7.874 8.268 8.661 9.055 9.449 9.843 10.236 10.630 11.024 11.417 30 11.811 12.205 12.598 12.992 13.386 13.780 14.173 14.567 14.961 15.354 40 15.748 16.142 16.535 16.929 17.323 17.717 18.110 18.504 18.898 19.291 50 19.685 20.079 20.472 20.866 21.260 21.654 22.047 22.441 22.835 23.228 60 23.622 24.016 24.409 24.803 25.197 25.591 25.984 26.378 26.772 27.165 70 27.559 27.953 28.346 28.740 29.134 29.528 29.921 30.315 30.709 31.102 80 31.496 31.890 32.283 32.677 33.071 33.465 33.858 34.252 34.646 35.039 90 35.433 35.827 36.220 36.614 37.008 37.402
37.795 38.189 38.583 38.976
CONVERSION TABLES
Units of Length
1 mile = 1,760 yards = 5280 feet 1 kilometer = 1,000 meters = 0.621 mile 1 mile = 1.607 kilometers 1 foot = 0.305 meter 1 meter = 3.281 feet = 39.37 inches 1 inch = 2.54 centimeters 1 centimeter = 0.394 inch
Units of Area
1 square mile = 640 acres = 2.59 sq. km 1 square kilometer = 1 million sq. meters = 0.386 sq. mile 1 acre = 43,560 sq. feet 1 square foot = 144 sq.inches = 0.093 sq. meter 1 square inch = 6.452 sq. centimeters 1 square meter = 10.764 sq. feet 1 square centimeter = 0.155 sq. inch
Units of Volume
1 cubic foot = 1,728 cubic inches = 7.48 U.S. gallons cubic inches x 16.387 = cubic centimeters (cc or [cm.sup.3]) 1 cubic meter = 35.314 cubic feet = 264.2 U.S. gallons 1 liter = 1,000 cubic centimeters = 0.264 U.S. gallons 1 British imperial gallon = 1.2 U.S. gallons
Units of Weight
1 metric ton = 1,000 kilograms = 2,204.6 pounds 1 kilogram = 1,000 grams = 2.2046 pounds 1 short ton = 2,000 pounds
Units of Pressure
1.0 pound per square inch = 144 pounds per square foot 1.0 pound per square inch = 27.7 inches of water() 1.0 pound per square inch = 2.31 feet of water() 1.0 pound per square inch = 2.042 inches of mercury() 1.0 atmosphere = 14.7 pounds per square inch (psi) 1.0 atmosphere = 33.95 feet of water() 1.0 foot of water = 62.35 pounds per square foot 1.0 kilogram per square centimeter = 14.223 pounds per square inch 1.0 pound per square inch = 0.0703 kg per square cm
(*) at 62 degrees Fahrenheit (16.6 degrees Celsius)
Units of Power
1.0 horsepower (English) = 746 watts = 0.746 kilowatts 1.0 horsepower (English) = 550 foot pounds per second 1.0 horsepower (English) = 33,000 foot pounds per minute 1.0 kilowatt (kw) = 1,000 watts = 1.34 horsepower (hp) English 1.0 horsepower (English) = 1.0139 metric horsepower (cheval-vapeur) 1.0 metric horsepower = 75 meters x kilograms/second 1.0 metric horsepower = 736 watts = 0.736 kilowatts
21.00 DEFINITIONS AND INDEX
This section is intended to provide both a brief definition of many automotive terms and an index by which they may be located in the text of the book. In addition to such items as axles, tires, carburetors, and other parts of the vehicle the index also covers such driving hazards as mud, snow, and log bridges.
In each entry, a brief definition follows the name of the item, and specific references follow the definition.
Accelerator. The foot-operated pedal that controls the carburetor and the speed of the engine. Stuck, 1.08, 7.90.
Air cleaner. Filter on top of the carburetor to remove dirt from air used in the engine. Changing, 18.14; locating defect, 8.12; maintenance, 18.14; oil-bath type, 18.14, 19.20; testing, 9.20.
Air compressor. Machine to produce air under pressure for inflating tires, etc. In shop, 14.32; operates grease gun, 18.10.
Air filter. See Air cleaner.
Alignment, wheel. Adjustment of the front wheels for best steering and least tire wear. Adjusting, 10.61.
Alternator. Electric generator to recharge battery, 10.53. Tests, 9.70.
Ammeter. Dashboard gauge indicating battery charge or discharge. After fording, 3.08; for testing generator, 9.70, for testing voltage regulator, 9.70; testing ignition system, 9.80.
Anchor. For winch, 6.41.
Antifreeze. Alcohol solution used in radiator to prevent freezing. Absence of, 7.70; flushing radiator, 18.13; cooling system. See also Radiator.
Armature. Moving part of an electrical device; most commonly refers to rotating part of a motor or generator. Starter, 10.56; testing generator, 9.70. See also Generator; Starter.
Axle. Shaft transmitting power from differential to wheel. Bent, 8.32, 8.35; broken, 1.03; crack test, 9.40; finding broken, 10.21; noises, 8.80; removing shaft, 10.21; testing, 9.40; weight formula, 20.00. See also Differential; Drive train.
Axle bearing. See also Ball bearing; Bearing; Roller bearing; Wheel bearing.
Backfiring. Popping or exploding sounds coming through the carburetor or exhaust system. Causes, 8.61. See also Carburetor; Timing; Valves.
Backing plate. The metal circle behind each wheel on which the brake cylinders are mounted. Noises, 8.80. See also Brake system.
Ball bearing. Friction-reduction device consisting of two cylinders with balls between them, used on axles, gearboxes, etc. Assembling, 10.23; greasing, 10.10; testing, 9.40; used to repair tubing, 10.10.
Ball joint. Ball-and-socket joint, similar to a human hip joint, in the steering linkage. Field repair, 7.30; inspection, 10.61; greasing, 18.10; periodic inspection, 18.21; repairing, 10.61, testing, 9.40.
Banging. And other noises, 8.80.
Battery. Rectangular plastic box containing lead plates and acid to store energy, making electricity by chemical action. Basic principle, 2.05; charging, 10.51; cleaning terminals, 7.80; corroded terminals, 7.81; daily inspection, 18.30; dead, 7.81; frozen, to thaw, 7.81; in cold weather, 18.15; jumper cables, 7.81; locating defects, 8.14; maintenance, 18.14; periodic inspection, 18.21; polarity, 9.70; specific gravity chart, 20. 10; testing, 9.70. See also Electrical system.
Bearing. Friction-reducing device to reduce wear on moving parts. Assembling, 10.23; greasing, 10.10, 18.10; installing, 10.10; installing on shaft, 10.23; packing, 10.10; replacing engine, 10.93; water pump, 10.71. See also Ball bearing, Roller bearing.
Block. To stop wheel, 3.04.
Block and tackle. Pulleys and rope arranged to multiply pulling force. For extricating car, 4.00; with winch, 6.44.
Block, engine. The heavy iron casting that forms the basis of the engine, containing the cylinder holes in which the power is produced. Cracked, 9.10, 9.20; removing, 10.92.
Boat anchor. For use with winch, 6.41.
Body. Outer metal shell of the car. Repairs, 11.00.
Bolt. Fastener consisting of a threaded shank and a head with provision for turning by wrench, screwdriver, etc. "Borrowing," 6.83; cutting, 10.10; stuck, 10.10.
Bowline knot. To tie, 6.12.
Brake drum. Heavy metal pie-plate-shaped casing mounted on wheel lugs under rims, against which brake linings rub to slow the car. Badly worn, 10.43; broken, 7.40.
Brake fluid. Hydraulic fluid used in the brake system. Bleeding, 10.42; checking level, 18.30; daily inspection, 18.30; in cold weather, 18.15; siphoning, 10.40; substitute, 7.40.
Brake, hand. The manual (or occasionally foot-operated) parking brake to hold an unattended car. Adjusting, 10.44; repairing, 10.44.
Brake line. Tubing connecting parts of the brake system, through which hydraulic fluid flows. Broken, 7.40; leaking, 7.40.
Brake lining. Replaceable fiber cover for the brake shoes that rubs against the inside of the brake drum. Oversize, 10.43; replacing, 10.43.
Brakes. Stopping mechanism for the car. Adjusting, 10.41; bleeding, 10.43; cause of spinning car, 3.04; dragging, 7.40; efficient operation, 3.00; failure, 1.09; hand, 10.44; hold spinning wheel, 4.01; locating defect, 8.40; operation on snow or mud, 3.04; parking, 10.44; preliminary examination, 2.01; pumping, 1.09; rebuilding, 10.43; relining, 10.43; removing rubber pedal pad, 2.03; repairs, 10.40; stopping on mud or snow, 3.00; testing, 9.50; trailer, 6.81; while fording, 3.08.
Brake shoes. See Brake linings.
Breaker points. Switch inside the distributor that controls electricity flowing to the ignition coil. Adjusting, 10.55; testing, 9.80. See also Distributor; Ignition system.
Breather cap. Screen-filled metal cover, usually about 2-3 inches (5-7 cm) in diameter, on top of the valve cover. Cleaning, 18.11.
Bridge. Building with winch, 6.40; convoy operation over, 3.02; crossing, 3.06; estimating tire track, 2.01; extrication from, 4.04; log, 3.06; repairing, 3.06; winching out of, 6.51. Brushes. Rectangular carbon blocks conducting electricity to or from the commutator of a motor or generator. Inspection of generator, 18.21; replacing generator, 10.53.
Cab. Part of the vehicle where the driver and passengers ride. Introduction to, 2.03.
Cable. Rope made of wire strands. Anchoring, 6.41; force of broken, 6.42; jumper, 7.81; snarled on winch, 6.43; winch, 6.34. See also Chain; Rope; Tow rope; Winch.
Camber. Definition, 10.61.
Capsizing. Tipping the vehicle off its wheels, 3.07. Restarting after, 7.10; salvage with winch, 6.61.
Carbon. Black, granular material sometimes deposited in the cylinder as result of incomplete burning of fuel. Compression test for, 9.20; in diesel engine, 13.10; removing, 10.95.
Carburetor. Cast metal housing mounted on the intake manifold, where fuel and air are mixed. Adjusting with vacuum gauge, 10.30; basic principle, 2.05; choke adjustment, 10.31; vacuum test, 9.20.
Cargo. See Load.
Carryall. Selecting, 19.10.
Caster. Definition, 10.61. See also Steering.
Centigrade. Comparison with Fahrenheit, 20.10.
Chain. Joining pieces, 6.21; on tow cable, 6.21; repairing, 6.23; storage, 6.22; towing, 6.20; trailer safety, 6.81.
Chains, tire. Fitting on tire, 3.03; in mud or snow, 4.01; repairing, 6.23; tire, 3.03; traction, 3.01; V-bar, 3.03.
Charger, battery. Homemade, 10.51.
Chassis. Metal frame upon which the vehicle is built. Alignment, 11.10; basic principle, 2.05; broken, 11.10; damaged, 8.32; load distribution, 2.02; repairs, 11.10.
Check lists. See all of Section 8.00.
Chock. See Block.
Choke. Circular metal plate in the air barrel of the carburetor to reduce air flow for starting the engine. Adjustment, 8.13, 10.31; causes "flooding," 8.12; locating defects, 8.13. See also Carburetor.
Cleaner. For hands, 12.00.
Clutch. Foot-operated device for disconnecting power between engine and gearbox. Bleeding hydraulic, 10.42; double clutching, 2.04; dragging, 7.20; driving with inoperative, 7.20; greasing, 18.10; housing plug, 15.20; locating defects, 8.52; operation, 2.04; purpose of, 2.04; removing rubber pedal pad, 2.03; slipping, 7.20; testing, 9.30; while fording, 3.08. See also Drive train; Transmission.
Cold weather. Maintenance, 18.15.
Commutator. Ring of metal segments around a motor or generator armature, each piece connected to a coil of the armature windings. Starter, 10.56; testing generator, 9.70. See also Brushes; Generator; Starter.
Compression. Squeezing force on fuel vapor exerted when a piston rises in the cylinder and the valves are closed. Diesel engine, 13.00, 13.10; low, 8.62; testing, 9.10, 9.20, 18.12. See also Piston; Piston rings.
Compression gauge. Operation, 9.20.
Condenser. Small metal cylinder in the distributor containing thin foil plates to momentarily absorb the ignition power and reduce distributor pitting. Replacement, 10.55; testing, 9.80. See also Distributor; Ignition system.
Conking out. When the engine "just stops." Causes, 8.63; locating cause, 8.60.
Convoy. Several vehicles traveling together for mutual assistance. Principles, 3.02.
Cooling system. Engine accessories that circulate water through the engine to remove the heat of burning fuel. Basic principle, 2.05; air in, 9.10; flushing, 18.13; leaks, 10.70; pressure test, 9.10; repairs, 7.70, 10.70; testing, 9.10; water pump noises, 8.80; water pump repairs, 10.71. See also Fan belt; Hose; Radiator.
Cotter pin. Retaining clip of folded wire to prevent a nut or another part from turning. Improvised, 7.00.
Crank. Hand operated, 7.81; testing engine, 7.90, 8.11; to start engine, 7.80, 7.81.
Crankcase. Sheet metal pan under the engine block to contain oil for the engine. Draining, 18.11; emission controls, 10.81; field repair, 7.90; uses for old oil, 10.93; to add oil, 18.11. See also Oil.
Crankcase breather. See Breather cap.
Cylinder. Hole in the engine block in which the piston moves. Examining light, 14.51; testing compression, 9.10; worn, diesel, 13.10.
Cylinder head. Heavy metal plate bolted over the top of the engine block to close the ends of the cylinders. Broken gasket, 8.11, 8.21; cracked, 8.62.; gasket, 8.11, 8.21, 9.10; improvised torque wrench, 14.50; loose, 8.21; removing, 10.94; repairs, 10.94; testing, 9.20.
Deadman. Construction, 6.41. See also Anchor.
Decarbonizing. 10.95.
Decoking. See Carbon; Decarbonizing.
Dents. Repairing, 11.00.
Derelict. Towing, 6.70.
Diesel engine. Internal combustion engine using heat from compression to ignite fuel. See all of Section 13.00. Fording with, 3.08; hard starting, 13.10; injector tests, 13.20; knocking, 13.10; locating problems, 13.10; power generator, 14.31; repairs, 13.30; testing, 13.20.
Differential. Gears in the middle of the axle housing to transfer power from propeller shaft to wheels. Damaged, 6.72; dismantling, 10.22; gear ratio, 10.22; ground clearance, 2.01; limited slip, 3.01, 4.01, 10.22; location, 2.01; lubrication, 18.11; periodic inspection, 18.21; switching front and rear, 10.22; towing car with damaged, 6.72; Unimog locking, 3.01, 4.01, 19.40.
Displacement. Calculating, 20.00.
Distributor. Rotary electric switch in a black plastic housing to connect ignition voltage to the spark plugs. Field repair, 7.82; locating defects, 8.12, 8.63; lubrication, 18.11; testing, 9.80.
Doors. Removal for safety, 2.01, 3.09. See also Body.
Double clutching. Operation, 2.04. See also Clutch; Gearbox; Transmission.
Downshifting. Process of shifting the transmission gears down to a lower gear. For emergency stop, 1.09; operation, 2.04; to slow vehicle, 3.04. See also Clutch; Gearshift.
Drive shaft. See Propeller shaft.
Drive train. Repairs, see all of 10.20. See also Differential, Gearbox; Propeller shaft; Transfer case; Transmission.
Drum. Storage of, 17.00; supplying fuel from, 17.10. See also Brake drum.
Electric winch. 6.33. See also Winch.
Electrical system. Alternator, 10.53; repairs, see all of 10.50; testing, 9.70. See also Ignition.
Electricity. In the shop, 12.00; tools requiring, 14.20, 14.30.
Emission controls. Repairs, 10.81.
Engine. Diesel, 13.00; installing, 10.92; introduction, 2.05; noises, 8.80; racing, 1.08; removing, 10.92; repairs, 10.90; replacing, 10.92; mined by submerging, 3.09; "running in," 10.93; testing, 9.20; uses for spare, 10.10; won't start, 8.12.
Exhaust. Fumes emitted from the engine, consisting of unburned fuel components and products of combustion. Color, 9.90; color, diesel, 13.20.
Exhaust system. Manifold too hot, 9.90; repairs, 10.80; testing, 9.90. See also Muffler.
Fahrenheit. Comparison with Centigrade, 20.10.
Fan. Blower to force air through the radiator to cool the engine. Removing with water pump, 10.71; while fording, 3.08.
Fan belt. V-belt driving the fan, and usually the water pump and generator, from the engine. Adjustment, 10.70; broken, 7.70; cause of overheating, 8.70; loose, 8.14; noises, 8.80,10.70; replacement, 10.70; squeaking, 10.70; substitutes, 7.70; while fording, 3.08. See also Cooling system.
Feeler gauge. Set of thin metal blades for measuring size of a small opening such as the gap of a spark plug. Adjusting valves, 10.91; to set plugs, 10.55.
Field expedients. All of Section 7.00.
Filler cap - Fuel. Testing, 9.50. See also Fuel; Fuel system.
Filter, oil. Replacing, 18.11. See also Crankcase; Oil.
Fire wall. Partition between the engine compartment and the cab.
Firing order (of spark plugs). To determine, 10.55.
Float. To raise submerged car, 5.01.
Float, carburetor. See Carburetor.
"Flooding." Definition, 8.12.
Fording. Driving the car through deep water, 3.08. Grease after, 18.10; stuck while, 4.05; with diesel engine, 13.00.
Forge. Making, 14.50.
Formulas. 20.00.
Forward control. Definition, 19.10; selecting vehicle, 19.10.
Four-wheel drive. Applying engine power to all four wheels instead of the conventional two-wheel drive. Principles, 3.01; when to engage, 3.01. See also Drive train; Transfer case.
"Freezing up." Inability of an engine to turn because of jamming or wedging of parts. From capsizing, 3.07.
Fuel. Carrying drums of, 2.02; daily inspection, 18.30; diesel, 13.00; grades, 19.00; leaking diesel, 13.10; principles of energy extraction, 2.05; reserve supply, 2.01; siphoning, 17.10; spilled, 10.10; storage, 12.00, 17.10; testing flow, 9.50; timing diesel injection, 13.30; weight of, 2.02.
Fuel, diesel. 13.00.
Fuel filter. Device to remove sand, water, or other impurities from fuel using a fine-mesh screen, porous ceramic, or plastic sponge material. Cleaning, 18.14; clogged, 7.50; diesel, 13.10; maintenance, 18.14.
Fuel line. Tubing from fuel tank to pump and carburetor. Bleeding diesel, 13.10; broken, 7.50; clogged, 7.50; diesel, 13.10; locating defect, 8.12; priming, 7.50.
Fuel pump. Engine-powered or electric pump to move fuel to the carburetor. Diesel, 13.10; inoperative, 7.50; testing, 9.50.
Fuel tank. Keeping full, 2.01; leaking, 7.50; patching, 10.30; soldering, 10.30; welding, 10.30.
Fuse. Electrical safety device that melts to open the circuit when overloaded. Blown, 7.80; causes of blown, 10.54; location, 7.81; locating blown, 7.81; testing, 7.80, 9.70; substitute for blown, 7.81.
Gas. See Fuel.
Gasket. Sheet of soft material such as cork or cardboard to seal joint between metal parts. Head, to test, 9.20; improvising, 10.10; leaking, 9.10; making, 10.10; removing, 10.10; replacing cylinder head, 10.94; tester 14.51.
Gas pedal. See Accelerator.
Gearbox. Housing and gears between clutch and propeller shaft to vary engine-to-wheel speed ratio. Locating defects, 8.51; lubrication 18.11; noise, 8.80; periodic inspection, 18.21; towing car with damaged, 6.72. See also Gear shift; Transfer case; Transmission.
Gearshift. Driver's handle for changing gear ratios. Operation, 2.04. See also Downshifting; Transfer case; Transmission.
Generator. Cylindrical accessory producing electricity, generally driven by the fan belt. Alternator, 10.53; basic principle, 2.05; locating defects, 8.14; lubrication, 18.11; repairing, 10.53; shop power, 12.00, 14.31; testing, 9.70; welder, 14.42.
Glass. Fixing cracked, 11.00; replacing window, 11.00.
Graphite. For lubrication, 18.11.
Gravel roads. Operation on, 3.00.
Grease. Thick lubricant for bearings, ball joints, etc. Gun, 18.10; packing bearing, 10.10; pit in shop, 12.00; removing, 12.00, 14.50.
Greasing. Procedure, 18.10.
Ground, electrical. Polarity, 9.70.
Gully. Straddling, 3.00. See also Ruts.
Head gasket. See Cylinder head gasket.
Headlights. Lamps on front of vehicle for night driving. Dim, 2.04; failure, 1.07; for testing battery, 9.70; for testing generator, 9.70; for testing starter, 9.70; mud on, 2.04; protection on gravel roads, 3.00; repairs, 10.54.
Help. Signals to secure, 5.00.
Hill. Descending with winch, 6.53; use of brakes on, 3.04; with slippery surface, 3.04.
Hitch. Trailer, 6.81; trailer, on front of car, 6.83.
Hoist. In shop, 12.00; making, 14.50. See also Winch.
Hook. For tow chain, 6.21.
Hose. Radiator, mending broken, 7.70.
Hydraulic winch. See Winch.
Hydrometer. Tester for battery condition which measures specific gravity of electrolyte; usually a glass tube with a rubber bulb on the end. Operation, 9.70; chart of SPG (specific gravity) readings, 20.10.
Ice. Driving on, 3.04.
Ignition coil. Electric device for raising voltage to spark plugs, usually a black plastic cylinder on the fire wall. Basic principle, 2.05; dropping resistor, 8.12; replacement, 10.55; testing, 9.80; wet, 7.82.
Ignition system. Electrical system for igniting fuel inside a gasoline engine. Locating defects, 8.12; principles, 10.55; repairs, 10.55; testing, 9.80; while fording, 3.08. See also Battery; Distributor; Ignition coil; Spark plugs.
Ignition timing. Adjustment of the ignition system to time the sparks at the correct point in the piston rotation cycle. Testing, 9.80.
Ignition wiring. "Leaking," 10.55.
Injector. Fuel sprayer that forces fuel into diesel engine cylinder. Diesel fuel, 13.10; testing diesel, 13.20; timing diesel, 13.10, 13.30.
Inner tube. Black rubber lining bladder of a tire. Locating leak, 10.62; patching, 10.62; removing, 10.62; salvaging rubber, 10.62; to replace spring, 7.00. See also Tire.
Insects. Removing dead, 18.14.
Intake manifold. Metal casting on the engine block to distribute air and fuel mixture from the carburetor to the cylinders. Basic principle, 2.05; vacuum test, 9.20.
Jack. Machine for lifting the car. Lift car off obstacle, 4.03; lift car out of mud and snow, 4.02; operation, 7.60; placement, 10.10; substitute, 7.60; to build hoist, 14.50; to raise car from bridge, 4.04; used over pit, 12.00; using winch as, 6.40; when in snow or mud, 4.01.
Jackknifing. Definition, 6.82; safety hazard, 6.80; to avoid, 6.82.
Jumper cables. Heavy wires with clips on the ends for connecting one car's battery to another's. To use, 7.81.
Knocking. Rattling noise in engine like loose marbles rolling around, caused by poor fuel burning in cylinders. Diesel engine, 13.10; eliminating, 10.93; identifying, 8.61, 8.80.
Knots. To join rope, 6.12.
Knuckle joint. See Steering knuckle.
Leaf spring. See Spring (Chassis).
Lights. Improvised for work, 7.00; in shop, 14.30; repairs, 10.54; work, 15.20.
Limited-slip differential. See Differential.
Litter. For carrying sick or injured person, 15.10.
Load. Capacity, 19.10. Causing capsizing, 3.07; height of, 2.01; in trailer, 6.82; lifting with winch, 6.40; loading the vehicle, 2.02; securing to truck, 15.10; weight calculation, 20.00.
Locking hubs. Hand-turned knobs on front wheels to disconnect wheels from axles. Advantages, 19.20; definition, 19.20.
Log. As deadman, 6.41; jammed under car, 6.52; moving with winch, 6.40.
Lubrication. Filling crankbase, 18.11; procedure, 18.11.
Lug nuts. Nuts fitting studs to mount brake drums and wheels. "Borrowing," 7.00; tightening, 7.60; see also Brake drum; Rim; Wheel.
Maintenance. Preventive, see all of Section 18.00. Routine schedules, 18.20.
Manifold, exhaust. See Exhaust system.
Master cylinder. Foot-operated hydraulic cylinder that forces fluid to the wheel cylinders to stop the car; usually located on opposite side of fire wall from brake pedal. See also Brakes.
Measurements. Charts 20.10.
Metric equivalents. 20.10.
Minibike. 19.00.
Moisture. On ignition wires, 7.82.
Mud. Capsized in, 6.61; extrication from, 4.00, 4.01; hung up in, 4.02; improving traction in, 3.04; resistance of, 3.04; winching out of, 6.50.
Muffler. Metal can containing sound baffles for the exhaust gas, usually mounted under the rear of the car. Clogged, 8.62; noise, 8.80; repairing leaks, 10.80; replacement, 10.80.
Night driving. Precautions, 3.00.
Noises. Bubbles in radiator, 9.10; unusual, 8.80.
Nut. Square or hexagonal metal fitting with a threaded hole to be screwed on a bolt or stud. "Frozen," 7.00; to remove, 10.10.
Obstacle. Hung up on, 4.03; straddling, 3.00.
Oil. Checking for leaks, 18.21; checking level, 18.30; consumption, 8.21; cooler, 19.20; daily inspection, 18.30; exhaust color checks, 9.90; gear, 18.11; improvised cooler, 15.20; locating defects, 8.21; loss of pressure, 1.01, 8.20; periodic inspection, 18.21; refilling crankcase, 18.11; SAE ratings, 18.11; spilled, 10.10; storage, 17.00; to free nut, 7.00; water in, 9.20.
Oil drum. As float, 5.01; load in truck, 2.02.
Oil filter. Screen or porous material to remove particles from engine oil, usually located in a can-shaped housing connected to the crankcase. Replacement, 18.11.
Oil pan. See Crankcase.
Overheating. Causes, 7.70; locating cause, 8.70; thermostat test, 9.10. See also Cooling system.
Parking brake. See Hand brake.
Parts. Availability, 19.00; carried in car, 16.00; interchanging, 19.00; stock in shop, 16.00.
Passengers. Number of, 2.03.
Patch. Hot, 10.62; tire, 10.62.
PCV. Positive crankcase ventilation, 10.81.
Pedals. Removing rubber pads, 15.20.
Pickup truck. Selecting, 19.10.
Piston. Cylindrical metal block moving up and down in the engine to provide power. Basic purpose, 2.05; diesel engine, 13.10.
Piston rings. Metal rings fitted into grooves in the piston to provide a tight seal with the cylinder wall. Compression test, 9.20; diesel, 13.10; replacing, 10.93; worn, 8.62.
Points. See Breaker points.
Power. Lack of, 8.62.
Pressure. Testing cylinder, 9.10.
Pressure gauge. To test fuel pump, 9.50.
Preventive maintenance. See all of Section 18.00.
Propeller shaft. Pipe-like rod transmitting power from gearbox to differential. Broken, 1.03; noises, 8.80. See also Drive shaft.
Pulley. Ratio calculation, 20.00; with winch, 6.44; see also Block and Tackle.
Push. To start engine, 7.81.
Pusher board. Operation, 6.70.
Radiator. Finned tubing set in frame at front of car for cooling the water circulated through the engine. Adding water, 7.70; air in, 9.10; boiling, 1.04; antifreeze, 7.70; basic principle, 2.05; checking water level, 18.30; daily function, 18.30; flushing, 18.13; locating defects, 8.70; oil in, 9.10; overheated, 1.04; overheating caused by low pressure, 9.10; pressure, 9.10; repairing leaks, 7.70, 10.70; soldering, 10.70; substitute for water, 7.70. See also Cooling system.
Radio. 4.00.
Recovery. Of submerged car, 5.01.
Resistor. Ignition coil, 8.12.
Rim. Metal wheel on which the tire and tube (if any) are mounted. Removing tire from, 10.62; split, 10.62. See also Tire; Wheel.
River. See also Fording.
Rock. Hung up on, 4.03; straddling, 3.00.
Rocker arm cover. Metal cover on top of engine block over the ends of the valves and arms that move the valves. Adjusting valves, 10.91; breather - see Breather cap.
Roller bearing. Friction-reduction device consisting of two cylinders with metal rollers between them, used on axles and other parts. Assembling, 10.23; greasing, 10.10; testing, 9.40.
Rope. Around tire, 4.00; splicing, 6.10; storage, 6.10; strength of fiber, 6.10; synthetic fibers, 6.11; using vines, 4.00. See also Cable, Winch.
Rotor distributor. Black plastic electric switch inside the distributor cap that turns to connect the center wire of the cap to each of the outer wires in turn. See also Distributor.
Rough running. Locating cause, 8.60; 8.61.
Running gear. See alignment; Springs; Steering; Tires.
"Running in." Diesel engine, 13.30; gas engine, 10.93.
Ruts. Straddling, 3.00.
Sand. Extrication from, 4.00; resistance of, 3.04.
Seat belts. Purpose, 19.20; value of 2.03.
Sediment cup. See Fuel filter.
Shimmy. Wobbling of front wheels, sometimes making steering difficult. Balancing tires, 10.62; locating cause, 8.35; repairs, 10.61. See also Steering; Steering box.
Shock absorber. Hydraulic cylinder between axle housing and chassis to reduce road bumps; usually located near each wheel. Basic principle, 2.05; broken, 8.80; bushing missing, 8.80; daily inspection, 18.30; periodic inspection, 18.21; replacement, 10.64; testing, 9.40.
Shop. Designing, 12.00.
Silencer. See Muffler.
Siphon. For gasoline, 17.10.
Skid. To regain traction, 3.04. Also see Traction.
Snow. Capsized in, 6.61; driving in deep, 3.05; extrication from, 4.00,4.01; hung up in, 4.02; resistance of, 3.04; winching out of, 6.50.
Soap. For hands, 12.00; to repair fuel tank, 7.50.
Solder. Improvised, 7.00.
Soldering. Process for joining metals by heating them and flowing on a soft, melted "solder" metal which cools and hardens. Fuel tank, 10.30; radiator, 10.70.
Solenoid. See Starter switch.
Spark coil. See Ignition coil.
Spark plug. White ceramic and metal terminal of the ignition system where electricity from the ignition coil causes a spark to ignite the fuel; one is located at the top of each cylinder. Basic principle, 2.05; field repair, 7.82; length, 10.55; locating defects, 8.12, 8.15; periodic inspection, 18.21; replacing, 10.55; setting gap, 10.55; size, 10.55; testing, 9.80; vacuum gauge test, 9.20.
Speedometer. Noise, 8.80.
Spline joint. Type of shaft joint in which one section has lengthwise ribs which slide into similar grooves in the other section; commonly used for propeller shaft. Greasing, 18.10; periodic inspection, 18.21. See also propeller shaft.
Spreaders. Springs or rubber circles used to pull tire chains tight. Use on tire chains, 3.03.
Springs - chassis. Flat leaf or coil springs between the axles and chassis. Basic principle, 2.05; coil type, 10.63; daily inspection, 18.30; dismantling, 10.63; judge of overloading, 2.02; removing, 10.63; replacing leaf, 10.63.
Spring. Wire coil with elasticity to return a part after use, such as to lift the accelerator after it has been depressed. Replace with rubber, 7.00.
Starter. Electric motor to turn the engine and start it. Armature, 10.56; bench testing, 10.56; brushes, 9.70; commutator, 9.70; field windings, 10.56; jammed, 7.81; locating defect, 8.11, 8.12; lubrication, 18.11; repairs, 9.70,10.56; testing, 9.70.
Starter switch. To test, 9.70.
Starting. Diesel engine, 13.10; locating cause of failure, 8.64.
Steering. Broken, 1.05; daily inspection, 18.30; effect of load on, 2.02; field expedients, 7.30; greasing, 18.10; grip on wheel, 2.03; locating defects, see all of Section 8.30; parts bent, 1.06; periodic inspection, 18.21; repairs, 10.61; testing, 9.40.
Steering box. Housing at the lower end of the steering wheel shaft which converts the rotary motion of the steering wheel to the lateral force needed to steer the front wheels. Cause of shimmy, 8.35; checking, 18.21; loose, 10.61; lubrication, 18.11.
Steering knuckle. Connection in wheel end of front axle to transit power to front wheels while allowing them to turn for steering. Checking, 18.21; lubrication, 18.11; testing, 9.40.
Still. For drinking water, 5.00.
Storage. In shop, 17.00; of parts, 12.00; on vehicle, 15.10.
Straddling obstacles. 3.00.
Stranded. 5.00.
Stream. See also Bridge; Ford; Submerged; Water.
Stud. Threaded cylinder screwed into a hole in an engine part so that part is left exposed to be used to hold down another part such as a cover. To remove, 10.10.
Stump. Hung up on, 4.03.
Submerged. 3.09; 5.01; field repairs after, 7.10; salvage with winch, 6.62.
Supplies. Carried in car, 16.00; daily inspection, 18.30; stock in shop, 16.00.
Swamp. To cross, 3.04. See also Mud; Traction.
Synchromesh. Type of transmission that compensates for differences in rotating speed of the drive gears and wheels to avoid grinding or clashing when shifting gears. See also Transmission.
Tailpipe. Pipe at the end of the exhaust system, from the muffler out the rear of the car. See also Exhaust system.
Temperature. Celsius and Fahrenheit chart, 20.10.
Temperature indicator. See Radiator.
Test instruments. 14.30.
Test lamp. To test fuse, 9.70.
Testing equipment. All of Section 9.00.
Thermostat. Heat-operated opening in the cooling system that opens when the engine becomes hot to allow water to flow. To test, 9.10.
Tie rod. Pipe-like connection between two front wheels to make them steer together. Adjusting toe-in, 10.61; bent, 1.06; broken, 1.05, 7.30; field repair, 7.30; troubleshooting, 8.35.
Timing. Adjustment to make spark plug fire at proper time in relation to piston movement. Adjusting, 9.80,10.55; diesel engine, 13.10,13.30; misfiring, 8.61; setting breaker points, 10.55; testing, 9.80; tune-up, 18.12.
Timing lamp. Test instrument used to adjust ignition timing of the engine. Operation, 9.80, 10.55.
Tipping over. See Capsizing.
Tire. Balancing, 8.31, 10.61, 10.62; blowout, 1.02; cause of worn, 8.32; changing, 7.60; changing press, 14.50; compressor to inflate, 14.32; daily inspection, 18.30; driving on flat, 7.60; effect of size on traction, 3.05; flat, on trailer, 6.82; in cold weather, 18.15; inflating tubeless, 10.62; lugs, 10.62; periodic inspection, 18.21; putting on rim, 10.62; removing from rim, 10.62; ripped, 10.62; rotating positions, 10.62, 18.21; selecting, 19.20; spare, 2.01; stuck in bridge, 4.04; track--instance between tires on same axle, 2.01; tubeless, 10.62; used for towing, 6.70; valve, 10.62; wear due to 4WD, 3.01.
Tire chains. See Chains, Tire.
Toe-in. Adjusting, 10.61; definition, 10.61.
Tools. See all of Section 14.00. Carried in car, 14.10, daily inspection, 18.30; "homemade," 14.50; improvised torque wrench, 14.50; in shop, 14.20; specialized, 14.30; storage, 12.00.
Torque. Chart for bolts, 20.10.
Torque wrench. Calibrated wrench used to apply a specific torque to a nut or bolt. Improvised, 14.50.
Towing. 6.00. Eyes, 15.20.
Tow rope. Hook for, 6.21; joining pieces of, 6.12; knots, 6.12; length of, 6.71; to attach, 6.71; use of old tire, 6.70.
Traction. Improving, 3.01, 4.00; increasing with chains, 3.01; loss of, 3.04; precautions when winching, 6.60; wheel hook, 4.00; winch not dependent on, 6.30.
Trailer. 19.00. Brakes, 6.81; crossing bridge, 3.06; crossing ford, 3.08; extricating, 6.83; for generator, 12.00; hitches, 6.81; loading, 6.82; maneuvering, 6.82; moving with winch, 6.40; towing, 6.82; towing with tractor, 6.80; uses of, 6.80.
Transfer case. Additional gearbox on 4WD cars to provide front-wheel power and higher gear ratio for added power. Lubrication, 18.11; operator, 2.04; periodic inspection, 18.21. See also Drive train; Gearbox; Transmission.
Transmission. Gear-changing equipment between engine and differentials, either automatic or manual. Automatic, 19.20; locating defects, 8.51; lubrication, 18.11; noises, 8.80; on 4WD vehicle, 3.01; periodic inspection, 18.21; towing car with damaged, 6.72. See also Gearshift.
Truck. Types, 19.10.
Tube, tire. See Inner tube.
Tubing. Bending, 10.10; repairing dented, 10.10; to put oil in housings, 18.11; to transfer fuel, 17.10.
Tune-up. Adjustment of ignition timing, valve clearance, and other variables for optimum engine operation. Procedure, 18.12.
Universal joint. Power-transmitting joint for a twisting shaft made of two V-shaped brackets with a four-pointed "spider" between them. Cover, 15.20; damaged, 8.33; greasing, 18.10; noises, 8.80; periodic inspection, 18.21; repairing, 10.24.
Vacuum. Engine, to test, 9.20; in fuel tank, 9.50; locating leaks, 9.20.
Vacuum gauge. Meter for measuring vacuum as a test instrument. Adjusting carburetor, 10.30, 18.12; operation, 9.20; testing timing, 9.80.
Valve, engine. Plug that closes cylinder at various points in the engine-operating cycle; usually located in the cylinder head. Adjusting, 10.91; basic principle, 2.05; checking by exhaust color, 9.90; compression test, 9.20; diesel engine, 13.10; grinding, 10.91; removing, 10.91; sticking, 8.62; testing, 9.20; timing, 8.62; tune-up, 18.12; vacuum test, 9.20.
Valve, tire. Stopper in the air nipple of a tire or inner tube which lets air into the tire but not out. Leaking, 10.62. See also Tire.
Vehicle. Basic designs, 19.10; selecting new, 19.00.
Vibration. Locating cause, 8.33.
Vines. To replace rope, 4.00.
Voltage. "Pressure" of electricity in any electrical system. To raise charging, 10.53.
Voltmeter. 14.30. To adjust voltage regulator, 10.53; to test generator, 9.70.
Voltage regulator. Electrical controls for the battery charging circuit, usually consisting of two or more small relays under a metal or plastic cover. Adjusting, 10.52; locating defects, 8.14; testing, 9.70.
Water. Adding to radiator, 7.70; battery, 18.14; car submerged in, 5.01; carrying, 7.70; distilled, 18.14; draining from gas tank, 15.20; driving in, see Fording; for the shop, 12.00; heater for shop, 12.00; ignition splash guard, 15.20; in crankcase, 9.20; in engine, 7.10, 8.11; in exhaust system, 9.90; in fuel, 7.50, 15.20; on ignition wires, 7.82; radiator, 18.13; reserve supply, 2.01; still for producing, 5.00; substitute for radiator, 7.70. See also Submerging.
Water pump. Centrifugal pump, usually mounted on front of engine with fan, for moving cooling water through engine and radiator. Leaking air, 9.10; noises from, 8.80; repairs, 10.71. See also Cooling system; Radiator.
Weight. Capacity of vehicle. See also Load.
Welder. Shop tool for joining metal by heating and melting the joint area. Electric arc, 14.42; gas, 14.41; generator type, 14.42; transformer type, 14.42.
Welding. Chain repairs, 6.23; chassis, 11.10.
Wheel. Metal circle on which the tube and tire are mounted. Bent, to test for, 9.40; mounting, 10.62; noises, 8.80. See also Rim.
Wheel, spinning. See Traction.
Wheel bearings. Locating defects, 8.34; to test, 9.40. See also Ball bearings, Roller bearings.
Winch. Accessory tool usually mounted on front of car for applying force by winding up a rope or cable. See all of Section 6.00. Broken cable, 6.42; cable for, 6.34; cable snarled, 6.43; capstan type, 6.31; drive system for, 6.33; drum type, 6.31; economic aspects, 6.30; electric, 6.33; going downhill, 6.53; hydraulic, 6.33; in mud, 6.50; in snow, 6.51; installing, 6.32; operation, 6.40; recover submerged car, 5.01; selecting, 6.31; to wind cable, 6.43; used as shop hoist, 12.00, while fording, 3.08.
Window. See also Glass.
Windshield wiper. Flat rubber-edged blade that oscillates across windshield to remove rain drops. Blade maintenance, 18.14.
Wire. Ignition, to test, 9.80.
Wire rope. Carrying on vehicle, 6.03; for winch, 6.34; joining sections, 6.02; splicing, 6.02; storage, 6.03; strength, 6.01; to form eyes, 6.02. See also Cable; Rope.
Workbench. For shop, 12.00.