 Introduction

Many plants deemed as invaluable for the smallholder farmer offer nutritious food for the family, fodder for animals, or timber for construction. Remarkably, bamboo offers all three of these assets from the same perennial plant! This Technical Note will focus on how to most effectively harvest, preserve and use bamboo as timber for construction purposes.
Plant Description
Two broad categories of bamboo can be distinguished: running bamboo (monopodial) and clumping bamboo (sympodial). As the names suggest, running bamboo has a more diffuse growth pattern, while clumping bamboo tends to remain congregated and confined. Generally speaking, running bamboo is smaller and found in colder climates, while clumping bamboo is commonly larger and requires warmer climates. Though this document is written from the perspective, experience, and study of clumping bamboos in a tropical and subtropical setting, some principles may also apply to running bamboos and/or temperate settings.
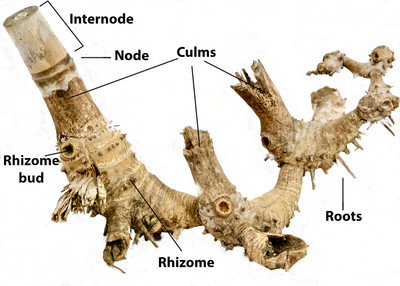
Figure 1. Stem and underground structure of bamboo. Source: Tim Motis
The core of a bamboo plant, the rhizome, is located under the soil. Stems called culms emerge from the rhizome; these are segmented by nodes that strengthen the stem, and from which branches will grow. Culms are commonly hollow in the portions between nodes (referred to as internodes; Figure 1). Leaves grow on branches that emerge from the nodes.
Each culm emerges as a shoot of fixed diameter. It will grow in height, but will not grow bigger around. However, as a bamboo clump matures, the diameter of new culms will increase each growing season, until a maximum (dependent on the species) is reached.
Harvesting
Timing is extremely important when harvesting bamboo for timber; proper timing can maximize bamboo’s characteristic strengths and minimize its weaknesses.
Maximizing Strength
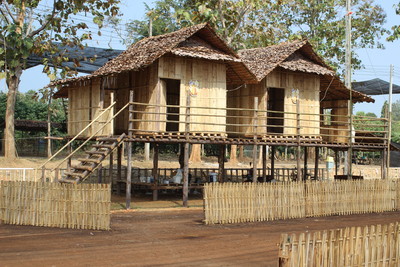
Figure 2. A bamboo home with a bamboo fence. Source: Craig Bielema
Bamboo is one of the fastest growing plants in the world, and a single culm can reach a height of over 100 feet in just one growing season--but it is best to wait three years for that culm to reach full maturity before harvesting. Once a bamboo culm reaches maturity, it will be much stronger. Culms begin to die roughly 8 to 10 years after they emerge as shoots, so the ideal harvest window is between 3 and 8 years of age.
Knowing this, how can you distinguish the age of a culm when you go to your bamboo clump to harvest? One method, which requires a considerable amount of patience and forethought, is to record the year on each culm as it emerges. This can be done with long-lasting grease pens, markers, or paints, or simply by scarring the outer layer of the bamboo with a knife or stone. This method, used diligently, will allow you to know the exact age of every culm in the clump.
You can also use simple observation to make an educated guess at the age of a culm. Clumping bamboo typically produces new shoots further and further from the center of the clump. This implies that the older, more desirable culms will be located in the hard-to-access center of the clump, while the younger, less desirable culms are located in the easy-to-access outside perimeter. With this in mind, you might want to clear-cut a path to the center of your clump, to enable easy access and removal of mature culms. If viewed from above, a clump managed like this would have the shape of a horseshoe.
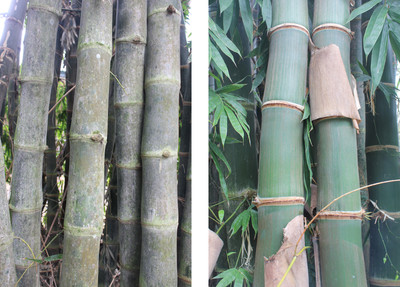
Figure 3. Old culms without sheaths (left). New clums with sheaths (right). Source: Tim Motis
Older culms generally do not look as nice as young ones, giving another valuable clue about the age of a culm. Older culms often are discolored due to sun damage, and scarred from rubbing on other culms; they are also more likely to have lichen, epiphytes, and/or scale living on them. Young bamboo, by contrast, is generally free of these imperfections; young culms will be smooth, clean, and may still have a waxy sheen. Older bamboo culms will have lost most, or all, of their culm sheaths (Figure 3), while younger culms may still retain some. Also, older culms tend to have more branches than younger culms.
Minimizing Weakness
Bamboo is vulnerable to infestation by insects and fungus after harvest. These pests feed on the starch in bamboo, destroying its structural integrity. Harvesting bamboo at the proper time can minimize the starch content, making it less desirable to pests.
To minimize starch, harvest bamboo culms when the plant is least active. Consider the time of year and day when planning to harvest your bamboo. A clump of bamboo is most active when ample water and sunlight are available. Bamboo will produce new shoots during the time of year when these resources are most available. This would be the worst time to harvest bamboo, because it would have high starch content. Instead, harvest bamboo at the time of year when the bamboo plants are less active and are not producing new shoots. During the day, a plant is least active before the sun shines on the leaves (generating starch through photosynthesis). To minimize starch content, harvest bamboo in the very early morning.
Harvesting Tips & Tricks
When harvesting bamboo, I suggest that you remove the culm down to the first node just above ground level. Cut just above that node, leaving the solid diaphragm of the node intact, but removing the hollow internode section so you do not leave a cup for water to collect in.
When harvesting large bamboo, a leaning culm can split as it falls. To avoid this, it can help to make an initial cut further up the culm, then a second cut just above the first node above ground level. If the culm does split, the cut above the first node will help prevent the split from continuing down into the rhizome.
When removing bamboo culm from a clump, the safest and easiest way is to take hold of the basal end, walk it out of the clump and tug the branchy section down and out of the branches of the other culms. With very large, heavy bamboo culms, you can tie a rope to the basal end of the bamboo and attach it to a truck or a winch to assist in the pulling. If those resources are not available, you can instead take the bamboo down in sections, from the bottom up. Each section cut out from the bottom will allow the culm to drop down for another section to be cut out. This is not an ideal method of harvest, since it will limit the length of the pieces you are harvesting.
Preservation & Post-Harvest Treatment:
Preservation methods are all various attempts to reduce the amount of starch in the culm and/or make the material unattractive to insects and fungi.
Water soaking
Water soaking, a traditional method of bamboo preservation, uses water to dilute and wash out the starch from the bamboo. This simple and inexpensive technique involves submerging bamboo in a pond or river for 1 to 3 months, then removing it and letting it dry. Since bamboo tends to float, it will need to be weighted to make it sink. To decrease buoyancy, you can also drill a hole in each internode to release the trapped air. This method is unlikely to remove all of the starch present in the bamboo. Clean flowing water from a stream or river would likely perform better than dirty, stagnant water from a pond, but whatever is most easily accessible is probably most appropriate.
In-Clump Curing
In-clump curing is another traditional method for reducing the starch content in a bamboo culm. With this method, cut the base of the culm, place it on a stone, and leave it standing in the clump with branches and leaves intact. As long as the leaves are green, the culm will consume the stored energy, thus decreasing the starch content.
Chemical treatments
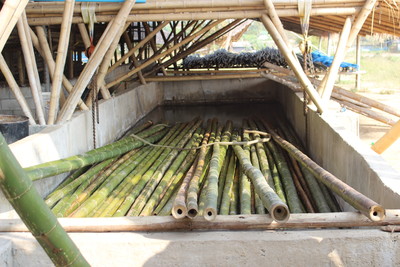
Figure 4. Recently harvested bamboo culms in the process of being preserved by soaking in a tank of chemical solution. Source: Craig Bielema
Various chemical treatments can deter pests from consuming any starch that is present in bamboo. A mixture of borax and boric acid is a common choice, because of its availability, low cost, and low toxicity. Copper sulfate is a bit more potent than borax, but requires more precautions during handling. Chemical solutions containing creosote or chromium are very strong pest deterrents and are more stable than copper sulfate or borax, but the risks they pose to both handler and environment make them much less viable options.
At ECHO’s farm in southwest Florida, we have found a mixture of 80% borax and 20% boric acid, mixed at a rate of 1 pound per 1 gallon of water, to be a sufficient chemical deterrent. When mixing the solution, it is helpful to heat the water in order to fully dissolve all of the borax and boric acid.
One simple way to apply the chemical solution is to use the aforementioned in-clump curing method, but place the cut end of the culm into a bucket of chemical solution, rather than just setting it on a stone. The culm will draw up solution from the bucket as the leaves continue to transpirate and demand more water. Leave the culm in the bucket for a few weeks before removing and using it. Though simple in theory, this process can be difficult to control; the wind can tip over the arrangement, the solution strength will vary depending on evaporation and rain, and the clump can become rather crowded if you are trying to harvest a large quantity of culms.
A more controlled version of the same method is to harvest bamboo, cut it into 2 meter sections, and place them all vertically into a barrel with enough solution so the bottoms of the bamboo are completely submerged. The solution will travel up into the culm through capillary action (wicking). Let the bamboo stand in the barrel for 3 weeks, then flip the lengths end for end and allow them to soak for an additional 3 weeks. This process is more controlled because it can be set up in a protected location where tipping, rain dilution, evaporation, or tampering are unlikely.
The most effective option for bamboo preservation would both reduce the starch and replace it with a chemical that deters pests. The sap replacement method of preservation does just that, but is more expensive and labor-intensive than the previously mentioned chemical treatment.

Figure 5. The boucherie system at ECHO. Source: Craig Bielema
One variation of the sap replacement method involves soaking bamboo in a large tank of chemical solution; this method requires heavy investment, both in infrastructure (building a tank to contain the bamboo and solution), and in the large volume of chemical solution that is needed.
Sap replacement can also be accomplished by applying a pressurized chemical solution to one end of a bamboo culm until it comes dripping out the other end, commonly referred to as the boucherie method. To do this, a flexible rubber pipe is fitted over the freshly cut end of a recently harvested bamboo culm, and secured with a steel hose clamp. The other end of the rubber pipe is attached to plumbing fittings connecting it to a source of pressurized chemical solution (the solution can be pressurized with air pressure, with a mechanical pump, or simply through gravity by placing the reservoir at a higher elevation than the bamboo to be treated). The pressurized solution will push its way through the vascular tubes that make up the bamboo, forcing the sugary sap to seep out anywhere that the outer layer of the bamboo has been cut. To ensure that as much sap as possible is removed and replaced with the chemical solution, you can add a dye, or colorant, to the chemical solution; when the liquid weeping from the bamboo changes color, you will know that the chemical solution is coming out, rather than the sap.
If the bamboo is freshly cut (i.e. the vascular tubes are not blocked), the time required to treat a full culm will depend only on the pressure of the liquid and the length of the culm. A higher pressure will increase the speed at which the liquid is pushed through the culm, but it may also cause the connection from the rubber pipe to the bamboo to leak and slip off. A pressure of 10 psi seems to be low enough to avoid most leaks, but high enough for a relatively fast treatment time (roughly 1 hour for a 20 ft culm).
Tight-fitting rubber pipes and heavy-duty hose clamps will minimize the likelihood of leaks and slips at the bamboo connection. Immediately before making the connection with the rubber pipe, use a machete to cut the bamboo end at an angle all the way around, making it cone-shaped, to make it easier to fit a very tight rubber pipe onto the bamboo. If possible, make this cut just before a node; the slight protuberance of the node will act as a barb, preventing the hose clamp and rubber pipe from slipping back off the bamboo.
Put a bucket or other container beneath the connection point. When leaks occur or the rubber pipe slips off (as will occasionally happen), the container will collect any spilled solution, which can be put back into the reservoir.
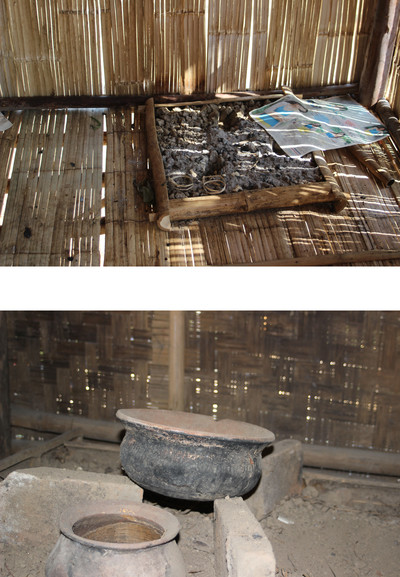
Figure 6. An open hearth (top) and a three stone fire (bottom) inside a traditional bamboo home in northern Thailand. Source: Craig Bielema
Heat treatment
Heat can be applied to bamboo as another method for preservation. Placing bamboo over an open flame and evenly rotating it will destroy the starch in bamboo. Heat treatment is most suitable for thin-walled bamboo, since heat does not easily penetrate to the interior of thick-walled bamboos. Also, because of the labor and fuel (firewood) required, it is often more suitable for furniture and musical instruments than for large structures. One side benefit of heat treatment is that you can manipulate the color of the bamboo to nearly any shade of brown.
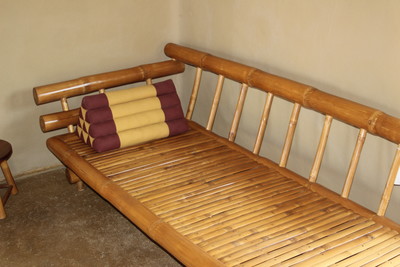
Figure 7. A bamboo couch. Source: Craig Bielema
Many indigenous homes constructed primarily from bamboo show little evidence of damage from insects or fungi, even though the bamboo has not been preserved. Some species of bamboo are less susceptible to pests than other species. However, the bamboo might also be preserved on a daily basis by the smoke and heat generated from the open cooking fire in the home; the same smoke and heat deters pests from consuming the bamboo. Realizing this benefit, many people place bamboo on a rack above the hearth for a time before using it in other projects.
Unfortunately, the smoke from cooking fires has other, less beneficial effects on people living in the home. According to the World Health Organization (WHO 2016), indoor air pollution generated by open fires and leaky stoves is responsible for over 4 million premature deaths annually. Implementation of clean and efficient cookstoves for use in the home will improve lung health and other health issues; however, it may also result in problems due to loss of bamboo preservation.
Drying
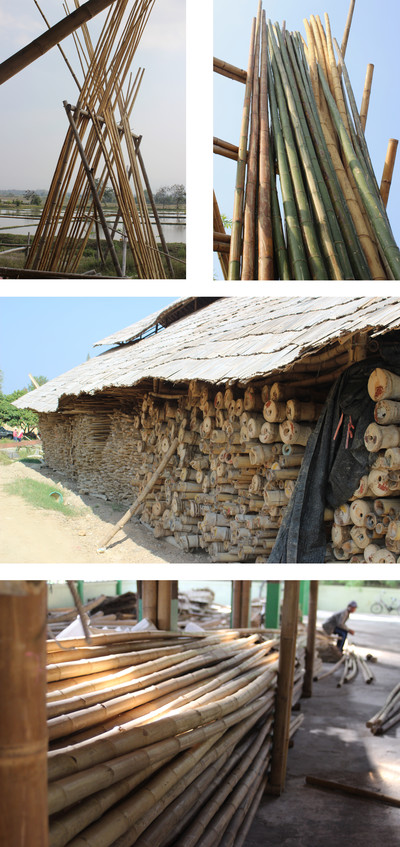
Figure 8. Preserved bamboo drying vertically in the sun (top) and drying and storage racks loaded with bamboo (bottom two). Source: Craig Bielema
After it has been harvested and preserved, let bamboo dry thoroughly before using it as a construction material. You might be tempted to use it while still green to avoid waiting, and also because it is easier to cut when wet. But bamboo shrinks as it dries; if it is joined together while still green, the shrinking will cause joints to loosen or break.
The amount of drying time will vary based on the size of the bamboo, the method of drying, and ambient conditions, but in general you can expect it to take around two months.
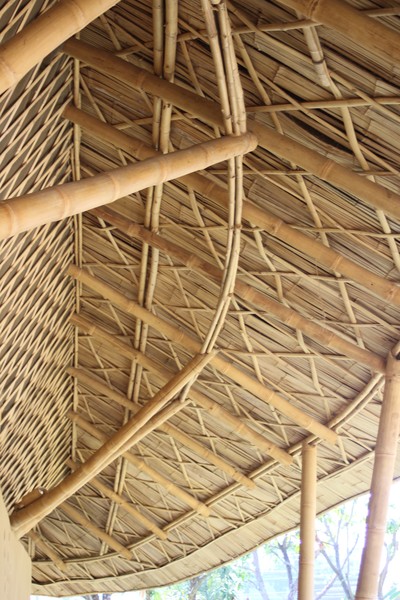
Bamboo can be dried horizontally in the shade or vertically in the open. The latter is faster and takes up less land area, but each culm must be rotated often enough to prevent cracking. Drying horizontally in the shade will take longer, and culms should be stacked in a way that optimizes air circulation. Horizontal drying racks can also serve as long term storage for bamboo (Figure 8).
Construction
Bamboo is an excellent material choice for a wide variety of construction projects. It is often split and woven into baskets, cages, mats, etc. It is also commonly used to make furniture, fences, trellises, bridges, and homes. It is even used in making musical instruments and bicycles! This section explains how to work with bamboo, and how it interacts with other building materials.
Material Selection
Bamboo is a non-uniform material and each culm is different, so each piece should be carefully selected. The obvious and most immediate characteristics to look for are diameter and length of the culm. The diameter of bamboo depends on the species, age of the plant, and growing conditions. Select diameter sizes based on what bamboo is available, strength requirements for intended use, and aesthetics. Note that the diameter of a single culm of bamboo varies along its length. The largest diameter portion of any culm is located at the basal end. The culm diameter tapers unevenly from bottom to top.
The wall thickness of bamboo is another characteristic to evaluate when selecting your material. Like diameter, wall thickness is determined by species, is directly related to culm strength, and tapers at a varying rate along the length of the culm. Also consider the distance between nodes (called internode length), which is determined by species and changes at a varying rate along the length of the culm, and which will affect the locations and strength of joints. A node is the strongest part of a culm; pieces should be joined together not right at the node, but rather just next to it, to prevent unwanted splitting.
A full culm of bamboo can be divided into three sections, of varying length. The bottom-most section has the largest diameter, the thickest wall, and the closest node spacing. This section is incredibly strong, but it is so heavy and the nodes are so close together that it is difficult to work with and not ideal for construction. The bottom section also tends to have sharp bends in it, because bamboo seems to emerge from the ground at an angle, then redirects itself to grow straight up.

Figure 9. It is worth taking the time to look through piles of bamboo to select the right culm(s) for each project. Source: Craig Bielema
The middle section of a bamboo culm is the most uniform in wall thickness, diameter, and node spacing. This is the part of bamboo you will want to harvest and preserve. You should be able to see a transition from the bottom section, with its hulking, meandering trunk and close nodes, to the middle section with its straight, uniform tube and almost evenly spaced nodes. The nodes in this middle section are spaced in a way that allows for easy joinery. The bamboo here tends to be both lightweight and strong.
The top section of a bamboo culm is marked by a sudden decrease in diameter and wall thickness, and by an elongated distance between nodes. This section is quite weak and undesirable for construction. However, it typically has many more branches and leaves, and can be used as fodder for animals.
After harvesting the middle section of bamboo, then preserving and drying it, more selection must be done. When selecting each piece for construction, you must determine how straight, or how curved, you need each piece to be for your project. Some culms will have a long sweeping curve that resulted from their growing conditions; the curve is easy to see when looking down the length of the culm. Bamboo will also have a zigzag-type curvature in one plane. When looking down the length of a piece of bamboo with the branches intact, you will notice branches emerge from opposite sides of consecutive nodes. The zigzag pattern in a culm seems to follow the branching habits; it will appear as if the culm grows toward the branch on one side, then switches direction to grow toward the next branch on the opposite side. Without branches present, the zigzag will be less obvious, but you should be able to see it by sighting down the length of the culm. This characteristic zigzag will be quite pronounced in some species, and nearly undetectable in others.
The plane perpendicular to the one that zigzags tends to be very straight. When selecting and orienting a culm of bamboo, you may choose to select a culm with a less pronounced zigzag, or you can rotate the culm to take advantage of the more linear edge and obscure the one that zigs and zags.
Appendix I shares species-dependent information about different bamboos, including average height, diameter, and more.
Processes for manipulating bamboo
Four basic processes--splitting, cutting, boring and bending--can be used with a variety of tools and techniques to manipulate bamboo and create almost any structure imaginable.
Splitting
Splitting is the act of separating material along a fault line; in wood and bamboo, this means splitting along the grain. Bamboo is very straight-grained, especially along the internodes, and thus easy to split. The grain along nodes tends to be a bit more ‘knotted up,’ but even these split easier than most wood. A machete, ax, or knife is typically used to split bamboo. The blade’s sharpness only matters for initiating the split. Once the blade has entered the material, the blade’s wedge shape does all the work of splitting. If you look closely, you will see that the sharp edge of the blade does not even contact the bamboo as it splits.
When splitting bamboo, start by splitting the culm in half, into roughly equal-sized pieces, then split the resulting pieces in half again. Repeat this until you reach the desired size. By always splitting in half, the resistive forces will be balanced, resulting in a straight split. If you instead trying to split a small piece from a larger one, the split tends to ‘run out’ and taper to a smaller size than desired. On longer pieces, if a split is beginning to taper, you can correct it to split straight by pulling the smaller side and bending it away from the knife.
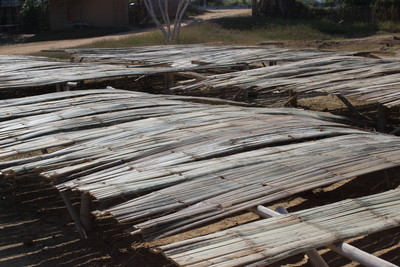
Figure 10. Bamboo that has been recently flattened and is now laid out to dry. Source: Craig Bielema
A splitting tool can be used to simultaneously split a whole culm into several equal-sized pieces. This tool consists of a steel ring with handles on the outside and radially arrayed blades on the inside. Before using this tool, be sure the bamboo culm is a bit smaller than the ring; as the culm splits it will expand outward.
Bamboo can be flattened into useful panels by creating many small splits in the culm. To do this, lay a culm of bamboo on the ground and strike it lengthwise with a machete or axe repeatedly on each node, at a spacing of roughly 1 centimeter all the way around the culm. Each strike with the machete or axe should break through only one wall of the culm and produce a split that runs about halfway down the internode. You will end up with a bamboo culm that has dozens, or even hundreds, of splits, but most of the splits will not connect from one node to the next. Find the longest split in the culm, and use a machete to increase that split so it runs the entire length of the culm. The bamboo should now open up so that you can access the inside. Stand on the inside wall of the bamboo to keep it open, and strike repeatedly with a machete to create more vertical splits. The bamboo will open more and lay flatter with each split. Finally, cut off the remaining chunks of node that are present on the inside. Lay the bamboo flat and open with the inside wall down and the outside wall facing up (Figure 10). Prop the ends of the bamboo 10cm or more off the ground, and weight the middle so that it touches the ground. Leave it like this until dry, so that the bamboo panel will remain flat and not curl up when in use.
Cutting
Sometimes you need to cut bamboo across the grain to get a desired length. However, cutting bamboo across the grain is more difficult than splitting. Think of a piece of bamboo as a bundle of fibers all going the same direction; splitting only requires you to separate some of the fibers from the others, but cutting requires that you sever every fiber in the bundle.
The simplest tool for this job is, again, a machete or an axe. However, it is very difficult to cut directly across the grain. Instead, to sever the fibers of bamboo with a blade, approach the culm at a 45 degree angle. This will allow the blade to split and sever fibers at the same time, and will remove a small chip of material. Subsequent angled cuts will allow the blade to plunge deeper, eventually cutting all the way through the material. The resulting cut will be beveled, but if a flat end is needed, the bevel can be trimmed flat with short strokes from the machete directly across the grain.
A cross-cutting saw actually behaves in much the same way as a machete at an angle. It may not appear so initially, because it is pushed and pulled directly across the grain. But the teeth are sharpened at roughly a 45-degree angle to the saw. As they are pushed and pulled through the material, they slice at an angle to break away small bits of material. Use of a saw (whether a hand saw or a power saw) can be faster and more precise than cutting with a machete, but it will also be more expensive and difficult to maintain.
Both hand saws and power saws sometimes splinter bamboo; this happens when the teeth of the saw exit the bamboo and, rather than severing the last fibers on the outside wall, they catch and pull them away from the bamboo. The result is a frayed, splintered and unsightly portion of the culm. Because it only happens when the saw’s teeth exit the bamboo, one method for avoiding this problem is to make a relief cut on the opposite side.
Splintering can be minimized in several ways. You can use a smaller saw; saws with smaller teeth tend to cause fewer splinters than saws with large teeth. Also, before cutting through a culm, you can lightly saw all the way around the perimeter to first sever the outer fibers. Another option is to place tape around the circumference of the culm at the desired location, then saw directly through the tape. The tape will hold the fibers together, preventing them from splintering.
Boring
When you bore holes in bamboo, you cut both with and across the grain, to make an opening for other materials or fasteners to pass through. A rough hole can be made by twisting a knife back and forth (to create a smaller hole), or by chopping a V-notch with a machete and rounding it out with a knife (to create a larger hole).
Drill bits like twist bits, forstner bits, and spade bits can be used to quickly and precisely make small holes in bamboo. Avoid auger bits with most bamboos; an auger bit has a screw-threaded tip which pulls the bit through the material, but it has a tendency to act like a wedge and split bamboo. Bamboos with very thick walls are less prone to splitting and can be bored with auger bits.
A hole saw, like a hand saw blade that has been bent around in a circle, can be used to cut large holes in wood or bamboo. Hole saws require a large amount of torque to cut, so a powerful electric drill is a necessity. Hole saws are able to create large, round holes of various sizes, but they jam easily and can be difficult to use.
Bending
Bending is a useful technique for curving straight bamboo or for straightening curved bamboo. Heat is the primary tool used in bending; apply it to bamboo slowly and evenly with a torch, heat gun, or steam. It is helpful to use a form with the appropriate radius to bend and secure the bamboo to while it cools. Because bamboo is hollow, it may kink or collapse while being bent. To avoid this, punch out the nodes of the bamboo, fill the culm with sand, and plug the ends.
Preparing bamboo for joinery
The principles of manipulating the size and shape of bamboo can now be applied to prepare a variety of joinery techniques with whichever tools are available.
Mortise and Tenon

Figure 11. ‘Through mortise and tenon’: A smaller diameter bamboo passing through a mortise cut through both walls in a larger diameter bamboo. Source: Craig Bielema
A mortise and tenon joint consists of a male protrusion (tenon), and a female recess (mortise), which fit together to make a very strong connection. Typically, in woodworking, the tenon is cut to be roughly ⅓ -½ of the stock material size, and the mortise made the same size as the tenon. Square mortises in wood are more difficult to cut than round ones, but square tenons are easier to cut than round ones. Square mortise and tenon joints are preferred, because they prevent material from rotating and have more face-grain gluing surface area. But, in bamboo construction, none of those factors matter much, because cutting a central tenon is simply not feasible. As a hollow material, any attempt to cut a tenon in the center will leave you with nothing. This limits, but simplifies the choices for creating a mortise and tenon bamboo joint; the full dimension of the stock bamboo is the tenon (no cutting required), and a round mortise is made to fit that tenon. Cutting a round mortise is simply boring a hole to the same diameter as the piece of bamboo that is to be attached to it.
Unfortunately, this technique necessitates that the bamboo to be mortised must be of a larger diameter than the tenon bamboo (preferably 2 wall-thicknesses larger in diameter). If the bamboo to be mortised were the same size or smaller than the tenon bamboo, then attempting to cut a mortise would result in a fishmouth joint (see next section).
A ‘stub mortise and tenon’ will have a tenon that terminates inside the mortise, and is a very clean-looking joint. For this, only cut a mortise through one wall of the bamboo. A ‘through mortise and tenon’ will have a tenon that goes entirely through a mortise, and is a stronger joint. The mortise is cut through both walls of the bamboo, but use caution when cutting through the second wall. If boring a hole all the way through there is a high likelihood of splintering when the drill bit emerges through the outer skin of the bamboo. To minimize this, drill a small pilot hole, roll the bamboo over, and use the pilot hole as a guide to drill from the outer skin toward the hollow center.
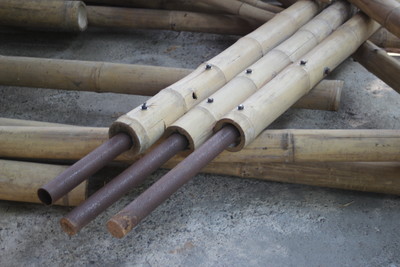
Figure 12. Bamboo fitted with steel ‘loose tenons’ which are secured in place with bolt. Source: Craig Bielema
A ‘loose tenon’ can be used to join bamboos of equal size. This is accomplished by cutting a mortise into both pieces that are to be joined, and using a small piece of bamboo or wood as the tenon that fits into both mortises. Use the hollow feature of bamboo to your advantage, and cut away the node to expose a natural round mortise, that is the hollow internode. Cut a mortise into the side of the other bamboo piece, make it the same diameter as the inside of your natural mortise. Now, cut a loose tenon from bamboo, wood, or steel that will fit tightly inside both mortises.
Square mortises can be useful when joining square materials to bamboo, such as dimensional lumber. Cut a square tenon in the lumber using a saw, and a square mortise in the bamboo of equal size. To create a square mortise, use a combination of sawing and boring to cut across the grain at the top and bottom of the mortise. Then, split away excess material along the grain with a knife or chisel.
To keep a mortise and tenon joint from rotating and/or coming apart, it is wise to lash, peg, and/or glue the joint together. Refer to the “Fasteners” section below for details.
Fishmouth

Figure 13. Cutting a fishmouth using a handsaw (top) then Shaping a hand-cut fishmouth using a chisel (bottom). Source: Craig Bielema
A fishmouth joint is so-named, because its shape resembles that of an open fish’s mouth. It can be thought of like a mortise that only goes halfway around a tenon, or a cradle for a bamboo to sit in. Fishmouth joints are commonly used at the tops of posts to support round beams, in creating bamboo trusses, and many other applications.
When creating a fishmouth, first identify the size of the material to be cradled inside it. Place the bamboo that is to be cut next to the butt end of the piece to be cradled, and scribe the intersection with a pencil. This will create the arc of a circle that is to become the fishmouth. Try to mirror this mark onto the opposite side of the bamboo as well.
The fishmouth can then be roughly cut at angle, using a machete or saw, starting at the lowest point of the arc. This will result in a V-shaped end on the bamboo, which can be rounded out with a knife, chisel, file, or rotary woodcarving tool. Test fit the pieces, mark any highpoints, and cut them away in an attempt sculpt the fishmouth until they are flush.
If using a holesaw is an option, find the holesaw size that is closest to the outside diameter of the piece to be cradled. If it is between two sizes, pick the smaller one, and sculpt to a perfect fit if you desire precision; but choose the larger if you are short on time, don’t want to sculpt, and can afford a sloppier joint. Use of holesaws can reduce, or eliminate, the cutting and sculpting; resulting in a fast, clean, perfectly round fishmouth.
Fasteners
Once the raw materials have been selected, manipulated to size and shape, and prepared for joinery, the final step is to fasten them together. Selecting the right fasteners and applying them properly will be discussed in this section.
Lashing
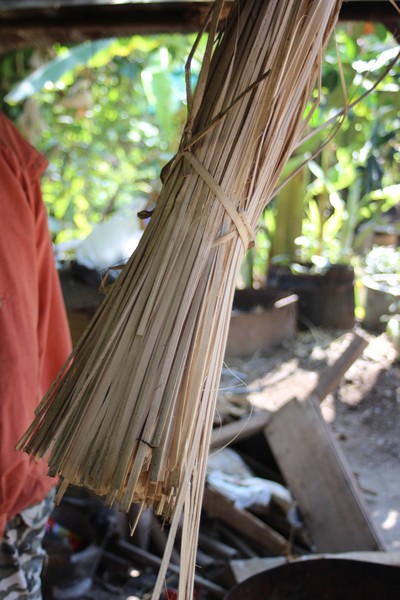
Figure 14. Strips of bamboo bast, to be used for lashing. Source: Craig Bielema
Joining bamboo together with rope, cord, fiber, or wire is a quick and easy way to make a simple connection. Two (or more) pieces of bamboo can be joined together with no cutting, boring, splitting, or any joint preparation. But, lashing is not only reserved for those most simple joints, it is also quite useful in joints that require fishmouths, pegs, and/or glue. Also, it should be noted that there are many, many knots and lashing techniques that can be employed on bamboo joinery; this section will only serve as a basic introduction of techniques, rather than an exhaustive collection.
First, we will explore lashing together pieces of bamboo that have not been manipulated in any way, and are simply intersecting each other. The type of material you choose to lash with will affect the approach. Lashing these pieces together with cord (rope, string, etc.) will follow basic knot-tying procedures for binding together any type of poles (see Appendix III). Very thin strips of bamboo bast fiber are traditionally used to join bamboo. They are cut by hand from green bamboo, wrapped around the poles that are to be joined, and the two ends of the bast are twisted together. This connection is very quick, inexpensive, and best learned from locals who have grown up utilizing this fast and fascinating fastening method. The bamboo bast is vulnerable to decay and time-consuming to produce, so synthetic strips have been produced as a replacement to provide better longevity and uniformity, while maintaining the fast, easy-twisting properties as the bast.
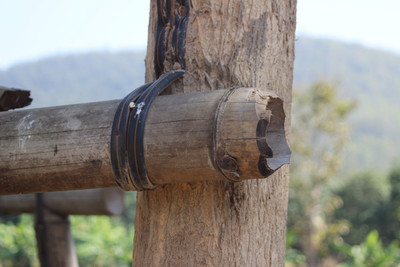
Figure 15. Bamboo lashed to a tree with old drip tape. Source: Craig Bielema
Old poly drip tape is a great resource that can be recycled into a strong lashing material. Metal wire also offers a long lasting, ready-made lashing material that can be used without the need for knot-tying. Wrap the metal wire around the poles to be connected, twist the ends together by hand, then grasp the twisted section with pliers, and give additional twists for a tight connection. Steel wire is the strongest, but prone to rusting and eventual failure. Use steel wire that is zinc-coated to minimize the potential for rusting, or use aluminum or copper wire if available, though they are not quite as strong. The very tight conditions that are achieved by twisting can be used on cords as well. Simply tie the cord in a loop using a double-fisherman’s bend (or other preferred knot) that is somewhat loose-fitting around the poles that are to be joined. Insert a split of bamboo (sharp edges removed with a knife) between the cord and pole, twist the bamboo split to add tension to the cord, and secure it in place. This technique can result in very tight joints that can later be tightened further if there is settling, shrinkage, or slippage that cause the joint to loosen.
Though it is simple and quick to secure bamboo together using only lashing, it is also valuable to use lashing in conjunction with other joinery techniques. Pegged joints are often lashed as well, to prevent the bamboo members from sliding apart along the axis of the peg. Also, in a post-and-beam type of joint with a fishmouth cut in the top of the post for a beam to rest in, lashing can play an important role in keeping the beam from sliding or lifting out of the fishmouth. Often a peg is also used in that post-beam connection, but it is located only in the post and used as a securing point for the lashing. In glued joints, lashing is utilized to provide additional tensile strength to the joint.
Gluing
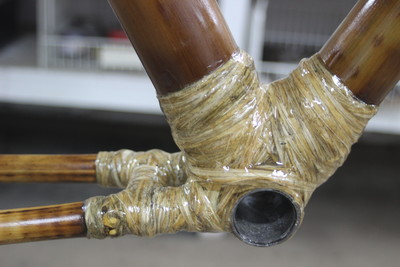
Figure 16. The bottom bracket joint of a bamboo bicycle, held together by a combination of hemp fiber lashing and epoxy. Source: Craig Bielema
Joining bamboo with glue will follow most of the same principles used in joining wood together with glue. Maximize glue surface area on edge-grain and face-grain, and minimize glue area on end-grain. Match the contours of the pieces being joined together, to minimize air gaps.
Bamboo does differ from wood in ways that are important to consider when applying glue. Bamboo is not milled into rectangular boards, it is typically used in whole, round pieces. This is important for a few reasons. The outer surface of bamboo has a hard, durable coating that does not give a good bonding surface for glue. So, it is important to use sandpaper or a knife to take away that outer surface anywhere glue is going to be applied. Also, that rounded outer surface is the face-grain and it is difficult the have another piece of bamboo match that contour without being mostly end-grain, which is not a good glue surface. But, a flexible piece of lashing can be glued to that rounded face-grain, as well as to the the face-grain of the other piece of bamboo being attached. That is how lashing and gluing can work so well in combination.
Common wood glue and two-part epoxy will both work well on bamboo. White or yellow wood glue is inexpensive, easy to clean up, strong, and some are waterproof. Brown wood glue is a bit more expensive and usually harder to find, but it is a bit stronger and is reversible if heat is applied. Epoxy is the strongest and most durable option, but also the most expensive.
Bamboo Fasteners
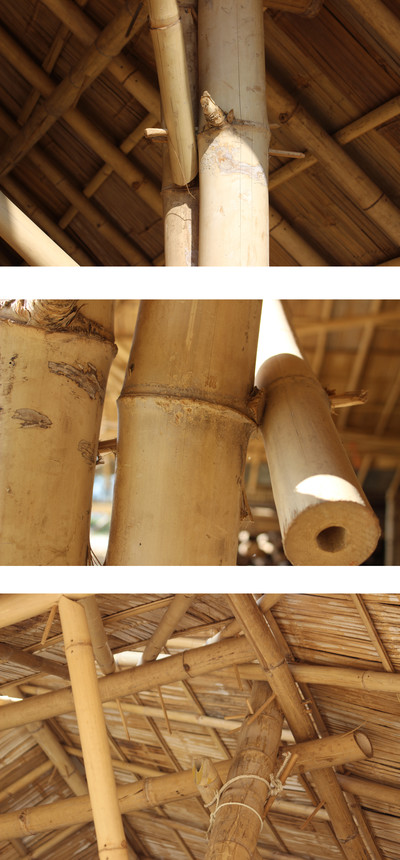
Figure 17. Bamboo peg used to join bamboo poles together. Source: Craig Bielema
Bamboo itself can be used as a fastener for joining poles together. One option of cutting thin strips of bamboo bast for use in lashing was already discussed. Also, mentioned earlier, scraps of bamboo can be cut into round pegs and used to join bamboo together. To use a bamboo peg, bore a hole slightly smaller than the peg through all the bamboo pieces that are to be joined together. Very long drill bits are helpful for boring a straight hole through all pieces. Bevel one end of the peg so it can find its way through all the holes more easily. Pound it in using a mallet or block of wood and trim away the excess, if desired. Pegs often complement other joinery techniques such as lashing and mortise-and-tenon.
Pegs
Round bamboo pegs are great fasteners for joining bamboo. They are very strong, shrink/swell at the same rate as the bamboo being joined, and are easy to make from scrap pieces of bamboo.
To make them, cut out one internode section and split it into roughly square shaped splits. The simplest way to make these square splits into round pegs, is to shave the corners off with a knife or machete. After doing quite a few, you can become quite fast and have a good eye for making them fairly uniform in size.
To achieve higher precision, force the square splits through a round die, cutting away the corners, and resulting in a perfectly round and uniform peg. A wad punch (commonly used for cutting circles in leather or rubber) can be purchased and, with the handle cut off, can serve as an excellent peg-cutting die. It would be advantageous to weld this to a larger diameter pipe, which can be secured in a workbench. A steel plate can be machined with a variety of different sized holes to hammer the splits through, but without a sharp edges this method requires a lot of energy. A steel pipe could be sharpened at one end and used as a die, but there tends be a lot of friction between the peg and the inside of the pipe, so this method also requires a lot of energy. However, the friction can be avoided if using a tapered pipe. Tapered pipes are not common, but they are used regularly in bicycle frames to make the seatstays, chainstays, and front forks. With access to an old steel bike frame that is able to be sacrificed, you can repurpose some of the tapered pipes into peg-cutting dies (see Appendix II).
Steel Fasteners
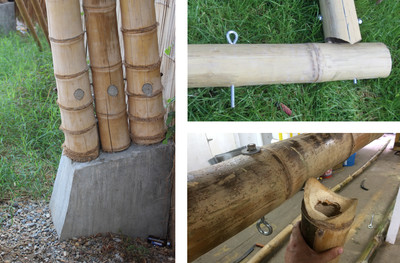
Figure 18. Bamboo posts secured to a concrete footing internally with steel, and hollow internodes infilled with concrete (left). A fishmouth being joined using a steel eye-bolt (right). Source: Craig Bielema
Nails and screws may be the quick and easy option when joining wood together, but they should only be used with great caution when joining bamboo. Nails and screws are essentially small wedges with a large amount of friction so they can be driven in easily but are difficult to pull out. If you remember from the section on splitting bamboo, the primary tool used to split is the wedge, and bamboo will split with little effort. It is for this reason that nails and screws are generally not advisable for use with bamboo, they tend to split apart, rather than join together. Of course, there are exceptions, and it is possible for them to get along. Pre-drilling holes (and counter-sinking, if necessary) in the bamboo will remove some the material that would otherwise need to be pushed aside by the metal fasteners, and with less material that must move out of the way, the easier it is for the fastener to enter without splitting. Also, selecting bamboo with very thick walls will can prevent splitting because there are simply more bonded fibers in the bamboo and it requires a greater force to break them all to cause a split.
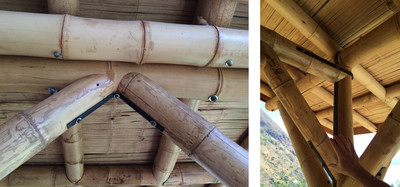
Figure 19. A bamboo hotel in Guatemala, most of the joints are made using steel straps and bolts. Source: Craig Bielema
Steel bolts offer much more strength than screws or nails, do not act as a wedge, and do not rely on friction in the bamboo to stay in place. They can be used in place of bamboo pegs for increased strength (and cost); but unlike pegs, the bolts will prevent slippage along the axis of the fastener, securing the joint in all three dimensions. To use a steel bolt as a fastener, bore a hole slightly larger in diameter than the bolt through all of the bamboo pieces to be joined together. Insert the bolt through the holes, and with washers on both sides, install a nut firmly for a tight joint, but not so tight as to split the bamboo. A good alternative to buying various length bolts for different joints is to use threaded rod, cut with a hacksaw or grinder to whatever lengths are preferred, and install a nut on both sides. One option is to bore an additional hole in the internode(s) that the bolt penetrates, and inject cement mortar for increased strength.
An eye-bolt can be used in conjunction with a standard bolt to easily strengthen and tighten a right angle fishmouth joint. A standard bolt is used in the hollow internode portion of the bamboo that has the fishmouth cut in it, and the eye-bolt is used in the other piece of bamboo. The two intersect in the hollow internode, with the standard bolt going through the eye of the eye-bolt. With a washer and a nut installed on the threaded end of the eye-bolt, every turn of the nut will draw in eye-bolt, the standard bolt going through that eye, and thus the bamboo member that is attached to that standard bolt. This will allow you to achieve a very tight, steel-reinforced joint, which can be tightened further in the future if necessary. This method can also work at different angles, but is trickier.
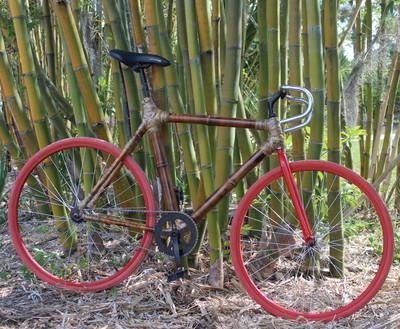
Figure 20. A bicycle with a frame made from bamboo, resting next to the clump from which it was harvested. Source: Craig Bielema
Steel bolts are also commonly used to attach rebar or steel plates to bamboo, which in turn is embedded in foundations or attached to other pieces of bamboo or other construction elements. This method allows for reinforcing of fishmouth joints at various angles as well as securing a bamboo structure to the ground without burying bamboo, thus limiting its exposure to moisture and pests.
Conclusion
This technical note is intended as an introduction to the general principles for bamboo construction. There are many bamboo species, preservation methods, joints, and fasteners that were not covered. But hopefully, with a general understanding of the underlying principles, you will be able to test, discover, and invent an array of specific techniques that work best for your circumstances.
References and Resources
Lopez, Oscar Hidalgo. Bamboo: The Gift of the Gods. 2003
Cusack, Victor. Bamboo World. 1999
Farrelly, David. The Book of Bamboo. 1984
International Network for Bamboo And Rattan (INBAR) - www.inbar.int
Guadua Bamboo - www.guaduabamboo.com
Adobe and Bamboo Research Institute (ABARI) - www.abari.earth
Appendix I: Species selection for construction
| Botanical Name | Physical Attributes | Photo |
|---|---|---|
| Bambusa oldhamii | Grows to 50 feet tall and produces nice straight poles 2-3 inches in diameter. Thick-walled but somewhat soft, minimal branches, and easy to harvest because it is a relatively open-clumper |  |
| Bambusa textilis | Grows 50 feet tall with a 1-2 inch diameter. Strong, but thin-walled and splits very easily. Best suited for weaving, fencing, or trellising projects. |  |
| Bambusa tuldoides | Very strong, thick-walled bamboo. Grows 50 feet tall with 2 inch diameter culms. Difficult to harvest as it is a tight-clumper with stiff branches growing at every node. |  |
| Dendrocalamus asper | Large bamboo, grows over 70 feet tall with 4-6 inch diameter culms. Great for construction, as it is long, straight, and very strong. Very thick walls at the base but rather thin elsewhere. Also good shoots for eating. |  |
| Dendrocalamus validus | Comparable to D. Asper in size, not as straight, but more consistent wall thickness. Good, strong bamboo for construction. |  |
| Guadua angustifolia | Excellent large bamboo for construction. Grows 80 feet tall, 6 inches in diameter, very straight, minimal bulging at nodes, with consistent node spacing, and thick walls. Fairly open-clumping for easy harvest, but watch out for the thorny branches. |  |
Appendix II: How to build a peg-cutting die from a bicycle frame
 The seatstays of a bicycle (the pipe running from the seat to the rear wheel) are the best to use for peg-cutting dies, because they are usually long, straight, and have a post already welded on. That post may be a gusset connecting to the other seatstay and/or a connection point for the rear brake, and it will prove useful when securing the die to a workbench. Cut out the longest, straight section of seatstay pipe as possible, retaining any welded on posts.
 Since the pipe is tapered, the diameter of the pegs it creates will be determined by the placement of cut on the smaller end. Consider what size pegs are desired for your building projects, and what drill bits are available to bore hole in the bamboo that needs to be pegged. Because pegs are commonly driven through two, or more, full pieces of bamboo, it is very beneficial to have extra long twist drill bits (25cm or longer). These can be difficult to find, and only come in a few sizes (If you have access to a welder, try making your own by welding a drill bit on the end of a pipe or rebar). I have found that making ¼”, ⅜”, and ½” diameter pegs provides a useful spectrum of size and strength, and I keep a set of extra long drill bits corresponding to those 3 sizes.
 So, find the drill bit you are going to use for pegging, insert it into the larger diameter end of the tapered pipe, and push it in until it stops. It stops because it is the same diameter as the location it is touching in the pipe, and that is the point at which you want to cut the pipe. Of course, you cannot see where it is touching inside the pipe, so you must mark the drill bit at the point where it is sticking out of the pipe, remove it from the pipe, lay it next to the pipe, align the mark with the larger diameter end of the pipe, and now mark the pipe where the tip of the drill bit lies. Now, cutting at that mark will result in a tapered pipe with its smallest inside diameter the same as the outside diameter of the drill bit you intend to use for drilling holes for pegs. I like to cut a little past the mark(on the larger diameter side of the tapered pipe), this will create pegs that are slightly larger than the holes that are bored for them, meaning a very tight fit.
 Now that the pipe has been cut at the proper location, sharpen that end(on the outside only), using a grinder, file, and/or sharpening stone. Now, to secure the die in a fixture, find a drill bit with the same outside diameter as the large end of the tapered pipe. Use that bit to bore a hole all the way through a large block of wood. Pound the large diameter end of the tapered pipe into the block of wood, until the welded-on post stops it from going any further. Now, you can place this block of wood with the die protruding upward on a workbench with a hole that allows the pegs to pass through.
To use the die, place a square bamboo split on the center of the die, and strike the top of the bamboo split with a mallet(use a soft mallet, like wood or rubber so as not to damage the sharpened edges of the die). The sharpened edges of the die will shave away the square corners, and a uniformly round peg will drop out the bottom.
Appendix III: Knots and Lashing
| Clove Hitch Used to secure rope to a pole. If used alone, be cautious as it can slip. |
|
|---|---|
| Wrap end around pole and over rope |  |
| Wrap around pole again, and loop under previous pass |  |
| Pull tight |  |
| Timber Hitch Useful for attaching a rope to pole(s) |
|
| Wrap end around pole and under rope |  |
| Wrap around rope, then pass through loop |  |
| Wrap a few times around rope |  |
| Hold wrapping against pole |  |
| Pull tight |  |
| Square Lashing Useful for attaching two poles together that intersect at right angles |
|
| Tie a clove hitch on one of the poles |  |
| Wrap the short end around the long one |  |
| Wrap the long end over the top pole and under the bottom pole alternately |  |
| Repeat this a few times |  |
| Do a full wrap around one pole |  |
| Wrap around the recent lashings by going under the top pole and over the bottom pole. This is known as frapping. |  |
| Continue frapping a few times to tighten the lashing |  |
| End with another clove hitch or two |  |
| Diagonal Lashing Useful for attaching two poles together that intersect at oblique angles |
|
| Start with a timber hitch around both poles |  |
| Wrap a few times around both poles in one plane |  |
| Wrap a few times around both poles in the other plane, perpendicular to the first |  |
| Frap around the lashing a few times |  |
| End with a clove hitch or two |  |
| Round Lashing Useful for attaching two parallel poles together |
|
|---|---|
| Tie a clove hitch around both poles |  |
| Wrap around both poles several times |  |
| End with a clove hitch or two |  |
| Can be used for bipods. Spread the two poles apart and the lashing will tighten up. |  |
| Can also be used for splicing two poles together to make a longer pole, by tying two round lashings |  |
| Tripod Lashing Useful for tying 3 poles together to form a tripod, which is very stable and can support a lot of weight. |
|
|---|---|
| Tie a clove hitch to the first pole |  |
| Wrap over the middle pole, under and around the last pole |  |
| Then wrap under the middle pole, and over and around the first pole |  |
| Continue this wrapping sequence several times |  |
| Frap between the first and middle poles |  |
| Frap between middle and last poles |  |
| Pull tight and end with a clove hitch or two |  |
| Cross the first and last poles beneath the lashing and spread all the poles apart to form a tripod |  |
| Double Fisherman’s Bend This is useful for tying two ropes together. It is also an excellent way to tie two ends of the same rope together, forming a loop. |
|
|---|---|
| Overlap the two ropes generously |  |
| Wrap one end around both ropes |  |
| Wrap it around both ropes again |  |
| Pass the end through both loops that were created |  |
| Pull tight |  |
| Repeat that process for the other end |  |
| Both knots will lock against eachother |  |
| Twist-Tensioned Loop This is a simple loop made with a double fisherman’s bend, and tensioned by twisting a stick |
|
|---|---|
| The double fisherman’s bend can be tied using the two ends from a single rope, resulting in a loop |  |
| Tie a double fisherman’s bend loosely around any pole you want secured together |  |
| Insert another smaller pole to tension the loop |  |
| Twist the smaller pole around to tension the loop. When it is tight, secure the smaller pole so it will not unwind. This lashing can be easily retightened in the future. |  |
Cite this article as:
Bielema, C. 2018. Bamboo for Construction . ECHO Technical Note no. 92.