Worms can be a lucrative and,beneficial addition to a small-scale farming operation. Several times in recent issues of EDN we have mentioned the value of compost. Here we report on the rapid production of compost using worms. Worm-produced compost, also called vermicompost, can be used in gardens and on agricultural land. The worms themselves can be used as a high-protein chicken feed or given or sold to others so they can begin worm composting themselves.
These two separate processes— vermicomposting and vermiculture— are related but slightly different. Vermicomposting is simply the use of worms to compost organic matter. Vermiculture is the production of more worms for various uses (for example, as chicken feed). Worm castings (worm manure) are a valuable byproduct of vermiculture. They hold moisture well, contain beneficial microbes and present plants with a usable form of nitrogen.
We mentioned vermicomposting in EDN 54-4 (information sent by Meg LaVal in Costa Rica about experiences using worms to compost organic waste from a bakery/restaurant and manure from a stable). Over the years, we have collected information about vermicomposting and vermiculture from other locations. Here we first outline some experiences that have been shared with us by members of our network. Near the end of the article, we present some general information about vermicomposting and vermiculture.
Redworms in Nicaragua
Mark Hare (currently working in Haiti) sent us information about a project using African redworms at Rancho Ebenezer in Nicaragua. They got a remarkable return on their investment!

Mark wrote, “Sebastián Ampié and his crew took 400 [g of] worms and divided them among 8 small holes in the ground (20 in. x 20 in. x 20 in. [50 cm x 50 cm x 50 cm]; Figure 1). They fed the worms once a week with a mix of goat and rabbit manure, mixed with some leaves, and after six months harvested the worm manure from the holes. They got slightly over 900 kg of worm manure and they harvested and counted (!!!!!) the worms—13,000 worms (including all sizes) weighing 9.63 kg. [Feeding and caring for the worms] took 20 minutes a week (two people, 10 minutes each). The final harvest, including counting the worms, took a total of 28 man-hours (Seba calculates that harvesting the manure and separating out the worms took about 6 hours of that 28 hours).
“The average weight of the “average” worm was 0.67 grams. They started with 400 grams (0.4 kg) and multiplied that by 24.1. Rancho Ebenezer sells worms to other organizations that want to produce organic fertilizer and use ecological production methods for C$300 (US$17.00) per kg. In terms of investment, the worms cost approximately C$120.00 (about US$7.00) and [the return from the sales amounted to] C$2889.00 (US$173.00).
Plus they harvested the worm manure, which is being used for vegetables.”

ECHO staff members Danny Blank and Lance Edwards visited Rancho Ebenezer in spring of 2004. Danny wrote the following in his report of their trip. “Vermiculture was something neither of us expected to have much exposure to on this Central American trip. We have long liked the idea of using worms in place of labor intensive composting methods and have a small vermiculture demonstration at ECHO, but we both were surprised at how well developed and integral worms are to the agricultural systems demonstrated at Rancho Ebenezer. Being an animal health and production center, a tremendous amount of poultry, goat, swine, cattle, and rabbit manure is produced on a daily basis. None seemingly goes to waste. The staff is keenly aware of manure’s vital role in sustaining and improving soils and agricultural production, especially with capital poor farmers. This is the beauty and vitality of integrated agriculture systems where there exists a cyclical recycling of nutrients between plants and animals. Worms are extremely useful in tying together animal waste and the safe return of valuable nutrients to the land. The natural breakdown process of animal waste is greatly accelerated with minimal human labor.
“Several vermiculture methods are demonstrated. One is part of the MIDPA system, which can be translated as Integrated, Diversified Yard Stewardship. This small system on approximately 0.25 acre shows how a family can raise milk goats, rabbits, and chickens along with fruits and vegetables on small hillside parcels of land. With double hedgerows of legume trees like Gliricidia planted along the contours, rabbits and zero-grazed goats are given a diet of leaves from mainly perennial trees and shrubs. Their manure is recycled through a vermiculture system and the worms are harvested twice a week for chicken feed. The worm castings are harvested twice a year to supply organic matter and fertility for fruit and vegetable production, thus completing the cycle.
“The worms [we saw as part of this system] were raised in a pit, maybe 2 ft. (0.6 m) deep covered in leaves to keep the soil moist. The pits were watered and manure was added once each week. A ring of bananas was planted around the pit to keep it shaded.
“In Rancho Ebenezer’s main production area, there were both in-ground and above ground systems. The majority were rectangular areas, maybe 4 ft. x 12 ft. (1.2 m x 3.6 m) at ground level with a 10 or 12 inch (25 or 30 cm) concrete wall (Figure 3). Roofing tin or tarps were used to keep the sun off and preserve the moisture. Manure was placed fresh in these units, except for goat manure which was soaked in water one day (reducing its initial harshness) before adding it to the worms. To harvest castings, fresh manure was placed along edges and then three days later the center part was harvested. The castings were returned to the fields and gardens, or incorporated in their tree nursery soil mix. Two types of worms were used; California red worms (Eisenia foetida) and another called African worms (Eudrilus eugeniae, also referred to as Fudrillus ssp) (Figure 2).” [According to Mark Hare, “African worms and Eisenia foetida are fairly easy to distinguish because the African worm is larger and has a bluish sheen.”]

In Nicaragua, Danny and Lance also visited the home of a woman who lived on a very small piece of land with her husband and children. “She recently converted a small formerly unused area into a productive garden. The steep sloping parcel behind their house, probably only 30 ft. by 60 ft. (9 m by 18 m), belonged to her father-in-law. With his permission, she skillfully transformed it into a small moneymaking venture producing papaya, bananas, and diverse garden vegetables. Of added interest to us was her vermiculture production (Figure 4). She had produced over ten large sacks of composted worm castings and was selling them for profit. Her father-in-law raised cattle and she would collect the manure from the stable where they were penned for the night. She fed the worms with cow manure, banana and mango peels, and other kitchen scraps. Her father-in-law initially made a joke of her “playing with manure and worms,” but has since taken an interest in her gardens and vermiculture operation. The manure had previously been unused until this woman discovered its vital role in improving the land’s productivity and generating income.”

“One of the most interesting finds in our Central American journey was to see vermiculture in three different locations in Nicaragua… .Where farmers are poor, redworms provide an inexpensive and labor-saving method for increasing fertility and soil health in their gardens and nursery soil mixes. Redworms also make a protein-rich food source for chickens.”
Honduras
At ECHO’s 2005 Agriculture Conference, Oscar Lupiac spoke about vermiculture in Azacualpa, Honduras. He reported that 12 100-lb bags of fertilizer were produced in 20 days; each of them sold for $5.00 per bag. The worms were sold, too, often as a very attractive protein source for birds.
Lupiac explained that coffee pulp is one form of agricultural waste commonly used as feedstock for worms. Using worms to compost coffee pulp helps alleviate a major environmental problem; coffee berry pulp is often thrown into the watercourse, polluting it while reducing oxygen levels in the water. Most manure is also useful as worm feedstock, although chicken manure is not recommended for vermicomposting because it is too alkaline.
Lupiac shared other insights, warning that the temperature must be kept in a specific range to keep worms healthy. [A good range is between 70 and 80ºF/21 and 27ºC.] He commented that vegetable oil and sulfur have been effective against ants, which are natural enemies of the worms. He also commented that, where worms are raised in large quantities, a container with cement sides can be made with a channel in the top of the cement around the perimeter. The channel is filled with water to keep ants out. [But be careful, because this could potentially provide a breeding area for mosquitoes. Perhaps adding a bit of oil on top of the water would prevent that.]
Lupiac shared that in Honduras vermiculture is often done at schools. Worms and vermicompost are sold, and the money that is raised is used for school supplies and for special activities like parties.
India
Padma wrote to us from India several years ago about composting with earthworms. “We use earthworms to compost all our organic wastes, and also promote their use for composting kitchen garbage, etc. for city-based groups. It’s a very effective and simple technology [and eliminates the work of turning a compost pile]—the worms do that themselves. It is also, strangely, a cold process; no heat is generated as in ordinary compost-making, and it [takes] two-thirds of the time needed to make compost. The earthworms are a [substantial] investment initially, but they multiply rapidly and prolifically if they’re well fed and treated right. From that first kg we have now sold about 50 kg of worms and still have a large number on the farm. Our free-range chickens also eat a lot of them. The compost is fine, powdery when dry, odorless, and is supposed to contain lots of useful soil bacteria. It’s all we use for our vegetables that we grow for our table and for market. Also, the worms secrete calcium in their guts to convert the rather acidic starting materials into a neutral vermicompost.”
Thailand
At ECHO’s first Southeast Asia Agriculture Conference in Chiang Mai in June 2007, Dr. Arnat Tancho from Maejo University and director of the Maejo Earthworm Information Center (sponsored by the Royal Project and the National Office for the Development of Research and Technology) shared about vermiculture projects in Thailand. His research centers on using earthworms for creating organic fertilizer. He commented that by using earthworms for organic waste control, 100% percent of the fertilizer needs for Thai organic agriculture can be provided from worm castings (worm manure). Food wastes on a large scale from hospitals and universities are used to feed worms, at the same time diverting these organic wastes from landfills.
Dr. Arnat shared that in Thailand, locally adapted Thai earthworms produce a more highly valued fertilizer than worms imported from other continents. He also pointed out that worm castings from human waste proved to be 96% pathogen free; a finding that is promising in Southeast Asia due to the overwhelming need for sanitary disposal of waste and to the exposed sewage systems that contaminate the water table and serve as breeding grounds for disease.
Some of the Thailand-related vermiculture information in this article is from Arnat Tancho’s Thai language earthworm manual “Sai Duen Din” or “Earthworms” (in English), published by the National Office for the Development of Research and Technology, 2nd printing, 2007, Chiang Mai.
Rick Burnette, Director of ECHO’s regional office in Southeast Asia, also shared some information about vermiculture specific to Thailand. In Thailand, cement tile containers and cement block beds are often used in backyard/farm earthworm systems. The preferred bedding (perhaps related to the needs of local earthworm species), is a mixture of six to eight parts of soil to one part well-composted animal manure. He also reported that fire ants are a major pest.
Vermiculture at ECHO
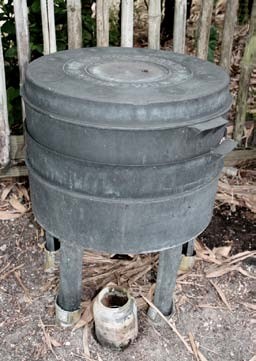
As a result of seeing the emphasis on and success with worms at Rancho Ebenezer and elsewhere, we now have a number of different vermiculture systems in place at ECHO. In the rooftop area we are experimenting with the commercially produced Can-o-worms system (Figure 5), featuring three feeding trays stacked on top of each other. Each feeding tray has numerous holes, allowing the worms (initially placed and fed on the bottom tray) to eat their way upwards through successive trays. Once the organic material is nearly processed by the worms in the bottom tray, food scraps are then placed in the mid-level tray. As worms search for additional food, they move upwards through the holes into the middle tray. The process is repeated as the worms eventually move into the top tray. The castings left in the bottom tray can be harvested and the cycle begun again. In order for worms to move upwards, the depth of organic material being fed to the worms must be such that there is little or no empty space for them to cross between trays. Below the stacked feeding trays is a collection tray allowing liquids to drain, be collected (see jar in Figure 5) and then used as fertilizer. The unit is best placed where it will not overheat in the sun, and may need to be covered during the hottest months. At a cost of over $100 (see Worm composting), the kit is clearly too expensive for most small-holder farmers. We show it primarily to illustrate the concept, which could be used to develop cheaper, customized designs.
In the rainforest area of ECHO’s demonstration farm we show a raised worm bed featuring a “flow through” design (Figure 6a). Organic material and worms are placed inside the feeding area elevated by wooden posts and held up by a large mesh screen or metal hardware cloth (Figure 6b). As worms move upward to feed on fresh supplies of organic material, their castings are left below. A bar is used to scrape the underside of the mesh screen, causing the castings to drop through the holes onto a collection surface below. The screen will sag if the organic material above is too thick or the castings are not harvested regularly.


In the lowlands area of the farm there are three concrete vermiculture beds constructed similarly to the bins used at Rancho Ebenezer and pictured in Figure 3. They have concrete side-walls and base, and are slightly sloped for drainage. The concrete base excludes tree roots from the bins. Excess liquids (e.g. rainfall) drain out of the bin through a PVC pipe and into a collection jug placed inside a barrel that is buried in the ground (Figure 7b). The barrel keeps the surrounding soil from caving in and covering the jug. Periodically the jug, now full of useful vermicompost tea, must be emptied to keep the barrel from flooding. The palm thatch shown in Figure 7a shields the worms from direct sunlight. A shade structure over the bins would accomplish the same thing and would reduce the likelihood of flooding during the rains. To separate worms from the castings, vegetable or manure-based feedstocks can be applied in stages starting at one end of the bin, thus encouraging the movement of worms towards fresh material, leaving harvestable castings at the end of the bin where worms were initially fed.


We also raise worms below our rabbit cages (Figure 8). As rabbits are fed with various leafy greens, bits and pieces of leaves and stems fall through the bottom of the wire cages. The green manure and the rabbit manure are processed by the worms thriving below.

Danny Blank, ECHO’s farm manager, has experimented with vermiculture in the past several years at ECHO. In an e-mail he shared, “My latest thoughts on worms…they are great for handling organic waste that is already nutritious (e.g. manure), moist (e.g. kitchen scraps), and small particle sized (e.g. again kitchen scraps, manure). I think the red wiggler worms are great for adding to piles of stored manure. I have seen hard pasture-aged cow patties turned into beautiful soft soil with moisture and worms (and probably millions of microbes) in just a few months. We are also making use of ECHO’s shredded office paper by spreading it over the most recently added thin layer of kitchen scraps, to keep the worm bed from getting too wet and attracting flies and anaerobic organisms. ‘There is no such thing as waste in a good farming system’—even office paper! Using paper in this way is another great application for vermiculture where one has a specific waste product that is especially moist, such as coffee bean skins and pulp.
“However, results from three experiments at ECHO using vermicompost as a natural fertilizer have been disappointing. We have done two experiments using vermicompost with tomatoes, and one with maize. All indicate that where vermicompost was the sole added source of fertility, there was not enough fertility to raise marketable, healthy plants (at least with the amounts we used and with our soil conditions at ECHO [Note that ECHO’s soil is extremely sandy]).
“I am still optimistic about using vermicompost, but in more limited applications, such as incorporated into potting soil mixes, or added to a transplant hole as a soil amendment before planting a vegetable. In both cases we would use it as a percentage of a mix, along with manure (e.g. 10% vermicompost/90% cow manure) or potting soil (most sources suggest 10-20% of the total mix be vermicompost).
A Few Basics about Vermicomposting
Much of the information presented below is adapted from the City Farmer web site, www.cityfarmer.info/
Container. Containers can be made from a variety of materials, including cement, wood, plastic (keep in mind wood insulates better than plastic) and even old tires. Depending on the available space and the system’s purpose, several smaller containers or one large one can be used. Drill 8 to 12 holes in the bottom for aeration and drainage (holes should be 0.25 to 0.5 inch [0.6 to 1.2 cm] in diameter). Raising the bin on bricks or blocks allows room for putting a container underneath to catch liquid. The liquid that drains from your compost bin can be used as a plant fertilizer. Bins will need a cover to create darkness and preserve moisture. It may also be necessary to incorporate some kind of ant deterrent (e.g. tar on the stands, or put the bricks in dishes of water to deter crawling insects.)
Bedding. Materials fed to the worms are typically buried in some kind of bedding in which the worms live. Many things can be used for bedding: shredded newspaper and cardboard; leaves; chopped straw or dead plants; sawdust; compost; and seaweed. Using a variety of materials for bedding will provide more nutrients for the worms. Moisten the bedding material before adding it to the bin. When first establishing the system, fill the bin ¾ full, and lift some of the bedding to create air spaces. Add a few handfuls of sand or soil for grit, to help the worms’ digestion of food.
Worms. Large soil-dwelling earthworms require soil to survive, and therefore are not suitable for vermicomposting. The ones that are most often used are the redworms Eisenia foetida (red wigglers) and Lumbricus rubellus. You can get worms from a manure pile or compost bin, or you can purchase them. [Be warned that if you purchase worms, they may not be adapted to your climate or location. It is best to find a source of worms locally, which also helps to avoid dealing with import issues for earthworms.] You will need 2 lbs of worms (about 2000) for one pound of food waste per day. If you start with fewer worms, add less food waste initially and multiply your own worms to support increased vermicomposting.
What to do. You can compost food scraps such as fruit and vegetable peels, crushed eggshells, tea bags, and coffee grounds. Manure can also be used. Do not add meat, dairy products, oily foods or grains, because they can lead to odors, flies and rodents. Also avoid citrus peels, pineapples, tomatoes and other acidic foods, because they can make the bedding acidic and thus intolerable to the worms. The City Farmer website suggests that you bury the food waste when adding it to the bin. However, Rick Burnette commented that worm farmers in Thailand prefer to place food scraps on top of the bedding, as burying the fresh material too deep may cause heating (from the composting effect) which could harm the worms. Keep the bins where the temperatures range between 40 and 80ºF (4 and 27ºC), and out of hot sun and heavy rain.
Add food and/or manure regularly. After about 2 ½ months, the original bedding will probably be gone or nearly gone. At this time you can separate the worms from the compost by moving finished compost to one side and adding new food and bedding to the other side, inviting the worms to gradually move to the new side. You could also dump all the contents of the bin onto a plastic sheet, place it in the full sun and separate the worms manually by making mounds and forcing the worms to congregate in the center of the mounds where it is cool and moist. Keep an eye out for tiny lemon-shaped worm cocoons.
Lightly cover the surface of the compost in the bin to minimize unpleasant smells, which can occur if there are not enough air spaces below (in this case, add less food and stir the contents gently to mix in more air). Drill more holes if the bin is too wet. If fruit flies are a problem, bury food waste and do not add too much at one time. Ants can also be a problem. However, local worm farmers often encourage insect biodiversity, including various types of maggots and grubs that help to break down the material. The larvae of these insects can be harvested and fed to chickens, fish, bullfrogs, etc. One ECHO staff member keeps his kitchen waste in a large plant pot. He finds that if conditions are kept especially moist and dense, the larvae of a large black fly (that is not a pest to people) thrive on the top layer and can break down even thick items like broccoli stems in a few days. The small red earthworms thrive about an inch below the larvae.
Look for website addresses and other resources with further information about vermiculture and vermicomposting in the supplement that is published on the website along with this issue.
Cite as:
Berkelaar, D. 2009. Income and Other Benefits from Using Worms to Make Compost. ECHO Development Notes no. 104