Seed storage in the tropics has been a frequent topic of ECHO publications and trainings due to its importance to the smallholder farmer. Access to quality seeds is imperative for agronomic and horticultural crop production. While on-farm seed saving benefits the smallholder farmer, cooperative seed storage through the creation of seed banks bolsters farmers at the community level.
Seed banks provide secure structures for seed storage, while also serving as genetic repositories for important plants in the community. Centralizing the seed saving process also allows for cooperative investment in appropriate technologies and data management. As members of a community learn these management skills, they are empowered to save seeds themselves.
Seed preservation in the tropics is rife with difficulties due to high temperatures and humidity, so investing in worthwhile storage technologies is instrumental in smallholder communities. Of course, the process of establishing a seed bank involves community buy-in, stakeholder cooperation, and resource investment. While the social elements of seed banking are important, thisTechnical Note focuses on earthbag building techniques as a resource-effective means of establishing a seed bank. ECHO has now installed earthbag seed banks at two of its global offices: one in Thailand and one in Florida. This publication will outline the benefits of earthbag seed banks, as well as how to get started with your own project.
Introduction to earthbag structures
Earthbag structures possess myriad qualities that are advantageous for seed banking: permanence, low-tech, cost effectiveness, and temperature moderation potential.
Permanence
Seed banks require permanent, dedicated structures to ensure security of community investment. After all, seeds are livelihood. While earthbag structures are not typical brick-and-mortar type building structures, they are stable and persistent through the stresses tropical climates may put them through.
Low-tech
Earthbag construction requires few resources and tools. At its very basis, an earthbag structure can be built with soil, bags, and barbed wire. Of course, the soil has particular requirements, namely that it contains at least 6% clay in order to be compacted, and the bags have to be sourced—though most commonly available 50-lb (23-kg) feed bags are suitable. As for tools, shovels and tampers (to compact the bags in place) are about all that is required.
Cost effective
Given the low-tech nature of earthbag building, and the wide availability of its required materials, earthbag structures are relatively cost effective. If the proper soil types are available in the community, bags and barbed wire can often be sourced locally for relatively little cost compared to other structure types. Our Thailand earthbag seed bank cost a total of $750 USD (Trail et al., 2019).
Temperature moderation
High temperatures and humidity are enemies of seed storage in the tropics. Drastic temperature fluctuations throughout the day cause moisture accumulation on seed and wall surfaces. This can significantly shorten seed longevity and/or introduce mold, which can contaminate seed lots and decrease germination rates. For more information about seed storage requirements, techniques, and management, search “seed storage” ECHOcommunity.org. Simple earthbag structures are not adept at controlling humidity—in fact, humidity can often be higher in the interior than on the outside. Due to their density, however, they are able to mediate temperature fluctuations.
The thick, earthen walls absorb heat during the day, preventing it from transferring to the interior of the structure. At night, the stored heat radiates inward, preventing the interior from getting too cool, and reducing surface moisture. The interior temperature of earthbag structures is cooler during the day and warmer at night than the ambient air outside the structure, mitigating temperature fluctuations. At ECHO’s Thailand office, maximum temperatures were 16.5°C lower inside the earthbag seed bank than external temperatures; conversely, minimum interior temperature was 1.5°C higher than external temperatures (Trail et al., 2019).
Earthbag construction
Planning
Site selection
When determining location of earthbag structures, there are four main criteria to consider before construction:
- Elevation. Earthbag structures must be located in well-drained area, as poorly drained, low areas act as wicks, drawing water up wall surfaces and into the interiors of the buildings. Avoiding moisture entry is critical to proper seed storage, as surface moisture and humidity cause mold and fungus issues that reduce seed viability.
- Fill soil. Earthbag structures are built with soil-filled bags. Therefore, it is crucial to obtain a reliable and sufficient source of soil before construction begins. Not just any soil will do. In order to achieve the compaction and stability necessary for a safe and durable structure, earthbag soils must contain at least 6% clay content.
Several methods exist for testing clay content, one being “the jar test.” With this method, obtain a sample of soil—excluding organic matter on the soil surface. Place enough of the sample soil in a glass jar to fill it halfway; add water to2.5 cm from the top. Secure the lid on the jar, then shake vigorously to mix the soil and water. Let the jar sit overnight or until clear. Soil particles will settle according to mass—first sand, then silt, and finally clay. You can then compare the ratio of clay (top layer) to the rest of the sample to gain a rough estimate of your clay content (Hunter and Kiffmeyer, 2004).
Too much clay is problematic as well! The ideal amount is somewhere between 10%-30% of the soil content. Below 6%-10% clay, soils are not stable; above 40% clay, soils shrink and expand, also compromising structural stability.
- Weight-bearing subsoil. Earthbag structures are heavy and require a strong and stable foundation. This can be achieved through tamped earth, the construction of a concrete pad, or other such means to achieve a base that will withstand the weight of the building over time. One note: if relying on tamped earth to serve as the foundation, it is important to be aware of soil texture (the composition of clay, silt, and sand of a soil), as this will determine compatibility; compaction increases the capacity of an earthen foundation to bear the weight of an earthbag building. Oftentimes, it is necessary to excavate to a subsoil that is compactable and stable. This is especially pertinent in sand-based soils, since they resist compaction.
- Sun protection. Building within a shaded area will further mitigate against high temperatures. Earthbag structures absorb heat: less exposure to the sun, less energy absorption and transfer to the interior of the building.
Materials required
Earthbag construction is material-efficient. The relatively few necessities that are required can usually be easily sourced in the tropics. Necessary materials include:
- Bags. Bags hold the soil and allow for tamping once in place. They form the walls of the structure. Woven polypropylene bags, of the kind many livestock bags and feed sacks, are widely available globally. While many sizes may be available, 20 kg bags (roughly 26 cm by 76 cm) may be easier to work with once filled with soil than larger bags. More important than size, perhaps, is consistency of size among bags; make sure that you are able to source enough bags of a given size to complete your project. Attempting to build with bags of different sizes makes the process difficult and risks compromising the structural integrity of the building.
- Barbed wire. As bags are layered, barbed wire is placed in between each course, acting as a sort of velcro in place of mortar, securing and binding bags in place.
- Concrete. While an earthen base is possible and minimizes cost, a concrete foundation and floor increases stability and can provide a drier floor and interior in low-lying areas that do not drain well.
- Gravel. Since earthbag walls wick moisture well, it is important to manage the movement of moisture/water in and around the building. Gravel can be utilized to increase draining and guide water away from the building.
- Wood or other roofing material. While earthbag buildings can be built solely out of bags of soil, seed banks should have extra ventilation and rain protection. Wood, metal, and other appropriate materials can be used to build a roof with extensive overhang and ventilation.
Design
Earthbag construction is less regimented than conventional building techniques, allowing for freeform structures and unique shapes. There are a few considerations, however, to keep in mind when designing earthbag structures.
- “Round is sound.” Earthbag building lends itself to freeform buildings, which are often more structurally sound than conventional angular construction. Round structures, in particular, are very stable—able to withstand winds and storms—while also being relatively easy to construct.Such designs are also resource efficient, maximizing volume and minimizing resource needs.
- Height. In earthbag construction, the standard rule used to determine how high earthbag walls can be built is up to eight times the wall thickness. In other words, if your walls are 30 cm thick, then the maximum wall height is 240 cm.
- Roof design. It is imperative that quality roof material be used. This may require metal, thatching materials, lumber, or other specific items.
The construction process
Foundation preparation
It is vital to provide a solid foundation for any building for several reasons. First, the foundation is the conduit by which the weight of the building is transferred to the ground. The foundation also provides a stable base that prevents environmental changes (e.g., fluctuating water levels in the soil, freeze/thaw cycles, severe weather) from affecting the structural integrity of the building. Furthermore, a secure foundation protects the lower part of the walls against erosion and moisture damage.
Basic foundations feature any or all of three parts: the footing, foundation walls, and the slab or pad.
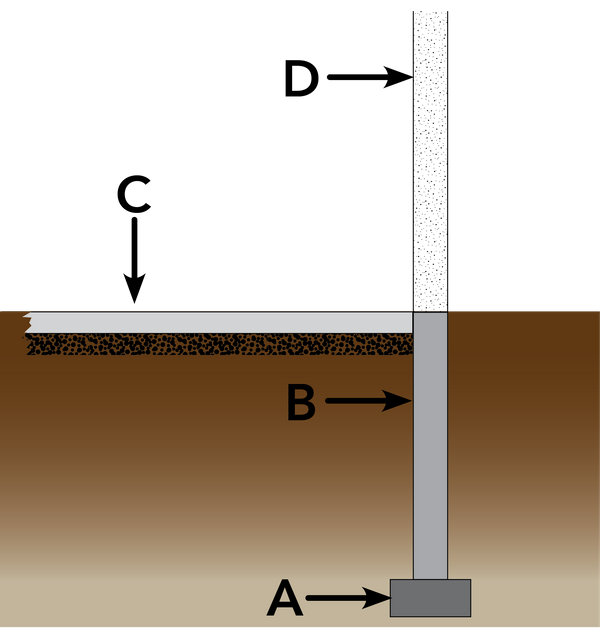
Figure 1. Illustration of a (A) footing, (B) foundation wall, (C) slab, and (D) wall. Source: Cody Kiefer
Footings are the structural parts of the foundation that disperse the weight of the building to the ground. Because they are wider than the foundation wall (described next), they spread the weight of the building over a greater surface area, providing a more secure and stable connection with the ground (Figure 1). A simple method to make a footing involves digging a trench in the shape that the structure will be and 10-15 cm wider than the width of the foundation wall. It is important that the trench reaches the subsoil level and extends 30 cm deeper than the frost line, if in areas of deep frost. The trench is then filled with rubble and gravel (making sure the largest rocks are at the base of the trench and spraying with water during the process to help the rocks settle) or with concrete, the most popular material for footings. If concrete is used, suspending steel rebar inside the concrete provides more tensile strength.
Foundation walls are extensions of the walls of the building that transfer the weight of the building below ground to the footing (Figure 1). These are often poured concrete, block, or stone. In the case of earthbag buildings, the foundation walls may extend above the ground if there is need to raise the building above any flooding zone or to level the pad in undulating terrain. Foundation walls are usually the same width as the walls of the building and run the perimeter of the building to support all exterior, load-bearing walls.
A slab, or pad, is a flat, horizontal, concrete surface often reinforced with rebar that provides a level, supported surface, usually raised above ground level, that can serve as the both foundation and floor of a building (Figure 1). The perimeter of the slab either rests atop the footing or incorporates the footing as a monolithic structure (Figure 2). (The surface area of a slab foundation increases when the footing is incorporated into it. Thus, the footing does not have to be as deep as when the footing and slab are separate structures.) The middle portion of the slab is supported by packed earth or gravel. Prior to pouring the concrete, place plastic between the ground and the slab to act as a moisture barrier, preventing the concrete from absorbing moisture from the soil.
Foundations may ultimately be as simple as a gravel footing beneath the earthbag walls and compacted earth or gravel for the floor. Where resources allow, however, incorporating a slab of some sort can help prevent water from entering the seed bank from stormwater runoff or capillary draw from the soil.
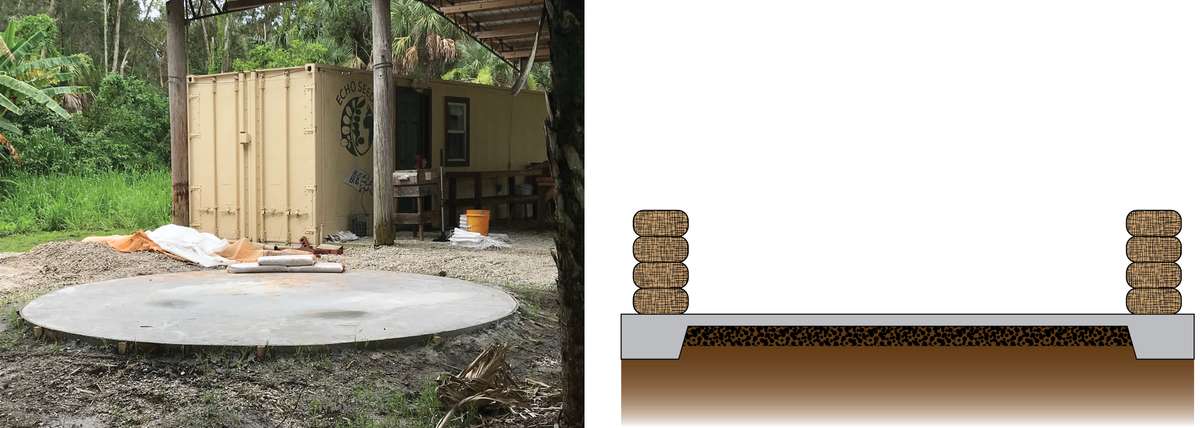
Figure 2. ECHO Florida’s concrete slab foundation for an earthbag seedbank (left), and an illustrated cross-section (right). Source: Cody Kiefer
A note on drainage: While foundation design plays a large role in earthbag seed bank moisture management, it can only compensate so much for poor site choice and preparation; it is vital that the driest site available be chosen. Beyond that, there are several site management methods that can help keep the seed bank as dry as possible. These include altering the grade of the site, where possible, to create a slight slope away from the building. A rule of thumb for grade is to create a 3 m buffer around the foundation that maintains a 5% slope away from the foundation (making the foundation the highest point). Ditches and drains can also channel water away from the building.
At ECHO’s Florida, USA, campus, the foundation consists of a slab-footing combination (Figure 2). The sandy soil was prepared with rough grading, then a crushed stone base mix was compacted in place to provide a stable surface for the foundation pour. Forms were then put in place to shape, hold, and level the concrete. Then a trench was dug around the perimeter of the slab for the footing. Rebar was placed in a grid within the slab layer and around the perimeter of the footing to reinforce the concrete and provide tensile strength to the foundation. This thicker perimeter provided the necessary strength to carry the weight of the earthbag seed bank’s walls. An impermeable liner (we used rubber pond liner but thick plastic would work) was then placed on top of the crushed stone to provide a capillary break, preventing water wicking through the concrete from the soil surface. Concrete was then poured into the form and leveled.
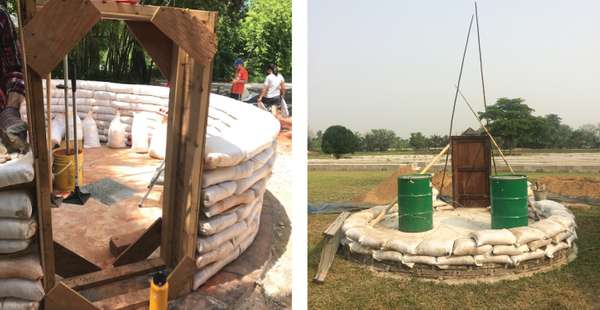
Figure 3. The door forms in place at ECHO’s Florida location (left) and Thailand office (right). Source: Cody Kiefer (left) and Patrick Trail (right).
At ECHO’s Chiang Mai, Thailand, office, the foundation consisted of cinderblock and concrete, built significantly above grade in order to keep the seed bank out of standing water during the rainy season.
Door forms and placement
Once the foundation is prepared, door forms should be built and put in place (Figure 3). These are temporary frames that the earthbags will be placed against during their installation, and are removed after installation in lieu of a permanent door frame assembly. Door forms are boxes built out of available timber, able to withstand the forces of the earthbags pushing in from the sides. A door form should be the same height and width as that of the final door frame to be installed, and slightly deeper than the earthbag walls will be (in order to prevent the bags from wrapping around the form).
During the earthbag wall assembly, “velcro" plates will be placed between courses on the exterior of the door form. The plates will ultimately serve to anchor the door frame and door (Figure 4). Each plate is comprised of a flat piece of wood (such as plywood), 1.25-2.5 cm thick, cut to a length of 30-40 cm and a width that is just a little less than that of the wall. Incorporated between courses along the door form, nails are driven through the plate and into the earthbags. A piece of lumber is then attached to the outer end of this plate and will be the anchoring point for the doorframe. [At ECHO Florida, the wood attached to the outer end of the Velcro plate was a piece of 2 X 4 lumber cut to a length that matched the width of the plate. “2 X 4” refers to dimensions for depth (approximately 2 in or 5 cm) and width (approximately 4 in or 10 cm.]
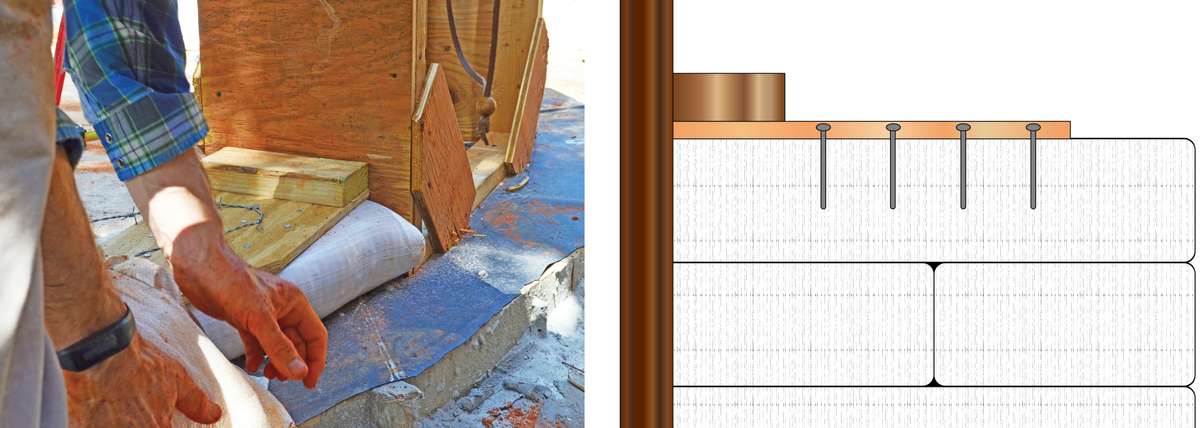
Figure 4. Velcro plate in place on top of first course of earthbags (left), and illustrated cross-section of a velcro plate in place (right). Source: Cody Kiefer
Earthbag filling and placement
Another opportunity to protect against water
Before earthbag installation, there are a couple of opportunities to further safeguard against water encroachment into the seed bank. If a slab is being used, then an impermeable membrane should be placed underneath the concrete, as explained earlier in describing the foundation of the ECHO Florida earthbag structure. [One or two layers of polyethylene sheeting (with a suggested 6-mil thickness) can be used for the membrane. Ensure that there are no sharp-edged stones puncturing the plastic before pouring the slab.] A similar impermeable membrane could be placed on top of the slab, underneath the earthbag coursework. This would provide a capillary break if water does manage to permeate the concrete, preventing it from creeping up the earthbag walls. If no concrete slab is being used, the first two-to-three courses should be gravel-filled bags. These will likely require double-bagging to withstand the abrasiveness of the gravel. This similarly prevents water from wicking up the seed bank walls.
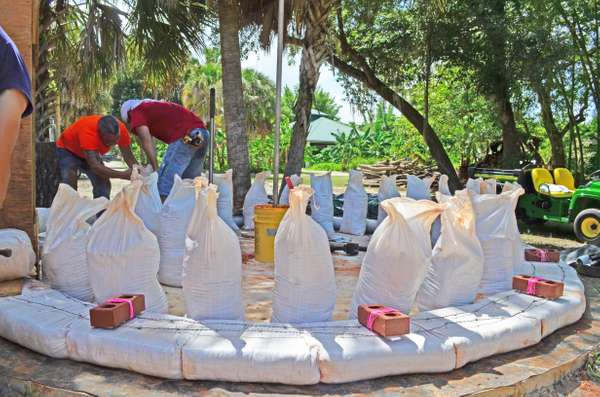
Figure 5. Filled bags are placed along the perimeter of the coursework in preparation of placement. Note the pole in the orange bucket, used in combination with a string to place each bag the same distance (circle radius) from the center of the structure. Source: Cody Kiefer
Staying true
The perimeter of the seed bank should be determined and marked in some way on the ground. One convenient way to do this on a round structure—and to maintain plumb walls during the building process—is to create a rigid-pole compass, which serves as a pivot point in the center of the building site. This can be done with a pole securely placed upright in a large bucket filled with concrete, gravel, or soil (Figure 5). A string or rope can be attached to this that is the length of the radius (half the diameter) of the building. This string—an articulating arm—can then pivot as the bags are placed in their proper position, maintaining the inner edge of the wall.
Staging, placing, and tamping
Before bag filling can begin, soil moisture should be considered. Remember: This soil needs to contain at least 6% clay content. Too little or too much moisture content and the earthbags will not compact well. One way to test for proper soil moisture is to form a ball and drop it onto a solid surface (e.g., a concrete slab or area of compacted earth) from 1.5 m. If the ball shatters from this height, the soil is too dry (Stouter, 2011). Incorporate small amounts of water until the ball no longer shatters.
When soil moisture is adequate, bags should be filled two-thirds full of soil. To help with this process, stands can be built to hold the bags upright and open as the soil is shoveled into them until two-thirds full. Closure of earthbags can be done with wire, string, or simply by folding the sides in (much like wrapping a present), then folding the top around to the underside of the bag immediately before placement. The folded openings are then secured against the adjacent earthbag. In either case, bags can be staged along the perimeter of the structure for ease of access during construction (Figure 5).

Figure 6. (A) Sliding an earthbag into place using a slider. Notice that bags are place firmly against one another. Staff member, Elliott Toevs, is also diddling the corners before moving on to the next bag. (B) Notice vertical seams, important for ensuring structural integrity of earthbag structures. Source: Cody Kiefer
Builder’s tip: Placing the final bag in each course requires two people. First adjust the final bag to fit the gap between the last two bags, over filling slightly. Then place one end of the final bag against the end of one of the last two bags. Next, push the other end of the final bag into place against the end of the second of the two last bags. To do this, have a helper lift the end of the second of the last two bags. Finally, push down the two abutting ends simultaneously in order to get them to fit snuggly and maintain a nice vertical seam.
The placement process involves putting the bags one-by-one, firmly against one another, ensuring that the top seam is secure against the bottom of the previous bag (Figure 6a). Seams should be vertical (at 90 degrees from the horizon; not slanted), ensuring a tight fit during the tamping process (Figure 6b). Bag placement should begin at the door form and work towards the midpoint of the circle, then repeat from the other side of the door form. The first bag on each side of the door form should fit securely against the form with a flat surface. To achieve this, partially compact the bottom of the bag during the filling process by tamping the bottom quarter of the bag, paying special attention to the corners, then filling the remainder of the bag as normal. The bottom, flattened portion of the bag will then be placed against the door form and each bag thereafter is slid into place, bag by bag, against the one before it, ensuring snug fits between each.
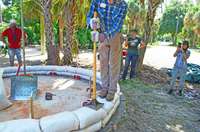
Figure 7. After all bags in a course are in place, tamping flattens, levels, and sets the bags. Source: Cody Kiefer
Do the diddle: Diddling is the process of inverting the bottom corners of the bags—pushing in from the outside—so that they point inward, then packing the soil against the corners to create solid, smooth edges. This is important to prevent soft spots and hard edges along the wall that could compromise the structural integrity of the wall and make the plastering process difficult.
Once a single layer of bags has been placed, each bag should be tamped so that they are flat, level, and hard-set (Figure 7). Begin by tamping along the center of the bags for the length of the course, then work your way back around the course, this time working the tamper from the center to the edges of the bags. Repeat this process of tamping from the center to the edges of the bags until you notice a change in the sound of the tamping process where bags begin to “ring”; you will notice a distinct shift from a “thud” to a “smack.” Lastly, check for high spots and tamp to level those.
Bonding courses
In typical brick-and-mortar construction, courses of block or stone are joined with mortar. In earthbag construction, four-point barbed wire serves the same purpose, joining courses of earthbags (Figure 8). Two parallel strands of barbed wire should be placed on top of each tamped course the entire length of the wall. Weights of some sort (e.g., rocks or blocks) can hold the wire in place as bags are added on top.

Figure 8. Close-up of barbed wire (left) and tie wires (right) atop tamped earthbags. Bricks hold the barbed wire in place as the next course is laid. Tie wires. Source: Cody Kiefer
If you plan to use chicken wire or wire lath to aid in the bonding and tensile strength of the finish plaster, tie wires should be added to the barbed wire with each repetition. Pairs of wire should wrap around the barbed wire and extend 8-10 cm beyond the wall, repeating every 40-45 cm, with one wire facing the exterior wall and one facing the interior.
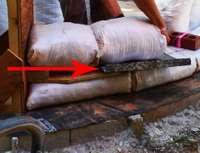
Figure 9. Close up of slider use in bag placement. Source: Tim Motis.
Sliders
With barbed wire in place, it is difficult to slide bags into position. A way to overcome this is the use of a “slider.” Sliders are sheets of flat sheet metal (or similar material), with a lip on one end, that are placed over the barbed wire while bags are butted against each other (Figure 9). When the bag is in place, the slider is removed and placed in the next position. While in place, the earthbag can be adjusted as much as necessary before removing the slider.
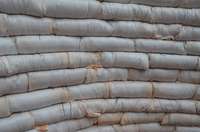
Figure 10. Notice the running bond and vertical seams as well as tie wires sticking out between courses. The hanging brick held barbed wire into place until displaced by an earthbag; string aids in keeping the bricks near the working level of construction instead of having to place and pickup bricks. Source: Cody Kiefer
Running bonds
Similar to brick laying, running bonds in earthbag construction are necessary for structural integrity. Bag ends should be staggered so that the vertical seams of one course do not align with those of the course below (Figure 10). This can be done by underfilling the first bag placed in alternating layers. This half-bag in each second course will create the necessary running bond throughout the wall.
Remember to place velcro plates on each side of the door form after the first course of bags is tamped, and then after every third course thereafter (Figure 11).
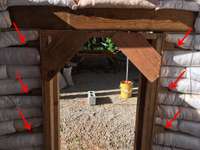
Figure 11. Arrows indicate velcro plate placement after every third course. Source: Tim Motis.
Arch or Lintel?
Once you have reached the top of the door, a lintel beam or arch is needed to bear the load of the subsequent courses over the door. In our construction at ECHO Florida, we opted to use a lintel beam as it required less technical skill and time to construct. While the size of lintel will depend on the length of span and load it will be subjected to, we used six 2 x 6 pieces of lumber laminated together to span the 75 cm doorway [“2 x 6” refers to standard depth (2 inches or 5 cm) and width (6 inches or 15 cm) dimensions of commonly available lumber in the United States.]. Another option would be to construct an arch out of earthbags. This method is done in a similar fashion to designing and constructing traditional brick arches. For more information on how to do this, consult the book Earthbag Building: The Tools, Tricks, and Techniques by Hunter and Kiffmeyer.
Bond Beam
In conventional brick construction, a reinforced concrete bond beam is installed on top of the final course. This is to increase tensile strength, which will provide greater lateral stability in your walls. Lateral stability helps walls withstand wind or other forces pushing sideways against the walls. In earthbag building, a bond beam may or may not be necessary; this depends largely on four factors: structure size and shape, presence of reinforcements within the wall, roof design, and earthquake potential.
- Building size and shape. Smaller, round buildings will offer more stability than large square ones. A circular wall provides more lateral stability than a straight wall. The height and width of the wall will also influence the amount of lateral support needed.
- Wall reinforcements. Four-point barbed wire placed between each course will increase tensile strength. The amount of buttressing employed on straight wall sections will determine lateral strength.
- Roof design. Lightweight roofs that utilize tension members help transfer the load directly perpendicular to the top of the wall. This will decrease the need for a bond beam, where compression style roofs (especially if they are heavy) will often require a bond beam since they tend to push outward on the walls rather than straight down.
- Earthquakes. In earthquake prone areas, a bond beam will be necessary to minimize the risk of collapse.
We chose not to incorporate a bond beam into our building for the following reasons: our building is a modestly-sized circular shape, four-point barbed wire was incorporated between each course, our roof was designed to prevent wall push-out, and the relatively low risk of earthquake.
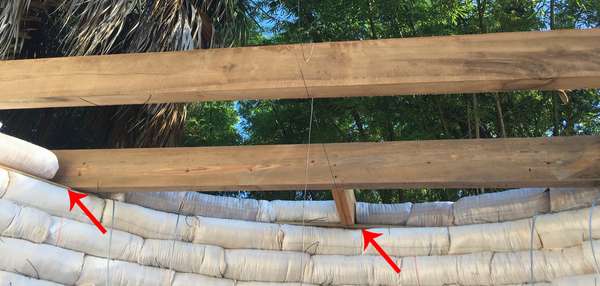
Figure 12. Ceiling joists and a rafter tie are worked into the fourth course from the top at ECHO Florida’s location. Source: Tim Motis.
The roof
One of the advantages of earthbags as a building medium is the ability to integrate structural elements within the wall construction. As wall construction nears the desired height, ceiling joists should be incorporated in the fourth course from the top (Figure 12). This allows three courses of earthbags to be stacked on top of the joists to secure them in place.
Roof design depends on seed bank size, shape, and what materials are available. At ECHO’s Asia Impact Center, the roof initially consisted of bamboo framework and was later replaced by a metal frame welded together by local workers (Figure 13). At ECHO’s Florida campus, rough-hewn and dimensional lumber for the joists and supports, and corrugated sheet metal for the roofing was used.

Figure 13. ECHO’s Thailand office initially installed a bamboo-based roof structure (left) and was later replaced with a metal structure (right). Source: Patrick Trail.
Ultimately, regardless of structure shape and size or materials used, earthbag roofs should extend far enough beyond the walls to protect them against rain and sun. This will substantially extend the life of the plaster and the building.
Ventilation and insulation
Another important design consideration of the roof is whether to ventilate the attic space. While there are pros and cons to ventilating or not, we chose to ventilate the attic space to help evacuate the hot air in the daytime. If you choose to ventilate your attic space, keep this one principle in mind: hot air rises. For the most effective ventilation strategy, the exhaust vents should be at or near the highest point, while the intake vents should be at or near the lowest point of the roof. One disadvantage of a ventilated attic is the potential for rodents and other pests to take up residence. To prevent this from happening, we carefully attached wire mesh to each opening.
Regardless of your decision to ventilate the attic, the use of insulation will be critical to maintaining a constant temperature inside the seed bank. While insulation is readily available at building supply stores in cold climates, access and cost may be prohibitive in warmer climates. To create the most affordable and accessible demonstration, at our Florida campus we have sought natural insulation methods. Table 1 lists commonly available materials with their corresponding R-values. The R-value of any given material indicates its resistance to heat (the higher the number the better). Despite a published R-value for a given material, there is always some variation due to moisture and compaction. Thus, it is important to ensure the insulation will remain dry and undisturbed. As a guide, International Building Code for Florida requires a minimum attic insulation R-value of 30. Thus, if we were to use rice hulls, you would need a 25 cm thick layer to achieve R-30.
Table 1. Commonly available insulating materials and corresponding R-values. |
||||
Material |
R-value per 2.54 cm |
Pros |
Cons |
Source |
sawdust* |
2.25 |
inexpensive biproduct |
easily absorbs moisture |
Spriggs, Roy E. “Home Manufactured ‘Loose-Fill’ Insulation.” Retrospective Theses and Dissertations. Thesis, Iowa State College, 1936. https://lib.dr.iastate.edu/rtd/16410. |
perlite |
2.7 |
inorganic, resists decay |
less available |
Gromicko, Nick. “Perlite for Insulation.” InterNACHI®. Accessed June 23, 2020. https://www.nachi.org/perlite.htm. |
rice hulls |
3 |
inexpensive biproduct |
varying availability |
Geiger, Owen, and Kelly Hart. “Using Earthbags as Ceiling Insulation.” EarthbagBuilding.com. Accessed June 23, 2020. http://earthbagbuilding.com/articles/ceilings.htm. |
cellulose (wood fiber) |
2.8-3.7 |
can be made with paper and hammermill |
loses effectiveness when exposed to water |
Project Lead the Way, Inc. 2010. “R-value and Densities Chart.” PDF Accessed June 23, 2020. https://www.windsor-csd.org/Downloads/R-ValueDensitiesChart2.pdf[ET4] |
wool |
4.1 |
resists moisture |
less available |
Wool, Havelock. “Loose Fill Insulation: Wool Insulation Products: Havelock Wool.” Havelock Wool | Wool Insulation, April 11, 2020. https://havelockwool.com/loose-fill-insulation/. |
dry air (for comparison) |
0.02 |
ubiquitous |
two orders of magnitude less effective at insulating than the next lowest R-value (sawdust) |
Shawyer, Michael, and Avilio F Shawyer. “Thermal Insulation Materials, Technical Characteristics and Selection Criteria.” FAO Fisheries Technical Paper 436 (2003). http://www.fao.org/3/y5013e/y5013e08.htm#bm08. |
*Varies by species and shaving size |
||||
Protection against decomposition, pests, and fire is an important consideration when using organic (containing carbon) matter for insulation. One of the easiest ways to offer pest and fire resistance is to mix a borate-based compound (i.e., borax, boric acid, etc.) into the insulation.
For more information on making your own cellulose insulation out of paper products, consult the article entitled “How to Make and Install Your Own Insulation” from Mother Earth News (1977).
Plaster
Once a roof is in place to provide protection from the elements, the plaster process can begin. Chicken wire or another mesh material should be applied to the exterior and interior walls (if using), held in place by the tie wires incorporated between courses. Ensure ample overlap in wire mesh to prevent gaps that could inhibit bonding of plaster to the wall.
Plaster protects earthbag structures from mold, vermin, water inundation, and UV (ultraviolet light) degradation. There are various commonly available materials that can be used for finishing earthbag seed banks. These include cement, lime, and earthen plasters. Cement is a readily available material worldwide, however, cement plasters are not as breathable as lime or earthen plasters and could compound moisture issues inside earthbag seed banks. Lime plasters are best applied in very thin layers because they take the longest to dry and because they shrink significantly (incorporating sand can help with shrinkage issues and durability); lime plasters serve well as the final coat over earthen plaster. Earthen plaster combines clay, sand, and fiber to protect the structure, and is the type used on the ECHO Florida earthbag structure.
Earthen plaster provides a protective layer that absorbs and transpires moisture, moderating moisture transfer to the interior of the seed bank. Clay serves as the binding agent for the sand and fiber to adhere to the earthbag walls. Sand strengthens the plaster while also reducing shrinkage and, therefore, cracking. Fiber boosts the tensile strength of the plaster, also minimizing cracking. Fiber can be in the form of straw, sawdust, grass clippings, cow or horse manure, paper, tree bark, coconut husk, animal hair, and so on.
Equipment utilized for plaster production can vary. It could be as simple as hands and feet in a mud pit, to something as mechanized as cement mixers. By-and-large, the process is similar, regardless of equipment available:
- Clay and sand should be sifted through a 6-7 mm screen to remove foreign materials and large clods of soil (large clods can be pulverized or soaked to soften);
- Add water to a lined pit (or cement mixer), then the screened soil;
- Layer straw on top of the water and soil mixture;
- Mix, adjusting materials as needed to achieve desired result (usually a thick, cake-like batter).
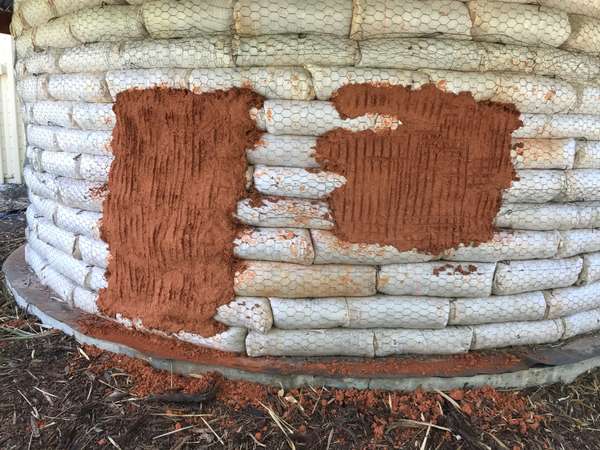
Figure 14. Comparing plaster mixtures on the seedbank at ECHO’s Florida location. Source: Cody Kiefer
Since materials for earthen plaster depend on availability, it is important to sample differing mixtures of various rates and fiber types to determine what works best in your situation (Figure 14). A good rule of thumb is to start with a soil mixture of 70% sand and 30% clay, then mix 70% soil mixture with 30% fiber (by volume). At ECHO’s Florida site, we relied on sawdust for the fiber component. While our 4:1 sand:clay mix was not ideal for plaster, we found the combination of a 3:1 (soil:sawdust) mix with the use of chicken wire lath produced favorable results. In order to minimize mold potential (sawdust is prone to mold), we added borax to the plaster at a rate of 1 cup/4 cubic ft (0.25 L / 0.028 cubic m) of soil.
Once mixed, plaster can be applied to the wire mesh via hand and trowel. This should be done in relatively thin layers to allow for even curing. The base coat should serve to cover the mesh material and even out low and high spots, where necessary. Once applied, it should have a rough surface texture to promote bonding of subsequent layers. This can be achieved by brushing over the plaster with a tool—such as a broom, rake, or hands—though caution should be taken to not drag the fiber out of the plaster. Once cured, water should be applied to the base coat via spray bottle or brush to further promote bonding of the next layer. Subsequent layers should be thin and allowed to fully cure before repeating the process. Number of layers will depend upon your plaster recipe and availability of resources. The final coat should be smoothed as much as possible to prevent standing water and uneven wear.
Clay content in plaster: Plasters consisting of at least 30% clay do not necessarily need the aid of mesh to bind to earthbag walls. Mesh materials such as chicken wire, however, do help promote adequate bonding regardless of clay content, and especially with plasters containing less than 30% clay content. Mesh is essential if a cement-based plaster is used.
Over time, there should be regular monitoring of earthen plaster to identify cracks, mold, wet spots, or other issues than can compromise structural integrity. These should be immediately addressed with removal of affected areas and/or addition of new plaster.
Special considerations for seed storage in earthbag seed banks in the tropics
While one of the major advantages of earthbag seed banks is their ability to provide a more controlled environment than open-air containment, there are extra considerations for optimizing seed storage conditions in an earthbag structure.
Rule of 100
Humidity and temperature are the two most important factors to manage in storing seeds. Dry and cool conditions extend seed longevity by slowing respiration and mitigating against fungi/mold. As much as possible, maintain temperature and humidity within the parameters of the “Rule of 100” equation:
Percent Relative Humidity + Air Temperature in Degrees Fahrenheit = 100 or less
Below are considerations for keeping seeds as cool and dry as possible.
Hermetic and vacuum sealing for lower humidity
An elevated location and floor, foundations with moisture barriers, and a ventilated ceiling are all ways to minimize humidity in an earthbag seed bank. In a humid climate, however, humidity in an earthbag structure may still be too high. At or above 65% humidity, disease-causing fungi proliferate and threaten the viability of seeds.
Aside from the above-mentioned construction considerations, the humidity that seeds are exposed to in an earthbag building can be well-managed with hermetic and vacuum sealing. Hermetic sealing is the practice of keeping seeds in sealed containers such as jars with airtight lids. This simple technique excludes ambient, humid air and can be combined with desiccants (e.g., baked rice) and/or vacuum sealing for further effectiveness.
Vacuum sealing is the removal of air from a sealed container. From ECHO Best Practices Note no.5: “Seed Storage in the Tropics,”
Vacuum sealing helps keep seed moisture content low by minimizing exposure to ambient humidity. It also minimizes oxygen presence, slowing seed respiration, reducing damaging free radicals, and thereby increasing the longevity of seeds in storage. It could be utilized alone or in combination with a desiccant…Vacuum sealing also helps to control insects in stored seeds…as a result of reduced oxygen in the container.
Vacuum sealing can be achieved with relatively simple, accessible technologies, such as bicycle tire pumps or brake bleeding pumps (see ECHO Technical Note 93, “Vacuum Sealing Options for Storing Seeds” for more information). Vacuum sealing drastically increases seed longevity and viability and is an appropriate companion practice to earthbag seed bank storage.
Shade for lower temperature
As explained earlier, earthbag walls and insulation moderate against temperature extremes. Another consideration is the use of shade to minimize exposure of the structure to the sun. A well-built earthbag structure will have extended eaves that keep the sun from hitting most of the exterior walls. Additionally, consider plantings around the structure for additional shade. Trees or other perennial plants can be selected and placed for their ability to shade the building while providing edible fruits or leaves.
ECHO seed storage resources
ECHO has produced various pieces on the subject of seed storage practices, methodologies, and appropriate technologies:
- Introducing New Seeds Overseas (TN 39)
- Extending the Life of Your Seeds (EDN 86)
- Seed Saving Steps and Technologies (TN 63)
- Vacuum Sealing vs. Refrigeration (AN 14)
- Bicycle Pump Vacuum Sealer for Seed Storage (EDN 126)
- Bicycle Pump Vacuum Sealer (PowerPoint with photos and instructions for assembly)
- Seed Storage in the Tropics (BPN 5)
- Low Oxygen Methods for Insect Control in Seeds (EDN 146)
Actionables
The primary means of temperature and humidity management in basic earthbag seed banks is through ventilation control. Preventing humid air from entering during times of rain and circulating air during dryer conditions, along with other controls such as vacuum sealing, can aid successful seed bank management.
Regular visual assessments of interior and exterior walls and surfaces are important. Any signs of mold, mildew, water damage, or other physical signs of damage should be addressed immediately.
Conclusion
Community-level seed access is an essential part of subsistence agriculture in the tropics. One way to empower farmers’ abilities to access quality, diverse seed supply is through community seed banking. Earthbag structures are one accessible, relatively low-cost option for creating community seed banks. They provide stable, permanent structures with the ability to buffer against temperature and humidity fluctuations that can damage seeds in storage. Community seed banks also centralize technology and record keeping for ongoing seed storage management. All of this in combination provides the potential for robust systems of storage, and the distribution of local, regional, and economically important agricultural seeds for smallholder farmers.
More photos of the ECHO Florida earthbag seed bank build are available, with captions by visiting: [http://edn.link/earthbagphotos].
Photo Credit
All photos credited to Cody Kiefer unless otherwise stated.
Further Reading
Geiger, O. 2019. Step by Step Earthbag Construction. EarthbagBuilding.com Website accessed 19 March 2020.
Geiger, O. and K. Zemskova. 2016. Earthbag Technology – Simple, Safe and Sustainable. Nepal Engineers’ Association Technical Journal XLIII-EC30 (1):78-90.
Haft, R., H. Husain, A. Johnson, and J. Price. 2010. Green Building in Haiti.
Hart, K. 2018. Essential Earthbag Construction: The Complete Step-by-Step Guide (Sustainable Building Essentials Series). New Society Publishers.
Hunter, K. and D. Kiffmeyer. 2004. Earthbag Building: The Tools, Tricks, and Techniques. New Society Publishers. https://up.codes/viewer/florida/fl-building-code-2017/chapter/18/soils-and-foundations#table_1806.2 Accessed 15 May 2020.
Motis, T. 2019. Vacuum-Sealing Options for Storing Seeds . ECHO Technical Note no. 93.
Stouter, P. 2011. Earthbag Building in the Humid Tropics: Simple Structures 2nd Edition. SCRIBD.
Trail. P., Y. Danmalidoi, S.M. Pler, A. Bicksler, and B. Thansrithong. 2019. Low-Cost Natural Building Options for Storing Seed in Tropical Southeast Asia. ECHO Asia Notes 38:6-8
Cite as:
Kiefer, C., T. Motis, and E. Toevs 2020. Earthbag Seed Banks. ECHO Technical Note No. 96.