- Book Review: "How to Make a Rope and Washer Pump"
- The Rus Pump
- The Rower Pump, West African Version
- Home-Made Water Repellent for Wood
- Preserving Wooden Bee Hives
- "Wick" Suggested to Preserve Untreated Poles
- Pedal-Powered Vehicles
- Sawdust Used to Fill Old Tractor Tires
- Simple Sawdust Cookers
- How Can I Simulate Long Days to Make Plants Bloom?
- Cassette Player and Radio Need No Batteries
- Serrated Hand Hoe
"HOW TO MAKE A ROPE AND WASHER PUMP." Robert Lambert wrote this 32-page booklet for the Intermediate Technology Development Group. The manual shows how to make a simple, cheap pump suitable for smallholding and garden use (see illustration from the book). The pump, which can raise water up to 6 meters (18 feet) from a stream, pond or well, has been field-tested in Tanzania and Zimbabwe. An output of 1 liter per second at 5 meters can be sustained, enough to irrigate 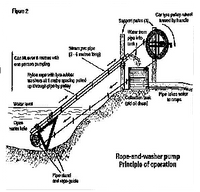 1/4 hectare if pumped 20 hours a week.
It is designed especially for irrigation of small plots. Providing "supplementary irrigation to crops at critical periods of growth can greatly increase the yield ... [or even] make the difference between a good crop and total failure." It is "particularly valuable for vegetable production in the dry season when vegetables may be grown only through the use of irrigation. [And prices received will be higher.]"
"The rope and washer pump is ... capable of lifting relatively large volumes of water from a water hole or well to its own height [but no higher]." "A rope is pulled up through a pipe by means of a pulley wheel [an old tire]. Fixed to the rope are flexible rubber washers [cut from a tire] whose diameter is slightly less than the internal diameter of the pipe." As the washers are pulled up through the pipe "water is drawn up and discharged at the top. The rope and washers pass around the pulley wheel and return to the bottom of the pipe."
Every moving part is out in the open and can be hand made with simple tools. The cost of materials in Zimbabwe in 1989 was US$30. A video tape is also available. I cannot review the one I purchased because I forgot that England uses a different video system than we do. However, the booklet is so profusely and well illustrated that I see little need for a video. Order from Intermediate Technology Publications, 103/105 Southampton Row, London WC1B 4HH, UK; fax 44 171 436 2013; e-mail itpubs@gn.apc.org. The price is œ5.95 (about $11.50) plus 20% surface postage, 40% airmail. In the USA, order IT Publications from Women, Ink., 777 UN Plaza, New York, NY 10017. They also have distributors in 15 other countries; write or e-mail for one of their excellent catalogs or addresses of local sources near you.
THE RUS PUMP. Wayne DeYoung in Haiti writes about a pump that he is sure will interest our network. It was used in a water well project by Dan Cook and others in Haiti. Wayne believes that it has phenomenal value for many gardening situations along rivers or ponds or where a hand dug well is available. "Dan is doing a gardening project where water is the main limitation. They dug a 45 foot deep well at 50› a foot, only to find that pumps were outrageously priced, especially now with the United Nations embargo. Then he heard that the Reeves in Gonaive had made a pump from PVC pipe. He bought about 50 feet each of 1-1/4 and 3/4 inch pipe for US $50." Wayne then describes how homemade foot valves were attached to the bottom of each string of pipe and the 3/4 inch string fitted inside the larger one. [Ed: A "string of pipe" refers to a series of pieces of pipe connected to make a long section.] "By pumping the 3/4 inch pipe up and down it pumps water beautifully, at least 5 gallon a minute."
World Vision Australia forwarded a package of brochures for our review (see below to order). The brochures were "developed by our appropriate technologist, Rus Alit, who has traveled extensively introducing the technologies to developing countries." When I saw the size of the brochures I wondered how enough could be included to be useful--each is a single 8-1/2 x 11-inch sheet of paper. But they are clever, to-the-point, and very well illustrated. The brochure on the Rus pump describes how it "has gained wide acceptance in South East Asia and the Pacific because it works well, is cheap and is easy to build." The main components are PVC pipes, a piece of hard wood and a tiny scrap cut from a discarded tire. It can pull water from a well up to 6 meters (18 feet). [The rope and washer pump mentioned above is also made from readily available materials. The model we recently built at ECHO quickly became a hit on our educational tours. It is especially useful for higher volume irrigation where water is pumped a modest height, e.g. up the bank of a stream into the field. It would not work in a narrow tube well.]
Our own appreciation for the Rus pump was heightened when Merrill Esch, who was studying at ECHO in preparation for work in Honduras, built a Rus pump for ECHO from the Australian design. It is unbelievably simple to build. The only part that might be difficult for some would be making the hardwood valve. Merrill even simplified that by using a 2-inch long piece of bamboo. Note that if the inside pipe is extra long, water can be lifted quite a distance. The bottom section of the Rus pump lifts water by suction, perhaps 6 meters (18 feet), then pushes it the rest of the way.
Diagram: Design for the Rus pump, courtesy of World Vision Australia and Rus Alit.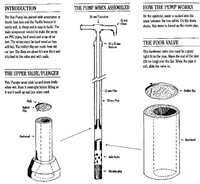
Notes from ECHO's experience with the Rus pump built by Merrill: (1) Selecting a piece of bamboo of the appropriate diameter is easier than making a hollow hardwood cylinder. (2) Rubber flaps made from innertubes are not thick enough. Cut them from tires as the bulletin says. (3) PVC pipe often comes with one end enlarged so that the next piece will fit into it. Merrill found that using this enlarged end for the upper valve made just the right fit inside the larger pipe. He just forced the bamboo into the end and did not need to make any special fittings. Note, however, that we have not used the pump under field conditions.
The complete series of 14 brochures (Rus Pump, Making a Hydraulic Ram, Digging a Tube Well, Making Ferro Cement Water Tanks, Making a Water Filter, Water Sealed Toilet, Stoves, A-Frame, Mud Bricks, and others) is available from to World Vision of Australia for A$10.50 (about US$8) plus about A$5 postage. If you work with any technologies, it is well worth having the whole set. Videos are also available; ask for ordering information. Write Bookstore, World Vision Australia, G.P.O. Box 399C, Melbourne, Vic 3001, AUSTRALIA; phone (03) 287-2233; fax (03) 287-2427. Contact World Vision in your country for more information on the technologies.
THE ROWER PUMP, WEST AFRICAN VERSION. Timothy Volk with the Mennonite Central Committee in Nigeria was prompted by the note on the Rus pump to write about the rower pump that MCC is successfully introducing in Nigeria. "The rower pump is rapidly gaining acceptance here, especially for dry season gardening. The [1994] price for the pump is 500 Naira (US$12.50), compared to 10,000 Nira for a gas powered pump."
The name "rower" comes from its mode of operation. A person sits on a log and "rows" back and forth to pump the water. "It is feasible to pump 60 liters per minute over long periods of time." Water can be lifted up to 6 meters.
The rower pump concept was developed in Bangladesh, where they are today mass-produced and used primarily in irrigation.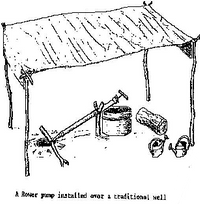 The West African version made design changes to lower its cost and simplify its construction. For example, in the Bengali version the piston and foot valve are made from machined aluminum and injection-molded polyethylene, while the corresponding parts in the West African pump are handmade from PVC plastic.
A detailed and well-written 36-page book, MCC West African Rower Pump, is published by the Africa desk of the MCC. They donated a few copies for ECHO to distribute to interested members of our network. If you want it sent via airmail enclose postage ($2 in the Americas, $4 elsewhere). The rower pump appears to be more difficult to make than the Rus pump, but not too much of a challenge for a mechanically-oriented person. In return for the extra work, the advantage is a higher volume of water and less effort.
HOMEMADE WATER REPELLENT FOR WOOD. Don Bernd wrote to ask what we would recommend to counter molding of "leather, books, accordion, and wood furniture" in extreme humidity in his part of Colombia. The U.S. Forest Service bulletin, "Wood Finishing: Water Repellents and Water-Repellent Preservatives," describes a method for treating wood that is exposed to weathering (but above ground). It is not clear from the publication what effect it would have on indoor wood exposed to extreme humidity, but it is worth a try. They treated experimental wood window sash and frames with the preservative whose formula is detailed below. The window units are in good condition after 20 years' exposure even though all the original paint has weathered away. Untreated painted window units decayed severely and fell off the test fence after only 6 years' exposure.
Extreme caution should be exercised in preparing the water repellent because the organic materials, especially the hot paraffin, are quite flammable. It is best to prepare it outside. Do not use a direct flame or heat near a flame such as the pilot light on a stove. To make one gallon of repellent, melt 1 oz. of paraffin wax in the top unit of a double boiler. Pour this into enough solvent to make a final volume of one gallon, stirring vigorously. The solvent should be at room temperature and can be either turpentine, mineral spirits or paint thinner. After these two are mixed, add 1.5 cups of boiled linseed oil. Exterior-grade varnish can be used in place of boiled linseed oil, but twice the volume (three cups) should be used. The preservative can be applied by brushing or dipping. The wood can be painted after it is dried if desired.
Even more protection can be obtained by including 1.75 cups of pentachlorophenol concentrate 10:1 (40%). The solution is then called a water-repellent preservative. Because this substance is poisonous it should be limited to outside use. Remember that it may be toxic to animals and plants. For (a little) additional information and a good list of product suppliers, request the free publication FPL-0124 from Information Services, U.S. Department of Agriculture, Forest Products Laboratory, Forest Service, 1 Gifford Pinchot Dr., Madison, WI 53705-2398, USA; fax 608/231-9592. (They offer their recent publications on wood utilization research to provide technical information on wood processing, timber economics, tropical woods, wood protection, and related topics.)
PRESERVING WOODEN BEE HIVES. It is possible that the water repellent just described would be especially helpful for treating wood that is to be used in constructing bee hives. But be careful if you add toxic chemicals to turn it into a water-repellent preservative. Professor G.F. Townsend at the University of Guelph in Ontario, Canada wrote the following: "In tropical countries it is necessary to either use wood that is resistant to termites and ants, or to treat the wooden parts of the hive. If you wish to stay away from any of the wood preservatives, the equipment may be dipped in a very hot solution of paraffin wax (about 158øC) for a two-minute period. Sometimes up to 50% rosin or some beeswax may be added to this mixture. This procedure is dangerous unless special equipment is devised for the dipping and heating. The only wood preservative which is relatively non-toxic to bees is copper naphthanate. ...If only paint is used, it should be an oil-base paint containing aluminum."
"WICK" SUGGESTED TO PRESERVE UNTREATED POLES. (Taken from Living Off the Land, April 1982.) Joy Horton in Loja, Ecuador wraps posts and poles to several inches above the expected ground level with burlap or newspaper soaked with a mixture of used motor oil and creosote. The wrapped post is then placed in a hole and more of the mixture poured onto the wick. Further treatments are applied twice yearly to the part of the wick that remains above ground. She does not recommend this method for garden stakes or trellises, as the mixture is toxic to plants. (Each issue of Living Off the Land is a "subtropic newsletter" which features one plant, usually a fruit, including recipes. It is oriented primarily to Florida readers. A one year subscription of 5 issues is $15 overseas airmail from Geraventure Corp., P.O. Box 2131, Melbourne, FL 32902-2131, USA. The editor, Marian Van Atta, also has a number of books available; write for a listing.)
PEDAL-POWERED VEHICLES. Ken Hargesheimer wrote, "There is nothing that costs so little that does so much for a third world family as a bicycle trailer. Mine is a chassis on which various units (e.g. pickup for hauling children, animals, tools or a tanker) can be mounted. It requires no welding. I can send all kinds of information and plans to anyone interested." He  also sent us a list of other designers, makers, etc. of pedal-powered vehicles and equipment, including people in many other US states, Canada, Kenya, and India. The products include a bicycle ambulance, weeder/harvesters, mowers, a grain reaper, and more. In the US send a self-addressed stamped envelope and $1 for copies; overseas send two International Postal Reply Coupons. His address is P.O. Box 1901, Lubbock, TX 79408, USA; phone/fax 806/744-8517.
SAWDUST USED TO FILL OLD TRACTOR TIRES. CERES, the magazine of the Food and Agriculture Organization, reported a method for using old puncture-prone tractor tires in making ox carts (September/October 1984 issue). Farmers would not accept metal wheels and could not afford new tires. Engineers settled on using old tires filled with sawdust. They are not susceptible to puncture and provide almost the same ride as air-filled tires. The cart carries 500 kg.
 SIMPLE SAWDUST COOKERS. Dale Fritz, a volunteer appropriate technologist who came to ECHO after years of experience in Afghanistan, built some simple stoves to heat our greenhouses with sawdust on a few cold nights this winter. They were modeled after "sawdust cookers" which run on dry sawdust, wood shavings, rice hulls, or similar materials, producing a moderate heat for an extended time.
A simple stove can be made from a gallon tin can with the top removed and a 1.5-inch (3.8 cm) hole cut in the middle of the bottom. Insert a metal or PVC pipe or wooden pole vertically in the hole, and add dry sawdust in layers, packing it down firmly before adding more. Fine, highly compressed sawdust burns longer than coarse or loose material. When the can is full, carefully remove the pipe or pole straight out of the sawdust to form a flue. Twist it slowly as you pull to keep from knocking particles loose. Place the can on two bricks which touch on one corner. Air will enter the bottom hole and be drawn up the flue by the flame. Light some paper and put it under the flue to ignite the sawdust. The sawdust will burn from the red-hot central core outward with an almost invisible flame.
Place two metal pieces across the top of the can on which to set the pot, while holding it high enough to maintain a draft for the flame. Dale found that the smoke could be reduced by cutting a 1.5-inch hole in the removed top and replacing it on the stove after packing in the sawdust. To nearly eliminate smoke, cover the outside edges of the top with a small amount of soil or sand. This lid sinks down as the sawdust is consumed.
To make the stove burn longer, increase the stove's diameter. Test stoves at ECHO 6 inches in diameter and 8 inches high (15 and 20 cm) burned for three hours, although toward the end the heat was not intense. A stove 16 inches in diameter and 20 inches high (41 and 51 cm) burned for over 8 hours. To make the stove hotter, use a taller container or join two cans together.
Regulate the rate of burning by opening or closing the base bricks to modify air flow. It is possible to extinguish the stove by cutting off the air flow on the top or bottom and relight the unused sawdust later, although rice hulls continue to smolder and cannot be reused. Other suitable fuels include chaff, coffee bean hulls, straw, or mixes of these materials. With some materials, ash will collapse inward and it may be necessary to gently clean out the bottom vent hole to maintain air flow.
Charlie Forst says that he used these cookers much of his four years in Zaire. "I saw them in use years ago by sawmill cooks in West Virginia. I often cooked breakfast in Zaire using rice hulls or coffee hulls. As long as the material is dry, it can be packed in a few minutes and the fire lit. After breakfast I would put rice or beans on the stove and let it burn out.
"Usually you do not even see smoke, just an almost invisible blue flame. But a gummy black layer does appear on the bottom of your pan. I made my stove about 8 inches (20 cm) diameter and 16 (40 cm) inches high. When visiting in one of the poorer sections of Kinshasa, Zaire, I saw quite a few people using variations on the stove, using waste from casket makers or other carpenters."
It is also possible to construct a similar stove out of bricks, with vertical and horizontal flues. Depending on the pots and other conditions, it may be more fuel-efficient to place the support bars for the pot lower in the stove so the pot can be sunk into the stove, making better use of the heat.
HOW CAN I SIMULATE LONG DAYS TO MAKE PLANTS BLOOM? Many plants respond  to the length of days. For example, most winged beans will bloom only when days are short; most onions will only form bulbs when days are long, etc. In some cases (including the above examples) varieties are available that do not have these day-length restrictions. But what can you do when such varieties are not available?
It turns out that what daylength-sensitive plants are actually measuring is the length of the night. For example, a temperate plant that blooms and produces seed when the days are long is actually responding to the short nights of summer. If you live in the tropics where nights are never as short as they are during the summer in temperate regions, you might still be able to get it to produce seed by interrupting the night with a period of artificial light. The plant will respond as though it had experienced two short nights--or one long day!
For another example, suppose you want to make cuttings of a temperate plant that in its native climate grows all summer (short nights) and blooms in the fall (nights about the same as are found all year in the tropics). There is a good chance it will bloom continually in the tropics, which makes it difficult to make cuttings. You can probably make it stop blooming by artificially shortening the nights.
Alan Ferguson in Bangladesh recently wrote us for information on how much darkness or light has to be provided to induce flowering, and how this could be measured without equipment. I passed the letter on to Carl Scharfenberg, a member of ECHO's Board of Directors. Carl is also vice-president for research at Yoder Brothers Nursery, one of the largest commercial nurseries in the States. They make frequent use of techniques for altering day lengths in their business, both artificial darkness when they need long nights and lighting when they need shorter nights.
Carl said the norm is to use 10 foot candles of light for the four hours between 10 P.M. and 2 A.M. A good rule of thumb is that if you divide the total watts of your lights by the area covered you should have 1 watt per square foot. If you use florescent lighting instead of incandescent, the number should be 0.6 watts per square foot.
Here is a neat trick they use to reduce the amount of electricity (which could be even more important if you must generate your own). They have found that they can divide the area into two parts. The lights in one area are left on for 5 minutes, then they are shut off and lights in the other area are left on 5 minutes. This is repeated 5 minutes on and 5 minutes off in each area for the four hours. This works just as well as four continuous hours of illumination, but uses half the electricity.
What about the opposite need: darkness to make longer nights for short day plants? This requires "nights" with less than 1 foot candle of illumination for about 13 hours. Carl uses a rule of thumb that it must be so dark that you cannot read a newspaper. A black polyethylene plastic cover works well.
CASSETTE PLAYER AND RADIO NEED NO BATTERIES. A few of you are in places where batteries are hard to come by and short-lived. We purchased a new cassette-tape player with a built-in generator and crank. By turning the crank at a rather moderate rate, the cassette operates just as though it had batteries. It plays at a uniform rate even if the cranking rate is irregular. It has a fast forward, rewind, and volume control, but does not record. It also runs on 4 flashlight batteries, 110 volts, 220 volts and either 6 or 12 volt car batteries. You must provide the adaptor for use in a car. They are available only to persons in the third world for use in their Christian work. Language Recordings International sells "The Messenger" for US$27 plus postage; contact them at P.O. Box 40181, Pasadena, CA 91114, USA; phone 213/250-0207.
Spore (Feb. 1996) featured the wind-up radio "Freeplay," with 20 seconds of winding producing 40 minutes of listening time. The radio will play for 7,000-20,000 hours. It can be used anywhere to receive VHF-FM, MW- AM, and Short Wave frequencies. Cost: US$35-45 plus shipping. Write Baygen Agency, 6 White Horse Dr., Epsom, Surrey KT18 7LY, UK.
SERRATED HAND HOE. I-Tech (P.O. Box 413, Veneta, OR 97487, USA) is an organization specializing in appropriate technologies. Public disclosures are made of all innovations so that they are in the public domain. They have developed plans for many improved labor-saving devices, including rice and wheat hullers, weeding spades from masonry trowels, a bean thresher using a manual lawn mower, and more. The serrated hand hoe is a useful tool: note the metal blade hand hoe with grooves.
 The hoe normally uses a straight edge to cut plant roots and stems. This can be improved by grinding slanted grooves or notches on its cutting edge. The grooves give a serrated edge to the hoe and keep the plant from sliding out of the cutting edge as it is being cut. Grooves are slanted at a slight angle, those on the right side slanting one direction and those on the left in the other.
It also requires less force to hoe with a serrated edge, for two reasons. First, the serrated edge has less surface area for initial contact with the plant. The result is that the entire momentum of the swinging hoe is transferred to a smaller area of the plant, giving a deeper cut. Second, the grooves also tear as well as cut. The tearing action is enhanced by slanting the grooves.
The modification can be done with a hand-held electric grinder in a few minutes. Grooves are approximately 0.8 mm (1/32 inch) deep by 16 mm (5/8 inch) long, spaced 13 mm (1/2 inch) apart. They are ground on the flat side of the hoe that faces the worker. Grooves ground on the flat side of the hoe will not wear out as quickly as those ground on the beveled side facing the earth, away from the worker. Grooves are also retained when the blade is sharpened on the beveled side. As the hoe wears, the sharp edges of the grooves are exposed.