ISBN 0-86619-066-X
VITA 1600 Wilson Boulevard, Suite 500 Arlington, Virginia 22209 USA Tel: 703/276-1800 * Fax: 703/243-1865 Internet: pr-info@vita.org
[C] 1980 Volunteers in Technical Assistance
I. WHAT IT IS AND WHAT IT IS USED FOR
II. DECISION FACTORS
- Advantages Considerations Cost Estimate
- Planning
III. MAKING THE DECISION AND FOLLOWING THROUGH
IV. PRE-CONSTRUCTION CONSIDERATIONS
- Site Selection
- Expense Alternating or Direct Current Applications Materials
- Tools
V. CONSTRUCTION
- Prepare the End Pieces Construct the Buckets
- Assemble the Turbine
- Make the Turbine Nozzle
- Turbine Housing
VI. MAINTENANCE
VII. ELECTRICAL GENERATION
- Generators/Alternators Batteries
VIII. DICTIONARY OF TERMS
IX. FURTHER INFORMATION RESOURCES
X. CONVERSION TABLES
APPENDIX I. SITE ANALYSIS
APPENDIX II. SMALL DAM CONSTRUCTION
APPENDIX III. DECISION MAKING WORKSHEET
APPENDIX IV. RECORD KEEPING WORKSHEET
I. WHAT IT IS AND HOW IT IS USEFUL
The Michell or Banki turbine is a relatively easy to build and highly efficient means of harnessing a small stream to provide enough power to generate electricity or drive different types of mechanical devices.
<FIGURE 1>
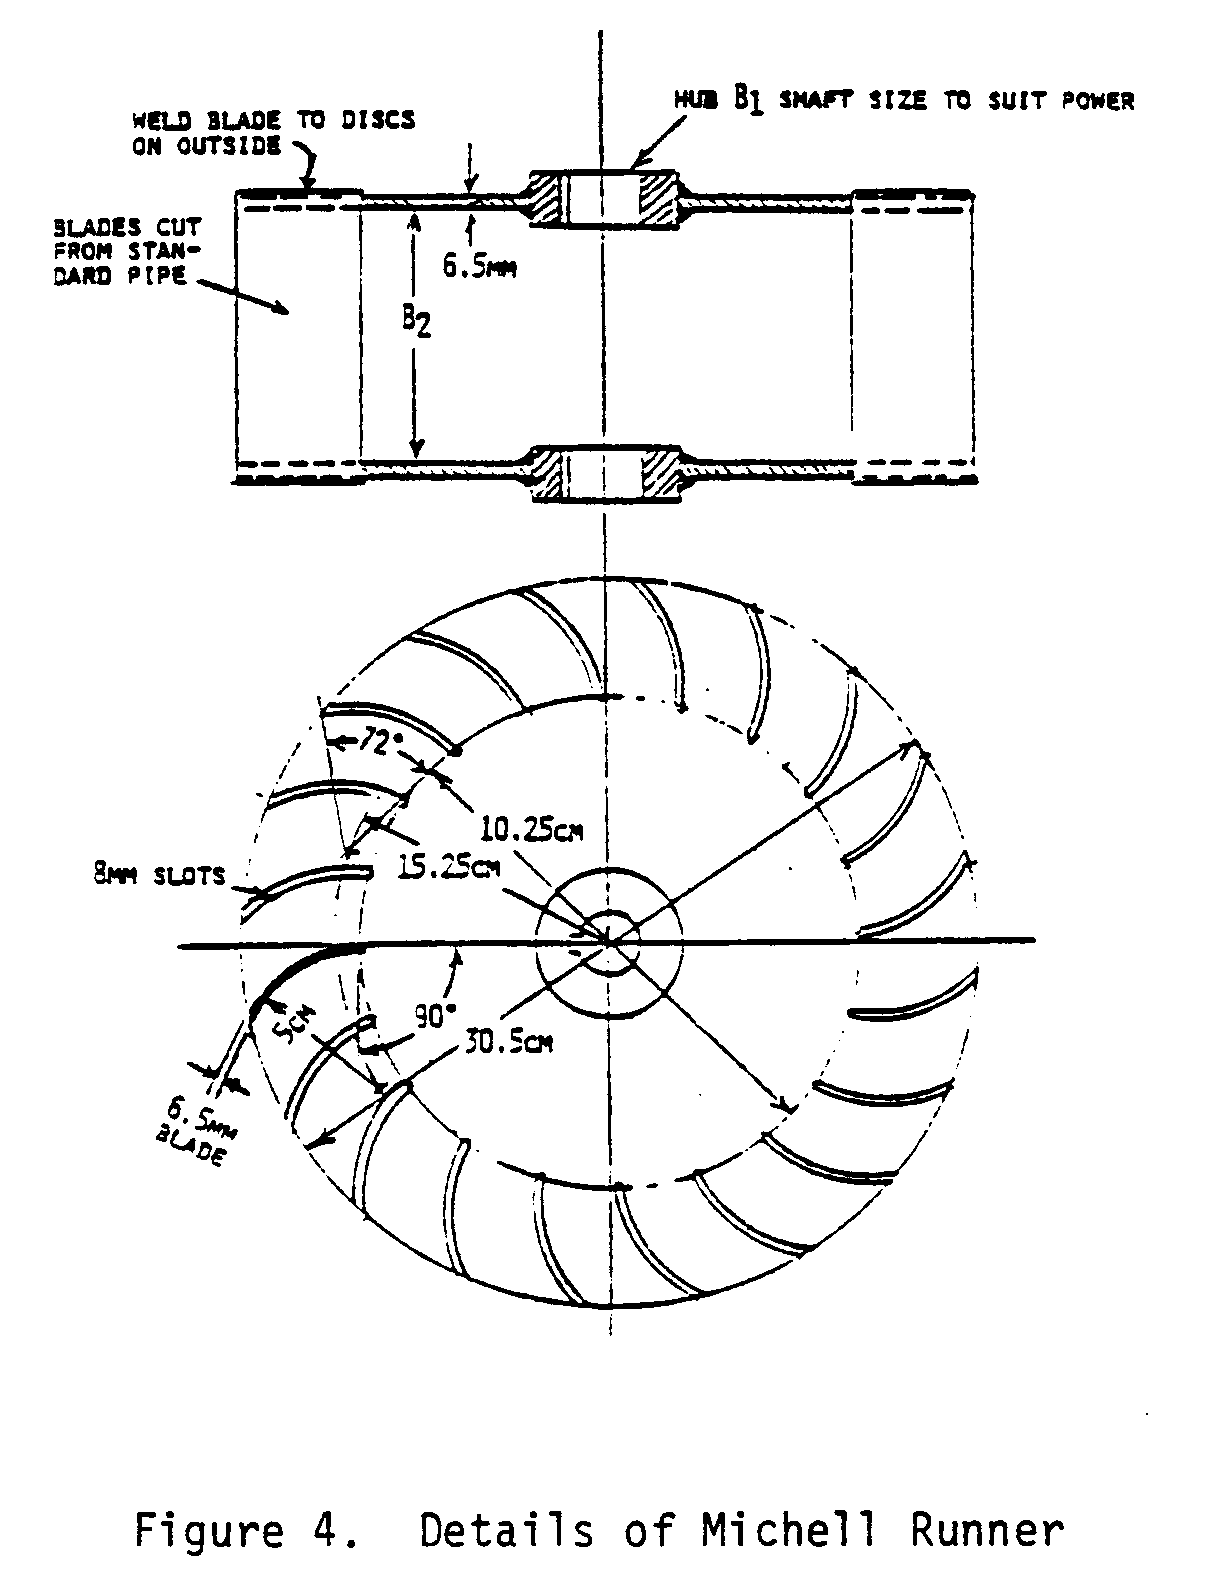
The turbine consists of two main parts--the runner, or wheel, and the nozzle. Curved horizontal blades are fixed between the circular end plates of the runner (see page 17). Water passes from the nozzle through the runner twice in a narrow jet before it is discharged.
Once the flow and head of the water site have been calculated, the blades of the 30cm diameter wheel presented here can be lengthened as necessary to obtain optimum power output from the available water source.
The efficiency of the Michell turbine is 80 percent or greater. This, along with its adaptability to a variety of water sites and power needs, and its simplicity and low cost, make it very suitable for small power development. The turbine itself provides power for direct current (DC); a governing device is necessary to provide alternating current (AC).
II. DECISION FACTORS
Applications: * Electric generation (AC or DC) * Machinery operations, such as threshers, winnower, water pumping, etc.
Advantages: * Very efficient and simple to build and operate. * Virtually no maintenance. * Can operate over a range of water flow and head conditions.
Considerations: * Requires a certain amount of skill in working with metal. * Special governing device is needed for AC electric generation. * Welding equipment with cutting attachments are needed. * Electric grinding machine is needed. Access to small machine shop is necessary.
COST ESTIMATE
$150 to $600 (US, 1979) including materials and labor. (This is for the turbine only. Planning and construction costs of dam, penstock, etc., must be added.)
Cost estimates serve only as a guide and will vary from country to country.
PLANNING
Development of small water power sites currently comprises one of the most promising applications of alternate energy technologies. If water power will be used to produce only mechanical energy--for example, for powering a grain thresher--it may be easier and less expensive to construct a waterwheel or a windmill. However, if electrical generation is needed, the Michell turbine, despite relatively high initial costs, may be feasible and indeed economical under one or more of the following conditions:
* Access to transmission lines or to reliable fossil fuel sources is limited or non-existent.
* Cost of fossil and other fuels is high.
* Available water supply is constant and reliable, with a head of 50-100m relatively easy to achieve.
* Need exists for only a small dam built into a river or stream and for a relatively short (less than 35m) penstock (channel) for conducting water to the turbine.
If one or more of the above seems to be the case, it is a good idea to look further into the potential of a Michell turbine. The final decision will require consideration of a combination of factors, including site potential, expense, and purpose.
III. MAKING THE DECISION AND FOLLOWING THROUGH
When determining whether a project is worth the time, effort, and expense involved, consider social, cultural, and environmental factors as well as economic ones. What is the purpose of the effort? Who will benefit most? What will the consequences be if the effort is successful? And if it fails?
Having made an informed technology choice, it is important to keep good records. It is helpful from the beginning to keep data on needs, site selection, resource availability, construction progress, labor and materials costs, test findings, etc. The information may prove an important reference if existing plans and methods need to be altered. It can be helpful in pinpointing "what went wrong?" And, of course, it is important to share data with other people.
The technologies presented in this and the other manuals in the energy series have been tested carefully and are actually used in many parts of the world. However, extensive and controlled field tests have not been conducted for many of them, even some of the most common ones. Even though we know that these technologies work well in some situations, it is important to gather specific information on why they perform properly in one place and not in another.
Well documented models of field activities provide important information for the development worker. It is obviously important for a development worker in Colombia to have the technical design for a machine built and used in Senegal. But it is even more important to have a full narrative about the machine that provides details on materials, labor, design changes, and so forth. This model can provide a useful frame of reference.
A reliable bank of such field information is now growing. It exists to help spread the word about these and other technologies, lessening the dependence of the developing world on expensive and finite energy resources.
A practical record keeping format can be found in Appendix IV.
IV. PRE-CONSTRUCTION CONSIDERATIONS
Both main parts of the Michell turbine are made of plate steel and require some machining. Ordinary steel pipe is cut to form the blades or buckets of the runner. Access to welding equipment and a small machine shop is necessary.
The design of the turbine avoids the need for a complicated and well-sealed housing. The bearings have no contact with the water flow, as they are located outside of the housing; they can simply be lubricated and don't need to be sealed.
Figure 2 shows an arrangement of a turbine of this type for
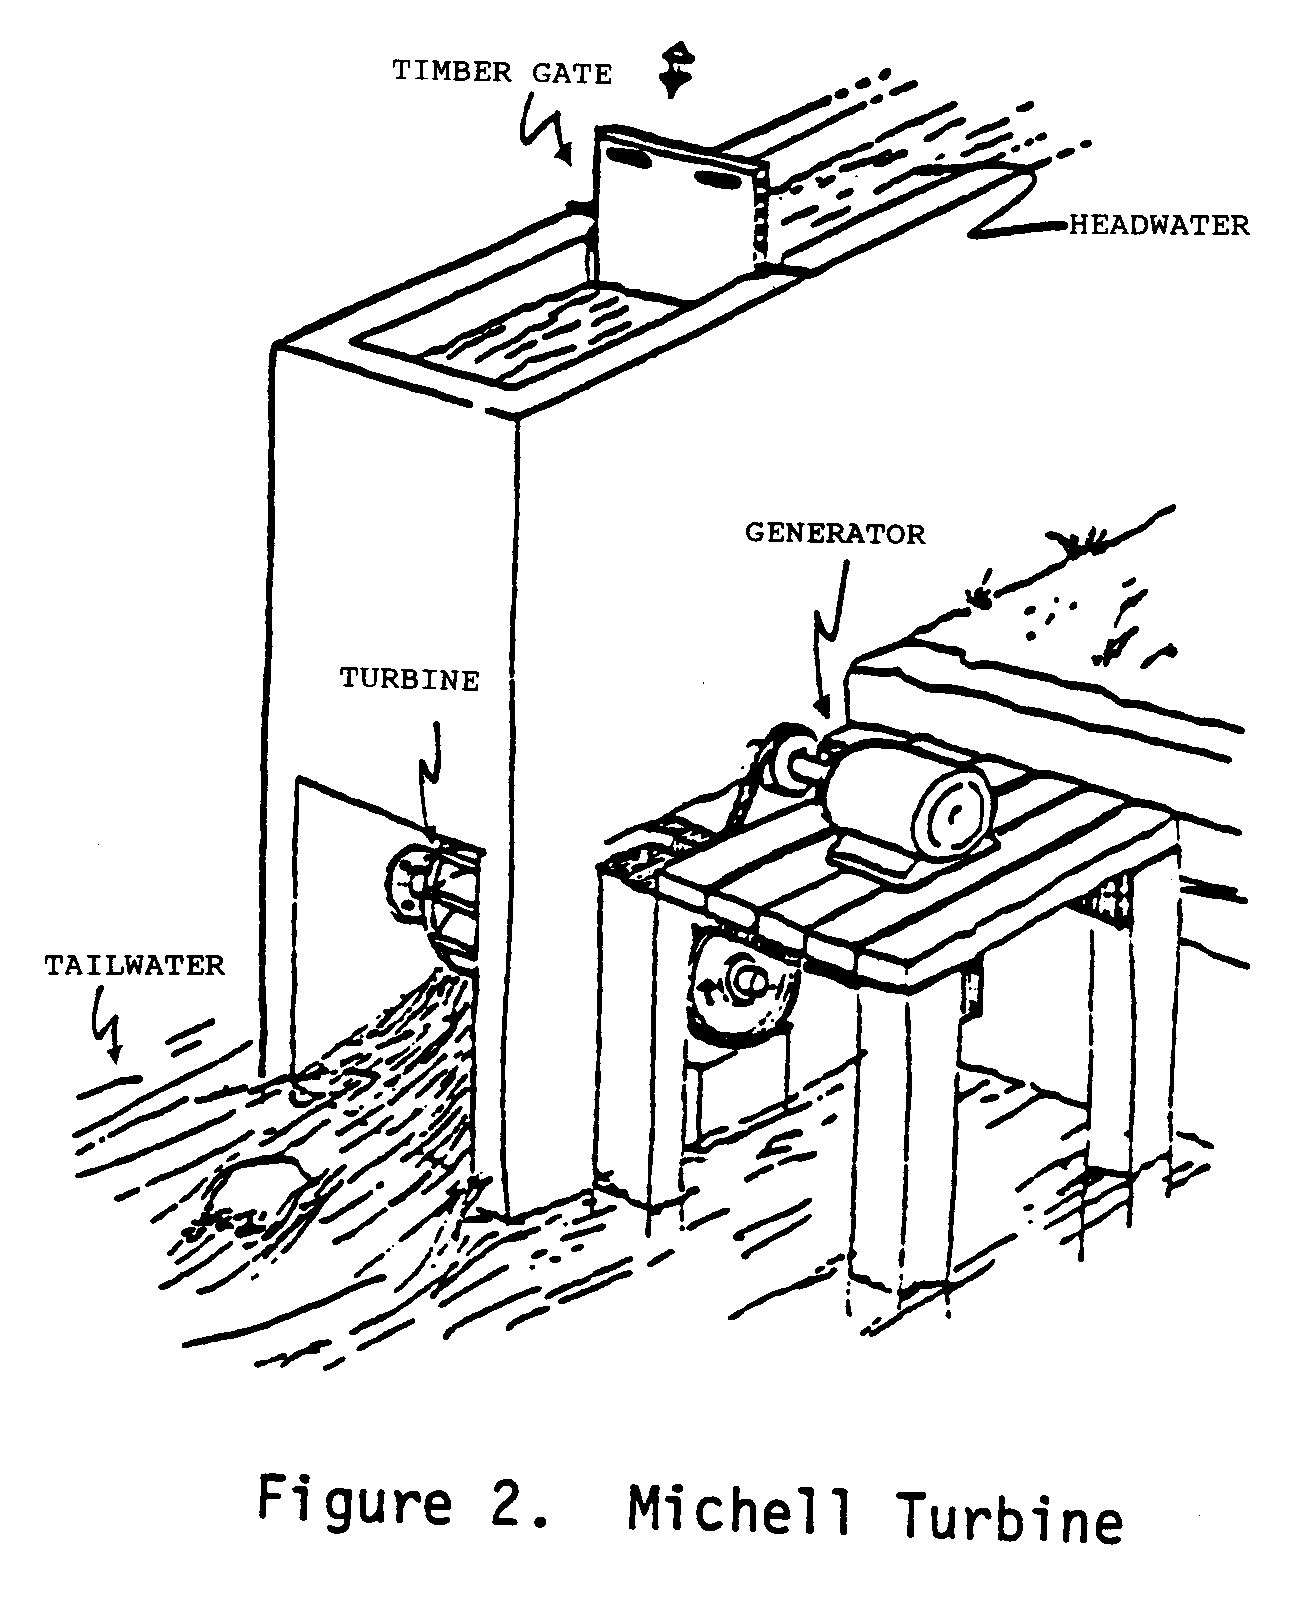
low-head use without control. This installation will drive an AC or DC generator with a belt drive.
SITE SELECTION
This is a very important factor. The amount of power obtained, the expense of installation, and even, by extension, the applications for which the power can be used may be determined by the quality of the site.
The first site consideration is ownership. Installation of an electricity-generating unit--for example, one that needs a dam and reservoir in addition to the site for the housing--can require access to large amounts of land.
In many developing countries, large lots of land are few and it is likely that more than one owner will have to be consulted. If ownership is not already clearly held, the property questions must be investigated, including any rights which may belong to those whose property borders on the water. Damming, for example, can change the natural water flow and/or water usage patterns in the area and is a step to be taken only after careful consideration.
If ownership is clear, or not a problem, a careful analysis of the site is necessary in order to determine: 1) the feasibility of the site for use of any kind, and 2) the amount of power obtainable from the site.
Site analysis consists of collecting the following basic data:
* Minimum flow.
* Maximum flow.
* Available head (the height a body of water falls before hitting the machine).
* Pipe line length (length of penstock required to give desired head).
* Water condition (clear, muddy, sandy, acid, etc.). * Site sketch (with evaluations, or topographical map with site sketched in).
* Soil condition (the size of the ditch and the condition of the soil combine to affect the speed at which the water moves through the channel and, therefore, the amount of power available).
* Minimum tailwater (determines the turbine setting and type).
Appendix I contains more detailed information and the instructions needed to complete the site analysis including directions for measuring head, water flow, and head losses. These directions are simple enough to be carried out in field conditions without a great deal of complex equipment.
Once such information is collected, the power potential can be determined. Some power, expressed in terms of horsepower or kilowatts (one horsepower equals 0.7455 kilowatts), will be lost because of turbine and generator inefficiencies and when it is transmitted from the generator to the place of application.
For a small water power installation of the type considered here, it is safe to assume that the net power (power actually delivered) will be only half of the potential gross power.
Gross power, or power available directly from the water, is determined by the following formula:
Gross Power
Gross power (English units: horsepower) =
Minimum Water Flow (cubic feet/second) X Gross Head (feet) 8.8
Gross power (metric horsepower) =
1,000 Flow (cubic meters/second) X Head (meters) 75
Net Power (available at the turbine shaft) Net Power (English units) =
Minimum Water Flow X Net Head(*) X Turbine Efficiency 8.8 Net Power (metric units) =
Minimum Water Flow X Net Head(*) X Turbine Efficiency 75/1,000
Some sites lend themselves naturally to the production of electrical or mechanical power. Other sites can be used if work is done to make them suitable. For example, a dam can be built to direct water into a channel intake or to get a higher head than the stream provides naturally. (A dam may not be required if there is sufficient head or if there is enough water to cover the intake of a pipe or channel leading to the penstock.) Dams may be of earth, wood, concrete, or stone. Appendix II provides some information on construction of small dams.
EXPENSE
Flowing water tends to generate automatically a picture of "free" power in the eyes of the observer. But there is always a
*Net head is obtained by deducting energy losses from the gross head (see page 57). A good assumption for turbine efficiency when calculating losses is 80 percent. cost to producing power from water sources. Before proceeding, the cost of developing low-output water power sites should be checked against the costs of other possible alternatives, such as:
* Electric utility--In areas where transmission lines can furnish unlimited amounts of reasonably priced electric current, it is often uneconomical to develop small or medium-sized sites. However, in view of the increasing cost of utility supplied electricity, hydroelectric power is becoming more cost-effective.
* Generators--Diesel engines and internal-combustion engines are available in a wide variety of sizes and use a variety of fuels--for example, oil, gasoline, or wood. In general, the capital expenditure for this type of power plant is low compared to a hydroelectric plant. Operating costs, on the other hand, are very low for hydroelectric and high for fossil fuel generated power.
* Solar--Extensive work has been done on the utilization of solar energy for such things as water pumping. Equipment now available may be less costly than water power development in regions with long hours of intense sunshine.
If it seems to make sense to pursue development of the small water power site, it is necessary to calculate in detail whether the site will indeed yield enough power for the specific purposes planned.
Some sites will require investing a great deal more money than others. Construction of dams and penstocks can be very expensive, depending upon the size and type of dam and the length of the channel required. Add to these construction expenses, the cost of the electric equipment--generators, transformers, transmission lines--and related costs for operation and maintenance and the cost can be substantial.
Any discussion of site or cost, however, must be done in light of the purpose for which the power is desired. It may be possible to justify the expense for one purpose but not for another.
ALTERNATING OR DIRECT CURRENT
A turbine can produce both alternating (AC) and direct current (DC). Both types of current cannot always be used for the same purposes and one requires installation of more expensive equipment than the other.
Several factors must be considered in deciding whether to install an alternating or direct current power unit.
The demand for power will probably vary from time to time during the day. With a constant flow of water into the turbine, the power output will thus sometimes exceed the demand.
In producing AC, either the flow of water or the voltage must be regulated because AC cannot be stored. Either type of regulation requires additional equipment which can add substantially to the cost of the installation.
The flow of water to a DC-producing turbine, however, does not have to be regulated. Excess power can be stored in storage batteries. Direct current generators and storage batteries are relatively low in cost because they are mass-produced.
Direct current is just as good as AC for producing electric light and heat. But electrical equipment having AC motors, such as farm machinery and household appliances, have to be changed to DC motors. The cost of converting appliances must be weighed against the cost of flow regulation needed for producing AC.
APPLICATIONS
While a 30.5cm diameter wheel has been chosen for this manual because this size is easy to fabricate and weld, the Michell turbine has a wide range of application for all water power sites providing head and flow are suitable. The amount of water to be run through the turbine determines the width of the nozzle and the width of the wheel. These widths may vary from 5cm to 36cm. No other turbine is adaptable to as large a range of water flow (see Table 1).
Impulse or Pelton Michell or Banki Centrifugal Pump Used as Turbine Head Range (feet ) 50 to 1000 3 to 650 Flow Range (cubic) feet per second 0.1 to 10 0.5 to 250 Application high head medium head Available for any desired condition Power (horsepower) 1 to 500 1 to 1000 Cost per Kilowatt low low low
Manufacturers James Leffel & Co. Omberger-Turbinenfabrik Any reputable dealer Springfield, Ohio 8832 Warenburg or manufacturer. 45501 USA Bayern, Germany
Dress & Co. Can be do-it-yourself Warl. Germany project if small weld and Offices Bubler machine shops are Taverne, Switzerland available.
Table 1. Small Hydraulic Turbines
The size of the turbine depends on the amount of power required, whether electrical or mechanical. Many factors must be considered to determine what size turbine is necessary to do the job. The following example illustrates the decision-making process for the use of a turbine to drive a peanut huller (see Figure 3). Steps will

be similar in electrical power applications.
* Power enough to replace the motor for a 2-1/2 hp 1800 revolutions per minute (rpm) peanut thresher.
* Gross power needed is about 5 hp (roughly twice the horsepower of the motor to be replaced assuming that the losses are about one-half of the total power available).
* Village stream can be dammed up and the water channeled through a ditch 30m (100 ft) long.
* Total difference in elevation is 7.5m (25 ft).
* Available minimum flow rate: 2.8 cu ft/sec.
* Soil of ditch permits a water velocity of 2.4 ft/sec (Appendix I, Table 2 gives n = 0.030).
* Area of flow in ditch = 2.8/2.4 - 1.2 sq ft.
* Bottom width = 1.2 ft.
Hydraulic radius = 0.31 x 1.2 = 0.37 ft (see Appendix I).
Calculate results of fall and head loss. Shown on nomograph (Appendix I) as a 1.7 foot loss for every 1,000 feet. Therefore the total loss for a 30m (100 ft) ditch is:
1.7 10 = 0.17 feet
Since 0.17 ft is a negligible loss, calculate head at 25 ft.
Power produced by turbine at 80% efficiency = 6.36 hp
Net power = Minimum water flow x net head x turbine efficiency 8.8
2.8 x 25 x 0.80 8.8 = 6.36 horsepower
Formulas for principal Michell turbine dimensions:
([B.sub.1]) = width of nozzle = 210 x flow - Runner outside diameter x [square root] head
= 210 x 2.8 = 9.8 inches --------- 12 x [square root] 25
([B.sub.2]) = width of runner between discs - ([B.sub.1]) = 1/2 to 1 inch = 9.8 + 1 inch = 10.8 inches
Rotational speed (revolutions per minute)
= 73.1 x [square root] head
Runner outside diameter (ft) 73.1 x [square root] 25 = 365.6 rpm 1
The horsepower generated is more than enough for the peanut huller but the rpm is not high enough.
Many peanut threshers will operate at varying speeds with proportional yield of hulled peanuts. So for a huller which gives maximum output at 2-1/2 hp and 1800 rpm, a pulley arrangement will be needed for stepping up speed. In this example, the pulley ratio needed to step up speed is 1800 .365 or approximately 5:1. Therefore a 15" pulley attached to the turbine shaft, driving a 3" pulley on a generator shaft, will give [+ or -] 1800 rpm.
MATERIALS
Although materials used in construction can be purchased new, many of these materials can be found at junk yards.
Materials for 30.5cm diameter Michell turbine:
* Steel plate 6.5mm X 50cm X 100cm
* Steel plate 6.5mm thick (quantity of material depends on nozzle width)
* 10cm ID water pipe for turbine buckets(*) * Chicken wire (1.5cm X 1.5cm weave) or 25mm dia steel rods
* 4 hub flanges for attaching end pieces to steel shaft (found on most car axles)
* 4.5cm dia solid steel rod
* two 4.5cm dia pillow or bush bearings for high speed use. (It is possible to fabricate wooden bearings. Because of the high speed, such bearings would not last and are not recommended.)
* eight nuts and bolts, appropriate size for hub flanges
TOOLS
* Welding equipment with cutting attachments * Metal file * Electric or manual grinder * Drill and metal bits * Compass and Protractor * T-square (template included in the back of this manual) * Hammer * C-clamps * Work bench
(*) Measurements for length of the pipe depend on water site conditions. V. CONSTRUCTION
PREPARE THE END PIECES
An actual size template for a 30.5cm turbine is provided at the end of this manual. Two of the bucket slots are shaded to show how the buckets are installed.
Figure 4 shows the details of a Michell runner.
* Cut out the half circle from the template and mount it on cardboard or heavy paper.
* Trace around the half circle on the steel plate as shown in Figure 5.

* Turn the template over and trace again to complete a full circle (see Figure 6.

- Draw the bucket slots on the template with a clockwise slant as shown in Figure 7.
* Cut out the bucket slots on the template so that there are 10 spaces.
* Place the template on the steel plate and trace in the bucket slots.
* Repeat the tracing process as before to fill in the area for the shaft (see Figure 8).

* Drill a 2mm hole in the steel plate in the center of the wheel where the cross is formed. The hole will serve as a guide for cutting the metal plate.
<FIGURE 9>
* Take a piece of scrap metal 20cm long x 5cm wide. Drill a hole the width of the opening in the torch near one end of the metal strip.
* Drill a 2mm dia hole at the other end at a point equal to the radius of the wheel (15.25cm). Measure carefully.
* Line up the 2mm hole in the scrap metal with the 2mm hole in the metal plate and attach with a nail as shown in Figure 10.
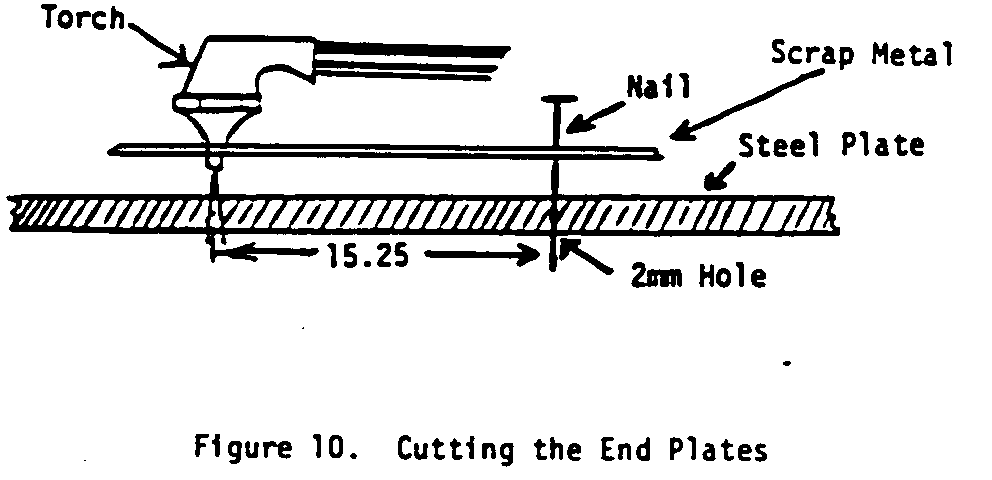
* Cut both end plates as shown (in Figure 10) using the torch.
* Cut the bucket slots with the torch or a metal saw.
* Cut out a 4.5cm dia circle from the center of both wheels. This prepares them for the axle.
CONSTRUCT THE BUCKETS
Calculate the length of buckets using the following formula:
Width of Buckets = 210 x Flow (cu/ft/sec) + (1 .5in) Between End Plates Outside Diameter of Turbine (in) x [square root] Head (ft)
* Once the bucket length has been determined, cut the 10cm dia pipe to the required lengths.
* When cutting pipe lengthwise with a torch, use a piece of angle iron to serve as a guide, as shown in Figure 11.
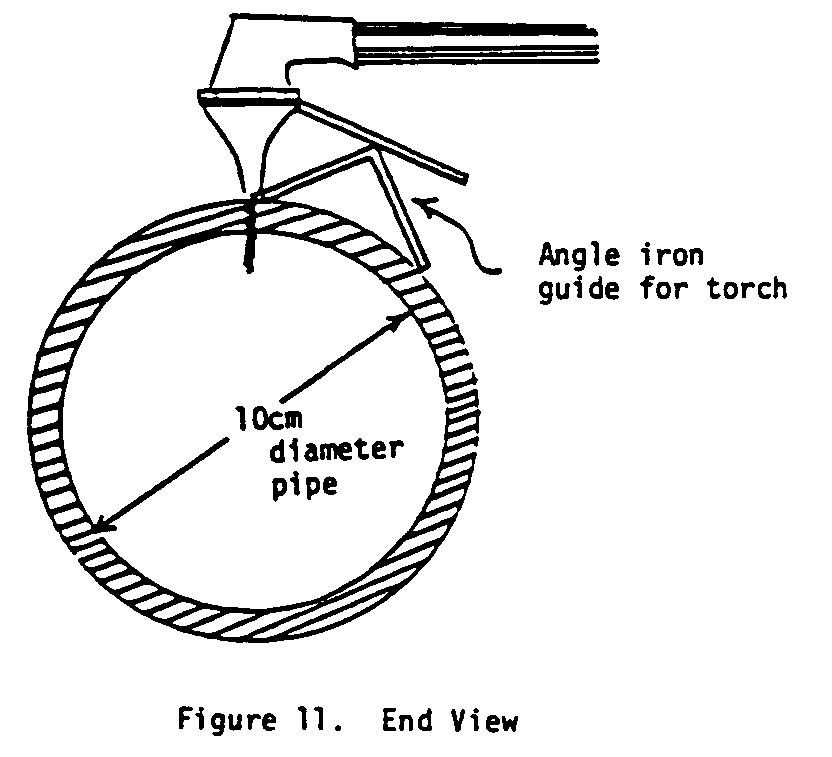
(Bucket measurements given in the template in the back of this manual will serve as a guide.)
* Pipe may also be cut using an electric circular saw with a metal cutting blade.
* Cut four buckets from each section of pipe. A fifth piece of pipe will be left over but it will not be the correct width or angle for use as a bucket (see Figure 12).

* File each of the buckets to measure 63mm wide. (NOTE: Cutting with a torch may warp the buckets. Use a hammer to straighten out any warps.)
ASSEMBLE THE TURBINE
- Cut a shaft from 4.5cm dia steel rod. The total length of the shaft should be 60cm plus the width of the turbine.
* Place the metal hubs on the center of each end piece, matching the hole of the hub with the hole of the end piece.
* Drill four 20mm holes through the hub and end piece.
* Attach a hub to each end piece using 20mm dia x 3cm long bolts and nuts.
* Slide shaft through the hubs and space the end pieces to fit the buckets.
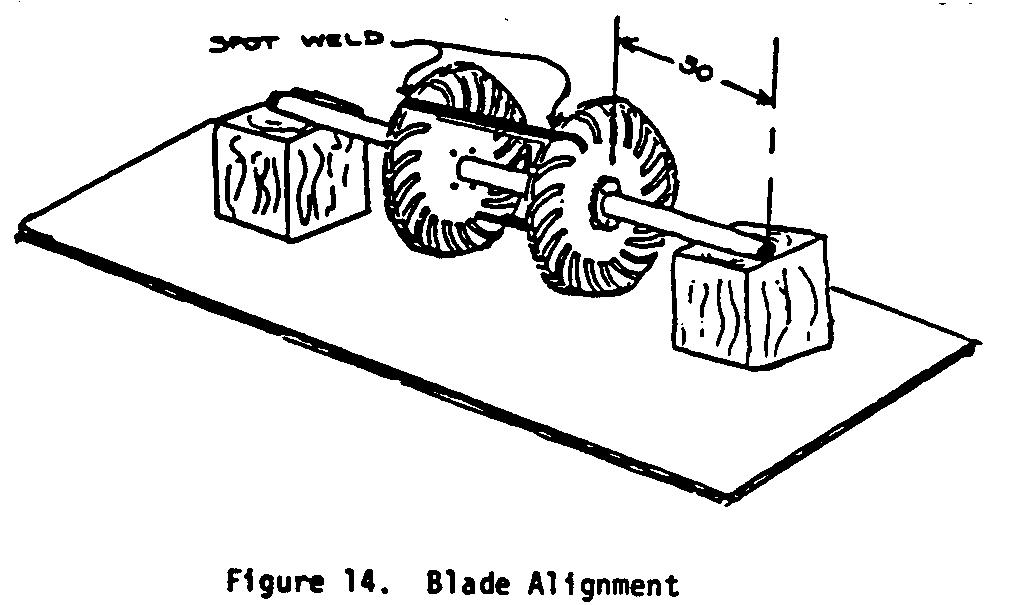
<FIGURE 13>
* Make certain the distance from each end piece to the end of the shaft is 30cm.
* Insert a bucket and align the end pieces so that the blade runs perfectly parallel with the center shaft.
* Spot weld the bucket in place from the outside of the end piece (see Figure 14).
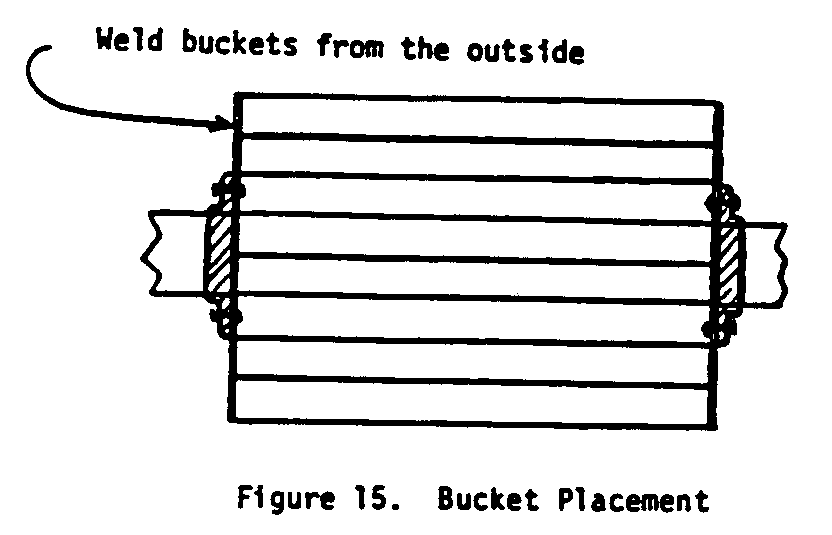
* Turn the turbine on the shaft half a revolution and insert another bucket making sure it is aligned with the center shaft.
* Spot weld the second bucket to the end pieces. Once these buckets are placed, it is easier to make sure that all the buckets will be aligned parallel to the center shaft.
* Weld the hubs to the shaft (check measurements).
* Weld the remaining buckets to the end pieces (see Figure 15).
* Mount the turbine on its bearings. Clamp each bearing to the workbench so that the whole thing can be slowly rotated as in a lathe. The cutting tool is an electric or small portable hand grinder mounted on a rail and allowed to slide along a second rail, or guide (see Figure 16). The slide rail should

be carefully clamped so that it is exactly parallel to the turbine shaft.
* Grind away any uneven edges or joints. Rotate the turbine slowly so that the high part of each blade comes into contact with the grinder. Low parts will not quite touch. This process takes several hours and must be done carefully. * Make sure the bucket blades are ground so that the edges are flush with the outside of the end pieces.
* Balance the turbine so it will turn evenly (see Figure 17).
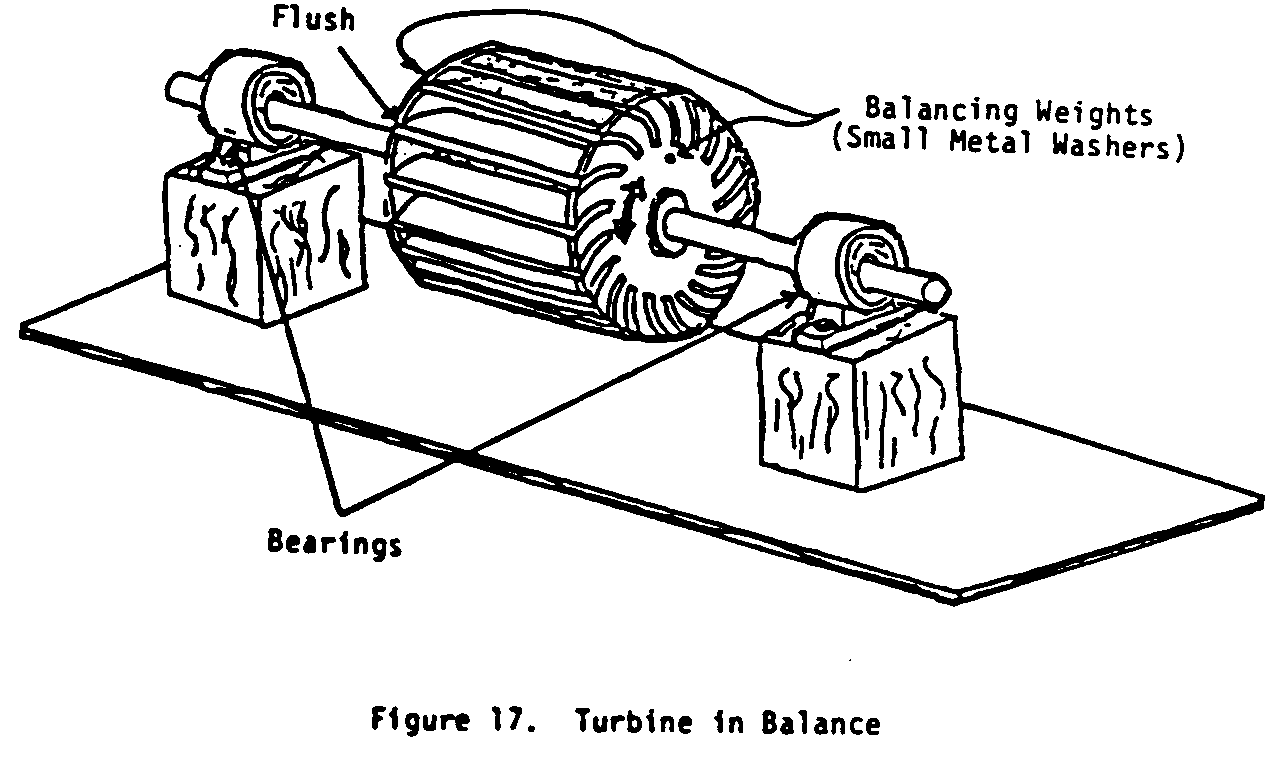
It may be necessary to weld a couple of small metal washers on the top of either end of the turbine. The turbine is balanced when it can be rotated in any position without rolling.
MAKE THE TURBINE NOZZLE
* Determine nozzle size by using the following formula:
210 X flow (cubic feet/second ------------------------------------------------------ runner outside diameter (in) x [square root] head (ft)
The nozzle should be 1.5cm to 3cm less than the inside width of the turbine.
Figure 18 shows a front view of a properly positioned nozzle in

relationship to the turbine.
- From a 6.5mm steel plate, cut side sections and flat front and back sections of the nozzle. Width of front and back pieces will be equal to the width of the turbine wheel minus 1.5 to 3cm. Determine other dimensions from the full-scale diagram in Figure 19.
* Cut curved sections of the nozzle from 15cm (OD) steel pipe if available. Make sure that the pipe is first cut to the correct width of the nozzle as calculated previously. (Bend steel plate to the necessary curvature if 15cm pipe is unavailable. The process will take some time and ingenuity on the part of the builder. One way of bending steel plate is to sledge hammer the plate around a steel cylinder or hardwood log 15cm in diameter. This may be the only way to construct the nozzle if 15cm steel pipe is unavailable.)
* Weld all sections together. Follow assembly instructions given in "Turbine Housing" on page 29.
The diagram in Figure 19 provides minimum dimensions for proper turbine installation. TURBINE HOUSING
Build the structure to house the turbine and nozzle of concrete, wood, or steel plate. Figure 20 shows a side view and

front view of a typical installation for low head use (1-3m). Be sure housing allows for easy access to the turbine for repair and maintenance.
* Attach the nozzle to the housing first and then orient the turbine to the nozzle according to the dimensions given in the diagram in Figure 19. This should ensure correct turbine placement. Mark the housing for the placement of the water seals.
* Make water seals. In 6.5mm steel plate, drill a hole slightly larger than the shaft diameter (about 4.53cm). Make one for each side. Weld or bolt to the inside of the turbine housing. The shaft must pass through the seals without touching them. Some water will still come through the housing but not enough to interfere with efficiency.
* Make the foundation to which the bearings will be attached of hardwood pilings or concrete.
* Move the turbine, with bearings attached, to the proper nozzle/turbine placement and attach the bearings to the foundation with bolts. The bearings will be on the outside of the turbine housing (see Figure 21). (Note: The drive pulley is

omitted from the Figure for clarity.)
Figure 22 shows a possible turbine installation for high head
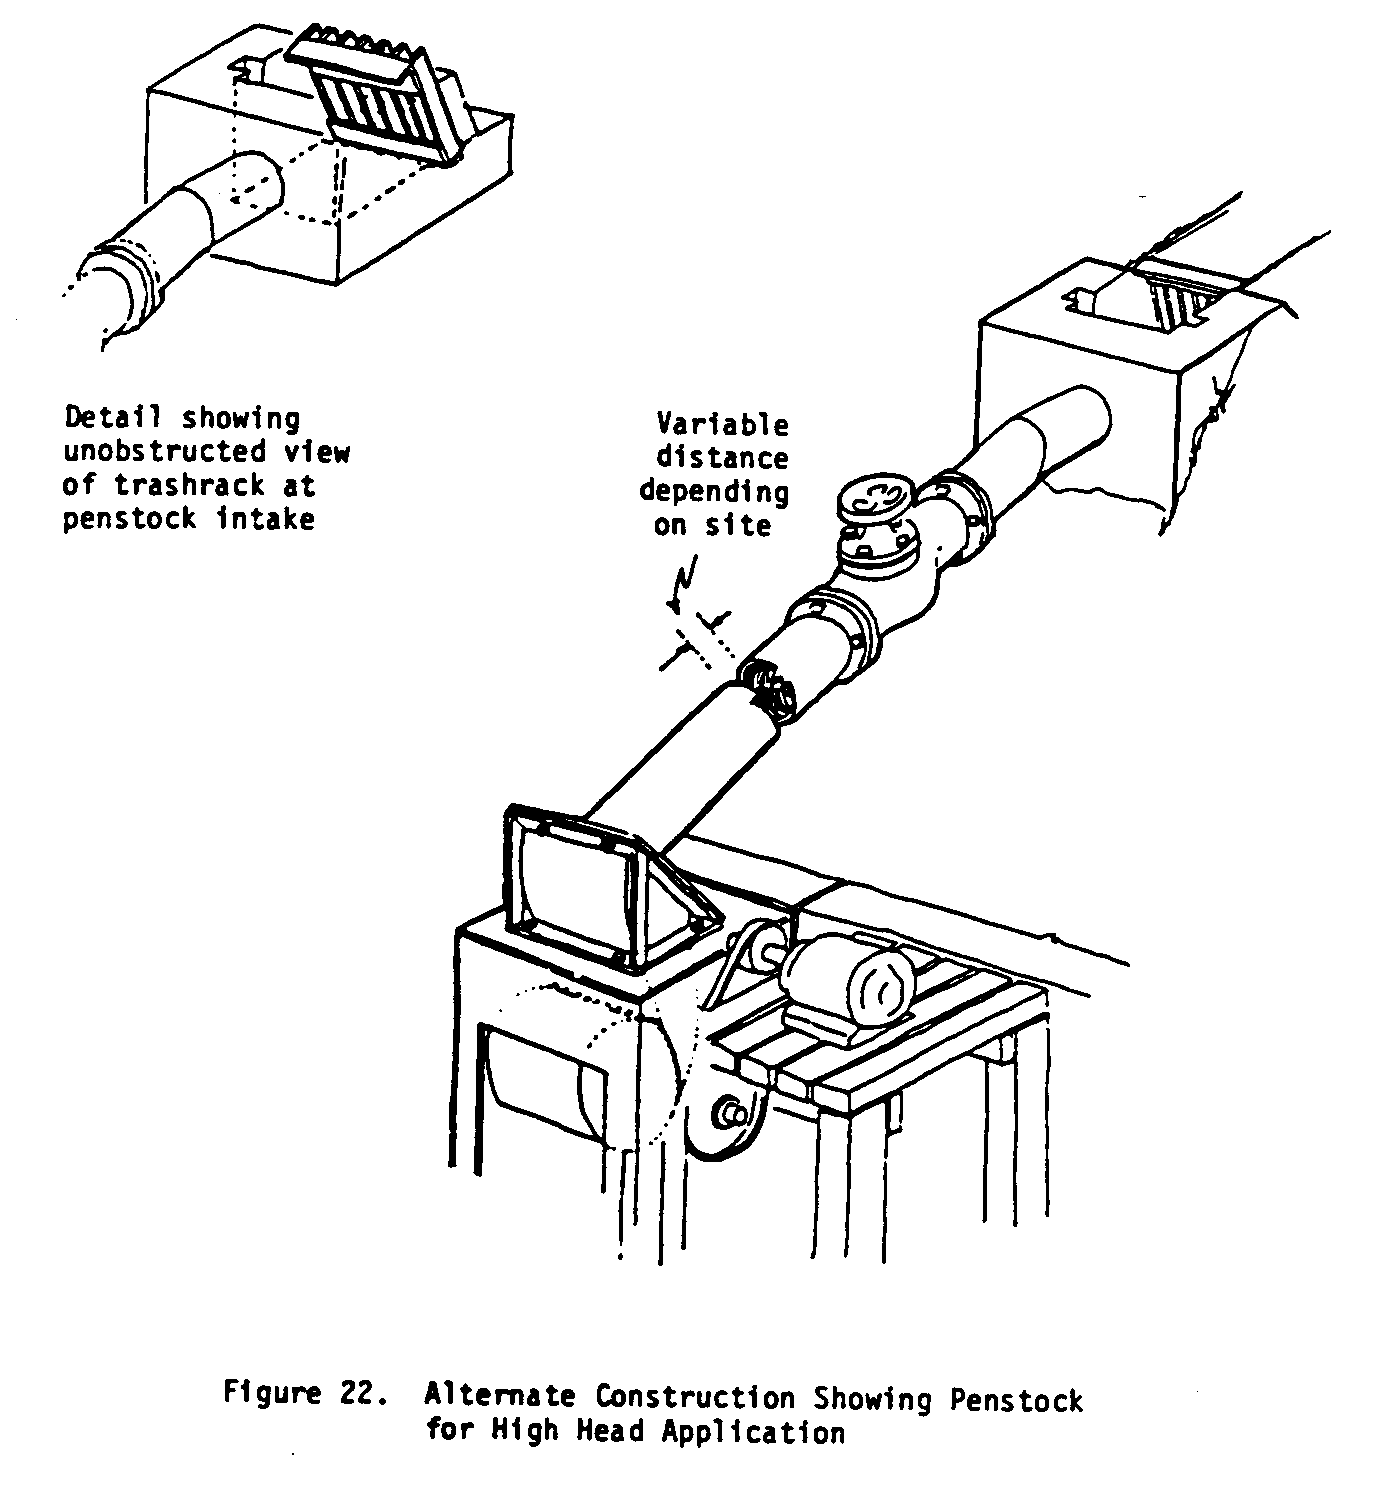
applications. A water shut-off valve allows control of the flow of water. Never shut off the water flow suddenly as a rupture in the penstock is certain to occur. If maintenance on the turbine is necessary, reduce the flow gradually until the water stops.
VI. MAINTENANCE
The Michell (Banki) turbine is relatively maintenance-free. The only wearable parts are the bearings which may have to be replaced from time to time.
An unbalanced turbine or a turbine that is not mounted exactly will wear the bearings very quickly.
A chicken wire screen (1.5cm x 1.5cm weave) located behind the control gate will help to keep branches and rocks from entering the turbine housing. It may be necessary to clean the screen from time to time. An alternative to chicken wire is the use of thin steel rods spaced so that a rake can be used to remove any leaves or sticks.
VII. ELECTRICAL GENERATION
It is beyond the scope of this manual to go into electrical generation using the Michell (Banki) turbine. Depending on the generator and accessories you choose, the turbine can provide enough rpm for direct current (DC) or alternating current (AC).
For information on the type of generator to purchase, contact manufacturers directly. A list of companies is provided here. The manufacturer often will be able to recommend an appropriate generator, if supplied with enough information upon which to make a recommendation. Be prepared to supply the following details:
* AC or DC operation (include voltage desired).
* Long range use of electrical energy (future consumption and addition of electric devices).
* Climatic condition under which generator will be used (i.e., tropical, temperate, arid, etc.).
* Power available at water site calculated at lowest flow and maximum flow rates.
* Power available to the generator in watts or horsepower (conservative figure would be half of power at water site).
* Revolutions per minute (rpm) of turbine without pulleys and belt.
* Intended or present consumption of electrical energy in watts if possible (include frequency of electrical use).
GENERATORS/ALTERNATORS
* Lima Electric Co., 200 East Chapman Road, Lima, Ohio 45802 USA.
* Kato, 3201 Third Avenue North, Mankato, Minnesota 56001 USA.
* Onan, 1400 73rd Avenue NE, Minneapolis, Minnesota 55432 USA.
* Winco of Dyna Technologies, 2201 East 7th Street, Sioux City, Iowa 51102 USA.
* Kohler, 421 High Street, Kohlen, Wisconsin 53044 USA.
* Howelite, Rendale and Nelson Streets, Port Chester, New York 10573 USA.
* McCulloch, 989 South Brooklyn Avenue, Wellsville, New York 14895 USA.
* Sears, Roebuck and Co., Chicago, Illinois USA.
* Winpower, 1225 1st Avenue East, Newton, Iowa 50208 USA.
* Ideal Electric, 615 1st Street, Mansfield, Ohio 44903 USA.
* Empire Electric Company, 5200-02 First Avenue, Brooklyn, New York 11232 USA.
BATTERIES
* Bright Star, 602 Getty Avenue Clifton, New Jersey, 07015 USA.
* Burgess Division of Clevite Corp., Gould PO Box 3140, St. Paul, Minnesota 55101 USA.
* Delco-Remy, Division of GM, PO Box 2439, Anderson, Indiana 46011 USA.
* Eggle-Pichen Industries, Box 47, Joplin, Missouri 64801 USA.
* ESB Inc., Willard Box 6949, Cleveland, Ohio 44101 USA.
* Exide, 5 Penn Center Plaza, Philadelphia, Pennsylvania 19103 USA.
* Ever-Ready Union Carbide Corporation, 270 Park Avenue, New York, New York 10017 USA.
VIII. DICTIONARY OF TERMS
AC (Alternating Current)--Electrical energy that reverses its direction at regular intervals. These intervals are called cycles.
BEARING--Any part of a machine in or on which another part revolves, slides, etc.
DIA (Diameter)--A straight line passing completely through the center of a circle.
DC (Direct Current)--Electrical current that flows in one direction without deviation or interruption.
GROSS POWER--Power available before machine inefficiencies are subtracted.
HEAD--The height of a body of water, considered as causing pressure.
ID (Inside Diameter)--The inside diameter of pipe, tubing, etc.
NET HEAD--Height of a body of water minus the energy losses caused by the friction of a pipe or water channel.
OD (Outside Diameter)--The outside dimension of pipe, tubing, etc.
PENSTOCK--A conduit or pipe that carries water to a water wheel or turbine.
ROLLED EARTH--Soil that is pressed together tightly by rolling a steel or heavy wood cylinder over it.
RPM (Revolutions Per Minute)--The number of times something turns or revolves in one minute.
TAILRACE (Tailwater)--The discharge channel that leads away from a waterwheel or turbine.
TURBINE--Any of various machines that has a rotor that is driven by the pressure of such moving fluids as steam, water, hot gases, or air. It is usually made with a series of curved blades on a central rotating spindle.
WEIR--A dam in a stream or river that raises the water level. IX. FURTHER
Brown, Guthrie J. (ed.). Hydro Electric Engineering Practice. New York: Gordon & Breach, 1958; London: Blackie and Sons, Ltd., 1958. A complete treatise covering the entire field of hydroelectric engineering. Three volumes. Vol. 1: Civil Engineering; Vol. 2: Mechanical and Electrical Engineering; and Vol. 3: Economics, Operation and Maintenance. Gordon & Breach Science Publishers, 440 Park Avenue South, New York, New York 10016 USA.
Creager, W.P. and Justin, J.D. Hydro Electric Handbook, 2nd ed. New York: John Wiley & Son, 1950. A most complete handbook covering the entire field. Especially good for reference. John Wiley & Son, 650 Third Avenue, New York, New York 10016 USA.
Davis, Calvin V. Handbook of Applied Hydraulics, 2nd ed. New York: McGraw-Hill, 1952. A comprehensive handbook covering all phases of applied hydraulics. Several chapters are devoted to hydroelectric application. McGraw-Hill, 1221 Avenue of the Americas, New York, New York 10020 USA.
Durali, Mohammed. Design of Small Water Turbines for Farms and Small Communities. Tech. Adaptation Program, MIT, Cambridge, Massachusetts 02139 USA. A Highly technical manual of the designs of a Banki turbine and of axial-flow turbines. Also contains technical drawings of their designs and tables of friction losses, efficiences, etc. This manual is far too technical to be understood without an engineering background. Probably only useful for university projects and the like.
Haimerl, L.A. "The Cross Flow Turbine," Water Power (London), January 1960. Reprints available from Ossberger Turbinen-fabrik, 8832 Weissenburg, Bayern, Germany. This article describes a type of water turbine which is being used extensively in small power stations, especially in Germany. Available from VITA.
Hamm, Hans W. Low Cost Development of Small Water Power Sites. VITA 1967. Written expressly to be used in developing areas, this manual contains basic information on measuring water power potential, building small dams, different types of turbines and water wheels, and several necessary mathematical tables. Also has some information on manufactured turbines available. A very useful book.
Langhorne, Harry F. "Hand-Made Hydro Power," Alternative Sources of Energy, No. 28, October 1977, pp. 7-11. Describes how one man built a Banki turbine from VITA plans to power and heat his home. useful in that it gives a good account of the mathematical calculations that were necessary, and also of the various modifications and innovations he built into the system. A good real-life account of building a low-cost water power system. ASE, Route #2, Box 90A, Milaca, Minnesota 59101 USA.
Mockmore, C.A. and Merryfield. F. The Banki Water Turbine. Corvallis, Oregon: Oregon State College Engineering Experiment Station, Bulletin No. 25, February 1949. A translation of a paper by Donat Banki. A highly technical description of this turbine, originally invented by Michell, together with the results of tests. Oregon State University, Corvallis, Oregon 97331 USA.
Paton, T.A.L. Power From Water, London: Leonard Hill, 1961. A concise general survey of hydroelectric practice in abridged form.
Zerban, A.H. and Nye, E.P. Power Plants, 2a ed. Scranton, Pennsylvania: International Text Book Company, 1952. Chapter 12 gives a concise presentation of hydraulic power plants. International Text Book Company, Scranton, Pennsylvania 18515 USA.
X. CONVERSION TABLES
UNITS OF LENGTH
1 Mile = 1760 Yards = 5280 Feet
1 Kilometer = 1000 Meters = 0.6214 Mile
1 Mile = 1.607 Kilometers
1 Foot = 0.3048 Meter
1 Meter = 3.2808 Feet = 39.37 Inches
1 Inch = 2.54 Centimeters
1 Centimeter = 0.3937 Inches
UNITS OF AREA
1 Square Mile = 640 Acres = 2.5899 Square Kilometers
1 Square Kilometer = 1,000,000 Square Meters = 0.3861 Square Mile
1 Acre = 43,560 Square Feet 1 Square Foot = 144 Square Inches = 0.0929 Square Meter
1 Square Inch = 6.452 Square Centimeters
1 Square Meter = 10.764 Square Feet
1 Square Centimeter = 0.155 Square Inch
UNITS OF VOLUME
1.0 Cubic Foot = 1728 Cubic Inches = 7.48 US Gallons
1.0 British Imperial Gallon = 1.2 US Gallons
1.0 Cubic Meter = 35.314 Cubic Feet = 264.2 US Gallons
1.0 Liter = 1000 Cubic Centimeters = 0.2642 US Gallons
UNITS OF WEIGHT
1.0 Metric Ton = 1000 Kilograms = 2204.6 Pounds
1.0 Kilogram = 1000 Grams = 2.2046 Pounds
1.0 Short Ton = 2000 Pounds
UNITS OF PRESSURE
1.0 Pound per square inch = 144 Pound per square foot
1.0 Pound per square inch = 27.7 Inches of water*
1.0 Pound per square inch = 2.31 Feet of water*
1.0 Pound per square inch = 2.042 Inches of mercury*
1.0 Atmosphere = 14.7 Pounds per square inch (PSI)
1.0 Atmosphere = 33.95 Feet of water*
1.0 Foot of water = 0.433 PSI = 62.355 Pounds per square foot
1.0 Kilogram per square centimeter = 14.223 Pounds per square inch
1.0 Pound per square inch = 0.0703 Kilogram per square centimeter
UNITS OF POWER
1.0 Horsepower (English) = 746 Watt = 0.746 Kilowatt (KW)
1.0 Horsepower (English) = 550 Foot pounds per second
1.0 Horsepower (English) = 33,000 Foot pounds per minute
1.0 Kilowatt (KW) = 1000 watt = 1.34 Horsepower (HP) English
1.0 Horsepower (English) = 1.0139 Metric horsepower (cheval-vapeur)
1.0 Metric horsepower = 75 Meter X Kilogram/Second
1.0 Metric horsepower = 0.736 Kilowatt = 736 Watt
*At 62 degrees Fahrenheit (16.6 degrees Celsius).
APPENDIX I
SITE ANALYSIS
This Appendix provides a guide to making the necessary calculations for a detailed site analysis.
Data Sheet
Measuring Gross Head
Measuring Flow
Measuring Head Losses
DATA SHEET
- Minimum flow of water available in cubic feet per second (or cubic meters per second).
- Maximum flow of water available in cubic feet
per second (or cubic meters per second).
- Head or fall of water in feet (or meters).
- Length of pipe line in feet (or meters) needed
to get the required head.
- Describe water condition (clear, muddy, sandy, acid).
- Describe soil condition (see Table 2).
- Minimum tailwater elevation in feet (or meters). _____
- Approximate area of pond above dam in acres (or square kilometers).
- Approximate depth of the pond in feet (or meters).
- Distance from power plant to where electricity will be used in feet (or meters).
- Approximate distance from dam to power plant.
- Minimum air temperature.
- Maximum air temperature.
- Estimate power to be used.
-
ATTACH SITE SKETCH WITH ELEVATIONS, OR TOPOGRAPHICAL MAP WITH SITE SKETCHED IN.
The following questions cover information which, although not necessary in starting to plan a water power site, will usually be needed later. If it can possibly be given early in the project, this will save time later.
1. Give the type, power, and speed of the machinery to be driven and indicate whether direct, belt, or gear drive is desired or acceptable.
2. For electric current, indicate whether direct current is acceptable or alternating current is required. Give the desired voltage, number of phases and frequency.
3. Say whether manual flow regulation can be used (with DC and very small AC plants) or if regulation by an automatic governor is needed.
MEASURING GROSS HEAD
Method No. 1
1. Equipment
a. Surveyor's leveling instrument--consists of a spirit level fastened parallel to a telescopic sight.
b. Scale--use wooden board approximately 12 ft in length.
2. Procedure
a. Surveyor's level on a tripod is placed downstream from the power reservoir dam on which the headwater level is marked.
b. After taking a reading, the level is turned 180[degrees] in a horizontal circle. The scale is placed downstream from it at a suitable distance and a second reading is taken. This process is repeated until the tailwater level is reached.
MEASURING HEAD WITH SURVEYOR'S LEVEL
Method No. 2
This method is fully reliable, but is more tedious than Method No. 1 and need only be used when a surveyor's level is not available.
1. Equipment
a. Scale b. Board and wooden plug c. Ordinary carpenter's level 2. Procedure
b. Place board horizontally at headwater level and place level on top of it for accurate leveling. At the downstream end of the horizontal board, the distance to a wooden peg set into the ground is measured with a scale.
c. The process is repeated step by step until the tailwater level is reached.
MEASURING HEAD WITH CARPENTER'S LEVEL
MEASURING FLOW
Flow measurements should take place at the season of lowest flow in order to guarantee full power at all times. Investigate the stream's flow history to determine the level of flow at both maximum and minimum. Often planners overlook the fact that the flow in one stream may be reduced below the minimum level required. Other streams or sources of power would then offer a better solution.
Method No. 1
For streams with a capacity of less than one cubic foot per second, build a temporary dam in the stream, or use a "swimming hole" created by a natural dam. Channel the water into a pipe and catch it in a bucket of known capacity. Determine the stream flow by measuring the time it takes to fill the bucket.
Stream flow (cubic ft/sec) = Volume of bucket (cubic ft) Filling time (seconds)
Method No. 2
For streams with a capacity of more than 1 cu ft per second, the weir method can be used. The weir is made from boards, logs, or scrap lumber. Cut a rectangular opening in the center. Seal the seams of the boards and the sides built into the banks with clay or sod to prevent leakage. Saw the edges of the opening on a slant to produce sharp edges on the upstream side. A small pond is formed upstream from the weir. When there is no leakage and all water is flowing through the weir opening, (1) place a board across the stream and (2) place another narrow board at right angles to the first, as shown below. Use a carpenter's level to be sure the second board is level.
<FIGURE A>
Measure the depth of the water above the bottom edge of the weir with the help of a stick on which a scale has been marked. Determine the flow from Table 1 on page 56.
<FIGURE B>
Table I FLOW VALUE (Cubic Feet/Second)
Weir Width
Overflow Height 3 feet 4 feet 5 feet 6 feet 7 feet 8 feet 9 feet
1.0 inch 0.24 0.32 0.40 0.48 0.56 0.64 0.72 2.0 inches 0.67 0.89 1.06 1.34 1.56 1.80 2.00 4.0 inches 1.90 2.50 3.20 3.80 4.50 5.00 5.70 6.0 inches 3.50 4.70 5.90 7.00 8.20 9.40 10.50 8.0 inches 5.40 7.30 9.00 10.90 12.40 14.60 16.20 10.0 inches 7.60 10.00 12.70 15.20 17.70 20.00 22.80 12.0 inches 10.00 13.30 16.70 20.00 23.30 26.60 30.00
Method No. 3
The float method is used for larger streams. Although it is not as accurate as the previous two methods, it is adequate for practical purposes. Choose a point in the stream where the bed is smooth and the cross section is fairly uniform for a length of at least 30 ft. Measure water velocity by throwing pieces of wood into the water and measuring the time of travel between two fixed points, 30 ft or more apart. Erect posts on each bank at these points. Connect the two upstream posts by a level wire rope (use a carpenter's level). Follow the same procedure with the downstream posts. Divide the stream into equal sections along the wires and measure the water depth for each section. In this way, the cross-sectional area of the stream is determined. use the following formula to calculate the flow:
<FIGURE C>
MEASURING HEAD LOSSES
"Net Power" is a function of the "Net Head." The "Net Head" is the "Gross Head" less the "Head Losses." The illustration below shows a typical small water power installation. The head losses are the open-channel losses plus the friction loss from flow through the penstock.
<FIGURE D>
<FIGURE E>
Open Channel Head Losses
The headrace and the tailrace in the illustration above are open channels for transporting water at low velocities. The walls of channels made of timber, masonry, concrete, or rock, should be perpendicular. Design them so that the water level height is one-half of the width. Earth walls should be built at a 45 [degrees] angle. Design them so that the water level height is one-half of the channel width at the bottom. At the water level the width is twice that of the bottom.
The head loss in open channels is given in the nomograph. The friction effect of the material of construction is called "N." Various values of "N" and the maximum water velocity, below which the walls of a channel will not erode are given.
TABLE II
Maximum Allowable Water Velocity Material of Channel Wall (feet/second) Value of "n" Fine grained sand 0.6 0.030 Course sand 1.2 0.030 Small stones 2.4 0.030 Coarse stones 4.0 0.030 Rock 25.0 (Smooth) 0.033 (Jagged) 0.045 Concrete with sandy water 10.0 0.016 Concrete with clean water 20.0 0.016 Sandy loam, 40% clay 1.8 0.030 Loamy soil, 65% clay 3.0 0.030 Clay loam, 85% clay 4.8 0.030 Soil loam, 95% clay 6.2 0.030 100% clay 7.3 0.030 Wood 0.015 Earth bottom with rubble sides 0.033
The hydraulic radius is equal to a quarter of the channel width, except for earth-walled channels where it is 0.31 times the width at the bottom.
To use the nomograph, a straight line is drawn from the value of "n" through the flow velocity to the reference line. The point on the reference line is connected to the hydraulic radius and this line is extended to the head-loss scale which also determines the required slope of the channel.
Using a Nomograph
After carefully determining the water power site capabilities in terms of water flow and head, the nomograph is used to determine:
* The width/depth of the channel needed to bring the water to the spot/location of the water turbine.
* The amount of head lost in doing this.
<FIGURE F>
To use the graph, draw a straight line from the value of "n" through the flow velocity through the reference line tending to the hydraulic radius scale. The hydraulic radius is one-quarter (0.25) or (0.31) the width of the channel that needs to be built. In the case where "n" is 0.030, for example, and water flow is 1.5 cubic feet/second, the hydraulic radius is 0.5 feet hr 6 inches. If you are building a timber, concrete, masonry, or rock channel, the total width of the channel would be 6 inches times 0.25, or 2 feet with a depth of at least 1 foot. If the channel is made of earth, the bottom width of the channel would be 6 times 0.31, or 19.5 inches, with a depth of at least 9.75 inches and top width of 39 inches.
Suppose, however, that water flow is 4 cubic feet/second. Using the graph, the optimum hydraulic radius would be approximately 2 feet--or for a wood channel, a width of 8 feet. Building a wood channel of this dimension would be prohibitively expensive.
<FIGURE G>
However, a smaller channel can be built by sacrificing some water head. For example, you could build a channel with a hydraulic radius of 0.5 feet or 6 inches. To determine the amount of head that will be lost, draw a straight line from the value of "n" through the flow velocity of 4 [feet.sup.3]/second to the reference line. Now draw a straight line from the hydraulic radius scale of 0.5 feet through the point on the reference line extending this to the head-loss scale which will determine the slope of the channel. In this case about 10 feet of head will be lost per thousand feet of channel. If the channel is 100 feet long, the loss would only be 1.0 feet--if 50 feet long, 0.5 feet, and so forth.
Pipe Head Loss and Penstock Intake
The trashrack consists of a number of vertical bars welded to an angle iron at the top and a bar at the bottom (see Figure below). The vertical bars must be spaced so that the teeth of a rake can penetrate the rack for removing leaves, grass, and trash which might clog up the intake. Such a trashrack can easily be manufactured in the field or in a small welding shop. Downstream from the trashrack, a slot is provided in the concrete into which a timber gate can be inserted for shutting off the flow of water to the turbine. (See shut-off caution on page 31.)
<FIGURE H>
The penstock can be constructed from commercial pipe. The pipe must be large enough to keep the head loss small. The required pipe size is determined from the nomograph. A straight line drawn through the water velocity and flow rate scales gives the required pipe size and pipe head loss. Head loss is given for a 100-foot pipe length. For longer or shorter penstocks, the actual head loss is the head loss from the chart multiplied by the actual length divided by 100. If commercial pipe is too expensive, it is possible to make pipe from native material; for example, concrete and ceramic pipe, or hollowed logs. The choice of pipe material and the method of making the pipe depend on the cost and availability of labor and the availability of material.
<FIGURE I>
APPENDIX II
SMALL DAM CONSTRUCTION
Introduction to:
- Earth Dams
- Crib Dams
- Concrete and Masonry Dams
This appendix is not designed to be exhaustive; it is meant to provide background and perspective for thinking about and planning dam efforts. While dam construction projects can range from the simple to the complex, it is always best to consult an expert, or even several; for example, engineers for their construction savvy and an environmentalist or concerned agriculturalist for a view of the impact of damming.
EARTH DAMS
An earth dam may be desirable where concrete is expensive and timber scarce. It must be provided with a separate spillway of sufficient size to carry off excess water because water can never be allowed to flow over the crest of an earth dam. Still water is held satisfactorily by earth but moving water is not. The earth will be worn away and the dam destroyed.
The spillway must be lined with boards or concrete to prevent seepage and erosion. The crest of the dam may be just wide enough for a footpath or may be wide enough for a roadway, with a bridge placed across the spillway.
<FIGURE J>
The big problem in earth-dam construction is in places where the dam rests on solid rock. It is hard to keep the water from seeping between the dam and the earth and finally undermining the dam.
One way of preventing seepage is to blast and clean out a series of ditches, or keys, in the rock, with each ditch about a foot deep and two feet wide extending under the length of the dam. Each ditch should be filled with three or four inches of wet clay compacted by stamping it. More layers of wet clay can then be added and the compacting process repeated each time until the clay is several inches higher than bedrock.
The upstream half of the dam should be of clay or heavy clay soil, which compacts well and is impervious to water. The downstream side should consist of lighter and more porous soil which drains quickly and thus makes the dam more stable than if it were made entirely of clay.
EARTH-FILL DAM
CRIB DAMS
The crib dam is very economical where lumber is easily available: it requires only rough tree trunks, cut planking, and stones. Four- to six-inch tree trunks are placed 2-3 feet apart and spiked to others placed across them at right angles. Stones fill the spaces between timbers. The upstream side (face) of the dam, and sometimes the downstream side, is covered with planks. The face is sealed with clay to prevent leakage. Downstream planks are used as an apron to guide the water that overflows the dam back into the stream bed. The dam itself serves as a spillway in this case. The water coming over the apron falls rapidly. Prevent erosion by lining the bed below with stones. The apron consists of a series of steps for slowing the water gradually.
<FIGURE K>
<FIGURE L>
Crib dams must be embedded well into the embankments and packed with impervious material such as clay or heavy earth and stones in order to anchor them and to prevent leakage. At the heel, as well as at the toe of crib dams, longitudinal rows of planks are driven into the stream bed. These are priming planks which prevent water from seeping under the dam. They also anchor the dam.
If the dam rests on rock, priming planks cannot and need not be driven; but where the dam does not rest on rock they make it more stable and watertight. These priming planks should be driven as deep as possible and then spiked to the timber of the crib dam.
The lower ends of the priming planks are pointed as shown in
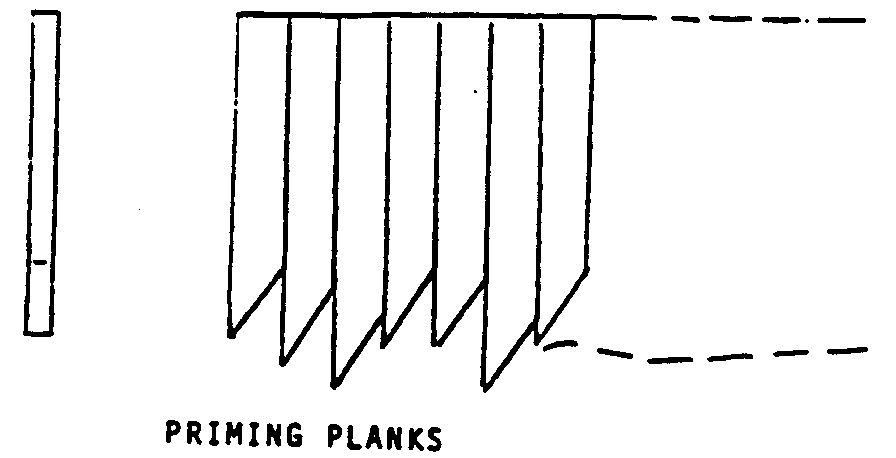
the Figure on page 69 and must be placed one after the other as shown. Thus each successive plank is forced, by the act of driving it, closer against the preceding plank, resulting in a solid wall. Any rough lumber may be used. Chestnut and oak are considered to be the best material. The lumber must be free from sap, and its size should be approximately 2" X 6".
In order to drive the priming planks, considerable force may be required. A simple pile driver will serve the purpose. The Figure below shows an excellent example of a pile driver.

CONCRETE AND MASONRY DAMS
Concrete and masonry dams more than 12 feet high should not be built without the advice of an engineer with experience in this field. Dams require knowledge of the soil condition and bearing capacity as well as of the structure itself.
A stone dam can also serve as a spillway. It can be up to 10

feet in height. It is made of rough stones. The layers should be bound by concrete. The dam must be built down to a solid and permanent footing to prevent leakage and shifting. The base of the dam should have the same dimensions as its height to give it stability.
Small concrete dams should have a base with a thickness 50 percent greater than height. The apron is designed to turn the flow slightly upwards to dissipate the energy of the water and protect the downstream bed from erosion.
SMALL CONCRETE DAM
APPENDIX III
DECISION MAKING WORKSHEET
If you are using this as a guide for using the Michell (Banki) Turbine in a development effort, collect as much information as possible and if you need assistance with the project, write VITA. A report on your experiences and the uses of this Manual will help VITA both improve the book and aid other similar efforts.
Volunteers in Technical Assistance 1600 Wilson Boulevard, Suite 500 Arlington, Virginia 22209, USA
CURRENT USE AND AVAILABILITY
* Describe current agricultural and domestic practices which rely on water. What are the sources of water and how are they used?
* What water power sources are available? Are they small but fast-flowing? Large but slow-flowing? Other characteristics?
* What is water used for traditionally?
* Is water harnessed to provide power for any purpose? If so, what and with what positive or negative results?
* Are there dams already built in the area? If so, what have been the effects of the damming? Note particularly any evidence of sediment carried by the water--too much sediment can create a swamp.
* If water resources are not now harnessed, what seem to be the limiting factors? Does cost seem prohibitive? Does the lack of knowledge of water power potential limit its use?
NEEDS AND RESOURCES
* Based on current agricultural and domestic practices, what seem to be the areas of greatest need? Is power needed to run simple machines such as grinders, saws, pumps?
* Given available water power sources, which ones seem to be available and most useful? For example, one stream which runs quickly year around and is located near the center of agricultural activity may be the only feasible source to tap for power.
* Define water power sites in terms of their inherent potential for power generation.
* Are materials for constructing water power technologies available locally? Are local skills sufficient? Some water power applications demand a rather high degree of construction skill.
* What kinds of skills are available locally to assist with construction and maintenance? How much skill is necessary for construction and maintenance? Do you need to train people? Can you meet the following needs? * Some aspects of the Michell turbine require someone with experience in metalworking and/or welding.
* Estimated labor time for full-time workers is:
* 40 hours skilled labor * 40 hours unskilled labor * 8 hours welding
* Do a cost estimate of the labor, parts, and materials needed.
* How will the project be funded?
* What is your schedule? Are you aware of holidays and planting or harvesting seasons which may affect timing?
* How will you arrange to spread information on and promote use of the technology?
IDENTIFY POTENTIAL
* Is more than one water power technology applicable? Remember to look at all the costs. While one technology appears to be much more expensive in the beginning, it could work out to be less expensive after all costs are weighed.
* Are there choices to be made between a waterwheel and a windmill, for example, to provide power for grinding grain?
Again weigh all the costs: economics of tools and labor, operation and maintenance, social and cultural dilemmas.
* Are there local skilled resources to introduce water power technology? Dam building and turbine construction should be considered carefully before beginning work. Besides the higher degree of skill required in turbine manufacture (as opposed to waterwheel construction), these water power installations tend to be more expensive.
* Where the need is sufficient and resources are available, consider a manufactured turbine and a group effort to build the dam and install the turbine.
* Is there a possibility of providing a basis for small business enterprise?
FINAL DECISION
* How was the final decision reached to go ahead--or not go ahead--with this technology? Why? APPENDIX IV
RECORD KEEPING WORKSHEET
CONSTRUCTION
Photographs of the construction process, as well as the finished result, are helpful. They add interest and detail that might be overlooked in the narrative.
A report on the construction process should include much very specific information. This kind of detail can often be monitored most easily in charts (such as the one below).
CONSTRUCTION
Labor Account
Hours Worked Name Job M T W T F S S Total Rate? Pay?
1
2
3
4
5
Totals
Materials Account
Item Cost Per Item # Items Total Costs
1
2
3
4
5
Total Costs
Some other things to record include:
* Specification of materials used in construction.
* Adaptations or changes made in design to fit local conditions.
* Equipment costs.
* Time spent in construction--include volunteer time as well as paid labor; full- or part-time.
* Problems--labor shortage, work stoppage, training difficulties, materials shortage, terrain, transport.
OPERATION
Keep log of operations for at least the first six weeks, then periodically for several days every few months. This log will vary with the technology, but should include full requirements, outputs, duration of operation, training of operators, etc. Include special problems that may come up--a damper that won't close, gear that won't catch, procedures that don't seem to make sense to workers, etc.
MAINTENANCE
Maintenance records enable keeping track of where breakdowns occur most frequently and may suggest areas for improvement or strengthening weakness in the design. Furthermore, these records will give a good idea of how well the project is working out by accurately recording how much of the time it is working and how often it breaks down. Routine maintenance records should be kept for a minimum of six months to one year after the project goes into operation.
MAINTENANCE
Labor Account Also down time Name Hours & Date Repair Done Rate? Pay?
1
2
3
4
5
Totals (by week or month)
Materials Account
Item Cost Reason Replaced Date Comments
1
2
3
4
5
Totals (by week or month)
SPECIAL COSTS
This category includes damage caused by weather, natural disasters, vandalism, etc. Pattern the records after the routine maintenance records. Describe for each separate incident:
* Cause and extent of damage. * Labor costs of repair (like maintenance account). * Material costs of repair (like maintenance account). * Measures taken to prevent recurrence.
<FIGURE M>