VITA 1600 Wilson Boulevard, Suite 500 Arlington, Virginia 22209 USA Tel: 703/276-1800 . Fax: 703/243-1865 Internet: pr-info@vita.org
Copyright [C] 1990 by Volunteers in Technical Assistance
All rights reserved. No part of this publication may be reproduced or transmitted in any form or by any means, electronic or mechanical, including photocopy, recording, or any information storage and retrieval system without written permission of the publisher.
Published by VITA 1600 Wilson Boulevard, Suite 500 Arlington, Virginia 22209 USA Tel: 703/276-1800 . Fax: 703/243-1865 Internet: pr-info@vita.org
Manufactured in the United States of America.
Library of Congress Cataloging-in-Publication Data
Attfield, Harlan H. D. Raising chickens and ducks/ by Harlan H.D. Attfield: illustrated by Joseph Layne and Marina Maspero Includes bibliographical references: p. 105 ISBN 0-86619-309-X 1. Chickens. 2. Ducks. 3. Chickens--Developing countries. 4. Ducks--Developing countries. I. Title. SF487.A933 1990 636.5--dc20 90-45999 CIP
ACKNOWLEDGEMENTS
Raising Chickens and Ducks was compiled by Harlan H.D. Attfield, a small stock and gardening expert, who has been a VITA volunteer for many years and has written numerous publications for VITA. Much of the information in this book was drawn from the selected writing of these poultry experts, who also reviewed the final manuscript:
James Archer Peter Krusch Poultry Expert Poultry Expert International Voluntary Services U.S. Peace Corps
Dr. H.R. Bird Allan A. McArdle Poultry Expert Poultry Production Adviser Volunteers In Technical Assistance Food and Agriculture Organization of the United Nations
J.N. Panda Poultry Development Officer Ministry of Food and Agriculture New Delhi, India
VITA Volunteer Joseph Layne is a professional artist, designer, and art instructor. The late Marina Maspero illustrated a number of publications for International Voluntary Services. VITA staff who were involved with the preparation of this book included Magaret Crouch, executive editor; Patricia Mantey, editing, design, layout, and charts; Suzanne Brooks, typesetting; Sandra Wark, tables.
TABLE OF CONTENTS
-
Acknowledgements
-
Introduction
-
Raising Chickens
-
Selecting a Breed of Chicken
-
Preparing to Raise Chickens
-
Caring for Chickens
-
Diseases and Their Control
-
Record Keeping
-
Raising Ducks
-
Selecting a Breed of Duck
-
Preparing to Raise Ducks
-
Raising Ducklings
-
Managing Egg Laying Ducks
-
Diseases and Their Control
-
The Chinese Rice-Husk
-
Incubation System
-
Materials Needed
-
Step By Step Incubation Process
-
Daily Activities in Brief
-
Appendix 1 Chicken Feed Formulas from Around the World
-
Appendix 2 Conversion of Units of Measurement
-
Appendix 3 Building the Colony Cage
-
Further Reading
INTRODUCTION
Worldwide, more people are using the spare space around their homes to grow food. They plant fruit trees, grow vegetables, and often raise a few animals--pigs, rabbits, goats, or poultry. This manual is intended for people who wish to raise chickens or ducks to improve the family diet and, possibly, earn some extra income. Moreover, chicken and duck manure is an excellent fertilizer for the vegetable garden or a valuable addition to the compost pile. This is especially important to farmers and gardeners who cannot afford or find other fertilizers, and to those who wish to make the best possible use of all the natural resources of their farms. The book is divided into two sections: the first deals with raising chickens at home, the second with raising ducks in wet areas.
Long before taking poultry into your care you must think about how to house and feed them. Because home flocks (under 50 birds) do not require the same professional attention to detail that commercial flocks do, they can be an important asset to the family diet without a large commitment of time and money.
However, even a small project will require a cash investment in chicks and feed for a period of more than six months during the brooding and growing period before any return can be realized. Then, after the birds have begun to lay, it will take more than another six months before all of the original investment is repaid.
Because chickens and ducks can utilize surplus grain, table scraps, garden trimmings, and by-products, they can provide a valuable food reserve. Some farming communities produce more grain than their people need. Of course the excess could be sold, but if not, it can be fed to poultry. Then, if there is a decreased production of grain in a certain year, the poultry flock can be reduced instead of decreasing the grain that is supplied to the people. Many farmer co-ops could maintain this kind of balance between grain production and poultry husbandry.
Modern science has greatly increased our knowledge of poultry production. New breeds have been developed, our understanding of nutrition has grown, we have learned how to better house poultry, and new medicines have come on the market that protect flocks against disease. This manual incorporates many modern techniques of poultry science with practical experience gained in Africa, Asia, the Caribbean, and the United States of America.
This publication does not address itself to commercial projects (flocks containing hundreds and thousands of birds). Operations of this type require a highly efficient level of production and access to professional technical help to provide a reasonable income.
We wish you the best of luck, and, Good Farming Harlan H.D. Attfield
SELECTING A BREED OF CHICKEN
There are many different kinds of chickens available. For centuries people in villages have been keeping local breeds. Left to fend for themselves, these birds have learned to live off the land with a great deal of success. They have adapted themselves to the climate, and being very active, they are not easily preyed upon by wild animals, cats, or dogs. The hens usually make excellent mothers, although many chicks are lost to predators and disease before they reach adulthood. Additionally, many people find these birds make a very tasty meal.
Even though local breeds have some good qualities, they are not usually well suited for rearing in confinement, and they do not produce enough eggs and meat to justify the cost of purchased feeds. For the person who wishes to provide their family with eggs and meat, we recommend "improved" breeds. The following will give you an idea of what is available.
Egg Laying Breeds As the name implies these birds are outstanding for egg production, but their bodies are small in weight--usually 4 1/2 lbs. (2 kg)--and do not yield a lot of meat. On the other hand, they are able to lay eggs at less cost than other breeds. One of the most popular breeds is the White Leghorn, which is capable of producing well over 225 eggs a year.
Dual Purpose Breeds These birds weigh around 6 lbs. (2.7 kg) and have been developed to be above average layers and yield more meat when slaughtered. Popular breeds in this category are Rhode Island Reds, New Hampshires, and Plymouth Rocks.
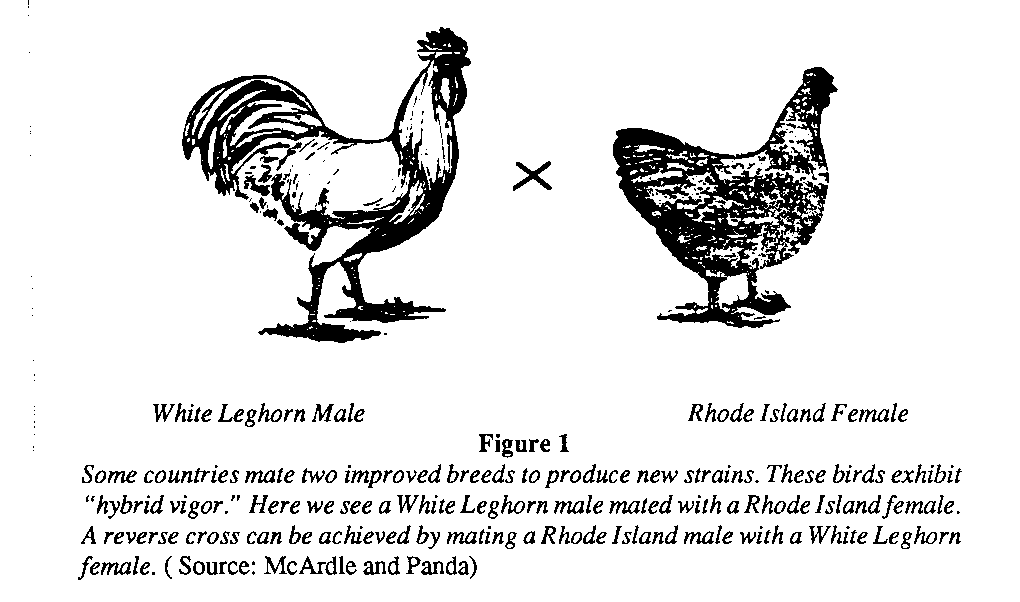
Cross Breeds Sometimes two improved breeds or a local breed and an improved breed are mated to produce new strains. A common cross in many countries is obtained by mating White Leghorn males with female Rhode Island Reds. The resulting strain exhibits what is called "hybrid vigor." They grow quickly and put on weight for a reasonable amount of feed. The hens often lay better than either of the pure breeds from which they were produced. <see figure 1>
"Custom breeding" chickens to perform well under local conditions is now practiced in many countries. In Java, Dr. Bird reported good results using a cross-strain called the Babcock 300.
What breed should you select? It is extremely important that you contact your local extension agent or university poultry expert before making your decision. They will be able to guide you and suggest a breed suitable to your area.
PREPARING TO RAISE CHICKENS
This guide has been written to show how to use improved breeds of poultry to produce more food for your family, and possibly earn some extra income.
This manual deals with raising chickens in pens and cages, which will protect a flock against disease, theft, and predatory animals. When chickens are raised in confinement, the birds are completely dependent upon you to provide them with the feed they will need to produce eggs and meat. This is not an easy task. Over the years poultry scientists have spent hundreds of hours and millions of research dollars to determine exactly what chickens require to produce the maximum amount of eggs and meat for the least amount of money.
Feed amounts to nearly 75 percent of the cost of rearing a bird to laying age and 60 percent of the cost of egg production. For the home poultry producer a good-quality commercially-mixed feed is recommended.
Balanced Feeds Commercially-mixed feeds are also called balanced feeds. Balanced feeds are exact blends of proteins, carbohydrates (energy feeds), vitamins, and minerals. They are very important to the home producer of poultry because they contain everything the flock needs to promote good health, rapid growth, and maximum egg production. Balanced feeds are available at government and private feed mills. In some countries government mills produce feeds at cost (under subsidy), which makes them very attractive to people raising poultry on a limited budget. Very often government mills establish stores conveniently located throughout the country. This also makes it easy for local poultry farmers to purchase balanced feeds. These stores quite often share space with local agricultural extension offices. Your local extension agent will be able to tell you where the nearest feed store is located in your area.
Commercial-milled poultry feeds are usually sold in the following categories: starter ration, grower ration, and laying ration. Specific recommendations of the feed manufacturer should be followed. Generally speaking, starter rations should be fed from birth to 6 to 8 weeks of age; grower rations should be fed beginning at 6 to 8 weeks and up until 18 to 29 weeks of age. Thereafter, layer rations should be used. In many countries only layer rations are available. If this is the case, layer rations can be used in place of starter and grower rations.
Poultry rations may come in mash, crumbles, or pellet form; one is equally as good as the other, but pellets cannot be used for chicks. Because chickens will waste less feed in crumble or pellet form, these feeds may be more economical in the long run, even though they usually cost a little more.
The appendix lists several balanced feed mix formulas currently used in many countries around the world. Study them carefully, and see if any of them fit your circumstances.
Mixing Balanced Feeds at Home This approach is not generally recommended because of the great difficulty involved in collecting all the ingredients necessary to duplicate scientifically-formulated feeds from commercial mills. Even one ingredient left out or improperly measured could result in failure. When individuals try to mix their own feed, they often pay more for ingredients than a professional feed miller who buys everything in large bulk quantities. On the other hand, farmer cooperatives have been organized to produce balanced feeds in many parts of the world.
Should a breakdown occur in the delivery of milled feeds to your area, you will have to prepare an "emergency ration" from locally available products until balanced feeds are available again. It is best to look over everything that is available in your area and know what you will do if this is ever necessary.
Should you wish to mix your own feed, please remember that it is best to use cereal by-products rather than cereal grains themselves, which often form the staple diet for many people. By-products--which cannot be used for human consumption--are valuable ingredients to producers of balanced feeds. Many countries are now placing high priority on making more effective use of locally available foodstuffs, particularly food by-products and waste materials rich in energy and protein. This is being done in an effort to expand the poultry industry without competing directly with people for scarce and costly cereal grains. To illustrate this point, in an experiment at the University of Wisconsin layers maintained 67 percent of egg production on the following diet formulated with rice bran:
Table 1. Supplemented rice bran diet.
Percentage
Rice bran 90.0
Fish meal 1.0
Alfalfa meal 1.0
Ground limestone 5.4
Iodized salt 0.5
Dicalcium phosphate 1.0
Methionine 0.1 Vitamin trace mineral 1.0
supplement(1) Free choice
LIMESTONE GRIT
(1) The vitamin-mineral supplement provides, per kilogram (kg) of diet: 6000 International Units (I.U.) of vitamin A, 900 International Chick Units (I.C.U.) of vitamin [D.sub.3], 22 I.U. of vitamin E, 10 milligrams (mg) of riboflavin, 0.7 mg of folic acid, and 200 mg of zinc carbonate. (Source: Costa, 1981)
Within limits a person can be very creative when formulating feeds at home. A good example of this is provided by poultry experts Mr. Allan McArdle and Mr. J.N. Panda in their publication entitled, New Methods Pay With Poultry (Literacy House Publication). They give the following advice to people living in rural parts of India:
Obtain waste grains; if possible, enough to give about 3 oz. (85 gm) for each bird daily so that with 12 birds you need to have about 2-1/2 lbs. (1.14 kg) of grains (try to pick grains the birds like). The grains can be partly replaced (up to half) by rice bran.
Obtain enough protein sources around the village such as:
- Meat from dead animals or alternatively meat offal (meat parts generally not eaten by humans) if available. Twelve birds would need about 1-1/4 lbs. (.57 kg) of meat or small fishes, frogs, or snails daily to balance their feed. These can be boiled and fed in the feed.
Note: If you have an extra supply of meat left over then try to preserve it. Cut it into thin strips, dip into salt solution, and hang in the sun to dry--keeping it away from flies. This will keep well; when needed it can be cut up and soaked in water. Feed about one-third to one-half of weight (when dry) above 1/2 lb. (.23 kg) for 12 birds daily. If you mix feed dry, this dried meat can be used ground-up without soaking.
- If enough meat, fish, frogs, or snails cannot be obtained daily--suppose only 3/4 lb. (.34 kg) was available for 12 birds--then it will be necessary to supplement from other sources. For example:
(a) Add about 1/4 lb. (.12 kg) or more of white ants--these can be dug out of big mounds around the village and jungle. (These are a valuable poultry feed.)
(b) Or use cowdung fly maggots. These can be grown in small pits that are filled with manure and kept damp. Sprinkling a little flour will also help. A good supply of maggots will usually be available in seven days. These have been used to supplement feed as with white ants.
(c) Other supplements are mango kernels, which can be crushed and used as 10 percent of the feed, or damaged fruit, which can be used as 10 to 20 percent of the feed.
(d) Any waste from cooked foods can be included in the feed if fed wet--otherwise use in a separate feeder.
(e) Green feed at the rate of about 1/2 gallon measure (1.9 liters) can be given for 12 birds, if not running on good pasture. Some village supplies may be Dub grass, cabbage and radish leaves; tender leaves from trees such as tamarind, papaya, agisti, etc.; and water hyacinth (Jagal or Chingudia Dal), wild sag, leaves of cow pea, mung, or biri crops.
(f) Also provide crushed bones and some fine gravel from the river.
In brief, 12 birds will need about 2-1/2 lbs. (I. 14 kg) grain and 1- 1/4 lbs. (.57 kg) meat. Meat offal is a good protein source and when it is available fresh and every day, it can provide a balanced feed capable of giving very good production. However, it must be fed along with wet mash every day. Alternatively, a reasonable formula can be made using snails, frogs, fish, or some meat plus white ants, etc. and other supplements, plus green feed--in all 3 to 4 lbs. (1.4 to 1.8 kg) of feed daily.
Some Feeds Must Be Used With Care Dr. H.R. Bird advises that some feed ingredients have special disadvantages that must be noted. Cottonseed meal contains a substance called gossypol, which discolors egg yolks and inhibits growth of young birds. However, cooking the meal will decrease the gossypol and result in a product that is satisfactory for growing birds, even though it may still discolor yolks. Mustard seed meal contains a growth inhibitor and should not represent more than 5 percent of the diet. Rapeseed meal contains a compound that interferes with thyroid function (an important gland), and also should not represent more than 5 percent of the diet, unless improved strains of the plant are used.
Soybeans contain an inhibitor of trypsin, an enzyme important for digestion, but it can be destroyed by cooking. The processing of soybean meal is now so well standardized that this inhibitor is seldom a problem.
To know whether soybean meal is cooked thoroughly enough, follow this simple procedure:
- Place 10 teaspoons (about 30 grams) of the cooked meal in a small jar with a tight lid.
- Add 1 teaspoon (about 4 grams) of fertilizer grade or feed grade urea and 5 teaspoons (25 cc) of water.
- Stir the contents and cover the jar with the lid. Seal should be tight.
- Wait 20 minutes. Sniff for the odor of ammonia (an extremely sharp smell.)
- If ammonia is present, the soybean meal contains the enzyme urease and has not been heated enough.
Field beans (navy, pinto, kidney, etc.), like soybeans, contain growth-inhibiting materials that can also be destroyed by cooking.
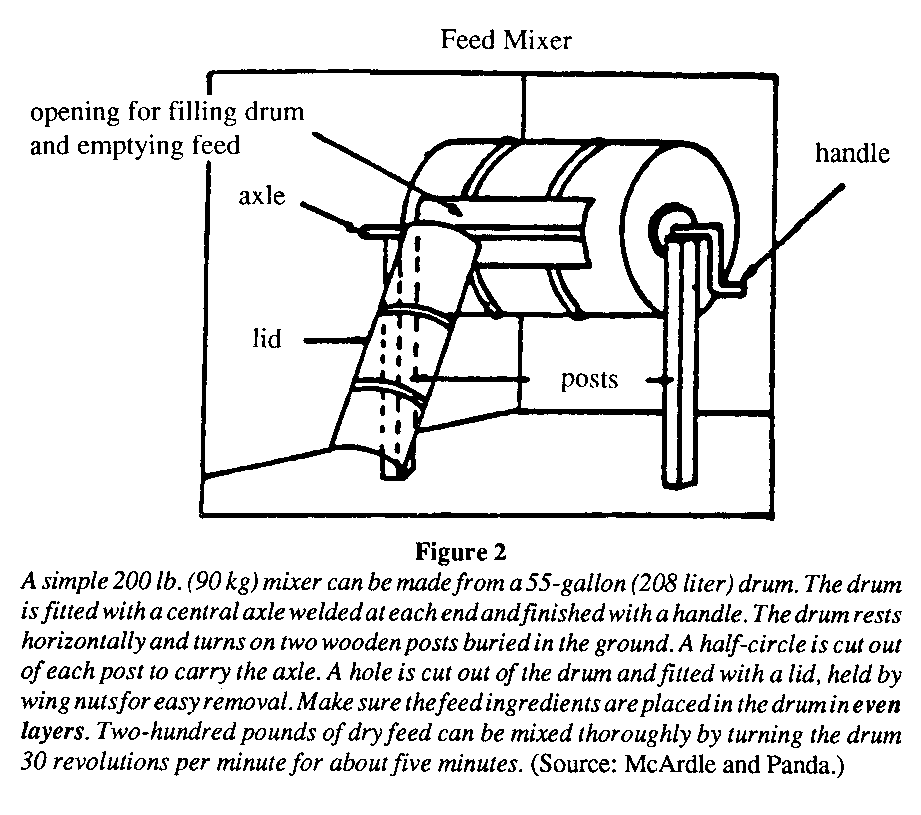
Now you must ask yourself: What feeds are available locally, at what volume, and at what price? Are they or substitutes available year round? Can they be combined to make a suitable formula, or will other ingredients have to be shipped in from other areas? If you are considering a medium-sized or large-scale operation, you should have local feed ingredients analyzed by professionals. The final test of the quality of the ingredients and the formulation is how well your poultry perform. Because of the difficulty of mixing feeds at home, it is generally better to use completely balanced and prepared feeds ready for use in dry form, purchased from government or private feed mills. <see figure 2>
Grit Because chickens don't have teeth to help break up their food, they will often eat grit--coarse sand, bits of limestone and granite, tiny pebbles, and fine river gravel. The grit lodges in the gizzard and helps grind grain and other rough feeds before they are passed on to the intestines. If you are feeding whole or cracked grains (rice, wheat, maize, etc.), fibrous, or tough feeds, you should provide some sort of grit in a small container near the feeder. Grit is not needed if the birds are on a diet of milled mashed feeds. Some people who keep their chickens on deep litter or in colony cages still provide grit even though they feed mashes in order to help their birds digest bits of litter or feathers that are commonly consumed by mistake.
Storing Feed A good manager is constantly on the alert for feed wastage. In damp weather feed should not be stored for more than four weeks to prevent it from becoming stale or even slightly mildewed. Some people store bags of feed up on a platform high enough to allow a cat to get behind and underneath it to control rodents.
Improved Feeds and Local Village Birds Village (native) breeds of chickens are generally small and are kept primarily as scavengers. Even though they lay a small number of eggs, they show a profit because they do not cost anything to feed. The important consideration about poultry is not the number of eggs they lay, but the costs involved for each dozen eggs. Improving the diet of village birds will result in an increase in egg production, but it may not be enough to justify the cost of purchased feeds. On the other hand, improving their diet by utilizing waste grains and by-products will result in increased production of eggs at virtually no cost. Remember, however, that native birds that range freely tend to "hide" their eggs, making it difficult for the owner to gather them.
The Importance of Water The importance of water in poultry production should never be underestimated. Many people fail to provide adequate watering facilities, especially in hot weather. Ample fresh water and enough space to reach it is extremely important to ensure good growth and maximum egg production. The following chart gives the minimum space requirements for birds during the growing and laying period:
Table 2. Waterer space requirements.
AGE IN WEEKS WATERER SPACE PER BIRD
0 - 3 1/4 linear inch (.7 cm)
3 - 8 1/2 linear inch (1.25 cm)
9 - maturity, and 3/4 linear inch (2 cm) during laying period
Table 3. Approximate growth rates and feed and water consumption for white egg type chickens.
Age Growth wt. Feed Consumption Water Consumption weeks lbs(kg) lbs(kg) per 100 birds per 100 birds per day (full feed) US gallons (liters) per day per week (cumulative)
1 0.15 (.07) 3 (1.4) 20 (9.1) 0.5 (1.9) 2 0.3 (.14) 4 (1.8) 55 (25) 1.0 (3.8) 3 0.45 (.21) 6 (2.7) 100 (46) 1.5 (5.7) 4 0.6 (.27) 7 (3.2) 155 (71) 2.0 (7.6)
5 0.8 (.36) 9 (4.1) 220 (100) 2.5 (9.5) 6 1.0 (.45) 11 (5.0) 300 (136) 3.0 (11.4) 7 1.2 (.55) 12 (5.5) 390 (177) 3.5 (13.3) 8 1.4 (.64) 14 (6.4) 495 (225) 4.0 (15.2)
9 1.6 (.73) 14 (6.4) 600 (273) 4.0 (15.2) 10 1.8 (.82) 15 (6.8) 715 (325) 5.0 (18.9) 11 1.9 (.86) 16 (7.3) 830 (377) 6.0 (22.7) 12 2.1 (.95) 16 (7.3) 945 (430) 6.0 (22.7)
13 2.25 (1.02) 16 (7.3) 1065 (484) 6.0 (22.7) 14 2.4 (1.1) 16 (7.3) 1185 (539) 6.0 (22.7) 15 2.55 (1.16) 17 (7.7) 1310 (595) 6.5 (24.6) 16 2.7 (1.2) 17 (7.7) 1435 (652) 6.5 (24.6)
17 2.8 (1.26) 18 (8.2) 1565 (711) 7.0 (26.5) 18 2.9 (1.32) 18 (8.2) 1695 (770) 7.0 (26.5) 19 3.1 (1.4) 18 (8.2) 1820 (827) 7.0 (26.5) 20 3.3 (1.5) 18 (8.2) 1950 (886) 7.0 (26.5)
21 3.4 (1.55) 18 (8.2) 2080 (945) 7.0 (26.5) 22 3.5 (1.6) 19 (8.6) 2210 (1005) 7.5 (28.4) 23 3.7 (1.7) 20 (9.1) 2350 (1068) 7.5 (28.4) 24 3.9 (1.8) 21 (9.5) 2500 (1136) 8.0 (30.3)
The figures in the table are only approximations. Actual feed consumption will depend on the strain of birds, the feed formulation, temperature, health of the birds, and the condition of housing.
Proper Housing When one thinks of free-ranging poultry that find their own feed, require little care, and provide food for the family table, one sees obvious advantages. Poultry have been kept this way for hundreds of years. There are disadvantage, however. Most communities that take a serious interest in their poultry practice some degree of confinement.
Letting poultry range freely is an economical way to provide them with feed. On the other hand, it exposes them to predators and diseases. Moreover, they cannot be guaranteed a balanced diet from just foraging. To achieve a well-balanced diet, they must be provided with supplemental food. Overall, free-ranging chickens require less labor than confined flocks, but when locating waste feed and pools of water they are more likely to contract parasites, bacteria, molds, and fatal diseases like coccidiosis and Newcastle disease (these will be discussed later). Unlike improved breeds, free-ranging village birds incubate their own eggs and thus reproduce themselves, and because they may lay eggs in unexpected places, many eggs are lost. Furthermore, the process of becoming broody (incubating and hatching chicks) decreases the maximum rate of egg production. Improved breeds of chickens tend to be poor mothers and fail to incubate their own eggs, but they do lay lots of eggs. Confined chickens in pens or cages with clean feeders and waterers, thus have the following advantages over free-ranging birds:
1) Better control of diseases. 2) Fewer losses of chickens to theft or predatory animals. 3) Less disturbance to vegetable gardens and neighbors' property by free-ranging hens. 4) Easy collection of eggs. 5) Easy access to chickens for routine inspection. 6) Easy collection of manure for use in the garden.
Three types of housing have proved very successful in many parts of the world: the slatted-floor pen, the deep-litter shed, and the metal-floor colony cage.
Slatted-Floor Pen This system was developed by Peter Krusch for use in Sierra Leone, Africa. Slatted-floor pens (Figure 3) are constructed on posts with floor and sides made of bush poles or split

bamboo. The roof may be of thatch or metal and should have a large overhang. If a metal roof is used, the structure should be placed in the shade of trees or thatch should cover the metal. Floors should be strong enough to support the weight of a person. The gap left between each of the floor pieces should not exceed 1 inch (2.5 cm), nor be any less than 3/4 inch (2 cm) to prevent eggs from falling through, while allowing enough room for droppings to pass through. If driver ants are a threat, the posts can be placed into cans containing kerosene or old motor oil.
Since poultry manure is extremely rich in nitrogen it is a valuable fertilizer for gardens. In order to collect this by-product, a slightly raised platform should be constructed below the slatted-floor and the manure scraped off frequently.
Nests should be provided at the rate of one individual 1 ft. x 1 ft. x 1 ft. (30 cm x 30 cm x 30 cm) nest for every five birds or one 2 ft. x 3 ft. (60 cm x 90 cm) colony nest for up to 50 birds. Of the two types of nests, the colony nest will be more satisfactory. For the convenience of the person collecting eggs from a slatted-floor pen, a hinged cover or removable back board will allow access to the nests from the outside. The bottom of the nest box should be tight enough so it can be filled to a depth of 4 inches (10 cm) with rice hulls, sawdust, or some other soft nesting material. (See Figure 4.) Poultry must be

protected from sustained strong winds or blowing rain. This can easily be accomplished by hanging mats, bags, or other such material over the sides of the pen when necessary.
When constructing the pen, keep in mind that each adult bird will require 2-1/2 to 3 square feet (.23 to .28 [m.sup.2]) of floor space.
Deep-Litter Shed This system utilizes a simple shed in which the birds are allowed to run free on a 6-8 inch (15 cm x 20 cm) layer of absorbent material, such as sawdust, rice hulls, wood shavings, peanut (groundnut) shells, leaves, dry grass, crushed maize corn cobs, tree bark, etc.
The design and explanation of the deep-litter shed housing is provided by Allan McArdle and J. N. Panda. This approach had been used successfully in many parts of India. (See Figure 5.)

In Africa some people construct their pens using mud and sticks or mud blocks. If you use these materials keep in mind that mud walls must be plastered with a good coat of cement. This plaster coat is not only to facilitate cleaning, but also to prevent the chickens from picking the mud. Provisions for adequate light and ventilation must also be taken into consideration in the design of this type of house.
There are a number of advantages to using the deep-litter system. Poultry kept in a shed with a bare floor have a very uninteresting life. Once they have eaten their feed they have nothing to do and often start vices such as feather picking. With built-up deep litter in the shed, birds have a source of constant occupation. They continually scratch in the litter and dust bathe in it. It also allows them to counteract extremes in weather. When the weather is hot they burrow into it to cool themselves, because the litter keeps a relatively constant temperature and is much cooler than the surrounding air. Chickens that keep cool lay more eggs.
After a year on deep litter the birds will have created an extremely valuable by-product, as illustrated in Figure 6.
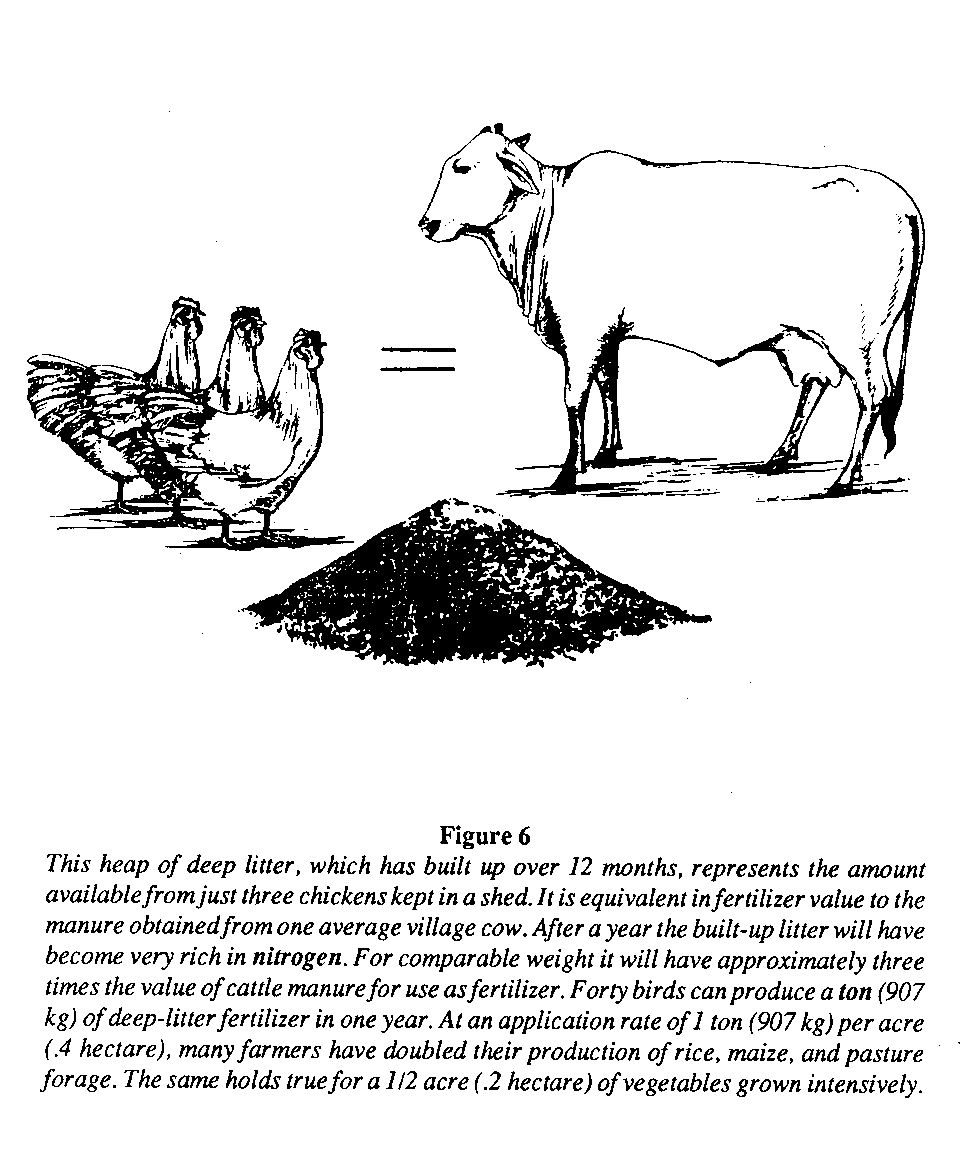
Table 4. Poultry Manure Information
MAMURE PRODUCTION
Layers: 25 pounds per 100 per day with normal drying. Four-tenths of a cubic foot per 100 per day. Moisture content 75-80% as defecated. Weight of a cubic foot of poultry manure at 70% moisture is approximately 65 pounds.
Fertilizer Value of Poultry Manure
Pounds per Ton
Moisture % Nitrogen Phosphorous Potash Fresh Manure 75 29 10 8 Stored Manure 63.9 24 13 16 Layer litter 22.1 50 23 36
When nitrogen is worth 25 cents per pound, phosphorous 15 cents per pound, and potash 8 cents per pound, the values per ton of poultry manure are:
Fresh Manure $9.39 Stored Manure 9.23 Layer litter 14.86
Other elements of plant food contained in poutry manure include calcium, magnesium, copper, manganese, zinc, chlorine, sulphur, and boron.
Source: Univ. of New Hampshire Bulletin 444--Farm Manure
Here are a few points to remember when constructing a deep-litter shed:
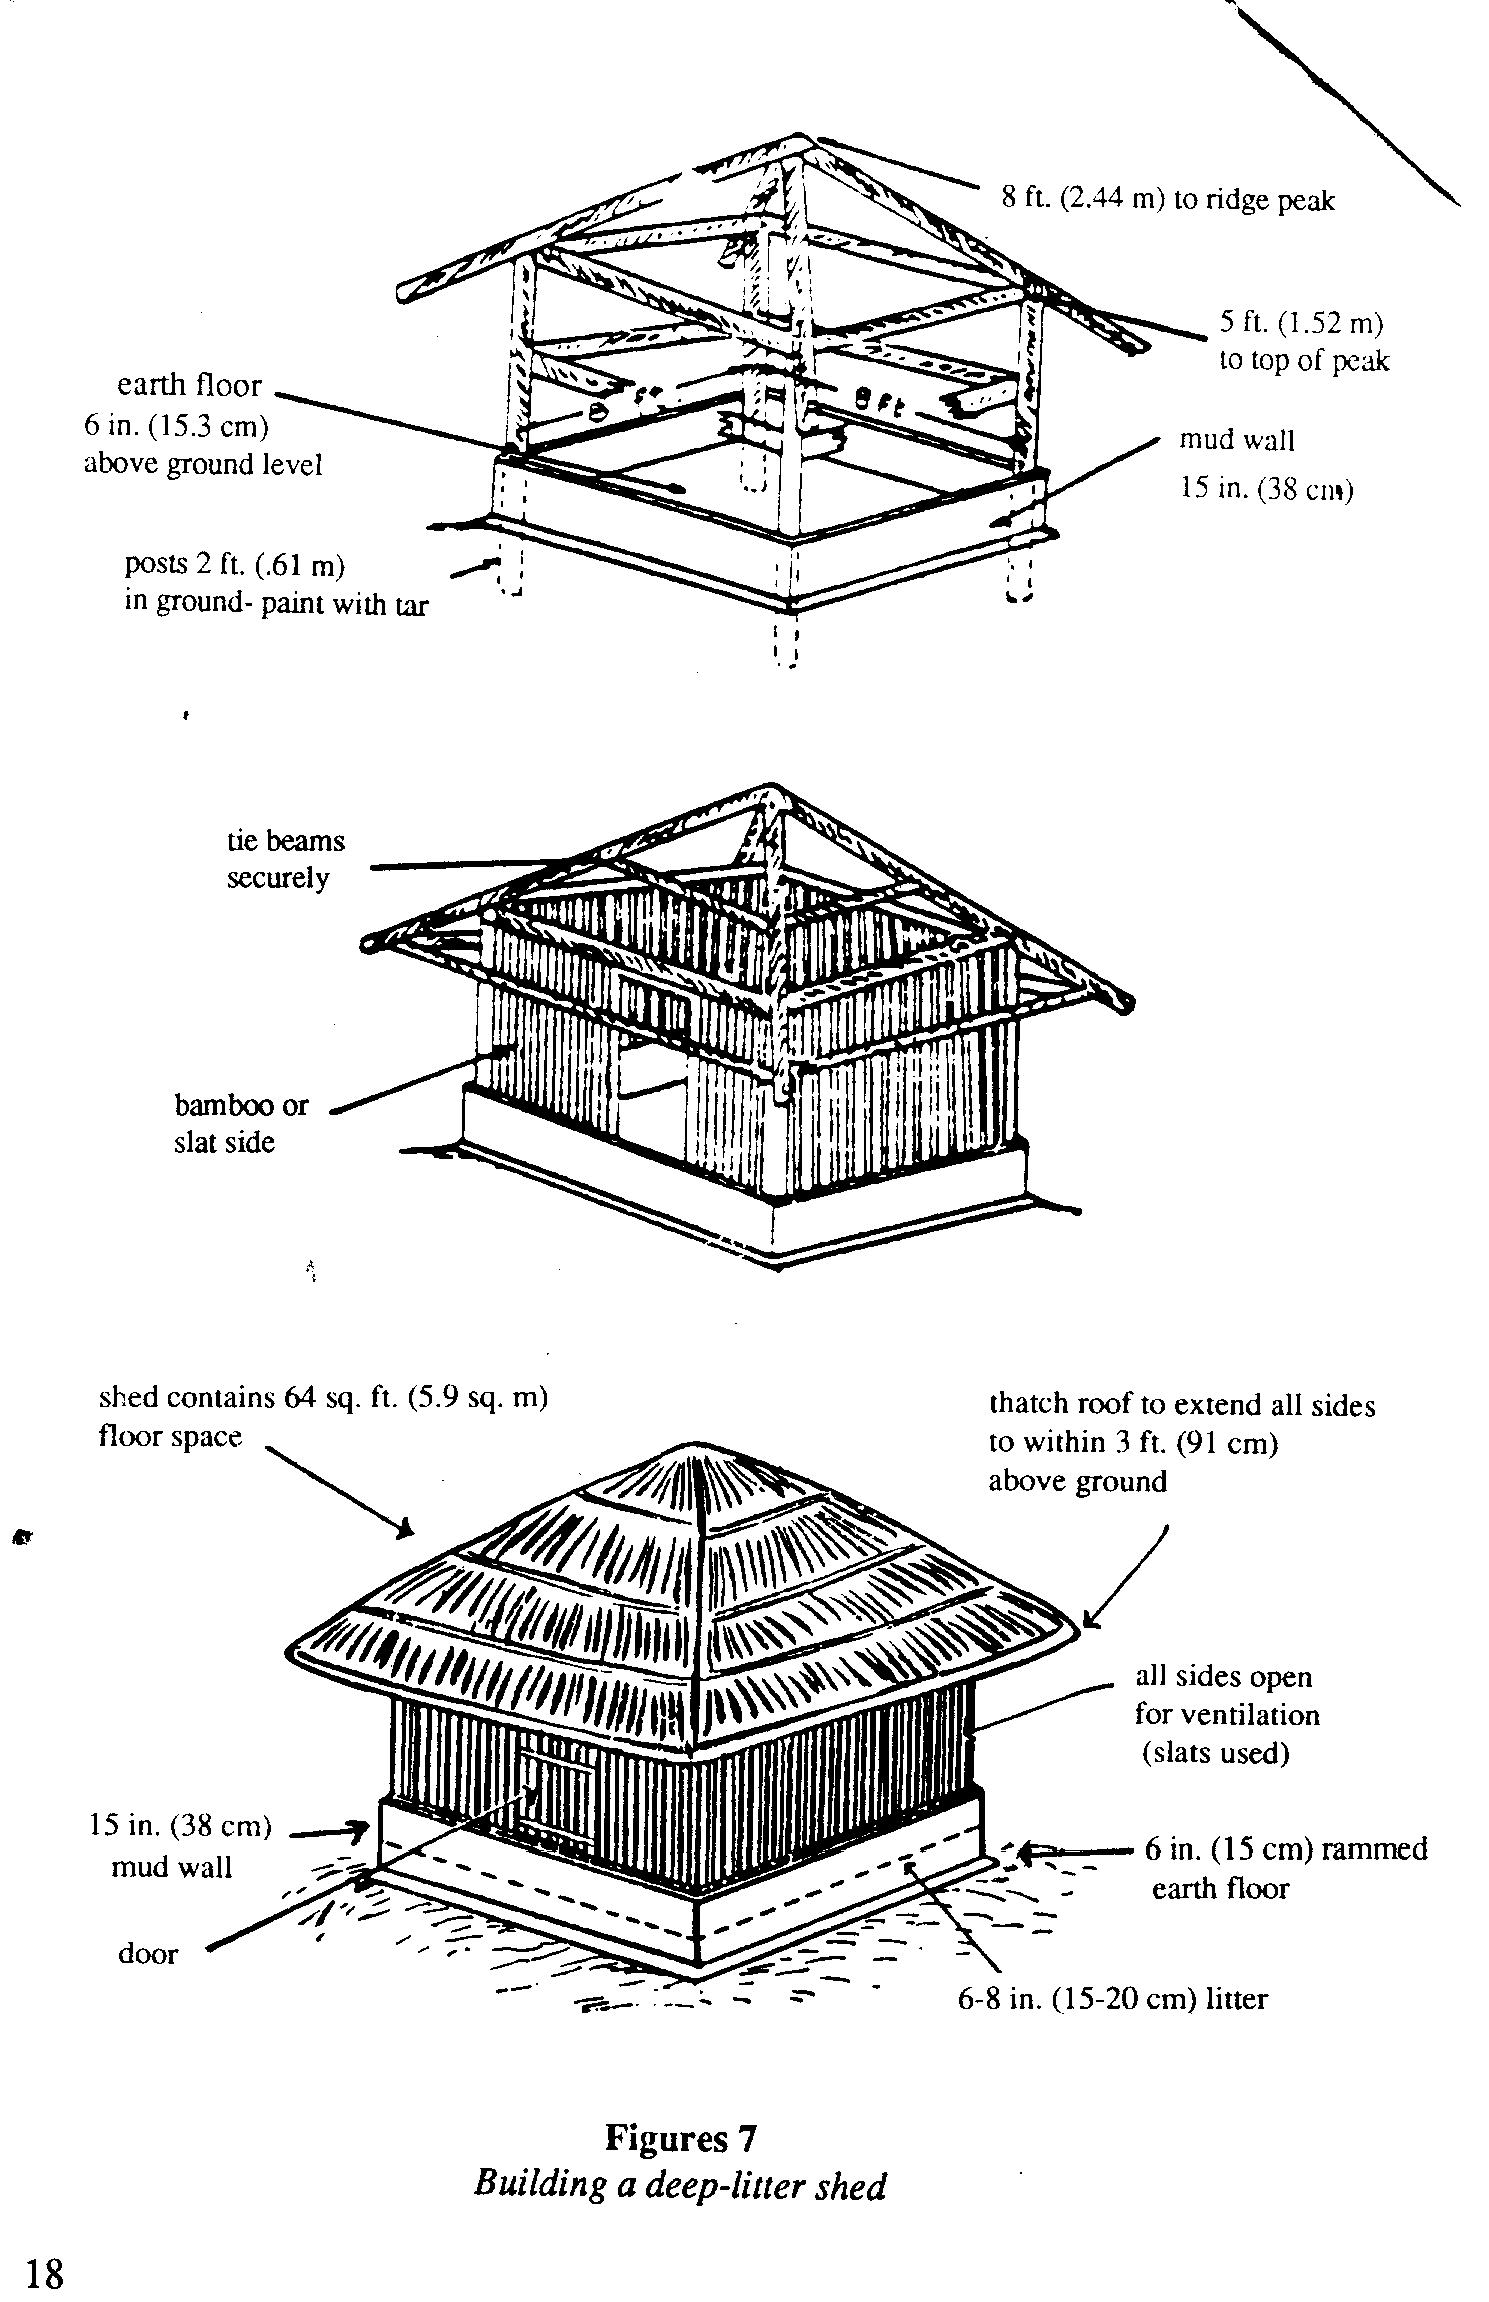
1) A 15-inch (38 cm) high mud wall surrounds the 8 ft. x 8 ft. (2.44 m x 2.44 m) floor area. The floor is made of rammed earth and is built-up 6 inches (15 cm) above ground level. If available, cheaply produced mud bricks can be used in place of rammed earth.
2) Corner posts are cut 7 feet (2.14 m) in length, painted with tar, and buried 2 feet (61 cm) into the ground. The ridge peak extends 8 feet (2.45 m) above ground level.
3) Bamboo pieces or wood slats with 3-inch (7.6 cm) centers are set 9 inches (23 cm) in the mud wall and attached to the upper beam at a 5-foot (1.5 m) level with a cross rail in between for added strength. Bamboo beams should be tied securely. The door, measuring 3 1/2 feet x 2 feet (1.07m x .61 m) in size, is set between two posts above the wall and opens outward.
4) The roof of thatch should be strengthened with bamboo cross-pieces to guard against animals and should extend sufficiently on all sides to reach within 3 feet (.9 m) of the ground. This will serve to protect the deep-litter from heavy rains and excess sunlight. It is very important to keep the 6-8 inches (15-20 cm) of deep litter dry and it should be stirred every one or two weeks. When stirring, turn the litter over thoroughly, as if digging in the garden.
5) At night chickens love to roost above the ground. This behavior is rooted far back in time when chickens needed to perch high in trees to protect themselves from predatory animals. Today, the use of roost poles is advised to help control respiratory problems and pests like ticks and blood-sucking mites. Two 4-foot (1.2 m) roost poles suspended by wire from the four corners of the shed (or fitted with legs) will allow sufficient space for 15 birds. The roost poles should be at least 2 feet above the surface of the litter. (See Figures 7 and 8.)
6) It will be easier to collect the eggs if the chickens have a nesting area. A nest measuring 2 feet x 1 1/2 feet (.61 m x .46 m) is made of mud (or mud blocks) and should be nearly the height of the shed mud wall. A division wall, 6 x 9 inches (15 cm x 23 cm) high, divides the nest into two compartments--enough space for 15 birds. A few inches (7-8 cm) of litter placed in the bottom of each compartment will make the nest comfortable and prevent egg breakage.
Metal-Floor Colony Cage The colony cage was designed by Harlan H.D. Attfield in Ethiopia and Mauritius for urban and village dwellers who wish to keep a small flock of chickens for egg production. It is particularly suited to people who have limited space around their homes. <see figure 9>

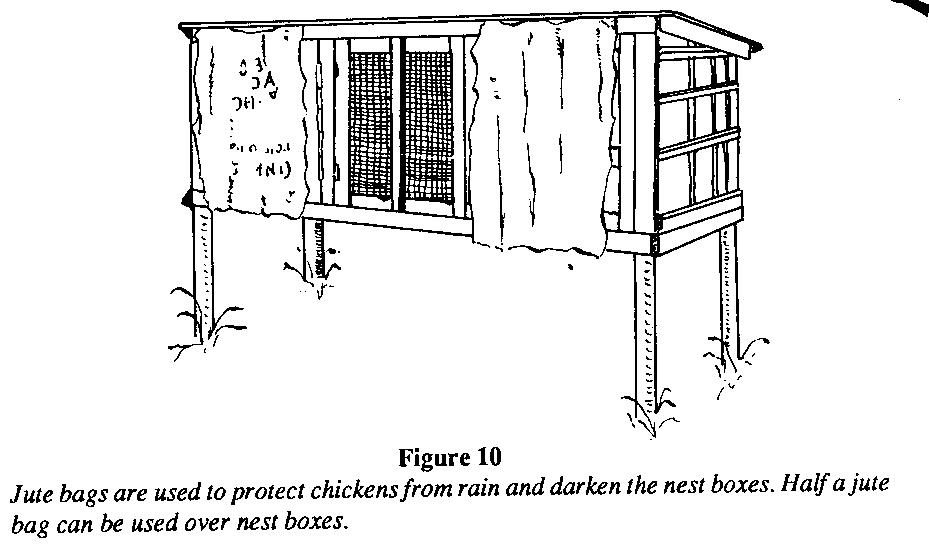
Keeping chickens in a roomy cage off the ground has several advantages, but this system can also give rise to a few problems. With care, however, they are easily prevented. <see figure 10>
1) In some cases the birds' droppings won't dry fast enough to avoid the breeding of flies. Manure should be removed weekly when such pests are troublesome.
2) Since limited space inclines chickens to cannibalism, they should be debeaked, and preferably before the onset of egg production. The process of debeaking is probably
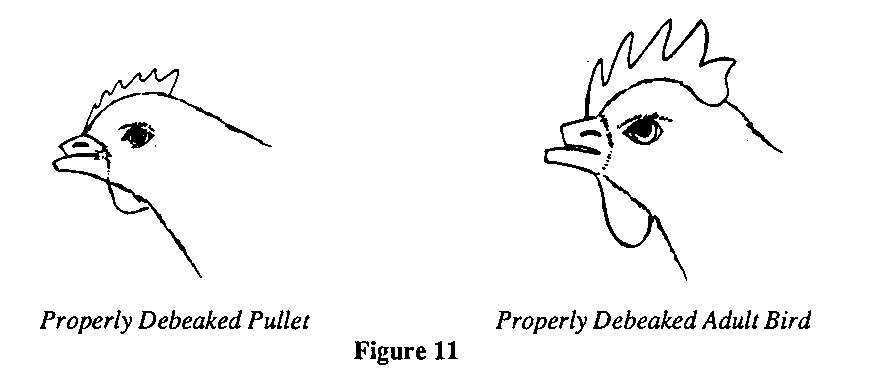
more discomforting to the poultry grower than to the bird. Debeaking is in no way harmful to the bird and is the only sure method of controlling cannibalism.
This operation is easily done on a young bird by removing the tip of the upper beak--just in front of the pad--with a sharp knife, scissors, or side-cutters. To prevent bleeding and infection, cauterize the wound by placing a hot knife against the cut surface.
Mr. Krusch recommends another method: Open the bird's mouth and place it over a rigid 3/4 inch (2 cm) board as shown in the diagram (Figure 12). With a sharp knife
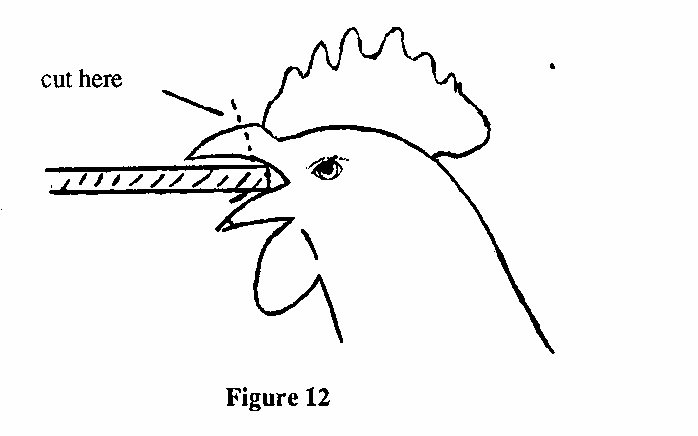
that has been heated to a dull red, cut the beak as shown. The hot blade will cauterize the wound. The tip of the lower beak is best removed by pressing the hot blade against it until the tip has been seared back. Care must be taken in both cases not to injure the tongue.
3) The cage should be placed in a shaded area to protect it from direct sunlight when temperatures are high. This is very important because the sheet-iron roof is an efficient conductor of heat. On windy or rainy days burlap bags can be hung over the front of the cage. According to some interesting test results, higher egg production can be maintained by protecting layers from wind, particularly during cold winter months.
A colony cage measuring 7 1/2 feet x 3 feet (2.3 m x.92 m) provides brooding, growing, and laying facilities for 10 to 12 birds, enough to produce at least half a dozen eggs a day, which is more than sufficient for the average family. In fact, if some eggs are sold during the year to friends and neighbors, the money received will pay for most of the feed and the cost of the baby chicks. When chickens become too old to produce eggs, the family can eat them or sell a few in the market for extra income.
The colony cage illustrated in this book <see figures 13 and 14> was built with the following materials:
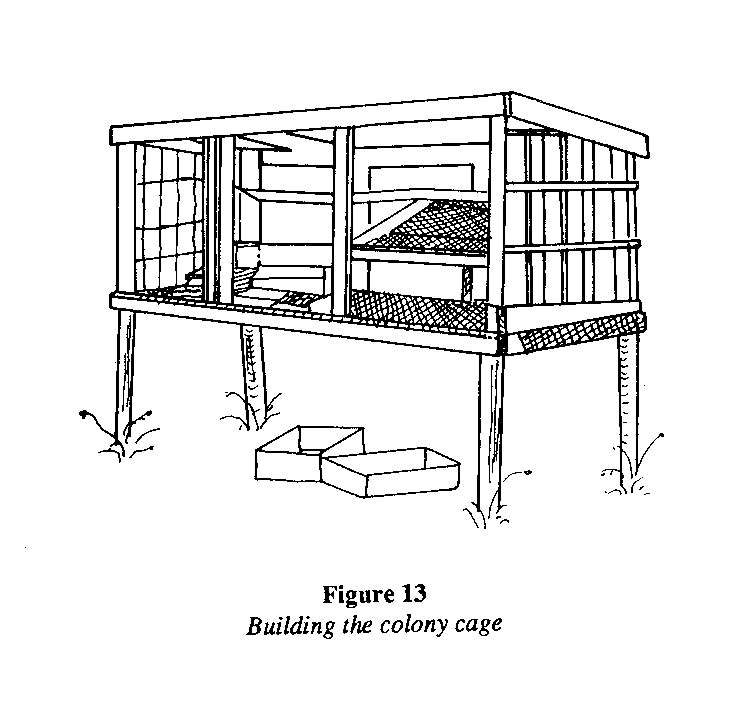
1) Packing crate boards (for back, sides, removable partition, central wall supports, and nest-box frame)
2) Five eucalyptus poles (two 60-inch-long (1.52 m) posts for the front uprights, two 54-inch (1.37 m) poles for the back, and an 8-foot (2.44 m) roost pole)
3) 50 feet (15.25 m) of 1 x 3 (2.5 cm x 7.5 cm) lumber strips (frame)
4) 8 feet (2.4 m) of heavy wire mesh, 3/4 inch (2 cm) square or 3/4 x 1 inch (2 cm x 2.5 cm) rectangular for floor
5) 10 feet (3 m) of 1/2 inch square (1.3 cm) galvanized mesh not the flimsy round type (doors and nest-box floor)
6) Two raisin crates or light boxes (nest boxes)
7) One sheet of galvanized iron (roof), 8 feet x 3 feet (2.44 m x .92 m). Aluminum, which reflects the heat of the sun, is also good roofing material for use in the tropics.
8) 2-inch (5 cm) straight nails, 3/4-inch (2 cm) U nails, flat-headed galvanized roofing nails, hinges
(See Appendix 3 for a detailed blueprint showing how to construct a colony cage.)
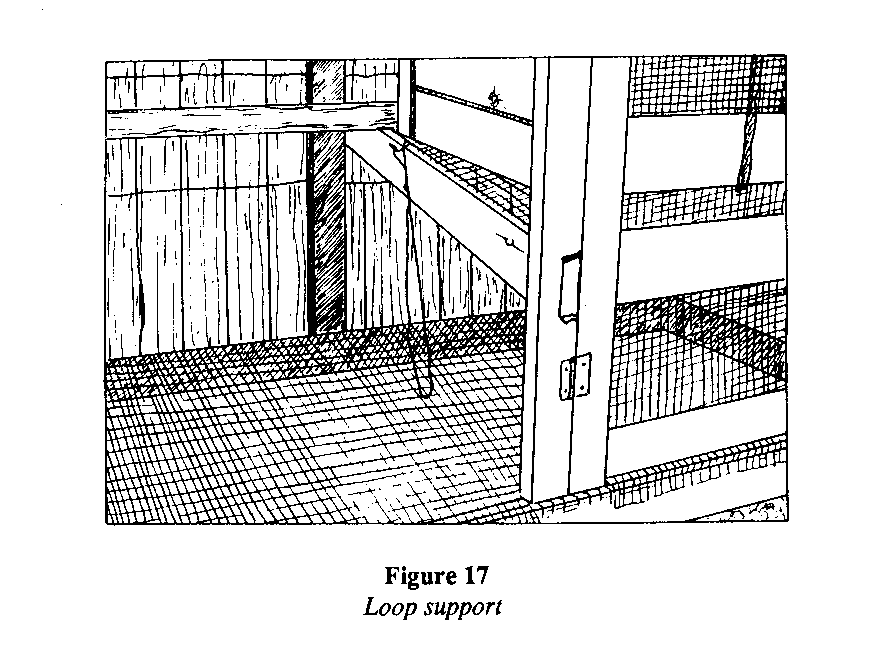
To prevent sagging in a stretched wire floor, a loop-wire support is recommended. Simply attach a piece of strong wire around the nest-box support nearest the center door and loop it through the wire floor, as shown in Figure 17.
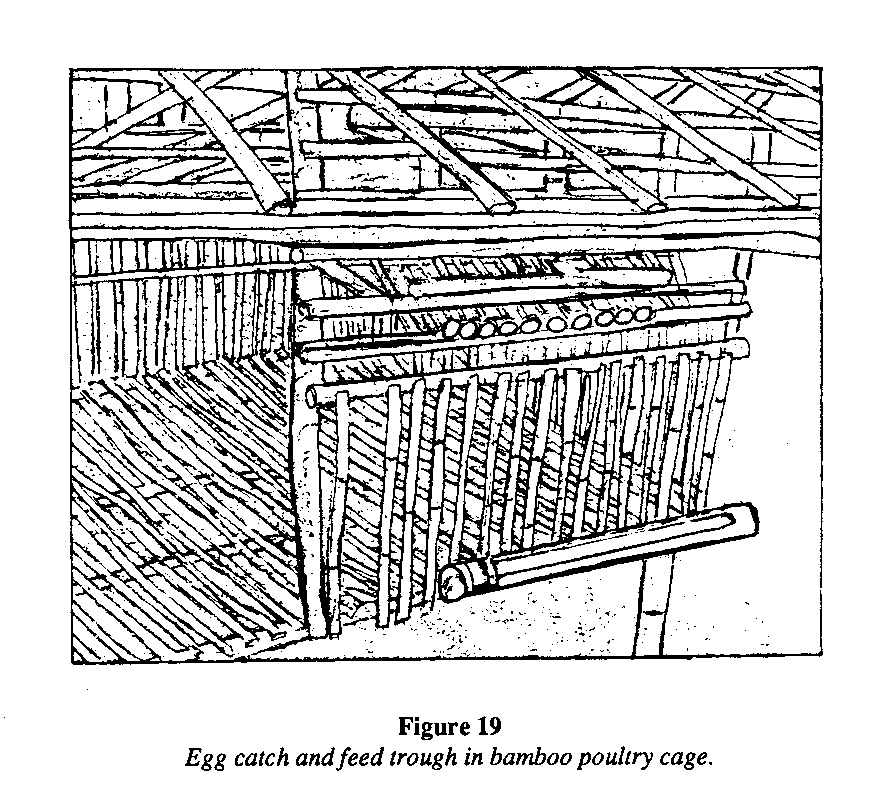
Colony cages can also be made from bamboo. The frame is made of small poles, with floor poles raised about 3 feet (.92 m) from the ground. The floor poles are covered with large bamboo stalks, split into strips 1 1/2 inches (4 cm) wide with the gap left between each of the floor pieces not exceeding 1 inch (2.5 cm) and not less than 3/4 inch (2 cm) to prevent eggs from falling through, yet large enough to allow droppings to pass through. Walls are constructed from vertical strips of bamboo 1 1/2 inches (4 cm) wide, spaced 1 1/2 inches (4 cm) to 2 inches (5 cm) apart. (See Figure 19.) Finally, the whole
structure can be covered with a thatch or iron-sheet roof. Tin shields on the support poles will keep rats and other pests from climbing up the poles. (See Figure 18.)

The cage on which these plans are based was fitted with a roost pole, which although isn't absolutely necessary, pleases the hens and gets them off the cold wire at night. Such a pole should be painted twice with crankcase oil that has been diluted half-and-half with kerosene, to repel blood-sucking mites.
The two nest boxes--which are adequate for 10 to 12 layers--must be kept darkened with a burlap blind to encourage use by the hens, since birds seek privacy and darkness at laying time. (See Figure 15.) The 1/2-inch (1.25 cm) square mesh of the nest floor will
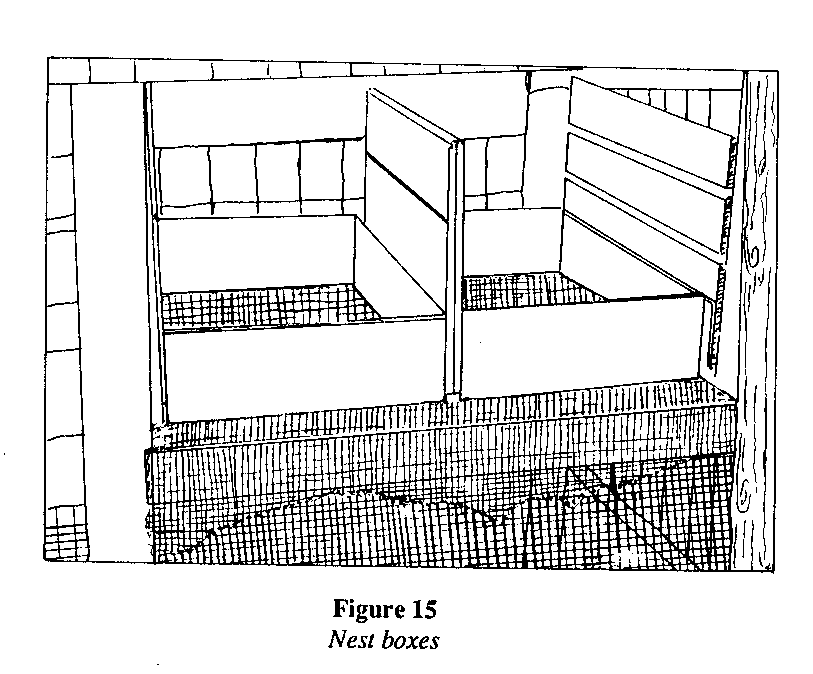
give a bit under the occupant's weight and prevents the egg from cracking when dropped.
One disadvantage of the conventional hen house is that eggs often accumulate in the nests and are sat on and kept warm by other hens entering the box. Naturally, the quality of the layings deteriorates very quickly under these conditions, and cracks and breakage often result. In the colony cage, this problem is eliminated by using a slanting nest-box floor that rolls the freshly laid eggs to an open air shelf. (See Figure 16.) The eggs will
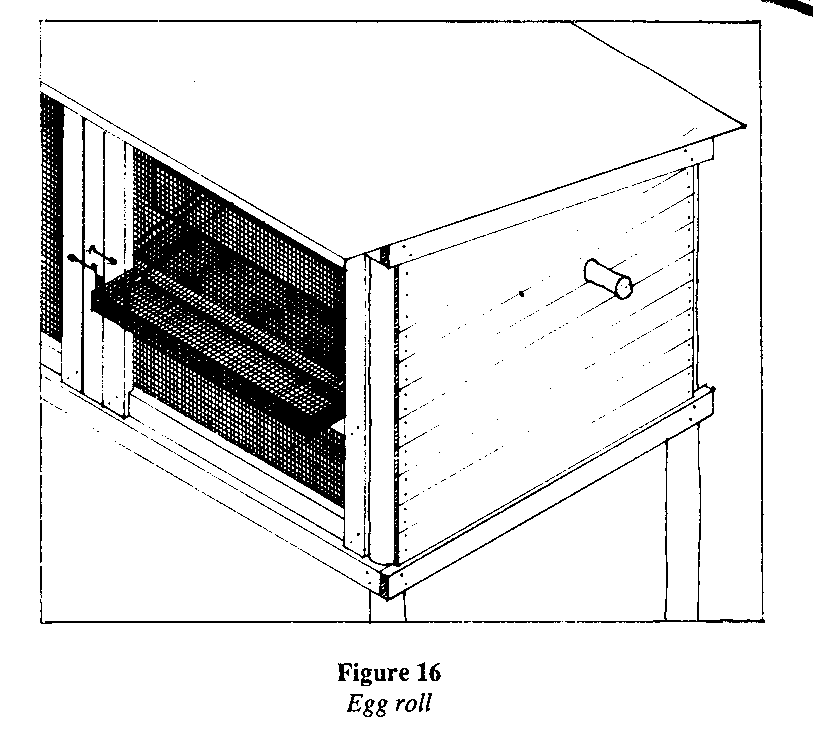
cool quickly and can be gathered whenever convenient.
Feeders and Waterers Many different types of feeders and waterers can be used. They can be made of wood, bamboo, or metal. If feeders are not properly constructed, the birds can easily waste more food than they eat! Spilled food means increased costs, and this cannot be tolerated. Waterers should remain clean at all times to prevent diseases.
Most people start their poultry project with chicks that are just a few days old. For the first two weeks of age the chicks can be fed from shallow troughs, pans (such as pie plates), or a solid bottom cardboard box cutdown to a 1-inch (2.5 cm) lip placed directly on the floor. At two weeks of age you should provide properly constructed feeders and waterers that prevent spillage and waste. Figure 20 through 24 show several designs. The
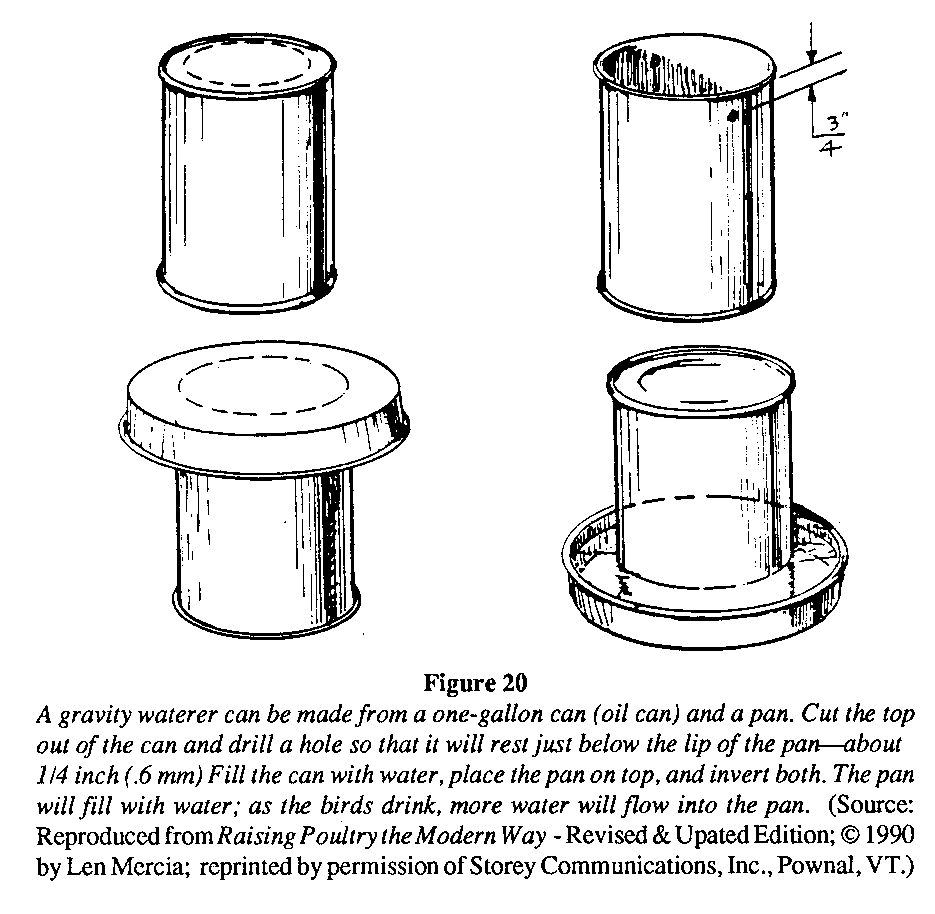
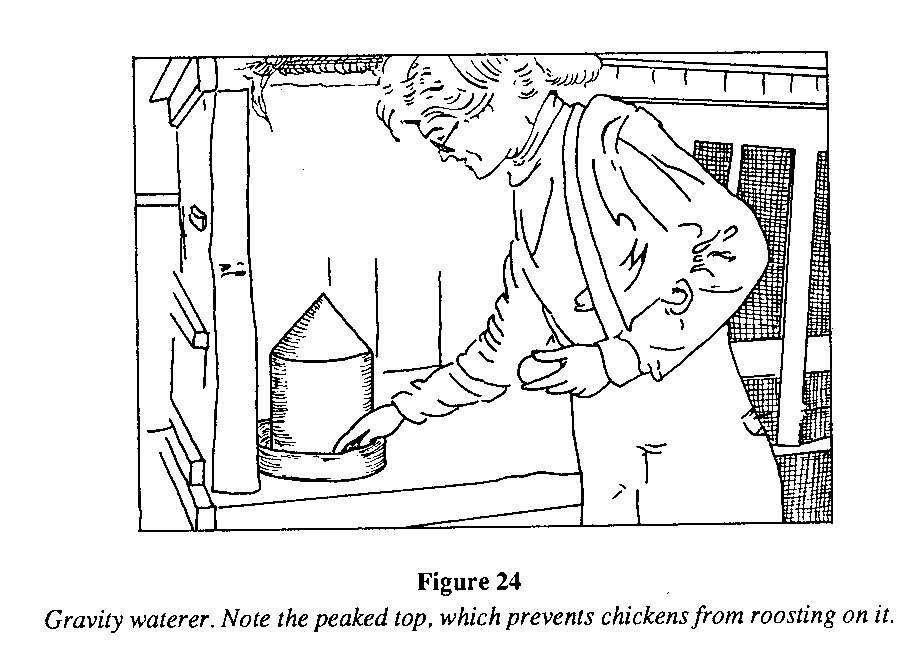
excellent results. The gravity waterer is excellent for all three types of housing since its large volume ensures less work and plenty of clean, fresh water for the flock. A particularly good design is shown in Figure 24. The peaked roof prevents birds from resting on top of the container.
Feeders The V-shaped feeders are nearly waste-proof and filth-proof and hold more feed than the flat-bottom feeders. For the colony cage a good feed container for older birds is a trough feeder fitted on the inside of the middle door. (See Figure 30.) By making this unit deep
and filling it only half-full, you can reduce wastage by beak-swinging hens.
In some countries local metal workers make gravity feeders that can be hung from the ceiling of the shed or cage. If these are used, the bottom of the feeder should be positioned at least 5 inches (12.5 cm) above the floor.
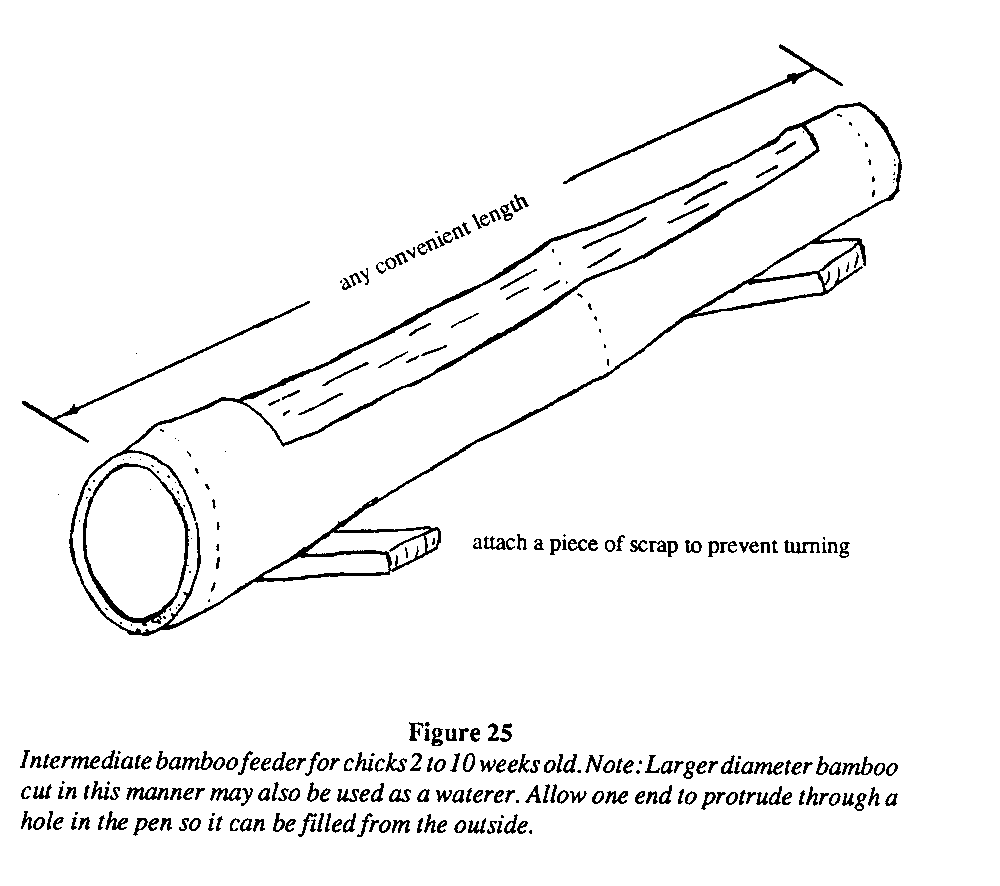
Here are several types of feeders that can be easily made. (see figure 25-29)
CARING FOR CHICKENS
Getting Started There are three ways to start your project: by buying day-old chicks, started chicks, or ready-to-lay pullets (female birds).
Day-old chicks will have to be kept warm under a brooder for several weeks. Started chicks are generally two months old, eliminating the need for home brooding, but they are very costly compared to day-old chicks.
Ready-to-lay pullets are five to six months old. They are very expensive, because the grower passes the overall cost of feeding and care on to you.
For our purposes, day-old chicks should be purchased from a reputable government or private hatchery. Day-old chicks come in two categories: sexed and straight run. With sexed chicks the females have been separated from the males (cockerels). Sexing chicks is difficult, but ensures getting mainly females. (5-10 percent of the females will turn out to be males due to sexing errors.
Straight-run chicks are the cheapest of all. A batch will usually contain 50 percent of each sex. If you wish to keep a laying flock of 12-15 birds you will have to start with at least 25-30 chicks. If straight-run chicks have been purchased, separate the two sexes as soon as you can tell them apart. Place cockerels in a separate pen. They are easy to recognize by their distinct comb and wattle development. These differences usually show up on White Leghorns and other light breeds before four weeks of age; in heavy breeds, before six weeks. Get rid of the cockerels as soon as they are heavy enough to be eaten or sold. The feed consumed per pound of gain goes up as birds get larger, and it is a rare case when cockerels can be raised profitably.
Transporting Chicks Chicks from commercial hatcheries will often be packed in a specially designed box. These boxes have small holes in the top and sides that can be punched out for better ventilation. Under tropical conditions, all of these holes should be punched out.
In hot weather chick boxes must never be stacked or kept in the sun or near other heat sources. When transporting by auto or lorry, check the floor under the boxes, as it may become extremely hot after several hours of driving. Additionally, take care to avoid wind and drafts. Needless to say, be sure to keep the boxes horizontal.
Under normal conditions chicks can survive their first 72 hours of transport without food or water. If there is a prolonged delay, they will have to be given water. This can be done by placing very shallow jar lids or the like in the boxes. Feed may be sprinkled directly into the boxes.
Brooding Chicks When brooding chicks on a small scale, very satisfactory results may be had by simply partitioning off a portion of a room within the home. One-half square foot (232 [cm.sup.2]) per chick will be more than adequate until the birds are six weeks old. A covering layer of litter (any dry moisture absorbent material such as sawdust, rice hulls, peanut shells, or sand) 1 1/2 to 2 inches (4 to 5 cm) deep, is placed on the floor of the brooding area. If chickens have previously been kept in the area intended for brooding, the space must be well cleaned, disinfected, and left to air out and dry prior to putting the litter down.
A brooding device, such as those shown in Figures 31 and 32, should be placed in the
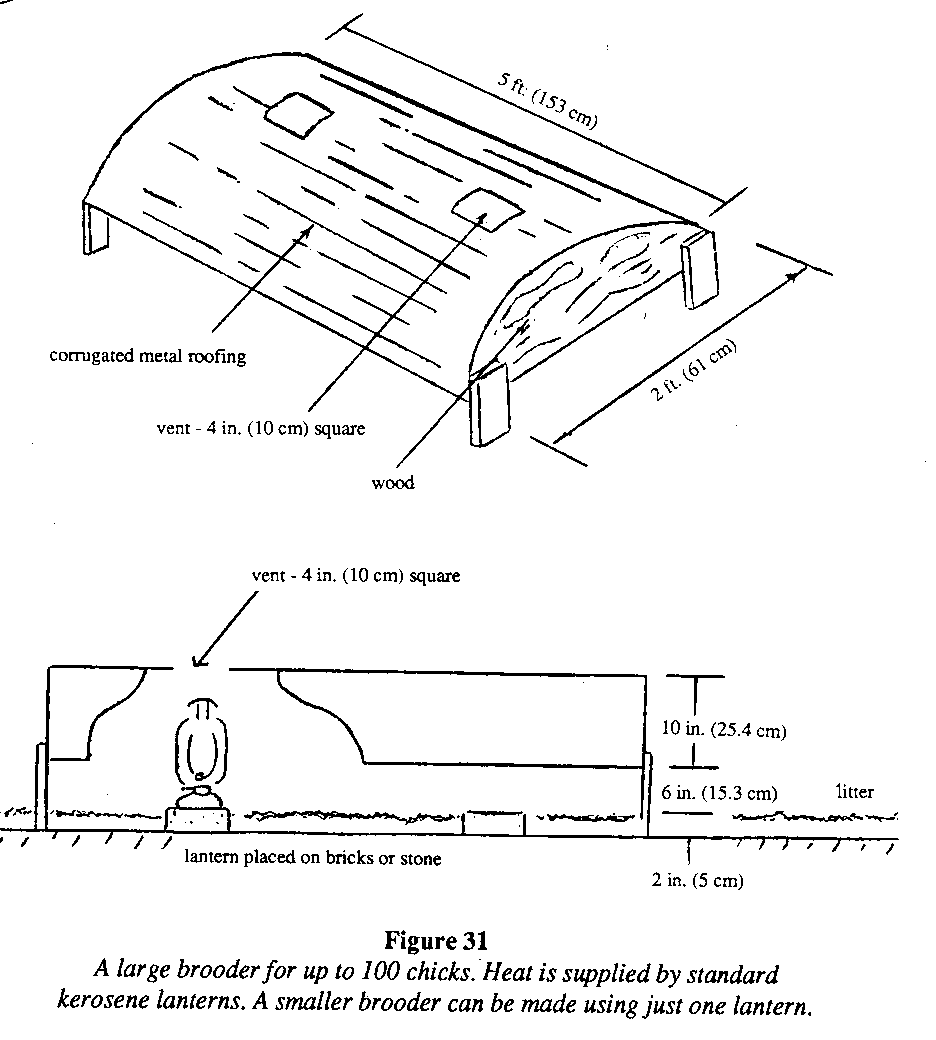
chicks.
When using the colony cage, chicks are started in the left-hand compartment with the removable wall in place. Newspaper, a jute bag, or a plastic sheet is placed on the wire floor and covered with about 2 inches (5 cm) of absorbent material to keep the young birds dry and clean. A cardboard box, as shown in Figure 32, fitted with a 60-watt electric
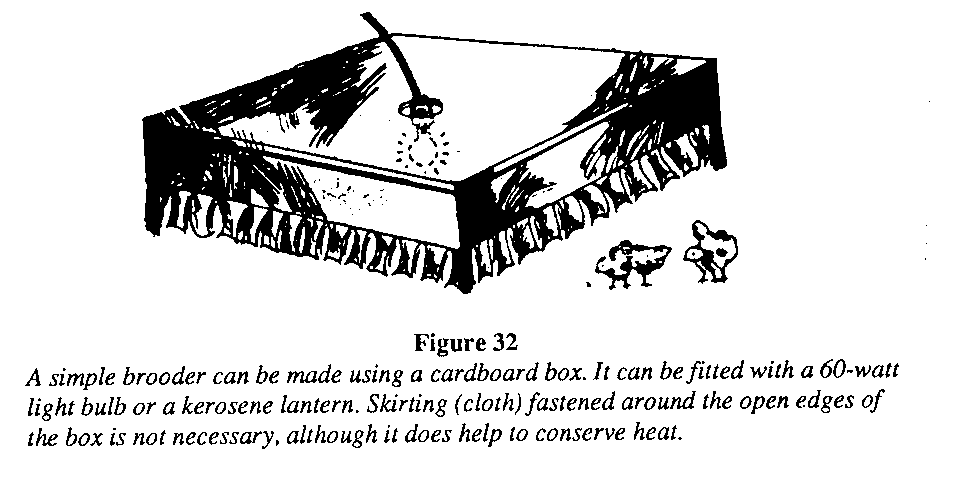
light bulb is placed in the rear of the compartment. Some people prefer to use kerosene lanterns, which are not subject to power failures and bulb burnouts. For seven to eight weeks the chicks are confined to the left-hand section of the cage. After that the box and litter can be removed and birds given the run of the cage.
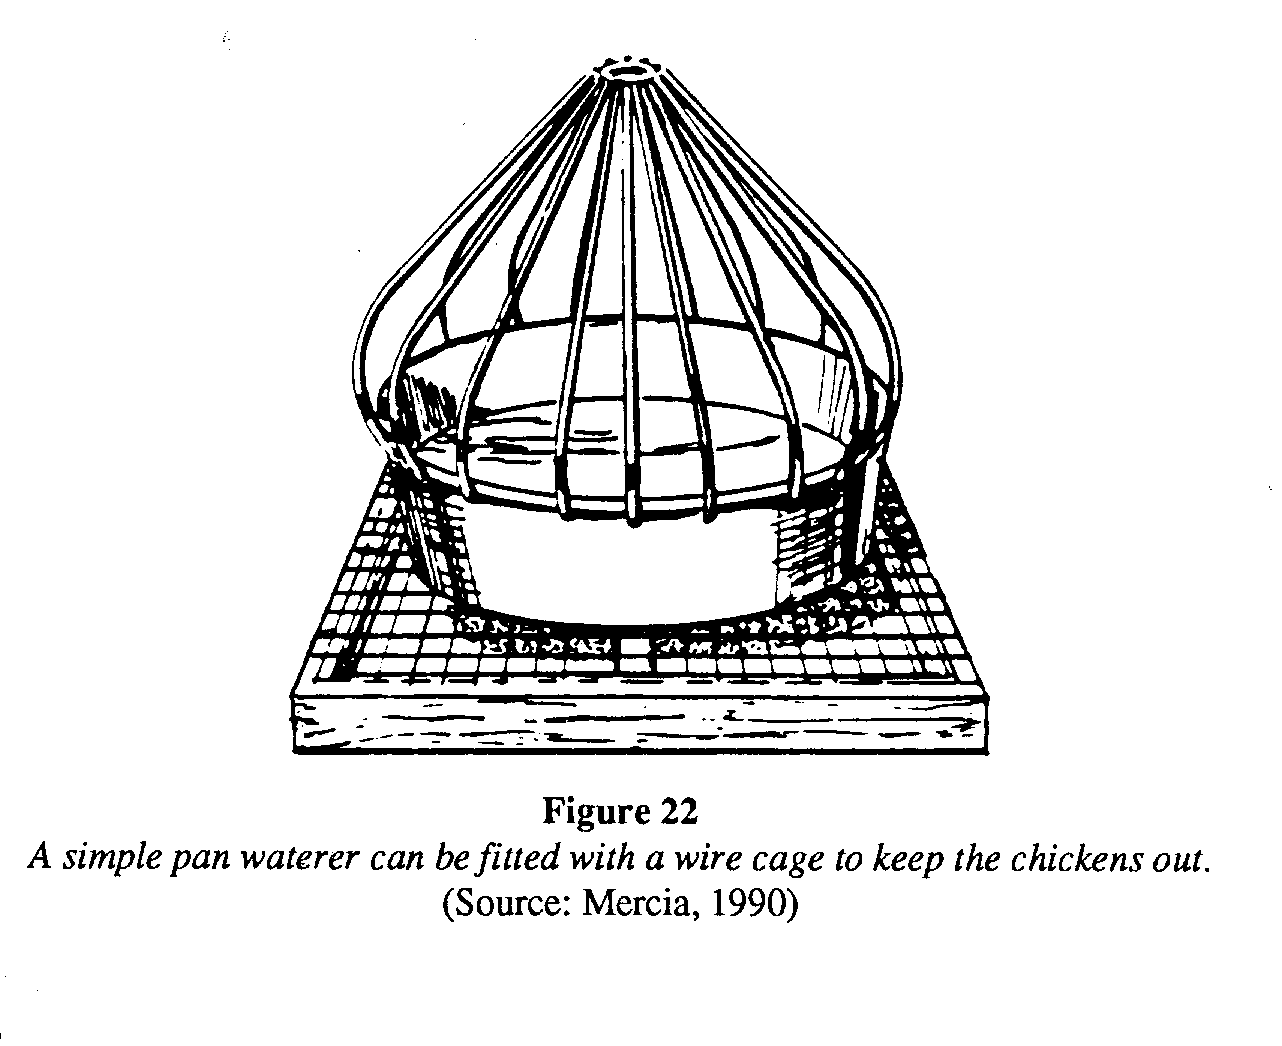
Feeders and waterers should also be filled and placed in the brooding area near the outside edges of the brooder prior to the arrival of the chicks. Waterers, pans, or other receptacles should have some type of guard on them to prevent the chicks from getting into the water and drowning or completely wetting their feathers. A simple wire-mesh grid can be used to cover pans or a dome-cage as shown in Figure 22. Gravity waterers
Feed, preferably in crumble form, can be placed in a cardboard box (one 18 inch x 24 inch [46 cm x 61 cm] box per 50 chickens) that has been cut down so that it has a lip of approximately 1 inch (2.4 cm). Shallow pans can also be used. Only enough feed to last 24 hours should be placed in the container; the residue is dumped in the litter and fresh feed supplied. One-half cup of coarse clean sand, grit, or tiny pebbles for every 25 chicks should be sprinkled on top of the feed once a week. The sand is used by the birds to help grind food in the gizzard.
Adequate feeder space is critical to the uniform development of birds. After two weeks, when regular feeders are used--at the rate of 2 1/2 linear inches (6.4 cm) of feeder space per bird--they should be kept full of feed at all times, and only cleaned out occasionally. After 10 weeks a minimum of 4 linear inches (10 cm) of feeder space per bird should be provided. Care should be taken to remove all objects that chicks might jump into, or catch a wing or leg on, get caught in, under, or behind.
Some mortality (0-3 percent) will occur during the first week and can be attributed to internally malformed chicks, or poor handling during hatching or while in transit. Some hatcheries give an extra 4 percent of chicks to help cover the loss.
Care must be taken during the first several weeks to avoid frightening the chicks, as this may cause them to panic and all run into a corner, where they pile on top of one another and smother. It is advisable to develop the habit of knocking on the door to the brooding area before entering. Dogs, cats, rats, and especially other chickens, must be kept away.
Chicks must be protected against chilling and overheating. The temperature under the brooder should be 90[degrees]F (32[degrees]C); in the third week the temperature can be reduced to 80, to 85[degrees]F (26.5 to 29.5[degrees]C). More can be learned by observing the chicks in the evening as they settle down than by using a thermometer. If they are evenly distributed around the edges of the brooder, conditions are good. If they are scattered out away from the brooder, the temperature is too hot. Inversely, if they are closely packed under the brooder, conditions are either too cold or drafty.
Whether chicks are comfortable or not during the day can be determined by chick "talk." Well-fed, comfortable chicks show their contentment in a low-toned "cheep." If uncomfortable from damp litter, hunger, or thirst, their "talk" is rapid and shrill. Ventilation should be good, but drafts or chill air must be avoided. Sometimes air guards are needed to protect chicks against drafts. (See Figure 33.) As chicks grow, more ventilation will be needed.
The litter should not be allowed to become damp. If it becomes at all damp, it should be stirred up, added to, or replaced. Most dampness problems come from poor ventilation.
As the chicks feather out, the brooder heat can be reduced gradually by turning down the lamps. The chicks should be fully feathered and completely weaned from the brooder by the eighth week. In the tropics or at times of the year when the nights are warm, brooder heat may not be necessary after the first week.
Chicks may at times develop vices such as picking their toes, feathers, or vents. This problem is usually triggered by overheating or something else wrong with the environment or management. Careful evaluation of the environment and daily routine should be made.
Chicks may also begin to peck at each other, and may kill each other. Immediate attention must be given to control cannibalism, otherwise high percentages of mortality will result. Picked birds showing any signs of wounds or blood should be taken out of the pen and not returned until completely healed. Some things that can be tried to stop an outbreak of cannibalism are: darkening the pen if possible; adding a small amount of salt to the water every second day, giving the birds some distraction by putting "toys" in the pen such as small pieces of newspaper, straw, or green leaves. If all else fails, the birds can be debeaked.
In the tropics during the dry season a situation known as "pasting up" can occur quite easily when the fecal material passing out of a chick accumulates around the vent, dries, and blocks further passage. To treat, carefully try to crush accumulated matter with fingers (do not pick) or wash with warm water into which a few drops of iodine have been added. Diseases that affect chicks will be discussed later.
Growing Period The growing period in a pullet's life is from the time it is weaned from dependency on artificial heat until the time it reaches sexual maturity and is ready to begin laying eggs. Light weight breeds begin laying at approximately 21 weeks of age, and heavier breeds begin two weeks later.
A prudent person will spend some amount of time each week observing the flock and asking: Are some birds being crowded away from feed and water? Is the feed depth in the troughs proper? Has stale, picked over feed accumulated in the bottom? Is the feed depth great enough for birds with grown out lower beaks to get enough feed? Are the feeder reels set in proper position? Care must be taken to ensure that birds always have adequate ventilation, pen, feeder, and waterer space. The following chart gives the recommended space adequate for birds during the growing and laying period:
Table 5. Pen, waterer, and feeder space requirements.
Age in weeks Space 0-6 1/2 sq. ft. (.023 [m.sup.2]) 7-12 1 sq. ft. (.093 [m.sup.2]) 13-16 2 sq. ft. (.37 [m.sup.2]) 17-during laying period 3 sq. ft. (.84 [m.sup.2])
Age in weeks Water 0-3 1/4 linear inch (.7 cm) 3-8 1/2 linear inch (1.25 cm) 8-during laying period 3/4 linear inch (2 cm)
Age in weeks Feeder 0-2 two 18 in. x 24 in. x 1 in. cartons per 100 (46 cm x 61 cm x 2.5 cm) 2-10 2 1/2 inches (6.4 cm) of intermediate feeder 10-during laying period 4 inches (10.2 cm)
Growing birds are subject to the same vices as chicks in the brooding period, and the same means of control are used. Some people routinely debeak all their birds when they reach 17 to 18 weeks of age to prevent cannibalism.
During the growing period the birds should be observed closely for proper development. It is not economical to keep weaklings; they should be disposed of without hesitation because they will never do well. The greatest hazard to the birds during the growing period is an outbreak of coccidiosis (See Diseases and Their Control).
Laying Period Birds should begin to lay at around 21 to 22 weeks of age, earlier in the case of a few, or later in the heavier breeds or if the flock is growing slowly due to illness or other management factors. A good laying bird, properly managed, should lay 19 to 20 dozen eggs during a laying cycle, usually 12 to 14 months. Any eggs not consumed by your family can be sold to neighbors for extra income. There is also the possibility of an occasional meal of chicken when poor producers are culled (removed) from the flock. The rate of lay of a flock is figured by dividing the number of eggs laid in one day by the number of layers. Birds should climb from a 6 percent rate of lay at 22 weeks of age to a peak of around 86 percent at 30 weeks. Thereafter, there will be a steady decline in egg production as can be seen in Figure 34.

It is extremely important that an ample supply of good feed and water always be available to birds during the laying period. The highly sophisticated breeding behind commercially hatched chickens will cause the individual bird to continue to lay at the expense of its own body weight until there is such a marked drop in its weight that it will go out of production completely for a long period of time.
Because commercial feeds cost money, there must be a return in eggs for the food given to chickens. Hens will "show" if they are laying eggs by the amount of coloring (pigmentation) displayed on various parts of their bodies. Before the pullets start laying there is a visible yellow color or pigment in the vent, eye ring, beak, and shank of the yellow skinned breeds, which becomes bleached during egg production. The yellow color comes from feed eaten by the birds, and is the same material that colors the yolk of the egg. This coloring goes into the eggs, and later fades from various parts of the hens' bodies as they lay more eggs. (See Figure 35.) After about six to nine eggs have been
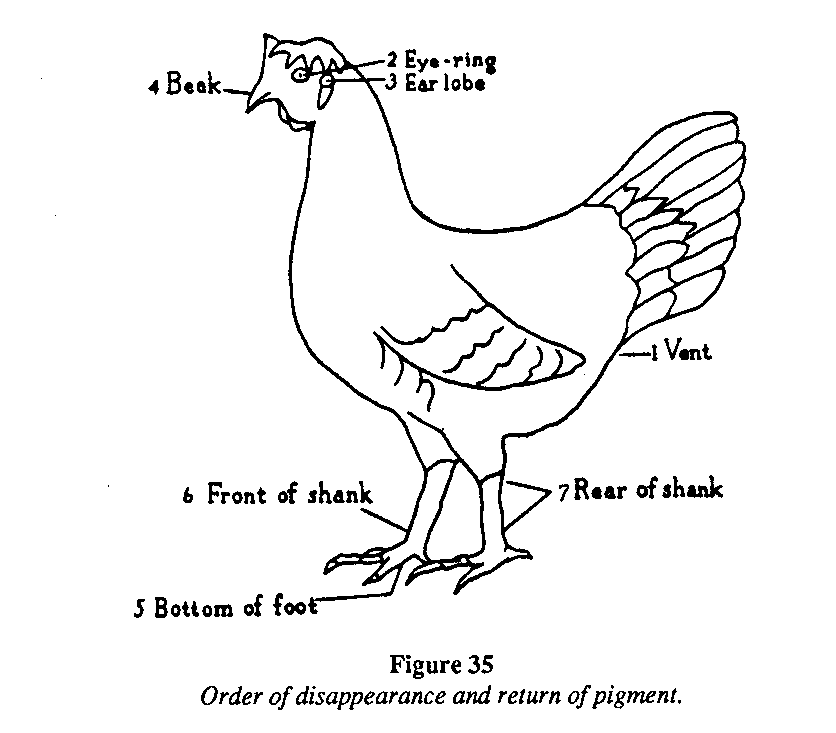
laid the yellow color fades from the vent, which is the first to bleach. In many cases the production of about a dozen to 15 eggs will bleach the eye ring. The ear lobes bleach a little more slowly than the eye rings. The beak requires from four to six weeks and the production of from 30 to 40 eggs. The beak loses color first at the base until it finally leaves the point of the beak. The shanks require the production of from 125 to 175 eggs to be completely bleached. As soon as the hen ceases to lay, the color returns to the various parts in the order in which it disappeared, but in a shorter time than it took to fade out.
Keep in mind that birds with free access to green plants or lots of yellow maize (corn) will not bleach out as rapidly as birds lacking these feeds, whether or not they are laying. Another way to distinguish layers from nonlayers is to examine the spread of the pelvic bones. (See Figure 36.) Birds with a spread of only one or two fingers are not good layers
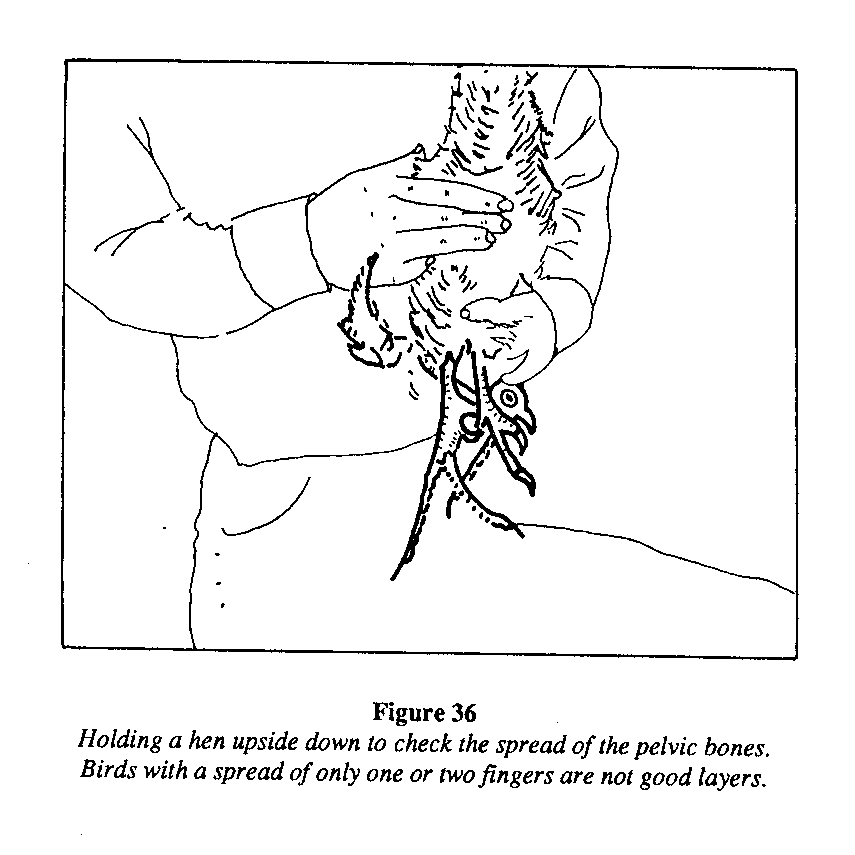
and should be disposed of. With the aid of a weak light, you might try culling after dark when the birds are quietly settled on their roosts. A summary of characteristics of layers and nonlayers is shown in Table 6.
Table 6. Characteristics of layers and nonlayers; high and low producers
CHARACTERISTIC OF LAYERS AND NONLAYERS
Character Laying Hen
Nonlaying Hen
Comb Large, red, waxy, full
Small, pale, scaly,shrunken
Wattles Large, prominent Small, contracted Vent Large, moist Dry, puckered Abdomen Full, soft, velvety, Shallow or full of hard fat pliable Pubic Bones Flexible, wide open Stiff, close together
CHARACTERISTIC OF HIGH AND LOW PRODUCERS
Vent Bleached, large, oval Yellow, dry, round, moist puckered Eye Ring Bleached Yellow-tinted Beak Bleached or bleaching Yellow or growing yellow Shanks Pale yellow to white, Yellowish, round, full thin, flat Head Clean-cut, bright red, Coarse or overrefined, balanced dull, long, flat Eyes Prominent, bright, sunken, listless sparkling Face Clean-cut, lean, free Sunken or beefy, full from yellow color yellowish, feathered and feathers Body Deep Shallow Back Wide, width carried Narrow, tapering, out to pubic bones pinched Plumage Worn, dry, soiled Smooth, glossy, unsoiled Molt Late molter Early molter Carriage Active and alert Lazy and listless
Source: Culling For High Egg Production, Vermont. Agricultural Extention Service, Circular 115Ru
Once each year chickens will renew their plumage (feathers). The process of replacing old feathers with new ones is called molting. When a hen starts to molt she will stop laying eggs. Hens that start their molt early, after eight or nine months of production, are called early molters. Other hens lay for 12 to 15 months before they molt, and are called late molters. To make a high egg record, hens must molt late in the year and renew their feathers in eight to ten weeks. Hens that molt early in the year may take six months to renew their feathers. Figure 36 shows the order in which slow and fast molters lose their
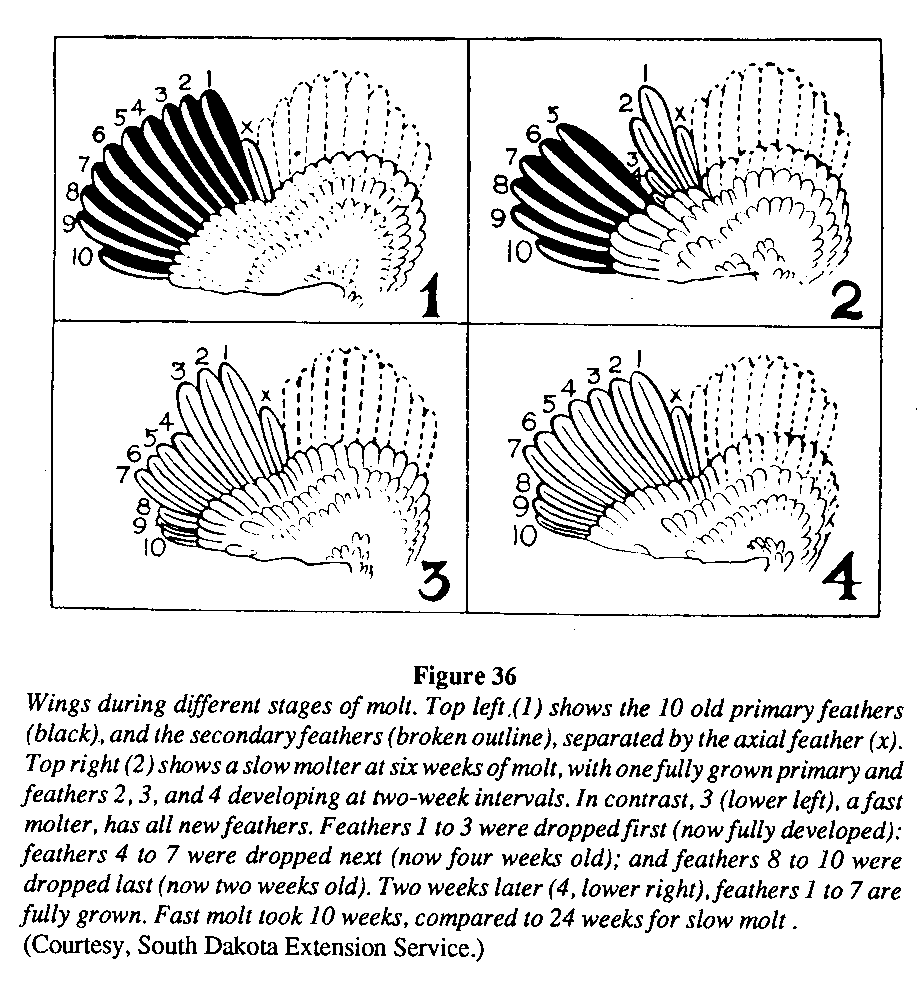
primary wing feathers. A slow-molting hen will drop just one primary feather at a time over a long period of time. With good strains of laying birds, the hens will drop a group of several primaries and then very shortly after drop more, thus going through their molt quickly and returning to production. Although most birds will stop laying during their molt, some of the best strains will renew half or more of their primary feathers before they finally stop laying.
The first year of laying is always the highest period of production, and because egg production declines with each succeeding year, many poultry experts advise backyard poultry farmers to replace the entire flock on a yearly basis. If hens are kept for a second year, only the best should be kept. All the hens should be sold or eaten by the end of their second laying year.
If you use the colony cage, replace the partition (removable wall) when the hens' production declines and prepare for a new batch of chicks. Reducing the floor space available to the hens while the chicks are growing will not be a problem.
Laying hens will on occasion "go broody." They will persist in sitting on their eggs in an instinctive attempt to hatch them (not a problem with the colony cage). A bird in this condition will gather eggs under her, sit on them, ruffle her feathers, and peck at anyone trying to dislodge her. Such a broody hen should be isolated with feed and water in a small separate pen or box that has a floor of wire or thin slats. The air circulating under and around the bird will frustrate her instinctive attempt to make a warm nest, and she will probably be broken of broodiness in a few days, after which she can be returned to the flock.
Handling Eggs and Meat You control everything that happens to an egg from the time it is laid until it is eaten or sold. The production of high-quality eggs requires careful attention to a few details to avoid heat damage, cracks, and dirt. No elaborate equipment is necessary.
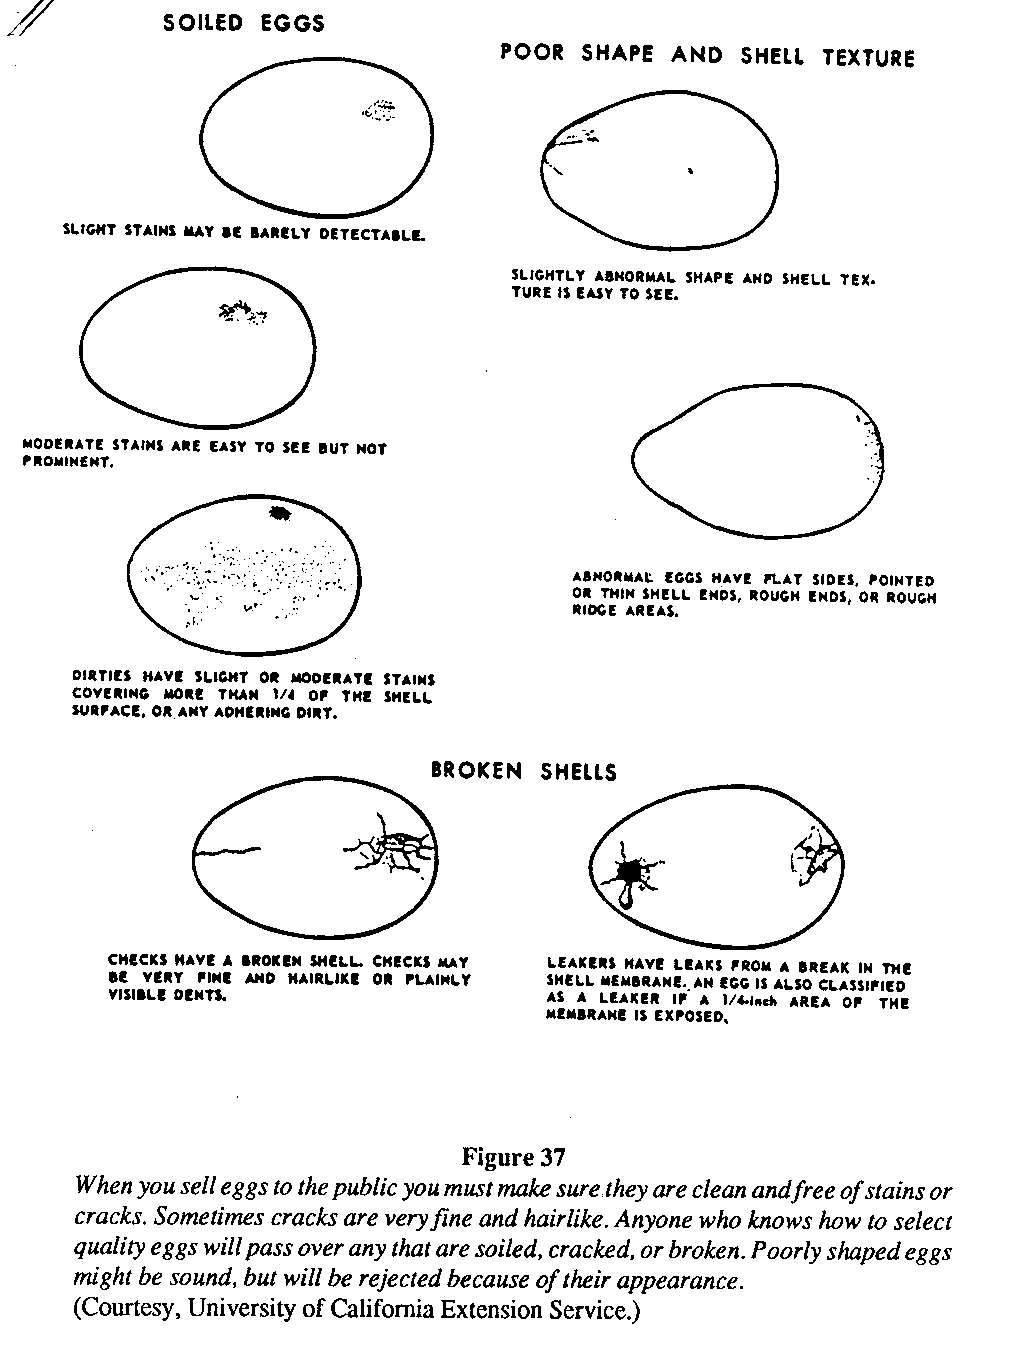
Eggs should be gathered at least twice a day throughout the year, and more often in hot weather. Frequent gathering not only helps prevent deterioration due to heat, but reduces the proportion of cracked, broken, and dirty eggs. (See Figure 37.)
Nests should have an adequate supply of clean nesting material in them at all times (except colony cage nests which have slanted wire bottoms). Dirty eggs should never be washed, but should be cleaned by lightly rubbing with fine sandpaper. As soon as the eggs have been gathered, they should be taken to a cool place and kept there until sold or eaten. Eggs still warm from the nest should be left in an open, coarsely-woven basket or tray until they have cooled. Rapid cooling is an important step in preserving quality and can be aided by allowing air to circulate around each egg. The range of temperature in which eggs may be held is from 29[degrees]F to 60[degrees]F (- 1.5[degrees] to 15.5[degrees]C). At temperatures above 60[degrees]F (15.5[degrees]C) deterioration can be thought of as comparable to the effect of heat on butter. The fact that cooled eggs will attract condensation when they are returned to a warm environment is of no consequence. Preferably, eggs should be refrigerated. In tropical areas without refrigeration egg storage may be a problem. A large crock or a section of culvert may be sunk in the ground in a room on the north side of a building to form a suitable holding place. Eggs may become tainted by strong odors and should never be stored in any place that smells musty or of kerosene. Eggs not consumed at home should be marketed at least twice a week, more often if possible.
Kill chickens the same day the meat is to be used unless are frigerator is available to keep it from spoiling. To kill chickens, hang them by their feet and cut across the veins in the throat with a sharp knife. Let all the blood drain into a container. The blood can be cooked, dried, and added to feed for other chickens (some people cook with the blood).
To remove feathers, place the bird (after it has been bled) in water at 130[degrees] to 135[degrees]F (54[degrees] to 57[degrees]C). This temperature is below boiling, but too hot to put your hand in. As soon as the feathers are well soaked with hot water, pluck them as quickly as possible. A small amount of soap or detergent in the water will help wet the feathers. Small feathers can be seared over an open flame.
To remove the internal organs, cut a small circle around the vent. Cut down towards the breast making an opening large enough to insert your fingers and pull out the intestines. Don't forget to remove the crop and trachea in the throat area. Be sure to save and eat the heart, liver, and gizzard. (See Figure 38.) The gizzard should be sliced open and the

contents removed and discarded. The gall bladder (a small sac filled with liquid) should be carefully cut away from the liver before cooking, taking care not to break the sac.
It is natural for some people to become attached to their birds. They view them more as pets than food for the table. Nonetheless, the object of raising poultry is to provide more food and possibly earn a little extra income. Try to keep this in mind throughout the project. If you find it impossible to kill your chickens, you can always sell them in the marketplace.
DISEASES AND THEIR CONTROL
It is always best to prevent disease before it occurs, because treating disease can be very difficult. Dr. H.R. Bird offers the following advice:
1) Feeding chickens a well-balanced diet will prevent them from developing nutritional diseases. Leaving out even one vitamin or mineral can produce slow growth, susceptibility to disease, and high mortality.
2) Whether a chicken flock is large or small, it is a good idea to keep it separated as much as possible from other poultry (ducks, geese, turkeys, etc.). Do not buy adult or half-grown birds and add them to your flock. Always raise young birds separately from mature stock.
3) Provide poultry with clean waterers and feeders and well-ventilated housing.
4) For birds housed in pens, provide sufficient ventilation to keep the litter dry enough so the birds can scratch in it. It should never become wet or sticky. Wet litter around waterers should be replaced. Stir litter at least once a week.
5) Isolate sick birds from the main flock immediately. Bury dead bird deeply.
6) Keep rodents (rats and mice) and unfriendly animals away from the flock.
7) If your birds are housed in cages, the cages should be constructed with wire netting or slats to allow the manure to fall through to the ground.
8) Observe nest boxes. Clean when necessary and add fresh nesting material.
9) Protect chickens from intense sun, rain, and drafts.
10) Give fresh greens to chickens at least once or twice a week.
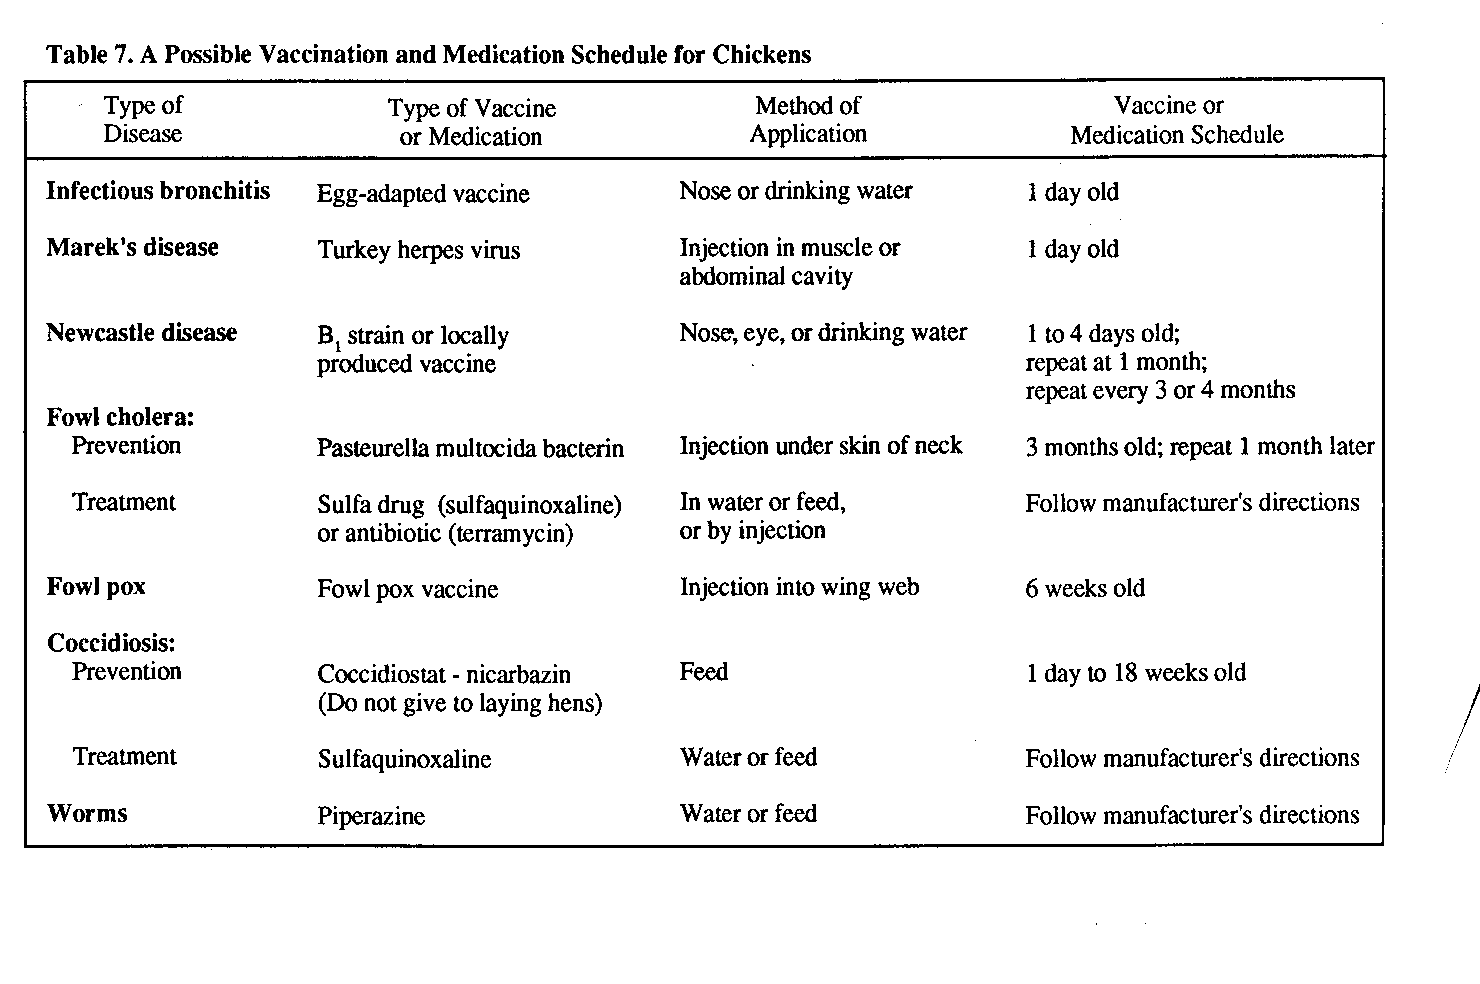
11) Follow the vaccination program recommended by your agricultural extensionist or veterinary officer. (See Table 7.)
In case of serious outbreaks of disease, Mr. Krusch advises that a thorough diagnosis be done by a qualified person, such as a veterinarian or pathologist. It is preferable that the post-mortem examination and diagnosis be conducted in a laboratory where microscopes and other apparatus are available. It is best if live sick chickens can be taken to the laboratory for examination. Along with the chickens take complete information concerning the nature of the disease outbreak, the number of birds affected, and general history of the flock. It is not advisable for the inexperienced poultry raiser to attempt to diagnose any illness other than coccidiosis and worms. Generally, a person qualified to make a diagnosis can also make suggestions on the cause and treatment of the trouble.
It would be impossible to list all the diseases and problems that affect poultry in a publication of this type. However, following is a description of the more commonly encountered ailments.
Pullorum This is a potentially deadly disease caused by a bacteria (Salmonella pullorum) that usually affects chicks under three weeks of age. It is transmitted from infected hens through their eggs to the chicks. Although there is no cure for this disease, it can be prevented. Always make sure you buy chicks from hatcheries that maintain pullorum-free breeding stock. Reputable hatcheries test for pullorum and practice good sanitation.
Fowl Cholera This bacterial disease is also known as hemorrhagic septicemia. The disease is passed through the droppings of infected birds. In severe cases, the bird may die in a period of from 12 to 24 hours. Birds may appear to be normal one day and be found dead the next day. Birds become weak and droopy, sitting with their eyes closed and necks contracted. Upon autopsy the heart and lungs often have hemorrhages and red spots. This disease is best prevented through a vaccination program.
Coccidiosis The greatest hazard to the birds during the growing period is an outbreak of coccidiosis, an infection caused by one or more species of a group of protozoan organisms known as coccidia. (See Figure 39.) The first signs of coccidiosis are paling and low vitality.
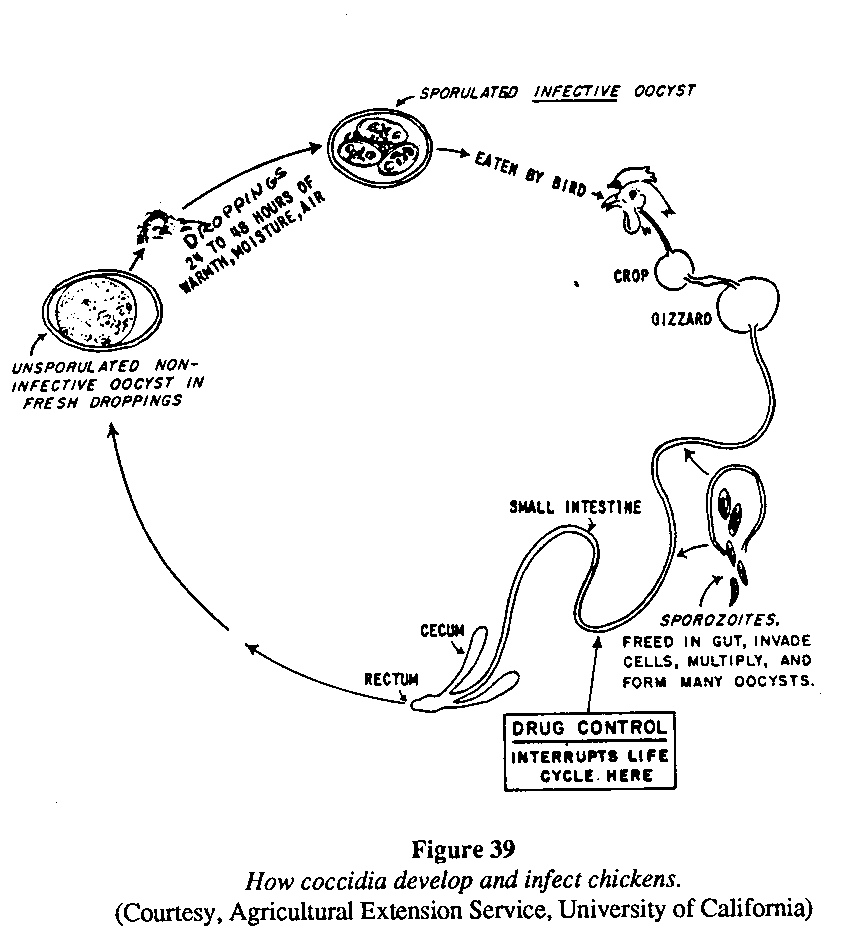
Feathers begin to look rough and dull. Gradually, the birds will droop and stand hunched with heads drawn and tails hanging. Affected birds are apt to crowd together. Diarrhea may or may not accompany the disease. Blood will begin to appear in the feces approximately four days after the original infection.
If the symptoms are recognized in time, the outbreak can be quickly and effectively controlled by the use of any good coccidiostat used in the water. Since coccidiosis strikes extremely fast, especially under hot, humid conditions, it is strongly recommended that anyone intending to keep poultry locate and obtain several days' supply of a coccidiostat at the time the chicks are purchased. Coccidiostats and directions for their use are usually available at dispensaries, pharmacies, agricultural extension stations, or veterinary offices.
Newcastle This is a highly contagious disease caused by a virus. It spreads rapidly from bird to bird. In chicks the most common symptoms are gasping, coughing, and hoarse chirps. Loss of appetite and a tendency to huddle are also common indications. Laying flocks often become infected all at once. They display a characteristic symptom--backward twisting of the head. Egg production falls to almost zero and the shells are often soft. The best way to prevent this disease is through vaccination. Many government hatcheries will vaccinate their chicks against this disease before selling them to the public.
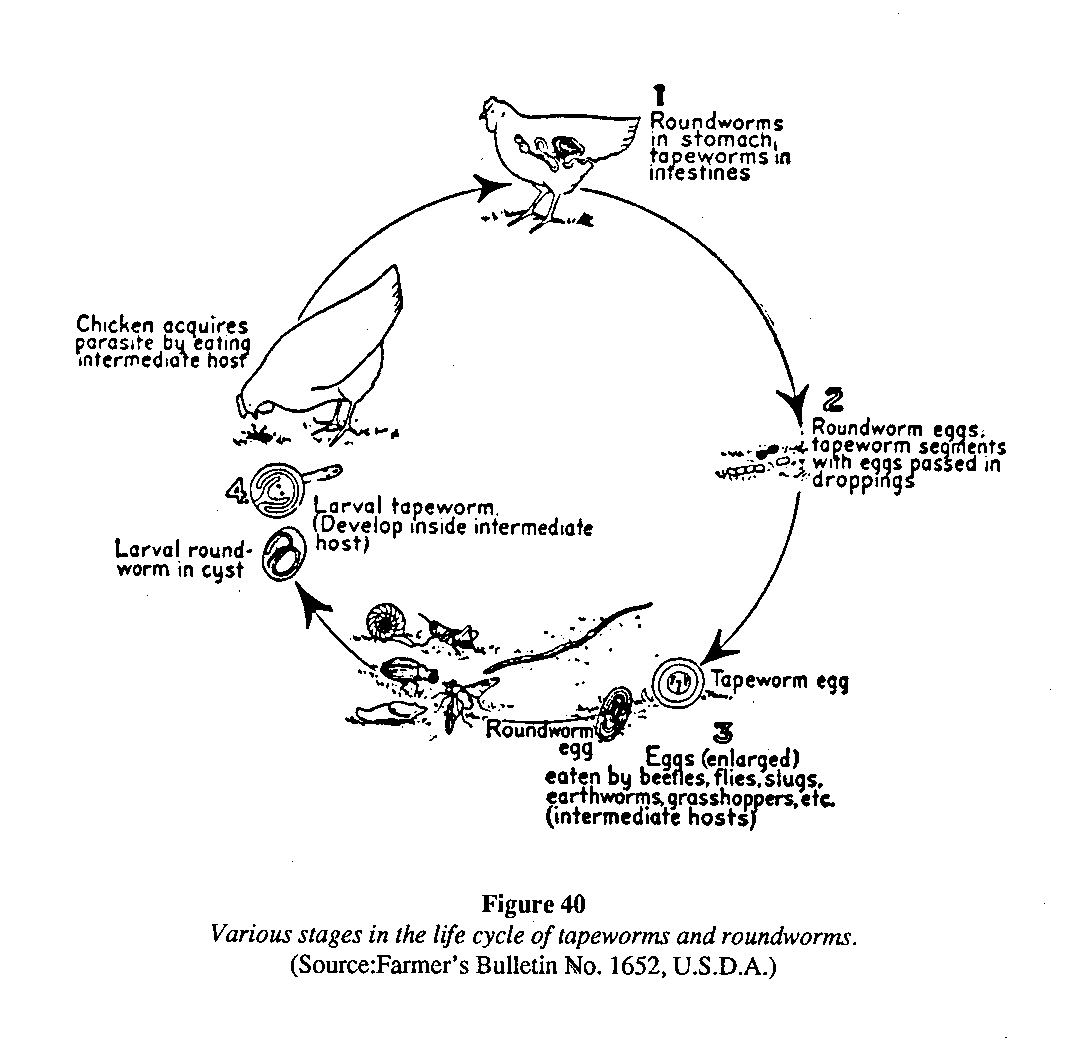
Worms The presence of worms in poultry will cause poor growth and lower egg production. Prevention through the use of good sanitation is the best cure for all kinds of worms. Worms are generally not a problem when wire or slatted floors are used. If worms are suspected and show up in the intestinal tract during a post-mortem examination, the flock
should be wormed immediately and every 30 days thereafter. Piperazine citrate is the basic active ingredient in mostworm medicines sold for use in cattle, swine, poultry, and even humans. Since different manufacturers package the drug in varying concentrations it is best to follow the manufacturers recommended dosages per weight; if the manufacturer recommends a 5cc dose for a 40-pound child and the birds weigh 4 pounds each, 5cc will treat 10 birds. Water should be withheld from the birds three hours prior to treatment. The required amount of medication is then mixed with enough water to last the birds 1 1/2 to 2 hours. Provide clean, fresh water as soon as the medicated water is finished. <see figure 40>
Lice and Mites Lice are biting insects that cause the birds a great deal of suffering. They cause irritation of the skin with scab formation. The most common louse affecting adult birds is the body louse. (See Figure 41.) When the birds are badly infested, growth and egg production can
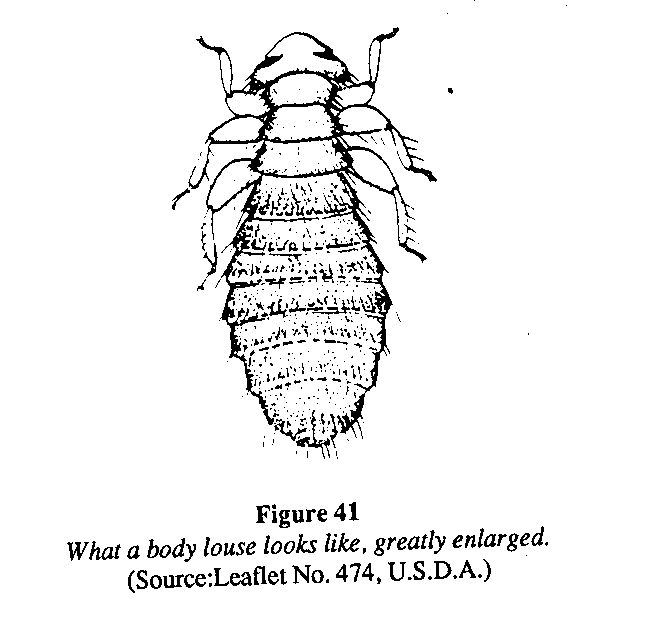
suffer. Several medicines (dusting powders) can be used to control lice (Carbaryl is effective).
Mites are also biting pests which usually live in the cracks and crevices of the poultry house and attack the birds at night. They are often very prevalent on roost poles. One of the best ways of controlling mites is to use a spray containing equal parts waste crankcase oil and kerosene. It should be thoroughly applied to the building, the roost poles, and equipment (except feeders and waterers). This is a good yet inexpensive practice and should be done as a matter of course.
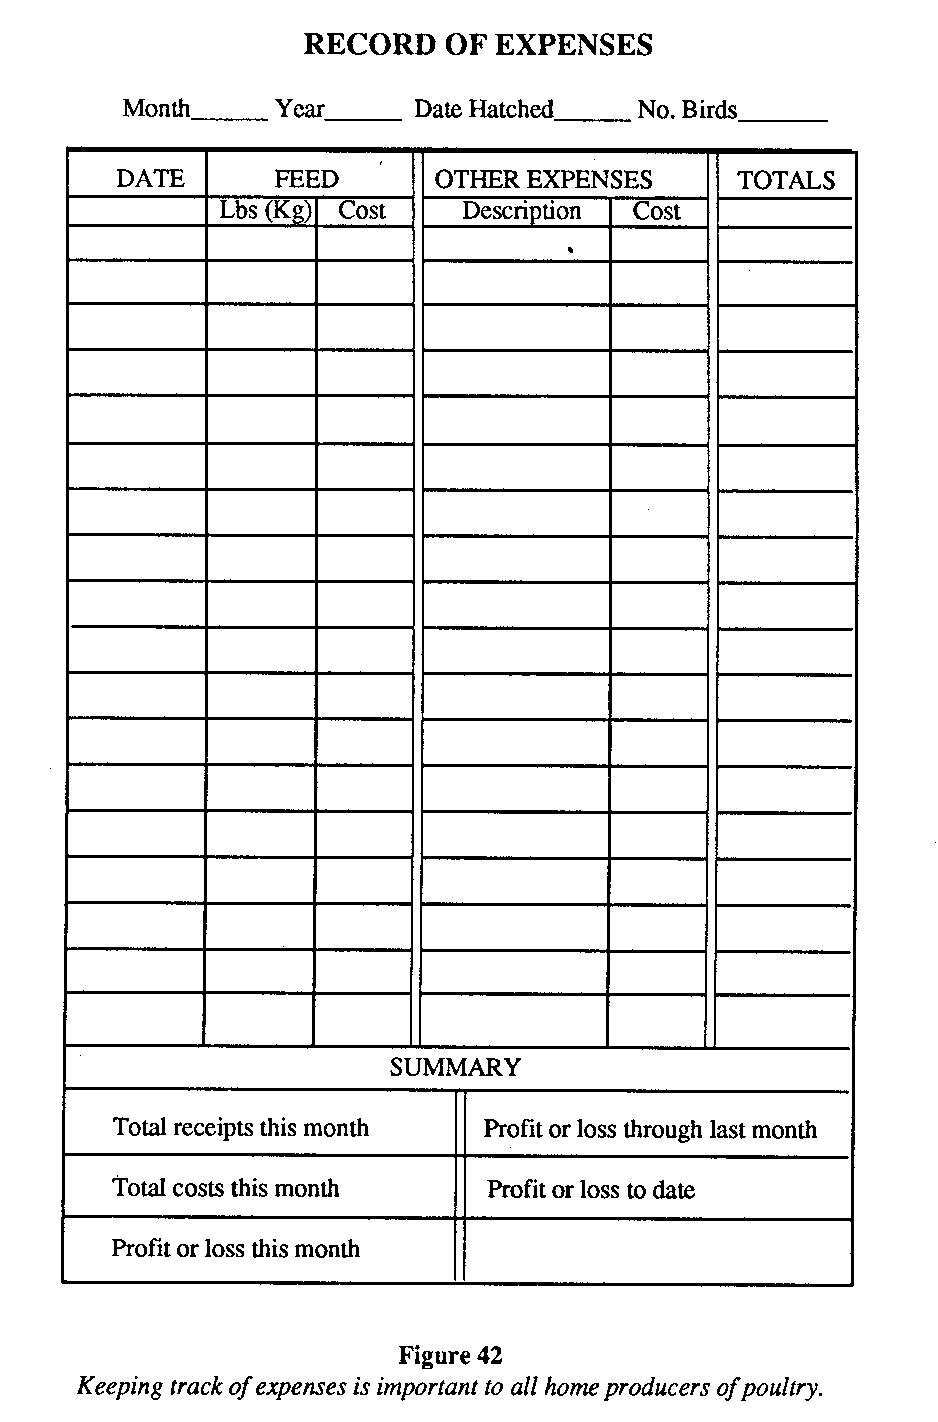
RECORD KEEPING
Records need not be complicated, but anyone who keeps poultry should keep records. Simple records will help you keep track of the performance of hens from when they first start to lay through their final weeks of production. It is very important to keep an accurate account of total expenses and income from eggs and meat. Figures 42 and 43
The percentage, or rate of lay, of a chicken flock can easily be converted into feed cost per dozen eggs by using the information contained in Figure 44.
RAISING DUCKS
Illustrations by Marina Maspero
SELECTING A BREED OF DUCK
There are many different breeds of ducks. The one you select will depend upon the purpose for which it is to be raised. If ducks are kept mainly for a little extra meat, then local village ducks or Muscovy ducks can be used. If your interest is in a breed that produces lots of eggs, then the best choice might be the Khaki Campbell, Thai, or Indian Runner. Other breeds offer combinations of high egg and meat production.
Local Village Ducks For centuries people have been keeping local breeds, particularly for their excellent quality meat. They are a good choice breed for the beginner, as they are very resistant to bad weather and periods when feed is in short supply. Village ducks are very good at foraging for their own food. Unfortunately, their legs are so short that their bodies almost touch the ground, and they have difficulty walking long distances. (See Figure 1.)
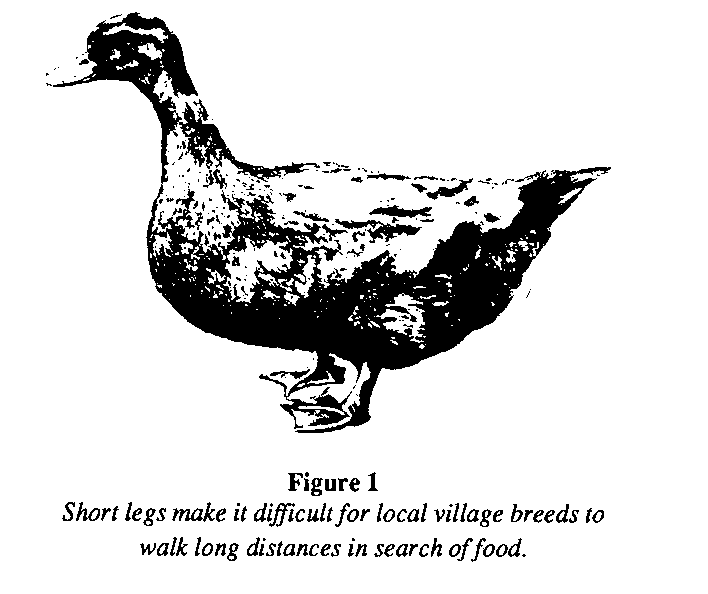
Generally they lay only 60 to 80 eggs a year.
Khaki Campbell This duck was produced in England by a breeder named Mrs. Campbell, who crossed English and Indian ducks. They are khaki colored--light yellowish brown--and are about the same size as village ducks, except they are more slender with slightly longer legs. (See Figure 2.) The average weight of each duck is 1 1/2 to 2 kilograms (3.3 to 4.4
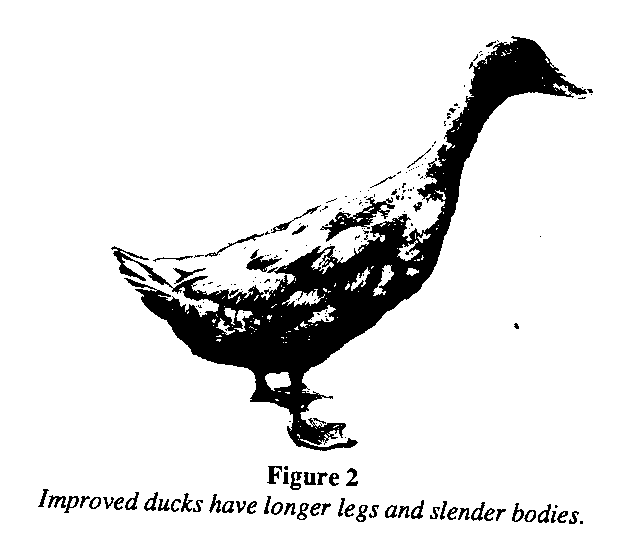
lbs.). They stand tall and are able to walk long distances in search of food. The male has a dark brown lower back, tail feathers, head, and neck. The upper back is greenish-black and the rest of his plumage is khaki. The legs and toes are brown. A single duck is capable of laying 250 to 300 or more eggs a year.
Indian Runner This duck holds its body almost straight from feet to head. The Indian Runner is second only to the Khaki Campbell in egg production and a single duck will lay 250 or more eggs per year. Generally these ducks are pure white with orange to reddish-orange feet and legs. Both males and females weigh approximately 1 1/2 to 2 kilograms (3.3 to 4.4 lbs.).
Muscovy The male is large, about 4 to 5 kilograms (8.8 to 11 lbs.), and the female weighs about 1 kilogram (2.2 lbs.) less. Red, fleshy lumps of skin are present around the beak and eyes. Plummage usually ranges from white to black and white, and they have a crest of feathers on the top of the head that can be raised or lowered at will. Unlike the other breeds mentioned, these ducks are good fliers and will often perch on walls or buildings. While the females are poor layers, they do sit on their eggs to hatch them and make very good mothers. Approximately 10 to 25 eggs will be laid three times a year. Muscovy ducks are excellent for small farms as they are very good foragers and can raise their own young. The eggs of the Muscovy take five weeks to hatch instead of the four weeks required by other ducks. The Muscovy male will often mate with females of other breeds of ducks; the crossbreed that results is generally fast growing and makes an excellent market item. Unfortunately, this type of breeding results in sterile ducks; and although the males may be seen to mate with female ducks, the eggs produced are all infertile; the female cross does not lay eggs at all.
White Peking This is a large duck weighing about 3 1/2 to 4 kilograms (7.7 to 8.8 lbs.) at adult age. Under good feeding conditions it can reach a weight of 3 kilograms (6.6 lbs.) in just eight weeks. Because these ducks are so attractive they are often kept by town people as pets. The duck's bill is an orange-yellow color, its legs and feet a reddish-yellow color, and it has yellow skin. The White Peking is not a good layer, but can produce from 100 to 150 eggs a year. It is a poor setter and seldom raises a brood (family) of ducklings.
Thai This is the commercial breed used in Thailand for egg production. They have long necks and narrow bodies and range in color from white to black, although most are some shade of brown or khaki. These ducks are excellent foragers, moving from place to place in search of food. They will lay around 150 to 200 eggs a year.
Cross Breeds Often an excellent duck results from crossing two different breeds of ducks. One of the best crosses results from breeding a male Khaki Campbell or Thai with a female village duck. The product is a duck well suited to local weather conditions and able to lay many more eggs than the pure village duck. They will often lay 100 to 200 or more eggs a year.
PREPARING TO RAISE DUCKS
If you are planning to raise ducks, the first thing to look for is duck feed. Duck raising is recommended to people living near ocean bays, marshes, rivers, lakes, or flooded lowlands. In these places lots of natural feed, such as snails, mussels, crabs, slugs, insects, and water plants are available. Another important point to remember is the need for medicines. The main diseases affecting ducks are fowl cholera and duck plague. Check with your nearest agricultural extension officer to see if vaccines and other medicines are available. Without a good vaccination program the whole flock could be destroyed in a few days. There are a few simple rules to follow in order to raise ducks successfully:
* Provide plenty of good feed. * Begin with healthy ducks. * Vaccinate against disease. * Give ducks good care.
It is always best to begin any project by studying and understanding all parts of it first, and you should read through all the information in this publication before taking any steps. The following two points are very important.
The Need for Feed Successful duck raising depends a great deal on a good location where the ducks can find a year-round supply of natural feed. If ducks are kept in such an area and correct management is practiced, a profit can be made. Long before you get your ducks you must decide how you will feed them. Will they be able to find feed all year long? Will you have to buy feed? What natural feeds are available? Ducks will eat:
snails earthworms fallen rice slugs insects rice bran small crabs water plants rice polish fish weed seeds wheat bran mussels water hyacinth sesame oil cake
Natural feeds are best and ducks do much better when allowed to forage on their own rather than penned-up and fed a mixed ration. If ducks must be raised in confinement, they can be fed chicken rations using the guidelines in Section One (Preparing to Raise Chickens) and in Appendix 1. Commercially-milled duck feeds are generally not available in many countries.
Proper Housing Almost any type of simple housing can be used for ducks. (See Figure 3.) About one
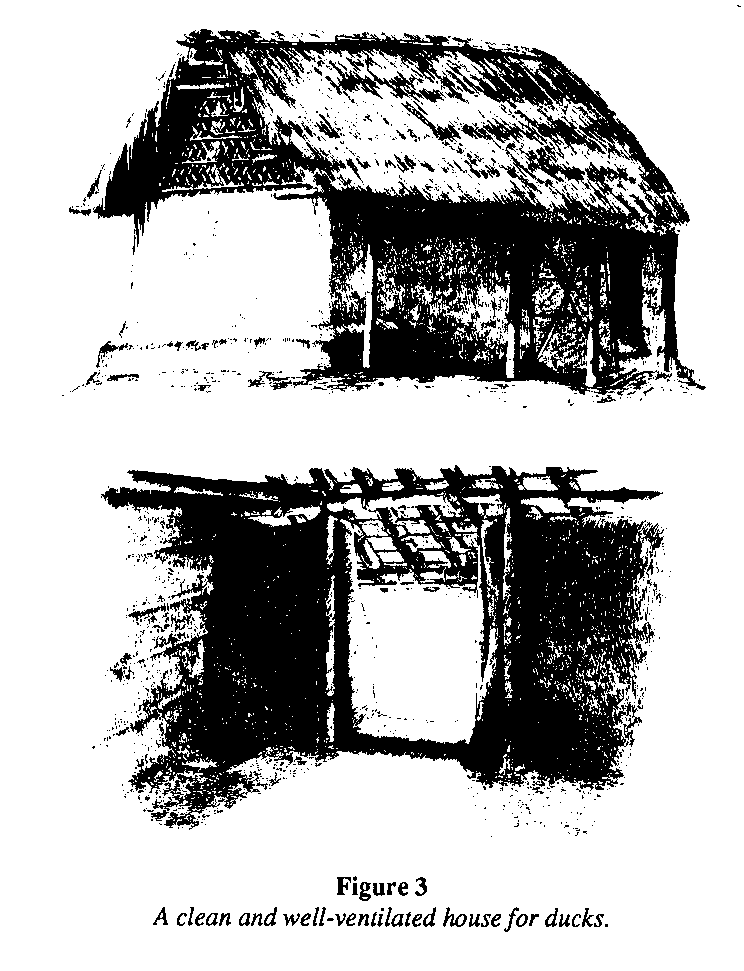
square foot (.093 [m.sup.2]) should be allowed per duck, but if the house is well ventilated and kept clean, as little as a half that may be allowed.
Some sort of litter, such as sand, rice husks, wood ashes, or straw, should be spread over the floor. When the litter becomes wet and dirty it should be replaced with fresh material; the old litter can then be added to a compost pile or mixed into the garden soil. Where litter is in short supply, it can be dried in the sun and used again.
Ducks will lay their eggs on the floor, but if a few shallow pits are dug along the sides of the wall and then lined with straw or rice husk, the eggs will stay fairly clean.
To prevent wild animals from burrowing in and killing the ducks it is a good idea to drive closely spaced bamboo stakes into the ground all around the house, or surround the walls with wire-netting sunk into the ground to about a foot (30 cm) in depth.
Some people herd their ducks long distances in search of food and may spend several weeks away from home with their birds. At night the ducks sleep in open fields with just a low wall made of bamboo or mats to keep them in. They may even be allowed to sleep unconfined, but a caretaker should always sleep nearby. This type of management is usually practiced by people maintaining large flocks of ducks (100 or more).
If possible, a beginner should start with older ducks, which do not require much careful treatment. Try to buy ducks that have been vaccinated for fowl cholera and duck plague so losses from these diseases will be minimal. The source of ducks depends upon the area. In some places ducks are available from another duck raiser or perhaps from private organizations and government farms. Wherever the ducks come from, they must be checked very carefully before they are taken home. Remember that it is not possible to breed and raise healthy ducks unless the ducks you begin with are good ducks.
Selecting Adult Egg Layers Do not buy ducks that are too old. A duck will lay well for three years, but her first year is the best. It is easy to identify a good egg-layer. Her feathers will be dull in color and frayed (worn down or broken). The back of her head will have been picked bare of feathers by the mating males and her beak will be very pale or flesh colored. A poor layer of equal age will be very attractive with bright shiny feathers and a yellow beak.
Buying Young Ducks (2 to 5 months old) When selecting young ducks pick those with the clearest, roundest eyes; tight, shiny feathers; a broad abdomen; erect posture; and a long thin neck. A fat, short-bodied duck will probably be a poor layer. A duck carries herself low to the ground, but a good egg-laying duck carries herself very erect. (See Figures 1 and 2.) Everything about a good

egg-laying duck is long and slender. Males may be selected in a similar manner, although breadth of abdomen is not so important. Special care should be taken in selecting the male, called a drake, for only one is needed to mate seven to ten females. If you purchase female crossbreeds, be sure the males are of a pure improved breed to ensure good quality offspring.
Buying Ducklings Another way to start is by purchasing day-old ducklings from a hatchery. Select active ducklings with bright clean eyes and dry feathers. Sometimes ducklings are born too weak and die very young. Others are born with some defect that we do not see, and may also die young. Look over all the ducklings carefully; if they don't appear healthy, don't buy them. Day-old ducklings, even in the best of health, will require a lot of time and care to keep them growing well (See Raising Ducklings).
Hatching Eggs Sometimes it is possible to buy duck eggs and hatch them at home using a chicken to brood them. For this purpose you will need a "broody" hen, which is a hen that tries to make a nest and raise a family of chicks. After finding a quiet place to stay, she will lay an egg each day until she has several in her nest. She will guard them carefully, and if you try to disturb her or try to take the eggs away, she will become very excited and may even try to peck your hands. If you wish to use a broody hen to hatch duck eggs, it is important to place the eggs under the hen when she first gets broody. To keep the hen comfortable and clean, provide a basket full of straw for her nest (See Figure 4). Duck
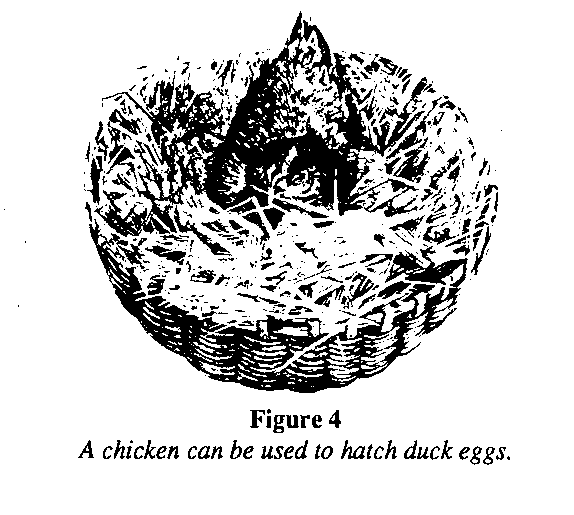
eggs take 26 to 28 days to hatch; the Muscovy requires 35 days and its crosses with other ducks need about 30 days. Use clean eggs of good size and shape with strong smooth shells. If the eggs are dirty, they should be cleaned with warm water and dried quickly. As duck eggs are large, a chicken can take care of only seven or nine properly. The hen must be treated carefully when she is brooding duck eggs. Allow her to leave the nest every now and then for food and water. If she does not go back before the eggs get cool, it may be because there are mites (tiny insect-like blood suckers) in the nest. In that case, remove the eggs and keep them warm, then burn the straw and spray the empty basket with kerosene or pour boiling water over it. After this treatment fill the basket with fresh straw and put the eggs back. Every time the hen leaves the nest sprinkle the eggs with warm water. Normally, the wet feathers of the mother duck moisten the eggs, but when using a hen you must do this yourself.
Not all the ducklings will hatch at the same time. Those that hatch first can be taken from the nest and kept warm by placing them on a layer of rice husk or straw in a covered basket until all have hatched. This will prevent the hen from injuring the ducklings by stepping on them or leaving the nest before all the eggs have hatched. When the hatch is finished, the ducklings can be given to the hen to care for until they are at least a month old.
RAISING DUCKLINGS
A great deal of time and patience is necessary to successfully raise a brood of ducklings by yourself. In many tropical areas the best time for raising ducklings seems to be during the first rains of the year. Ducklings purchased from a hatchery require special attention. The following section presents guidelines for raising ducklings purchased from a hatchery.
Providing Shelter For the first 10 to 14 days the ducklings can be kept in clean baskets or boxes. Put a one to two-inch (5 mm) layer of rice husk or straw in the bottom of the basket and change it frequently to keep the ducklings dry and comfortable. It is a good idea is to add a thin layer of husk or straw several time a day. Care should be taken not to crowd too many ducklings in one basket. They should have a small amount of space to move around, but if the basket is too large for the number of ducklings, their body heat will quickly be lost and they will become chilled and die. (See Figure 5.)

To protect the ducklings from cold the basket should be covered with a piece of loosely woven jute bag (single thickness). In very cold weather the bag can be folded over to provide extra warmth inside. Some duck raisers add some heated rice husk to the basket when the ducklings feel cold.
You must carefully observe the needs of the brood at all times. When the ducklings feel too warm they will raise their mouths in an upward direction and cry, "che che." At this time the bag over the basket should be partially withdrawn or removed completely. If the ducklings feel cold they will crowd together to try to keep warm. It is your job to keep a constant comfortable temperature by covering or uncovering the basket as needed. Ideally, the ducklings should be kept at a temperature of 80[degrees] to 85[degrees]F (26.5[degrees] to 29.5[degrees]C) for the first 10 days to 14 days.
Feeding Ducklings start eating the day after they hatch and grow very fast. Starting in the early morning the ducklings should be fed four to five times a day. Try to provide a mixture of different kinds of feed. Ducklings enjoy boiled or broken rice, rice bran, oil cake, chopped earthworms and snails (no shell for the first few days), bits of fish, green vegetables or water plants, crushed wheat, and rice polish. Whatever mixture is used, it should be moist and chopped or ground in small bits. Feed a small amount of green plants or leafy vegetable at each meal. It has been discovered that feeding stinging nettle (Urtica dioica) to the ducklings will help prevent various types of diarrhoea. Stinging nettle also contains lots of vitamins and minerals, which will help ducklings grow strong and healthy. (See Figure 6.)
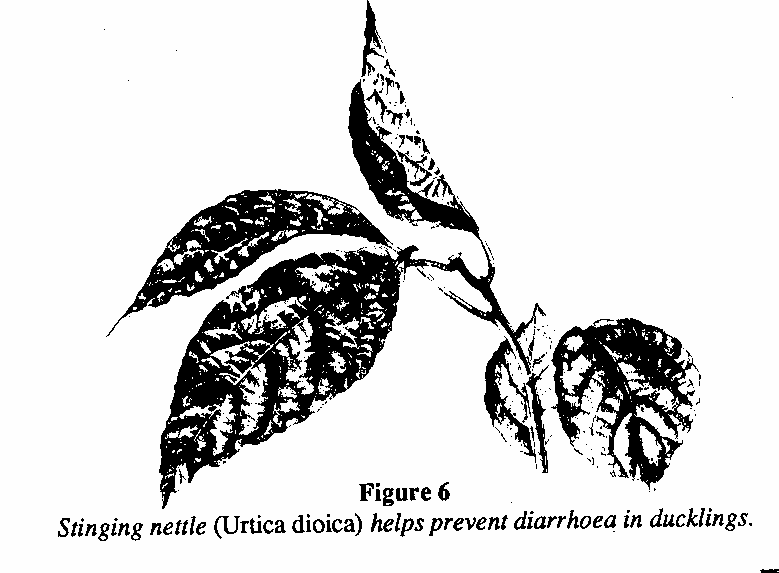
Never feed ducklings in their basket. Instead, remove a few ducklings and place them on a clean jute bag, mat, plastic sheet, piece of paper, or in another basket. Sprinkle the food in front of them and they will quickly start to pick it up. When ducklings have finished eating (after one or two minutes) they should be placed in a shallow pan containing a half-inch (1.25 cm) of water. After drinking they should be put on a dry jute bag or on a layer of husk or straw in another basket until they have dried off. Then they can be put back into their basket.
Bathing Many duck raisers allow their ducklings to bathe for a minute or two at noon in a pan filled with an inch or two (3-5 cm) of water. If you do this be sure to let the ducklings dry off before putting them back in their basket.
Be on the alert for ducklings with dry eyes or eyelids stuck together; in either case the eyes should be carefully moistened with clean water. Practice good management. The baskets, pans, bags and other things should be kept CLEAN. Some duck raisers use an antiseptic, like Savlon, to clean their equipment.
10 Days to 14 Days Old After 10 to 14 days the ducklings can be kept on rice husk or straw in a corner of the house on the floor. At this age ducklings should be allowed plenty of fresh air and sunlight. During the day they can be allowed to search around the house for insects and small plants. They can even be walked to a nearby field or marshy pond where there is abundant natural feed. Even though they are foraging on their own, provide them with a mixture of feed and drinking water two to three times a day. Simple bamboo containers can be made to keep the feed and water clean. (See Figure 7.)
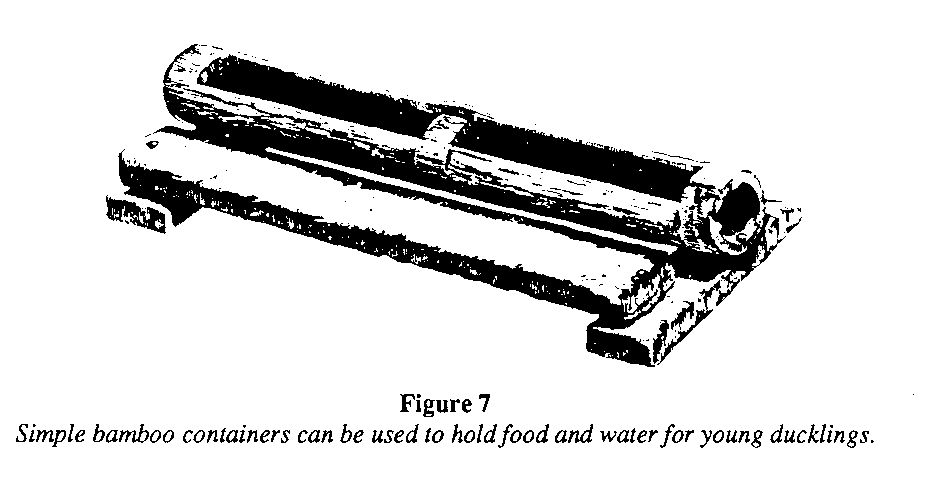
If it suddenly rains and the ducklings are not able to find shelter many will die due to chilling. Older ducks enjoy the rain but young ducks must be protected in stormy weather. By the time ducklings have grown to the age of three or four months they will be able to stand up to most conditions of bad weather with little discomfort. At noon the ducklings should be kept in the shade of a tree as the sunshine at this time is very powerful. After the noon-day heat has passed the ducklings can continue their foraging and be returned to the house before dusk. A light feeding just before putting them inside will encourage them to return each day with their caretaker.
4 Weeks Old When the ducklings are four weeks old they will need housing that provides one square foot per bird, although, if the house is well ventilated and kept clean, as little as a half square foot may be allowed. Every morning the ducklings should be given clean water and a mixture of feed. Be sure to use clean pans or bamboo containers for feed and water. Feed the ducklings outside the house and in the same place each day. After a one or two minute feeding the ducklings can be taken out for a day of foraging. It's best not to take them too far from the house if the weather looks bad.
MANAGING EGG-LAYING DUCKS
If you have plenty of natural feed nearby, are willing to do the work yourself (or at least provide daily supervision), and practice good management, you will have a successful project. A large flock of ducks, while requiring some investment as well as labor, can provide an excellent income--the main profit being eggs.
Herding Ducks are very easy to move from place to place. They will stay together and walk long distances if someone (even a child) with a long pole is there to keep them headed in the right direction. In this way the ducks are guided to places where feed is available and are kept out of trouble.
You should remember that ducks and rice do not go well together when the rice is in the seedbed, being transplanted, or when it is headed out (producing grain). Many farmers will not allow ducks in their fields at any time while rice is growing, although ducks cannot harm established rice before it produces grain. As a matter of fact, the Chinese use ducks to control harmful insects and keep down the weeds growing between the rows of rice in the paddy.
New ducks may be turned out with an older flock and they will usually stay together. If the new flock is large and there are no older ducks to teach them, the new ducks should be penned up for about a week to learn their new home and surroundings.
It is important that ducks be given as much time as possible to search for their own feed. When the ducks are herded back to their house they should be given a light feeding of rice bran and oil cake (if available). This will encourage the ducks to return home promptly at the end of each day's foraging. If drinking water is not provided just before returning home, it should be given to the ducks before they are closed in for the night. Do not put the ducks into their house until it starts to get dark: If they are forced in earlier they will become upset and avoid being housed. They may even take to sleeping outside.
The layers may be released at about 7:30 in the morning as most of the eggs will have been laid by this time. If the ducks are let out much earlier they will lay their eggs away from home. If kept in later they will become overheated and restless. Ducks are very sensitive to changes in their lives. Be regular in your work. Ducks will never lay well if they are constantly upset by changes in the time when they are released or put into their house. Any upsetting change will often cause a female to stop laying and begin moulting. She may take two months to complete a moult and during this time there will be no eggs and no income.
A Lesson From Bangladesh Many clever approaches to duck raising have been tried in Bangladesh. South of Boshurhat in the Noakhali District ducks are taken to the salt mud-flats where no rice is grown. There they feed on crabs and slugs until the rice crop is harvested nearby. At the end of the harvest the ducks are taken into the fields where they feed all day on fallen rice grains. Often enough rice remains in the fields to feed the ducks for three to four months. For at least two months there is usually enough rice to allow the ducks to lay plenty of eggs; thereafter, there may be only enough to maintain them. When the rice is finished, in March or so, the ducks may have to be fed some rice bran and oil cake until the rains start in April. At this time small crabs come out of the soil and slugs are available. By eating this feed the ducks will continue to lay eggs until the next harvest begins in November. An experienced and hard working person can thus keep a large flock of ducks (100-300) with very little purchased feed.
Keeping Records A simple record should be kept of your expenses (ducklings, feed, medicine, etc.), losses and income. For this purpose see the section on Record Keeping in part one for a sample record sheet.
Slaughtering Ducks Ducks can be killed and prepared for the table using the same method described for chickens. However, duck feathers sometimes resist wetting during scalding; a small amount of detergent added to the water will eliminate this problem. Many people save the soft "down" feathers and use them to stuff pillows and toys.
DISEASES AND THEIR CONTROL
Because treating disease is often very difficult, it is best to prevent disease from ever occurring. Following these simple rules can do much towards keeping ducks free from disease:
* Never feed rotten or spoiled food to ducks. * Keep house, feed, and water containers CLEAN. * Protect ducks from intense sun and rain (particularly young ducks). * Avoid overcrowding. * Vaccinate ducks on time. * Take sick ducks away from the other ducks immediately.
Vaccinating Ducks Fowl cholera and duck plague are two of the most common diseases affecting ducks. When the ducklings are about six weeks of age or are well-feathered on the breast, they should receive their first vaccination against fowl cholera. The vaccine can be obtained from your local veterinary officer or agricultural extensionist. One cc of vaccine is given under the skin of the breast. Sixteen days later the ducks should receive a second 1-cc injection. This is again repeated after another 16 days for a total of three fowl cholera injections. Thereafter, the ducks should receive 1 cc at least once every year (every six months if vaccine is available). When the ducklings are seven weeks of age they should receive 1 cc of duck plague vaccine in the thigh muscle. No further injections of plague vaccine will be required for the life of the duck because these vaccines give the ducks lifelong immunity.
Fowl Cholera This is the same disease that affects chickens and other poultry. The signs of the disease are lameness; hot, swollen joints in the feet and legs; infected eyes; diarrhea; and occasionally a swollen head. Death may come suddenly without symptoms or the duck may be sick for several days. If a sick duck is cut open after death, the liver may be enlarged, pale, and have small gray spots scattered over the surface. Vaccinate your ducks to protect them from this disease. If an outbreak occurs in birds not vaccinated, the disease can be controlled with sulphamethazine. It is given in water according to the instructions with the medicine.
Duck Plague Signs of this disease are very similar to fowl cholera and the two are often confused, but there are several differences. With duck plague there is weakness and lameness without swelling or fever of the joints. The eyes become very watery and the feathers surrounding the eyes have a foamy discharge; there is a watery nasal discharge and diarrhea. Usually ducks die after about three days of illness. If the body is opened there are no obvious signs of disease; if the heart is examined, however, it will have small bloody areas (hemorrhage) on the muscle surface and the gizzard may also show signs of damage (muscle necrosis).
The veterinarian can use the following guidelines when examining a duck that has been sick for several days with the cholera/plague symptoms: No internal symptoms except liver symptoms and pus in the joints means cholera. Cholera also shows heart hemorrhages, but liver and other involvement is marked. No treatment is effective against plague, but in case of an epidemic, when there is no vaccine available, 1 cc of Raniket vaccine may be given to the healthy birds; this will offer protection for about one month.
Botulism Food poisoning can be a serious problem in both young and adult ducks. It is caused by bacteria that grow in decaying plant and animal material. When ducks eat food containing this bacteria they become very sick and lose control of their neck muscles, which makes their heads hang. Left untreated, food poisoning will often result in death. If the ducks are only slightly affected they can be given Epsom salts in their drinking water (I pound [2.2 kg] Epsom salts per 5 gallons [19 lit.] water) until their condition improves.
You can avoid this problem by practicing good management. Watch your ducks carefully when they are searching for food. Keep them away from decaying snails, worms, mussels, crabs, fish, and plants. Be sure their feed and water containers are kept clean and that only freshly collected food is provided.
Ducks from the Market Be very careful about purchasing ducks from the market. Very often ducks are offered for sale because the farmer has lost many to disease and wishes to sell them before they all die. Introducing sick birds to your flock might spread the disease. Try to buy ducks from healthy flocks and not from peddlers. If you must buy ducks from an unknown source, keep them separated from the rest of the flock for at least three weeks and watch them carefully for signs of disease.
THE CHINESE RICE HUSK INCUBATION SYSTEM
This interesting method of incubation is commonly used throughout Thailand, Vietnam, Taiwan, and China to produce ducklings for sale. Because the system uses no electricity and requires only the occasional use of a small kerosene stove, it can be used in villages lacking electric power.
The system makes it possible to hatch hundreds of duck eggs at one time. It works because a fertilized duck egg that is at least 10 days old will produce enough heat to warm itself and other eggs if placed in a well-insulated container. When the incubation is beginning and there are no eggs at least 10 days old, it is necessary to supply heat. One way to keep the eggs warm is to place them between jute bags filled with heated rice husk; later, no heat will be needed except that which is produced by the eggs themselves.
One person can handle at least 1,000 eggs per setting. But before such a large-scale operation is attempted, make sure you have a dependable source of fertile eggs and a good market for the ducklings. Once the process is underway it requires only about an hour or two per day for every 200 to 300 eggs set.
The Chinese rice-husk system is a very labor intensive process, and as it requires close daily supervision at all hours, it is well suited to women at home. There are many unused water areas where ducks could be kept and people in many countries are now organizing cooperatives to provide baby ducks to interested farmers.
Materials Needed
Eggs You will need a dependable supply of clean fertile duck eggs because 100 to 300 eggs are set every five days (six times in a month). These can be obtained by:
* Searching in villages to find who keeps a male duck with their females (very few do) and contracting to buy their eggs. * Contracting with someone else to bring you eggs when needed. * Setting up your own breeding flock. * Buying from a large duck farm.
In Taiwan the only eggs accepted for hatching and paid for are those that are fertile at 24 hours incubation. To determine this the eggs are held in front of a strong light; the growing embryo can be seen through the shell. This is called "candling," and after the eggs are checked, the infertile or rotten eggs are returned to the supplier. This would be difficult in a situation where there are many small village suppliers, but if each person's eggs were marked with a symbol, you could then determine how good they are at candling time, and make an adjustment when the next batch was delivered.
To ensure that the very best eggs are obtained for hatchings, a slightly higher price can be paid than the market rate. This should be based on:
* Fertility (over 80 percent) * Cleanliness * Size * Freshness
Remember: You will need enough money to buy six lots of eggs for the first month's operation, and during this time there will be no income from ducklings sold.
Housing A room, building, or compartment that can be made draft-free is necessary. The room is the most important part of the process. If it is cold and drafty, or allows all the heat to escape, it will be useless. The walls should be solid; of mud, cement, or insulated wood or bamboo. A thatched roof holds the heat in nicely. Tin will give heat off too quickly at night unless insulated underneath with a layer of straw. Windows and doors must be made fairly airtight with jute sacking and boards. The walls should have all holes filled in with mud, cement or some kind of airtight packing. The room should be as airtight and insulated as possible. If there is any chance of airflow, hang jute cloth from the ceiling to the floor. The object is to prevent drafts and sudden air temperature changes. Once incubation begins the temperature near the roof should be over 85[degrees]F (29.9[degrees]C)--90[degrees] to 95[degrees]F (32[degrees]to 35[degrees]C) is ideal. Once the room or building has been selected, the next step is to build the equipment.
Basket Cylinders
Each cylinder holds about 900 eggs. The size can be decreased if desired, but larger cylinders should not be used. To make a cylinder, a bamboo mat about 60 inches x 84 inches (153 x 213 cm) is folded on its width to make a piece 30 x 84 inches (76 cm x 213 cm). This is then rolled on its length to make a cylinder about 30 inches (76 cm) deep and 20 inches (51 cm) wide. The cylinder is sewn with wire and fastened with three or more bamboo hoops to make it rigid. (See Figure 8.) A smaller cylinder of 16 inches (40

cm) in diameter and 24 inches (61 cm) in depth can be made to hold about 300 eggs.
Boxes for Cylinders
After the cylinders have been made, they must be installed. A box made of bamboo and matting or wood is built against the inside wall of the incubation room. It should be 36 inches (91 cm) deep and 36 inches (91 cm) wide and long enough to hold the basket cylinders you are using. The mats are used in double thickness and reinforced with bamboo to make strong walls on all four sides. Six inches (1 5 cm) of husk is placed in the bottom and this is covered with a mat. The cylinder(s) is then placed on this mat and the space between the cylinder sides and box sides is filled with dry, clean rice husk. The cylinder should be completely surrounded with husk on both sides and bottom. The top of the box may be covered with a mat fitted to leave the top of the cylinder open. (See Figures 9a and 9b.)

Incubation Bed
This is a traylike or bedlike structure with 8-inch (20 cm) sides. It can be made of wood or with mats and bamboo. If the latter type are used, the sides should have double walls with an inch of rice husk separating them, as a single thickness of mat will not provide adequate insulation. (See Figure 10.) One or two inches (3-5 cm) of rice husk is placed
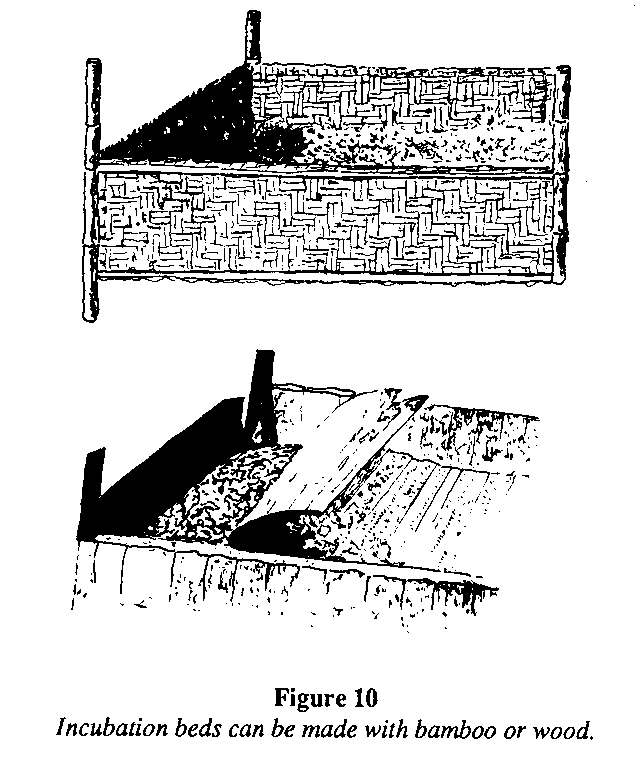
in the bottom of the bed and covered with a fine grass or reed mat (washable type). About one square foot (.093 [m.sup.2]) of space is required for every 38 eggs. A bed 6 feet long (1.83 m) and 4 feet (1.22 m) wide will hold 900 eggs. The bed should be placed on the rafters, or as high off the floor as is possible, to make use of the heat trapped near the ceiling.
Kerosene Stove and Cylinder
With the rice-husk system eggs are warmed before placing them in the cylinders. The sun can be used for this purpose, but on cloudy or rainy days, the eggs must be heated over a small kerosene stove. The stove is placed inside a basket-cylinder and an open weave winnowing tray is placed on top; the eggs are rolled around the tray to warm them. (See Figure 11.)
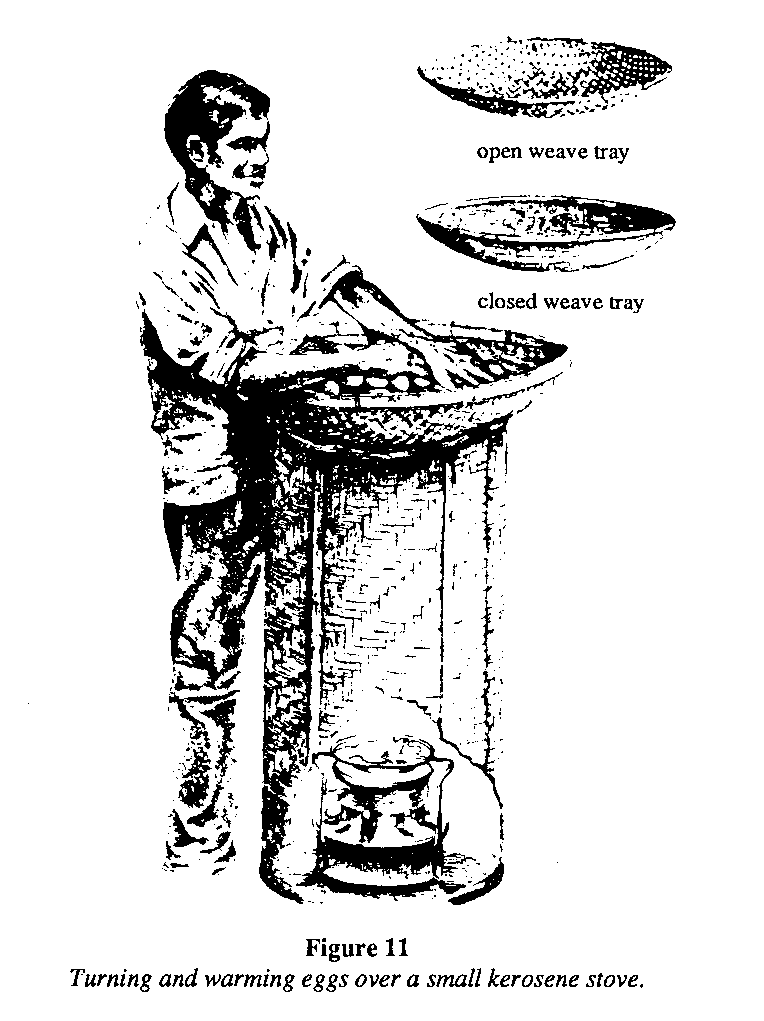
Winnowing Trays
Some flat winnowing trays about 36 inches (90 cm) in diameter will be needed. A tightly woven tray is used to cover the cylinders when there are eggs being incubated and open-weave trays are good for heating the eggs and rice husk over the stove.
Kerosene Lamp
A strong light is needed for candling the eggs. This is best done with an electric light, but a kerosene lamp with a clean chimney and a reflector is sufficient. (See Figure 12.)
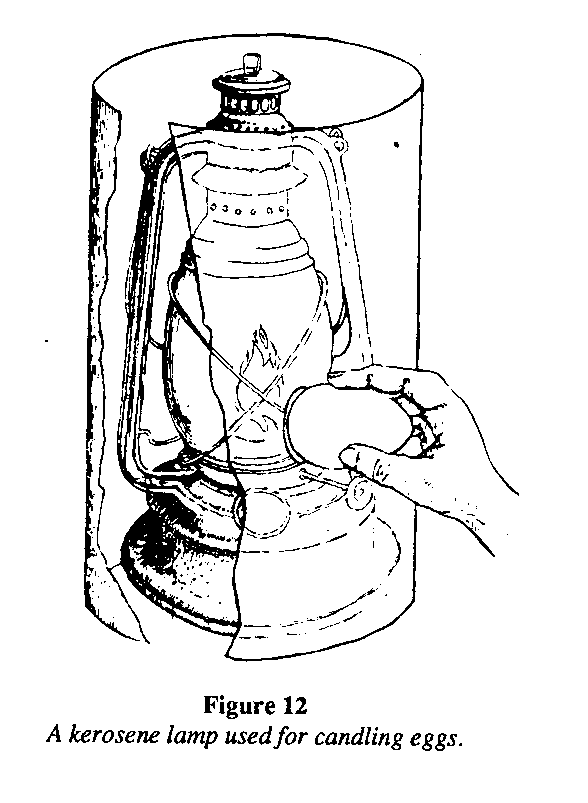
Cloth
Before the eggs are placed into the cylinder they must be bundled in lots of 90 using pieces of coarse cloth. Very cheap cloth can be used for this purpose; a square piece approximately 30 inches (76 cm) by 30 inches (76 cm) is enough for every 90 eggs.
Thermometer
A clinical thermometer (from a pharmacy or medical supply store) is used to check the temperature of the eggs in the cylinders and while heating in the sun. Actually, this is necessary only for the beginner; later, with practice, a person can accurately "feel" the temperature by holding an egg against their upper eyelid.
Other Items
A bamboo mat is needed to set the eggs out in the sunshine; and a few baskets to hold eggs, ducklings, shells, and miscellaneous garbage.
Step By Step Incubation Process
1) The eggs should be washed in a mild solution of Savlon (a mild disinfectant) with warm (not hot or cold) water. Allow the eggs to dry before continuing. (See Figure 13.
2) Each batch of eggs must be marked with a symbol for identification. (See figure 14.)

Every five days a new batch of eggs will be mixed with the older ones; to tell them apart each must be properly marked.
3) Now tie the eggs in bundles of 50-90. (See Figure 15.)
4) Place the bundles on mats or trays in the sun; open the bundles and spread the eggs out to heat. A thermometer may be inserted in a cracked or broken egg; when the temperature reads about 100[degrees]F (38[degrees]C) the eggs are bundled up. If it is not possible to use the sun's heat, a small kerosene stove must be used. (See Step 7.)
5) While the eggs are being heated in the sun, rice husk is heated in the same way. Fill a bag with heated husk (half-full) and place it in the bottom of the cylinder. Put the warm egg bundles on top of this and place another bag (half-full) of husk over them. This creates a "sandwich" of eggs between two bags of heated husk. (See Figure 16.
6) The eggs may remain this way for 24 hours without any further attention. If the room is well-insulated and the cylinder containers are well-made, the eggs should lose only two to four degrees overnight.
7) The next day the eggs must be taken out and turned. This is done by placing the bundle on a winnowing tray. The bundle is opened and the eggs spread out. The eggs are then rolled with a gentle circular motion of the hands. The bundles are retied and replaced in the basket so that the bundles that were formerly on top are now on the bottom and vice versa. If the temperature of the eggs is good, 98[degrees]F(36.5[degrees]C) and above, then the eggs need not be reheated, only the half-bags of husk. If the eggs are placed between bags of heated husk their temperature will be maintained. In case the eggs have cooled to below 98[degrees]F (36.5[degrees]C), it would be best to reheat the eggs in the sun or over a stove. (See Figure 11.) The eggs must be turned twice a
day or else the embryos will stick to the shell and die. Early in the morning and late afternoon will be sufficient, but the closer you can get to a 12 hour schedule the better it will be. Heated husk must be applied every time in order to keep the egg temperature high enough. The ideal range is 98[degrees] to 100[degrees]F (36.5[degrees] to 38[degrees]C). The eggs must be kept between 98[degrees] to 102[degrees]F (36.5[degrees] to 39[degrees]C) or they will die. If you have only a few eggs and put in a great deal of very hot husk, the eggs may be cooked; and if you have many eggs and use only a small amount of husk, the eggs may become too cool. A thermometer may be inserted into the bundles at different levels to check the temperature. Later on the temperature may be judged by the "eyelid check" as experience is gained. Remember that the bundles should always be replaced in the basket in the reverse order to that in which they were taken out.
8) The eggs are turned twice every day until the fourth day when they are candled, or examined for fertility. The room is darkened except for a single light bulb or kerosene lamp (see Figure 12) and the eggs are held up before the light so that the
inside may be seen. The fertile eggs show a small long dark spot looking something like a spider. Infertile eggs will be clear, with only the shadow of the yolk showing. Rotten eggs will have some loose material floating about inside and the color will be blotchy or black. A good fertility rate for eggs is 75 percent to 90 percent fertile eggs per batch; 75 percent is all right and 80 to 90 percent is very good.
9) On the fifth day, new eggs are added to the system. They should be washed, marked, and heated before mixing them with the older eggs. The new batch should have about the same number of eggs as the first batch. The new eggs are mixed with the older eggs so that each bundle will have half new and half old eggs, but with a total of 50-90 eggs.
10) The bundles should be warmed with heated husk twice a day for the next four days, and then all the eggs are candled again on the ninth day.
11) On the tenth day another new batch of eggs is mixed in after heating. Heated husk will likely have to be added until the 13th day, when the embryos in the eggs become large enough to heat themselves without assistance. Heated husk may still be needed after this time, but that will depend on your room, air temperature, cylinder construction, etc. In any case, by the 14th day all that should be needed is to turn or roll the eggs twice a day. On the 14th day the eggs are all candled again. By this time close attention should be paid to the temperature under the uppermost bag of heated husk. Probably only a light cover, such as a winnowing tray or sack will be needed across the top of the cylinder. If the room is very warm it may be better to leave the eggs in the cylinders uncovered and to rotate the order of the eggs at noon and at night to prevent the bottom bundles from becoming overheated. The bottom eggs are always much warmer than those at the top; this is why it is necessary to reverse the order when turning or when overheating threatens. Close observation is essential until you are familiar with this process.
12) On the 15th day a new batch of eggs is added after washing, marking, and heating. Heated husk should also be added as the new eggs might upset the even temperature of the older eggs. On the 16th day the eggs will probably be warm enough to remove the upper bag again.
13) On the 17th day the temperature will likely be very high and if you leave the oldest eggs in the bundles past this time they will overheat and you will have a very poor hatch. The eggs with the oldest batch mark must be taken out and put into the overhead incubation bed. The eggs are laid on their sides one layer deep and are packed very closely in the bed. If they do not cover all the space, a rolled jute bag may be placed across the open edge to hold the eggs tight and to conserve heat. Batches should not be mixed on the beds but kept in separate groups with a rolled jute bag divider between them. The eggs should be covered with a light cloth or pieces of jute cloth depending on the air temperature at the ceiling. If the ceiling temperature is much over 85[degrees]F (29.5[degrees]C), 90[degrees]F (32[degrees]C) is good, then only a light cover will be needed. Watch the temperature very closely if the eggs are covered, as they can overheat in a matter of an hour or two. By 1 or 2 p.m. on a hot day there may be no need for a cover, or a very light one may be used. As the eggs get older in the bed less cover will be needed, and finally no cover will be required at all. Less harm is caused to the eggs by cooling than by overheating. Turn the eggs on the beds three to four times per day. The eggs at the sides should be rolled to the middle and those in the middle to the sides.
14) This process is then followed with new eggs being added every 5th day, candling every 4th day after setting, and older eggs being transferred to the beds at 17 days (16 to 18 days depending on temperature of room).
15) On the 25th day, the oldest eggs should have begun to hatch. At this time turning may be discontinued as the eggs will break if handled roughly. Leave the eggs alone. Do not pick the shell away from a duckling to "help" it out. They will hatch alone with no assistance from anyone about 24 hours after they first crack their shells. If many die in the shell, this is not because they needed to be helped, but because the eggs were allowed to overheat in the cylinders or the ceiling temperature was too low. By the 28th day hatching should be completed. If you started with clean, large eggs of high fertility and freshness, you will obtain a 60 percent hatch, but probably the most you can expect in the beginning is 50 percent or less while learning the system. Breakage of eggs may seem high in the beginning, but this will decrease with practice. Temperature control will also become easier with experience.
16) On the 28th or 29th day clean out all the shells, dead ducklings, and unhatched eggs. The mats should then be lifted out, washed, and disinfected with Savlon. During the hatch the baby ducks, shells, etc. should be removed periodically as the ducklings will sit in a large mass on the unhatched eggs and cause them to overheat. Cleanliness is important to prevent disease in young ducks. The baby ducks can be placed in baskets with husk or straw on the bottom and then sold or distributed. They do not have to eat or drink for two days after hatching, which allows you time to sell them. The ducklings may be separated according to sex as shown in Figure 17.
Daily Activities in Brief
Day 1 -- Wash, mark, bundle, and heat eggs. Put into the cylinders between two half-filled bags of heated husk. Day 2 -- Turn eggs morning and evening; heat husks both times. The order of the eggs is reversed: the eggs that were on top are placed at the bottom of the cylinders, and those that were at the bottom are placed on top. Day 3 -- Same. Day 4 -- Same, but candle eggs and discard infertile eggs.. Day 5 -- Wash, mark, and heat new eggs. Mix new eggs half and half with older eggs in each bundle. Turn the eggs and heat husk as usual. Day 6 -- Turn the eggs and heat the husk. Day 7 -- Same. Day 8 -- Same. Day 9 -- Same, but candle all eggs. Day 10 -- Add new eggs. Turn eggs and heat husk as usual. Day 11 -- Turn eggs and heat husk. Day 12 -- Same. Day 13 -- Same, but heating the husk may not be required. Day 14 -- Turn eggs and candle. Usually heated husk not needed. Day 15 -- Wash, mark, and heat new eggs. Mix new eggs half and half with older eggs in each bundle. Turn eggs. Heated husk is not required. Day 16 -- Turn eggs. Day 17 -- Turn eggs; move first batch of eggs to incubation bed. Day 18 -- Turn eggs in cylinders two times a day and eggs in incubation bed four times a day. Day 19 -- Turn eggs and candle. Day 20 -- Wash, mark, and heat new eggs. Mix new eggs half and half with older eggs in each bundle. Turn eggs. Day 21 -- Turn eggs. Day 22 -- Turn eggs; move second batch to incubation bed. Day 23 -- Turn eggs. Day 24 -- Turn eggs and candle. Day 25 -- Wash, mark, and heat new eggs. Mix new eggs half and half with older eggs in each bundle. Turn eggs. Day 26 -- Turn eggs. First batch beginning to crack their shells. Day 27 -- Turn eggs; move third batch to incubation bed. First batch beginning to hatch. Day 28 -- Turn eggs. Hatching of first batch finished. Clean-up.
APPENDIX 1
Chicken Feed Formulas from Around the World:
All Mash Rations, Benin
Ingredients Chicks Broilers Layers
Percentage
Maize 26.8 31.5 29.5 Sorghum 35.0 35.0 35.0 Fish meal 6.0 4.0 3.5 Skim milk powder 5.0 5.0 5.0 Groundnut cake 21.5 18.5 15.5 Alfalfa meal 3.0 3.0 3.0 Shell grit 1.0 1.0 7.0 Dicalcium phosphate 1.1 1.4 1.4 Salt 0.3 0.3 0.3 Vitamin concentrate 0.3 0.3 0.3
TOTAL 100 100 100
Laying Mash, Cambodia
Ingredients Percentage
Broken rice 20.0 Maize 29.5 Rice bran(1) 15.0 Fish meal (43% crude protein)(2) 15.0 Groundnut cake meal 5.0 Soybeans or mung beans 5.0 Hevea cake meal(3) 5.0 Ipil-ipil leaf meal, dried (Leucaena glauca) 3.5 Ground limestone 2.0
TOTAL 100.0
(1) Rice bran, if good quality, is introduced in bigger portions. Quality depends on work in the rice mill, which is not standardized. (2) Fish meal is made from dried fresh-water fish and is rich in fat and minerals. Fresh fish meal is excellent, but old fish meal tends to become rancid. (3) Hevea cake meal has similar composition to linseed meal. It contains less crude fiber if the hulls are entirely separated.
All feed tables (Source: Poultry Feeding in Tropical and Subtropical Countries, Food and Agricultural Organization of the United Nations, 1971.)
Recommended Poultry Rations, Colombia
Ingredients Starter(1) Growth Layer Breeder and broiler after 6 weeks
Percentage
Maize 62.5 27.5 73.0 73.0
Milo Wheat by-products 5.0 50.0 5.0 5.0
Lucerne meal 3.0 8.0 3.0 3.0
Soybean oil meal 13.0
6.0 6.0 Fish meal 3.0 3.0
Meat meal 3.0 3.0 3.0
Cottonseed meal 3.0 1.0
Sesame meal 5.0 3.0 6.0 6.0
Calcium carbonate 1.0 5.0 3.0 3.0
Calcium phosphate or 1.0 1.0 0.5 0.5
Bone meal 1.0
Iodized salt 0.5 0.5 0.5 0.5
Total 100.0 100.0 100.0 100.0
Grams per 100 kilograms
Manganese sulfate 10.0 10.0 10.0 10.0
Zinc sulfate 10.0
Vitamin A (300,000 I.U./g) 2.5 2.0 2.0 2.0
Vitamin D.sub.3 2.5 2.0 1.0 1.0
Pure riboflavin 0.3 0.2 0.3 0.3
Vitamin [B.sub.12] concentrate (6 mg [B.sub.12]/lb) 45.0 45.0
(1) For all chicks up to 6 weeks and for broilers until they are sold. At 8 weeks the protein content of the broiler ration can be reduced by replacing 1.5 percent fish and meat meal by 3 percent maize.
Mashes for Poultry, Congo
Ingredients All mash All mash All mash Laying mash for chicks for pullets for to be fed up to 2-6 layers with grain 2 months months
Percentage
Maize, ground 33 40 40 20 Millet, ground 22 15 20 18 Rice, dehulled, ground 11
Rice, paddy, ground 10 10 10
Fish meal 7.5 7 3 4
Meat meal 3 5
Skim milk powder 5 6
Yeast, dried 3 1 1
Groundnut cake meal 9 12.5 12 25 Alfalfa meal 7.5 5 7 12 Dicalcium phosphate 0.5 1 0.5 2 Oyster shells 1 2 3 3 Salt 0.5 0.5 0.5 1
TOTAL 100 100 100 100
Poultry Rations, Eritrea, Ethiopia
Ingredients Percentage
Ground barley 39.5 Ground durra (sorghum) 20.0 Ground yellow maize 20.0 Meat meal 15.0 Calcium powder 4.0 Marble grit 1.0 Common salt 0.5
TOTAL 100.0
Note: Fresh alfalfa and grain were being fed as supplements.
Poultry Rations, Ghana
Ingredients Chick feed Layer feed
Percentage
Concentrate 30 22 Maize 46 49 Rice bran 15 20 Oyster shells 1 3 Dicalcium phosphate 4 3 Grass meal 4 3
TOTAL 100 100
Poultry Rations, Kenya
Ingredients Chick Growers Complete Layers Broilers all mash layers mash all mash mash mash
Percentage
Bran 20 20 20 20
Pollard 10 10 10 10
Wheat (ground)6 Maize 32 24 30 27 58
Simsim (sesame) cake 2.5 2 4 4 4
Sunflower seed meal (hulled) 2.5 2 3
Alfalfa meal 5 10 10 8 2
Oats 7 15 10 10 5
Barley 5 6 5 3 3
Meat meal(1) 10 5 5 10 12
Fish meal(2) 5 5 3 5 6
Flocculated lime 1 1 3 3 1
TOTAL 100 100 100 100 100
Estimated protein content 19.4 16.8 16.4 18.4 19.9
(1) carcass or Grade B, 50% protein (2) 55% protein
Experimental Layer Rations Using Hawaiian Ingredients Ingredients Percentage
Meat and bone meal (50%) 20.5 Tuna meal (58%) 5.0 Blood meal 2.0 Pineapple leaf meal 30.0 Molasses, cane 30.0 Tallow, beef 12.5 TOTAL 100
Grams per 1001b (45.5 kg)
Vitamin premix(1) 300 BHT (antioxidant) 6 Manganese sulfate 8 Methionine 50
(1) Provided per pound ration: 2,500 I.U. vitamin A, 300 I.C.U. vitamin D, 1.5 mg thiamine, 1.5 mg riboflavin, 5 mg pantothenic acid, 15 mg niacin, 2 mg pyridoxine, 600 mg choline, 0.005 mg vitamin [B.sub.12].
All Mash Poultry Rations, Myanmar (Burma)
Ingredients Chicks Layers
Percentage
Rice bran 26 20.5
Broken rice 16 19
Yellow maize 16 20
Sesame oil cake 10.5 22
Groundnut Cake 5.4
Fish meal 10.5
Blood meal 2 12.5
Milk 5.5
Gram 5.5
Shells 1.5
Bone meal 1.5
Mineral mixture 2 2
Salt 0.5
Cod liver oil 0.5 0.5
Yeast 0.1
TOTAL 100.0 100.0
All Mash Rations, University College, Ibadan, Nigeria
Ration A Ration B Ration C
Ingredients General purpose Growers mash Chick mash layers + breeders 12-14 weeks mash
........Percentage.......... Guinea corn or yellow maize 67 66 62 Palm kernel cake 9 11 6 Cowpeas(1) 3 4 8 Rice bran (or maize bran)(2) 7 3 6 Groundnut cake 5 7 8 Blood meal(3) 5 5.5 6 Salt (manganized) 1 1 1 Bone meal 2 1.3 1.8 Oyster shell 1 1.2 1.2
TOTAL 100 100 100 Total percent crude protein 20.17 21.83 22.4 Total percent nitrogen 62.35 62.30 60.74 free extract Total percent crude fiber 5.65 4.45 5.10
(1) Or bambara groundnut (Voandzei subterranea Thouars) or pigeon pea (Cajanus cajan). (2) Poor quality containing much husk. (3) Poor quality, pan dried
All Mash Poultry Rations, Sri Lanka
Ingredients Chicks Growers Layers
Percentage
Tambagalla (sorghum) 40 45 42
Rice bran 7 23 19.5
Fish meal 10 12 8.5
Coconut meal 25 20 18.5
Gingelly Cake (Sesamum indicum) 12 2
Cowpeas 6 3
Shell grit 6.5
Salt 0.5 0.5 0.5
TOTAL 100.5 100.5 100.5
Added per 100.5 kg: Potassium iodide (g) 0.145 0.145 0.145 Choline chloride (21.7%) g 555 530 540
All Mash Laying Rations, Thailand
Ingredients Percentage
Rice bran 57 Broken rice 8 Ground yellow maize 7 Fish meal 7 Ground soybean cake 4 Ground groundnut cake 2 Copra meal 5 Ground oyster shell 5 Ground dried legume leaf 3 Table salt 1 Shark-liver oil or vitamins A + [D.sub.3] 1
TOTAL 100
All Mash Poultry Rations, Uruguay
Ingredients Chicks Layers
Percentage
Ground maize 40.5 40
Ground wheat 20.0 5.0
Sorghum3.0
Ground barley 16.0 20.0
Bran 10.0
Meat meal 15.0 7.0
Ground sunflower cake 7.0 10.0
Oyster shells 1.0 4.0
Salt 0.5 1.0
TOTAL 100.0 100.0
APPENDIX 2
Conversion of Units of Measurement
The inch-pound system is used in some older publications and is preferred for general use in Myanmar and the United States of America. Some common units of the inch-pound and metric systems employed in agricultural publications are defined below.
Length
1 inch (in.) = 2.54 cm 1 mm =.039 in. 1 foot (ft.) = 12 in. = 0.305 m 1 cm = .39 in. 1 yard (yd.) = 3 ft. = 0.914 m 1 m = 39.4 in. 1 mile (mi.) = 1 760 yd. = 1.61 km
Area
1 square in. = 6.45 sq. cm 1 sq. cm = .155 sq. in. 1 square foot (sq. ft.) = 0.093 sq. m 1 sq. m = 10.76 sq. ft. = 1.196 sq. yd. 1 square yard (sq. yd.) = 0.836 sq. m 1 acre = 0.405 ha 1 square mile (sq. mi.) = 2.59 sq. km or 259 ha
Volume
1 fluid dram (fl. dr.) = 3.70 cc 1 L = .264 gallons (U.S.) 1 fluid ounce (fl. oz.) = 8 fl. dr. = 29.6 cc 1 gallon (Imperial) = 4 Imp. qt. = 4.55 L 1 pint (U.S.) = 16 fl. oz. = 0.473 L 1 bushel (bu.) = 35.2 L 1 quart (U.S.) = 2 pt. = 0.946 L 1 gallon (U.S.) = 4 qt. = 3.79 L 1 cubic foot (cu. ft.) = .0283 cu. m = 28.3 L 1 cubic yard (cu. yd.) = 0.765 cu. m
Weight and Mass
1 grain (apothecaries') (gr. ap.) = 64.8 mg 1 g = .035 oz. = .0022 lb. 1 dram (apothecaries') (dr. ap.) = 60 gr. ap. = 3.89 g 1 kg = 2.2 lb. 1 ounce (apothecaries') (oz. ap.) = 8 dr. ap. = 31.1 g 1 pound (apothecaries') (lb. ap.) = 12 oz. ap. = 0.373 kg 1 ounce (avoirdupois or commercial) (oz. av.) = 28.35 g 1 pound (lb. av.) = 16 oz. av. = 0.454 kg 1 (short) ton (tn.) = 2 000 lb. av. = 0.907 t
Temperature
degrees Centigrade ([degrees]C)= 5/9 x ([degrees]F - 32) degrees Fahrenheit ([degrees]F) = (1.8 x [degrees]C) + 32
APPENDIX 3
Building the Colony Cage <see image>

General Notes:
- Make sure that all edges are flush on floor, so that the chickens' droppings fall to the ground.
- Stretch floor screen tight to prevent sagging; hold screen with a piece of binding wire attached to angle support (see section A-A.)
- Use only 3/4 in. sq. or 3/4 in. x 1 in. mesh for floor and 2 in. x 1 in. battens.
- Brood box can be as simple as a cardboard box. This box is used when removable wall is in place to provide warmth and shelter for the chicks. Remove both the wall and brood box when chicks are big enough.
- Removable wall (see brood box.) This wall is used to confine the chicks to the brooding area.
- Door covers. Cut burlap or any other thick cloth material to fit over doors in front. The cloth covers can be lowered when needed to protect chickens from wind and rain. Cover nest box door to darken interior and provide layers with privacy.
- Egg roll. This roll is necessary to keep chickens from breaking their own eggs after laying. Make sure to test the roll against breakage and adjust the slope of the floor on which the eggs roll as well as the width of the egg-catch tray if necessary. The sloping floor under the nest box (the egg roll) and the egg shelf are not attached to each other. The egg shelf is attached to a piece of wood on the door; when the door is closed it butts up against and joins the sloping wire under the nest boxes. In this way, the eggs collect on the outside of the door where they cool in the outside air. (See page 102.) Soft material can be placed in the egg shelf for protection if needed.
(See page 21 for a detailed list of the materials needed to build this cage.)
Cage design by Harlan H.D. Attfield Drawings by G. Baya
FURTHER READING
Abbott, J.C.; Stewart, G.F. Marketing Eggs and Poultry. Rome: Food and Agriculture Organization of the United Nations.
Attfield, H.; Archer, J. First Lessons In Duck Raising. Bangladesh: International Voluntary Services, 1978.
Biddle, G.; Jergenson, E. Approved Practices In Poultry Production. Illinois: The Interstate Printers.
Bird, H R. "Understanding Poultry Meat and Egg Production." Arlington, Virginia: Volunteers in Technical Assistance, 1984.
Costa, M.A. "The Evaluation of Indigenous Feedstuffs for the Nutrition of Swine and Poultry in Belize, Central America." M.S. Thesis, Michigan State University, 1981.
Khan, A.S.; Chaudhry, A.M.; and Aslam, M. Economics of Modern Poultry Production in West Pakistan. Lyallpur, Pakistan: West Pakistan Agricultural University, 1969.
Krusch, Peter. Poultry Handbook For West Africa. Washington, D.C.: Peace Corps Information Collection and Exchange, 1970.
Maurer, A.J., and Maurer, E.A. Raising Chickens in Eastern Nicaragua. Wisconsin-Nicaragua Partners and Centro para el Desarrollo Regional.
McArdle, A.; Panda, J.N. New Methods Pay With Poultry. Washington, D.C.: Peace Corps Information Collection and Exchange, 1979.
Mercia, L. Raising Poultry The Modern Way - Revised and Updated Edition. Pownal, Vermont: Storey/Garden Way Publishing, 1990.
National Academy of Sciences. Nutrient Requirements of Poultry. Washington, D.C.: National Academy Press, 1977.
North, M.O. Commercial Chicken Production Manual, Second edition. Westport, Connecticut: AVI Publishing Company, Inc., 1978.
Orr, H.L. Duck and Goose Raising. Publication 532. Ontario, Canada: Ministry of Agriculture and Food.
Piliang, W.G.; Bird, H.R.; Sunde, M.L.; and Pringle, D.J. "Rice Bran as the Major Energy Source for Laying Hens," Poultry Science 61 (1982): 357.