This process is for the manufacture of small, box-shaped paper bags (our specific process turns out one and three quarters kilo bags, but a similar process is possible for other sizes as well.) It is designed to make 500 bags per day with a labor force of 3 to 5 people.
This method uses labor as much as possible, and simple machinery where necessary to provide speed. The machinery is completely hand operated, and consists of a device for folding the bag tube and simple aids in hand-folding the bag bottoms.
Please send testing results, comments, suggestions, and requests for further information to:
VITA 1600 Wilson Boulevard, Suite 500 Arlington, Virgnia 22209 USA Tel: 703/276-1800 * Fax: 703/243-1865 Internet: pr-info@vita.org
[C] VITA, Inc. 1989 ISBN 0-86619-286-7
VOLUNTEERS IN TECHNICAL ASSISTANCE
VITA Technical Bulletins offer do-it-yourself technology information on a wide variety of subjects.
The Bulletins are idea generators intended not so much to provide a definitive answer as to guide the user's thinking and planning. Premises are sound and testing results are provided, if available.
Evaluations and comments based on each user's experience are requested. Results are incorporated into subsequent editions, thus providing additional guidelines for adaptation and use in a greater variety of conditions.
This simple process for manufacturing paper bags requires the construction of several simple pieces of equipment. These are made mostly of wood, with some pieces of spring steel and iron or mild steel strips. Construction requires basic carpentry skill and simple tools.
TOOLS AND MATERIALS
Tools
- fine-toothed saw (for cutting small pieces of wood) + hack-saw + vise (for bending metal and sawing) + hammer + both wood and metal files + pliers + small hardened drills + screwdriver
Materials
o wood (including: smooth planks, fine grained wood that can be cut into very small blocks) o soft spring steel o wood screws, nails, washers o mild steel or iron strips (approximately 1.25cm x .3cm) o a small cutting board or equivalent o thick scissors o a supply of white glue and a dispenser o a supply of paper bag paper in a roll cut to the proper width
HOW TO CONSTRUCT PAPER BAG MAKING EQUIPMENT
The most complex equipment is the BAG FOLDING MACHINE, which is
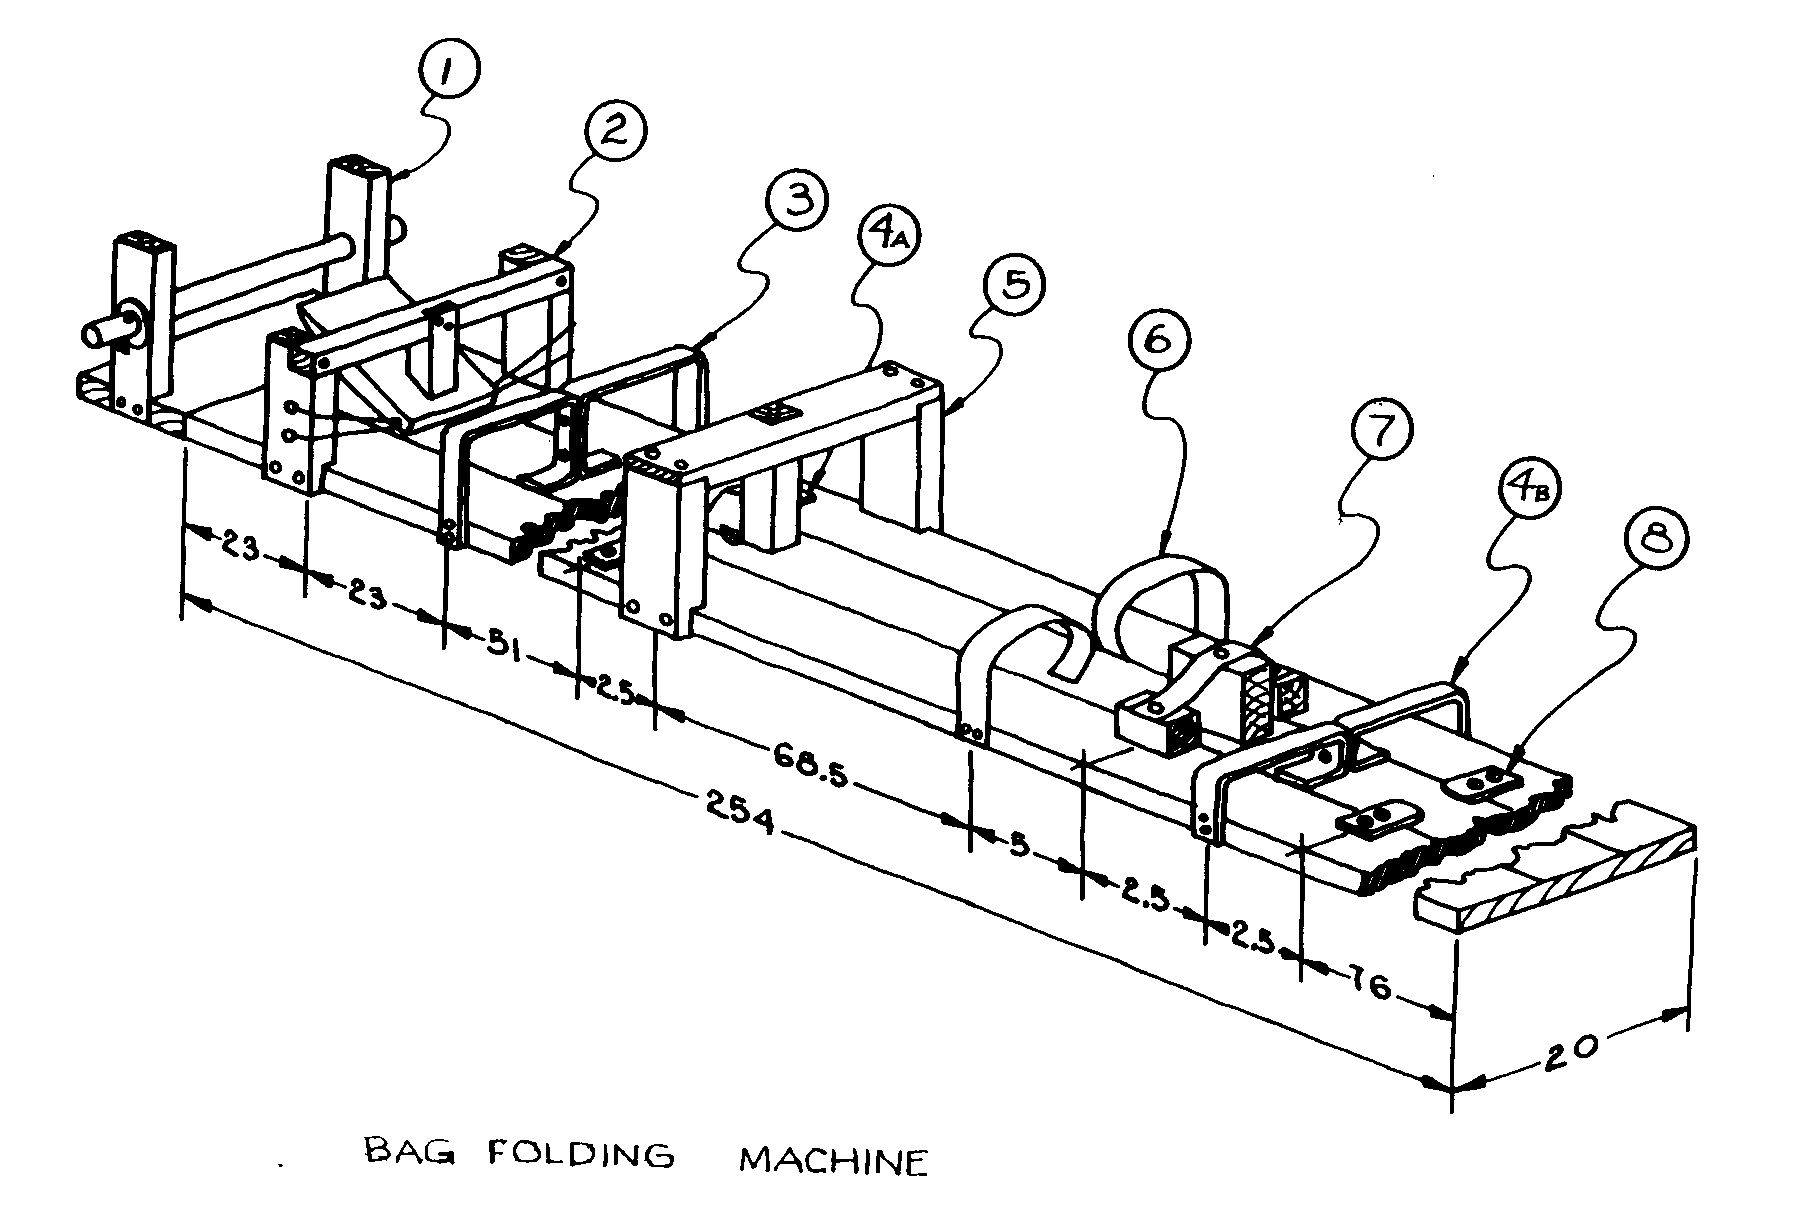
used to convert a roll of paper into a bag-shaped tube by means of a continuous folding process. Others are a GLUING AID and a BOTTOM FOLDING AID. See drawings for details.
Please note: All dimensions are in centimeters. Dimensions not shown in the drawings are optional.
Bag Folding Machine
The base of this mechanism is a long smooth plank, approximately 254 cm in length. A convenient width is approximately 20cm.
A rack (Component 1) to hold a roll of paper is fastened at one
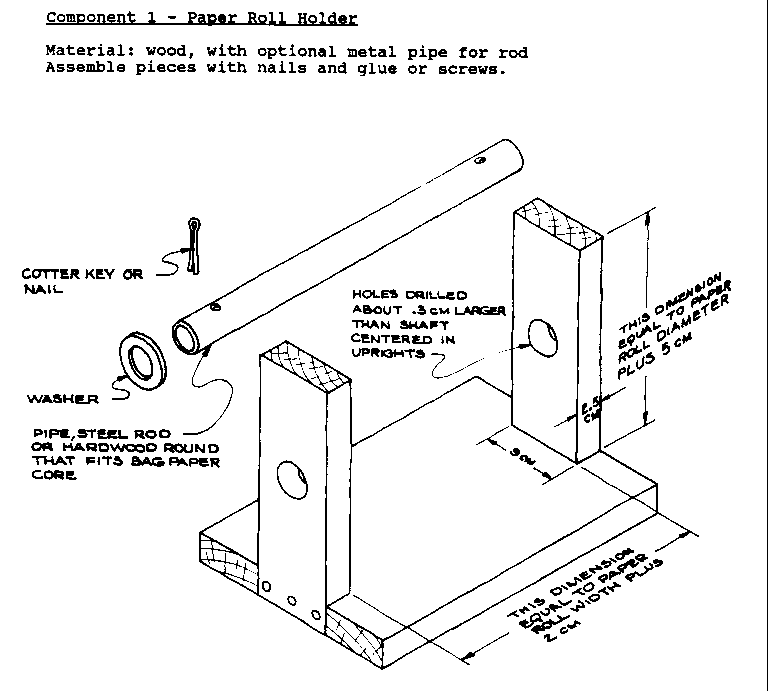
end of the base so that the paper is held with the center of the roll at the beginning of the base. The rack is made so that the roll will be exactly centered on the base, and not free to move from side to side.
Further along the base is a shoe (Component 2) that gradually
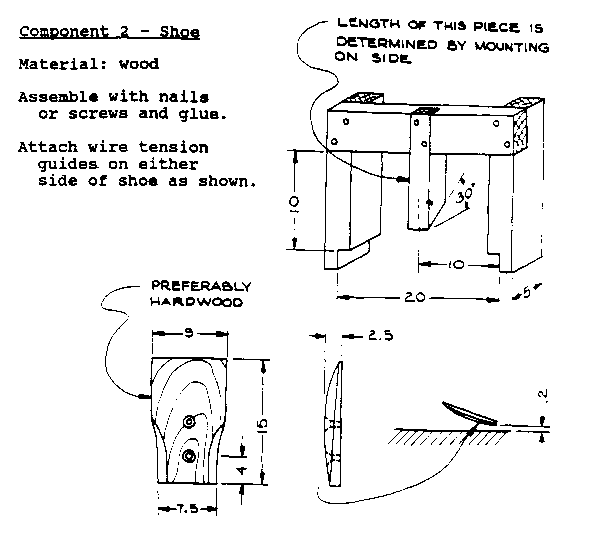
slopes downward so that it almost touches the base about 30cm from the center of the roll (measured along the base). The shoe is designed to bring the paper down to the base, and to fold up the sides of the paper. To aid in this folding, guides made of steel wire on each side of the shoe almost press against the side of the shoe where the shoe comes closest to the plank.
Approximately 15cm from the bottom edge of the shoe is a guide (Component 3) made of iron stock. The main purpose of the guide
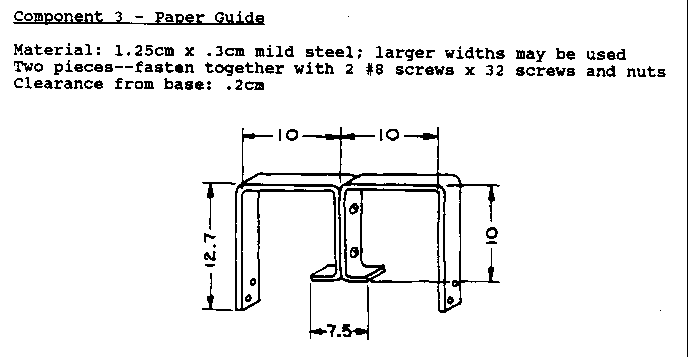
is to keep the bottom of the paper as flat as possible against the base. The guide is the exact width of the distance between the two first folds that were made by the shoe. It keeps the paper from drifting from side to side. This guide also is fastened so that it does not quite touch the base.
About 50cm further along the base are two more guides (Component 4A),
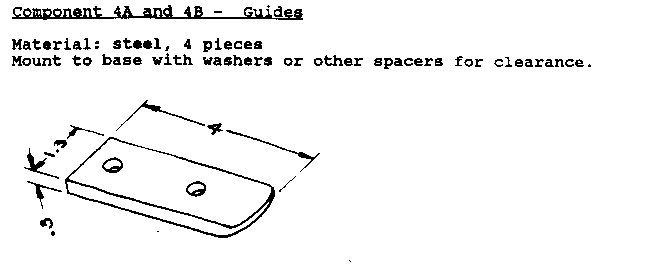
one on each side of the base. These are horizontally placed pieces of metal that extend in from the position of the first fold to the position where the second fold is to be placed.
A block of wood (Component 5) is positioned between these two
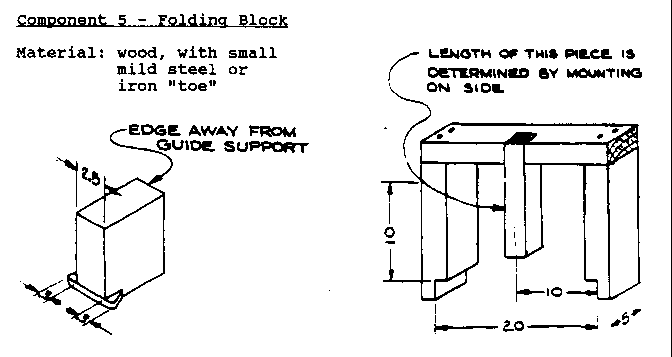
guides. This block makes the second two folds by means of a small piece of iron stock screwed to the bottom of the far end. The block of wood itself tends to keep the paper apart so that the two second folds will not be too close together. The block is prevented from moving with the paper by a piece of wood that extends downward.
About 68cm further along the base are two guides (Component 6)
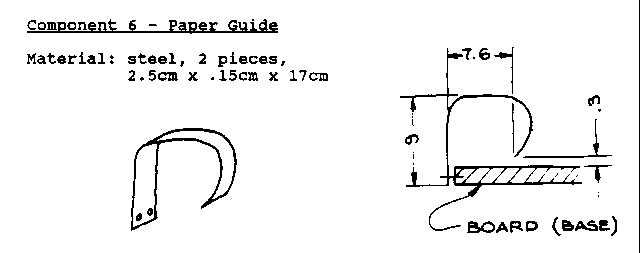
that hook under the two second folds and hold these flaps of paper approximately 1cm above the base. Their purpose is to keep the flaps from slipping under the next guide, another block of wood.
This second block of wood (Component 7) is positioned with a
2.5cm space between it and the previous guides. This block is identical to the other in every way except that it has no piece of iron. This block is simply a guiding device, not a folding device. It is held down by a piece of spring-steel.
The next guide (Component 8), positioned directly in front of
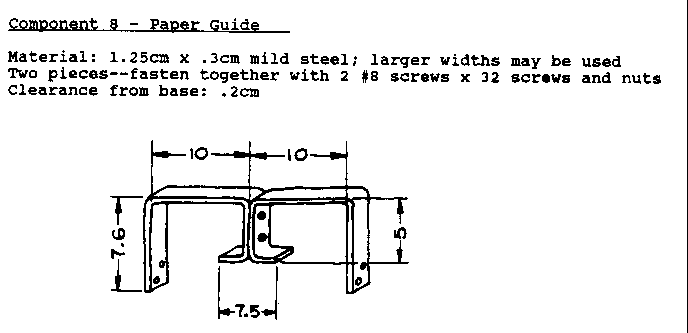
this block of wood, prevents the block from being pulled along with the paper. This guide is similar to the one positioned after the shoe. It is the width of the bag, and it sits on top of the two folds, but under the top layer of paper, which is about to be folded down. The guide serves the purposes of keeping the paper flat against the base, and of making sure that the top two folds which are about to be made are not too close together.
Centered about 2.5cm from the center of this guide are two more horizontally placed metal guides (Component 4B) whose purpose it
is to make the final two folds, and to assure that these folds are not too far apart. These guides are the same as Component 4A
except that they do not extend inward quite as far.
Gluing Aid
This device consists of a foot square wood base, to which wooden position guides (for the paper bag) are fastened. Also to the base, a template arm is fastened by a hinge mechanism, so that it can swing down to place the template on the center of the seam to be glued together.
Another hinged arm, with a weight, is fastened to the base directly opposite to the first arm. The weight is positioned so that it will come down on the glued seam in the center of the bag.
<GLUING AID>

Make gluing aid weight and template pivot arms of wood as shown. Fasten with small nails or screws and glue.
<FIGURE 1>
Cut glue template out of sheet metal. Fasten to template pivot arm with small headed nails.
<FIGURE 2>
Bottom Folding Aid
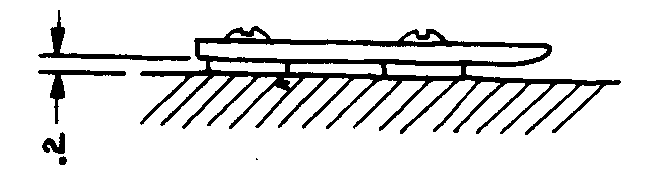
The third device is the bottom folding aid. This device consists of a wood base with an aligning block along one side and a sheet metal spring to hold the bag in place.
BOTTOM FOLDING AID
HOW TO OPERATE
The first step in the operation is to place the properly cut roll of paper in the machine so that the paper will come off the bottom of the roll. The paper should be correctly folded for a couple of feet (as if it had come out of the machine) so that the paper can be fed into the machine. The paper should be fed over and under the guides as appropriate. To feed the paper under the spring-loaded blocks, lift the blocks to put less friction on the paper.
Paper bag lengths of paper are made by standing at the end of the machine, grasping the end of the paper, pulling to the indicated length, and cutting the length off with the cutting edges.
<FIGURE 3>
The tube is then placed in the tube gluing aid so that the seam can be glued. One flap of the paper is raised, and the other left flat. The temperate arm is lowered, and the glue is applied in the template slot by the glue dispenser. The template arm is raised, the raised flap of paper is dropped, and the weighted arm lowered to press the glued seam. The glue will set in about 15 seconds or less.
The glued tube is then placed in the bottom folding aid with the glued seam facing downward. The tube is placed under the metal strip with one end placed against the guide line. The tube is then folded up on both sides of the metal strip so that there will be two crisp, straight, parallel creases.
Bag Folding Sequence
Folds in a bag tube:
<FIGURE 4>
Bottom folds: Parallel folds to begin making bottom. (Bags placed with seam down. Both folds are upward.)
<FIGURE 5>
The bag is left flat on a table, except for everything right of the inner fold, which is bent left.
<FIGURE 6>
The bag is opened up, and formed into a box shape.
<FIGURE 7>
The four 2.5cm-deep cuts are made here:
<FIGURE 8>
The sides, top, and bottom are folded in.
<FIGURE 9>
Flaps are folded along dotted line (which already exists as a fold), outer flap first, then inner flap. The bag is then pressed under a weight. The bag is now complete.
The bag can now be opened.
<FIGURE 10>
Alternate Gluing Methods
An alternative to the tube gluing aid is to glue the tube section by section as it is pulled out of the tubing machine and cut off to the proper length. The template on the mechanism may have a tendency to clog, making it somewhat difficult to apply glue to the bag by this means.
There are other simple ways to apply glue to paper besides with a dispenser. A brush can be used that is manually dipped in a pot of glue and spread on the paper. The advantage to this system is that it is neater, and the glue can be applied evenly and thinly. The main disadvantage is that the brush tends to dry out and may be difficult to clean.
HOW TO ADJUST AND MAINTAIN
The only mechanism that needs careful maintenance is the tubing machine.
Some possible problems:
1) The guides must not touch the base where the paper is to slip under. If they do, the paper will bind and perhaps tear.
2) The spring must apply enough pressure so that the blocks of wood will stay in position, and not be pushed up when the paper is drawn through the machine. But the spring cannot be too tight, or the friction on the paper will be too great.
3) All guides that keep the paper from moving from side to side or which cause the paper to be folded must be the proper width and perfectly aligned. Otherwise, the folds will not be smooth.
4) There must be no sharp edges rubbing on the paper (except on trailing edges). The paper will tear if these edges are sharp.
Other than the above, the tolerances are not critical, and any problems can be easily corrected by simple adjustments.