Published by VITA 1600 Wilson Boulevard, Suite 500 Arlington, Virginia 22209 USA Tel: 703/276-1800 . Fax: 703/243-1865 Internet: pr-infor@vita.org
ISBN 0-86619-030-9
[C] 1980 Volunteers in Technical Assistance
I. WHAT IT IS AND HOW IT IS USEFUL
II. DECISION FACTORS
- Applications Advantages Considerations Purpose
- Cost Estimate
III. MAKING THE DECISION AND FOLLOWING THROUGH
IV. PRECONSTRUCTION DECISIONS
- Size Site Selection Other Considerations
- Disadvantages of Plastic Films
- Construction Requirements
V. CONSTRUCTION OF THE STILL
- The Tray
- The Frame
- The Base
- Assemble the Still
VI. OPERATION AND MAINTENANCE
VII. DICTIONARY OF TERMS
VIII. CONVERSION TABLES
IX. FURTHER INFORMATION RESOURCES
APPENDIX I. DECISION MAKING WORKSHEET
APPENDIX II. RECORD KEEPING WORKSHEET
I. WHAT IT IS AND HOW IT IS USEFUL
A solar still is a device that uses energy from the sun to purify salt- or brackish water. Solar stills (as shown in Figure 1) can be easy to construct and maintain. Depending upon
their size, they can provide water for many uses. And in desert areas where sunshine is plentiful and water is not, a solar still can be very important.
A solar still is little more than a shallow, watertight box with a clear glass or plastic top. The bottom of the box is usually painted black to absorb the sun's heat. The base of the still is filled with nonpotable water, for example, brackish water. The sun's heat evaporates the water, which then condenses on the inner surface of the cover. The condensed water runs into troughs from which it can be collected in storage containers. The still's cover is tilted to collect the greatest amount of solar energy. Glass-covered solar stills are much more rugged and trouble-free and are able to withstand climatic and environmental conditions much better than plastic. So, over a long period of time, the increased cost of glass will pay for itself.
Since the water is pure and free of harmful bacteria, there is no fear of water-borne diseases commonly associated with water supplies in many developing countries. In some parts of the world where the major supply of water is the sea or ocean, solar distillation of saltwater has proved to be economically feasible when compared to mechanical conversion of saltwater.
The portable still described here produces 3 liters (.8 gallons) of water per day. [While the basic design can be enlarged to produce up to 758 liters (200 gallons) per day, the resulting still would be 185 sq m (2000 sq ft) and would be very expensive to build.] Once built, the only maintenance required is to keep the outside of the glass clean and to flush out the interior occasionally to remove the salt buildup.
II. DECISION FACTORS
Applications: * Purifying salt- and brackish water
* Clean water supply for family needs, hospital or dispensary, etc.
Advantages: * No fuel costs
* Still can produce up to 3 liters (.8 gallons of water per day
* Easy to build and operate
* Portable design -- ideal for field applications
* Designed to catch rainwater run-off
Considerations: * Limited output
* Has to be filled manually
* Operable only during daylight hours
* Must be cleaned periodically
PURPOSE
What is the water to be used for and how much is needed? Consider these questions carefully before beginning. The amount clean water processed from the still is small in comparison to normal water usage which in a developing country runs from 24-40 liters (6-11 gallons) per day. This limits the still's value to those needs it can meet. In many areas, the primary use for a solar still has been to provide potable water from seawater or brackish water which is unfit to drink in its natural state. This still could provide enough water to meet an individual's drinking needs.
Consider also care and maintenance of the solar still. Someone has to fill and clean the still in the design presented here.
COST ESTIMATE(*)
$15 to $30 (U.S., 1979) including material and labor.
()Cost estimates serve only as a guide and will vary from country to country.
III. MAKING THE DECISION AND FOLLOWING THROUGH
When determining whether a project is worth the time, effort, and expense involved, consider social, cultural, and environmental factors as well as economic ones. What is the purpose of the effort? Who will benefit most? What will the consequences be if the effort is successful? And if it fails?
Having made an informed technology choice, it is important to keep good records. It is helpful from the beginning to keep data on needs, site selection, resource availability, construction progress, labor and materials costs, test findings, etc. The information may prove an important reference if existing plans and methods need to be altered. It can be helpful in pin-pointing "what went wrong?" And, of course, it is important to share data with other people.
The technologies presented in this series have been tested carefully, and are actually used in many parts of the world. However, extensive and controlled field tests have not been conducted for many of them, even some of the most common ones. Even though we know that these technologies work well in some situations, it is important to gather specific information on why they perform better in one place than in another.
Well documented models of field activities provide important information for the development worker. It is obviously important for a development worker in Colombia to have the technical design for a still built and used in Senegal. But it is even more important to have a full narrative about the still that provides details on materials, labor, design changes, and so forth. This model can provide a useful frame of reference.
A reliable bank of such field information is now growing. It exists to help spread the word about these and other technologies, lessening the dependence of the developing world on expensive and finite energy resources.
A practical record keeping format can be found in Appendix II.
IV. PRECONSTRUCTION CONSIDERATIONS
SIZE
The relationship between the size of a solar still and its capacity depends upon its design and efficiency. The area/ capacity rate is approximately 10 to 1 if the unit is glass covered and well insulated. For example, a 114-liter- (30-gallon-) per-day still will require 300 sq ft under optimum conditions. On cloudy or rainy days, production stops so it is necessary to build a solar device to anticipate this handicap. Therefore, it is best to provide for a good storage facility to hold the water produced.
Because this still is quite small, it is designed so that water collected can be drained into bottles. The water could also be collected in 208-liter (55-gallon) drums that have been cleaned and rustproofed or in ferroconcrete water storage tanks--any good catchment setup can be used.
SITE SELECTION
The still requires unobstructed sunshine from early morning to late afternoon. It should be placed so that the length of the still runs from east to west. The south-facing glass should face due south as much as possible. The still should be kept level.
OTHER CONSIDERATIONS
The quality of the water produced can be greatly affected by the storage facility and the collection method just to name two factors. Many prefer to boil water which sits in a catchment of some kind before using it as drinking water. On the other hand, if the still is kept clean and the distillate is drained into clean bottles for storage [20-30 liter (5-8 gallon) bottles are a good size], the water will remain clean.
DISADVANTAGES OF PLASTIC FILMS
Because of the following problems, glass-covered stills appear to be more reliable:
* Plastic films become brittle and deteriorate from the sun's ultraviolet radiation. As a result, depending upon quality of the plastic, they may have to be replaced every three to six months.
* Condensing water usually forms droplets on the surface of the plastic film. These droplets reflect a portion of the solar energy back to the sky and they often drip back into the basin.
* Plastic film is easily damaged by heavy rains, winds, and wildlife.
* Plastic collects dust which can only be removed by using fresh water from the still.
CONSTRUCTION REQUIREMENTS
Tools
* Hammer * Welding equipment * Screwdriver * Paint brushes * Wood saw * Wood chisel or router * Metal saw * Drill with bits * Pliers * "C" clamps * Ruler
Materials
1 Galvanized steel sheet, 58cm X 128cm X 0.3mm thick (water tray)
1 Hardboard sheet, 60cm X 124cm X 3mm thick (insulation backing)
2 Glass panes, 27.5cm X 122cm X 6mm thick (transparent cover)
4 Lumber,() finished, 5cm X 5cm X 25cm, (legs)
4 Lumber,() finished, 2cm X 8cm X 128cm (base frame, long)
5 Lumber,() finished, 2cm X 8cm X 60cm (base frame, short)
2 Lumber,() finished, 5cm X 10cm X 120cm (side members)
3 Lumber,() finished, 4cm X 5cm X 50cm (tray ribs)
2 Lumber,() finished, 17.5cm X 60cm X 2cm thick, cut angular as shown or equivalent (end pieces)
1 Lumber,() finished, 4cm X 4cm X 124cm (glass support)
1 Copper tubing/galvanized steel pipe, 3/8" X 11cm long, (drainpipe)
2 Copper tubing/galvanized steel pipe, 3/8" X 6cm long (distillate and rainwater pipes)
1 Plastic tubing, length variable depending on collection bottles, etc.--to fit snugly over copper tubing
* Nonhardening caulking, similar to that used for steel windows
* Preferably a white wood or equivalent (tulip, a cottonwood).
* Wood shavings, to fill volume 0.3 cubic meters (insulation)
* Primer for galvanized steel surfaces, preferably one coat wash primer and then one coat zinc chromate
* Aluminum paint
* Wood primer
* Flat black plastic paint
* White plastic paint
* Nails
* Screws
* Clamps
V. CONSTRUCTION OF THE STILL
THE TRAY
- On one end of the galvanized steel sheet, drill a 3cm diameter hole for the drainpipe as shown in Figure 2.
- Using tin snips or a metal saw, cut the galvanized steel sheet 4cm from the end on each long side, cutting 4cm deep (as indicated in Figure 2).
- Bend the long sides as shown in Figure 3.
- Bend the ends into corners. Solder all four corners at the top and bottom, inside and out, as indicated in Figure 4.
- Using clean water, test for leaks. If any leaks appear, resolder that corner, inside and out.
- Using a metal saw, cut the copper drainpipe as shown in Figure 5. The drainpipe should
extend at least 5cm below the bottom of the framework to permit easy installation of the plastic tubing.
- Bend the sections very carefully as shown in Figure 6 and flatten with a hammer.
- Turn the tray upside down and line up the hole in the drainpipe with the hole in the bottom of the tray as shown in Figure 7. Solder all four tabs securely. Check for leaks.
- Paint the tray with a suitable primer and then with a good flat black plastic paint. The paint should be able to withstand continuous immersion and temperatures of 65-70[degrees]C 150-160[degrees]F) and should not fade or discolor under the influence of the sun's rays.
THE FRAME
- Grooves can be cut into the side members or built up for the distillate and rainwater troughs and the glass rest. Two options are shown below in Figure 8.
If Option 1 is used, holes should be drilled for the drainpipes, after assembly, and edges sealed with caulking. The side members should be primed and painted with good white plastic paint. Be sure that the upper face containing the grooves is thoroughly painted to prevent leakage.
- Cut and prepare the end sections, cutting a door in one piece, as shown in Figure 9. Painting probably should be done after assembly of still section as shown on the following page.
- As shown in Figure 10, nail the end sections to the side members. Nail the tray ribs in place using nails at least 10cm long.
- Nail the hardboard or plywood insulation retaining sheet in place beneath the tray ribs (see Figure 10). (If hardboard is used, it should be soaked in water for at least 24 hours, removed from water and allowed to dry thoroughly; then nailed in place.) Nail edges closely to prevent bulging at the seams.
- Place the tray in the still to get the drainpipe location. Remove the tray from the still and drill a hole for the drainpipe in the retaining sheet. Be sure it is in the end where the door is located.
- Paint the outside bottom face of the hardboard or plywood with aluminum paint.
- Drill two holes for the distillate and the rainwater drainpipes in the door end only. See Options 1 and 2 in Figure 11 below.
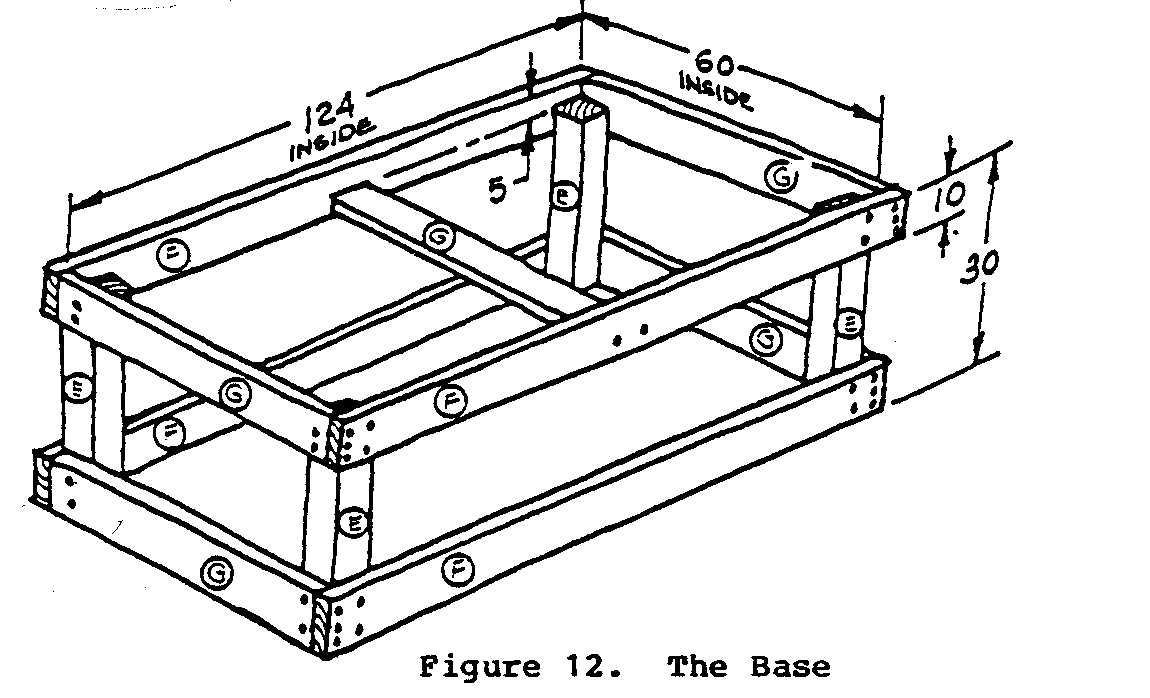
THE BASE
Make a sturdy base for the still, using available materials. The dimensions in Figure 12 should be used as a guide.
ASSEMBLE THE STILL
- Place the insulation in the still under the ribs, between the ribs, and level with the top of the ribs (see Figure 13). Do not pack too firmly but pack evenly and fully.
- Install the tray in its place making certain the drainpipe is properly positioned.
- Nail the tray into the framework at about 4cm intervals, at the top edge only. Do not nail the tray into the rib supports but only into the side members as shown in Figure 14.
- Install the glass support into the framework as shown in Figure 14.
- Clean the glass panes extremely well and put them in place. Care must be taken to avoid fingerprints, putty, or paint marks on the glass. Caulk the glass well with non-hardening putty (silicone rubber or similar caulking is good).
- Secure the glass panes with several metal or wooden clamps (see Options 1 and 2 in Figure 15). They should prevent a strong wind from lifting and possibly breaking the glass.
- Install the plastic tubing to the trough pipes and be sure to allow sufficient tubing to enter several centimeters into the collection bottles.
VI. OPERATION AND MAINTENANCE
For proper operation and maintenance of your solar still, follow the guidelines listed below:
* For the first use, fill the still with water to a depth of approximately 2cm (1"). From then on, early each morning, at about 7 or 8 o'clock, drain the water remaining from the previous day. Add fresh water, again to a depth of about 2cm.
Be careful not to touch the underside of the glass.
* Do not use the distillate produced by the still for the first few days; this avoid contamination.
* Always wash out collecting bottles in fresh water and then in distilled water. The collecting bottles must be large enough to hold 1-3 liters (1 gallon). Use only thin-necked collection bottles with tops loosely stoppered around the tubing to prevent contamination of the distilled water.
* Keep the distillation unit and surrounding area clean at all times to maintain quality distilled water.
* Keep the distillation water in a 20-30 liter (5-8 gallon) container so that there will always be extra water available. The areas around storage bottles must also be kept clean.
* Clean the glass every few days with distilled water and squeegee (see Figure 16)
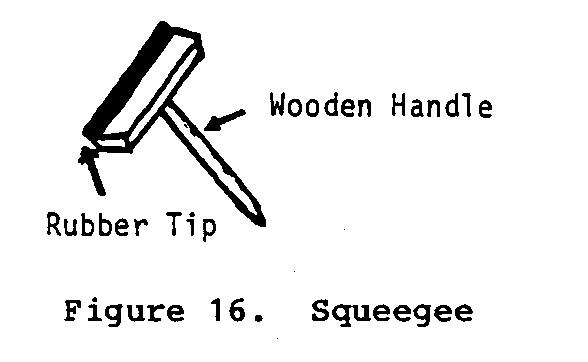
or clean cloth.
* Clean the outside glass before rainstorms during the rainy season; the clean rainwater can be collected and added to the reserve stocks.
VII. DICTIONARY OF TERMS
BACTERIA--Any of numerous one-celled micro-organisms of the class Schizomycetes, having a wide range of biochemical, often pathogenic (toxic), properties.
BRACKISH WATER--Water containing some brine or salt.
BRITTLE--Likely to break, fragile.
BULGING--Swollen; grown larger or rounder.
CATCHMENT--A structure or vessel, such as a basin, reservoir, or barrel, for collecting water.
CAULK--To make watertight or airtight by filling in cracks.
CAULKING COMPOUND--Substance used to fill in cracks to keep something watertight or airtight.
CONDENSE--To reduce a gas or vapor to a liquid or solid.
CONTAMINATION--To make impure or unsuitable by contact or mixture with something unclean.
DETERIORATE--To lower in quality, character, or value. To disintegrate or wear away.
DISTILLATE--The liquid condensed from vapor in distillation.
EVAPORATE--To convert from liquid to vapor.
FERROCONCRETE--Concrete containing steel bars or metal netting to increase its tensile strength.
HANDICAP--Disadvantage or disability.
IMMERSE--TO cover completely in a liquid.
NONPOTABLE WATER--Contaminated water not fit for human consumption.
POLYETHYLENE--A plastic compound of ethylene used for packaging and insulation of containers, etc.
PORTABLE--Mobile, easily moved.
POTABLE WATER--Uncontaminated water fit for human consumption.
PUTTY--A doughlike cement made by mixing whiting and linseed oil, used to seal joints in pipes, fill holes in woodwork, and secure panes of glass.
ROUTER--A tool or machine used to cut furrows or hollows in wood.
TROUGH--A long, narrow, generally shallow receptacle, especially one for holding water.
VIII. CONVERSION TABLES
UNITS OF LENGTH
1 Mile = 1760 Yards = 5280 Feet 1 Kilometer = 1000 Meters = 0.6214 Mile 1 Mile = 1.607 Kilometers 1 Foot = 0.3048 Meter 1 Meter = 3.2808 Feet = 39.37 Inches 1 Inch = 2.54 Centimeters 1 Centimeter = 0.3937 Inches
UNITS OF AREA
1 Square Mile = 640 Acres = 2.5899 Square Kilometers 1 Square Kilometer = 1,000,000 Square Meters = 0.3861 Square Mile 1 Acre = 43,560 Square Feet 1 Square Foot = 144 Square Inches = 0.0929 Square Meter 1 Square Inch = 6.452 Square Centimeters 1 Square Meter = 10.764 Square Feet 1 Square Centimeter = 0.155 Square Inch
UNITS OF VOLUME
1.0 Cubic Foot = 1728 Cubic Inches = 7.48 US Gallons 1.0 British Imperial Gallon = 1.2 US Gallons 1.0 Cubic Meter = 35.314 Cubic Feet = 264.2 US Gallons 1.0 Liter = 1000 Cubic Centimeters = 0.2642 US Gallons 1.0 Metric Ton = 1000 Kilograms = 2204.6 Pounds 1.0 Kilogram = 1000 Grams = 2.2046 Pounds 1.0 Short Ton = 2000 Pounds
UNITS OF PRESSURE
1.0 Pound per square inch = 144 Pound per square foot 1.0 Pound per square inch = 27.7 Inches of water() 1.0 Pound per square inch = 2.31 Feet of water() 1.0 Pound per square inch = 2.042 Inches of mercury() 1.0 Atmosphere = 14.7 Pounds per square inch (PSI) 1.0 Atmosphere = 33.95 Feet of water() 1.0 Foot of water = 0.433 PSI = 62.355 Pounds per square foot 1.0 Kilogram per square centimeter = 14.223 Pounds per square inch 1.0 Pound per square inch = 0.0703 Kilogram per square centimeter
UNITS OF POWER
1.0 Horsepower (English) = 746 Watt = 0.746 Kilowatt (KW) 1.0 Horsepower (English) = 550 Foot pounds per second 1.0 Horsepower (English) = 33,000 Foot pounds per minute 1.0 Kilowatt (KW) = 1000 Watt = 1.34 Horsepoer (HP) English 1.0 Horsepower (English) = 1.0139 Metric horsepower
(cheval-vapeur)
1.0 Metric horsepower = 75 Meter X Kilogram/Second 1.0 Metric horsepower = 0.736 Kilowatt = 736 Watt
* At 62 degrees Fahrenheit (16.6 degrees Celsius).
IX. FURTHER INFORMATION RESOURCES
Brace Research. "How to Make a Solar Still (Plastic covered)," Faites Vous-meme #1 (Do It Yourself #1), January 1965. Brace Research, McDonald College of McGill University, Ste. Anne de Bellevue, Quebec, Canada. Probably the most useful booklet of these three. Contains plans for a large, fairly low-cost solar still, especially designed for developing areas. Plans include materials list, clear schematic drawings, and easily followed instructions. Design given has been used extensively in Barbados.
Edson, Lee and Weldy, James. "Glass-covered Solar Still," revised July 1967. Plans for a solar still very similar to the one below, only larger (6 X 8 ft), putting out 5 gallons water/day under optimum conditions. Includes list of materials, schematic drawings, and instructions. Available from the University of California, 1301 S 46th Street, Richmond, California USA.
Edson, Lee and Weldy, James. "How to Build a Solar Still," revised by B.W. Tliemat, June 1966, 13 pp. Plans for building a small "roof-type" still of glass and wood, big enough to supply drinking water for one person under optimum conditions. Includes list of materials, schematic drawings, and instructions. May be a bit too technical for some. Available from Sea Water Conversion Lab, Richmond Field Station, University of California, 1301 S 46th Street, Richmond, California USA.
SOLAR DISTILLATION
Department of Agriculture. Survival in the Desert (Solar Still). Available from VITA.
Dunham, Daniel C. Fresh Water from the Sun -- Family Sized Solar Still Technology: A Review and Analysis. 1978, 176 pp. Office of Health, United States Agency for International Development, United States Department of State, Washington, DC 20523 USA.
Gomkale, S.D. and Datta, R.L. "Some Aspects of Solar Distillation for Water Purification," Solar Energy, Vol. 14, 1973, pp. 387-392.
Papoulias, Nicholas G. Solar Stills. June 1975. Church World Service, Athens, Greece. Available from VITA.
Porteous, Andrew. "The Design of a Prefabricated Solar Still for the Island of Aldabra," Desalination. January 1969. Elsevier Publishing Company, Amsterdam, The Netherlands.
Read, W.R. "A Solar Still for Water Desalination (Design, Construction, and Installation)," Report E.D. 9. September 1963. CSIRO, PO Box 26, Highett, Victoria, Australia 3190.
VITA. "Solar Desalination." List of enclosures for VITA case #28179.
APPENDIX I
DECISION MAKING WORKSHEET
If you are using this as a guideline for using a solar still in a development effort, collect as much information as possible and if you need assistance with the project, write VITA. A report on your experiences and the uses of this manual will help VITA both improve the book and aid other similar efforts.
Publications Service VOLUNTEERS IN TECHNICAL ASSISTANCE 1815 North Lynn Street, Suite 200 Box 12438 Arlington, Virginia 22209-8438 USA
CURRENT USE AND AVAILABILITY
* Note current domestic and agricultural practices which might have potential for solar application.
* Document days of sunshine, seasonal changes, haze, cloud cover. Check to see if such information has already been collected for the local area. Another way of finding the information is to search out annual rainfall figures and work from there.
* Have solar technologies been introduced previously? If so, with what results?
* Have solar technologies been introduced in nearby areas? If so, with what results?
* Are there other current practices which might be enhanced by improved use of solar energy--for example, salt production?
IDENTIFY APPROPRIATENESS OF THIS TECHNOLOGY
* Is there a choice to be made between a solar technology and another alternative energy technology? Or, is it important to do both on a demonstration basis?
* Under what conditions would it be useful to introduce a solar technology for demonstration purposes?
* If solar units are feasible for local manufacture, would they be used? Assuming no "funding," could local people afford them? Are there ways to make the solar technologies "pay for themselves?"
* Could this technology provide a basis for a small business enterprise?
NEEDS AND RESOURCES
* What are the characteristics of the problem? How is the problem identified? Who sees it as a problem?
* Has any local person, particularly someone in a position of authority, expressed the need or showed interest in solar technology? If so, can someone be found to help the technology introduction process? Are there local officials who could be involved and tapped as resources?
* How will you get the community involved with the decision of which technology is appropriate for them.
* Based on descriptions of current practices and upon this manual's information, identify needs which solar technologies appear able to meet.
* Are materials and tools available locally for construction of technologies?
* Are there other projects already underway to which a solar component might be added so that the ongoing project acts as a technical and even financial resource for the new effort? For example, if there is a post-harvest grain loss project underway, could improved solar drying techniques be introduced in conjunction with the other effort?
* What kinds of skills are available locally to assist with construction and maintenance? How much skill is necessary for construction and maintenance? Do you need to train people? Can you meet the following needs?
* Some aspects of this project require someone with experience in metal-working and/or welding. Estimated labor time for full-time workers is:
* 8 hours skilled labor * 8 hours unskilled labor
* Do a cost estimate of the labor, parts, and materials needed.
* How will the project be funded? Will outside funding be required? Are local funding sources available to sponsor the effort?
* How much time do you have for the project? Are you aware of holidays and planting or harvesting seasons which may affect timing?
* How will you arrange to spread knowledge and use of the technology?
FINAL DECISION
* How was the final decision reached, either to go ahead or not to go ahead, with this technology?
APPENDIX II
RECORD KEEPING WORKSHEET
CONSTRUCTION
Photographs of the construction process, as well as the finished result, are helpful. They add interest and detail that might be overlooked in the narrative.
A report on the construction process should include very specific information. This kind of detail can often be monitored most easily in charts (such as the one below). <see report 1>
Some other things to record include:
* Specification of materials used in construction.
* Adaptations or changes made in design to fit local conditions.
* Equipment costs.
* Time spent in construction--include volunteer time as well as paid labor, full- and/or part-time.
* Problems--labor shortage, work stoppage, training difficulties, materials shortage, terrain, transport.
OPERATION
Keep log of operations for at least the first six weeks, then periodically for several days every few months. This log will vary with the technology, but should include full requirements, outputs, duration of operation, training of operators, etc. Include special problems that may come up--a damper that won't close, gear that won't catch, procedures that don't seem to make sense to workers, etc.
MAINTENANCE
Maintenance records enable keeping track of where breakdowns occur most frequently and may suggest areas for improvement or strengthening weakness in the design. Furthermore, these records will give a good idea of how well the project is working out by accurately recording how much of the time it is working and how often it breaks down. Routine maintenance records should be kept for a minimum of six months to one year after the project goes into operation. <see report 2>
SPECIAL COSTS
This category includes damage caused by weather, natural disasters, vandalism, etc. Pattern the records after the routine maintenance records. Describe for each separate incident:
* Cause and extent of damage. * Labor costs of repair (like maintenance account). * Material costs of repair (like maintenance account). * Measures taken to prevent recurrence.
MANUALS IN THE ENERGY SERIES
This book is one of a series of manuals on renewable energy technologies. It is primarily intended for use by people in international development projects. However, the construction techniques and ideas presented here are useful to anyone seeking to become more energy self-sufficient. The titles in the series are:
Helical Sail Windmill
Hydraulic Ram
Making Charcoal: The Retort Method
Overshot Water-Wheel: Design and Construction Manual
Small Michell (Banki) Turbine: A Construction Manual
Solar Still
Solar Water Heater
Three Cubic Meter Bio-Gas Plant: A Construction Manual
For a free catalogue of these and other VITA publications, write to: VITA Publications Service P. O. Box 12028 Arlington, Virginia 22209 USA
ABOUT VITA
Volunteers in Technical Assistance (VITA) is a private, nonprofit, international development organization. VITA makes available to individuals and groups in developing countries a variety of information and technical resources aimed at fostering self sufficiency--needs assessment and program development support; by-mail and on-site consulting services; information systems training; and management of long-term field projects. VITA promotes the application of simple, inexpensive technologies to solve problems and create opportunities in developing countries.
VITA places special emphasis on the areas of agriculture and food processing, renewable energy applications, water supply and sanitation, housing and construction, and small business development. VITA's activities are facilitated by the active involvement of VITA Volunteer technical experts from around the world and by its documentation center containing specialized technical material of interest to people in developing countries.