A VITA publication
ISBN 0-86619-071-6
[C] 1980 Volunteers in Technical Assistance
Published by VITA 1600 Wilson Boulevard, Suite 500 Arlington, Virginia 22209 USA Tel: 703/276-1800 * Fax: 703/243-1865 Internet: pr-info@vita.org
This book is one of a series of manuals on renewable energy technologies. It is primarily intended for use by people in international development projects. The construction techniques and ideas presented here are, however, useful to anyone seeking to become energy self-sufficient.
CHARCOAL RETORT
I. WHAT IT IS AND WHAT IT IS USEFUL FOR
- Cost Estimate Background Applications Retort for Charcoal Production
II. MAKING THE DECISION AND FOLLOWING THROUGH
- Discussion
III. PRE-CONSTRUCTION CONSIDERATIONS
- Applications Kiln Design Site Selection Preparing Wood for Charring Materials Needed Tools Needed
IV. RETORT CONSTRUCTION
- Prepare the Oil Drums
- Make the Chambers
- Make the Covers
- Make Trays to Hold the Wood
- Make Tar Condensers
- Make Gas Escapes
- Set up the Retort - Trench Method
- Set up the Retort - Elevated Method
- Fit the Tar Condensers
- Weld the Gas Pipes
- Insulate the Retort
V. OPERATION AND MAINTENANCE
- How to Use Tar
VI. CONVERSION TABLES
VII. FURTHER
APPENDIX I. DECISION MAKING WORKSHEET
APPENDIX II. RECORD KEEPING WORKSHEET
CHARCOAL RETORT
I. WHAT IT IS AND WHAT IT IS USEFUL FOR
Applications: * Charcoal production * Lumber drying * Wood preservative/pest control (by-products)
Advantages: * Easy to build and maintain * Portable * Produces a high quality charcoal * Cuts in half the charcoal production time * Requires less fuel than other methods * Produces useful tars as a by-product
Considerations: * Retort must be replaced every two years * More expensive than traditional methods
COST ESTIMATE
$100 to $600 (US) including materials and labor.(*)
BACKGROUND
A given quantity of charcoal produces approximately twice as much heat as the same weight of wood. Producing charcoal is relatively simple. When wood is heated in the absence of air above 270[degrees]C (518[degrees]F), water and other materials will be driven from the wood without burning. Charcoal is the substance that remains.
One problem with some traditional methods of charcoal production is that they are inefficient. It may take almost as much fuel to heat a charcoal kiln as the kiln will produce. The challenge is to seek better ways of producing charcoal. Essentially, efforts have revolved around finding improved methods to heat the wood and to promote destructive distillation (forcing water and other materials from the wood) without burning large amounts of wood to ashes. These efforts have resulted in a wide variety of types of kilns, or ovens, for charcoal production.
In an area where combating deforestation is a major concern, and where people must walk miles each day to collect firewood, increased availability
* Cost estimates serve only as a guide and will vary from country to country.
of charcoal can make an important contribution to the overall quality of life. Another benefit of promoting increased use of charcoal, and introducing technologies related to use of charcoal, is that it may be more easily accepted on the village level than will some of the more "unusual" technologies. In most places, charcoal is not an unknown quantity--though using charcoal wisely may be new. People are more likely to accept the use of charcoal in an improved stove than something totally unfamiliar (e.g., a stove powered by solar energy).
It is very important to note that large-scale charcoal production can cause or add to deforestation problems if not done carefully. Such ventures should be attempted only after ensuring proper conservation of forests and other wood supplies. Do not make charcoal if it will waste more trees than are saved.
APPLICATIONS
For domestic purposes, charcoal is used in cooking and heating. It is popular for cooking because it burns with very little smoke and with steady heat. Stoves that use charcoal can be smaller and more efficient than those in which wood is burned.
Charcoal has a number of industrial and market applications that make it attractive to the entrepreneur. Charcoal can replace coke or fuel oil, which in many countries are very expensive and must be imported. Charcoal can also be used:
* For drying produce or fish.
* As a fuel in the process of manufacturing lime and cement.
* For the extraction of metals, particularly iron, from their ores (iron and steel made by burning charcoal are generally higher in quality than metal produced by means of mineral coal).
* For forging.
RETORT FOR CHARCOAL PRODUCTION
The retort is one of the most efficient means of producing good quality charcoal. Wood is placed in a large steel cylinder (or "retort"). This has a tightly closed door, and some means to let tar and gases escape. The cylinder is heated from the outside. No air enters the barrel. When the wood in the cylinder has been heated to the right temperature, a chemical reaction (called carbonization) begins that gives off heat and by-products. Little additional outside heat is necessary.
The retort presented here (see Figure 1) was designed and tested in the West
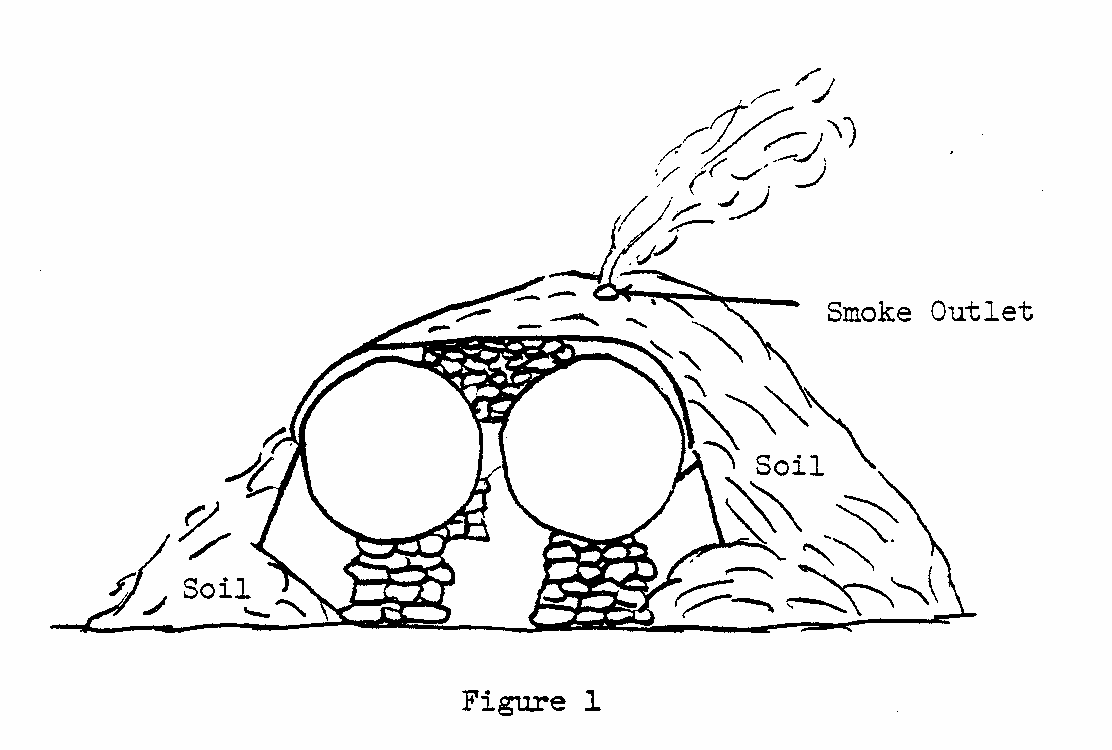
Indies. Based on other retorts used around the world, it can be constructed from oil drums.
This retort cannot collect the gases that are released during the charcoal production process. That requires more complicated equipment, which is not practical in smaller-scale production operations. But the retort can be made so that the gases become fuel for part of the kiln-firing process, Or, it can be made to collect the tars from the production process. These tars can be used for weatherproofing or preventing rust. They can also provide some protection from termites when applied on fence posts or painted around the foundations of buildings.
II. MAKING THE DECISION AND FOLLOWING THROUGH
DISCUSSION
When determining whether a project is worth the time, effort, and expense involved, consider social, cultural, and environmental factors as well as economic ones. What is the purpose of the effort? Who will benefit most? What will the consequences be if the effort is successful? Or if it fails?
Having made an informed technology choice, it is important to keep good records. It is helpful from the beginning to keep data on needs, site selection, resource availability, construction progress, labor and materials costs, test findings, etc. The information may prove an important reference if existing plans and methods need to be altered. It can be helpful in pinpointing "what went wrong?" And, of course, it is important to share data with other people. The technologies presented in this booklet have been tested carefully, and are actually used in many parts of the world. However, extensive and controlled field tests have not been conducted for many of them, even some of the most common ones. Even though we know that these technologies work well in some situations, it is important to gather specific information on why they perform properly in one place and not in another.
Well-documented models of field activities provide important information for the development worker. It is obviously important for a development worker in Colombia to have the technical design for a kiln built and used in Senegal. But it is even more important to have a full narrative about the kiln that provides details on materials, labor, design changes, and so forth. This model can provide a useful frame of reference.
A reliable bank of such field information is now growing. It exists to help spread the word about these and other technologies, lessening the dependence of the developing world on expensive and finite energy resources.
A practical record keeping format can be found in Appendix Il.
III. PRE-CONSTRUCTION CONSIDERATIONS
APPLICATIONS
Before constructing the retort, consider carefully the probable costs of building, running, and maintaining it. Weigh these against the probable output or profit. The record-keeping section has ideas for calculating monthly production figures.
Retort operation can be a small business. A small crew can operate it on a regular production schedule. To be a successful business, the retort should be near a good wood supply and demand for charcoal should be certain. Costs and profits must be estimated. These factors cannot be discussed here in detail, but each plays a part in making the business work. There are many good small business guides available for further help.
A good way to start a retort is to create a community kiln. Local members share the jobs: bringing the wood, loading, firing, unloading, etc. Each member then gets part of the output.
KILN DESIGN
The kiln has two chambers. Each chamber has three barrels. An extra barrel can be used on each chamber if needed. This depends on the supply of oil drums, wood, and workers.
Another thing to decide is whether to install tar condensers or gas pipes. The trade-off is not always easy to decide. It is affected greatly by local conditions. If tar condensers are installed, tar may be collected and used for several purposes. If they are not installed, gases produced during the charring process can be used as fuel to finish the process. This lowers the amount of wood needed to fire the retort. The basic decision is whether it is more economical to collect tar (with condensers) or to save fuelwood (with gas pipes).
SITE SELECTION
It is very important to place the kiln near the wood supply. Almost any wood can be made into charcoal. The most abundant woods for charcoal-making are in savannas or tropical rain forests. Sometimes wood can be gotten very cheaply through land clearing or forestry operations. However, such sources are undependable. Another source is the tops, branches, and trunk sections from softwoods, hardwoods, and palms. Softwoods usually produce soft, bulky charcoal. Heavy hardwoods give charcoal that burns longer. This charcoal is preferred.
In many areas, wood is scarce. If the wood must be brought from far away, the kiln may not be a good idea. Be careful.
If wood is plentiful, the production site should be near both the wood and the labor. If possible, choose a site that requires little clearing. The retort and production area require a large cleared area for easy movement and safe operation.
If the soil is firm, dig a trench. The fire will be placed there while the retort remains at ground level. But if the soil crumbles easily, the retort must be raised on a foundation. The fire will go underneath. Building a foundation requires extra effort and expense.
PREPARING WOOD FOR CHARRING
Wood should be cut well in advance of the charring process. In drier climates, cut it three-four weeks before. In tropical climates, allow six weeks. The wood must be cut beforehand so that it dries out somewhat before the charring process begins.
The tools required for preparing wood are:
* Axe * Wedges-steel, steel/wood, twisting * Saws * Sharpening stone * Machete * Sharpening file * Hammer--3kg sledge * Saw setting pliers
For wood smaller than 10cm (4") in diameter, it is usually best to use an axe and machete to fell and cross-cut trees. When working with larger wood, saws are cheaper and easier. The bush saw is good for wood 10-20cm (4-8") in diameter. Wood can be split with a hammer and wedge. A twisting wedge is very useful. By rotating it in the initial opening, it does the complete job. There is no need for a second wedge.
For most purposes, the wood should be cut in pieces 1-1.5m (about 5') long and 3-12cm (1-1/4 to 4-3/4") wide. Many producers do not like to make charcoal from wood smaller than 3cm (1-1/4"). On the other hand, wood wider than 12cm (4-3/4") often makes poor charcoal because the center does not char well. Split any wood larger than 10cm (4") wide. Rotten wood should be rejected since it usually makes very poor charcoal.
Cross-cut the wood immediately after felling. It is easier to cut then. The moisture evaporates much faster from wood cut and split into small lengths. The moisture lost from the wood is at first proportional to the drying time. But the drying rate in the tropics slows down considerably after about three months. This is because there is always some moisture in the tropic air. Once the drying wood becomes as dry as the air, it will not dry further. Other methods must be used. Indeed, fungi and insects make further air drying risky.
MATERIALS NEEDED
* Six or eight oil drums. Each drum should be 79-92cm (31-36") long, 57cm (22-1/2") across with a capacity of 151-209 liters (40-55 gallons).
* Two smaller oil drums for trays. If these are not used, then use 5.5m (18') of thin metal sheeting, 91.5cm (36") wide. If four oil drums instead of three are used lengthwise in the retort chamber, the sheeting should be 7.5m (24-1/2') long.
* Metal sheeting, 6.5-8mm (1/4-5/16"), to make two covers, each measuring 66cm (26") across.
* Iron bar, 2.15m (7'), with a hook at the end to pull out the trays. Make it longer if four drums are used to make each chamber.
* 20 spacer reinforcements, each 4.5cm (about 2-1/2") wide, made from scrap steel that is 6.5mm (1/4") thick.
* Old iron, for the sides and top of the retort.
* 20 bolts, 7cm (2-3/4") or longer X 26mm (1") in diameter. Matching nuts.
* 20 clamps, each 4cm X 6cm X 6.5mm (1-1/2" X 2-1/2" X 1/4").
* Bricks or stones; more are needed if building a foundation.
You must choose between building tar condensers or gas escapes. Tar condensers let you collect tar. Gas escapes let you use the gas produced inside the retort as fuel to keep the retort hot. You need different supplies for each, as listed below:
For Tar Condensers
* Two pieces 8cm (3") galvanized iron pipe, each 3m (9-3/4') long.
* Two pieces 8cm (3") galvanized iron pipe, each 61cm (2') long.
* Two pieces 8cm (3") galvanized iron pipe, each. 2.2m (6-1/2') long.
* Two 8cm (3") galvanized iron pipe "T".
* Bucket or small drum to collect the tar.
For Gas Escapes
* Two pieces 8cm (3") galvanized iron pipe, each 15-23cm (6-9") long.
NOTE: Both iron bar and galvanized iron pipe can often be bought in hardware stores.
TOOLS NEEDED
* Welding equipment to fasten the oil drums together, and to attach spacer reinforcements and bolts to the open ends of the oil drums.
* A drill to drill holes in the clamps.
* A wrench to tighten cover nuts.
* A shovel to insulate the retort with soil.
* A metal chisel and hammer to cut the ends from the oil drums.
IV. RETORT CONSTRUCTION
PREPARE THE OIL DRUMS
* Gather six 200-liter (55-gallon) oil drums.
* Check with water for leaks.
* Weld close any leaks. Don't worry about leaks in the bottoms.
* Remove the bottoms of all six drums.
* Remove the tops of only four drums. Two drums need tops. Most oil drums have bung holes on top. These will later be useful.
* Beat out, as much as possible, any dents.
MAKE THE CHAMBERS
* Weld together two drums that have no tops or bottoms. Then weld these to one of the two drums that has a top. These three welded drums make one of the two retort chambers. The total volume of each chamber is about 600 liters (165 gallons). <see figure 2>
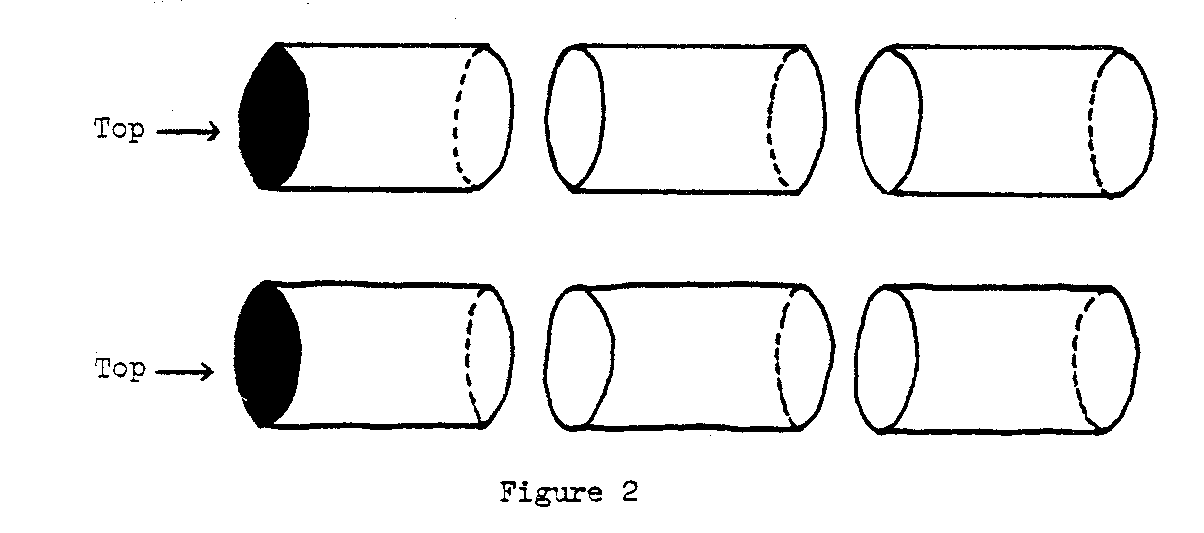
* Weld together the other three drums in the same way.
*If a longer retort chamber is wanted, weld to the open end an extra drum with no top or bottom.
MAKE THE COVERS
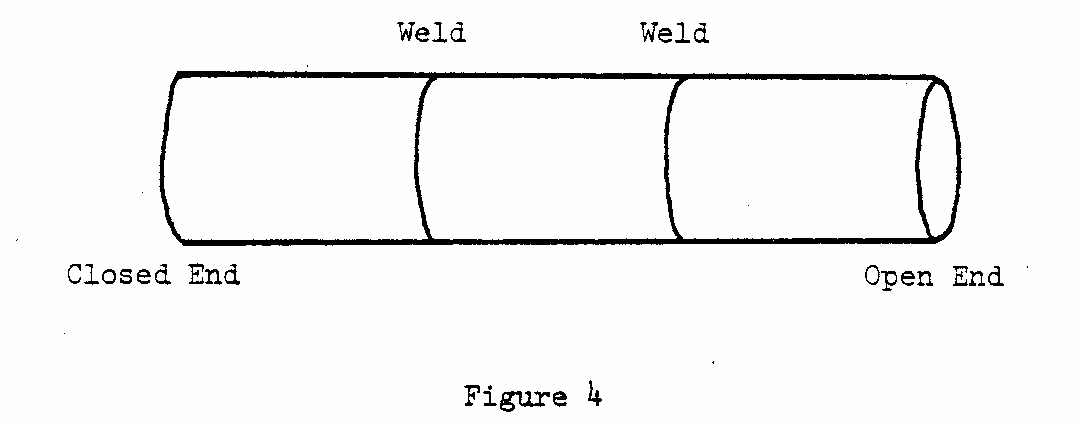
* Use fairly heavy sheet metal to make two covers. These covers fit over the open ends of the chambers. They should be 9cm larger in circumference than the drums. <see figure 3>
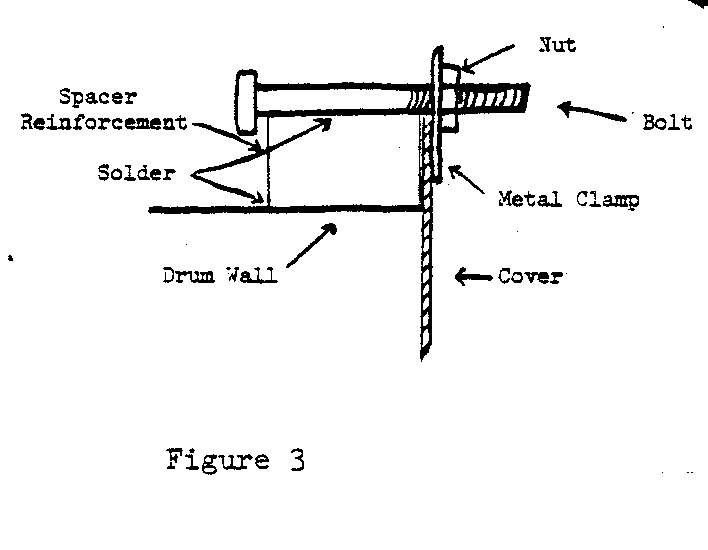
* Weld ten 7cm (2-3/4") bolts with spacer reinforcements to the open end of each chamber. These bolts will hold the covers in place. The spacer reinforcements act as braces for the bolts. <see figure 4>
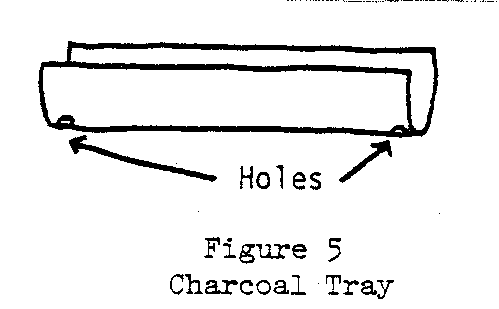
MAKE TRAYS TO HOLD THE WOOD
* Make two trays for each chamber from light sheet metal or thin oil drums--total of four trays.
* Curve the trays to fit the chambers.
* Bore a 2.5cm (1") hole at each end of the trays. <See figure 5>
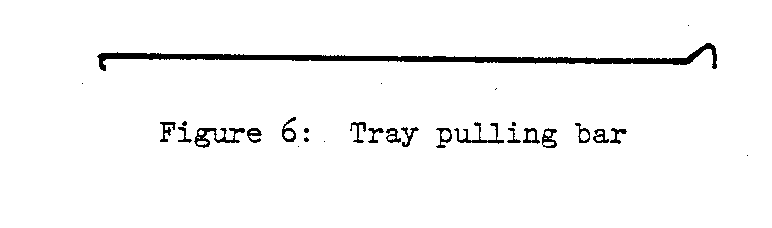
* Make a hook at one end of the 2.15m (8') iron bar. This bar will be used pull trays from the retort. <See figure 6>
MAKE TAR CONDENSERS (Optional)
If you want to collect tar, make tar condensers. The other choice is to make gas escapes. Gas escapes allow you to use gas from inside the retort as fuel to keep the retort hot. To make tar condensers:
* Fit together the 8cm (3") galvanized iron pipe as shown in Figure 7. The
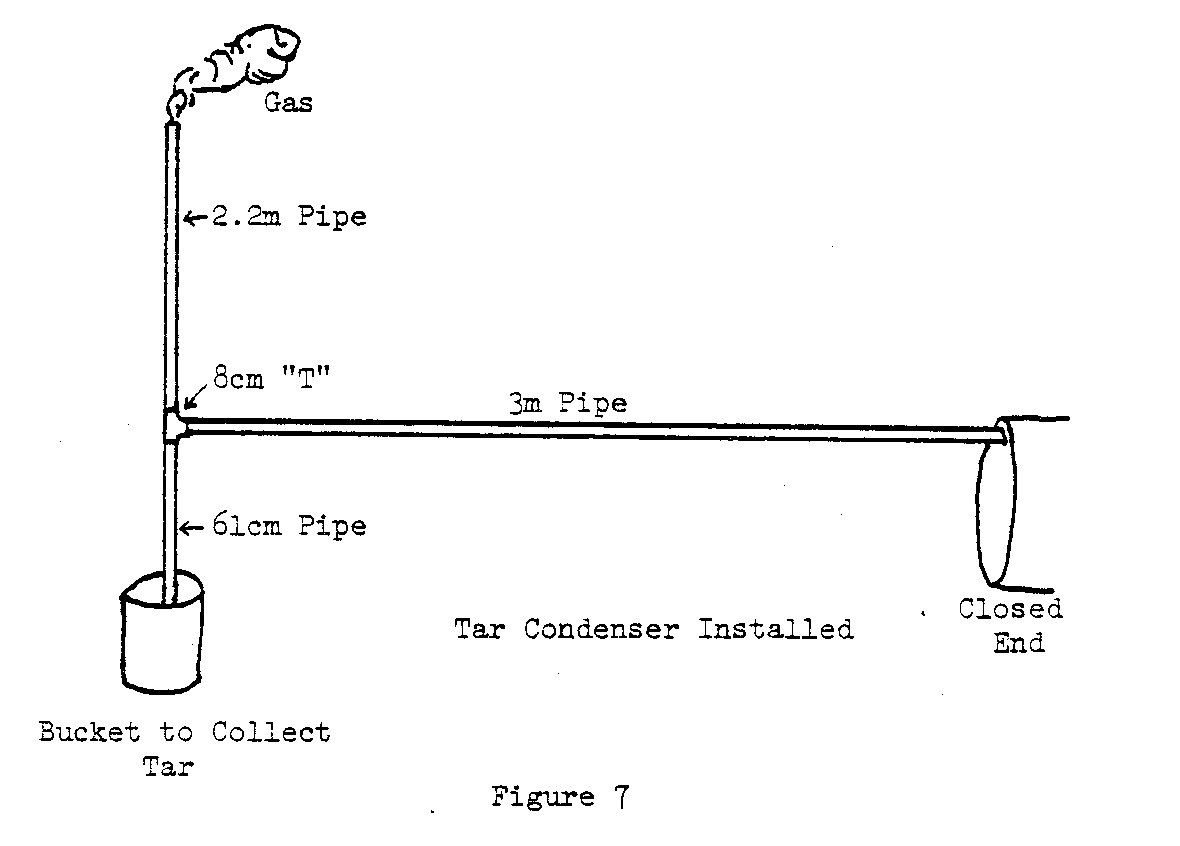
3m (9-3/4') piece connects with the closed end of the retort. The 2.2m (6-1/2') piece goes upward as a chimney. The 61cm (24") piece goes downward as a tap for the tar. These three pieces are joined together by one 8cm (3") galvanized iron pipe "T".
* Repeat the entire process for the second retort.
This condenser works as follows:
* The 3m (9-3/4') piece of pipe joins to the hole in the closed end of the retort.
* Gas from the burning wood enters the pipe.
* The gas goes through the entire condenser.
* Some of the gas condenses and forms tar in the pipes.
* This tar flows down the 61cm (24") piece of pipe into a bucket.
* The gas exits at top through the 2.2m (6-1/2') piece of pipe.
MAKE GAS ESCAPES
* Cut one hole in the bottom of each chamber, near the open end. Each hole should be 8cm (3") in diameter.
* Cut two pieces of 8cm (3") pipe, each about 15-23cm (6-9") in length. One piece will be used for each chamber.
* Weld one of the two pieces of pipe to one of the two holes; repeat. <see figure 8>
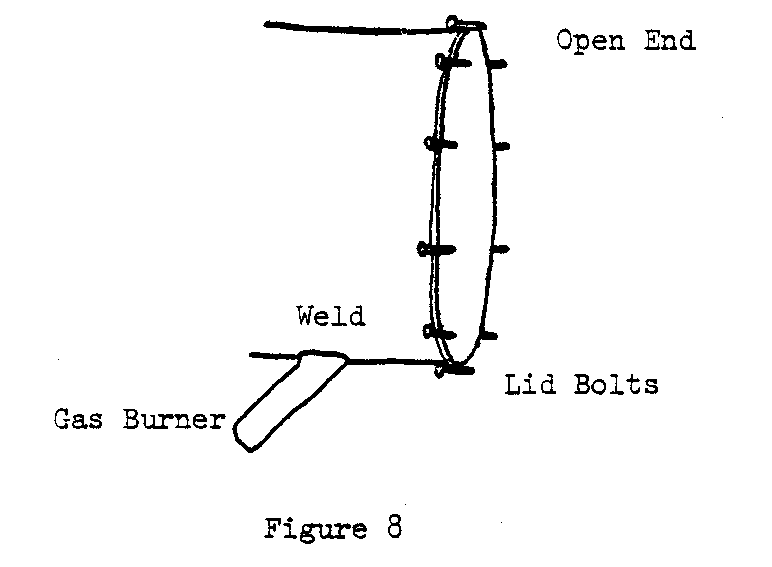
The two pipes act as gas burners. Gas forms inside the chambers and will start burning about two-three hours after the fire is lighted. Once this happens, no more wood is needed outside the chambers to keep them hot. The retort heats itself.
SET UP THE RETORT--TRENCH METHOD
Use this method if the soil is firm. The fire will be placed in the trench. The retort will be at ground level, above the fire.
Remember to clear a large area of land on which to work. If possible, set up the retort at the edge of a small gully or depression. Otherwise, dig an area next to, wider and deeper than, the trench that lets you easily care for the fire. You should be able to attend the fire easily.
To Make The Trench
* Dig the trench as long as the chambers, 30cm (12") deep X 45cm (18") wide.
* Place the chambers lengthwise on either side of the trench. The chambers are parallel to, and partly hang over, the trench (see Figure 9).
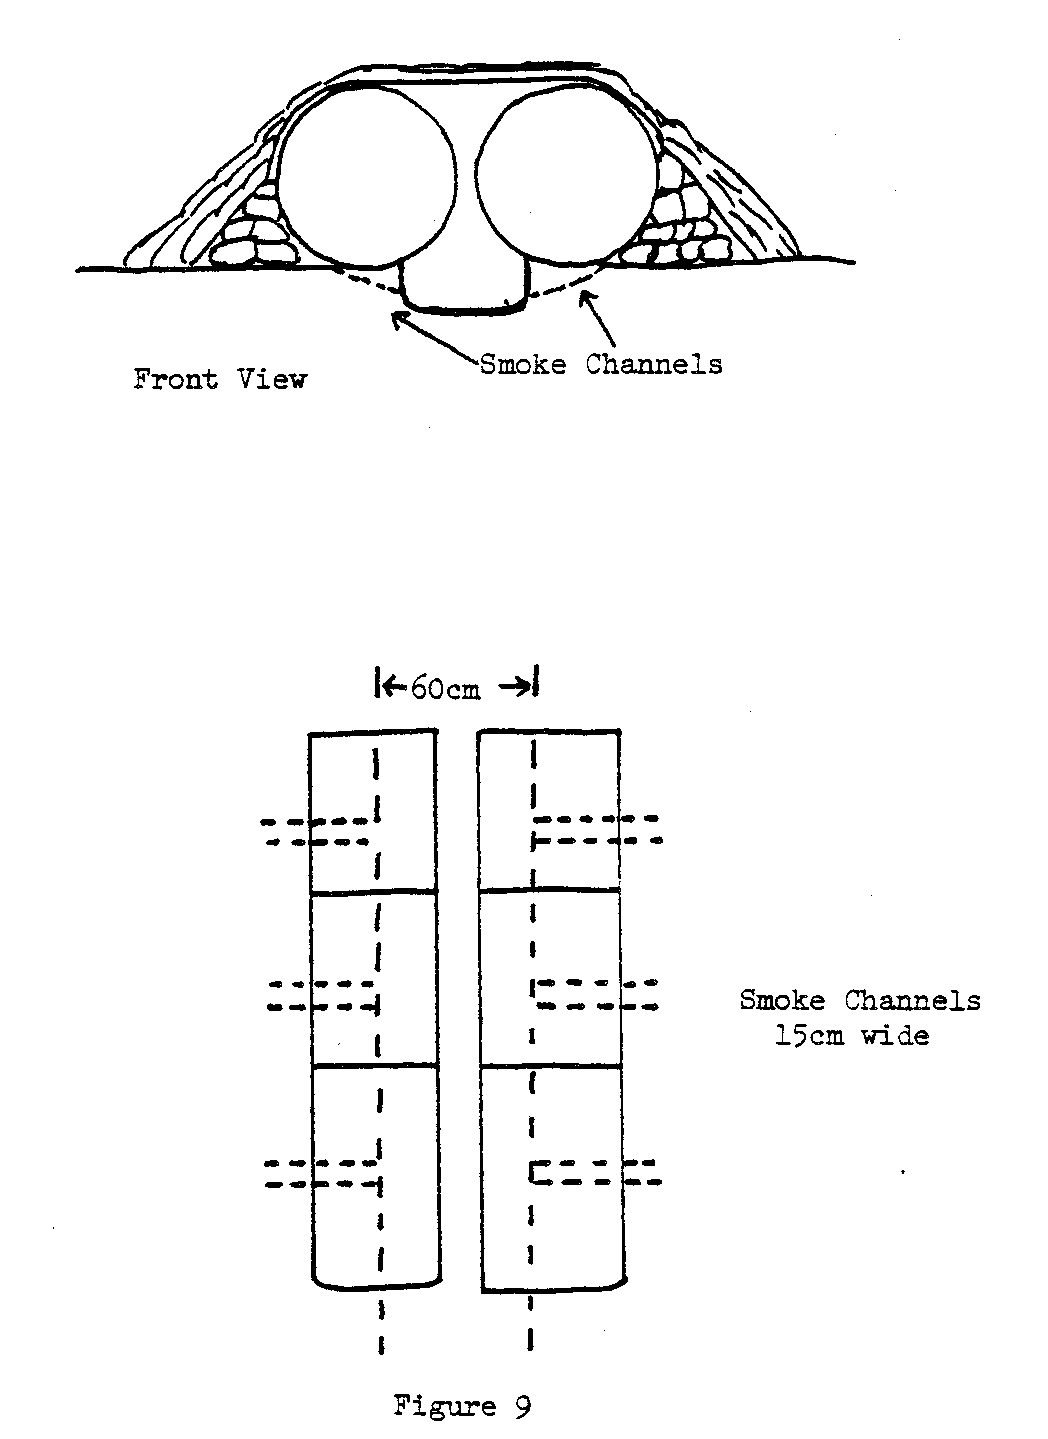
* On the side of each chamber away from the trench, place some stones for support.
* Cut smoke channels in the ground perpendicular to the chambers. These channels are 15cm (6") wide and placed approximately midway of each barrel section [about every 90cm (35-1/2")]. One end touches the chamber; the other leads away.
SET UP THE RETORT - Elevated Method
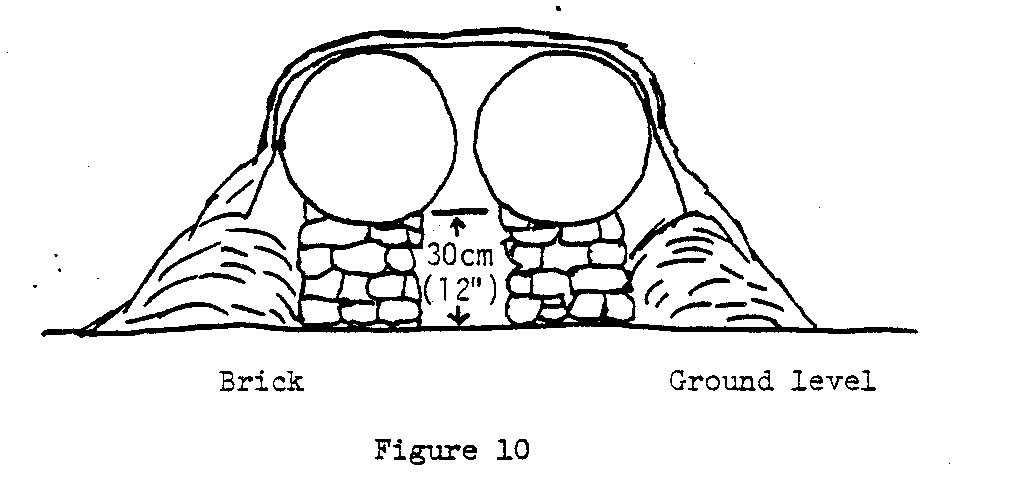
Use this method if the dirt is not firm enough for a trench. You will need extra bricks, stones, or other materials to support the two chambers. The basic idea is to raise the chambers above the ground and put the fire beneath them. The fire is at ground level. There are two good ways to do this:
* Make two neat piles of bricks or stones. The piles should be about 90cm (35-1/2") apart. Rest the chambers on these piles. The joints where the barrels are welded together must rest on the piles. The bottom of the chambers should be about 30cm (12") above the ground. The fire is made in the space under the two chambers. <see figure 10>
* Place old railway lines or girders on piles of stones or bricks. Rest the chambers on these. Put the fire below. <see figure 11>
FIT THE TAR CONDENSERS
If you are using tar condensers instead of gas escapes, you must now connect them to the chambers. There is one condenser for each chamber. Check whether there is a bung hole on the closed end near the top of the chamber. If so, screw one condenser into each bung hole. If there is no bung hole, cut an 8cm (3") hole in the closed end of each chamber. Weld the condenser in place here.
WELD THE GAS PIPES
If you are using gas escapes instead of tar condensers, you must now connect them. Weld the gas pipes to holes cut near the open end of each chamber, as described on page 14.
INSULATE THE RETORT
* Gather some sheets of old iron.
* Place the sheets against the sides and on top of the chambers. This forms a "house" around the chambers .
* Make one or two holes at the far end of the roof. These will let out the smoke. <see figure 12>
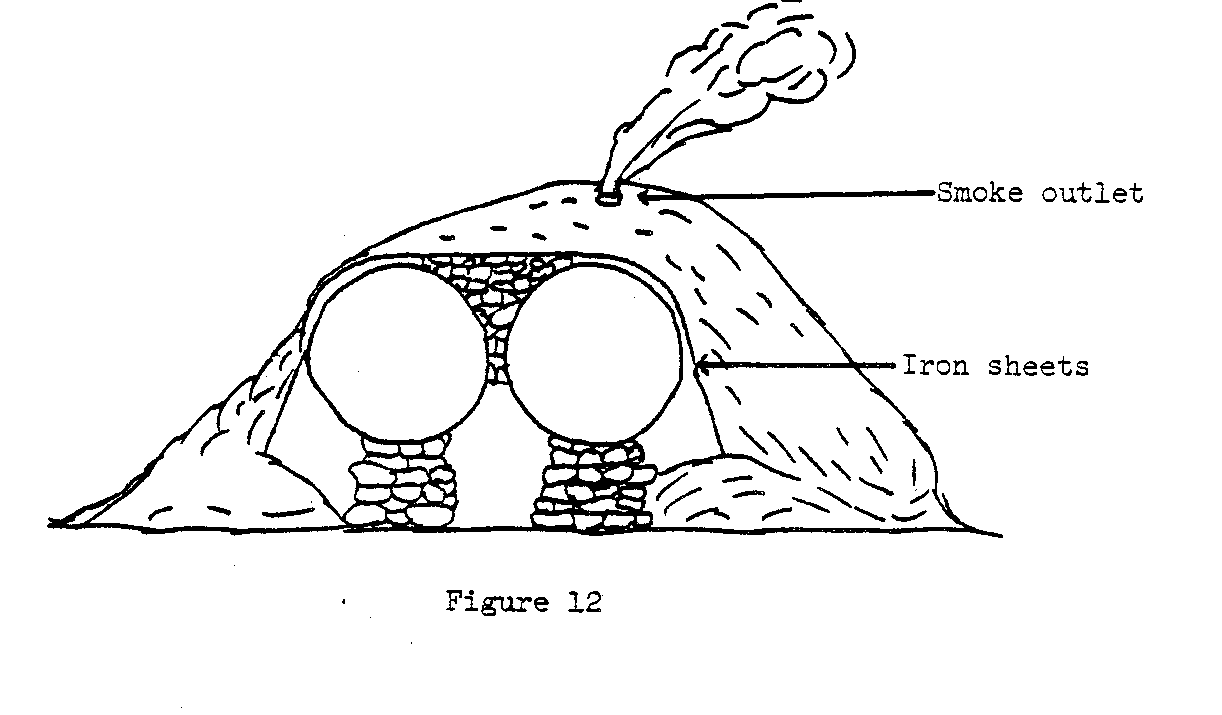
* Pile dirt against the sides of the iron sheets. Put 2-3cm (about 1") of dirt on top leaving the smoke hole(s) uncovered. The dirt helps keep in the heat. Don't use too much or the whole retort could break.
V. OPERATION AND MAINTENANCE
* Early in the morning, put the trays in the chambers. Pack in as much wood as possible.
* Put on the covers. Screw the nuts to the bolts. Do not screw the nuts too tightly. That may cause the covers or bolts to bend.
* After the retort is closed, build a fire under the chambers. Use small branches, leaves, bark, and roots. Try not to use good wood that could be made into charcoal. Make a very strong fire. The flames should touch the chambers below and at the sides.
* Let the fire burn strongly for two-three hours. Then the gas and tar will flow quickly through the pipes.
* If you are collecting tar, stoke the fire for two more hours. Put the bucket in place.
* If you have gas pipes, you do not need to watch for the tar. You also do not have to stoke the fire. The gases from the pipe will now keep the fire burning. They will burn until the charcoal is made. When the gases stop flowing, the fire stops. The charcoal is finished.
* Leave the retort closed overnight to cool.
* The next morning, unbolt the covers. Pull out the trays with the iron bar.
* Dump the charcoal from the trays. Let it cool for a few hours. If any part of it starts to burn, sprinkle it with some water.
* Bag the charcoal.
* Pack the chambers with new wood and begin the process from the start.
HOW TO USE TAR
If you install tar condensers, two types of tar will form in the bucket. heavier tar settles to the bottom; a watery tar is on top.
The heavy tar is like bitumastic paint. It is very sticky and takes a long time to dry. But this is often not a big problem. This tar can be painted on fence posts for termite control. It can also be painted on pipes or corrugated iron to prevent rusting.
The watery tar is too thin to be used for painting. It must be boiled to make it thicker. Boiling must be done outdoors because the tar smells very bad.
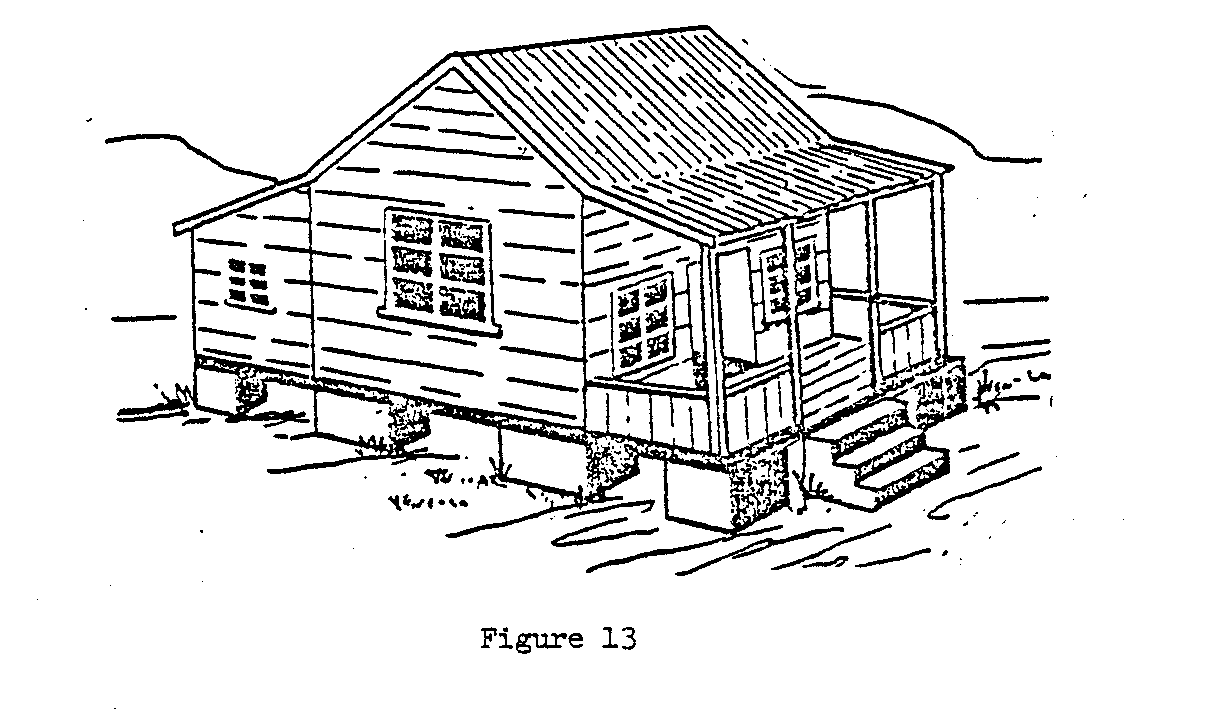
Once thickened, this tar can be used to paint any type of wood. It dries quickly with a dull, jet black finish. It protects wood from termites. If the painted portion is more than 23cm (9") wide, termites will not cross it. A band painted around the base of a building will protect the foundation from termites. This makes the tar very valuable in many parts of the world. Unfortunately, the thickened tar cannot protect trees. It will not soak through the bark deeply enough. <see figure 13>
VI. CONVERSION TABLES
UNITS OF LENGTH
1 mile
1760 yards = 5280 feet
1 kilometer
1000 meters = 0.6214 mile
1 mile
1.607 kilometers
1 foot
0.3048 meter = 30.5 centimeters
1 meter
3.2808 feet = 39.37 inches
1 inch
2.54 centimeters
1 centimeter
0.3937 inch
UNITS OF AREA
1 square mile
640 acres = 2.5899 square kilometers 1 square kilometer
= 1,000,000 square meters
0.3861 square mile
1 acre
43,560 square feet 1 square foot
= 144 square inches
0.0929 square meter 1 square inch = 6.452 square centimeters 1 square meter = 10.764 square feet 1 square centimeter = 0.155 square inch
UNITS OF VOLUME
1.0 cubic foot = 1728 cubic inches = 7.48 US gallons 1.0 British imperial
gallon
1.2 US gallons 1.0 cubic meter = 35.314 cubic feet = 264.2 US gallons
1.0 liter
1000 cubic centimeters = 0.2642 US gallons
UNITS OF WEIGHT
1.0 metric ton = 1000 kilograms (kg) = 2204.6 pounds (lb) 1.0 kilogram kg) = 1000 grams (g) = 2.2046 pounds (lb)
1.0 short ton
2000 pounds (lb)
UNITS OF PRESSURE
1.0 pound per square inch (psi) = 144 pound per square foot 1.0 pound per square inch (psi) = 27.7 inches of water* 1.0 pound per square inch (psi) = 2.31 feet of water* 1.0 pound per square inch (psi) = 2.042 inches of mercury* 1.0 atmosphere = 14.7 pounds per square inch psi) 1.0 atmosphere = 33.95 feet of water* 1.0 foot of water = 0.433 psi = 62.355 pounds per square foot 1.0 kilogram per square centimeter = 14.223 pounds per square inch 1.0 pound per square inch = 0.0703 kilogram per square centimeter
(*)At 62 degrees Fahrenheit (16.6 degrees Celsius)
UNITS OF POWER
1.0 horsepower (English) = 746 watt = 0.746 kilowatt (kw) 1.0 horsepower (English) = 550 foot pounds per second 1.0 horsepower (English) = 33,000 foot pounds per minute 1.0 kilowatt (kw) = 1000 watt = 1.34 horsepower (hp) English 1.0 horsepower (hp) (English) = 1.0139 metric horsepower (cheval-vapeur) 1.0 metric
Horsepower
75 meter X kilogram/second 1.0 metric horsepower = 0.736 kilowatt = 736 watt
VII. FURTHER
Basore, C.A. and Moore, D.C. The Production of Lump Charcoal From Pine Sawdust Without a Binder. Auburn, Alabama, 1942. Available from VITA.
Chandler, John L. and Wates, Richard B. Making Charcoal the Easy Way. University College of the West Indies. Available from VITA.
Coconut Research Institute. Coconut Shell Charcoal. Leaflet #6, reprinted December 1970. Available from VITA.
Food and Agriculture Organization. Coconut Shell Charcoal, paper #63. FAO, Via delle Termi de Caracalla, 00100 Rome, Italy.
Forest Products Research Institute. Charcoal Making in the Backyard. Technical Note #55, May 1964. College, Laguna, E-109, Philippines.
Forest Products Research Laboratory. The Construction and Operation of Charcoal Kilns. Department of Scientific and Industrial Research, Leaflet #35, May 1944,
Forest Products Research Laboratory. Further Notes on the Manufacture of Charcoal in Portable Kilns. Department of Scientific and Industrial Research, Leaflet #124, July 1942. Available from VITA.
Hicok, Henry and Olson, Richard. The Connecticut Charcoal Kiln. Forestry Department, The Comm. Agric. Exp. Station, 1947. Contains highly detailed instructions for construction and operation of a fairly small (one or two cord) cinder block kiln. Also has a discussion of possible problems and maintenance of the kiln. In addition, there are a few plans for larger designs, also a short section on uses of charcoal and costs of production. Available from VITA.
International Labor Organization. Charcoal Making for Small-Scale Enterprises. Geneva, 1975. Information on the uses of charcoal, making charcoal and marketing charcoal. Detailed plans for building and using an improved earth kiln and portable steel kiln. Also has instructions for record keeping, various aspects of marketing, training for charcoal makers, and setting up a charcoal-making cooperative. ILO, CH 1211, Geneva 22, Switzerland.
Lane, Paul H. "Wood Carbonization in Kilns." Forest Products Journal, Vol. X, No. 7 (July 1960), 344-348. Forest Products Resource Society, 417 North Walnut Street, Madison, Wisconsin USA.
Little, E.C.S. "A Kiln for Charcoal Making in the Field." Tropical Science, Vol. 14, No. 3 (1972), 261-270. Contains plans for construction and use of the CUSAB (Charcoal from Useless Scrub and Bush) Kiln. This design is made of metal, is portable and makes charcoal from small scrub and bush wood. Unlike other designs, it employs a "continuous feeding system" in which wood is fed into the burning kiln until full. Tropical Products Inst., 56/62 Gray's Inn Rd, London, England WC1X8LU.
Loo, Thio Goan. Activated Charcoal/Coconut Shells. Volunteers in Technical Assistance #25758, 1974. Available from VITA.
Michener, T.S. Press for Charcoal Briquettes. Volunteers in Technical Assistance #28530, 1977. Available from VITA.
National Science Development Board. Charcoal from Wood. Forest Products Research and Industries Development Commission. College, Laguna, Philippines, No. 8, June 1960.
Simmons, Fred. Charcoal From Portable Kilns and Fixed Installations. FAO Supplement. Contains information on design and use of concrete kilns and metal kilns. Also has several retort designs, including a section on retorts for sawmill by-products such as sawdust, shavings and wood chips. Basically a good detailed review of the state of the art in commercial charcoal production. Available from VITA.
USDA Forest Service. "Charcoal: Production, Marketing, and Use." Forest Products Lab Report 2213, July 1961. Goes into great detail on the designs and operation of large-scale concrete kilns and metal kilns, charcoal briquetting and comparison of yields of various types of wood. Would be highly useful for setting up a larger-scale commercial charcoal-making enterprise. Northeastern Wood Utilization Council, Inc., PO Box 1577, New Haven, Connecticut USA.
Volunteers in Technical Assistance. Manufacture of Charcoal From Wood, 1976. VITA #26587, 1976.
Willard, R.C. Process of Charcoal Making. Volunteers in Technical Assistance, 1977.
APPENDIX I
DECISION MAKING WORKSHEET
If you are using this as a guideline for using the Charcoal Retort in a development effort, collect as much information as possible and if you need assistance with the project, write VITA. A report on your experiences and the uses of this Handbook will help VITA both improve the book and aid other similar efforts.
Publications Service VOLUNTEERS IN TECHNICAL ASSISTANCE 1815 North Lynn Street, Suite 200 Box 12438 Arlington, Virginia 22209-8438 USA
CURRENT USE AND AVAILABILITY
* What kinds of trees are available, and in what quantities?
* Is deforestation a problem? If so, to what extent? If not yet a problem, will deforestation be a problem if present wood uses continue?
* What are the current major uses of wood in the area? Are present uses wasteful, inefficient or unhealthy? Include here a look at cookstoves, heating methods, charcoal production techniques, etc.
* What amount of time is spent gathering wood per week? Who gathers the wood: men, women, or children? How much does this cost in human terms? Can wood be purchased? How much does it cost (in dollars)?
* Is charcoal currently used? If so, for what purposes?
NEEDS AND RESOURCES
* What are the characteristics of the problem? Is the local population aware of the problem/need? How do you know?
* Has any local person, particularly someone in a position of authority, expressed any interest in better charcoal production methods? If so, can that person help you? Are there local officials who could be tapped as resources?
* How will you get the community involved with deciding which technology is appropriate for them?
* Note possibilities for expanded markets for charcoal if production were increased and costs lowered. Check with local charcoal users to see what their opinions of market demand might be.
* Find out what "trash" woods are available, if any. This includes sawdust, wood chips, etc. left from sawmill operation. It also includes such tree litter as sticks, branches, and animal dung.
* What local materials are available for use in building improved charcoal production facilities?
* Are machine shop facilities necessary? If so, are they available locally for manufacture of wood-conserving technology?
* What kinds of skills are available locally to assist with construction and maintenance? How much skill is necessary for construction and maintenance? Do you need to train people? Can you meet the following needs?
* Some aspects of the project require someone with experience in metalworking and/or welding.
* Estimated labor time for full-time workers is:
* 5 hours skilled labor * 10 hours unskilled labor * 3 hours welding
* Do a cost estimate of the labor, parts, and materials needed.
* Would the technology require outside funding? Are local funding sources available to sponsor the effort? How will the project be funded?
* What is your schedule? When will the project begin? How long will it take? Are you aware of holidays, planting or harvesting seasons that may affect timing?
* How will you arrange to spread knowledge and use of the technology?
FINAL DECISION
* How was the final decision reached to go ahead--or not to go ahead--with this technology?
APPENDIX II
RECORD KEEPING WORKSHEET
CONSTRUCTION
Photographs of the construction process, as well as of the finished product, are helpful. They add interest and detail that might be overlooked in the narrative. A report on the construction process should include a lot of specific information. This kind of detail can often be recorded with photographs, which lend interest and detail. Specific information can be monitored most easily in charts (see below). Some other things to record include:
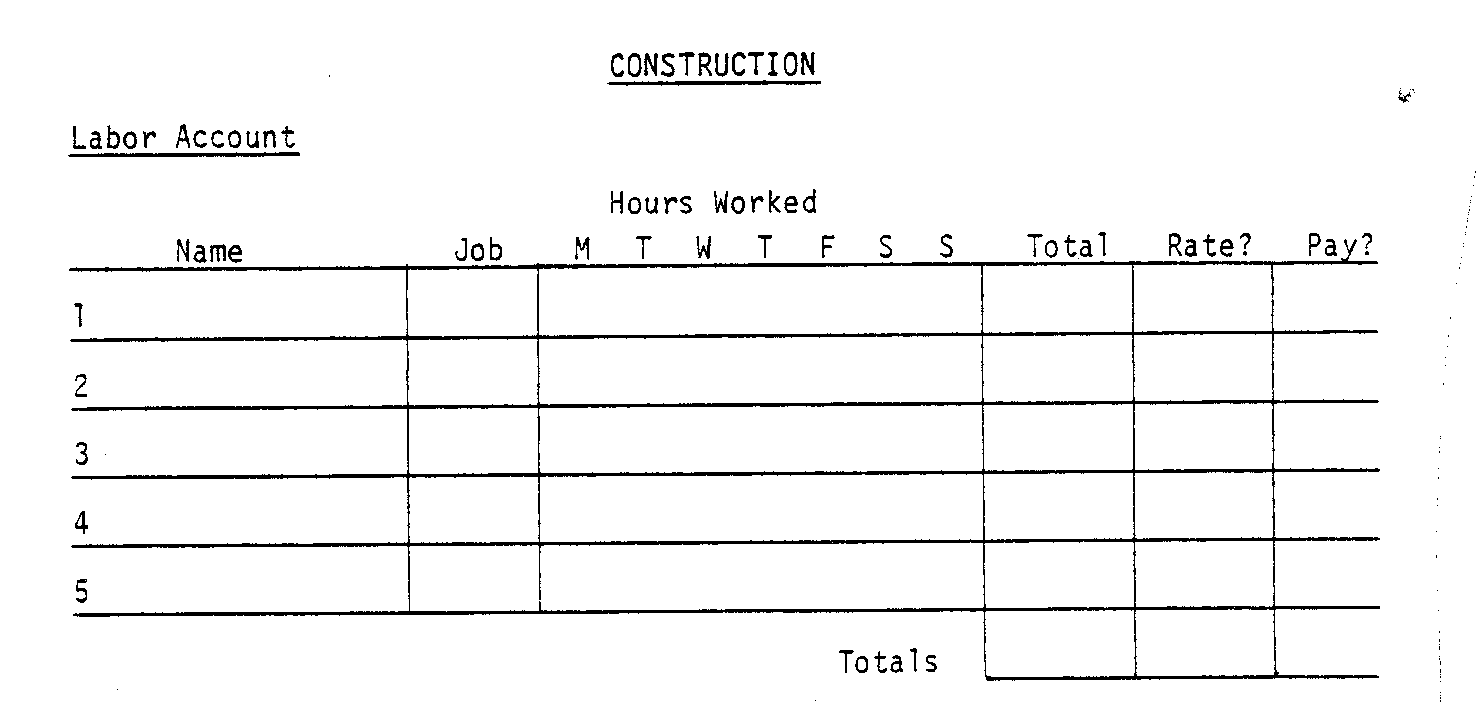
* Specification of construction materials.
* Design changes made to fit local conditions.
* Equipment costs.
* Time spent in construction. Include volunteer time as well as paid labor, full- and part-time. * Problems: labor or material shortages, work stoppages, training difficulties, terrain, transport, etc. <see report 1>
OPERATION
Keep log of operations for at least the first six weeks, then periodically for several days every few months. This log will vary with the technology, but should include full requirements, outputs, duration of operation, training of operators, etc. Include special problems that may come up--a damper that will not close, gear that will not catch, procedures that do not seem to make sense to workers, etc.
MAINTENANCE
Many aspects of maintenance can be most easily recorded on a chart. Maintenance records enable keeping track of where breakdowns occur most frequently and may suggest areas for improvement or strengthening weakness in the design. Furthermore, these records will, give a good idea of how well the project is working out by accurately recording how much of the time it is working and how often it breaks down. Routine maintenance records should be kept for a minimum of six months to one year after the project goes into operation.
SPECIAL COSTS
Keep a special set of records to track repair costs of damages that fall outside routine maintenance. This category includes damage caused by weather, natural disasters, vandalism, etc. Pattern the records after the routine maintenance records. Describe for each separate incident:
* Cause and extent of damage. * Labor costs of repair (like maintenance account). * Material costs of repair (like maintenance account). * Measures taken to prevent recurrence.
OTHER MANUALS IN THE ENERGY SERIES
Small Michell (Banki) Turbine: A Construction Manual
Helical Sail Windmill
Overshot Water-Wheel: Design and Construction Manual
Wood Conserving Stoves: Two Stove Designs and Construction Techniques
Three-Cubic Meter Biogas Plant: A Construction Manual
Hydraulic Ram for Tropical Climates
Solar Water Heater
Solar Grain Dryer
The Dynapod: A Pedal-Power Unit
Animal-Driven Chain Pump
Solar Still
For free catalogue listing these and other VITA publications, write to:
VITA 1600 Wilson Boulevard, Suite 500 Arlington, Virginia 22209 USA Tel: 703/276-1800 . Fax: 703/243-1865 Internet: pr-info@vita.org
ABOUT VITA
Volunteers in Technical Assistance (VITA) is a private, nonprofit, international development organization. Started in 1959 by a group of concerned scientists and engineers, VITA maintains an extensive documentation center and worldwide roster of volunteer technical experts. VITA makes available to individuals and groups in developing countries a variety of information and technical resources aimed at fostering self-sufficiency--needs assessment and program development support; by-mail and on-site consulting services; information systems training. It also publishes a quarterly newsletter and a variety of technical manuals and bulletins.
VITA VOLUNTEERS IN TECHNICAL ASSISTANCE
ISBN 0-86619-071-6