VITA 1600 Wilson Boulevard, Suite 500 Arlington, Virginia 22209 USA Tel: 703/276-1800 * Fax: 703/243-1865 Internet: pr-info@vita.org
[C] 1977 Volunteers in Technical Assistance ISBN 0-86619-060-0
PREFACE
This manual presents an overview of the entire process of raising rabbits--from selecting healthy animals to preparing proper foods to treating disease. A separate section of the manual includes step-by-step procedures for the construction of a hutch unit to house two does and one buck.
Raising Rabbits is written in clear straightforward language. It reflects VITA's emphasis on preparing material which can be used easily by extension workers and by do-it-yourselfers regardless of cultural context or geographic location. The author and illustrators all are VITA Volunteers with considerable skill in their areas of expertise.
Harlan Attfield, the author, is a VITA Volunteer who is now working in an innovative integrated farming program in Bangladesh with International Voluntary Services, Inc. He has over ten years experience in tropical agriculture and has served in Nigeria, Ethiopia and Mauritius. Small stock and beekeeping are among his specialties.
Attfield has written over 30 articles and books detailing his experiences, and has placed special emphasis on effective communication with extension workers. VITA will soon distribute some of the material produced by the Bangladesh program as Technical Bulletins.
Catharine S. Roache, a VITA Volunteer for eight years, is an author and illustrator of children's books, as well as a poet. In addition, she has special interest and involvement in working with senior citizens and with college students.
George R. Clark is an instructor in drafting and design at Kellogg Community College. Clark has been a VITA Volunteer for over eight years and has contributed technical drawings and expertise to a number of VITA publications and projects.
A special note of thanks goes to Jeff Cox, Associate Editor, Organic Gardening and Farming Magazine, who provided editing support in his role as a VITA Volunteer and to Jerome D. Belanger, Editor and Publisher of Countryside Magazine, who reviewed this manual for technical content.
Table of Contents
PART 1
1 Introduction
2 Preparing to Raise Rabbits
3 Caring for Rabbits
4 Breeding Rabbits
5 Keeping Records
6 Rabbit Diseases and Their Control
7 Killing, Skinning, and Tanning Rabbits
PART 2
Hutch Construction
Wood Hutch with Metal Roof
Wood and Bamboo Hutch
Worm Husbandry
PART 1
<FIGURE 1>
1 Introduction
Raising rabbits is very popular in Europe and North America. In England over one million families have rabbits. In America, people eat 30 million pounds of rabbit meat each year.
There are a number of reasons why raising rabbits is becoming a more and more important activity throughout the world:
- Rabbits can produce large amounts of delicious meat. Although rabbit meat is firmer, it tastes very much like chicken. Rabbit meat contains a lot of protein and is low in calories and fat. So rabbit meat is both good to eat and is a very healthy food.
- Rabbits multiply quickly. A rabbit raiser can start with two females and one male and produce fifty, or more, rabbits in one year. Even a small backyard project in which two to three females and one male are raised can furnish meat to strengthen the family diet. On the other hand, 50 to 150 females can mean a business which provides part-time employment and perhaps extra income.
- Rabbits are easy to raise at home -- whether home is in the city or the country: Rabbit hutches do not take up a lot of space, and rabbits are clean, quiet and easy to care for.
- Rabbit skins are also valuable; they can be made into hats, fur-trimmed collars, slippers, pillows, small rugs, etc.
In addition to these reasons, gardeners and farmers often use rabbit manure as a fertilizer. The manure of wellfed rabbits contains nitrogen and phosphorus. This manure can be mixed directly into the soil to help the growth of farmers' crops. Other manures, such as chicken manure, cannot be used this way. This is especially important to farmers and gardeners who cannot afford or find other fertilizers -- and to those who wish to make the best possible use of all the natural resources of their farms.
There are only a few simple rules to follow in order to raise rabbits successfully:
- Build a good hutch.
- Begin with healthy animals.
- Give rabbits good care.
Why not try raising rabbits? Good luck and good farming!
Harlan H. D. Attfield
<FIGURE 2>
2 Preparing to Raise Rabbits
Most people who decide to raise rabbits want to produce meat. And they want to produce this meat as quickly, and cheaply, as possible. Therefore, before beginning any part of the project, it is very important to decide:
* how much room there is for raising rabbits. If there is only room for a few hutches, there is a limit on the number of rabbits which can be raised.
* what kinds of breeds of rabbit are available. Some breeds of rabbits grow more quickly; some are better for eating. In other words, it is necessary to check the sources of rabbits to see if a good breed is available. And the breed will determine the size of the hutch.
* what foods are available for feeding the rabbits. Rabbits will eat a variety of foods, but some are more important for rabbits than others. Some will lead to faster growth; some are more expensive; etc.
It is always best to begin any project by studying and understanding all parts of it. Therefore, it is a good idea for a prospective rabbit raiser to read through all the information in this handbook before taking any steps. Successful rabbit raising depends upon setting up the effort so that few problems are likely to occur, and upon managing the project so that any problems which do come up can be handled quickly and easily.
Choosing the Breed of Rabbit
There are over sixty breeds and varieties of rabbits in the world. These breeds, or different kinds of rabbits, can be put into three main groups, according to size:
Small breeds The Polish rabbit, for example, weighs a little more than 1 kg as an adult.
Medium breeds The New Zealand, California and Palomino breeds have an average adult weight of 4 1/2 kg.
Heavy breeds The Flemish Giant can weigh over 6 1/2 kg as an adult.
This handbook focuses on raising rabbits to produce meat for the table, or even for profit. For this purpose, medium-breed rabbits which grow rapidly are the best choice -- they will yield more meat from the amount of food fed them.
<FIGURE 3>
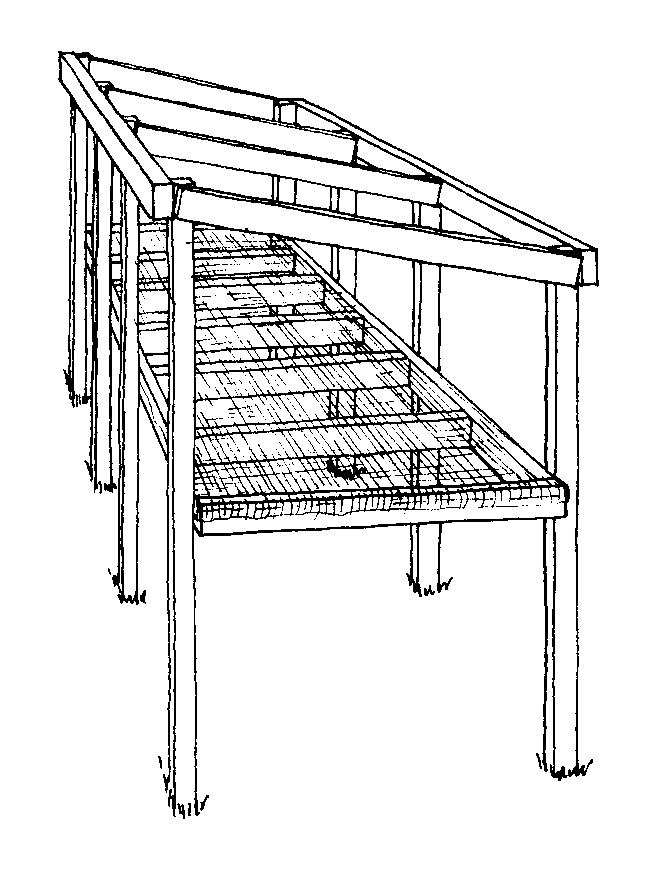
The Hutch
The hutch which is detailed in this manual (Part B, "Hutch Construction") is ideal for medium-breed rabbits. It was designed and used successfully by the author. The following discussion presents some of the major factors to keep in mind while building a hutch; for example, protection from wind, rain and sun.
Hutches can and do look very different from one area to the next. There are no critical measurements which say that a hutch must be just so high or so long or it will not work. There are size ranges which are better for certain types of rabbits. And there are design differences. For example, a hutch in a cold climate may have completely closed sides; a hot humid climate may suggest more open sides and greater overhang on the roof to increase ventilation. All hutches, no matter how they are different or similar, should provide:
- plenty of air
- sunlight to the inside of thi cages
- protection from rain and winds
- a quiet home (undisturbed by dogs)
- a self-cleaning floor
- a good roof that does not leak
- a cage for each medium-breed rabbit
- a water container for each rabbit
- a manger(s) for grass
Most people prefer to build a hutch for one male and two females, but some two-rabbit hutches (one male and one female) are also built.
It costs only a little more to build a hutch for three rabbits than to build a hutch for two. Two females will produce more young (and therefore increased meat yield), and the male will not become lazy.
Each adult rabbit must have its own cage. This is very important. Each compartment (cage) for a medium-breed rabbit should measure about 75cm (2 1/2 ft) wide, 1m (3 ft) deep, and 60cm (2 ft) high.
Materials
Many different kinds of materials can be used to build a hutch. The hutch pictured on the next page was made using:
- packing cases
- four eucalyptus poles
- 14 strips of pine
- 1 cm (1/2 in) square wire netting
- one flat sheet of galvanized iron
- binding wire
Hutches can be made of many other woods and materials, including bamboo (see Part B).
<FIGURE 4>
Protection From Weather
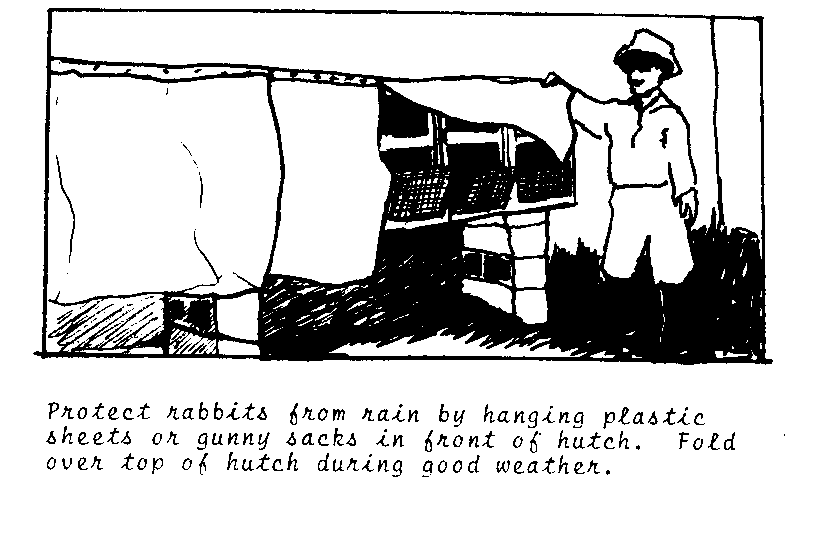
The weather conditions that most affect rabbits are rain, sun and heat. Rabbits often enjoy sitting in the sun, but they must always be able to get out of the direct rays of the sun. Too much sun can kill rabbits. Rabbits tolerate cold in their "fur coats" better than extreme heat.
Also, protect rabbits from rain and wind. If the sides, front or back of the hutch are covered only with wire netting, hang sheets of plastic or gunny sacks over these spaces during rains to protect the rabbits. Always place the enclosed back of the hutch to the wind. Rabbits suffer when exposed to drafts. In severe winter it is best to bring the hutch under the shelter of a roof (a corner of the barn) or under the eaves of the house.
Self-Cleaning Floors
<FIGURE 6>
The floor of the hutch should be no higher than the waist and be self-cleaning. A self-cleaning floor is made by stretching 1 cm (1/2 in) square wire netting in a frame. Wire floors help prevent rabbits from becoming sick and dying because manure and urine pass through the holes of the wire and drop to the ground. The inside of the hutch then stays clean, dry and sanitary.
The manure under the hutches should be gathered every few months and used on vegetable gardens. Rabbit manure is better than the manure of pigs, chickens or cows for growing vegetables.
<FIGURE 7>
Preparations for Feeding
The Manger
Rabbits eat lots of grass and leaves. But grass should never be scattered on the floor of the hutch. Grass on the floor of the hutch gets dirty with manure and urine, and this dirty grass can make rabbits sick. It is easy to prevent this problem by building a simple manger, or feeding place, of wire netting or planks. This can be fastened to the outside of the hutch. The rabbits then pull the grass through the wire mesh and feed themselves as they are hunqry. The manger should be large enough to hold plenty of grass and leaves.
<FIGURE 8>
Sometimes baby rabbits crawl out of the cage into the manger. To prevent them from falling to the ground, make a cover for the manger.
<FIGURE 9>
A manger can be placed between two compartments in a hutch.
It is not necessary to build a manger, but it is necessary to make the food available so that it is not lying on the hutch floor to get dirty. One way to do this is to tie grass and leaves in bundles with string or wire and hang it on the inside of the hutch near the front. This method will prevent the grass and leaves from becoming dirty or spoiled.
Water
Rabbits need water. They get some water from eating grass and leaves, but they need more water than this. Make sure rabbits can get water whenever they wish to drink.
To do this, make an automatic water container:
- Turn a large bottle over and fasten it to the inside of the hutch so the lip of the bottle is inside a small tin can. Make sure there are no sharp edges on the tin can.
- The lip of the bottle is about lcm below the top rim of the can.
- Remove the bottle and fill the can and bottle with water.
- Replace the bottle. As the rabbit drinks water from the can, more water will fall from the bottle, thus providing rabbits with plenty of clean, fresh water.
Fill the bottle as often as necessary to keep the water supply clean and fresh -- probably at least once a day.
<FIGURE 10>
Automatic watering systems using pipe and nipples are a good investment for the rabbit raiser who is raising many rabbits.
Feed Dishes
If possible select a heavy earthenware crock with about 8cm (3 in)-high sides. Heavy dishes cannot be tipped over by the rabbits.
A coffee or butter tin can be used. Nail the can to a small board. Be sure there are no sharp edges on the can.
A section of bamboo with an opening cut into the side can be used. Fasten it to a small board to keep it from rolling.
Whatever kind of container you use, young rabbits will climb into them. Usually rabbits will not urinate on their food but could contaminate it with their droppings. This will have to be watched.
If feed pellets are used, a feed hopper can be built like the one below. This has the advantage of always keeping the feed clean.
<FIGURE 11>
3 Caring for Rabbits
When the hutch is ready, the rabbit raiser can get started. This section presents guidelines for selecting, handling and caring for rabbits.
Check New Stock Carefully
The source of supply depends upon the area. In some places rabbits are available in the market, from another rabbit breeder or perhaps from government sources. Wherever the rabbits come from, they must be checked very carefully before they are taken home. Remember that it is not possible to breed and raise healthy rabbits unless the rabbits you begin with are good rabbits.
You must be able to answer YES to all six of the following questions before you take the rabbit home:
- Is the animal active and alert?
- Are its eyes bright and clear?
- Is its nose clean, not runny?
- Are its ears clean and dry inside?
- Is its fur smooth and clean?
- Are its feet dry and free of sores?
If the rabbit fits these guidelines, ask about the litter from which the rabbit came. Choose rabbits that have come from large litters and from females that have had good, large litters. Do not select brother and sisters for breeding; they will not produce healthy young.
Handling Rabbits
Just a short word here on the proper ways to handle rabbits. Rabbits are generally gentle and will not bite, but they do become frightened and can hurt themselves or the handler if they jump suddenly. It is always better to handle rabbits properly.
Never lift rabbits by their ears or legs: they can be hurt if lifted this way.
Adult rabbits There is plenty of loose skin at the back of the neck over the shoulders. Hold the rabbit by this loose skin with one hand and support its weight by placing your other hand under its rump (tail). Be sure to hold the rabbit's feet away from you to avoid scratches from the long toe-nails.
Small rabbits Lift and carry small rabbits by holding them between the hips and the ribs. The heel of the hand should face the rabbit's tail; the rabbit's head should be pointing toward the ground.
<FIGURE 12>
Heavy rabbits Grasp a fold of skin over the shoulder and lift. Hold the rabbit against your body with its head under your arm. Your forearm should extend along the side of the animal, and your hand should be under the rabbit's rump to support the weight of the rabbit.
<FIGURE 13>
Feeding Rabbits
Rabbits are not hard to feed because they can live on plants and other foods which are easy to find. Rabbits get the vitamins, minerals and fiber they need by eating the leaves of plants. Corn, peanuts and other seeds can be eaten by rabbits and are a good source of protein.
It is important to feed rabbits well. Well-chosen food can help keep the rabbits free from disease while producing good growth at low cost. Breeding females, called does, must be especially well-fed to produce healthy young rabbits and the milk to feed them.
Elements in Foods
protein. Protein is a substance which helps rabbits grow and stay healthy. Protein is contained in rabbit meat and is one reason why rabbit meat is so healthy. Rabbits must be fed protein to produce protein.
Proteins from plants are best for rabbits. Rabbits can eat peanuts (groundnuts), soyabeans, sesame, linseed, hempseed and cottonseed. These seeds are usually ground and added to rabbit mashes and pellets. Whole soyabeans have about 36 percent protein but are not enjoyed by rabbits unless the beans are ground into a meal or pelleted.
Oil cake from soyabean, peanut, sesame, flax and cottonseed is a good source of protein.
Salt
There is a noticeable difference in the amount of salt each rabbit consumes daily. For this reason it is a good idea to place a block or spool of salt in each cage. Each rabbit will take what it needs by licking the salt.
Salt should not come in contact with metal cage parts, such as screening. Salt can be added directly to the food in a quantity of 1/2 percent.
Vitamins
Very little is known about a rabbit's requirement for any of the vitamins, but rabbits do need vitamins A and D. Freshly cut green plants, some root crops and high quality hay are excellent sources of vitamin A. The best source of vitamin D is found in cured roughages, especially field-cured luzerne. Fresh cut greens will also provide vitamin B and vitamin E. When labor and expense permit, rabbits should be given good quality green plants as part of their diet.
Minerals
All dry and fresh green plants will contain some or all of the minerals needed by rabbits. If the rabbit's feed is properly balanced, there will be plenty of minerals for the rabbit.
Foods
cereal grains. Rabbits will eat oats, wheat, barley and grain sorghums (milo, kafir, feterito, hegari, darso and sagrain). These grains may be fed whole as soon as the young rabbits come out of the nest box at three weeks of age. Grains fed to rabbits should be plump and not spoiled or moldy. Soft varieties of maize (corn) can be eaten by rabbits, but the tougher, flintier types must be crushed or ground. Rabbits enjoy sunflower seeds but these seeds are usually valued more for other purposes.
When rabbits are allowed to choose from several types of grain, their first choice will be oats, followed by soft varieties of wheat, grain sorghums and barley.
Usually, it is a good idea to prepare a feed mixture which contains a number of grains. Here is one suggestion for a grain mix (the quantities are for a small number of rabbits):
1kg whole oats
1kg wheat
1/2kg crushed corn (soft varieties)
1kg soyabean meal in pellet form
Nursing does should be full-fed (food continuously available) the grain mix. Dry does and herd bucks should be given as much as they will consume in 20-30 minutes.
Grains which are ground and made into a mash should be dampened with water before serving. Otherwise, dust will get into the rabbit's nose and cause irritation. When possible, feed should be pelleted: there is less waste when pellets are used.
green feeds and roots. Rabbits enjoy green plants; tender cane tops have also been used with success. Rabbits also like sweet potatoes, carrots, sugar beets, turnips, and white potatoes.
Green plants and root crops contain protein, minerals, and vitamins; they are almost 90 percent water. These contents make them very important food for rabbits.
However, if rabbits eat too many greens then they will not eat enough of concentrated feeds (like grain mixes). And these concentrated foods produce faster weight gain.
NEVER ALLOW GREEN FEED TO STAND IN PILES AND BECOME HEATED BEFORE FEEDING TO RABBITS. Green feed which has been standing too long can cause serious digestive problems in the herd. Also, NEVER PLACE GREEN$ ON THE FLOOR OF THE CAGE where they will become dirty. Disease is spread when greens are not hung up or placed in a manger.
dried plants (hays). Luzerne; clover, peanut, lespedeza, vetch and kudzu hays are excellent for rabbits. Hay must be of good quality: it should be leafy, small stemmed, green in color, free of dust and mold, with a nice smell. Tender elephant grass and Sudan grass can be fed to rabbits but contain less protein than the plants listed first. Often weather conditions do not allow for the making or storing of hay. When hay is available, it can be placed before the rabbits at all times. They will eat about 55 - 85 gm (2 - 3 oz), daily.
commercial feeds. Many rabbit raisers prefer to buy a COMPLETE feed for their rabbits. The packages should indicate the amount of protein, fat, etc. that they contain. The following chart shows how much of each of the listed substances rabbits require. If the concentrate contains these ingredients in about the same percentage amounts, it is a complete feed.
Suggested Rabbit Feed Concentrate Analysis
protein 15 - 20 %
fat 3 - 5.5 %
fiber 14 - 20 %
nitrogen-free 44 - 50 % extract
ash or mineral 4.5 - 6.5 %
Coccidiostats
These are preventive medicines for coccidiosis (See Section 6). If available, it is wise to add some medicine to the feed to protect rabbits from this disease. A ration containing 0.025 percent of sulfaquinoxaline is effective for reducing the infestation of intestinal and liver types of coccidiosis in the herd. The use of medication should not take the place of good management. It is more economical to prevent than to cure.
Young rabbits are born free of this disease but may quickly become infected by licking their soiled feet, fur, or hutch equipment, or by eating feed or drinking water that is contaminated with the "eggs" (oocysts) of the disease organism (protozoans).
When rabbits are raised in areas where there is considerable humidity or long periods of rain or fog, the coccidia infestation may build up until it causes heavy losses. Manure pellets do not cause danger while they are whole, but once they begin to break down or get mashed the disease organism is released. Hutches with self-cleaning floors, mangers and proper food, and good management practices all help reduce the possibilities of infection. Authorities on rabbit raising feel that it is impossible to get rid of the disease entirely, but they feel that good practices such as those mentioned here can reduce the problem considerably.
Other Foods
Kitchen scraps, except greasy and spoiled food, are enjoyed by rabbits. By weight, dry or stale bread has about the same feeding value as the cereal grains. Bread can help reduce the cost of feeding rabbits. The fruits and rinds of oranges and qrapefruits and trimmings from vegetables can be fed to rabbits. Cow's or goat's milk is good for rabbits. Although poultry mash (formulated for growers and layers) is generally more expensive than rabbit feed, it is nutritionally adequate for homestead rabbits.
A Note on Feed Storage
Keep feed dry and protect it against insects and rodents. Keep feed away from dogs and cats; they can be a source of tapeworm infestation.
Proper Amounts and Combinations of Foods
Rabbits can be given a combination of foods as long as the total food intake is about the same. In general, herd bucks (males) and dry does (females not breeding) need only 1/2 cup of mash each day; pregnant or nursing females require 3/4 - 1 cup per day.
bucks. Rabbits can be full-fed by leaving food in the hutch at all times. Rabbits fed by this method eat small amounts of food more often and gain weight more quickly. Herd bucks, however, should be hand fed. This means supplying them only with as much food as they can eat in 20 - 30 minutes. If herd bucks are allowed to eat all the time, they become fat and lazy. Two possible daily feeding plans for bucks are:
125 - 185gm (4 1/2 - 6 1/2 oz) concentrate (depending upon weight), plus 15-minute feeding of greens.
or
85gm (3oz) of grain mixture and all the good quality hay or greens they will eat.
Please note: All weight conversions, here and following, are given in approximate figures.
Does
A doe at six months of age will eat at the rate of 3.8 percent of her live weight, daily. For example, a 4.5kg (about 10 lb) doe will eat .038 x 4.5 = .17kg = 170gm (or .038 x 10 = .38 lb = about 6oz), daily. If hay and grains are fed, she will consume 70gm (2 1/2 oz) of a grain mixture and about 100gm (3 1/2 oz) of hay, to make 170gm (6oz).
The following chart is a good guide when feeding a combination of concentrate and greens:
Concentrate-Greens Feeding Chart
Weight of Doe Daily Ration 45gm (1.6oz) or more greens, PLUS concentrate ration of:
2 1/4 kg (about 5 lb) 70-85gm (2 1/2 - 3oz)
4 1/2 kg (about 10 lb) 125-140gm (4 1/2 - 5oz)
6 3/4 kg (about 15 lb) 185-200gm (6 1/2 - 7oz)
Note: The amounts of concentrates can be reduced by increasing the amounts of greens fed.
To feed a doe correctly the rabbit raiser must know when she is pregnant. An experienced rabbit raiser can feel for the babies inside the mother at 14 days after mating (see Section 4, "Breeding Rabbits"). A doe must be given all the concentrates she will eat without waste while pregnant. After the young rabbits are born, continue to feed the doe and the young rabbits all the concentrates they will eat without waste. The doe's diet should be reduced only when the young rabbits are removed and until pregnancy is noted again.
Producing a 1.8kg (4 lb) fryer Generally, it takes 7kg (15.4 lb) of complete concentrate (pellets are best) to produce a 1.8kg (4 lb) fryer in 8 weeks. The following chart shows four different feeding plans. This should help the rabbit raiser decide which plan is best for his situation.
Concentrates Luzerne Hay Green Feed Time
PLAN A 7kg (15.4 lb) ---- 8 weeks
PLAN B 4kg (8.8 lb) 1.5kg (3.2 lb) ---- 8 weeks
PLAN C 4.5 - 5kg (10-11 lb) ---- .5-lkg (1-2 lb) 8 weeks
PLAN D 3.6 - 4kg (8-9 lb) ---- 1.4-1.8kg (3-4 lb) 10-11 weeks
Note: Amount of food to produce 1.8kg (4 lb) fryer also includes a portion required for doe from breeding through weaning.
4 Breeding Rabbits
When buying rabbits find out how old they are. The minimum age for breeding depends upon type: heavy types take 9-12 months before they are old enough to breed; New Zealand Whites are ready to breed at 6-9 months of age.
Do not breed females until they are old enough to handle the strain of nursing. One male, or buck, can service as many as ten females but he should not be used more than two or three times a week. A maximum use for short periods would be five times weekly.
How to Mate Rabbits
The female, or doe, will probably object to having the buck placed in her cage and might attack or injure him. Therefore always place the doe in the buck's cage for mating. Do not disturb the animals and make sure people and dogs are not around. People and dogs can frighten the rabbits and they will not mate.
<FIGURE 14>
When the doe is placed in the buck's cage, he will probably mount her quickly. If after a few seconds the buck falls over on his side or suddenly falls backwards, mating has taken place. Often when the buck falls he will look as if his whole body has suddenly tightened. Allow only one or two falls. Then remove the doe and place her back in her own cage.
DO NOT LET THE DOE STAY WITH THE BUCK ALL DAY LONG. If mating has not occurred within the first few minutes, remove the doe and try again after a few hours.
As soon as the doe has been mated and returned to her cage, WRITE DOWN THE DATE OF MATING on a small card attached high in the inside of the hutch. If you fail to write down the date you will not know when to feel for the young within the doe at 14 days or put a nest box in her cage before she gives birth.
Holding the Doe for Mating
Sometimes a doe will hide in the corner of the buck's cage, and he will not be able to mount her. If this happens, help the buck by holding the doe for mating. This is very easy to do.
<FIGURE 15>
Use either hand to hold the ears and a fold of skin over the doe's shoulders. Place your other hand under her body and between her hind legs. Place one of your fingers on each side of the tail and push gently backwards. This action will throw the doe's tail. up over her back, so that the buck can quickly mount and mate her. If the doe's tail is down, the buck will not be able to mate her.
Feeling for Young Rabbits
It is possible to feel the small, round babies inside the doe two weeks after breeding has taken place. Keep the doe in her cage. Hold her ears and a fold of skin over the shoulders as though holding the doe for mating. Slide the other hand under her stomach with your thumb on one side of the stomach and your fingers on the other. Gently press in on the stomach wall with your thumb and fingers and slide your hand backward and forward. If the doe is pregnant, you will be able to feel small, hard, marbleshaped lumps as you slide your fingers back and forth with the stomach gently squeezed between them. This "test" is a good one, but must be practiced often to be successful.
Kindling
Kindling is the act of giving birth. The doe will kindle 31-32 days after mating. A doe will probably eat less food two or three days before kindling. Five to seven days before the kindling date, put a small box, called a nest box, inside the doe's cage. She will give birth in this box. It is usually possible to find boxes which work very well, but if you must build a box it should be lightweight and measure about 30cm deep x 35cm wide x 20-30cm high (12" x 14" x 8-12").
Place nothing in the nest box or the hutch if the weather is warm. The doe will pull fur from her stomach to make the box comfortable. If the weather is cold, place dry grass or straw in the hutch three days before kindling, and the doe will prepare her own nest.
Does usually kindle at night. As each baby is born, the doe will lick it and give it milk. Does usually give birth to 4 or 6 babies the first time. After that a doe usually produces 6-8 babies at each kindling.
One or two days after the rabbits are born, carefully look inside the box for any dead babies. Move the fur to one side with a small stick or pencil. Remove any that you find.
When the doe is with her babies, it is important to keep children and dogs from bothering her. If the doe becomes frightened she might injure her young by jumping into the box quickly and crushing them. Or, frightened does eat their babies. Does also will eat their young if they do not have enough protein food. If a doe continues to do this after a second or third time, however, she should be replaced.
Following are some examples of nest boxes you can make.
<FIGURE 16>
<FIGURE 17>
This closed-top winter nest box will hold the body warmth of the baby rabbits. These nest boxes can be made of 1cm (1/2") or even 2 1/2cm (1") lumber. One 4 x 8' (about 1.2 x 2.4m) sheet of plywood will make four of these boxes, with just a little left over. Use wood for these boxes. If metal is used the box will "sweat" and create a health problem for the young rabbits.
The doe will use the top of the box to sit on. This allows her to get away from her babies and keeps her feet warm. When the young are a few weeks old they will start following the doe up to the top. Do not leave the nest box in the cage too long. The rabbits will quickly soil the wood surfaces and problems with coccidiosis (see page 40) could result.
A nest box can be made from a nail keg turned on its side and steadied with a piece of wood nailed across the front.
<FIGURE 18>
Weaning
Weaning means removing the babies from their mother. Young rabbits open their eyes 10-11 days after birth. They will come out of the nest box at about three weeks of age, and at this time they start eating food other than their mother's milk. They should be separated from their mother at eiqht weeks (no sooner) and placed in another cage for fattening. If the young are separated before they are eight weeks old they will stop gaining weight for a few days, and might even lose weight.
After weaning, breed the doe again. Wean and breed the doe on the same day. If the doe becomes pregnant each time she is bred, she can produce four litters in 12 months. But do not expect to reach this goal at first; it is sometimes difficult even for experienced rabbit raisers
Especially strong does, however, can be bred at 7 weeks or even 6 weeks after kindling. When this is done, the young should continue to stay with their mother for the full 8 weeks before weaning. If the does are properly fed so they can stand the strain, this is a very good system of breeding. The doe is alone in her cage for only a short time before the next litter is kindled, and the hutch equipment is used to the best advantage.
Determining Sex
This can be done at weaning time (8 weeks) or earlier, after you gain experience. Hold the young rabbit as shown here or place it on its back on a table. There are two openings near the tail. The opening nearest the tail is where the droppings (manure) come out. Above this is the outside opening of the sex organs. Place your thumb below this opening and your finger above it. Press down gently. You will see the red, moist flesh inside. As you press down you will see a slit or a circle with a small hole in the middle. If you see a slit, the rabbit is a female. If you see a circle, the rabbit is a male.
<FIGURE 19>
Orphan Litters
Sometimes a doe dies at kindling or shortly afterward. Many rabbit breeders will not take time to raise orphan young, but young rabbits left without a doe can be fed whole cow or goat milk from a bottle until able to eat grains and grass at two weeks of age. When raising orphan litters care must be taken to keep all feeding equipment sanitary.
Balancing Litter Size
Some breeders mate several does at one time so they will all kindle within a day or two of each other. If a doe has an exceptionally large litter (10-16) and another doe has a small litter (2-4), some of the rabbits from the large litter can be transferred to the smaller one. A litter of eight is an ideal size.
Handle young rabbits as little as possible, but do not worry about destroying the scent of the human hand. As soon as the rabbits are placed in the nest box any odor clinging to them is quickly destroyed.
Failures to Conceive
The doe can be sterile, not able to produce young, if the food ration is unbalanced or the weather is too hot or too cold. Commercial breeding has shortened the barren tendency so that it is possible to achieve four or more litters in a year. However, a balanced diet is very important if does and bucks are to realize this high rate of production.
Bucks and does that are too old can account for conception misses. With excellent care and feeding a rabbit will remain profitable to breed for 3-4 years. After this time does tend to give birth to small litters of 2 or 3 young.
Animals which have been known to produce well for several years are of special interest to the rabbit raiser. Keep records of good does and select rabbits from the litters of these outstanding does to keep aside for replacement stock.
Sore hocks or other injuries can cause a loss of vitality in both does and bucks. Rabbits must receive excellent care combined with good management to achieve profitable results.
5 Keeping Records
If you are only raising rabbits in your backyard, you probably do not need to keep extensive records. The following forms should prove sufficient. However, once you get into a rabbit raising business where keeping a production schedule becomes extremely important, more detailed records may be necessary.
Basic Records
<FIGURE 20>
These sample records (on the page before, and below) contain information essential to the careful rabbit raiser. Good records save time and allow planning of yearly production. Records are the key to successful breeding and handling of the litter. Make an individual record for each breeding animal and tack it somewhere in the cage where it will remain dry and will not be chewed on by the rabbit.
<FIGURE 21>
Complete Record Keeping
Mrs. Anne Faunce, a commercial rabbit raiser in the United States wrote in Countryside and Small Stock Journal, (*) January 1974, that good records lead to increased pleasure,
(*) Now known simply as Countryside, published monthly at 312 Portland Road, Highway 19 East, Waterloo, Wisconsin 53594 U.S.A.
satisfaction, and net income in a rabbit raising operation. The remainder of this section is drawn freely from her article:
Well-organized, simple record keeping systems do not take long to keep up-to-date and should be kept daily. The time is well-spent. Good records help to reduce mortality (death rate) and to increase regular breeding and conception rates. They help the rabbit raiser to keep litters uniform in number and size of the young. All of these factors can lead to increased profits.
Our record system developed as we learned what we wanted and needed to know, and how to record it simply. Every bit is essential for proper evaluation of does and bucks. The buck performance records have increased our net profits steadily.
The point of keeping records is to use them, so we keep permanent individual performance records in our house and on each hutch door.
We were able to test such things as control-feeding and breeding schedules with the aid of our individual buck and doe records, plus the herd performance records. Here are some of the things we found:
* For our herd, control-feeding produced the same or better weights at the same day-age as free-feeding, a lower mortality rate, as well as the reduced feed cost.
* A 38-39 day rebreed schedule was the most practical and profitable in supplying our processor with a minimum fryer weight of 4.5 lb (2kg). We get 5 1/4 litters per year. We also get 5-6 year old does producing profitable litters.
* Our herd actually made us more money if we limited litter size to 7 or 8 young, depending on the doe.
We use the same headings for doe and buck performance records and the does' hutch cards; this simplifies recording and understanding. We have found that all we need to know about the bucks while working in the rabbitry is the date bred and the doe's number.
We make entries in every column on the does' hutch cards. When working with nest box litters, the information is right at hand to decide how many young to leave with her, or how successful a foster mother she is.
We designed our own hutch cards -- according to our own needs. On the following pages are sample cards and explanations of how we set them up:
PLEASE NOTE: In the "weight" columns on the hutch cards, figures are given in pounds. One kilogram = 2.2 pounds.
Does
<FIGURE 22>
Column 1: Buck Identification of the buck used in any mating is needed to compare litters out of different mates, or different litters out of the same mates. You can plan for future matings and stock selection.
Column 2: Date bred This date shows you when the doe should kindle, and when to put in the nest box. An "L" (late) in this column would show that the doe did not rebreed on schedule. It's very important to know this: if she's always a late breeder, cull her (separate her out). We learned to save stock only out of does which bred and conceived regularly, year around (in addition to other desirable traits). This includes bucks as well.
Using the information in this column pays off in increased conception rates -- and overall production: in 1965 our annual conception rate was 82 percent, and our Fall (August through December) breedings conception rate was 70 percent. By 1971 annual conception rate was 95 percent and the Fall rate was 93 percent. The does bred on schedule, and conceived.
Column 3: Date kindled This gives you a reference point for recording exact age in days of the young later on. Shows if the doe is always late, early or on time. Not needed on buck records.
Column 4: Number of young
kindled Shows the total number of young born. If some were born dead, or died soon after birth, we indicated this as a two part figure: 14/10 -- 14 the total number born, and 10 the number alive and well. This column is useful in doe and buck evaluation.
number of young at 1 week We found it frequently takes 4-7 days to get all litters settled down to the exact number we expect the doe to raise; so we decided that one week was a practical date. This figure is used as the reference for checking any mortality later on. If it's a good, bad even or uneven (in quality -- not number) litter, the appropriate letter is added.
Column 5: Young at 3 weeks A summary of the litter's nest box history. Useful in early estimate of number for future sales, and in evaluation of sire and dam.
Number Shows survival and mortality. To rate the litter, add the appropriate letter.
Age in days Accuracy in days is necessary for proper appraisal of the rate of weight gain in the nest box.
Weight of litter Shows the doe's nursing ability, and also the sire's capability to give his young the ability to make the most of the doe's milk. You can compare with other litters on the sire's and dam's records. When breeding for herd bucks, the doe's milking ability is of great importance, because she passes this on through her son to his daughters.
Column 6: Weaned This and the next column really sum it up for the commercial rabbit raiser.
Number Shows survival and mortality in the litter. This is important for sales, and as part of the doe's and buck's performance records.
Age in days Since a whole litter can gain close to a pound a day at the age of 8-9 weeks, exactness is essential for factual judgement.
Weight of litter We weigh the whole litter at once -- it's a lot quicker and easier, and more accurate than one by one and adding it up. Since we look closely at the total number of pounds produced, it is logical.
Column 7: Number Marketable on Time (MOT) This is the real key to profit and loss on a litter, and reflects the performance -- and profitability -- of a doe or buck. Included in this figure are any young saved for breeding stock: even though they are to be separated out, they would of course be marketable. Holdover fryers to be used as breeders eat up the profit of those sold, and take up valuable hutch space -- so use your records well and take care in selecting breeding stock.
Column 8: Notes Limited space means limiting notes to important things, and abbreviating legibly, such as WNB for "wet nest box," O.F. for "off feed," S4D for "saved 4 does" (for breed stock), etc.
Bucks
<FIGURE 23>
After we started keeping the same records on the bucks' performance sheets, we found that it made a helpful difference in judging the doe's performance. We could now be sure if some things were the doe's fault or not. A high mortality-rate among fryers or an irregular growth rate would be reason to check the records of the bucks she has been mated with. If those bucks show up well, then she can be culled without wasting time, feed and hutch space on "another chance;" if the bucks do not show up well, then the doe's service is continued and we check the bucks. Having both doe and buck records makes it a lot easier to find the poor performers faster and without losing any more money. After the records have been in use for a year or so, these problems are likely to disappear.
Keeping the buck records and using them has really made our herd more profitable. We were able to work on facts instead of impressions. Once I had to put our favorite buck on the "stew list." In spite of the buck's being beautifully built, a terrific worker with even the reluctant does, throwing good, uniform, easily identifiable litters, his offspring just didn't grow out well. His MOT equalled only 46 percent! Other things that showed up were: low number of young kindled, high kindling mortality, high fryer mortality, uneven litters. All good culling reasons, not easily found out without records. About three times a year we evaluate every buck's performance record and give him a herd rating. This is in addition to normal checking and any special watching needed in between. Young bucks are first rated after their tenth breeding litter goes to market. Foster litters, or any litter where more than two have been added, are not included. By taking the total numbers of young at one week, at weaning and MOT we can calculate the percentage rates for mortality and marketability-on-time.
The herd bucks then are listed according to percentage raised and MOT of the litters. Those at the bottom are culled. The first time we used this rating, 7 out of 28 bucks were culled for less than a 65 percent MOT rating. Exactly one year later, 6 out of 28 with less than an 80 percent MOT rating were culled. Four months later, we culled two bucks; all the rest had 85-95 percent MOT. And along with the increase in MOT came a very nice increase in profits! If something undesirable showed up in a buck between herd ratings, we did not wait to cull him.
I cannot stress enough how much difference it can make financially to keep and use performance records on both does and bucks. They give the information necessary to make good management decisions on breeding, selection and culling.
6 Rabbit Diseases and Their Control
It is best to prevent disease; treating disease is often difficult. Following these simple rules can do much toward keeping rabbits free from disease:
- Keep hutch, nest boxes, water cans and mangers CLEAN. Clean wire floors with soap and water after each litter.
- Give rabbits fresh green food to eat. Remove stale food from mangers.
- Protect rabbits from intense sun, rain and drafts.
- Keep unfriendly dogs away.
- Use wire netting for hutch floors. Hutch floors should be "cornerless."
- Take sick rabbits away from the other rabbits immediately.
- Watch for signs of the following diseases.
Coccidiosis (Intestinal)
Signs: Diarrhea, a swollen belly. Rabbit sits in a hunched position and will not eat. Often the rabbit staggers around and is not able to keep its balance. This disease attacks rabbits between the ages of 2 and 10 weeks. Coccidiosis can cause death.
Cause: A one-celled animal parasite living in the lining of the rabbit's intestines.
Treatment: Mecryl Powder, Sulphamezathine, Amprol, Sulfaquinoxaline or Eimryl Urgence are used to prevent and treat this disease. Follow the directions for each medication carefully. coccidiosis (continued)
This disease is spread through the droppings of infected rabbits. Keep the hutch clean at all times: one dirty corner in the hutch could lead to this disease.
Hutch floors should be of wire netting. If the netting is stretched tight, there will be little need for additional supports. If you must use wood supports build them as shown here. You can also use rod iron.
<FIGURE 24>
Ear Mange
Signs: Dirty ears. Crusts on inner surface of ear. Often the rabbit shakes its head or scratches its ears.
Cause: Mites. These insects are so small you can only see them with a magnifying glass. They dig under the skin on the inside of the rabbit's ears and cause pain.
Treatment: Remove the crusts with your fingernail. Go to a pharmacy and ask for a solution of 0.25 percent Lindane in vegetable oil, or a mixture of 2 parts iodoform, 10 parts ether and 25 parts vegetable oil. Swab either one of these solutions inside the ear with a piece of cloth or cotton. Apply again after one week. Check all other rabbits' ears for this problem.
Remarks: This disease can destroy the centers of balance in the rabbit's inner ear. If a rabbit is not treated for this disease it will result in a condition known as wry neck: the rabbit will hold its head to one side or fall over. Once this happens to a rabbit, it cannot be treated. The best thing to do is prevent it by treating the ear mange promptly.
Colds
Signs: Sneezing and rubbing the nose with the front feet. Fluid will show around the nose. This fluid may be thin and clear, or it may be thick and yellow.
Cause: Several types of bacteria and virus.
Treatment: Reduce the amount of concentrates you are giving your rabbit for a few days. Give the rabbit all the green grass and leaves it wants.
Remarks: This disease attacks animals in over-crowded, damp, dirty hutches. Protect rabbits from rain. Always provide lots of fresh greens to eat.
Sore Hocks
Signs: Rocking forward on front feet; hind feet show sores on the bottom. Rabbit may lose the fur pad on the sole of the foot, with scales and irritation in this area. If allowed to get worse, the foot bleeds or becomes spongy with pus draining from it.
Cause: Wet or rough floors which rabbits bang their feet upon. Floors that are sharp, that sag too much, or that are filthy, may contribute to this.
Treatment: Soak the affected parts in warm, soapy water until the crusts come off. Rinse and dry thoroughly. Rub in ointment but do not use so much that the foot becomes sticky and picks up dirt (use zinc ointment, petroleum jelly, sulfathiazole ointment).
Remarks: Keep rabbits undisturbed so they do not bang their feet. Select replacement stock from quiet animals.
Sore Eyes
Signs: Rubbing eyes with feet. Fluid from eye either thin and clear, or thick and yellow.
Cause: Irritation from flies or injury from jagged wire, etc.
Treatment: Clean eyes with boric acid water, or just clean water. Apply ophthalmic ointment (antibiotic, silver oxide, yellow oxide of mercury, Argyrol).
Remarks: This can often be contagious. Isolate sick animals.
Skin Mange
Signs: The rabbit shows an intense itching, the skin becomes reddened and irritated, the hair comes out, and yellow crusts may be present.
Cause: Mites (similar to ear mange).
Treatment: Wash the affected area with warm soapy water, rinse and dry (important: rabbits can get pneumonia if not dried quickly). Clip the hair away from the edges of the sore area. Rub dry flowers of sulphur into the skin thoroughly. Repeat treatment in four to six days.
Remarks: Contagious. Isolate infected animals. Clean and disinfect hutches which have been used by diseased animals.
Mucoid Enteritis (Scours or Bloat)
Signs: Drinking but no eating. Rabbits sit hunched up with squinting eyes, grind their teeth, have dull, rough coats, and swollen bellies. They may have diarrhea.
Cause: The cause is not known, but it is not thought to be contagious.
Treatment: No specific treatment known. Take away all food and water for 48 hours; then give small quantities of green food for a few days. Let them have small amounts of water during this time.
Remarks: Usually affects rabbits at about six weeks of age. Do not confuse this with coccidiosis, which can be treated.
Pneumonia
Signs: Heavy breathing. Rabbit often tilts its head back so that the nose is in the air. Rabbit moves very little and will not eat. Body temperature, as shown by a thermometer placed in the rectum, is high (39.5 - 41 [degrees] C -- or 103 - 106 [degrees] F). As the animal gets worse the eyes and ears may show a bluish color because of lack of oxygen.
Cause: Bacteria. Usually comes with other diseases, or if animal is pregnant, nursing young, or chilled and wet. Also attacks very young rabbits.
Treatment: Injections of antibiotics given before the disease progresses too far. The Veterinarian will usually give 200,000 units plus 0.25gm dihydroatreptomycin intra-muscularly (into a muscle) in the hind leg. Keep animal warm and dry, reduce concentrates and give plenty of green feed and and clean water.
Remarks: The critical time for the doe is two weeks before and two weeks after kindling. Watch the doe closely during these times. Pneumonia also can follow right after many of the other diseases. Watch for it. Treat and isolate infected animals promptly.
Caked Breast (Caked Udder)
Signs: In early cases, the breasts (one or more) are firm, pink and feel hot to the touch. Later on, little knots can be felt in the breasts. Following this, the breasts may darken and become dry and cracked.
Cause: Milk not being taken from the breasts fast enough. Doe may have too few young, or not be letting them nurse.
Treatment: Reduce concentrates and provide plenty of green feed and clean water. Rub Lanolin (or oil or some kind of skin-softening agent) well into the breasts and try to get milk to flow by massaging and encouraging young to nurse. If breasts crack, soften crusts and allow to drain, but do not lance with a knife.
Remarks: Do not wean all the young rabbits from heavily milking does at the same time; take a few at a time from her. Breed heavy milkers a few days before weaning the young. If a heavy milker loses a litter, breed her again at once. Breeding helps to reduce the milk in the breasts.
Avoid disturbances, particularly at night.
If breasts start getting blue, the doe should have antibiotic injections (Penicillin) at once. Isolate the doe and wash your hands thoroughly before taking care of other does.
7 Killing, Skinning, and Tanning Rabbits
Animals are killed when they reach the desired market weight. In many cases, getting the meat is more important than worrying about the skin. When possible, rabbits are kept longer, gaining weight at a slower rate, so that they can be kept until the combined value of the meat (carcass) and pelt (skin) will bring the highest return.
In the United States, 80 percent of the rabbits marketed are classed as "fryers." This means they are tender and suitable for quicker cooking methods. To become classified as fryers, medium and heavy breeds of rabbits are weaned and marketed at two months of age, when their weight averages 1.7 - 2 kg (3 3/4 - 4 1/2 lb). The meat that you actually are able to "dress" out of the animal -- or fryer yield of the carcass -- will average from 50 to 60 percent of the live weight.
At the time of slaughter there should be some fat over the ribs, along the backbone, in the flanks, and around the tailhead and the kidneys, increasing the dressing percent over that of the thin rabbit. To do this, rabbits must be properly fed. Small bones and thin skin show quality in an animal. Because of this, medium breeds with small bones and thin skin will give higher dressing percent than ones with large bones and thick skins.
The amount of food in the stomach and intestines has an effect on dressing percent. If the rabbit is without food and water for a few hours before killing, the dressing percent will be lower.
The profit you get from a fryer will depend on how much feed and labor cost you have to subtract from the fryer's market price.
In the following two sections are step-by-step instructions on killing and skinning, and tanning the hides of rabbits.
<FIGURE 25>
Killing and Skinning a Rabbit
Rabbits are easier to kill and clean than any other farm animals. With experience, the whole job can be done in two or three minutes! Follow these steps:
Kill the rabbit quickly and painlessly. Hold it by the hind legs, head pointing down. In a few seconds he will stop struggling and hang quietly. With the edge of the palm of your free hand (or with a pipe or stick), give a quick "chopping" blow to the back of its neck. This blow will kill the rabbit quickly without pain.
<FIGURE 26>
Some people prefer dislocating the neck to kill a rabbit. The operation is faster than the blow to the neck and well suited to the commercial rabbit raiser. Hold the rabbit by the hind legs with one hand. The thumb of the other hand is placed on the neck just behind the ears, with the fingers grasping the neck. Pressing down on the thumb while quickly pulling the rabbit upwards dislocates the neck.
<FIGURE 27>
Next, hang the rabbit by one of the hind legs using a piece of rope or twine, or by putting a large nail through the hind leg.
<FIGURE 28>
After this, cut off the head, front feet, and the one hind foot not attached by rope or nail.
<FIGURE 29>
Now, cut the skin on the inside of the leg of the foot attached by the rope or nail. Continue this cut to the tail and up the other leg.
<FIGURE 30>
<FIGURE 31>
Peel the skin off both hind legs and cut the tail off. Start pulling the skin down.
<FIGURE 32>
Continue pulling the skin down and completely off the body.
<FIGURE 33>
<FIGURE 34>
Now, with your knife, slit the body of the rabbit up the middle of the belly, but do not cut the intestines.
To finish, remove everything inside except the kidneys, liver and heart, which are good to eat. Cut up the carcass or cook whole.
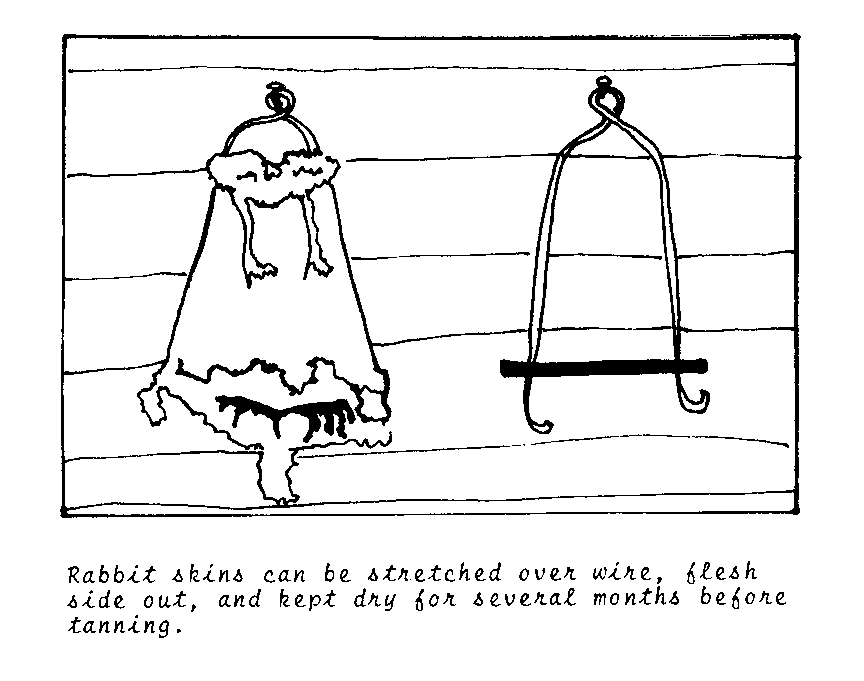
Tanning a Rabbit Skin
In the introduction to this manual it was said that many beautiful items could be made with rabbit skins. Rabbit skins must be tanned (treated so they will be soft and durable) before they can be used to make hats, rugs, and other articles. This is not very difficult to do and one method is given below:
- Take the skin and slit it up the middle. Tack it on a board or the side of the house with the fur side down and the skin side up.
- The following day examine the skin to see if it is drying flat. Remove any patches of fat or meat. Let the skin dry completely.
- After the skin is dry, soak it in clean, cool water. Change the water several times. When the skin is soft, lay it over a pole or board and work over the skin side with a coarse file or dull knife to remove any tissue, flesh or fat. This will also remove any grease or oil. All the fat and oil must be out of the skin before continuing.
- Now put the skin in warm water with 30gm (about 1oz) of soda or borax to the gallon. Get soda or borax at the pharmacy. Add a little soap to help remove the grease and clean the skin. Wash the skin in this mixture and then remove the skin. Squeeze the water out of the skin slowly and carefully.
- Wash the skin in a little gasoline which will remove the last bits of dirt and grease.
- Now the skin is ready to be preserved with chemicals (tanned). You will need about .45kg (1 lb) of ammonia alum (ammonium aluminum sulfate) or potash alum (potassium aluminum sulfate) to dissolve in one gallon of water. After this, add about 110gm (4oz) washing soda and about 225gm (8oz) of salt in 1/2 gallon of water. Pour the soda-salt-water mixture slowly into the alum-water mixture while stirring well.
- Take about a cup of this mixture and add baking flour until you make a thin paste. Tack out the skin smoothly with the fur side down. Put the paste on the skin side about 1/2cm (1/4 in) thick. Lay a piece of paper or cloth over it.
- The next day scrape off most of the paste and put some more on again. Repeat this for two more days (Repeat for only one more day if the skin is from a young rabbit).
Now put another layer of paste on and leave it for four days.
Finally, scrape off the paste and wash the skin in a gallon of water with about 30gm (1oz) of soda or borax. Rinse the skin in cool water. Squeeze out all the water and stretch the skin in all directions. Pull the skin side back and forth over the edge of a board. Much of the success in making a soft skin depends upon this repeated work. After you have worked the skin for a long time it will become soft and dry. It is now ready to be made into beautiful rugs, hats, handbags or collars for dresses.
<FIGURE 35>
Part 2
<FIGURE 36>
Hutch Construction
Detailed step-by-step instructions for building a wood hutch with a sheet metal roof are presented first. Following are a few sketches and notes on a variation on this basic hutch design, made with a wood frame and bamboo sides and roof. Both hutches provide good living and breeding space for rabbits.
<FIGURE 37>
Wood Hutch with Metal Roof
<FIGURE 38>
VITA Volunteer George R. Clark has prepared these construction steps from plans provided by Harlan Attfield. Some construction tips: Be sure all edges on floor are flush, so all rabbit droppings fall to the ground.
Where wire netting is fastened to posts, turn wire edges down to avoid injury to the rabbits.
<FIGURE 39>
<FIGURE 40>
<FIGURE 41>
<FIGURE 42>
<FIGURE 43>
<FIGURE 44>
<FIGURE 45>
<FIGURE 46>
<FIGURE 47>
<FIGURE 48>
<FIGURE 49>
<FIGURE 50>
<FIGURE 51>
<FIGURE 52>
<FIGURE 53>
<FIGURE 54>
<FIGURE 55>
<FIGURE 56>
<FIGURE 57>
<FIGURE 58>
<FIGURE 59>
Wood and Bamboo Hutch
<FIGURE 60>
Assemble a teak frame. Attach a wire mesh floor (1 x 1cm / 1/2 x 1/2" squares).
<FIGURE 61>
* Nail full-length strips of bamboo along the back wall.
* Nail double walls of bamboo strips to form each divider between cages, and single walls of bamboo strips at each end of the hutch.
* In this hutch, nest boxes made from wood crates have been built right into the outside wall of each of the end cages. <FIGURE 62>
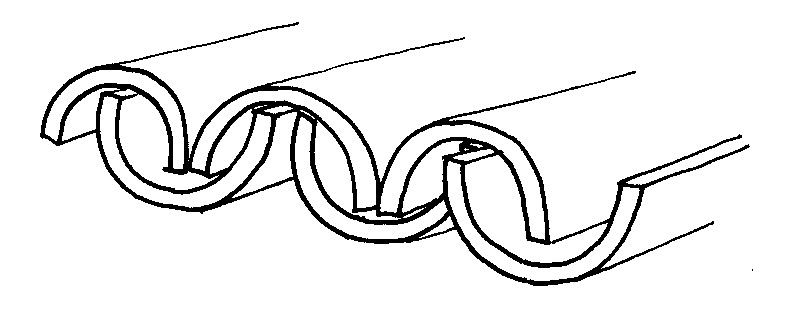
* To make a roof, split bamboo lengths into halves, chip out the "nodes" with a hammer, paint the inside surfaces with a waterproofing substance like creosote or solignum, and nail down onto the top of the hutch frame in an interlocking pattern (shown above). Make the bamboo lengths long enough to overlap the front and back of the hutch.
* After nailing down the bottom bamboo pieces of the roof, you can either nail each top piece to the bottom ones, or lay all. the top pieces into place without nailing, and hold them permanently in place by nailing every half meter or so through two or three half-sections of bamboo laid along the length of the hutch over the top pieces.
<FIGURE 63>
Frame a door to cover the entire front of each cage, and cover with bamboo strips nailed into each frame. Attach the doors to the hutch with two 4" hinges each and a latch for each.
Worm Husbandry
Turn your rabbit manure accumulation into a home for one of the farmer's greatest friends -- the earthworm.
Growing worms is easy and the advantages are many. Rabbit manure and waste feed falling through the wire make good food for earthworms.
Dig pits or place shallow bins below the hutch floors, and stock them with worms. The worms will consume and compost the pellets, creating finely ground fertilizer of the very highest quality.
Bins or shallow pits can be formed from cement, cinder blocks, or lumber (2 x 12") and are sunk a few inches into the ground. Since worms breed best at temperatures above 4.5 [degrees] C (40 [degrees]), pits should be sunk low enough to insure against soil temperatures colder than this during the fall. During winter the worms will slow down or become dormant. The colony will quickly re-activate during the spring when the soil temperature rises.
Bins or pits should be a few centimeters or inches larger than the actual size of the hutch so they will catch every pellet.
"Pit-run" worms are economical to start with and are obtainable from earthworm growers and many rabbit raisers. To start a "worm farm" lay down a starter mix of 50 percent rabbit manure and 50 percent peat moss or fine compost. If moles are a problem, lcm (1/2") square wire mesh can be used to line the bottom and sides of the pit. A few inches of crushed limestone can be placed at the bottom of the pit to correct manure acidity and provide a porous base for drainage.
Keep the pits moist by sprinkling with a little water. Some rabbit and worm growers make a habit of emptying the water crocks directly into the worm bins when freshening the rabbits' water supply. The only other work involved is levelling the pits as the compost "grows" and forking over the bin contents every 2 or 3 weeks to keep it loose.
When the bins get too full of worms some of them should be forked out (a shovel will cut the worms), and deposited in the garden, flower beds, or greenhouse, or they can be sold.
An excellent book on earthworms that is used by rabbit breeders in the United States is:
Raising Earthworms for Profit
by Earl B. Shields P. O. Box 472 Elgin, Illinois 60120 U S A
Cost: $2.00 (US)