Introduction
Relevance of low-cost vacuum sealing technologies
Two broad categories of seeds exist, referred to as recalcitrant and orthodox. The former must be kept moist and planted soon after they are collected; large-seeded fruits such as mango and avocado are typical examples. The second type of seeds are discussed in this document. Orthodox seeds are generally smaller than recalcitrant seeds and represent almost any grain, legume, or vegetable crop. Orthodox seeds can be dried and stored for extended periods of time—often for many years, depending on the crop and storage conditions.
This document presents ways to remove air from seed containers, for the purpose of extending the viability of stored seeds. The technologies presented here are most relevant to community-level seed banks or development practitioners looking for options for storing small volumes of high-value seed for planting. They would not be practical for storing large quantities of grain for human or animal consumption. With the exception of commercial vacuum sealers, the technologies presented are inexpensive, and many can be constructed with local materials.
Importance of controlling seed storage conditions
Quality seed is crucial for initiatives aimed at preserving or increasing crop diversity. Whether seeds are purchased or grown out and collected in the field, they typically need to be stored until conditions are right for planting. How those seeds are stored affects how many will germinate and grow when planted.
Seed survival during storage depends on seed moisture content, air temperature, and oxygen levels. Increases in these factors causes seeds to metabolize their food reserves more quickly, shortening storage life. Seed moisture content is influenced by the humidity of the air in the storage space or container. Hot, humid conditions lead to rotting of seeds. For these reasons, being able to improve seed storage conditions is highly beneficial to farmers and development practitioners, particularly those working in the humid tropics.
Role of vacuum sealing in extending seed life
Vacuum sealing seeds is an effective way to extend their viability, for two main reasons. First, maintaining seeds under a vacuum keeps humidity out of the storage container, which is very important in areas where humidity is high during at least part of the year (e.g. during rainy season).
Secondly, vacuum sealing reduces oxygen levels. Partial or complete removal of oxygen has been found to extend the life of dry, orthodox seeds in storage (Groot et al. 2015; Ohlrogge and Kernan 1982). Vacuum reduces exposure of seeds to free radicals, forms of oxygen that damage cells. Reduced oxygen also helps control insect pests in stored seeds. In a 12-month research trial conducted at ECHO’s seed bank in Thailand, Lawrence et al. (2017) found that the weevil population in vacuum-sealed cowpea seeds stayed low, while weevils rapidly multiplied in non-vacuum-sealed seeds. They concluded that vacuum sealing can be a low-cost way to control seed pests without using chemicals.
Vacuum-sealing is more practical for long versus short-term seed storage. Opening a container or bag of seeds lets air in, eliminating the vacuum. Thus, vacuum sealing could be cumbersome for seed containers that need to be opened frequently (e.g. in response to frequent requests for seeds). For short-term storage, storing seeds in airtight containers—with no vacuum---is better than storing them in paper envelopes or open containers subject to high humidity. [NOTE: Filling an airtight container full of seeds accomplishes the same things as vacuum; humidity is excluded, and oxygen is lowered as air spaces are occupied by seeds. Oxygen can be reduced even further by mixing sand or ash with the seeds. Vacuum is usually easier, though, than keeping multiple containers full of seeds.]
Suitable containers
Plastic tubes or bags are used with food or commercial vacuum sealers. Plastic works best for smooth-coated seeds like beans; seeds that puncture the plastic cannot be stored in this way. Plastic bags can also be punctured by insects (Thompson 2016). Other good options for vacuum storage include jars, plastic containers, buckets, or pots. Mason jars are an excellent option, because they come in a range of sizes and are available in most places. Gaskets can often be made with strips of rubber to make a container airtight.
Regardless of the material you use, two main factors must be considered:
- Whether or not the container is airtight.
- How easily the container can be connected to a pump or other technology that is used to draw a vacuum.
Technologies for vacuum-sealing
Air can be removed from a container of seeds in multiple ways. We present several options in the remaining sections of this Technical Note. None is a perfect solution for every context. Consider the following factors when selecting a method for vacuum sealing seeds:
- Cost and availability of local materials. Materials that can be found locally are easy to replace and cost less than materials that have to be purchased elsewhere.
- Level of difficulty. Aim for an approach that is easy to use and replicate, and that does not require complex modifications.
- Usage level. Consider how often you need to vacuum seal seeds, and in what quantity. A functioning seed bank would likely require that a vacuum be drawn on many batches of seeds throughout the year, so a seed bank would probably need a more robust technology than an individual farmer or gardener would need.
Bicycle Pump Vacuum Sealer
The content of this section is adapted from a PowerPoint by Niemeet Chompoothong and Brock Mashburn. We include steps for modifying a bicycle pump in Thailand, supplemented with information from Tim Motis to reflect pump designs available to ECHO in Florida.
Important principles
Not all bicycle pumps are designed the same way. Some are harder to modify than others. If possible, view the valve assembly at the end of the pump rod before buying a pump, so you get an idea of how difficult the pump will be to modify. If drilling is required, view the information shown in step 5 of modifying a pump (in the section below), but also consider a technology other than a bicycle tire pump. A bicycle vacuum pump typically costs around 20 USD or less.
Supplies
- Bicycle pump
- Scissors
- Tape
- Pliers
- Glue
- Pen
- Jars
- Tire valve stem
- Drill/drill bits
- Inner tube rubber
- Tubing
- Valve core removal tool
Steps in modifying the pump
Instructions are given for two pump models available in Florida (Bell [Air Attack 350] and Air Master [Bomba Manual]) and one pump model available in Thailand (Tesco). We hope that the methods shared here will apply to a range of pump designs, and that they will spark further improvements that fit your context. One type of pump not presented here has a hollow rod with no threads on the end; we have not found a good way to modify this type of pump.
Step 1. Remove the original hose/tube from the base of the pump (Figure 1).
|
|
|
|
|
Figure 1. Bell and Air Master pumps (left and middle photos, respectively) with original tubing, and the Air Master pump with original tube disconnected (right). |
||


Step 2. Attach alternate tubing to the bicycle pump (Figures 2 and 3).
Tubing is available in most hardware stores. Look for tubing with an inner diameter of 5/16 inch (Figure 2). Cut the tubing at 1.2 to 1.5 m, long enough to operate the pump on the floor with a seed container on a table or shelf. Attach one end to the base of the bicycle pump, as described in Figure 3. The other end will be attached to a PVC cap (see step 10).
|
|
|
Figure 2. Tube with an inner diameter of 5/16 inch (7.94 mm) fits well over a bicycle tire valve stem. This is useful if a bicycle tire valve is used to connect the hose to the pump (Figure 3) and/or to a seed container (Figure 4). |

|
Figure 3. Alternate tubing attached to three different pump models. |
||
|
Bell (Air Attack 350) |
Air Master (Bomba Manual) |
Tesco |
|
|
||
|
Push tubing through the black, cone-shaped, threaded plastic nut (part of the original tube). Then screw the plastic nut onto the base of the pump; the nut will hold the tubing in place as long as the tubing is wide enough for a tight fit. |
The original tube on this pump lacked a nut to secure a new tube. However, a plastic inflator like the red one shown here can be used. These are used for inflating things like plastic balls and air mattresses. Its threads are finer than those on the base of the pump, but with a pliers, the plastic inflator piece can be threaded into the base of the pump by force. Then the new tubing can be pushed on to the end of the inflator piece. |
Another option, as shown for this pump, is to use an empty tire valve stem; shown above is a valve stem with the core removed and threads oriented towards the bottom. Screw the stem into the base of the pump. Alternatively, you can It is also possible to simply insert small-diameter tubing directly into the hole at the base of the pump, using strong glue such as super glue. |

Step 3. Remove the pump rod (Figure 4).
The pump rod must be removed to expose the piston valve assembly at the end of the rod. The handle can remain attached to the rod.
|
Figure 4. Removal of the pump rod and handle for three different pump models. |
||
|
Bell (Air Attack 350) |
Air Master (Bomba Manual) | Tesco |
|
|
||
|
Must remove a small screw, after which the piece that holds the rod in place can be lifted off. |
On the Air Master and Tesco pumps, the top of the pump cylinder is threaded. Thus, the tops can simply be removed by rotating them counter-clockwise. | |

Step 4. Remove parts associated with the pump valve assembly (Figure 5).
|
Figure 5. Piston valve parts for three different pump models, prior to reversing the direction in which they are oriented on the pump rod. |
||
|
Bell (Air Attack 350) |
Air Master (Bomba Manual) | Tesco |
|
|
||
|
Apart from the rubber O-ring, the valve on this pump is one piece. |
The valve assembly for both the Air Master and Tesco models is made up of more than one part. | |

Step 5. Modify the piston valve to reverse the direction of air flow (Figure 6).
Modifying the piston valve as shown in Figure 6 has the effect of creating a vacuum when the pump handle is pulled upwards.
|
Figure 6. Reversed piston valve parts for three different pump models, after reversing their orientation on the pump rod. |
||
|
Bell (Air Attack 350) |
Air Master (Bomba Manual) | Tesco |
|
|
||
|
For both the Bell and the Air Master models, you will need to drill through a portion of the piston valve. As shown for the Air Master model, start with a drill bit that is slightly smaller in diameter than that of the pump rod. As necessary, use a larger drill bit to widen the hole, until it is just big enough for the threads on the end of the pump rod to rotate through (creating new threads on the sides of the piston valve that was just drilled). A hole that is too wide will ruin the valve assembly; it will slide freely up and down the pump rod, rendering it useless for drawing a vacuum. |
A benefit of the Tesco pump is that no drilling is needed. Simply remove the nut at the end of the pump rod and re-assemble the parts in reverse order. First slide the perforated metal plate (A) on to the pump rod, then the barrel washer (B), followed by the rubber/leather piece (C), solid metal plate (D), and nut (E).
|
|

Step 6. Obtain a tire valve stem (Figure 7).

Figure 7. Valve stem cut from a bicycle inner tube.
If possible, find a used, old tire inner tube from which the valve stem can be cut. In the U.S., valve stems for tubeless car tires can be purchased from hardware stores, but these are typically thicker at the base than at the top end. An inner tube valve stem, whether from a car or bicycle, is more likely to have a uniform thickness, making it easier to connect them to tubing or PVC (explained later).

Figure 8. Examples of valve-core removal tools. NOTE: The longer red tool is easier than the other tool for swapping valve cores in and out of PVC end caps (used to connect to a seed container as explained later).
Step 7. Remove the valve core from a tire valve stem (Figure 8).
This must be done to modify the valve core as a check valve. The easiest way to remove the core is with a valve core removal tool. If you do not already have one, it is well worth spending 2 to 5 USD at most any hardware store to obtain one. Figure 8 shows two different types.
Insert the valve core tool into the valve stem and rotate counter-clockwise (Figure 9).
|
Figure 9. Removing the valve core from a tire valve stem, using a valve core removal tool. |
||
|
|

Step 8. Modify the valve core to create a one-way check valve.
|
Figure 10. Example of two different types of Schrader valve cores. |
|
|
|
The spring has already been removed from the long (left) valve core shown here; on a new core, the spring would be seen in the area indicated by the arrow from the black circle. The spring in a new short (right) type is embedded inside the casing indicated by the arrow from the red circle. |

A one-way check valve is necessary to prevent loss of vacuum between pump strokes. To create a one-way check valve, you will need to modify the valve core by removing a spring. It is difficult to pull air through the valve core with the spring left in place.
Most valve cores are “Schrader” types. Long Schrader valve cores have an exposed spring that can easily be cut and removed. However, at this writing (2018) most valve cores sold in hardware stores and tire repair shops are short and have the spring inside (Figure 10).
To create a one-way check valve with a short Schrader valve core, follow the steps below:
A. Saw through a portion of the valve stem to expose the spring (Figure 11).
B. Remove the spring from the valve core, without destroying other parts of the core (Figure 11).
C. Screw valve core, minus the spring, back into the valve stem (Figure 12).
|
Figure 11. Exposing the spring from a short schrader bicycle valve stem core. |
|
|
|
Expose the spring by securing the core in a vise and using a small hack saw to cut it just below the threads; rotate the core and cut until the spring is exposed, as shown on the right. Do not saw off the pin that runs through the core. |

|
Figure 12. Removal of the spring in a short Schrader valve. |
||
|
|
||
|
Use a thin piece of metal (e.g. a bent paper clip, hook or pin) to pull out enough of the spring to grip and pull it off with a pliers. |
Valve core before (left) and after (right) modifying it by removing the spring. Once the spring is removed this step is complete; no glue is necessary. | Thread the modified valve core back into the tire valve stem with the top of the pin (just above the threaded portion in the middle photos) facing up. Thus, the core is oriented the same way as it was originally before removing and modifying it. Using the valve core tool, turn the core clockwise until it fits tightly within the valve stem. |
|
Test the newly-created check valve (far right) by alternately blowing and sucking air through it. Air should only be able to pass from the shiny/metal side of the valve stem to the black side of the stem (not vice versa). |
||

Step 9. Modify a PVC end cap.
|
Figure 13. Drilling a hole in a PVC cap. |
|
|
|
|
|
A 1¼ inch (32 mm) wide PVC end cap. |
Drilling with a 5/16 inch (7.94 mm) bit.
|

Select a PVC end cap that will fit over a small hole (explained later) in the lid of your seed container(s). This piece will be used to connect the vacuum pump to the lid of a seed container, allowing you to remove air from the container. To modify a PVC end cap for use in a bicycle vacuum pump, do the following:
A. In the top of the PVC cap, drill or melt a hole (Figure 13) that is a little smaller in diameter than the bicycle tire valve stem. You want the connection between the two to be tight, to minimize leaks.
B. Insert and glue the check valve (created in step 8) into the PVC end cap. Figure 14 shows how to orient the check valve so that air moves in the proper direction.
C. Add a gasket to the PVC end cap (Figures 15 and 16). This can be made with inner tube rubber. The gasket creates an airtight connection between the lid of your seed container and the PVC end cap.
D. Allow time for the glue to dry; this will depend on the type of glue used.
|
Figure 14. Using PVC cement to glue the check valve stem into the PVC end cap. |
|
|
|
 |
|
Insert the tire stem with the metal end of the stem facing downwards. This orientation is required for proper function as a check valve. |
Glue the inside of the cap with PVC cement, to melt the rubber of the tire stem to the PVC. The outside can also be glued for a tight seal. |

|
Figure 15. Using a pencil and scissors to create a gasket from inner tube rubber. |
|
|
|
|
|
Draw a circle slightly smaller in diameter than the PVC cap to be conneced to the pump. Draw a slightly larger circle around the first circle. The diameter of the outer circle should be slighlty wider than that of the PVC cap to be connected to the pump. |
Using a scissors, cut just inside the inner circle. |

|
Figure 16. Gluing the gasket to the end of the PVC cap. |
|
|
|
 |
|
Apply a strong glue, such as super glue, to one side of the gasket. |
Place the PVC end cap onto the glued side of the gasket. After the glue dries, trim the outer edges with scissors. |

Step 10. Complete the pump by attaching the tubing (from Step 2) to the PVC cap.
The end of the tubing should fit tightly over the end of the valve stem that was glued into the PVC cap. Figure 17 shows several fully-modified bicycle pumps.
Figure 17. Assembled versions of the Bell (left), Air Master (middle), and Tesco (right) vacuum pumps.

To check your pump, with the bottom/gasket side of the PVC cap on the palm of your hand, draw up on the pump handle. As you operate the pump, you should feel the PVC cap draw up tightly against your hand. If the check valve is working properly, the PVC cap should still stick to your hand even on a down stroke, or when you stop operating the pump. The check valve works by gravity, so it will function best when a vacuum is drawn with the tire stem oriented vertically.
Operating a bicycle vacuum pump
Step 1. Make a small hole in the lid of a seed container (Figure 18).
This can be done by pounding a nail or sharp screw through the lid.
|
Figure 18. Mason jar with a hole in the lid. |
|
|
|
 |


Air needs to be pulled out of the jar with the pump, so do not press the tape over the hole.
Step 2. Place a piece of tape (duct, scotch, or electrical tape) over the hole in the lid (Figure 19).
Step 3. Press the PVC cap down over the tape, and draw upwards on the pump handle (Figure 20).
Press the PVC cap firmly down onto the container lid. Continue to operate the pump until up-strokes become difficult.
Step 4. Quickly remove the PVC cap (Figure 21).
After the air is evacuated from the jar, and the PVC cap is removed, the tape will be sucked down over the hole. Quickly pressing your finger over the tape helps to make sure there are no leaks. Pulling the cap off the lid can sometimes cause the gasket to become unglued from the PVC cap; if that becomes a problem, experiment with other glues or try sliding the PVC cap off to one side after a vacuum is drawn (rather than pulling it up and away). To make sure air has been removed from the jar, check to see if the lid curves down slightly, indicating that it is tightly drawn to the jar.


After drawing a vacuum, consider applying PVC cement or silicon glue over the tape that covers the hole in the lid, to ensure that the vacuum is maintained.
Modification of bicycle pump with fewer parts
It is possible to simplify the connection between the pump and a container of seeds, eliminating the need for tubing, valve-core check valve, and PVC end cap. With this approach, the pump cylinder connects directly to the seed container via the rubber donut-shaped gasket (Figure 22).
This modification involves the following steps:
Step 1. Remove the base of the pump, along with the original tube.
Step 2. Remove the pump rod and piston valve assembly, and modify the piston valve to reverse the direction of air flow (see steps 3, 4, and 5 explained earlier for modifying a bicycle vacuum pump to draw vacuum).
There should be no holes in the metal pump cylinder for air to leak through; if there are, wrap electrical tape around the cylinder to cover the holes.
Step 3. Create a donut-shaped rubber gasket (Figure 23), using scissors to cut a circle out of a piece of inner-tube rubber.
Step 4. Create a small hole in the seed container lid (Figure 23).
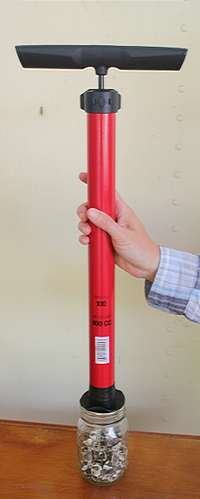
Figure 22. Tubeless bicycle vacuum sealer.
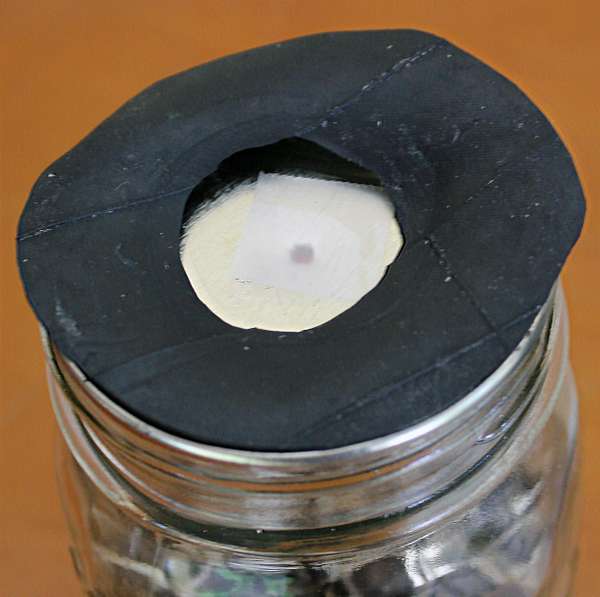
Figure 23. Rubber gasket over taped hole in container lid.
To operate the pump, place a small square of tape over the hole in the lid. Then place the gasket on top of the lid as shown in Figure 23. Operate the pump while pushing the pump cylinder downward against the rubber gasket. On the upstroke, air is drawn out of the container as vacuum pressure pulls the tape upwards. On the down stroke, the tape settles down against the hole of the lid, preventing loss of vacuum in the container. Thus, the tape serves as a simple check valve; electrical tape works best. With this version of a bicycle vacuum sealer, vacuum can even be drawn from narrow-necked bottles, as long as the bottle has an airtight cap (with tape over a small hole in the cap) and the pump cylinder can fit over the neck of the bottle.
Further reading on bicycle vacuum pumps
Bicksler, A. 2015. Bicycle Pump Vacuum Sealer for Seed Storage. ECHO Development Notes, Issue 126
An ECHO Development Notes article that describes the effectiveness of a modified bicycle pump for maintaining viability of lablab seeds in an earthen house.
Chompoothong, N. and B. Mashburn. Bicycle Pump Vacuum Sealer. Posted to ECHOcommunity.org in 2018.
A PowerPoint that details how a bicycle pump was modified for vacuum sealing by ECHO in Asia:
Thompson, K. 2016. Seed Saving in the Tropics: Lessons Learned from the Network. ECHO Asia Notes 28:1-3.
An article by Ken Thompson on airtight seed containers and low-cost vacuum pumps developed for use in rural Cambodia. It describes a bicycle vacuum pump with the bottom of the pump cylinder cut off; instead of using tubing and a PVC end cap to connect the pump to a seed container, the open end of the cylinder is fitted directly on to a bottle or larger container. This article also describes a variation of the bicycle pump made with PVC pipe.
Syringe vacuum pump
A syringe vacuum pump is very simple and easy to make. It is also inexpensive; a 60-ml syringe costs about 1 USD. The following steps to assemble a syringe vacuum pump are from the above-mentioned article by Thompson (2016). The steps are also demonstrated on an ECHO Asia video called Syringe Vacuum Pump: An Appropriate Technology for Seed Saving.
Steps to make a syringe vacuum pump
Some syringes are made specifically for food sealing, but plastic 60-ml syringes are more widely available. Based on the above-mentioned video and ECHO Asia Note 28, I assembled a syringe pump as follows:
Step 1. Saw the top off of a 60-ml syringe (Figure 24).
Sand the rough edges of the cut syringe, with sandpaper or even a rough piece of wood.
Step 2. Add a release valve to the syringe.
When the plunger of the syringe is pulled upwards, air is drawn out of the seed container. When the plunger is pushed back down, we want that air to exit through the release valve instead of back into the container. To equip the syringe with a release valve, do the following:
a) Use a thumb tack to make a hole a half centimeter or so up from the sawed-off end of the syringe (Figure 25).
b) Cut a small square of inner tube rubber and tape it over the hole (Figure 26).

 Make the cut as straight as possible. A crooked or jagged cut will make it difficult to form a leak-free connection with your seed container.
|
Figure 26. Small, square piece of rubber taped over a hole near the cut end of the syringe, to create a release valve. |
||
|
|
||
|
Cut a piece of rubber that is about 1.5 cm square. |
Place the square piece of rubber, indicated by the red arrow, on a piece of electrical tape. | Press the tape down to hold the rubber piece in place over the hole in the syringe. |

When the syringe handle is pulled upwards, the resulting suction closes the release valve. When the syringe handle is pushed downwards, air passes through this hole.
Step 3. Create a one-way check valve.
A one-way check valve ensures that air cannot go into the jar when the plunger is pushed downwards. Instead, the air is forced out of the syringe through the release valve created in the previous step. The one-way valve is made with a small piece of electrical tape placed over a small hole in the lid of your seed container (Figure 27). When the plunger is pulled up, the tape lifts up slightly, allowing air to be withdrawn from the jar. When the plunger is pushed back down, the tape presses up against the lid, preventing air from entering the jar.
|
Figure 27. One-way check valve for a syringe vacuum pump. |
|
|
|

|
|
Hammer a small nail or sharp screw through the lid of your seed container to create a small hole (indicated by the red arrow). |
Place a small piece of electrical tape (1 cm2 or less) over the hole. |

Step 4. Make a gasket (Figure 28).
A gasket is needed to make a leak-proof connection between the bottom of the syringe and the lid of your seed container. Cut a hole into a piece of inner tube rubber. The size of the hole needs to be slightly smaller in width than the piece of electrical tape used as a one-way check valve (Figure 26). Place the gasket over the one-way valve.
How to operate the syringe vacuum pump

To operate the pump, press the syringe down firmly onto the gasket (Figure 29). At the same time, pull up on the plunger. You should feel resistance at first, followed by the sound of air being withdrawn from the jar as the tape from the one-way check valve in the lid lifts up. As you push the plunger back down, you should feel or hear air exiting through the release valve in the side of the syringe. Pump the plunger up and down multiple times until it becomes noticeably harder to pull up on it. When you withdraw the syringe from the gasket, the tape for the one-way valve should keep the vacuum. Add additional tape or glue to reinforce the tape over the hole in the jar lid, to help maintain the vacuum.
Vacuum pressure can be measured by attaching a hypodermic needle to a tube, and connecting that tube to a vacuum gauge. The gauge shown in Figure 30 measures vacuum pressure on a scale from 0 to 70 cm mercury (Hg). Removing all of the air from a container would give a reading close to 70 cm Hg. After seven strokes of a syringe pump attached to the empty mason jar in Figure 29, I measured between 20 and 25 cm Hg of vacuum pressure. More air can be withdrawn using a bicycle vacuum pump than with a syringe vacuum pump; we have measured 40 to 50 cm Hg with bicycle vacuum pumps.


Brake bleeder vacuum pump
Brake bleeder pumps, available in most automotive parts/supply stores, are used to service brake systems of automobiles. Hand-operated bleeder pumps can be purchased for 15 to 25 USD. Though probably more expensive than a bicycle pump, a hand-operated brake bleeder pump comes equipped with a vacuum gauge and is already built to draw a vacuum.
Modification for use with seeds
No check valve is need, since the pump is already made to draw a vacuum. Depending on the parts that come with the hand-operated bleeder pump, you may need to modify it slightly in order to connect the pump to a container of seeds. Figure 31 illustrates the use of a PVC end cap to facilitate this connection.
|
Figure 31. Brake bleeder pump with original (left) and modified (right) connection apparatus. |
|
|
|
|
|
This pump came with a rubber suction cup at the end of the tubing. This allows for removal of air from a container, but air will re-enter the container once the suction cup is removed. |
Here the suction cup is replaced with a PVC end cap, equipped with a rubber gasket (see Figures 11 to 14 for how to construct). Since no check valve is needed, all that is needed to connect the tubing to the PVC is a bicycle tire valve stem with the core removed. |

Operating a brake bleeder pump
As shown in Figures 18 and 19, place a piece of tape loosely over a small hole in the container lid, to allow air out of the container but not back in. Press the PVC cap on to the lid, over the tape, and squeeze the pump multiple times (Figure 32). As you operate the pump, the gauge will show the resulting vacuum pressure. A brake bleeder pump is capable of drawing a vacuum equal to or greater than that drawn by a bicycle vacuum pump. Operate the pump until clockwise movement of the needle in the gauge slows down (stronger vacuum pressure becomes more difficult to achieve with continued operation of the pump). Then remove the PVC cap as shown in Figure 21.
Kitchen food sealers and related items
A number of kitchen food sealers (Figure 33) are available for purchase. Depending on size and features, they range in cost from about 50 to 200 USD. They require electricity and appropriately sized plastic. Vacuum-sealing in plastic bags instead of containers like jars is an attractive option for seeds that have to be transported; the weight and bulk of a solid container is eliminated. As mentioned earlier, a limitation is that the plastic can be pierced by seeds with sharp edges.


Small hand-held bag sealers are also available at a cost of about 15 USD. The one shown in Figure 34 requires electricity, but it can be charged with an adaptor for cordless operation. An accessory that costs about 10 USD can facilitate connection between the sealer and a mason jar. It should be possible to bypass the jar sealer accessory by connecting the tubing it comes with to a PVC cap, as is possible for the brake bleeder pump (Figures 31).
Commercial vacuum sealer
A commercial vacuum sealer (Figure 35) is the most expensive option, ranging in cost from 500 USD up to 1500 USD or even more. Similar to kitchen food sealers, commercial vacuum sealers remove air from plastic packaging, but they do so with more control over vacuum speed and pressure. Of all the methods discussed, these are able to create the strongest vacuum (approximately 60 cm Hg).


Final thoughts
Though more kinds of vacuum sealers exist, this technical note emphasizes the vacuum sealing options with which ECHO staff are most familiar. Hopefully one or more of these technologies will be practical for your situation. Though vacuum-sealing methods vary in how much air they can remove, they all exclude humidity and reduce oxygen levels, which helps to extend seed life. As you experiment with the use of vacuum for storing seeds, keep in mind that seed viability is best preserved when humidity exclusion and air removal are combined with practices that keep temperatures cool and stable—such as storing seeds in insulated containers or structures.
References
Bicksler, A. 2015. Bicycle Pump Vacuum Sealer for Seed Storage. ECHO Development Notes, Issue 126
Chompoothong, N. and B. Mashburn. Bicycle Pump Vacuum Sealer. Posted to ECHOcommunity.org in 2018.
Groot, S.P.C., L. de Groot, J. Kodde and R. van Treuren. 2015. Prolonging the longevity of ex situ conserved seeds by storage under anoxia. Plant Genetic Resources 13: 18-26.
Lawrence, B., A.J. Bicksler, and K. Duncan. 2017. Local treatments and vacuum sealing as novel control strategies for stored pests in the tropics. Agronomy for Sustainable Development 37:6
Ohlrogge, J.B and T.P. Kernan. 1982. Oxygen-Dependent Aging of Seeds. Plant Physiology 70(3):791-794
Thompson, K. 2016. Seed Saving in the Tropics: Lessons Learned from the Network. ECHO Asia Notes 28:1-3
Cite this article as:
Motis, T. 2019. Vacuum-Sealing Options for Storing Seeds. ECHO Technical Note no. 93.