OVERVIEW
Concrete is a strong and inexpensive construction material when it is properly prepared and used. This introduction explains the importance of a good mixture and describes the materials used in the mixture. Following this are entries on:
- Calculating amounts of materials for concrete
- Mixing concrete by machine or by hand
- Testing concrete mixtures
- Making forms for concrete
- Placing concrete in forms
- Curing concrete
- Making quick-setting concrete
- Useful sources of information on concrete
Concrete is made by combining the proper proportions of cement, water, fine aggregate (sand), and coarse aggregate (gravel). A chemical reaction, hydration, takes place between the water and cement, causing the concrete to harden or set rapidly at first, then more slowly over a long period of time.
Importance of a Good Mixture
After concrete has set, there is no simple non-destructive test to find out how strong it is. Therefore, the entire responsibility for making concrete as strong as a particular job demands rests with the supervisor and the people who prepare, measure, and mix the ingredients, place them in the forms, and watch over the concrete while it hardens.
The most important factor in making strong concrete is the amount of water used. Beginners are likely to use too much. In general, the lower the ratio of water to cement, the stronger the concrete will be. <see figure 1>
The proper proportioning of all materials is essential. The section on "Calculating Amounts of Materials for Concrete" provides the necessary information.
Aggregates: Gravel and Sand
To make strong concrete, the coarse aggregate (gravel) and fine aggregate (sand) must be the right size, have the right shape, and be properly graded.
Coarse aggregate sizes can vary from 0.5cm (1/4") to 4 or 5cm (1 1/2" or 2") in diameter. The maximum size depends on the nature of the work. In general the largest particles should not be more than one-fourth the thickness of the smallest dimension of the section. Sand can vary from sizes smaller than 0.5cm down to, but not including, silty material.
Very sharp, rough, or flat aggregate should not be used in concrete. The best aggregate is cubical material (from a rock crusher) or rounded gravel (from a stream bed or beach).
Proper grading means that there are not too many grains or pebbles of any one size. To visualize this, think of a large pile of stones all 5cm (2") in diameter. There would be spaces between these stones where smaller pebbles would fit. We could add to the pile just enough smaller stones to fill the largest spaces. Now the spaces would be smaller yet, and even smaller pebbles could fill these holes; and so forth. Carried to an extreme, the pile would become nearly solid rock, and only a very small amount of cement would be needed to fill the remaining spaces and hold the concrete together. The resulting concrete would be very dense, strong, and economical.
It is extremely important that the aggregate and sand be clean. Silt, clay, or bits of organic matter will ruin concrete if too much is present. A very simple test for cleanliness makes use of a clear wide-mouth jar. Fill the jar to a depth of 5cm (2") with the fine aggregate (sand) and then add water until the jar is three quarters full. Shake the mixture vigorously for a minute. The last few shakes should be sideways to let the sand level off. Then let it stand for three hours. If there is silt in the sand, it will form a distinct layer above the sand. If the layer of very fine material is more than 3mm (1/8") deep, the concrete will be weak. <see figure 2>
If there is too much fine or silty material, another source of sand should be found. If this is impractical, it is possible to remove the fine particles. This can be done by putting the sand in a container like a drum. Cover the sand with water, stir or agitate vigorously, let it stand for a minute, then pour off the liquid. A few such treatments will remove most of the fine and organic matter.
In very dry climates, the sand may be perfectly dry. Very dry sand will pack into a much smaller volume than sand that is moist. If 2 buckets of water are added to 20 buckets of bone dry sand, you can carry away about 27 buckets of damp sand. If your sand is completely dry, add some water to it.
Another point to consider in selecting an aggregate is its strength. About the only simple test is to break some of the stones with a hammer. If the effort required to break the majority of stones is greater than the effort required to break a piece of concrete of about the same size, the aggreage will make strong concrete. If the stone breaks easily, the concrete made of these stones will be no stronger than the stones themselves.
Water
The water used to prepare concrete must be clean, and free of organic matter. Water acceptable for drinking is preferable. Any clear, fresh water is acceptable. Salt water may be used if fresh water is not readily available, but it will reduce the strength of concrete about 15 percent.
If you must use dirty or muddy water, let the water settle in a large pan or tank to remove most of the dirt.
Cement for concrete, if it is a U.S. brand, comes in 42.6kg (94 pound) sacks, and is 28.4 liters (exactly 1 cubic foot) in volume. It must be kept perfectly dry prior to use, or the chemical action will begin and the cement will be ruined.
Mixing the materials, getting them in place rapidly, tamping or compacting to a dense mixture, and proper curing are important parts of the construction process. These will be discussed in the sections on mixing and curing concrete.
Concrete reinforced with steel rods is used for structures such as large buildings and bridges. Proper design of reinforced concrete and placement of steel reinforcing is a complex procedure that requires the help of a trained engineer.
CALCULATING MATERIALS FOR CONCRETE
Three methods are given here for finding the correct proportions of cement, water, and aggregate for concrete:
- A "Concrete Calculator" fold-out chart
- Using water to estimate proportions
- A "rule of thumb"
Using the Concrete Calculator
The amounts of materials needed for a concrete construction job can be estimated quickly and accurately with the "Concrete Calculator" chart. The chart is given in both English (Chart A) and metric (Chart B) units.
To use one of the charts, you must know:
- + The area of concrete needed in square meters or square feet.
- The thickness of concrete needed in centimeters (inches).
- The kind of work to be done (see below).
- The wetness of the sand (see below).
To use the calculator, follow these steps:
- + Make a light pencil mark on Scale 1, representing the area of concrete needed. If the volume is less than 400 liters or 15 cubic feet, multiply it by a convenient factor (for example, 10); then, when you find the amounts of materials the chart says to use, divide them by the same factor to get the actual amounts needed.
- Make a similar mark on Scale 2, the slanted scale indicating thickness.
- Draw a straight line through the two marks intersecting Scale 3 to find the volume of concrete needed.
(If the shape of the area is complex, measure it in sections, add up the volumes of all the parts and mark the total volume on Scale 3.)
- + Mark the kind of work on Scale 4. A line through the marks on Scales 3 and 4 to Scale 5 will give the amount of fine aggregate needed.
- Continue on a zig-zag course as shown in the KEY to calculate the rest of the materials.
- Add 10 percent to the amounts indicated by the chart to allow for wastage and miscalculation.
- If the mix is too wet or too stiff, see page 312 for instructions on adjusting it. Materials can be measured in buckets. Most buckets are rated by the number of gallons they hold. To convert to liters, multiply gallons by 3.785. To convert to cubic feet: 1 cubic foot = 7.5 gallons. A 4-gallon bucket would hold 15.15 liters or 0.533 cubic feet.
NOTES
NOTES The definitions used in the chart are:
Kind of Work:
"5" means "5-gallon paste" (5 gallons or 19 liters of water to one sack of cement), for concrete subjected to severe wear, weather, or weak acid and alkali solutions. An example is the floor of a commercial dairy.
"6" means "6-gallon paste," for concrete that is to be watertight or subjected to moderate wear or weather. Examples: watertight basements, driveways, septic tanks, storage tanks, structural beams and columns.
"7" means "7-gallon paste," for concrete not subjected to wear, weather, or water. Examples: Foundation walls, footings, and mass concrete where water tightness and abrasion resistance are not important.
Fine Aggregate:
Sand or rock screenings up to 0.5cm (1/4") in diameter. It should be free from fine dust, loam, clay, and organic matter or the concrete will be weak. The particles should vary in size.
Coarse Aggregate:
Pebbles or broken rock from 0.5cm (1/4") up to 4 or 5cm (1 1/2" or 2"). Nothing larger than 2cm (3/4") should be used with a 5-gallon paste.
Condition of Sand:
Dry: feels slightly damp but leaves very little water on the hands. Average: feels wet, leaves a little water on the hands. Wet: dripping wet, leaves a lot of water on the hands.
Gallons: Chart A is based on the U.S. gallon (0.835 Imperial Gallon).
Using the Water Displacement Method
The "Concrete Calculator" chart assumes that the aggregate is well graded. When the aggregate is not well graded, an alternate method can be used to find the correct proportions for a concrete mixture. The advantage of this method is that only a small sample of the ungraded aggregate needs to be divided into coarse and fine particles.
Well-graded aggregate seldom occurs naturally. Some "pre-mix" processing would be needed to grade it.
Remember that when you make concrete, you are filling the spaces in the aggregate with cement mortar or paste. The amount of cement paste needed can be found by adding water to a known volume of aggregate. To do this:
- Divide a sample of the aggregate into coarse and fine particles by sifting it through a 0.5cm (1/4") screen.
- Fill a pail with the coarse aggregate (dry).
- Fill the pail with water. The amount of water used equals the amount of fine aggregate and cement paste needed to fill the spaces.
- Into another pail, put an amount of fine aggregate equal to the volume of water used in Step 3.
- Fill the pail with enough water to bring the water level to the top of the fine aggregate. The volume of water used equals the volume of cement paste needed to fill the remaining spaces. Add about 10 percent to this volume to allow for waste and to make the mix more workable.
- To find the correct ratios of materials, divide the volume of cement paste needed into the volumes of fine and coarse aggregates.
- Add these two ratios to get the ratio for ungraded aggregate. For example: If you are using a 19-liter (5-gallon) pail, and it takes 12.
- liters (3.4 gallons) of water to fill the pail in Step 3, put 12.8 liters (3.4 gallons) of fine aggregate in the second pail (Step 4). If Step 5 takes 6.4 liters (1.7 gallons) of water, this is the volume of cement paste needed. Divide this volume into the volumes of fine and coarse aggregates to get the ratios of materials: 19 liters (coarse aggregate) = 3 ----------------------------- 6.4 liters (cement paste) 12.8 liters (fine aggregate) = 2 ---------------------------- 6.4 liters (cement paste)
The sum of the two ratios is 5, so the ratio of ingredients in this case is 1:5, or 1 part cement paste to 5 parts ungraded aggregate, by volume.
To find the ratio of water to cement, see "Kind of Work" page 309. For directions on adjusting a mixture that is either too wet or too stiff, see page 312.
Using "Rule of Thumb" Proportions
For a variety of small concrete construction tasks and for repair and patch-work, the following simple "rule of thumb" can be used as a simple guideline.
Use the ratio 1:2:3, by volume, to proportion the cement and aggregate and use a water-cement ratio of 6 gallons water to 1 sack of cement. That is, for every sack of cement (28.4 liters or 1 cubic foot) used, add 56.8 liters (2 cubic feet) of fine aggregate and 85.2 liters (3 cubic feet) of coarse aggregate. Add 28.7 liters (6 gallons) of water for each sack of cement.
A home-made box of 28.4-liter (1-cubic foot) volume will help in proportioning the mixture. The volume of concrete produced by a one-sack batch using the proportions given above will be about 142 liters (5 cubic feet).
The most common mistakes made by inexperienced persons are using too much cement, which increases the cost, and using too much water, which produces weak concrete.
MIXING CONCRETE
Concrete must be thoroughly mixed to yield the strongest product. For machine mixing, allow 5 to 6 minutes after all the materials are in the drum. First, put about 10 percent of the mixing water in the drum. Then add water uniformly with the dry materials, leaving another 10 percent to be added after the dry materials are in the drum.
Making a Mixing Boat or Floor
On many self-help projects, the amount of concrete needed may be small or it may be difficult to get a mechanical mixer. Concrete can be mixed by hand; if a few precautions are taken, it can be as strong as concrete mixed in a machine.
Tools and Materials
Lumber, 2 pieces: 183cm x 91.5cm x 5cm (6'x 3' x 2") Galvanized sheet metal: 183cm x 91.5cm (6'x 3') Nails, Saw, Hammer
Or:
Concrete for a mixing floor: about 284 liters (10 cubic feet) of concrete is needed for a 244 cm (8') diameter mixing floor that is 5cm (2") thick with a 10cm (4") high rim Shovel
The first requirement for mixing by hand is a mixing area that is both dean and water-tight. This can be a wood and metal mixing boat (see Figure 3) or a simple round
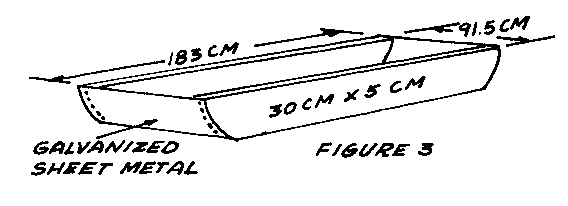
concrete floor (see Figure 4).
The ends of the wood and metal mixing boat are curved to make it easier to empty. The raised edge of the concrete mixing floor prevents loss of water while the concrete is being mixed.
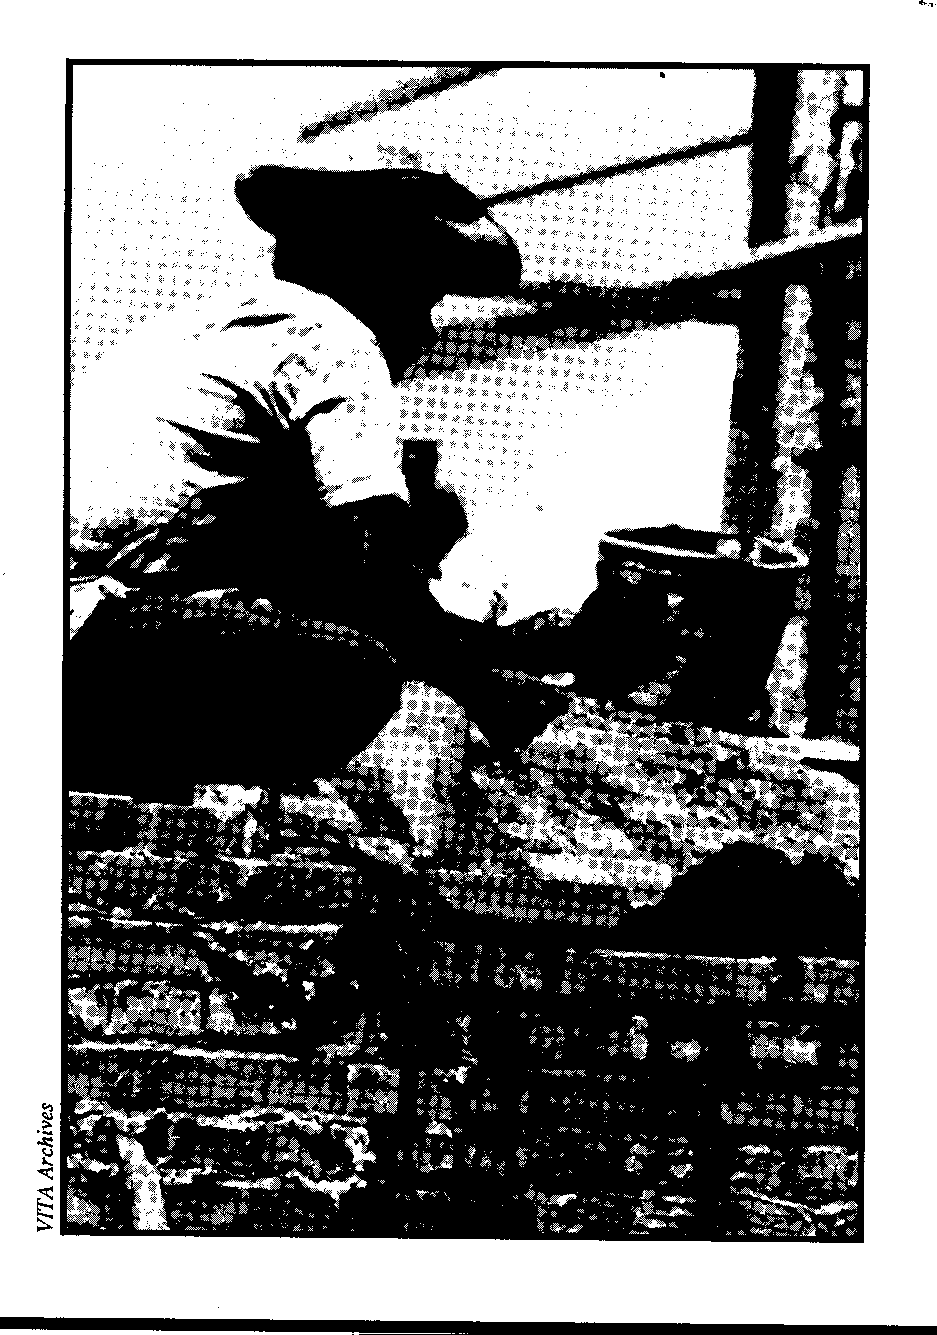
The procedure is:
- Spread the fine aggregate evenly over the mixing area.
- Spread the cement evenly over the fine aggregate and mix these materials by turning them with a shovel until the color is uniform.
- Spread this mixture out evenly and spread the coarse aggregate on it and mix thoroughly again.
- Form a hollow in the middle of the mixture and slowly add the correct amount of water and, again, mix thoroughly.
The mixture should be placed in the forms within 20 minutes after it is completely mixed.
When work is finished for the day, be sure to rinse concrete from the mixing area and the tools to keep them from rusting and to prevent cement from caking on them. Smooth shiny tools and boat surfaces make mixing surprisingly easier. The tools will also last much longer. Try to keep from getting wet concrete on your skin because it is caustic. If you do, wash it off as soon as possible.
A workable mix should be smooth and plastic--neither so wet that it will run nor so stiff that it will crumble.
If the mix is too wet, add small amounts of sand and gravel in the proper proportion, until the mix is workable.
If the mix is too stiff, add small amounts of water and cement, maintaining the proper water-cement ratio, until the mix is workable.
Note the amounts of materials added so that you will have the correct proportions for subsequent batches.
If a concrete mix is too stiff, it will be difficult to place in the forms. If it is not stiff enough, the mix probably does not have enough aggregate, which is uneconomical.
Slump Tests
Slump Cone
A "slump cone" is a simple device for testing a concrete mixture to see that it has the right proportion of materials.
Tools and Materials
Heavy galvanized iron sheet: 35.5cm x 63.5cm (14 1/8" x 25 1/2") Iron strap: 3mm x 2.5cm x 7.5cm (1/8" x 1" x 3") 4 pieces 16 Iron rivets: 3mm in diameter and 6mm long Wooden dowel: 16mm in diameter and 61cm long
Testing
To perform the test:
+ Dampen the slump cone and set it on a flat, moist, non-absorbent surface. Stand on the clips at the bottom of the cone to hold it down. + Fill the cone in three layers approximately equal in volume. Because the diameter at the bottom of the cone is large, the first layer should fill the cone to about one-fourth its height. + Stroke each layer 25 times with the wooden dowel. + After the top layer has been stroked with the dowel, smooth the surface of the concrete so the cone is filled exactly. + Carefully lift the cone off the concrete. + Place the empty cone along-side the concrete. Measure the difference between the height of the cone and the height of the concrete. This difference is the slump.
Suggested slumps for various types of construction are:
+ Reinforced walls and footings: 5cm to 13cm (2" to 5") + Unreinforced walls and footings: 2.5cm to 10cm (1" to 4") + Thin reinforced walls, columns and slabs: 7.5cm to 15cm (3' to 6') o Pavements, walkways, culverts, drainage structures, and heavy mass concrete: 2.5cm to 7.5cm (1' to 3')
Correcting the Mixture
If the slump is not within the desired range, or if the mixture is obviously either too fluid or too stiff, the proportions of the mixture must be changed. To make the mixture more fluid and increase the slump, increase the proportion of water and cement without changing the water-cement ratio. To make the mixture stiffer and decrease the slump, increase the proportion of the aggregates without changing the fine aggregate-coarse aggregate ratio. Do not add just water to make the mix more fluid; this will weaken the concrete.
MAKING FORMS FOR CONCRETE
Fresh concrete is heavy and plastic. Forms for holding it in place until it hardens must be well braced and should have a smooth inside surface. Cracks, knots, or other imperfections in the forms may be permanently reproduced in the concrete surface.
Wood is commonly used for forms, because of its light weight and strength. Since cracks between boards can mar the concrete surface, plywood, which has a special high-density overlay surface, is often used. The finish on plywood provides a smooth casting surface and makes it easier to remove the forms for reuse.
If unsurfaced wood is used for forms, oil or grease the inside surface to make removal of the forms easier and to prevent the wood from drawing too much water from the concrete. Do not oil or grease the wood if the concrete surface will be painted or stuccoed.
Forms for flat work, such as pavements, may be 5cm x 10cm (2" x 4") or 5cm x 15cm (2" x 6") lumber, the size depending on the thickness of the slab. Stakes spaced 122cm (4') apart hold the forms in place.
Figures 9 and 10 show forms for straight-wall construction. To prevent the forms
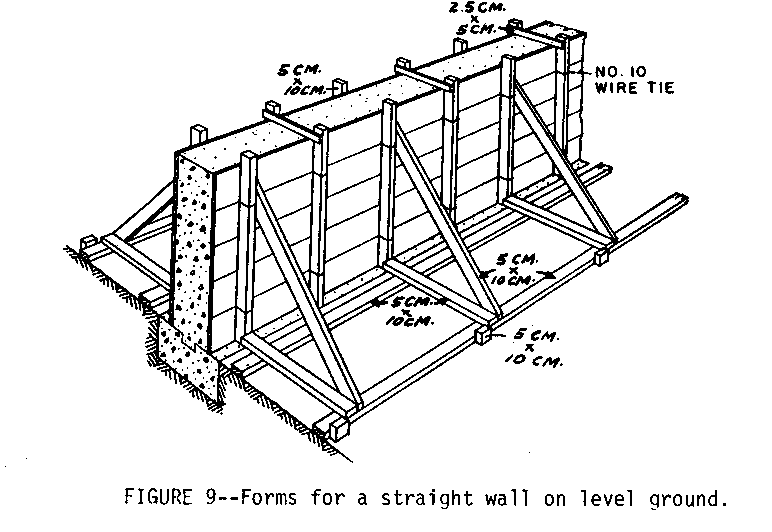
from bulging, opposite studs should be tied together with 10- to 12-gauge wire, which should be twisted to draw the form walls tight against wooden spacer blocks. (The blocks are removed as the concrete is placed.)
The ties should be spaced about 76cm (2 1/2') vertically on the studs. When the forms are removed, clip the wires close to the concrete and punch them back. Pit holes caused by punching back the wires should be pointed up with mortar.
Forms should be easy to fill with concrete and easy to remove once the concrete has hardened. Screws or double headed nails which can be taken out easily can be a great help in removing wooden forms without damaging the concrete.
Forms are sometimes made of other materials. For example, metal forming is more economical for repeated work, such as curbs, slip forming for monolithic concrete tanks or silos, and reinforced concrete floors for multistory buildings.
The finest natural finish on a concrete surface can be obtained by casting on polyethylene. Sometimes polyethylene forms are used for decorative work, or a kraft paper with a polyethylene film surface is used as form finer.
PLACING CONCRETE IN FORMS
To make strong structures, it is important to place fresh concrete in the forms correctly. The wet concrete mix should not be handled roughly when it is being carried to the forms and put in the forms. It is very easy, through joggling or throwing, to separate the fine aggregate from the coarse aggregate. Do not let concrete drop freely for a distance greater than 90 to 120cm (3' to 4'). Concrete is strongest when the various sizes of aggregates and cement paste are well mixed. The concrete mix should be firmly tamped into place with a thin iron rod (about 2cm or 3/4" in diameter), a wooden pole, or a shovel.
CURING CONCRETE
When the forms are filled, the hard work is done, but the process is not finished. The concrete must be protected until it reaches the required strength. It starts to harden almost immediately once the water is added, but the hardening action may not be complete for several years.
The early stage of curing is extremely critical. Special steps should be taken to keep the concrete wet. In temperate climates, the mixture should be kept wet for at least 7 days; in tropical and subtropical climates, it should be kept wet for at least 11 days. Once concrete dries, it will stop hardening; after this happens, rewetting will NOT re-start the hardening process.
Newly-laid concrete should be protected from the sun and from drying wind. Large areas such as floors or walls that are exposed to the sun or wind should be protected with some sort of covering. Protective covers often used are: canvas, empty cement bags, burlap, palm leaves, straw, and wet sand. The covering should also be kept wet so that it will not absorb water from the concrete.
Concrete is strong enough for light loads after 7 days. In most cases, forms can be removed from standing structures like bridges and walls after 4 or 5 days, but if they are left in place they will help to keep the concrete from drying out. In small ground-supported structures such as street drains, the forms can be removed within 6 hours of completion provided this is done carefully. Plans will usually say if forms should be left in place longer.
Concrete is usually expected to reach the strength for which it was designed after 28 days. Concrete that is moist cured for a month is about twice as strong as concrete that cures in the open air.
QUICK-SETTING CONCRETE
Quick-setting concrete is often useful; for example, when repeated castings are needed from the same mold. A concrete mixture that contains calcium chloride as an accelerator will set about twice as fast as a mixture that does not. The mixed batch must be put into the forms faster, but since quick-setting batches are usually small, this is not a problem. Calcium chloride does not lessen the strength of fully-cured concrete.
No more than 1kg (2 pounds) of calcium chloride should be used per sack of cement. It should be used only if it is in its original containers, which should be moisture-proof bags or sacks or air-tight steel drums.
To add the calcium chloride, mix up a solution containing 1/2kg per liter (1 pound per quart) of water. Use this solution as part of the mixing water at a ratio of 2 liters (2 quarts) per sack of cement (42.6kg or 94 pounds). Solid (dry) calcium chloride must never be added to the concrete mix; only use it in solution.
Sources:
VITA Volunteers:
John Bickford, Connecticut; Robert D. Cremer, New York; Kenneth D. Hahn, California; R. B. Heckler, Florida
A Building Guide for Self-Help Projects, Accra, Ghana: Department of Social Welfare and Community Development, 1961.
Design and Control of Concrete Mixtures, Chicago: Portland Cement Association
Use of Concrete on the Farm, Farmers' Bulletin No. 2203, Washington, D.C.: U.S. Department of Agriculture, 1965.
Other Useful Publications:
Basics of Concrete, Ideas and Methods Exchange No. 49, Washington, D.C.: U.S. Department of Housing and Urban Development, Division of International Affairs
Concrete Technology: Student Manual, Albany, New York: Delmar Publishers
Hobbs, Wesley. Making Quality Concrete for Agricultural and Home Structures, University, Addis Ababa, Ethiopia: Haile Sellassie
Useful sources of information on concrete, including how-to-do-it manuals:
Portland Cement Institute 18 Kew Road Richmond Johannesburg, South Africa
Instituto del Cemento Portland Argentino San Martin 1137 Buenos Aires, Argentina
Cement and Concrete Association of Australia 147-151 Walker Street North Sydney, Australia, N.S.W.
Associacao Brasileria de Cimento Portland Caixa Postal 30886 Sao Paulo, Brazil
Cement and Concrete Association 52 Grosvenor Gardens London, S.W. 1, England
The Concrete Association of India P.O. Box 138 Bombay 1, India
Portland Cement Association 33 West Grand Avenue Chicago, Illinois 60610 USA