VITA 1600 Wilson Boulevard, Suite 500 Arlington, Virgnia 22209 USA Tel: 703/276-1800 . Fax: 703/243-1865 Internet: pr-info@vita.org
ACKNOWLEDGEMENTS
VITA acknowledges, with deep thanks and appreciation to the author, this very special contribution to its development work.
Handloom Construction was written and illustrated by Joan Koster--educator, anthropologist, artist and weaver. Koster, a long-time VITA Volunteer, has provided assistance through VITA to loom builders and weavers around the world. VITA is very pleased to be able to offer a portion of Koster's work collected in one manuscript.
Special thanks go also to VITA Volunteer Virginia Palmer for her review and comments, to Margaret Crouch and Laurel Druben of the VITA staff for editorial work, to VITA staffer Carolyn Marcus, whose skill at layout and page design so well highlighted the author's excellent work, and to VITA Volunteer Kit Cone, for typesetting services.
Mt. Rainier, Maryland USA 1979
TABLE OF CONTENTS
INTRODUCTION
1 Which Loom to Build?
Fibers: Choice and Preparation
What Products to Weave?
The Looms
Table I
Table II
Table III
2 A Weaver's Dictionary
3 The Simple Frame Loom
Materials Needed
Construction
How to Weave on a Frame Loom
Variations of the Simple Frame Loom
How to Weave on a Pegged Loom
4 The Inkle Loom
Materials Needed
Construction
Set Up the Loom for Weaving
How to Weave on an Inkle Loom
Steps in Weaving
5 The Foot-powered Loom
Pit Loom Version
Materials Needed
Construction
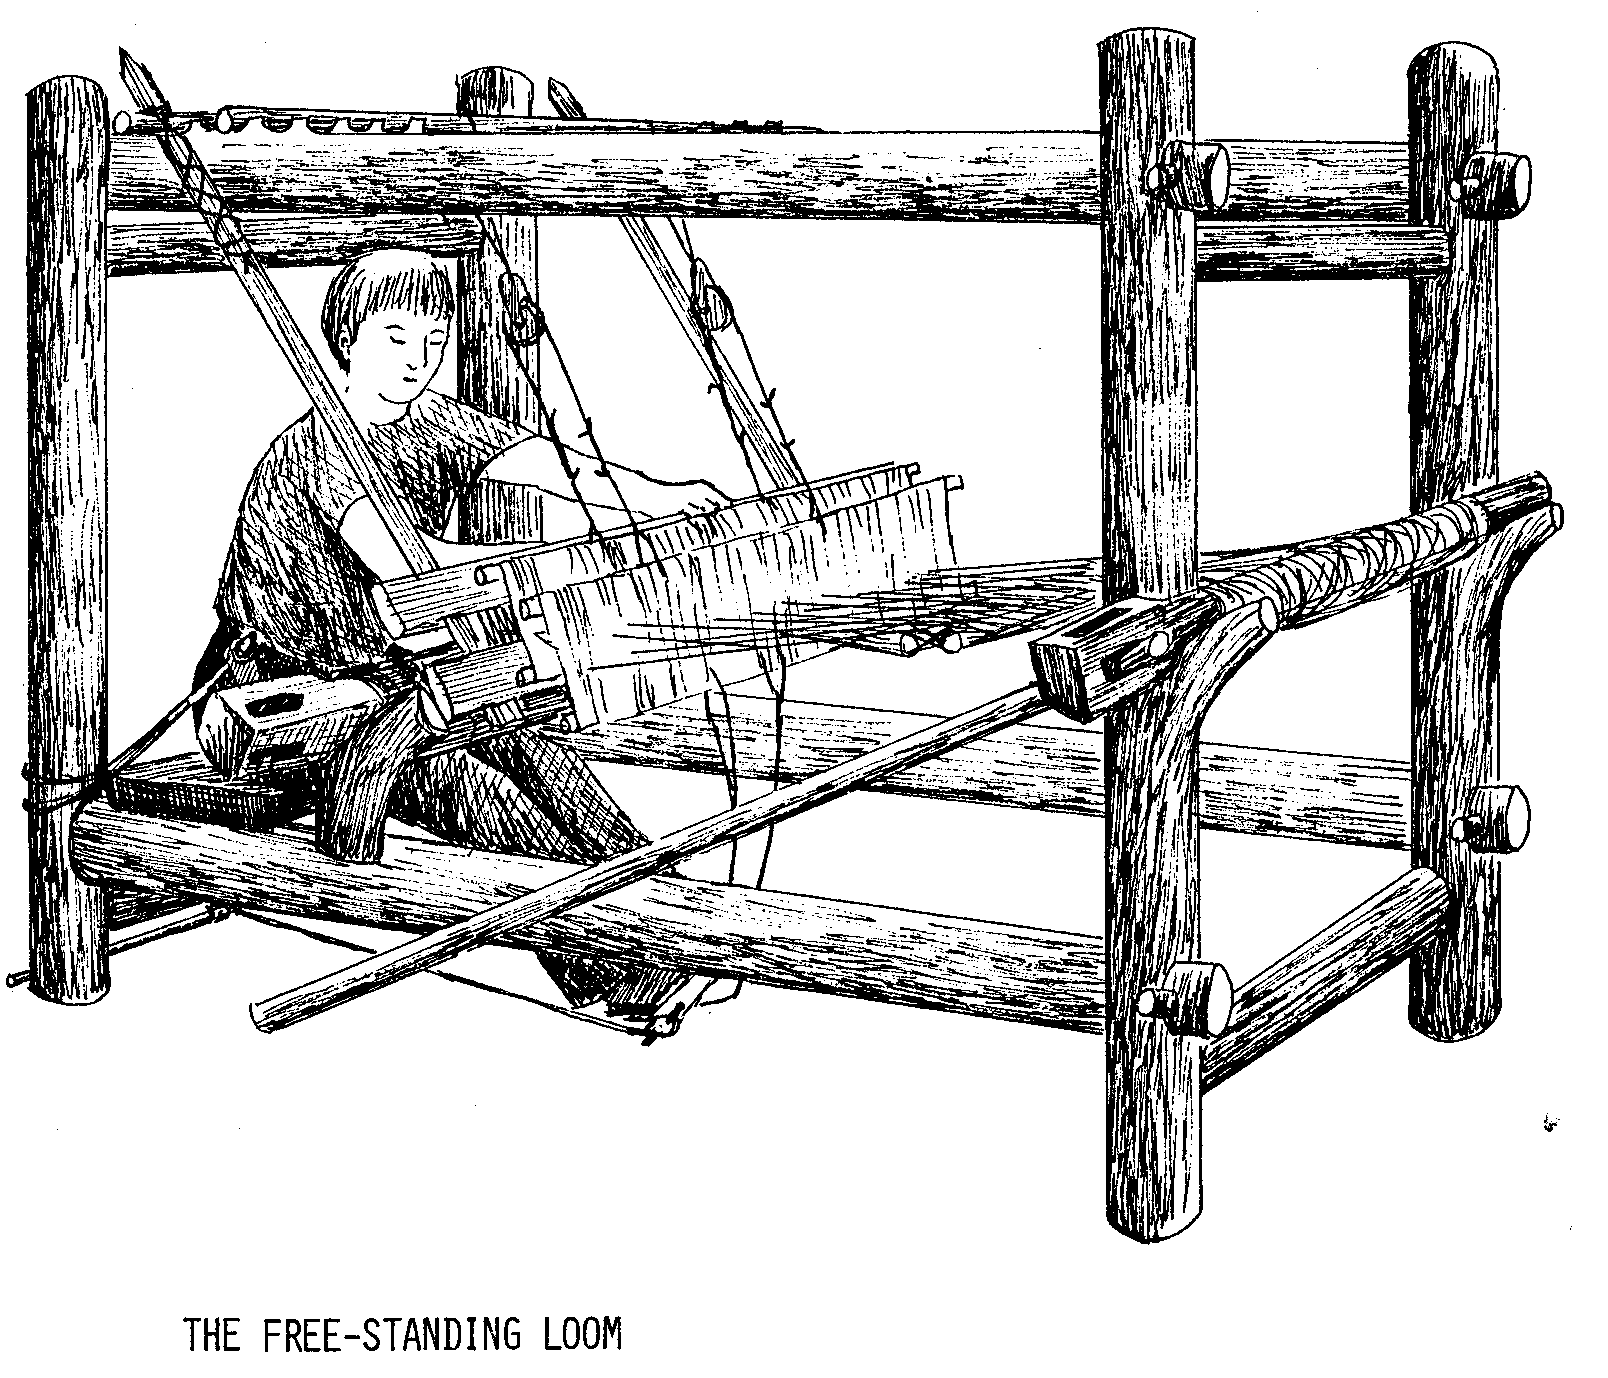
Free-Standing Loom Version
Materials Needed
Construction
The Moveable Parts for Both Loom Designs
Warp the Foot-Powered Loom
How to Weave on a Foot-Powered Loom
Steps in Weaving on Both Looms
6 The Weaver's Tools
The Beater
The Raddle
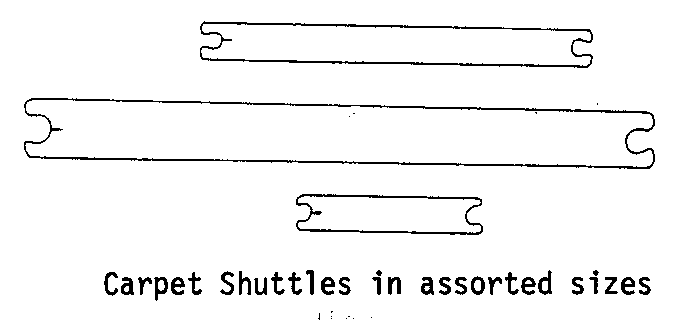
The Shuttles
The Skeiner
The Skein Winder
The Stretcher
The Warping Board for a Foot-Powered Loom
7 Weaves, Patterns and Finishing Touches
Planning the Fabric
Keeping Records
Facings
Warp-Faced Weave
Weft-Faced Weave
Balanced Weave
Color Pattern Weaves
Tapestry Weave
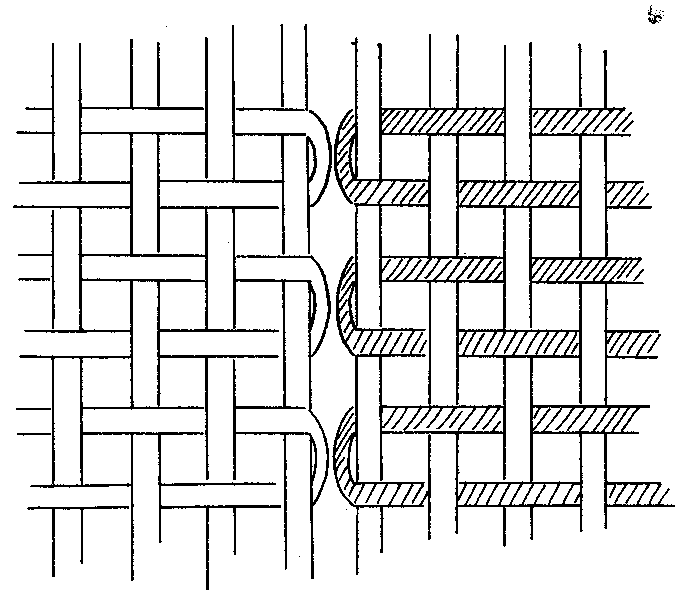
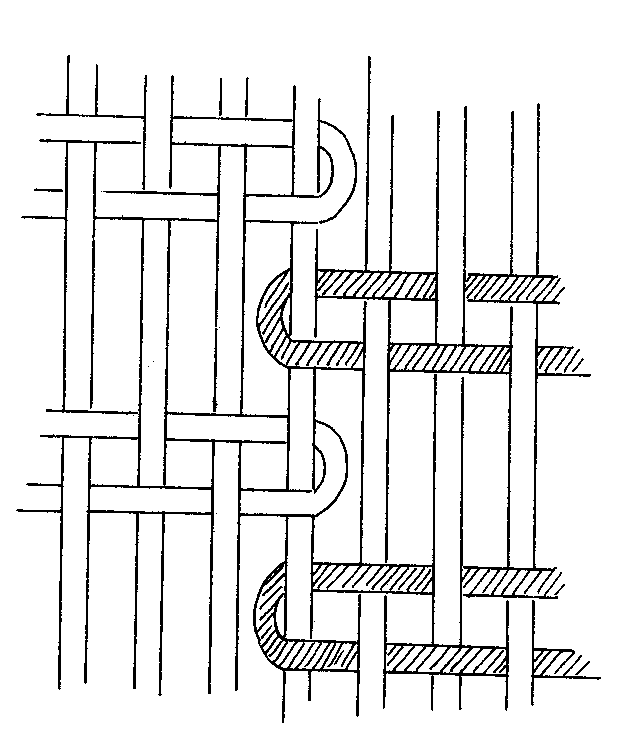
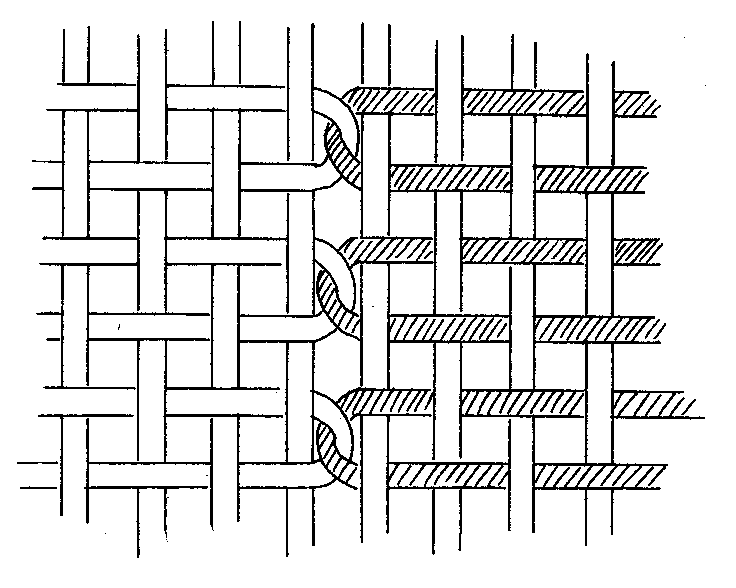
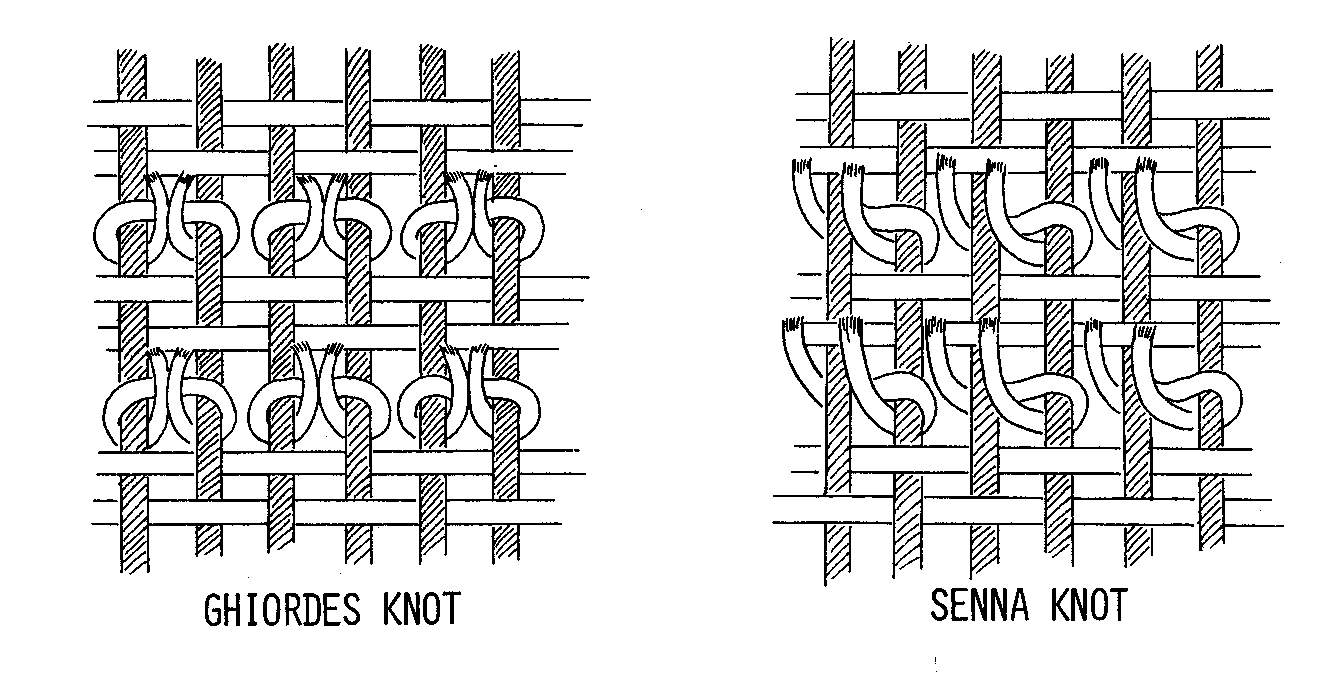
Knotted Weaves
Finishing Touches
8 Where to Find More Information
Introduction
With inexpensive machine-made cloth increasingly available almost everywhere, it seems likely that fewer and fewer people will be interested in producing their own cloth. As a result, handweaving may be in danger of becoming a neglected craft. Yet there are many advantages to handweaving--particularly in the home and on a cottage industry basis.
Weaving can be done in one's spare time using free or inexpensive
fibers available locally, and simple, efficient looms can be built from local materials at little cost. Therefore, as long as the loom and fibers cost little, the finished cloth requires an investment in time rather than money.
There are other advantages as well. Handwoven cloth is often sturdier and longer wearing than manufactured cloth. It can be designed to meet special needs: sacks can be made in a size and shape that is easily carried and stored; mats and rugs can be made to fit individual rooms.
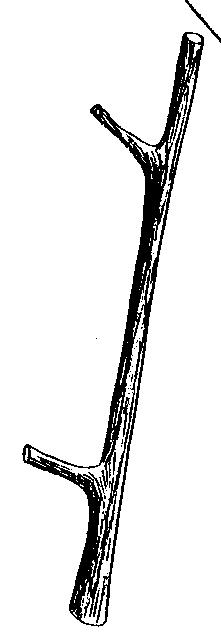
A simple loom made
from local materials.
Loomed products can provide extra cash income, especially for agricultural or herding families. Such products can be sold locally to people unable to weave their own cloth, to the tourist trade, or for export. Cloth and cloth products are relatively easy to store and ship, and they suffer little spoilage if cared for properly.
Because people all over the world have been weaving since the very earliest times, there are many styles and varieties of looms. This is a book about building and using some of these. Three types of looms, including two variations of a foot-powered loom, are presented here. The book gives 1) detailed directions for building each kind of loom, 2) the advantages and disadvantages of each, and 3) instructions for weaving.
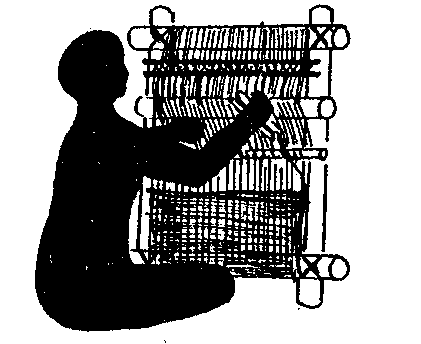
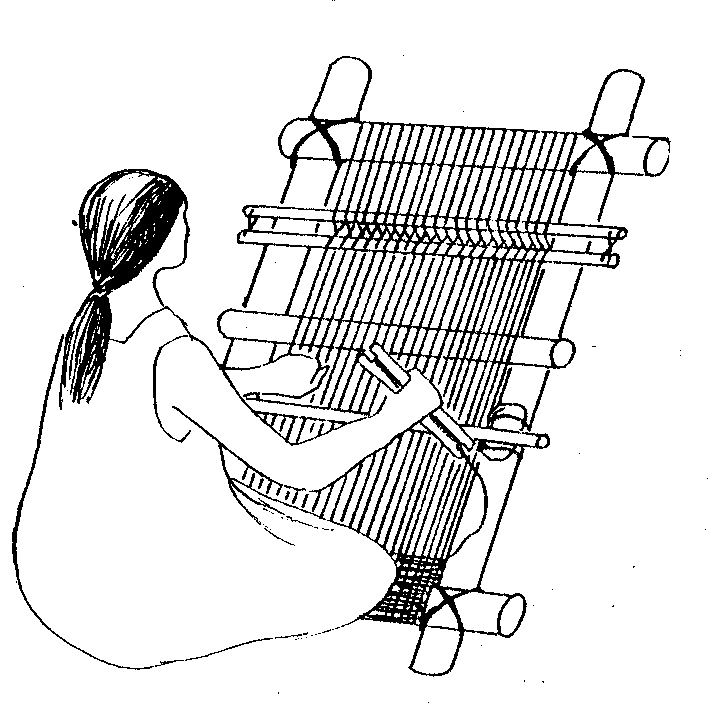
The most basic design for a loom is the simple frame loom. This loom has been used throughout the world by people as widely separated as American Indians and the villagers of Upper Volta. Foot-powered looms--sometimes called multiple harness looms--are those on which the weaver operates foot pedals to shift moveable parts of the loom, making it possible to weave more quickly and easily. Most foot-powered looms operate the same way but differ in the design of the frame that holds the loom. One version of this loom, called a pit loom, sits in a pit dug for the weaver's feet and the foot pedals. The pit loom described here, which is similar to looms used in Greece, Turkey, the Balkans, and northern India, can be supported by being attached to a wall or suspended from the ceiling. The free-standing loom, on the other hand, has its own supporting frame and a raised bench for the weaver. The free-standing loom depicted in this manual is like those used in Greece, the Balkans, Turkey, Iran, northern Europe and colonial America.
Read this manual carefully before deciding which loom to build. The manual has been written to assist with thinking about the questions which must be answered before a loom is built. For example:
-- What types of fibers are available and how much do they cost? -- What product or articles will be woven? -- If the handwoven article is to be sold, is there a market? -- If the articles are to be sold, can they be made and sold quickly enough to make the effort worthwhile? -- What materials are available for building the loom?
Once these factors--construction materials, purpose, fibers, and so on--have been considered, it will be much easier to decide which loom can or should be constructed.
This manual first describes briefly a range of fibers which can be used and then presents a brief summary of each of the types of loom, the construction materials needed and the products best produced. As a guide to the potential loom builder, the looms are then compared with each other in terms of all these factors. The first chapter provides a very good framework for making decisions concerning which loom is best for a given purpose. Chapter 2 is an illustrated dictionary of basic terms used by a weaver and throughout this manuscript.
Directions for construction and use of each type of loom are covered in Chapters 3, 4 and 5. Chapter 1 includes information on choosing, treating and spinning fibers. Other sections cover types of weaves and finishings, and weaver's tools. An annotated list of references is also included.
1 Which Loom to Build?
The decision to build one loom rather than another should be made after considering a number of questions.
What kind of cloth or article is to be made?
If there is only one kind of fiber available, then this fact can dictate the choice of product and the loom. If there is a variety of fibers, choose a loom that can handle those fibers used most often in the type of products or articles being produced.
What size cloth is needed?
Will all the cloth you make be the same width, or do you want to make articles of varying widths? Some looms can weave cloth of varying dimensions, but most weave only within certain limits for width and length.
How fast does the material have to be produced?
Will you be weaving for personal use or to meet market demands? In general, the more complex the loom, the faster it weaves. However, a weaver's skill can often compensate for the slower rate of a simple loom.
What materials are available locally for loom building?
In general it is almost always cheaper to build a loom than to buy one. In many places it may not be possible to find or import the type of loom needed. The basic construction material for simple looms is wood. Almost any kind of wood can be used as long as it is as straight as possible and well-seasoned. It need not be milled lumber. Tree limbs with the bark removed make excellent loom supports.
With an understanding of the basic principles of weaving and a little carpentry skill, the looms in this manual can be adapted to work with most materials available anywhere.
This chapter will help the user make the decision by providing information on each of these points, beginning with the discussion of fibers. This seems a good place to begin because it appears to be the case that few people realize the range and variety of materials which can be woven. Guidelines are provided for preparing fibers and for judging whether there is sufficient quantity to complete a product.
Fibers: Choice and Preparation
In order to compete with manufactured cloth, handwoven cloth must be made from free or inexpensive materials available locally. If weaving is done now, or was done in the past, learn which materials are used and how they are prepared. Fibers from domestic plants
and animals will usually be available in greater quantities than those from wild sources. However, sometimes grain straw or sugarcane residues can be used in weaving. Domesticated animals such as sheep, goats, rabbits, camels and many others can also provide quantities of useful fibers.
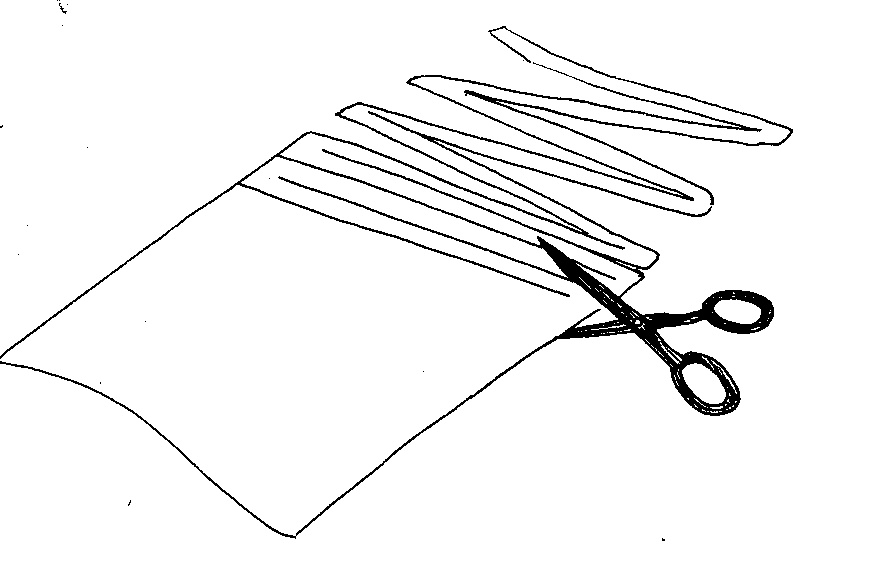
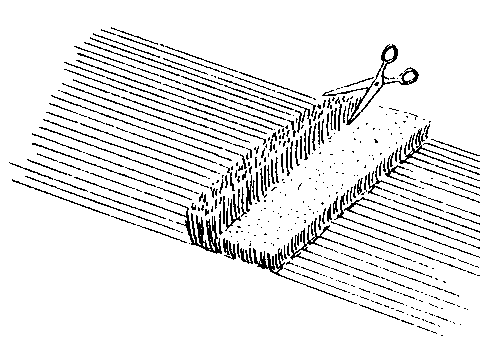
Experiment with new materials as well. Perhaps a nearby factory discards packing materials of natural fibers, synthetics or plastics. Sheets of plastic or old plastic bags can be cut into strips and woven to make waterproof mats and raingear. Old clothing and cloth can be cut into strips and woven into the rag rugs which are traditional in many parts of the world. <see picture>
Even cardboard and paper, when made into strips, can be woven.
Almost any fiber, if it is clean, pliable and either in strips or capable of being spun into thread, can be used in weaving; the range of materials that can be used is almost endless. The following list is just a sample of the variety of fibers and materials used in different parts of the world for weaving.
Sources of Materials for Weaving
ANIMAL/INSECT
VEGETABLE MAN-MADE
Buffalo
Amaryllidaceae-Agave, Sisal, Mauritius Hemp Acrylics Camel
Apocynaceae and Asclepiadociae-Milkweed Cardboard Cattle
Bombacaceae-Kapok Old Cloth Cat
Bromeliaceae-Kapok Paper Chinchilla
Bromeliaceae-Caroa, Pineapple, Spanish Moss Plastic Dog
Gratineae-Broomcorn Polyester Fox
Leguminosae-Sunn Hemp Rayon Goat
Liliaceae-Formio Flax, African Bowstring Guinea Pig
Linaceae-Flax Horse
Malvaceae-Bimili, Cotton, Henaf, Hibiscus, Mesta, Llama
Okra, Urena Musk Ox
Moraceae-Hemp, Paper Mulberry Opposum
Musaceae-Abaca, Banana Rabbit
Palmae-Coir (Coconut), Crin vegetal, Palmetto Racoon
Piassava, Toquilla Sheep Tiliaceae-Jute Basswood Silkworm
Thymeliaceae-Lace Bark Vicuna
Urticaceae-Ramie (China Grass) Yak Also various grasses, reeds and bamboos, as well as crop residues-grain straw, bagasse (sugarcane)
Preparing Fibers for Weaving
Part of the consideration of whether a certain fiber is appropriate for use is the quantity in which it is available and, of course, the amount of time and effort required to prepare it for weaving. The discussion here is not intended to be a complete guide to fiber preparation. Indeed, that will be the subject of another book. Rather, the purpose of this discussion is to give enough information on fiber preparation to enable wise decisions concerning the use of the looms to be described in this manual.
Very few fibers are ready for weaving in their natural state. Most require some special preparation to make them flexible or thin enough for weaving. Although each fiber requires specific handling, the following illustrations summarize the basic processes required by most fibers.
Fiber Preparation
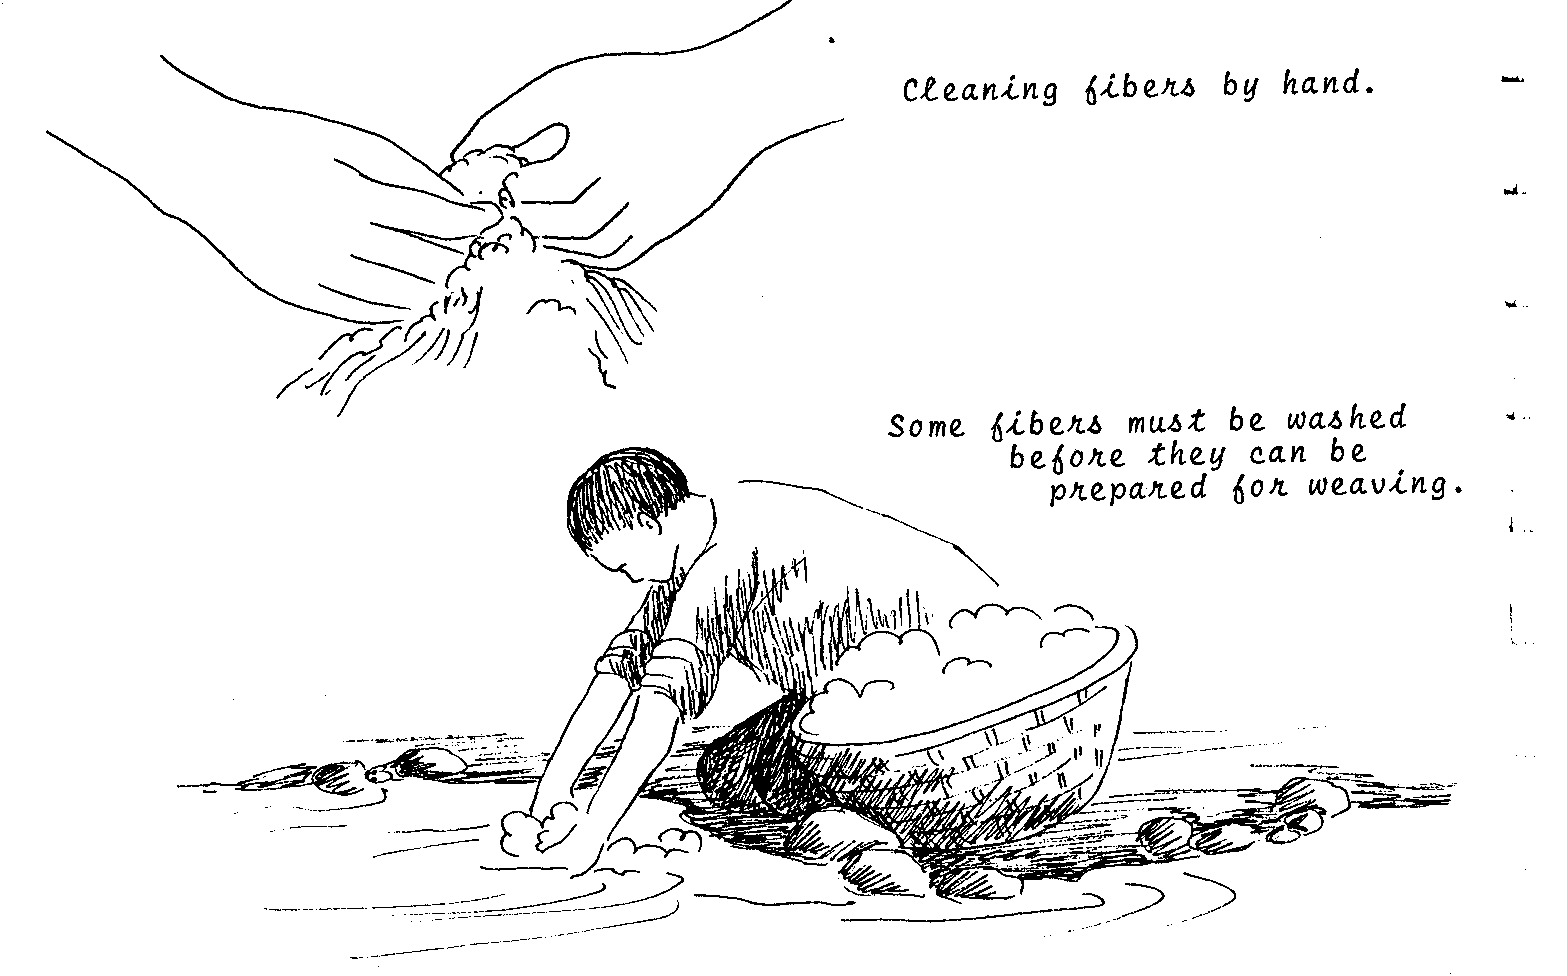
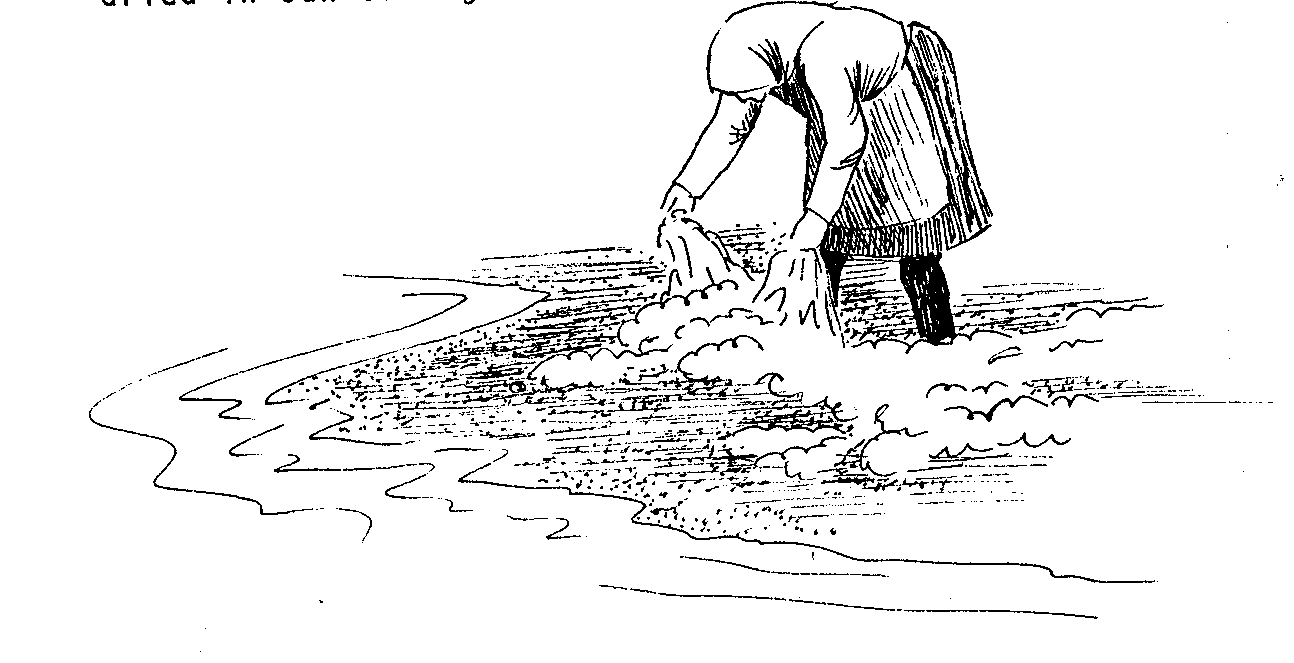
Cleaning - Most fibers must have dirt, seeds, sticky sap,
husks or oils removed. For some this involves washing or soaking.
Drying - Fibers that are washed or soaked usually are air-dried
in sun or light shade.
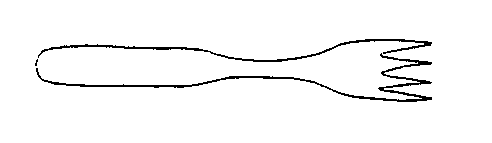
Combing - Fibers are drawn through a
toothed tool in a manner similar to combing one's hair. This straightens and smooths the fibers to prepare them for spinning.
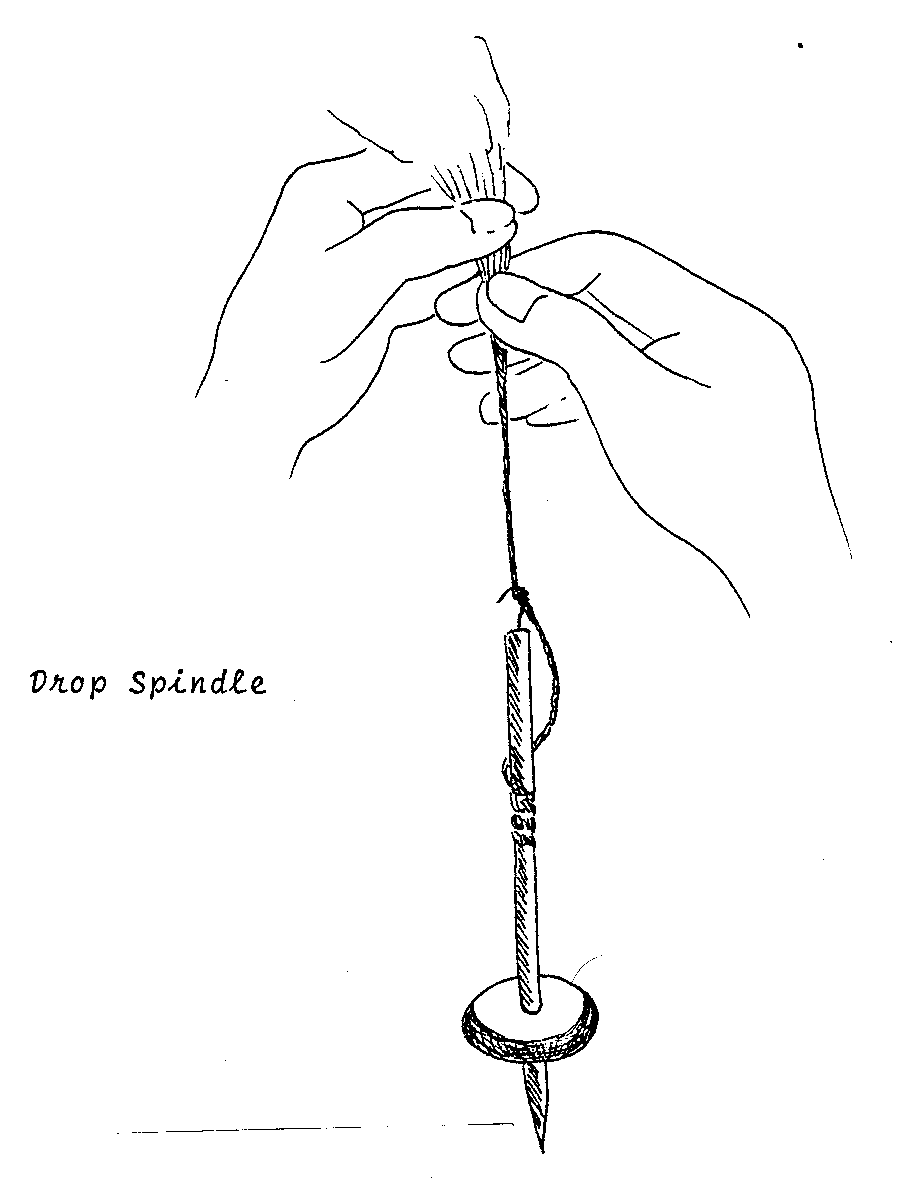
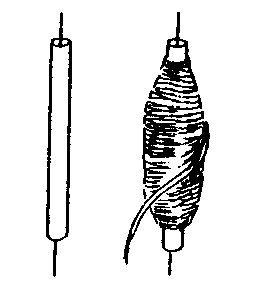
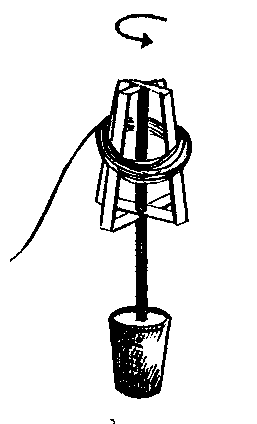
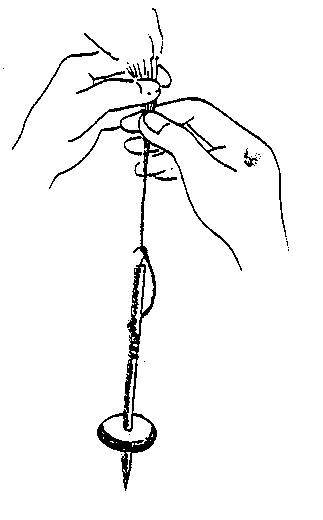
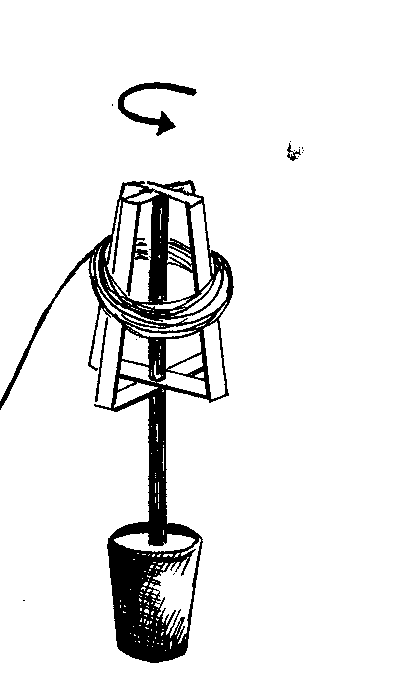
Spinning or Twisting -
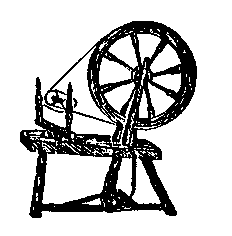
Spinning:some fibers, such as wool, hair and fluffy plant materials - cotton, flax, milkweed, etc. - can be made into continuous strands by spinning. Spinning involves pulling off small bits of the fiber and twisting them tightly together. This can be done with a drop spindle or spinning wheel as illustrated.
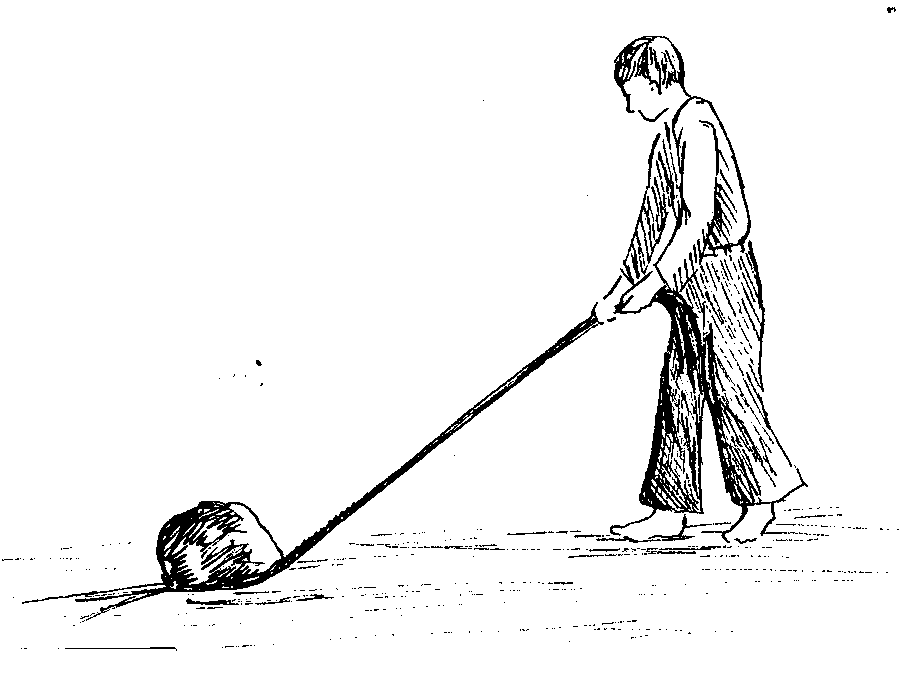
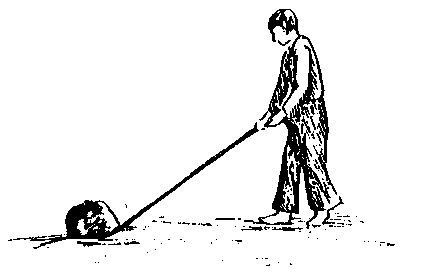
Twisting: strips of plant material - leaves, grasses, stalks, etc. - and of old cloth or plastic can be made thicker and stronger by placing a heavy weight on one end and turning the strip in one direction until it is round in circumference.
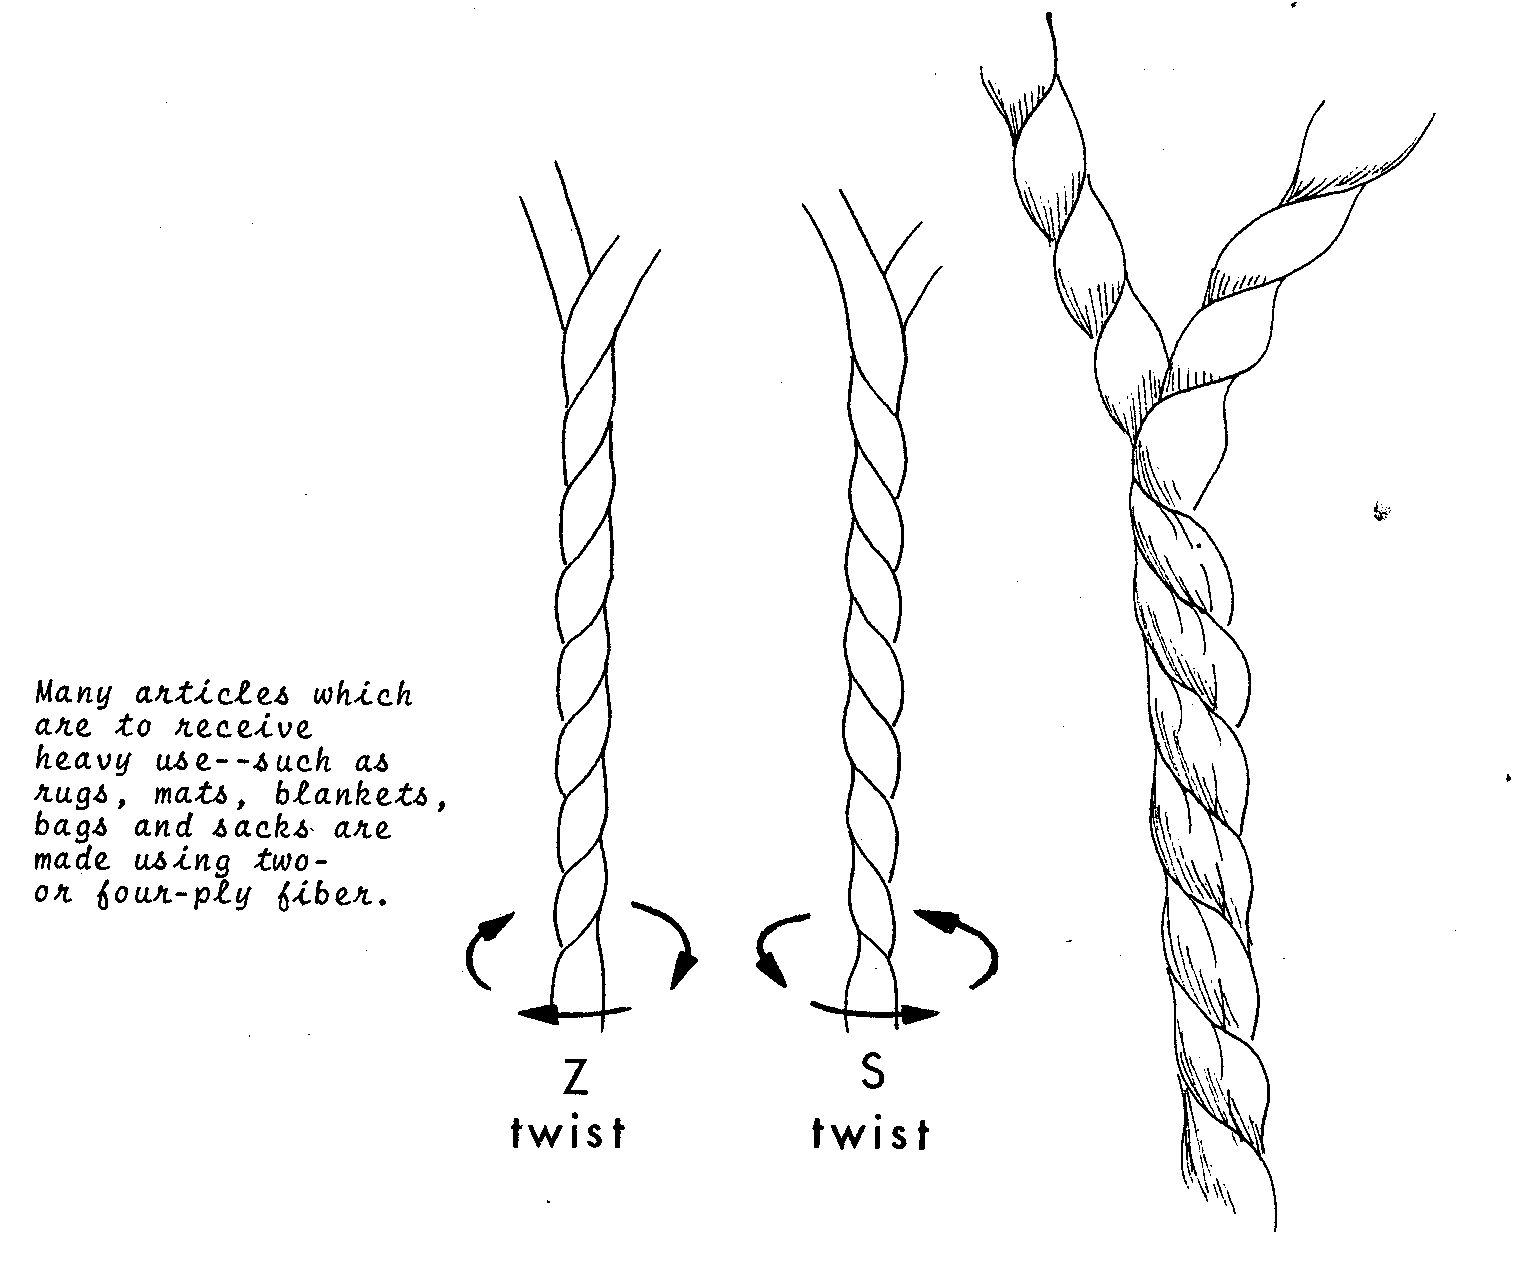
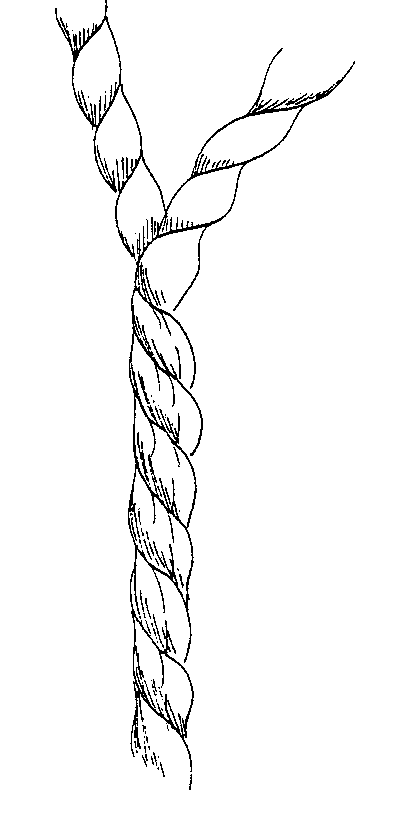
Plying - Fibers can be made
stronger by twisting together two or more strands. Spun or twisted fibers should be twisted in the direction opposite from which they were spun or twisted before. The same technique described for spinning or twisting can be used. Two-ply means the yarn is made of two strands, four-ply from four, etc.
The potential builder now has some idea of the range of materials which can be used for weaving and of the steps involved in preparing them. It is also important that the builder or user at this point have an idea of what needs to be woven and of how fast the articles must be completed.
Key to this knowledge is understanding of the kinds of products which can be woven out of which fibers and of how much material is necessary for a given product.
What Products to Weave
Many items can be woven. Some woven products are not finished on a loom, but must be sewn or fastened together after the material is woven on the loom. Bags, sacks, clothing are good examples. <see picture> Other products,
such as belts, mats and rugs can be almost completely finished on the loom. This is a time factor to be considered.
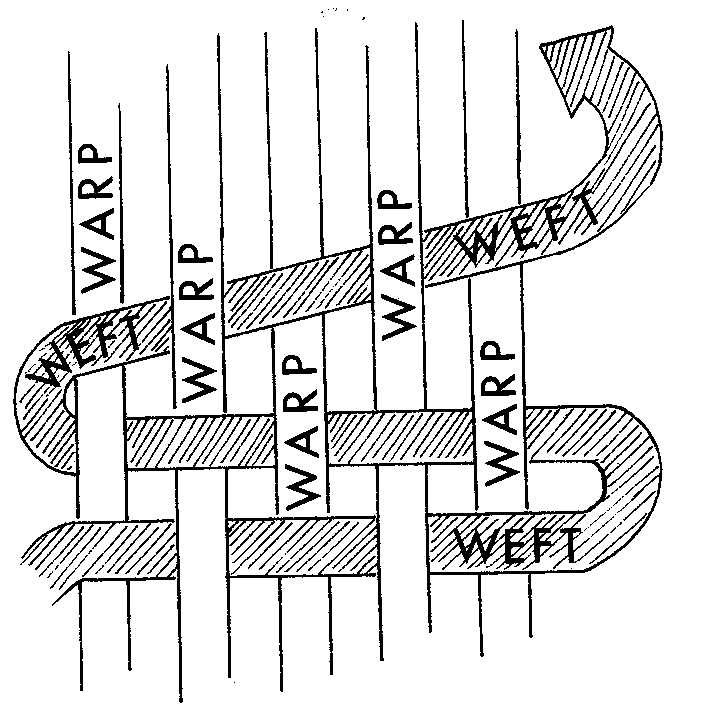
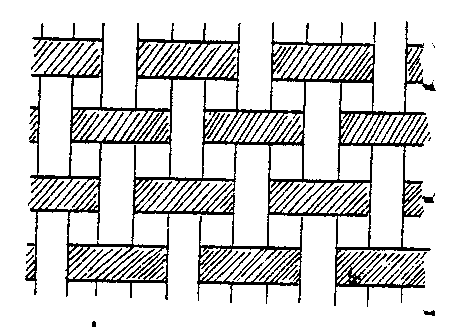
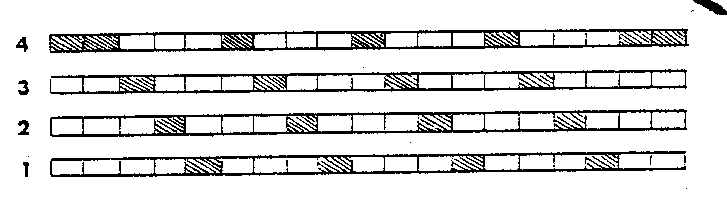
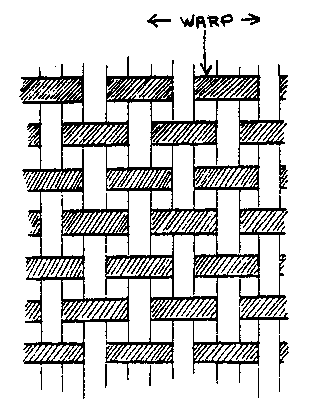
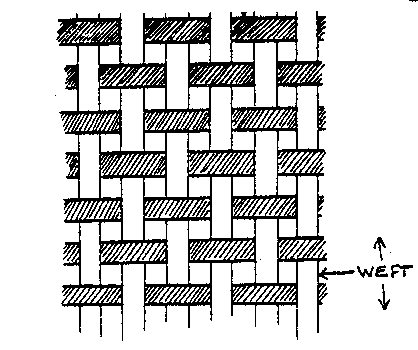
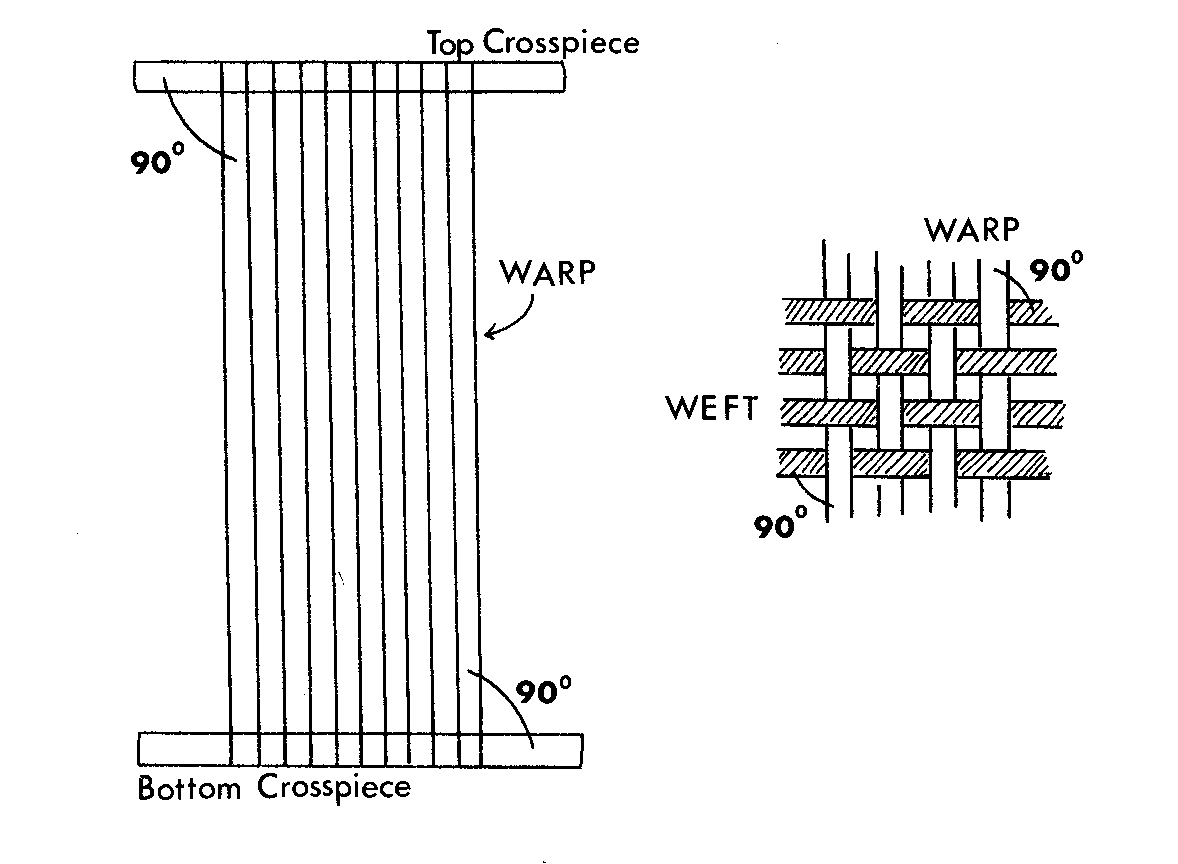
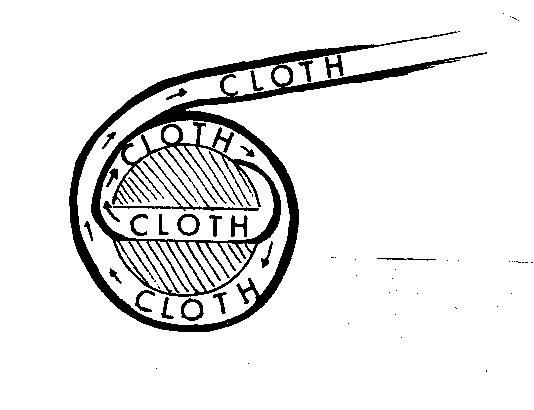
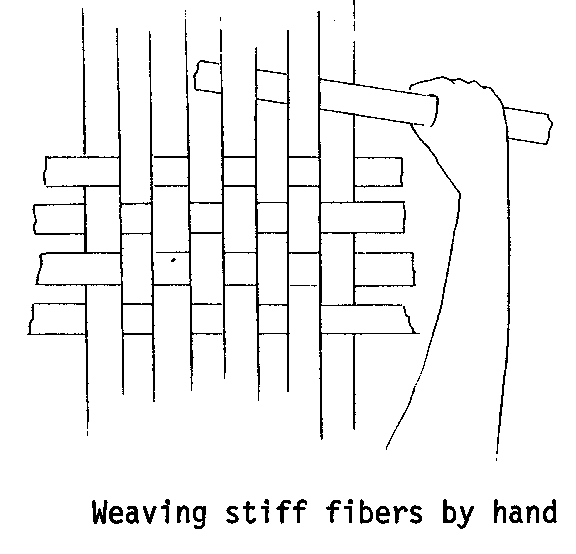
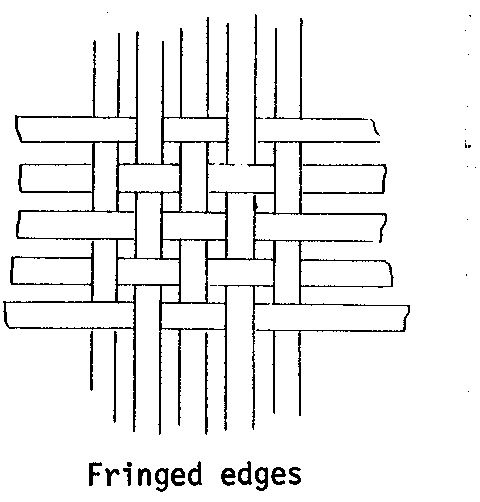
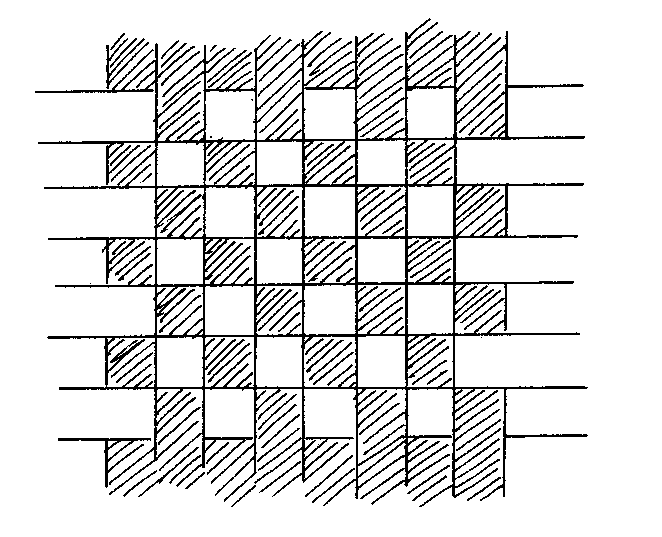
Regardless of the fiber used or the final product desired, all weaving consists of alternating rows of threads, yarn or strips made from the raw material. The vertical threads are called the warp; the horizontal threads are called the weft. (As indicated previously, the fibers may be one-, two- or four-ply depending upon the number of strands twisted together. Essentially, the purpose of all looms, no matter how complex, is to hold the warp (fibers) very tightly so that the weft (fibers) can be pulled across over one strand, under the next, over and under as shown in the illustration on the previous
page.
When considering the product to be made it is useful to know that warp and weft fibers do not have to be the same.
If you find you do not have enough of one fiber, it is possible to combine two or more in the same cloth. Always use the stronger for the warp. The following chart shows how fibers may be combined in certain articles.
A selected warp from the chart may be used in combination with one or more of the wefts listed for the same article. For example, an attractive and sturdy bag for carrying water bottles could be made using a two-ply wool warp and a weft of alternating bands of one-ply wool, coarse goathair and jute. A similar bag might have a warp of heavy cotton and alternating wefts of linen, cotton and jute. Combinations of different fibers will produce cloth of varying textures. In choosing fibers for a specific article consider the textural effect of the finished cloth: clothing and linens should use fibers that are soft to the touch; rugs, sacks, and mats can use the coarser fibers.
Suggested Warps and Wefts
ARTICLE
WARP WEFT
Bags
Heavy cotton Heavy cotton 2-4 ply wool 1-2 ply wool Linen Linen Jute
Coarse goathair Jute
Blankets
Heavy cotton Heavy cotton 2-4 ply wool 1-4 ply wool 2 ply coarse goathair soft and coarse goathair Linen Linen
Fabric (Heavy--for
Heavy cotton Heavy cotton jackets, coats 2-4 ply wool 2-4 ply wool capes, pants) 2 ply coarse goathair 2 ply coarse goathair Heavy linen Heavy linen
Fabric (Light--for
Medium, heavy cotton
Medium, fine cotton dresses, shirts, Fine 2 ply wool 1 and 2 ply fine wool table linens) Fine, medium linen Fine linen Silk Synthetics
ARTICLE
WARP WEFT
Mats
Heavy cotton
Jute Heavy linen Hemp Jute Straw Hemp
Cardboard and many other vegetable fibers
Raingear
Heavy cotton
Loosely spun goathair Heavy linen
Plastic strips 2 ply coarse goathair
Rugs
Heavy cotton Heavy cotton 2-4 ply wool 1-4 ply wool Heavy linen Old cloth cut in strips Jute Jute Hemp Animal Hair
Sacks
Heavy cotton Heavy cotton 2-4 ply wool 2-4 ply wool Heavy linen Heavy linen Jute Jute Hemp
Sheets
Medium, heavy cotton
Medium, fine cotton Fine 2 ply wool Fine 1 and 2 ply wool Medium, heavy linen
Medium, fine linen Silk
Wall Hangings
Cotton Any 2-4 ply wool Linen Silk Synthetics
Once there is an idea of what fibers are available and of the ways in which fibers can be combined to produce a product, it is necessary to make sure there is an adequate supply of fibers to produce the thread or yarn for the desired products. Or to look at the same point in another way, it is necessary to find out how much yarn or thread is needed to produce the cloth for a given article.
Here is a rough formula for estimating the amount of thread necessary:
A. Estimate how many vertical threads (warp) there will be in one square centimeter of cloth. (The thinner the thread, the more there will be.
B. Estimate how many horizontal threads (weft) will be in the same square centimeter of cloth.
C. Determine the width of the finished piece of cloth. (in cm.)
D. Determine the length of the finished piece of cloth. (in cm.)
(AxC) x D = the length of warp needed
(BxD) x C = the length of weft needed
(AxCxD) + (BxDxC) = total thread needed for cloth.
Remember that this is just an estimate. It is always a good idea to have extra warp and weft. (See pages 127 & 128 for a further discussion of determining amounts of warp and weft needed.
The Looms
The Simple Frame Loom is the most
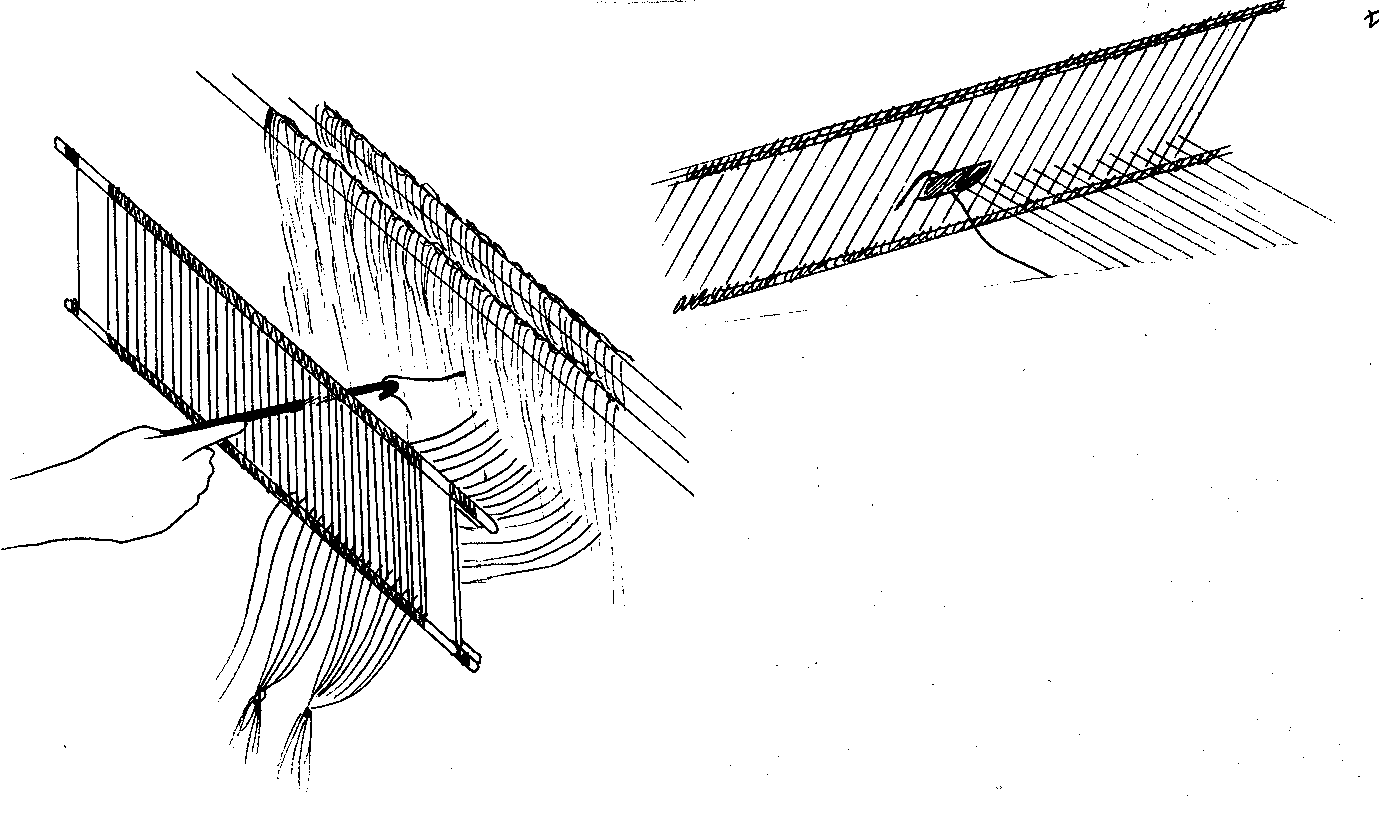
basic design for a loom. The frame, a structure of four pieces of wood, serves to keep the warp (vertical) threads taut and straight so that the weft (horizontal) can pass through more easily.
The loom has a shed stick and heddle which make the weaving go faster and more uniformly than on an even simpler loom where the weaver must intertwine the warp and weft with just the fingers. The frame loom requires less time in construction and in setting up the warp than the more complex foot-powered loom, but requires a greater investment in time spent in the actual weaving of the cloth.
Even though it is slower and simpler than other looms, the frame loom has certain advantages to be considered. Only the frame loom can be made big enough to weave large, one-piece fabrics, rugs and mats. Variations of this loom are used, for example, to weave Persian or Oriental rugs in Afganistan and Iran. Another advantage of the frame loom is that it is especially suited to weaving very coarse fibers and is useful for weaving heavy mats of straw, grasses or similar fibers. The frame loom is also very suitable for weaving pile or shag rugs, and tapestries. The knotted and tapestry weaves used for such rugs require slow painstaking fingerweaving by the weaver no matter which style loom is used, and so the foot-powered loom loses its advantage of greater speed when this kind of work is being done.
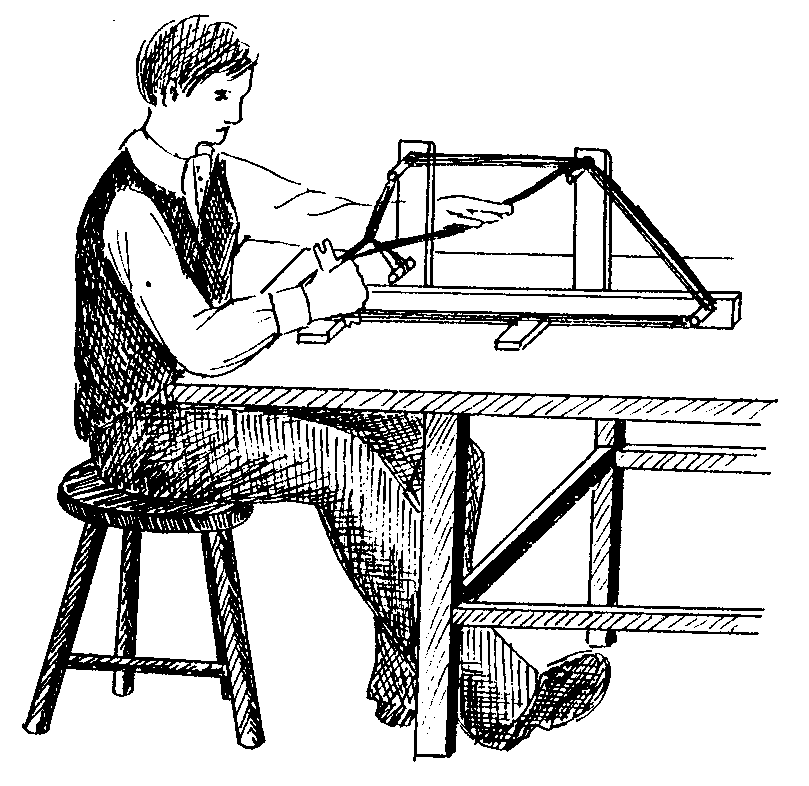
The Inkle Loom is designed to
produce very strong continuous bands or strips of fabric ranging from about 2 to 28 centimeters. This loom is popular for weaving belts and decorative trims. Although the inkle loom produces a limited size and type of material (the strips range in length from 90 to 180 centimeters), it has advantages for some situations and uses.
The Inkle Loom is fairly small; some versions are small enough to hold in one's lap or work on a table. This can be an advantage if working space is limited. An ingenious system of changing the warp makes setting up the loom and weaving on it a very rapid process. Many beautiful and intricate patterns can be developed and carried out on the loom. The fabric produced is warp-faced which means that the weft does not show at all in the finished cloth. This means that if fibers for weaving are limited, excellent cloth can be produced by using good fibers for the warp and poorer ones in the weft. Even if one of the other looms is chosen, the Inkle Loom is a good supplementary loom on which to weave straps and trim for bags, blankets, and clothing woven on the other looms.
The Foot-Powered Multiple Harness Loom has been used with success in many places throughout the world. It incorporates most of the features necessary for a smooth, consistent production of fabric. Although designs for more complex versions exist, and can be found in some of the sources listed on pages 157-162, the foot-powered loom design presented here has been chosen as more suitable for construction where materials, carpentry skills and tools are in limited supply.
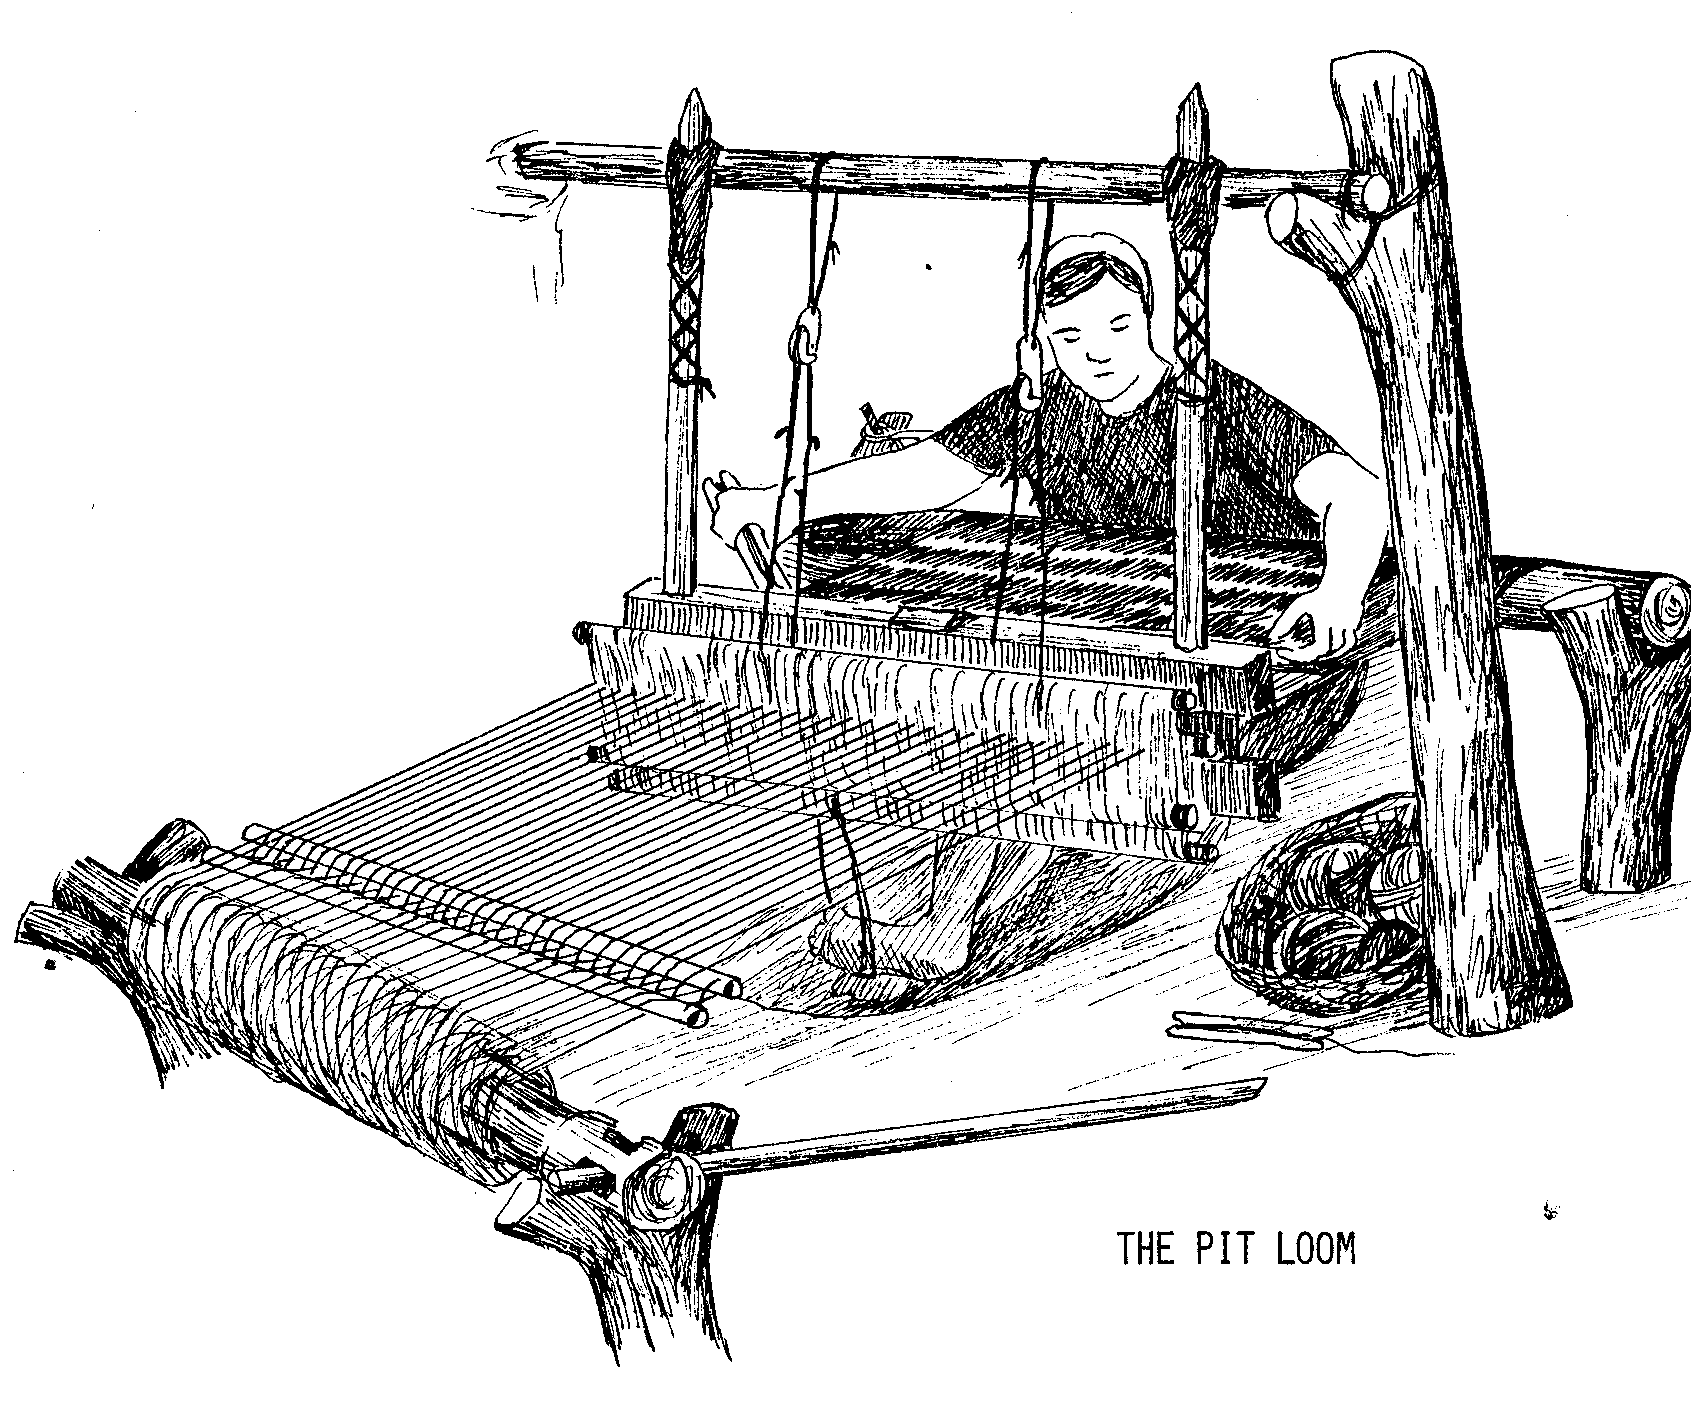
Two versions of this loom are presented. The Pit Loom is built
permanently into the floor and wall or ceiling of a dwelling. Because it uses the structure of the building in this way, it requires a minimum of wood and is, therefore, very suitable for construction in areas where wood is expensive or in limited supply. The design for this loom is based on models in current use in Greece, the Balkans, Turkey, and Northern India.
The other version presented is a Free-standing or Self-supporting
Loom. The moveable parts of this version are supported by a large, sturdy wood frame which can be disassembled for storage. This loom requires more wood and carpentry skill than all the others presented in this manual. However, it does not have to be made of commercially milled lumber, but can be constructed from unmilled tree limbs. Looms of this design are also used in Greece, and the Balkans, Turkey, Iran, and were once common in northern Europe and Colonial America.
Both versions, the Pit Loom and the Free-Standing Loom, use the same moveable parts. The advantage to this is shown particularly in cases where it is not possible to construct enough frames for every family that wishes to weave. When this is the case, a village may choose to build a few of either or both types. Each family then has a set of moveable parts and the families share use of the several loom frames. This allows more people to weave than might otherwise be possible.
Some other important features of these last two loom designs are the use of multiple harnesses and footpedals (or treadles). Multiple harnesses refer to the combination of pulleys and heddles which raise and lower the warp. These looms can use up to eight harnesses. This means the loom is smooth and fast operating, and also that there is a great variety of weaves and patterns possible. (See Chapter 7.) The use of footpedals frees both hands to deal with the weft and shuttles.
The warp used on these looms must be very strong and even. Cotton, wool, linen, jute and silk have all been used on this type of loom. (See chart on page 20.) The weft, however, can be quite variable--from yarn to rags, raw wool and plant fibers. And although the warping process is complex and time consuming, the foot-powered loom can hold a great quantity of warp, enough for several large articles, so warping need not be done frequently.
This loom is particularly suited for cottage industries where an investment in the more complex framework will pay off in the resulting uniformity and strength of the fabric.
The tables on the following pages bring much of the information which has been presented together in a form which enables easier comparison. Table I presents an overview of the looms from the standpoint of size of finished material, fibers best used, speed, etc. For example, the loom builder can see from Table I that if speed is not a consideration and ease of construction is, the frame loom may be a good choice.
Table II shows some common fibers and their suitability for use in warp and weft on these looms. Table III presents some guidelines as to the products which can be woven on each loom.
Table I - A Comparison of these Looms
FRAME LOOM
INKLE LOOM FOOT-POWERED LOOM
Size Range of
h.30 cm and up 30 to 90 cm 120 to 150 cm Loom Frame w.30 cm and up 6 to 30 cm 90 to 120 cm
Width of
4 cm and up 2 to 28 cm 2 to 100 cm Finished Cloth
Length of Warp 2 X Loom hgt. 90 cm 200 cm to 3600 cm Held on Loom
Ease of
Easy, little Easy, some Complex, some Construction
carpentry skill carpentry carpentry skill needed skill helpful needed
Type of Materials Wood Wood Wood needed for
Nails Dowels Reed or Bamboo Construction
Sticks Screws Cement, Shovel Cord Saw, Chisel Saw, Chisel, Drill (See specific
Hammer, Drill
Screwdriver Rope, Cord, String sections on
Knife Drill Knife construction
Rocks for more detail)
Best Fibers
Fine to Coarse Good quality Good quality of all kinds warps - thin to warps - thin to thick; Weft does medium thickness; not show - can be All kinds of weft of varying quality
Speed
Relatively slow Fast Fast
Handling
Small sizes very Small, easy to Large; Pit Loom convenient to use and store style is a permanent use and store;
installation in Large sizes (90cm
home; Self-supporting and over) harder
can be disassembled to handle. Looms to store. Both are wider than 120cm,
easy to use - both may require two hands are free to weavers.
deal with weft.
Table II - Sample Fibers and their Suitability for use on these Looms
Before continuing with the text familiarize yourself with these words. Listed here are some of the words used in this manual which refer to specific tools or processes used in loom construction or in weaving. Words referring to parts of looms have been defined in terms of their function rather than their construction, since actual construction may vary with the loom type.
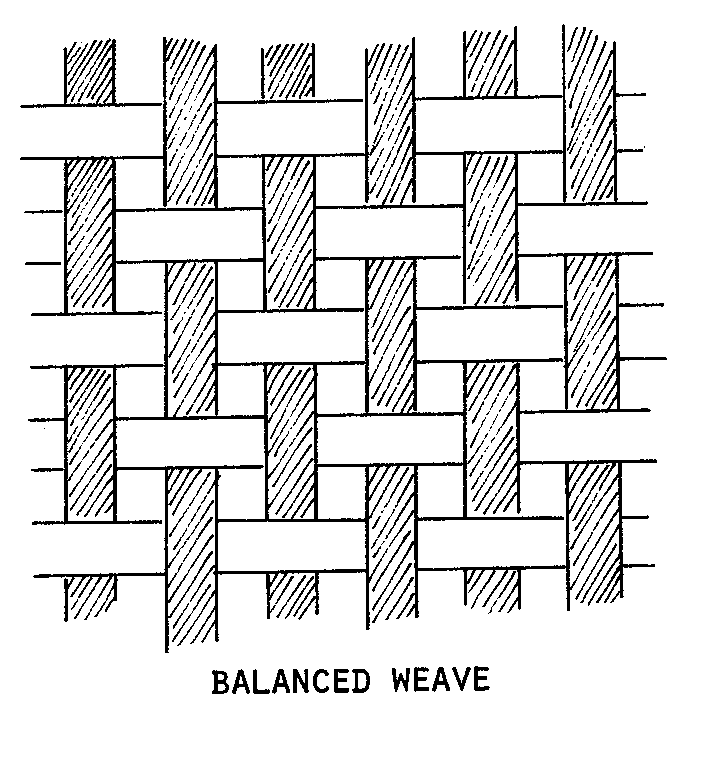
Balanced Weave (n) The warp and weft show equally
in the finished cloth.
Beater (n) A special tool used to push against the
finished row of weaving to create a tight, firm cloth. Beaters of different types are used depending on the fiber being woven and the loom in use. (See page 113 for a more complete description.)
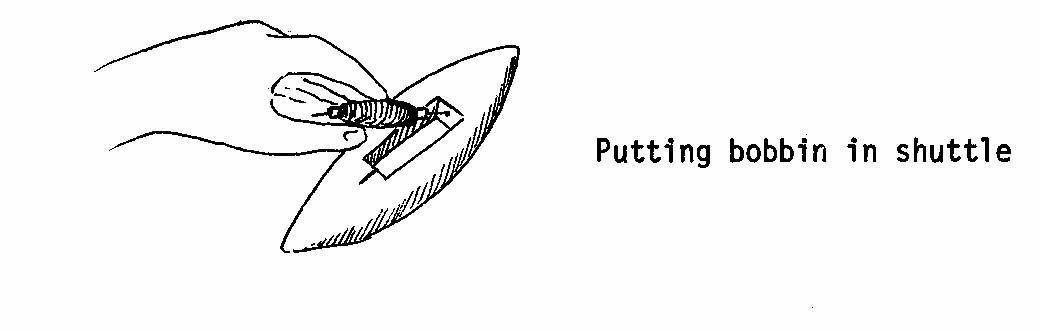
Bobbin (n) A small spool used in some shuttles to hold the thread
or yarn being used as weft. (See page 118 for a more complete description.)
Bobbin winder (n) A machine used to wind yarn on to a bobbin.
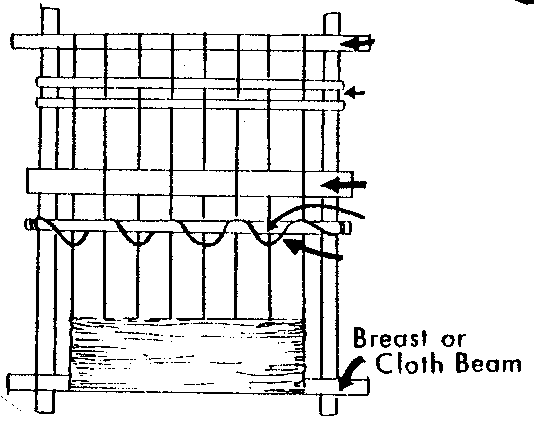
Beast beam (n) Another name for the cloth beam, or the crosspiece of the loom which is closest to the weaver during weaving. It is usually applied to looms having a continuous warp.
Cloth beam (n) The crosspiece of a loom frame, or on some looms a separate bar which holds the rolled up finished cloth. See also
Breast Beam.
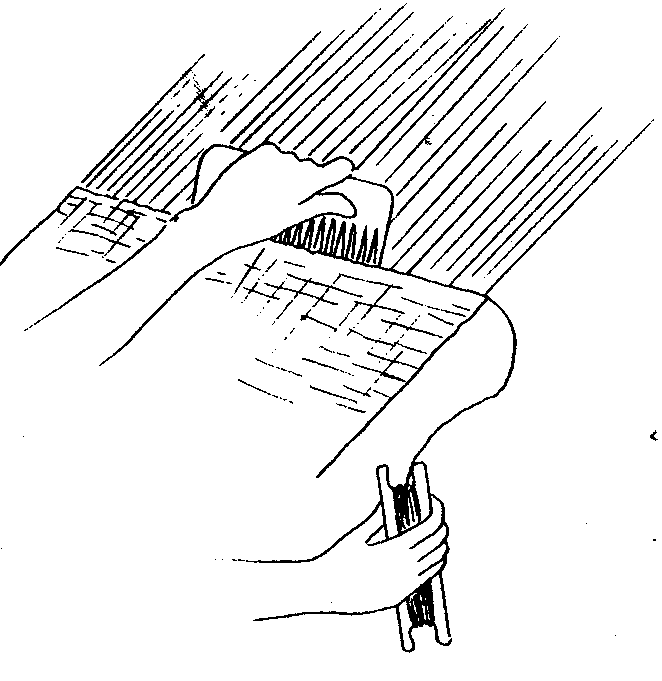
Comb (n) 1. A part of more complex looms which separates
individual warp threads to keep them straight and evenly spaced and which also serves as a Beater, pushing the newly put in weft against the finished edge of the weaving. It is sometimes called the Reed, because it may be constructed of thin slivers of reed. 2. A toothed tool used to straighten and untangle fibers before spinning. (See page 114 for a further description.)
Comb (v) The process by which fibers are straightened and smoothed to prepare them for spinning into yarn. (See page 9 for a more detailed description.)
Dents (n) The spaces between the teeth of the Comb.
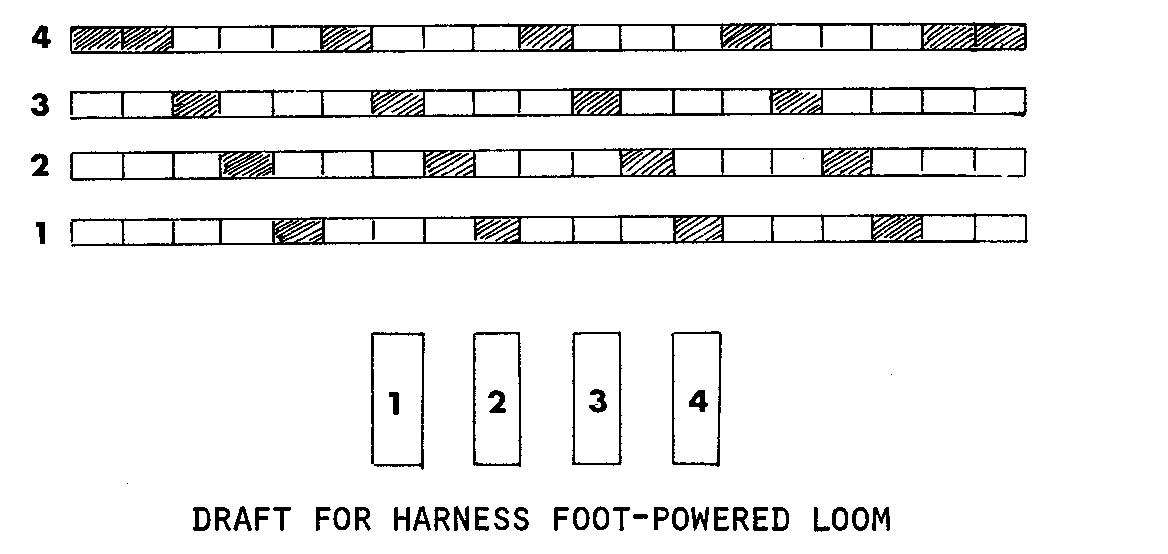
Drafting (v) Drawing a diagram of a threading pattern
for the warp. (See page 130)
Fiber (n) The raw material, from a plant, animal or synthetic
source, from which thread, yarn or pliable strips are made for weaving.
Handloom (n) Any frame which holds the threads taut for
human-powered weaving.
Harness (n) A combination of pulleys and heddles which raise
and lower selected warp threads.
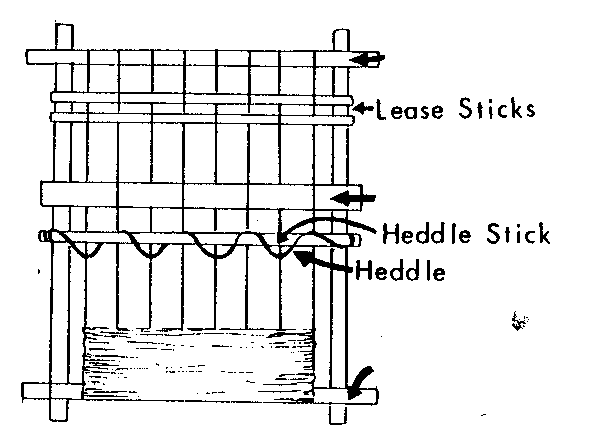
Heddles (n) A special device, of varying design, which
holds selected warp threads in the proper position for weaving.
Heddle stick (n) A rod or stick which supports the heddles.
Lease Sticks (n) Two lightweight sticks or poles woven into the warp behind the heddles. They increase warp tension and help keep the warp straight and evenly spaced.
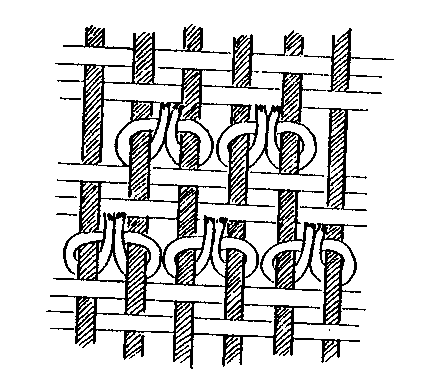
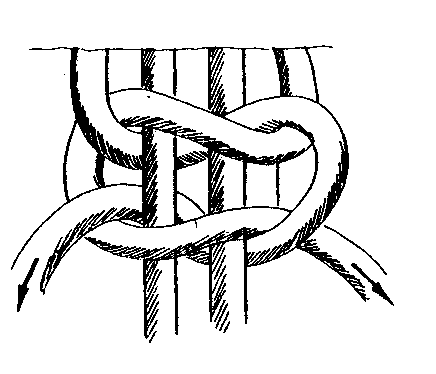
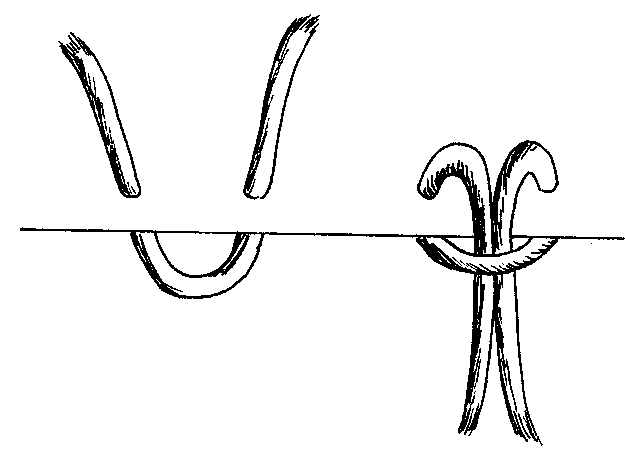
Knotted weaves (n) A style of weaving in which the weft
is tied to the warp with one of several special knots.
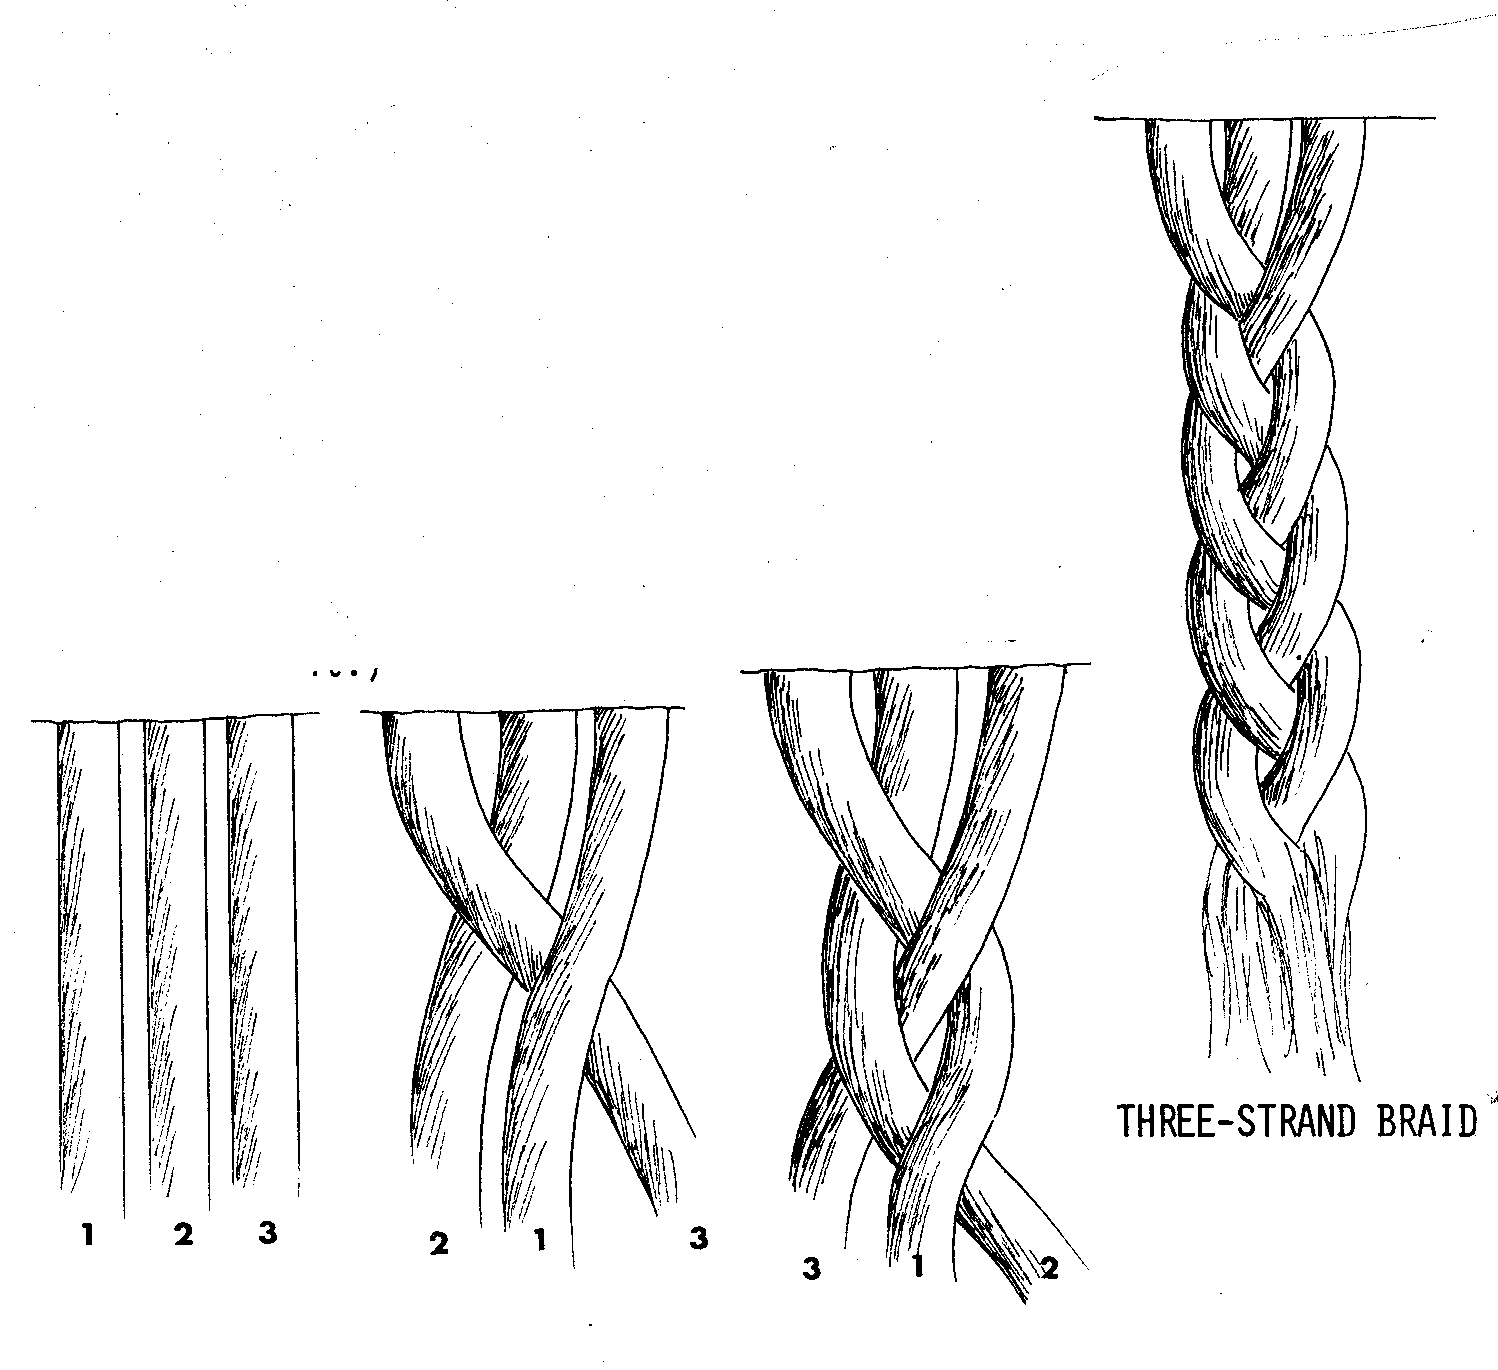
Macrame (n) A technique for making fringes, braids, laces and openwork designs using several types of knots, especially the square knot.
Multiple Harness Loom (n) Any loom having more than one set of harnesses.
Overhand knot (n) A simple knot used to join two
threads together, and also used to tie together the warp left at each end of a woven piece.
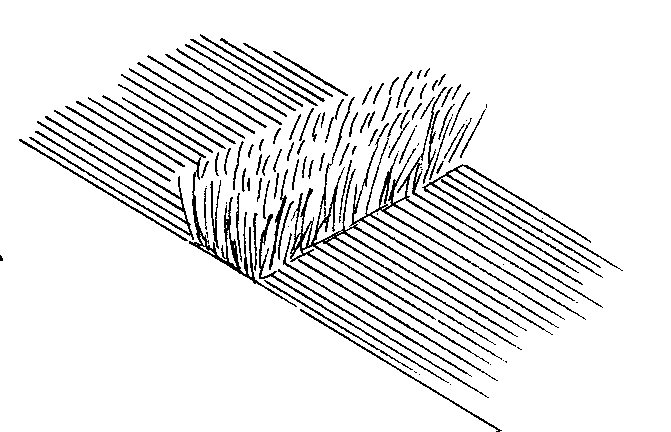
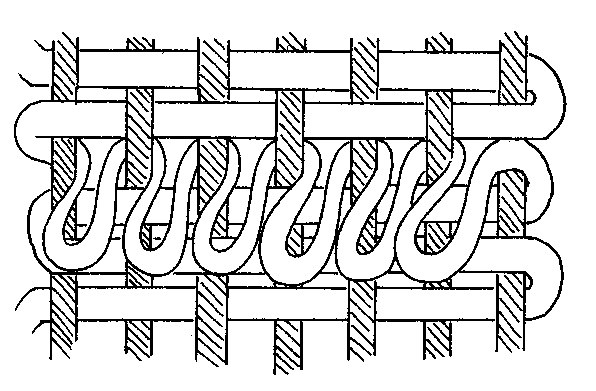
Pile (n) A soft, upstanding weft, similar to fur or
velvet, produced by knotted weaves that have been cut short. (See page 143)
Plain weave (n) The simpliest of all the weaves. The weft is
woven over and under alternating warps. Also known as Tabby Weave. (See page 131)
Plying (v) Twisting together two or more strands of fiber or
yarn to produce a thicker or stronger thread or yarn. (See page 10 for a more detailed description.)
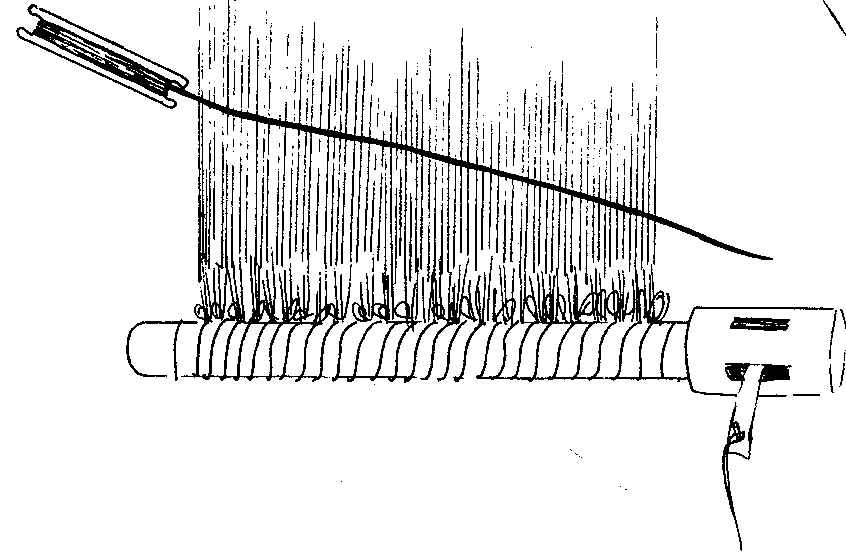
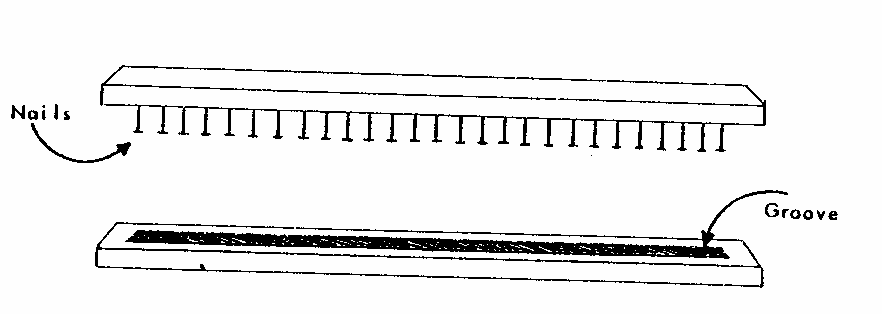
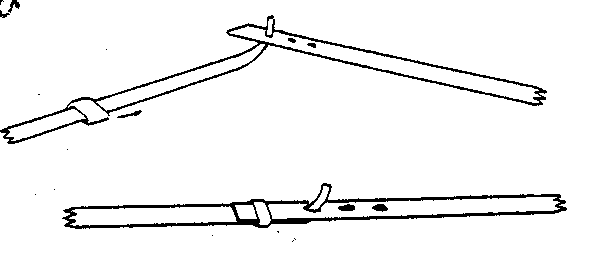
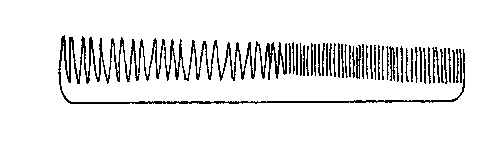
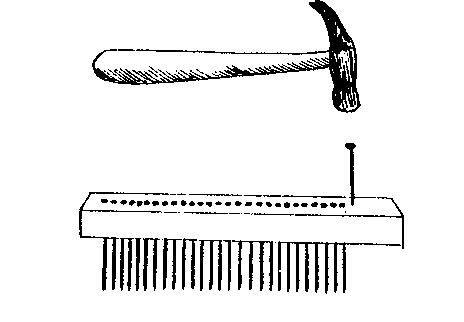
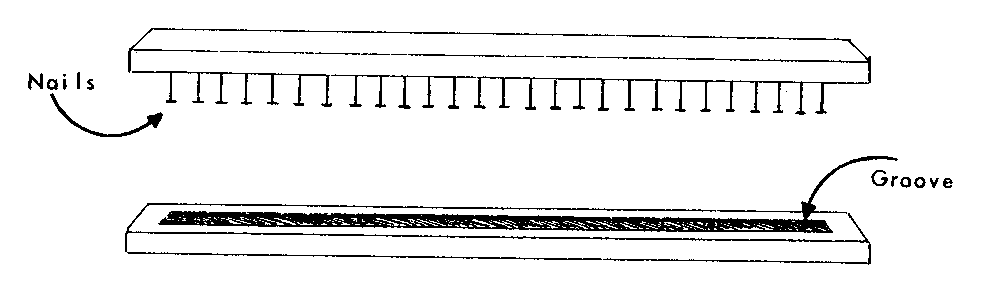
Raddle (n) A special tool used to guide
the warp on to the warp beam during the warping process.
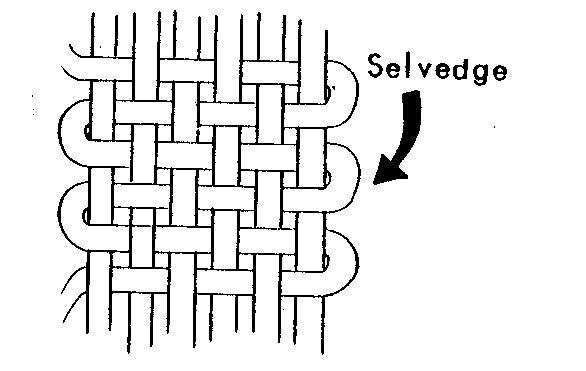
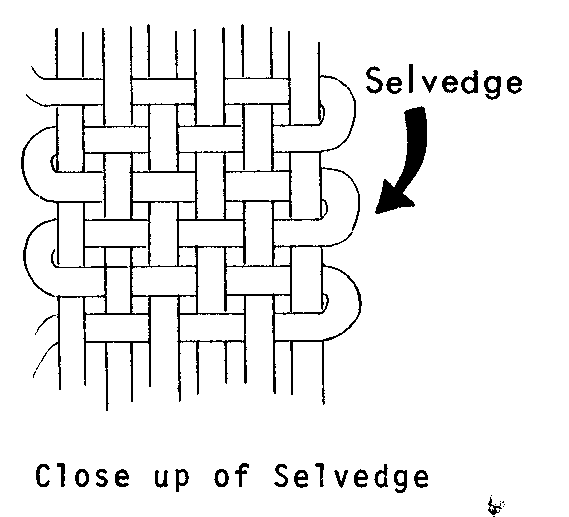
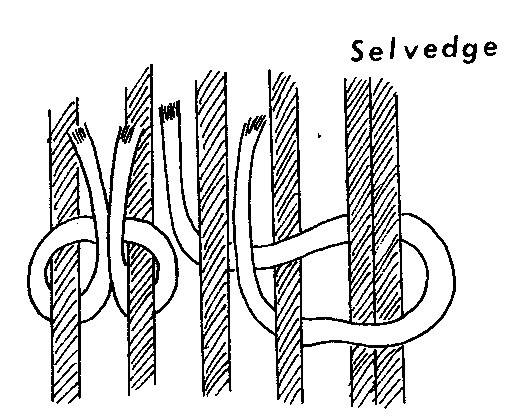
Selvedges (n) The edges of the woven cloth that are
parallel to the warp.
Shag (n) A soft, upstanding weft, similar to pile,
except that the weft is left uncut and so has an uneven, fluffy appearance. It is produced by the knotted weaves. (See page 144)
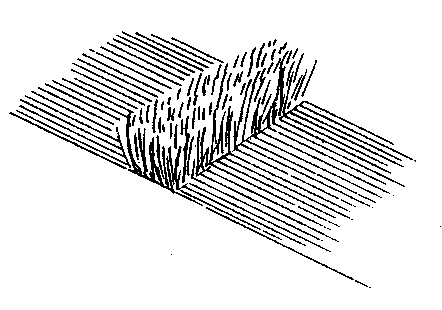
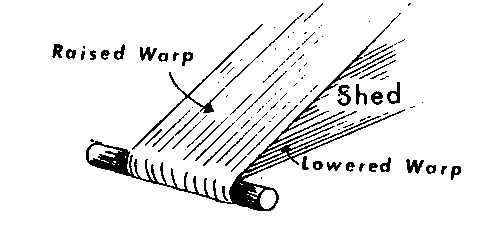
Shed (n) The space created when selected warp threads
are raised and lowered through which the weft is passed.
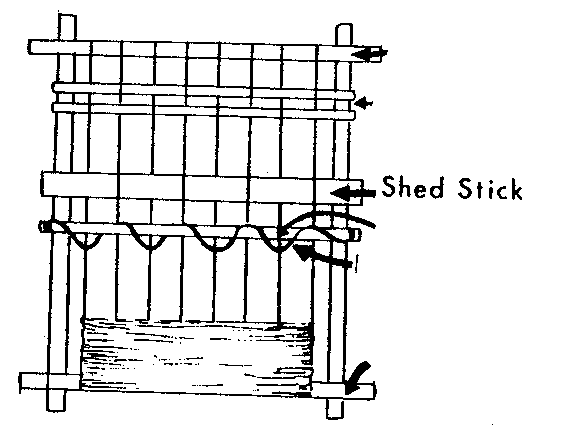
Shed stick (n) A stick used on simple looms to create
the shed, or space through which the weft is passed.
Shuttle (n) A tool of various design that holds the weft as it is passed through the shed. (See page 116 for a more complete description.)
Skein (n) A measured length of continuous yarn wound in a loose
circle and tied at opposite ends.
Skeiner (n) A tool used to wind yarn into a skein. (See page 119 for more detail.)
Skein winder (n) A tool used to hold a skein of yarn as it is
unwound on to a shuttle or bobbin. Sometimes called a Reeler. (See page 120 for more detail.)
Spindle (n) A quickly rotating stick on which spun yarn is wound.
The rotating motion of the spindle twists the fiber into thread. (See page 9 for more detail.)
Spinning (v) Twisting together animal, plant or synthetic
fibers to create continuous strands of thread. (See page 10 for more detail.)
Spinning wheel (n) A human-powered mechanical device which serves
to rotate the spindle for spinning fibers into yarn.
Square knot (n) A strong knot used to join two threads
together; also used in Macrame.
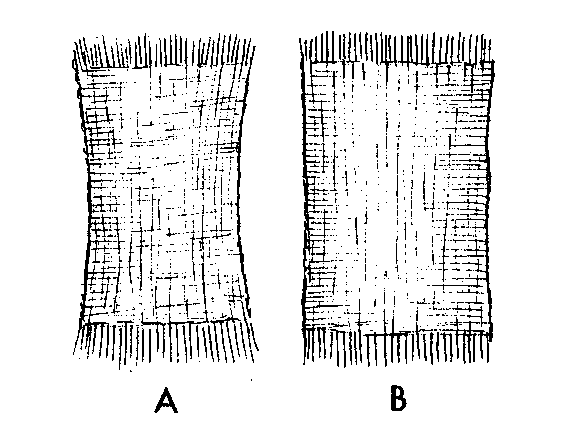
Stretcher (n) A metal or wooden bar that holds the
edges or selvedges of the woven cloth parallel. (See page 122 for a more detailed description.)
Tapestry weave (n) A variety of plain weave in which
several colors are woven into a design or picture. (See page 140)
Taut (adj) A string or thread pulled as tightly as possible. The tauter (or tighter) a thread is pulled the higher the pitch sound will be made when the string is plucked with the fingers.
Thread (n) A continuous strand of fiber, in this manual
synonymous with yarn.
Threading (v) Drawing the warp through the heddle and teeth of the comb.
Treadles (n) Another name for the footpedals which operate the harnesses on the foot-powered loom.
Twill weave (n) A weave produced when a
warp or weft thread, or both, go over and under more than one thread at a time in a regular pattern. (See page 133 for a more complete description.)
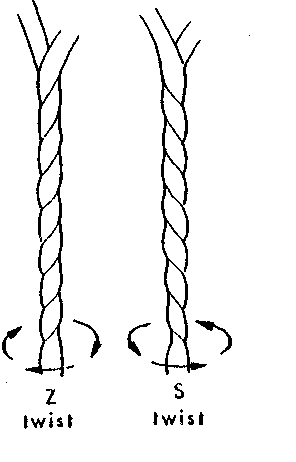
Twist (n) The direction in which yarn is turned in spinning or
plying. A Z twist turns clockwise. An S twist turns counterclockwise.
Twisting (v) The process of placing a weight on one end of a pliable strip of fiber and turning the strip to produce a rounded circumference. (See page 10 for more detail.)
Warp (n) The group of threads or yarns stretched across the loom
frame, and extending perpendicularly from the weaver's body. Also, called Warp Threads.
Warp beam (n) A bar or crosspiece found on most looms
which hold the unwoven warp threads.
Warp chain (n) A simple finger crochet stitch used to gather measured warp and prevent it from untangling.
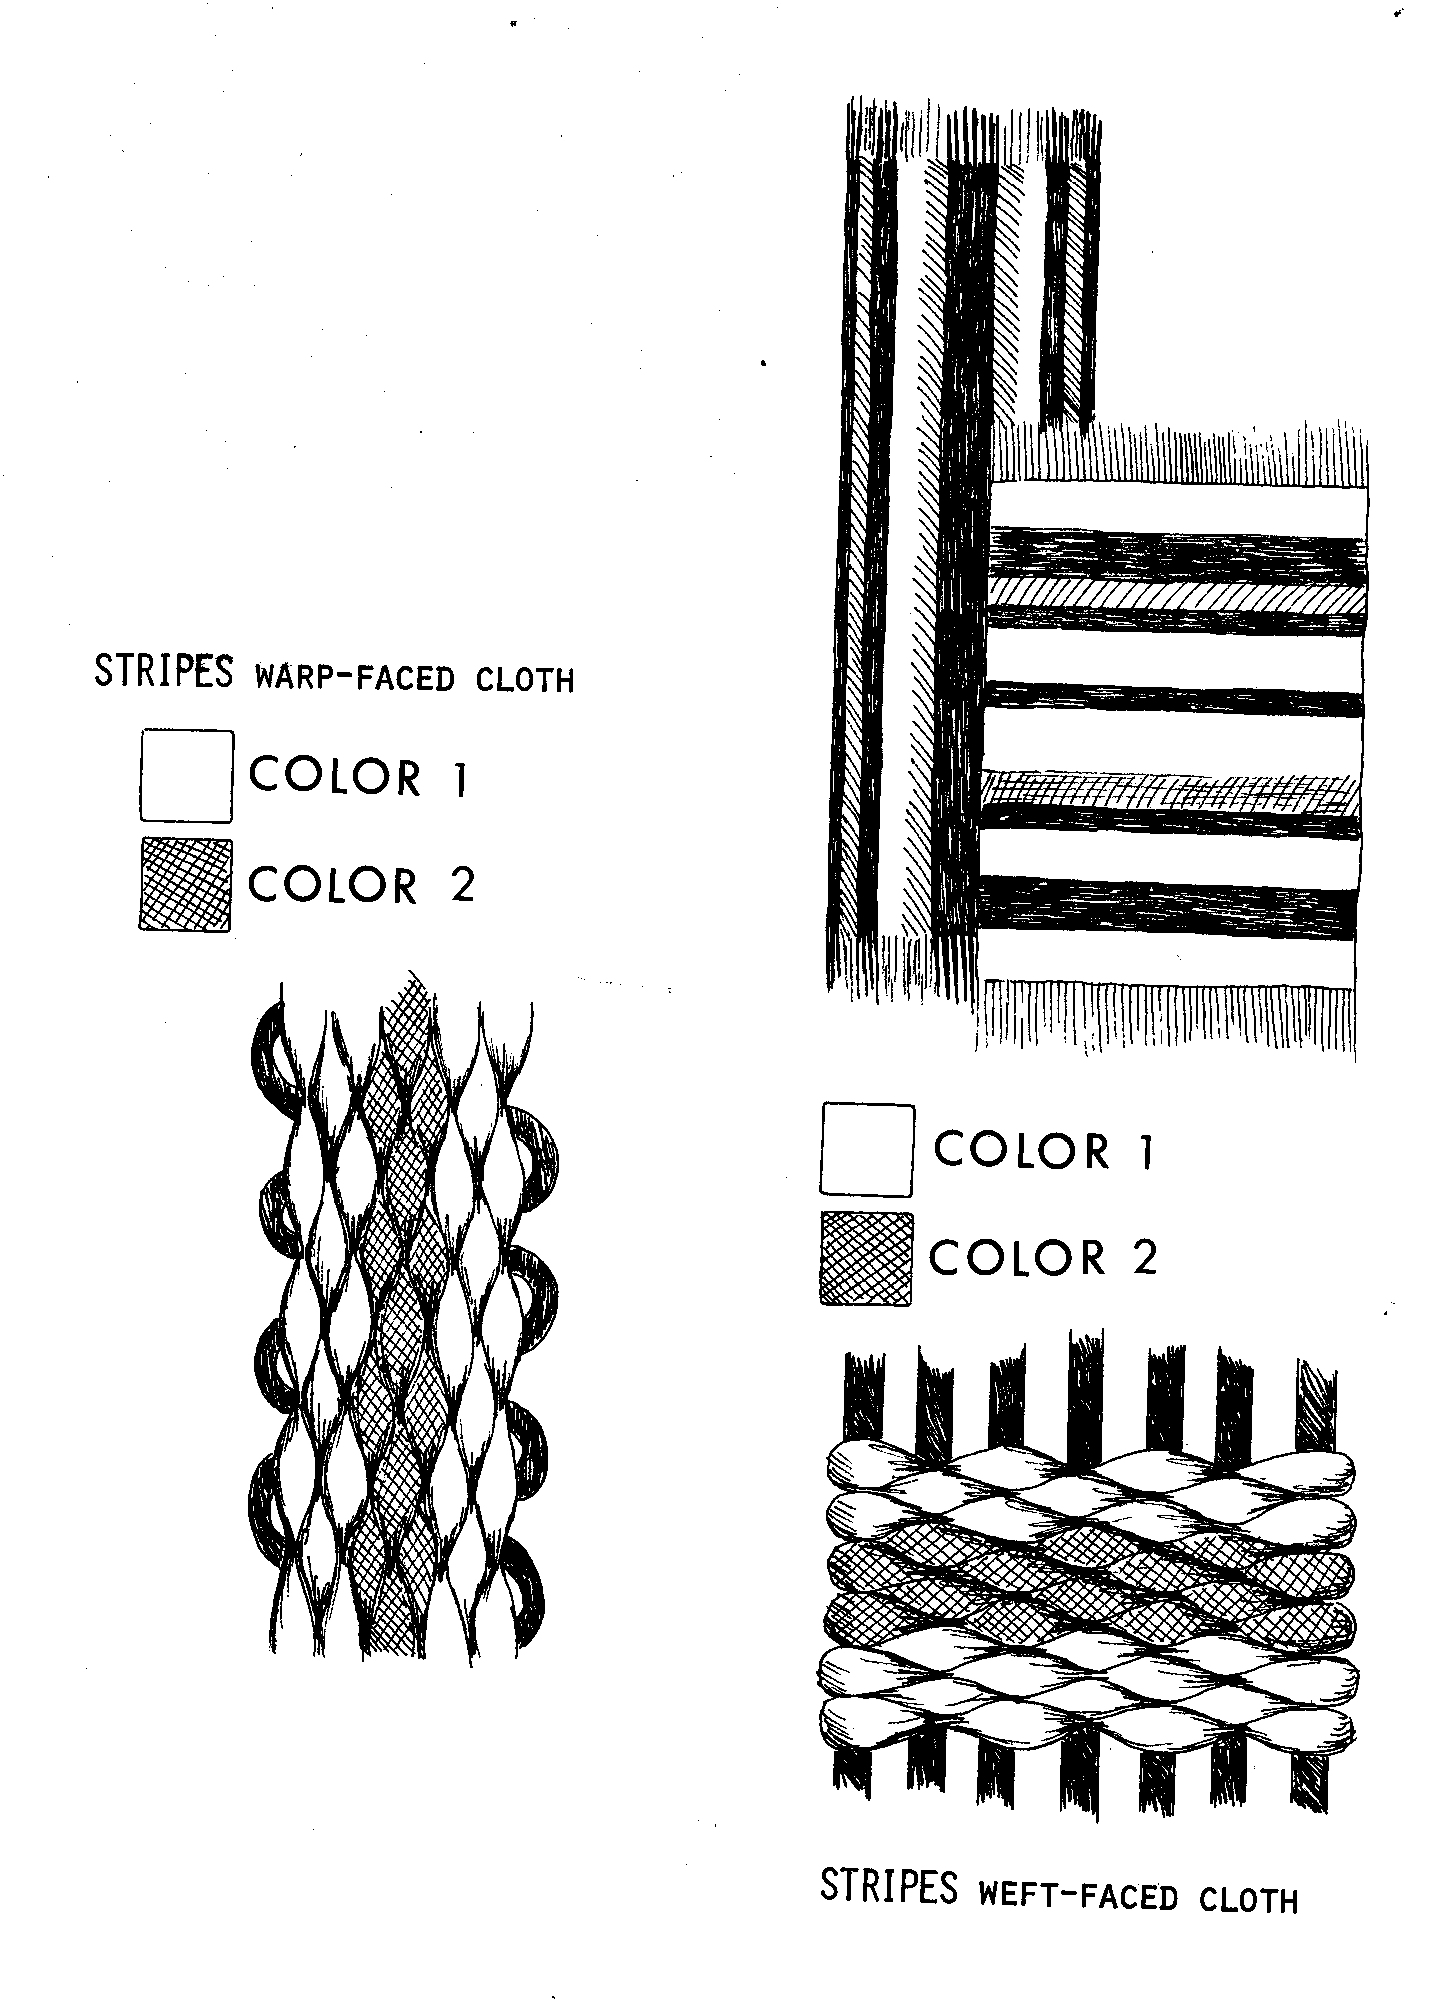
Warp-faced (adj) A cloth in which only the warp threads show.
Warping (v) The process of winding the warp on to the loom frame or warp beam and threading it through the heddles and comb.
Warping board (n) A special tool used to measure
out long length of warp in a confined area. (See page 124 for a complete description.)
Weave (n) The pattern or arrangement in which the warp and weft intertwine. (See Chapter 7 for a complete discussion of the different weaves.)
Weaver (n) The person who is operating the loom.
Weaver's knot (n) A special knot used only for joining a
broken warp thread. It does not slip.
Weaving (v) The process of intertwining the warp and weft together to create a piece of cloth.
Weft (n) The threads woven in and out of the stretched warp
to produce a piece of continuous cloth. Also referred to as weft threads.
Weft-faced (adj) A cloth in which only the weft threads show.
Yarn (n) A continuous strand of fiber, in this manual
synonymous with thread.
3 The Simple Frame Loom
The following directions explain how to build a very basic loom.
No dimensions are given since there is no real limit on the size of the loom. The smallest practical size, however, is probably about 30cm in either direction. While it is possible to build looms smaller than 30cm, it is not practical because weaving narrower than 30cm can be done on the 30cm framework. Therefore, loom size can vary from one made small enough to hold in the lap (30 by 60cm is a good size) or large enough to weave a room size rug. Such large-size looms must be worked by several weavers at one time.
Materials Needed
FOR THE FRAME
Two (2) sturdy pieces of wood() slightly larger than the desired width of the finished cloth. These will be horizontal pieces of the frame (AB and CD).
Two (2) sturdy pieces of wood() slightly longer than two thirds the desired length of the finished cloth. These will be the vertical pieces (EF and GH).
(*) NOTE: This wood and any other wood used for this loom need not be commercial lumber. Tree limbs with the bark removed may be used instead.
Lashing or Nails to join the frame.
FOR THE HEDDLE
One (1) strong stick, the width of the loom frame.
A length of cotton or synthetic cord (such as is used in fishnets) about four (4) times the width of the loom.
Two (2) blocks of wood or two (2) flat ended stones. (See page 92, "Heddle Construction" for proper size.)
FOR THE SHED STICK
One (1) rounded piece of wood, the width of the loom. For looms between 30 and 60cm wide, it should be about 4cm in diameter; for looms between 60 and 120cm wide, 8cm in diameter; for looms between 120 and 180cm wide, 12cm in diameter, and so on. Increase 4cm for every 60cm in width.
FOR LEASE STICKS
Two (2) lightweight poles, such as reed or bamboo, the width of the loom.
TOOLS AND SUPPLIES
Hammer
Drill Sharp Knife Sandpaper Oil for Wood
Before beginning to build, please note the following:
The wood used must be as straight as possible and well-seasoned so it will not warp during use.
Smooth and sand the wood so there are no rough spots that will catch the thread or yarn.
Oil the wood rather than use paint or varnish. Oil keeps the wood from drying and cracking, and provides a smooth renewable finish for the yarn to move against.
The top and bottom crosspieces (called the cloth and warp beam
on the foot-powered loom) must be at right angles to the warp threads and parallel to each other. Measure carefully during construction to make sure they are parallel.
Construction
A. Prepare wood pieces
1. Remove bark if necessary 2. Sand and smooth rough places 3. Oil wood to prevent splitting
B. Build the Frame
1. Join the four pieces of wood to make a rectangular frame. 2. The pieces AB and CD (width) should overlap the pieces EF and GH (length) as shown in the illustration. AB and
CD must be on top of EF and GH. 3. Lash or nail the joints together so that the pieces do not move and are at right angles to each other--as shown below left.
C. Prepare the Heddle Stick
1. About 2 to 3cm in from each end of the stick cut a groove 0.3cm deep completely around the circumference.
D. Prepare the Lease Sticks
1. About 2cm in from the ends of each stick, drill a hole completely through to the other side. The hole should be large enough to put a piece of string through.
The Frame is Now Complete
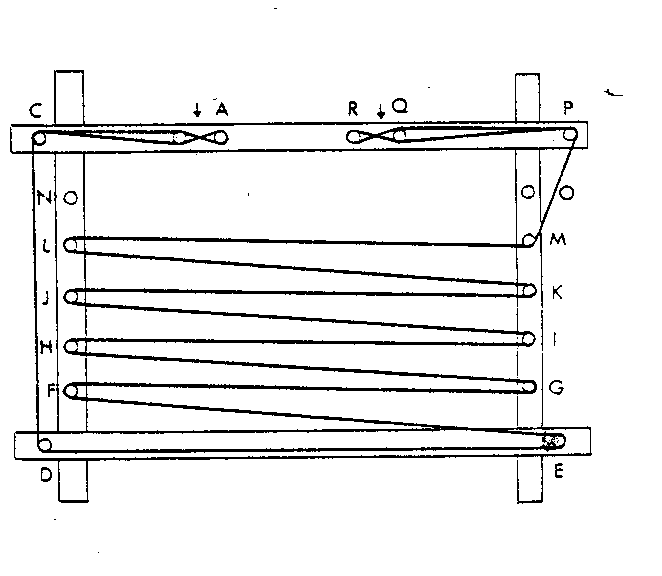
Set Up the Loom for Weaving
NOTE: Before setting up the warp, you may wish to read Chapter 7 , Weaves, Patterns and Finishing Touches. This may help you choose a weave and/or a pattern to set up. Plain weave or a basket weave and/or a striped or plaid pattern are recommended for your first weaving attempt.
A. Warp the Loom
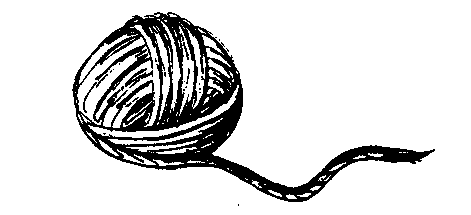
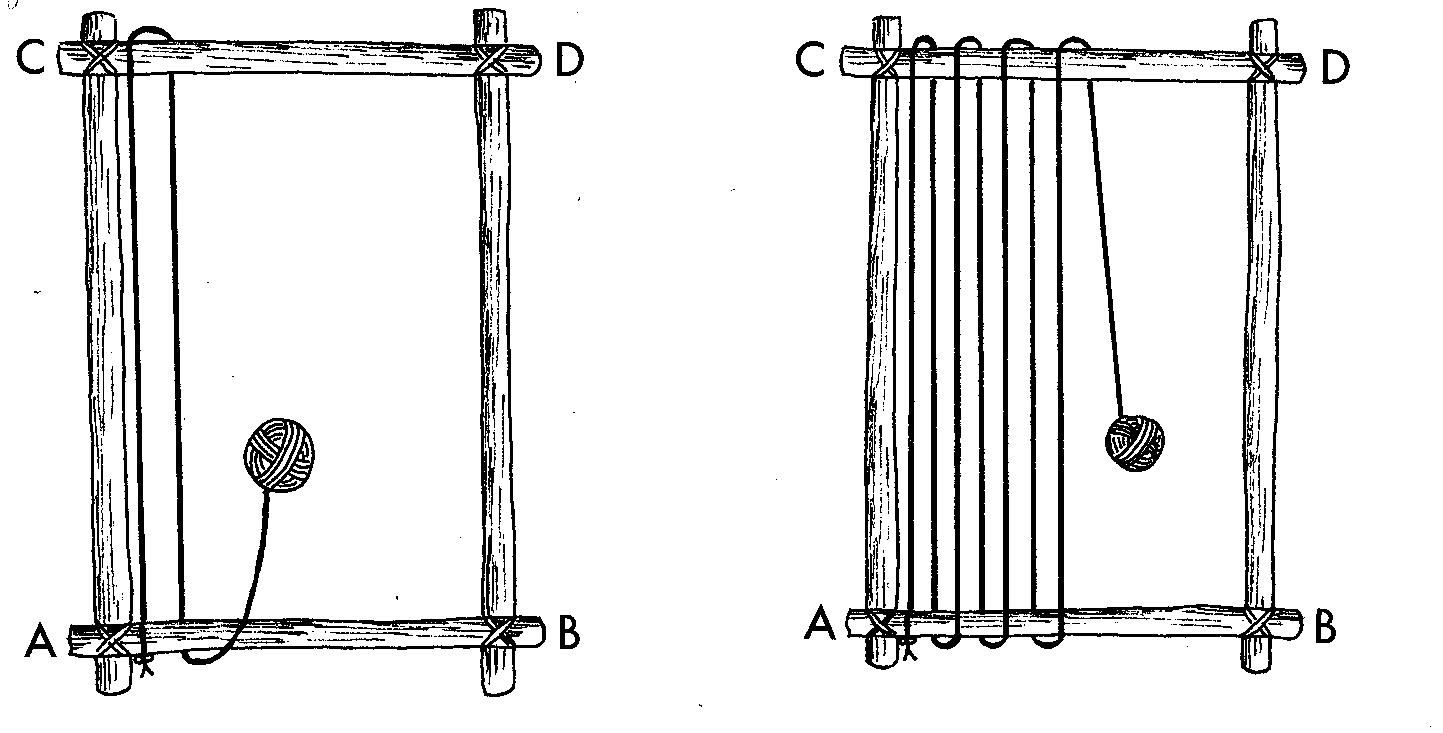
Gather the warp into a ball, or in the case of very stiff fibers, into an easily undone skein.
Tie one end of the warp, in an easily undone knot such as a half-hitch, to the far inside corner of crosspiece AB (as shown above).
Unwind a small length of warp and bring it up and around crosspiece CD (as shown at
left). 4. Bring the warp down and around AB in the same direction you started as illustrated at bottom left. 5. Continue Steps 2 thru 4 until the desired number of warp threads is reached (as shown
below). (See page 127, for calculating the number of warp threads.)
Untie the beginning end and join with a square knot to the other end, so that they stretch diagonally across the back of the loom.
Make sure all the warp threads are stretched as taut as possible.
NOTE: If your pattern calls for several different color warp threads, such as in a plaid, start warping as indicated in Steps 1 thru 4, and then:
a. When the desired number of the first color warp is reached, do not cut off the extra warp but set aside the whole ball of remaining warp still attached to the loom. b. Pick up a ball or skein of the next color. c. Tie the end of the new color to AB using a half-hitch. d. Wrap the new color around as described in Steps 2 thru 4. e. When the desired number of threads have been wound, set aside this ball like the first; do not cut it off. f. Start the next color in the same way. If you must repeat a color, just pick up the original ball of that color, pull it taut and continue winding. g. When all the required warp is wound around the frame, untie all the beginning ends from AB and hold them in one hand. h. Pick up the free ends of all the colors of warp and tie both groups together using a square knot. On very wide looms it may be necessary to tie the ends in several groups.
Your Loom is Now Warped
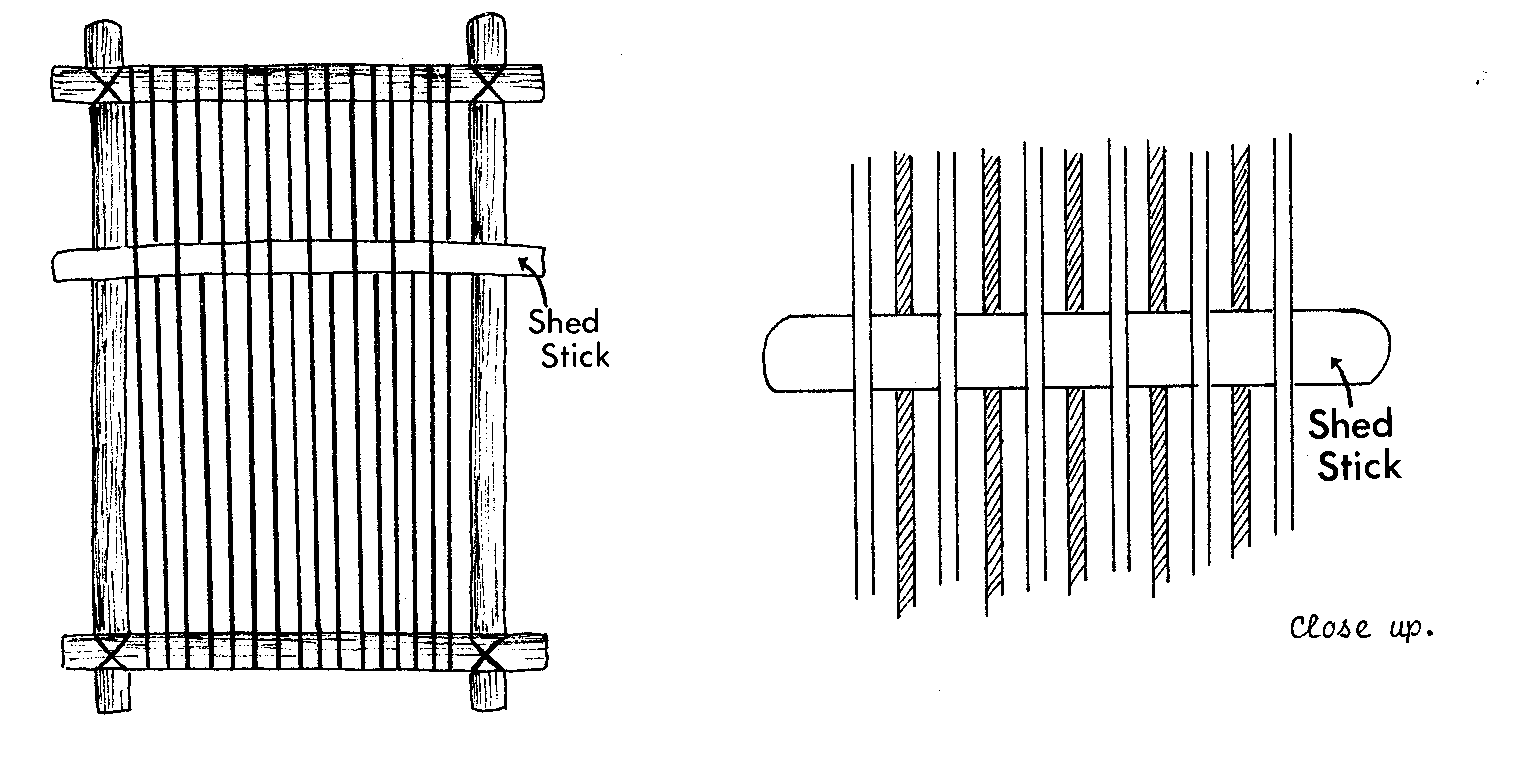
B. Place the Shed Stick on the Loom
NOTE: Look at the warped loom frame. Notice that there is one set of warp threads on the top side and another set on the bottom. If you grabbed all the warp on one side and pulled on it, the warp would slide around the loom, so that the side that was in back moves to the front, or top. This is a continuous warp--there is no beginning and no end. In the following directions, you will be attaching the working parts to the loom. They must be attached only to the top side of the warp, so that the warp will continue to slide around freely. When the warp is referred to as being lowered or raised, this refers only to the top warp threads.
Lay the loom flat on a table or the ground.
Place the shed stick across the middle of the loom, at right angles to the warp threads.
Weave the stick in and out of the top warp threads, going over and under every other top warp for Plain Weave. If you are using another weave check for the proper order.
This shed stick will be left in place during
the entire weaving process, but it should be free to slide up and down the loom at right angles to the warp.
C. Place the Lease Sticks on the Loom
1. Take one of the lease sticks and place it above the shed stick, going over and under the same top warp threads as did the shed stick. (Loom should still be lying flat on ground.)
2. Push this stick towards the top of the loom or crosspiece CD as shown above.
3. Take the other stick and place it in the space between the shed stick and the other lease stick as shown below.
4. Weave the second stick in and out of the top warp, going under the warp threads lowered by the shed stick, and over the ones raised by it. This will tighten the warp on the loom.
5. Slide the two lease sticks together until they are 4 to 8cm apart.
6. Tie them together by putting a string through the holes at each end and tying as illustrated (left)
using a square knot. This will keep the sticks together and prevent them from slipping sideways.
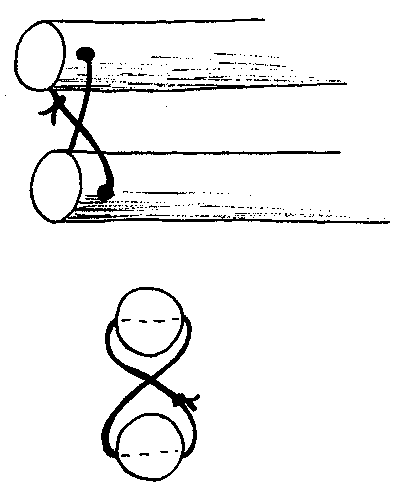
D. Make the Heddle
1. With the loom still lying flat on the ground, lay the heddle rod across the lifted top warp threads that are in front of the shed stick as shown.
2. Move the heddle rod closer to the shed stick so that the bottom edge of the heddle stick is even with the top edge of the shed stick. Check this by looking at the loom from the side. The heddle rod should still be resting directly on the raised top warp threads.
3. Place a block of wood or a flat
ended stone of the right size at each end of the heddle stick so that the heddle remains at the same height as the shed stick. If the loom will be used on the lap or in an upright position lash the blocks or stones to the frame. Do not permanently fasten them, however, as the heddle rod must move up and down the loom during weaving. A simple lashing that can be untied easily works best. On small looms tape can be used.
4. Tie the end of the cord of string in the groove at one end of the heddle stick.
NOTE: The next Steps 5, 6, 7 and 8 describe the process of attaching the heddle to the warp. Read the directions through and study the illustrations before beginning. Remember that raised and lowered warp refers to the top warp only.
5. Loop the cord once completely around the heddle stick, bring the end of the cord down, under the first lowered warp thread and then back up between the same two raised warp threads.
6. Continue the cord over the heddle stick again, and then repeat the process of going between the two raised warp threads, under a lowered one, back up between the same two warps and over and around the heddle stick.
7. As each lowered warp thread is looped by the cord, pull the lowered warp up to the same height as the raised warp threads.
8. Repeat the above process until all the lowered top warp threads are raised to the same height by the cord. Tie the end of the cord in the groove at the other end of the heddle stick.
E. Check the Position of Heddle and Shed Stick
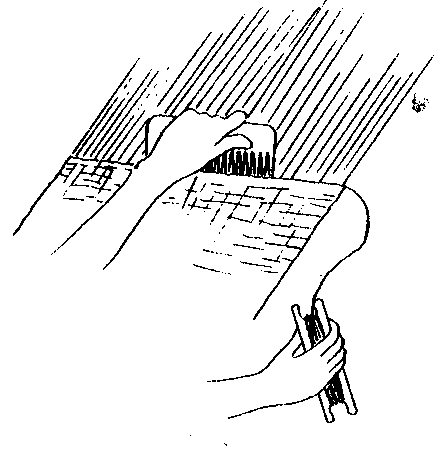
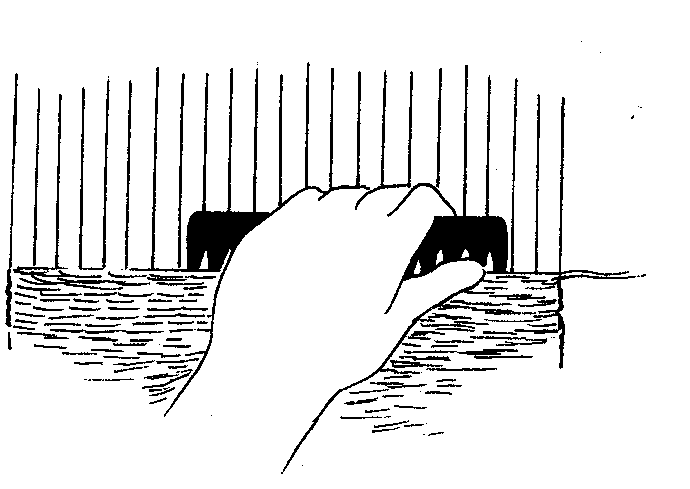
Position the heddle stick relative to the shed stick so that there is enough room for your fist behind the heddle rod. 2. Press down on the warp behind the heddle with your fist.
3. This should create a shed or space in front of the heddle and between the top warp threads that is large enough to pass your shuttle through. 4. Lift up on the warp threads behind the heddle using your fingers and palm. This should also create a shed big enough for the shuttle. 5. If your shuttle does not fit through easily, adjustments can be made in the size of the shed by moving the heddle and shed stick either further apart or closer together.
F. Positioning the Loom
1. Depending on the size and shape of the loom it can be used in one of three positions:
1) Held on the lap 2) Leaned against a wall or tree, the weaver either sitting on the ground or a stool, or if the loom is tall, standing. 3) Laid flat on the ground. As the weaving progresses the weaver can sit on the finished cloth.
You Are Now Ready to Weave
How to Weave on a Frame Loom
You will need a Beater, Shuttle and a Stretcher to help you weave. Consult Chapter 6, "The Weaver's Tools" for directions for making these and other helpful tools.
Steps in Weaving
1. Wrap weft on to shuttle.
Press down on warp behind heddle with fist.
Slide shuttle into shed created in front of heddle.
Move fist to next section of warp, press down and slide shuttle along.*
Repeat this process until shuttle has reached other side of the loom. With practice you will develop a steady rhythm.
*On very large looms you may prefer to use a piece of wood instead of your hand.
Pull shuttle out and beat weft tightly into place with a Beater.
Repeat from Step 3, but start at the other side of the loom and instead of pressing down on the warp, lift it up using the fingers and palm.*
* On very large looms you may prefer to use a piece of wood instead of your hand.
Beat the weft in after each row.
Remember to alternate each row - one pushing down, one pulling up.
After you have woven about 10cm of fabric, put a Stretcher in position as shown in illustration at left.
Continue weaving until you reach the heddle and can no longer fit the shuttle through the shed.
Release the tension on the warp by removing the blocks or rocks holding the heddle rod. Holding the finished weaving on both sides, pull down slowly and steadily so that the finished cloth moves down and under the bottom crosspiece AB.
Adjust the position of the heddle, shed stick and lease sticks so that the shed is the proper size.
Weave as before on the new warp.
When you reach the top beam of the loom with the lease sticks and shed stick you can advance the warp by pulling down on all the warp threads so that the finished woven cloth moves under the bottom beam and around to the back side of the loom. The unwoven warp will slide over the top beam to the front. Adjust the diagonal warps so they are parallel on the front side. (They will remain twisted on the back) Move the heddle, shed stick and lease sticks into proper position and continue weaving.
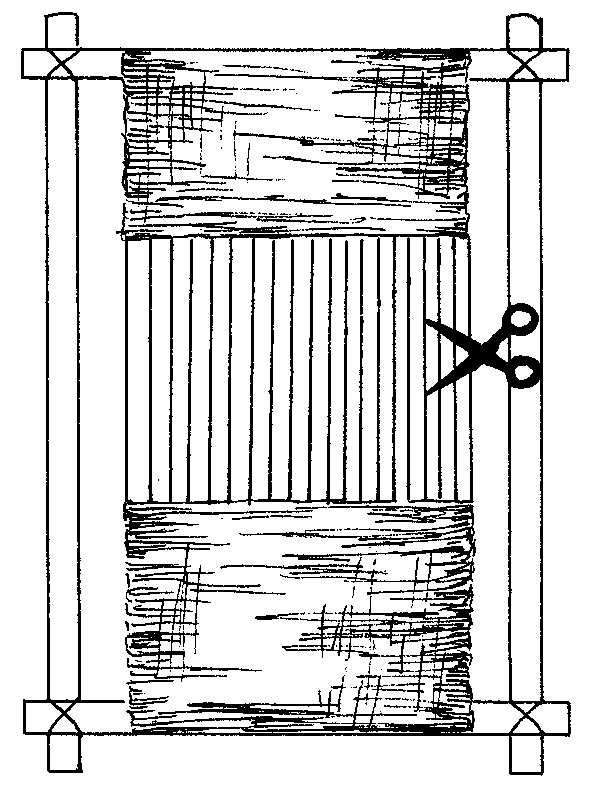
When the weaving can be advanced no further, or the cloth is the desired length, the weaving is finished.
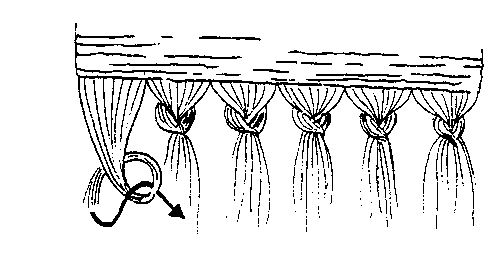
Cut the warp so that there is an
equal length of extra warp threads on both ends of the cloth. Remove from loom and tie ends to prevent unraveling <see picture> (See pages 145-155.)
Variations of the Simple Frame Loom
The Pegged Loom: This loom is suitable for places where the weaver
can work outside or where dwellings have earthen floors.
Materials Needed: Same as Frame Loom except instead of four crosspieces only two are needed. These should be slightly longer than the desired width of cloth.
Prepare the materials as described for the frame loom.
Warp the Loom
Put the two crosspieces upright in the ground, slightly farther apart than the desired length of the weaving.
Place the two lease sticks upright in the ground, between the two crosspieces and about 30cm apart.
Tie the end of the warp to one crosspiece. Wrap the warp around the four uprights as shown, until the desired number of warp threads are reached.
Each warp thread is tied to the loom separately. <see picture>
Untie the first warp end and tie it to the other end.
Taking care to keep the warp in place, pull up the crosspieces and lease sticks carefully from the ground and lay them flat where the weaving will be done.
Drive stakes on the inside ends of each crosspiece. Make sure the warp is stretched tightly.
NOTE: An important difference between the Frame Loom and the Pegged Loom is that the Pegged Loom does not have a continuous warp. This means that all the warp threads both top and bottom will be picked up by the shed stick and heddle as the weaver works.
Place the Shed Stick on the Loom
This is done the same way as the Frame Loom except all the warp threads are used.
The Lease Sticks
The sticks are already in position because of the way the loom was warped.
The Heddle
The heddle is put into position the same way as on the Frame Loom.
The blocks or stones that support the heddle will rest on the ground, since there is no frame.
When looping the lowered warp with the cord, remember to pick up all lowered warp threads.
How to Weave on a Pegged Loom
Weaving progresses in much the same way as it does on the Frame Loom--except that the warp does not move. Instead, as the cloth approaches the heddle, the heddle, shed stick and lease sticks are moved back. The weaver moves forward by sitting on the finished weaving.
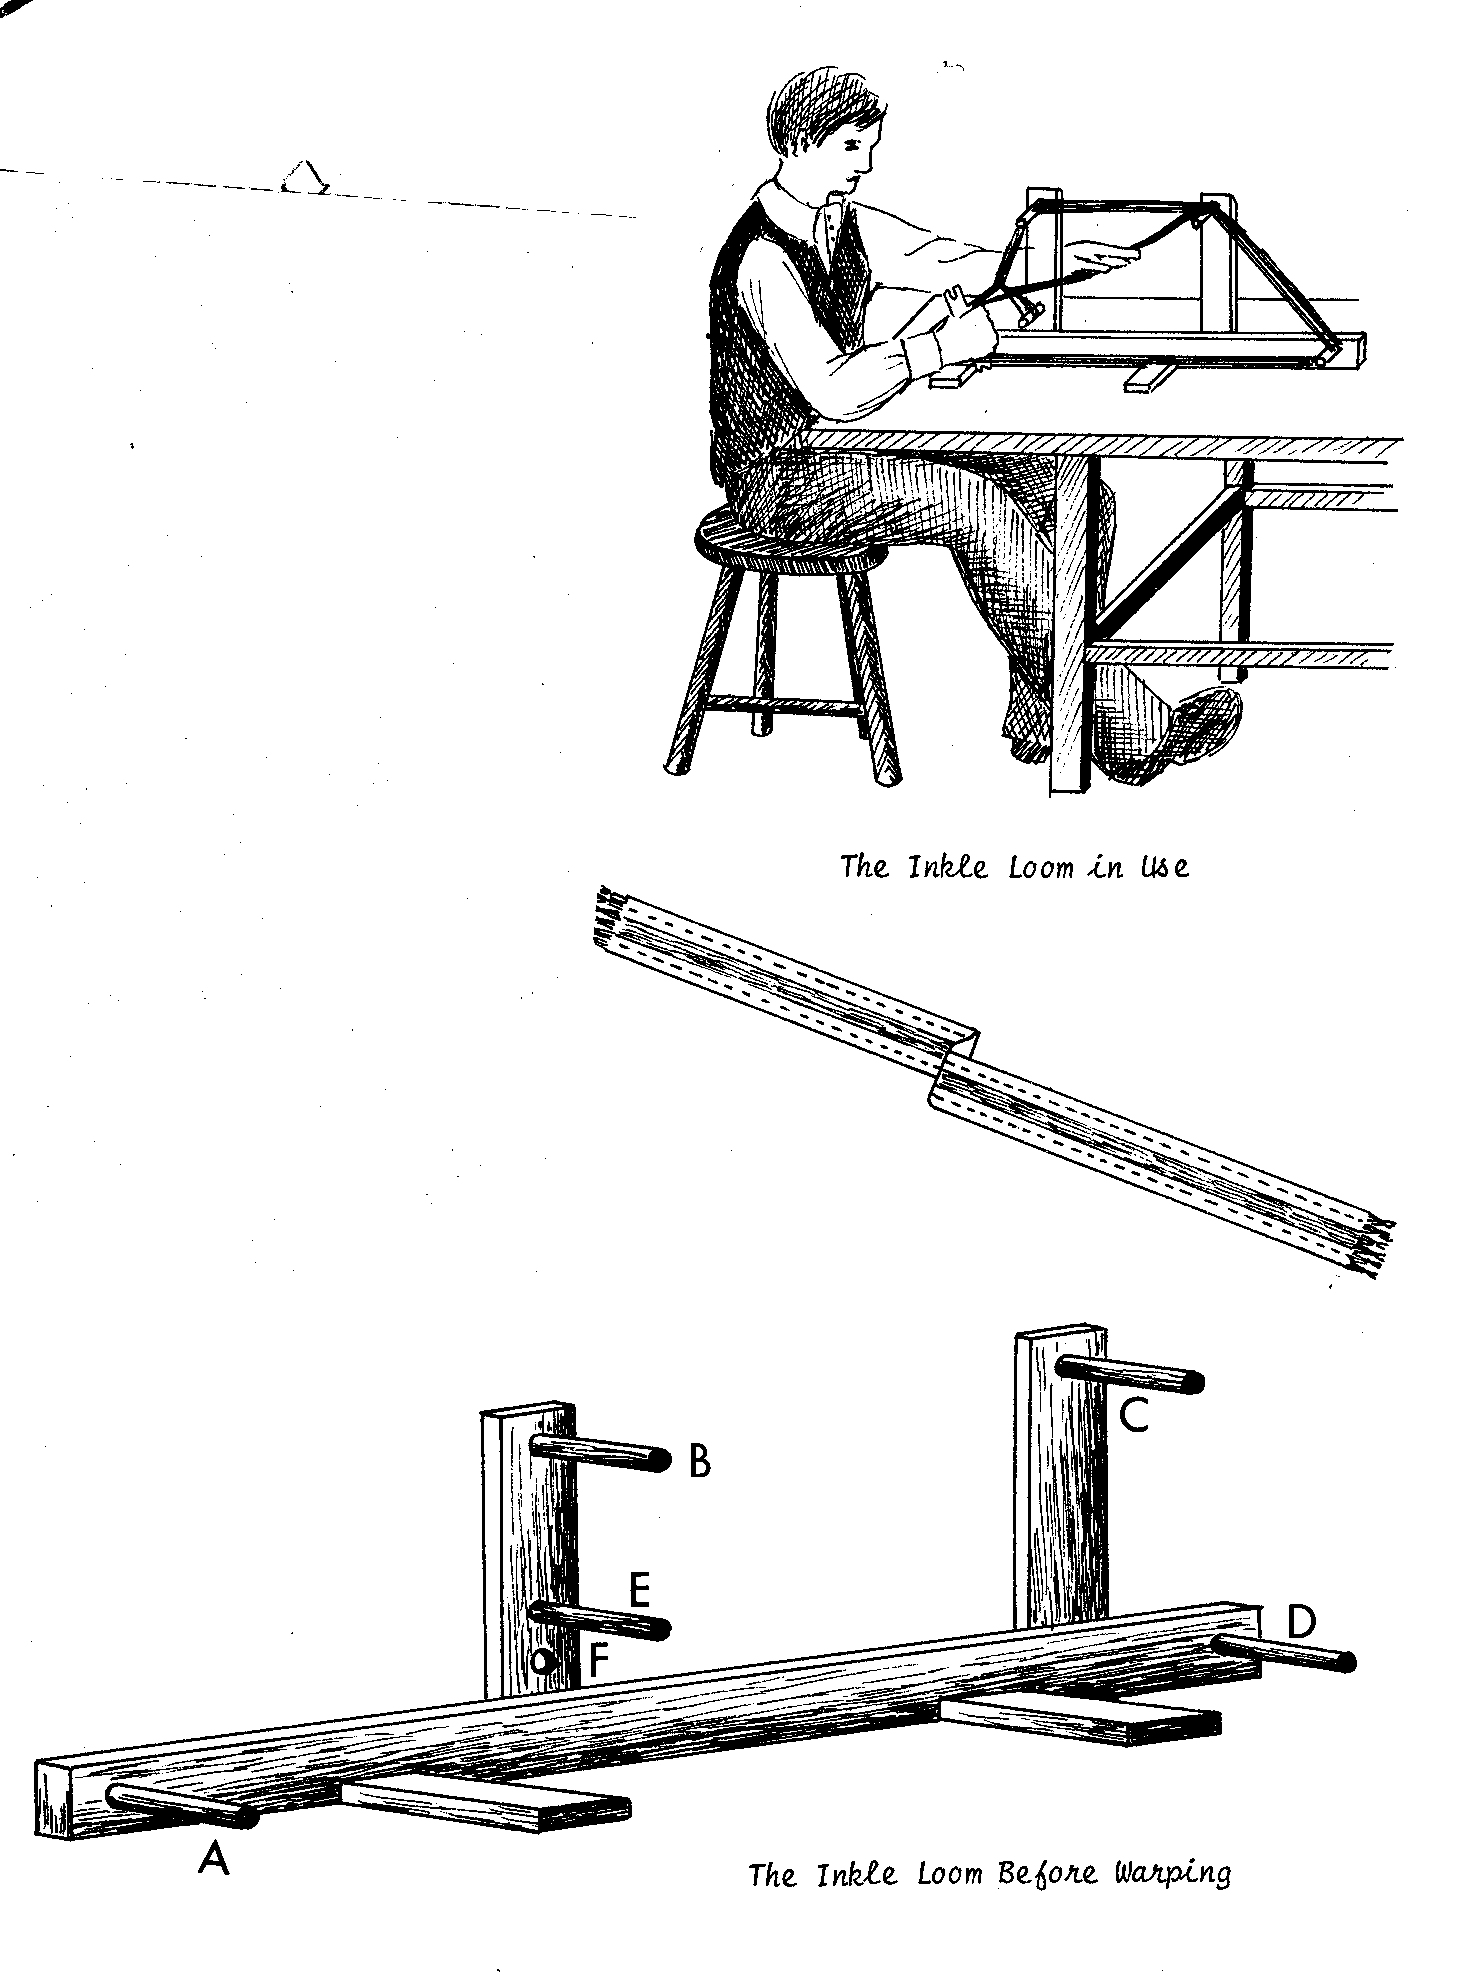
4 The Inkle Loom
The loom shown here produces
strips of fabric about 1 meter long by 2 to 18cm wide. The size of the loom can be increased.
DIMENSIONS: Height 25cm Width 20cm Length 45cm
LENGTH OF WARP HELD: 100cm
WIDTH OF FINISHED CLOTH: 2 to 18cm
Materials Needed
FOR THE FRAME
One (1) board 3 by 5 by 45cm long Two (2) boards 3 by 5 by 25cm long Two (2) boards 1 by 5 by 15cm long Five (5) dowels or rounded sticks 20cm long, 1.5cm in diameter
FOR THE HEDDLES
About 5 meters of cotton or synthetic string
TOOLS AND SUPPLIES
Chisel
Drill
Screwdriver
10 Wood screws
Sandpaper
Oil
Construction
A. Prepare the Wood
Sand and smooth all rough spots and edges
Oil wood to prevent splitting
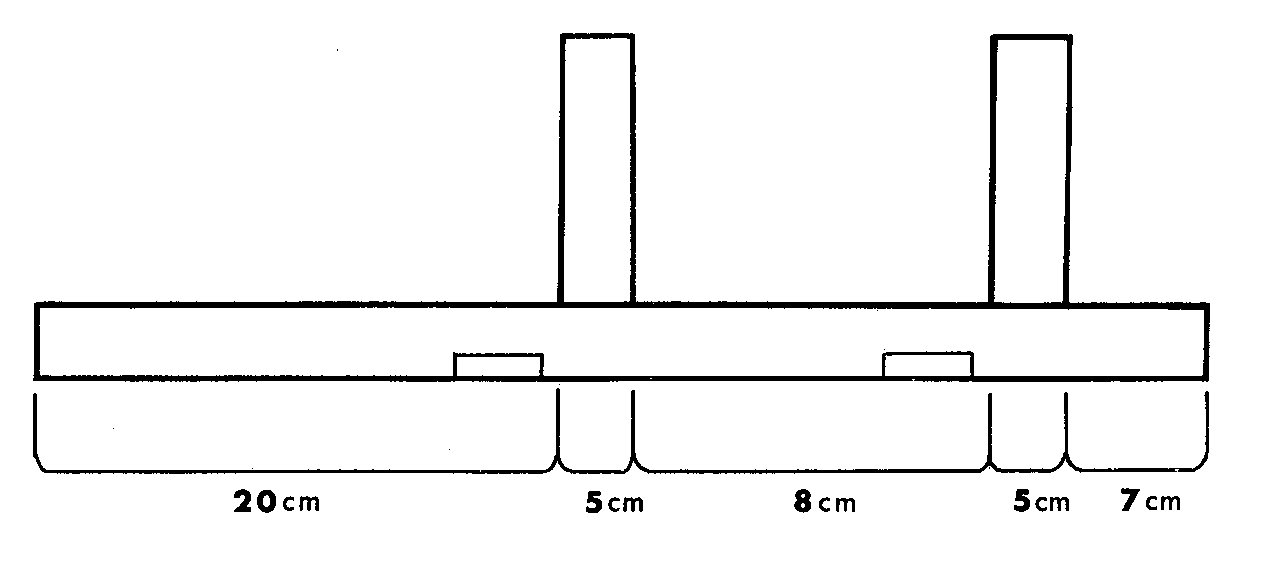
B. Build the Base
With chisel, carve out two rectangular slots on the bottom of the 3x5x45cm board exactly as illustrated.
B. Build the Base (cont'd.)
Place the two 1x5x15cm boards in the slots so that they are flush and project equally on both sides
Screw in place, using three screws for each board.
Turn the piece over so that the two projecting boards become the base.
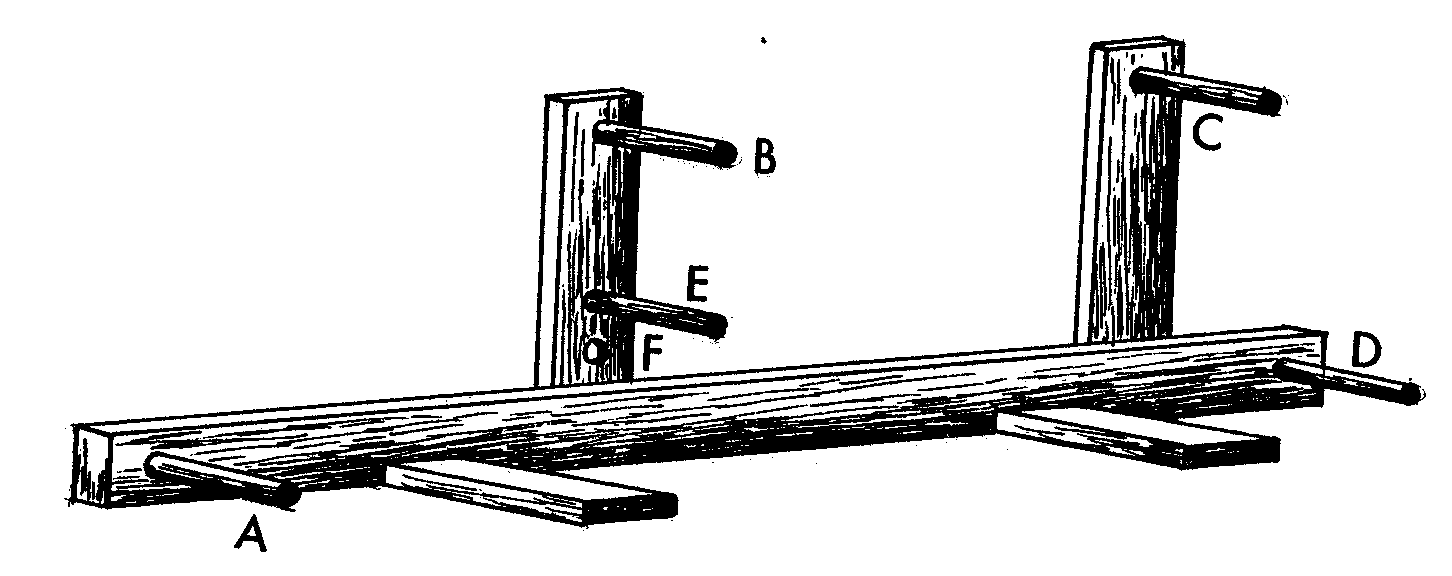
C. Build the Frame
Drill holes A and D in the 3x5x45cm board. Holes should be 1.5cm in diameter and spaced as shown.
Drill holes B, E, F in one 3x5x25cm board and hole C in the other 3x5x25cm board. Holes should be 1.5cm in diameter and spaced as shown.
Screw the 3x5x25cm boards to the side of the 3x5x45cm board as shown. Use
two screws in each.
The base with uprights should now look like this.
Place dowels in holes. They should be tight. Loose dowels can be made
tighter by wrapping paper around the ends before putting them in the holes. (NOTE: Right-handed weavers should have dowels projecting to right, left-handers to left)
D. Make the Heddles
1. Place dowels in holes B and F 2. Wrap a piece of string from the ball around the dowels and tie with a square knot. Remove the string circle from the dowels. This is the heddle.
3. Repeat for each heddle needed. You will need half as many heddles (or string circles) as number of lengths of warp you will use. For example 18 heddles would be needed to weave a 18cm wide belt made up of 36 lengths of coarse 2 ply wool. In general the thinner the yarn the more heddles you will need.
If you run out of heddles, do not be concerned as more can be made at any time.
Set Up the Loom for Weaving
NOTE: Before warping the loom, choose a weave and/or pattern to set up. Plain weave and a striped pattern are good choices for a first weaving project.
A. Warp the Loom
Note the letters on the accompanying drawing of the loom. Each letter represents
the hole and the dowel in that position. This will be used to help you guide the warp on to the frame. 2. Move the dowel from hole F (where it was for making the heddles) to hole E. 3. Make one ball or easily undone skein of each color warp to be used.
Tie the end of the first color to dowel A, in an easily undone knot such as a half-hitch.
Wrap the warp three times around dowel A, clockwise.
Take the warp from dowel A, between dowels B and E, and then over dowel C as shown.
Bring yarn down and around dowel D and then back along bottom of dowels to A.
Pull warp taut.
Repeat this winding from A, between B and E, over C and down to D returning to A with the second warp.
Bring third warp thread from A up and over B, then over C, down to D and return to A.
Lay ball of warp down.
Place a heddle (string circle) over the third warp as illustrated.
Bring the two loops of the heddle down and over the end of dowel E. Slide back toward frame.
Pick up ball of warp. Bring yarn from A to C around D and return to A.
Repeat Steps 10 through 14 until warp is desired width. Remember to alternate one warp with a heddle and one without.
To end: For last two warps wrap the yarn around twice from A to C to D to A, without heddles. Locate the first warp end and untie it. Cut other end from ball. Tie in a square knot under dowel A.
NOTE: If your pattern calls for changing the color of the warp, procede as follows:
a. Lay aside the first color when the warp is at dowel A. b. Tie new color to A using half-hitch, wind around A three times in a clockwise direction. c. Continue warping as before (Steps 10 to 14) d. When desired number has been wound, lay aside color and either take up the previous one or tie on the next new color and continue warping as before.
Do not cut off any balls of warp. e. To end: Locate all ends and untie from A. Cut off balls of warp leaving enough to tie a knot. Knot the ends together in one knot, using the square knot. <see picture>
Your Loom is Now Warped
How to Weave on an Inkle Loom
You will need a Beater and a Shuttle for weaving. Consult Chapter 6, "The Weaver's Tools" for directions for making these and other helpful tools.
Steps in Weaving
Wrap weft on shuttle.
Move the dowel in hole E to hole F. This will pull the warp much tighter.
Place hand under warp behind dowels B and F. Pull up as illustrated.
This creates the shed (or space) in front of dowel F. 4. Pass shuttle through shed. 5. Place hand on top of bottom warp threads behind B and F, as illustrated.
Push down. Pass shuttle through.
Beat weft into place with a Beater.
Repeat Steps 3 to 7 until you can no longer fit shuttle through shed.
Advance warp by grasping it in your hands between A and B and pulling toward yourself. The woven cloth will go under the loom and the unwoven warp moves forward between A and B.
Continue weaving until the beginning of the cloth is behind dowel B. Cut warp between A and B at the heddle.
Slide heddles off (they can be reused) and tie end of warp to prevent unravelling (See pages 145-155).
5 The Foot-Powered Loom
There are two versions of the Foot-Powered Loom presented here. Directions are given first for building the frames for the Pit Loom (which can be fixed to a wall or ceiling) and the Free-Standing Loom. Instructions for constructing the moveable parts and for warping and weaving on the looms follow and are the same for both of these foot-powered looms.
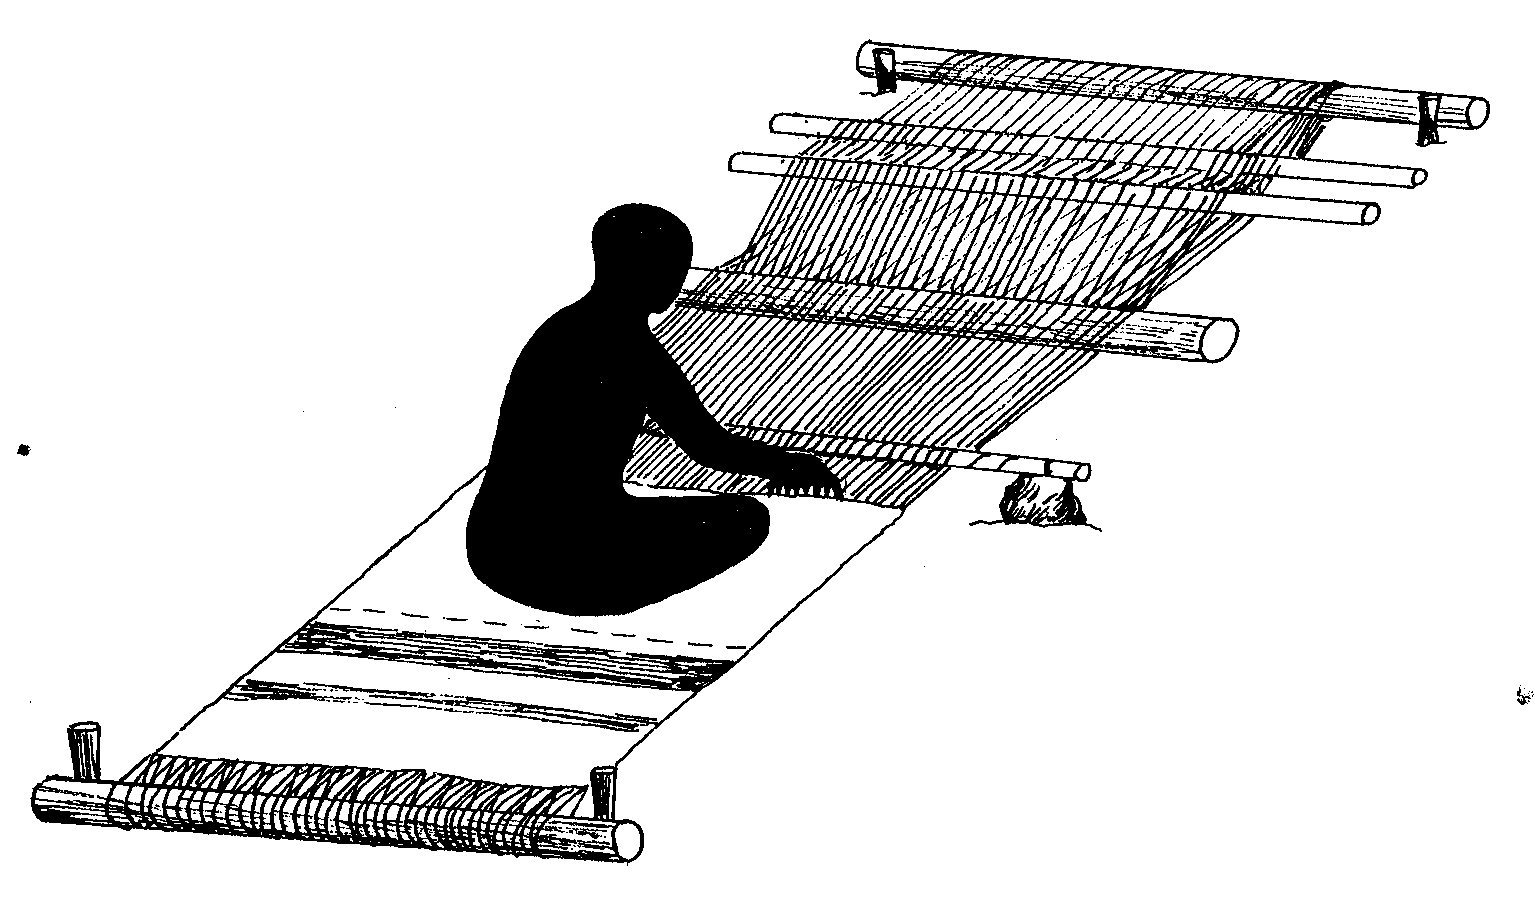
Pit Loom Version <see picture>
DIMENSIONS: Height: 120cm or height from floor to ceiling Width: 100cm Length: 200cm
LENGTH OF WARP HELD: 200 to 3600cm
WIDTH OF FINISHED WEAVING: 2 to 100cm
Materials Needed
For the Frame of both wall-mounted and ceiling-mounted types:
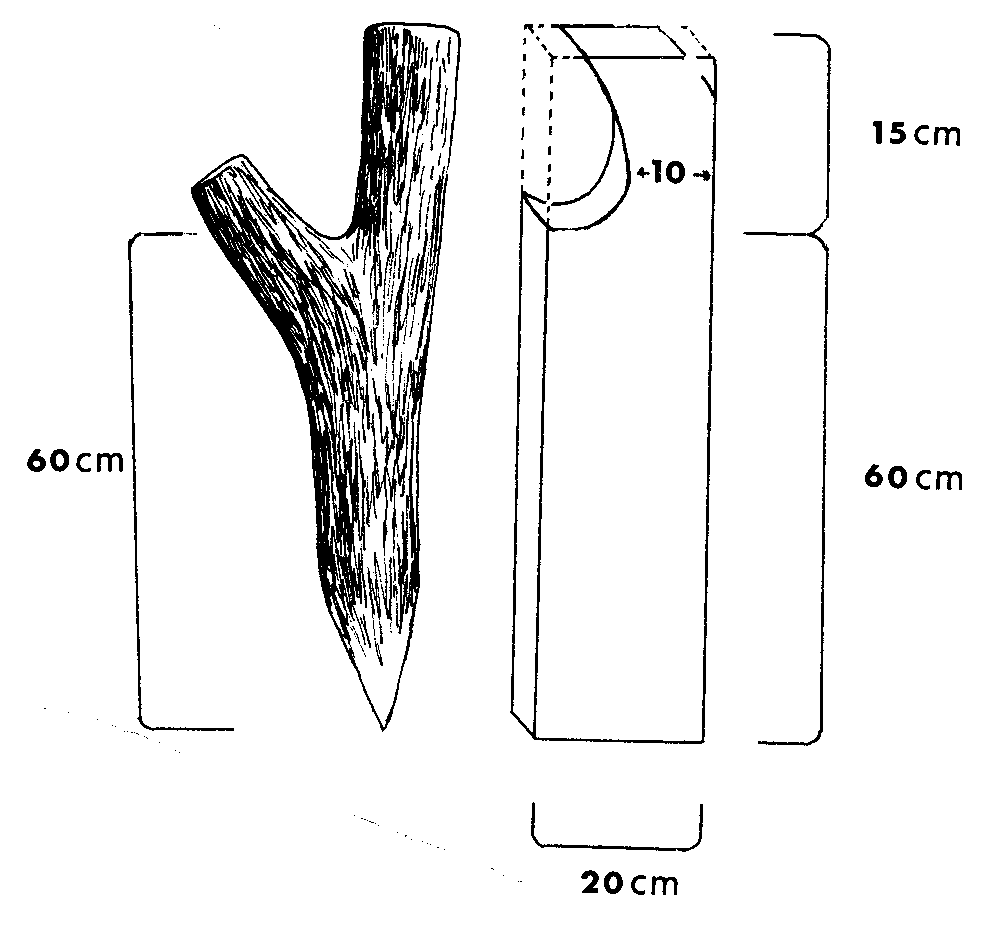
Four (4) appropriately shaped forked tree branches at least 15cm in diameter at the base, and at least 60cm in length from the base to the bottom of the fork. Commercial lumber, 5x20x75 with a notch cut out as indicated, may be substituted.
For the Frame of the wall-mounted type only:
One (1) forked tree branch at least 15cm in diameter at base and 120cm long. Commercial lumber 5x20x120cm with a notch cut out as indicated, may be substituted.
One (1) piece of wood 115cm long and 5cm in diameter.
Tools and Supplies (for both types)
Sandpaper
Oil for Wood
Wood Preservative
Shovel
Cement (Optional)
Pit Loom Construction
A. Find a Site
This loom is permanently built into the house or other building. Locate so that it will not interfere with other activities and where the weaver will be comfortable while working.
1. Locate the loom in a building with an earthen floor. After the loom is constructed the floor may be cemented over. 2. Place the front of the loom in such a way that light from a door or window will come from the weaver's side or over his or her shoulder. 3. Leave clear access to both ends of the loom from at least one side. 4. Build a loom supported by a wall so that one of the long sides of the loom runs along the wall. 5. Build a loom supported by the ceiling so that there is a beam about midway over the loom from which to hang the harnesses.
B. Prepare the Wood
1. Remove bark 2. Sand and smooth any rough places or edges 3. Put wood preservative on the bases of the five forked posts 4. Oil the wood to prevent splitting
C. Erect the Frame
1. Mark off a rectangle one meter wide by two meters long on the floor where the loom will be located. 2. Dig a hole in each of the four corners. The hole should be about 30cm deep. 3. Place the four short forked posts in the holes and fill the earth firmly around them. Clay or mixed clay soils will provide the firmest base. Make sandy soils firmer by adding clay or cement.
D. Build the Pit
1. Mark off a second rectangle 20cm in from the front of the loom, 60cm wide, 80cm long. 2. Dig the pit 40 to 50cm deep, about the length of the weaver's leg from the back of the knee to the sole of the foot.
E. Attach the Wall-Supports for the Wall-Supported Type
1. Dig a hole 30cm deep midway along the outside edge of the rectangle. 2. Place the end of the 120cm forked post in hole and fill as described earlier. 3. Place the meter length of wood in the fork and push until it touches the wall. It should be parallel to the ground and at right angles with the wall. Mark the wall where it touches. 4. Remove pole and make a hole in the wall at that spot, the same diameter as the stick. 5. Put pole back into the fork and push until it is firmly in the wall. 6. Seal with plaster or cement.
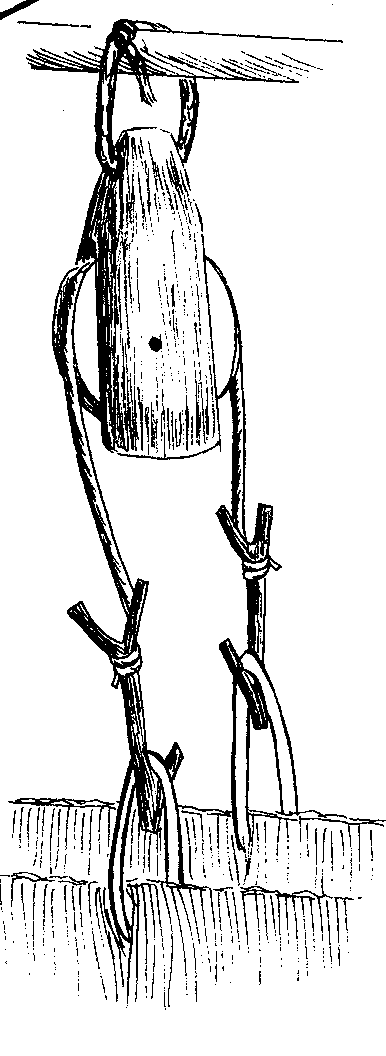
The Wall Supported Frame Is Now Complete <see picture>
OPTIONAL: If desired the floor and pit can be coated with a smooth layer of cement.
THE MOVING PARTS FOR THIS LOOM AND THE WARPING AND WEAVING TECHNIQUES ARE DESCRIBED STARTING ON PAGE 84.
Free-Standing Version <see picture>
DIMENSIONS: Height: 130cm TOOLS AND SUPPLIES: Width: 98cm Length: 200cm Drill Wood Glue Saw 26 Wood Screws LENGTH OF WARP HELD: 200 to 3600cm Hammer Sandpaper Rasp Oil for Wood WIDTH OF CLOTH WOVEN: 2 to 90cm Screwdriver
Materials Needed:
For Frame: (Letters are used to identify pieces in text)
(A) Four pieces of wood - 110cm long, 6cm in diameter OR 4x6x110
(B) Four pieces of wood - 132cm long, 8cm in diameter OR 8x8x132
(C) Two pieces of wood - 5x10x30
(D) Two pieces of wood - 200cm long, 8cm in diameter OR 6x8x200
(E) Two pieces of wood - 4x9x30cm
(F) Two pieces of wood - 200cm long, 6cm in diameter OR 3x6x200
(G) Two pieces of wood - 3x4x55
(H) One board - 32x110, thickness ranging from 2 to 5cm
(J) Two poles or sticks - 110cm long, 2cm in diameter
Fourteen (14) wooden pegs or dowels 15cm long, 3cm in diameter
Free-Standing Loom Construction
A. Prepare the Wood
1. Remove bark of unmilled tree limbs 2. Sand and smooth all rough spots and edges 3. Oil wood to prevent splitting
B. Build the Frame (all dimensions in centimeters)
1. Trim both ends of pieces A as illustrated.
2. Cut four slots in each of the four B pieces using the dimensions indicated. Slots must go completely through piece.
3. Shape piece C as illustrated. Drill hole as diagramed. Sand inside until smooth.
4. Trim ends of piece D as illustrated. Cut a slot 2x7cm 32cm
in from one end of each piece D. Slot should be 7cm long.
5. Trim bottom ends of E as shown. Cut out
notch as shown on pattern. Sand inside until smooth.
Trim ends of each piece F as illustrated.
C. Join the Frame
1. Attach each piece C to piece B in the position diagramed using two wooden pegs and glue.
2. Place the trimmed end of piece E in the slot in piece D. The notch must face toward the shorter end as shown.
Glue and peg in place. Make sure it is securely attached: this piece undergoes great stress during weaving.
3. Place pieces A into the corresponding slots of pieces B. Note the position pieces C in illustration glue and screw together.
4. Place the trimmed ends of D and F into the appropriate slots in pieces B. Hammer them so that the trimmed end projects as far as possible.
5. Drill a hole 2cm in diameter, as close as possible to the crosspiece at each point where the trimmed ends project.
6. Taper the remaining eight pegs so that they are 3cm at the top and 2cm at the bottom.
Drive the tapered peg into the drilled holes.
8. Place Piece H, the seat, between the end of the loom and piece E.
D. Make and Attach the Rod Holder
1. Cut ten semi-circular notches out of the top edge of piece G with the dimensions illustrated.
2. Smooth inside edges of cutouts with rasp and sandpaper.
3. Glue and screw pieces G to the top of pieces F in the location illustrated.
4. Place pieces J, the rods, across the top of the loom frame, resting in the notches of piece G.
The Moveable Parts for Both Loom Designs
The following parts--the beams, beater, comb and heddles--are designed to be interchangeable for both foot-powered looms. These parts are not a permanent part of the loom frame. When necessary they can be removed--even when there is still cloth being woven--and stored away. This means that more people can weave than might be possible otherwise; it is not necessary for each weaver to have his or her own frame. It is possible to construct a set of moveable parts for each weaver so that several people can share the same loom frame.
I. Cloth Beam (SEE ILLUSTRATION ON PAGE 85)
A. Materials Needed:
One (1) straight tree limb - 125cm long, 10cm in diameter, or milled lumber - 10 x 10 - 125cm.
B. Construction
Trim the piece of wood to 6cm in diameter for 115cm of its length.
Leave the remaining 10cm in diameter, but drill and chisel a hole 2cm by 5cm completely through one side.
Drill a similar hole from the other side at right angles to the first.
Cut a notch 2cm by 90cm completely through the beam in the 6cm diameter section.
The Cloth Beam Is Now Complete <see picture>
II. The Warp Beam
A. Materials Needed:
One (1) straight tree limb, 125cm long, 10cm in diameter, or milled lumber 10x10x125cm.
B. Construction
1. Construction proceeds as described for the cloth beam from Step 1 to Step 3.
Cut groove 2 x 90cm only to a depth of 2cm; do not cut completely through the beam.
The Warp Beam Is Now Complete
III. The Beater (SEE ILLUSTRATION ON PAGE 85)
A. Materials Needed:
Two (2) pieces of wood - 5 x 5 x 120cm (labelled A).
Two (2) pieces of wood - 1 x 4 x 120cm (labelled B).
Two (2) pieces of wood - 1 x 2 x 4cm (labelled C).
B. Construction
Drill and chisel a hole 1cm by 4cm in each end of both pieces A. Smooth the insides of the holes.
Carve a groove 1cm deep the length of both pieces A between the two holes as shown.
Nail piece C to the bottom of each piece B.
Sand and smooth each piece B. Taper the top end to a point, to ease assembly.
Slide pieces B into the holes in pieces A so that the grooved edges of pieces A face one another.
The Beater Is Now Complete <see picture>
C. Attach the Beater to the Loom
Pit Loom
1. Ceiling type: suspend a rod one (1) meter long from 2 hooks in a ceiling beam.
2. Wall type: suspend from a crosspiece which is attached to the wall and supported by a fork.
3. Free-Standing: Attach to rod (J) which rests across top of frame on pieces G.
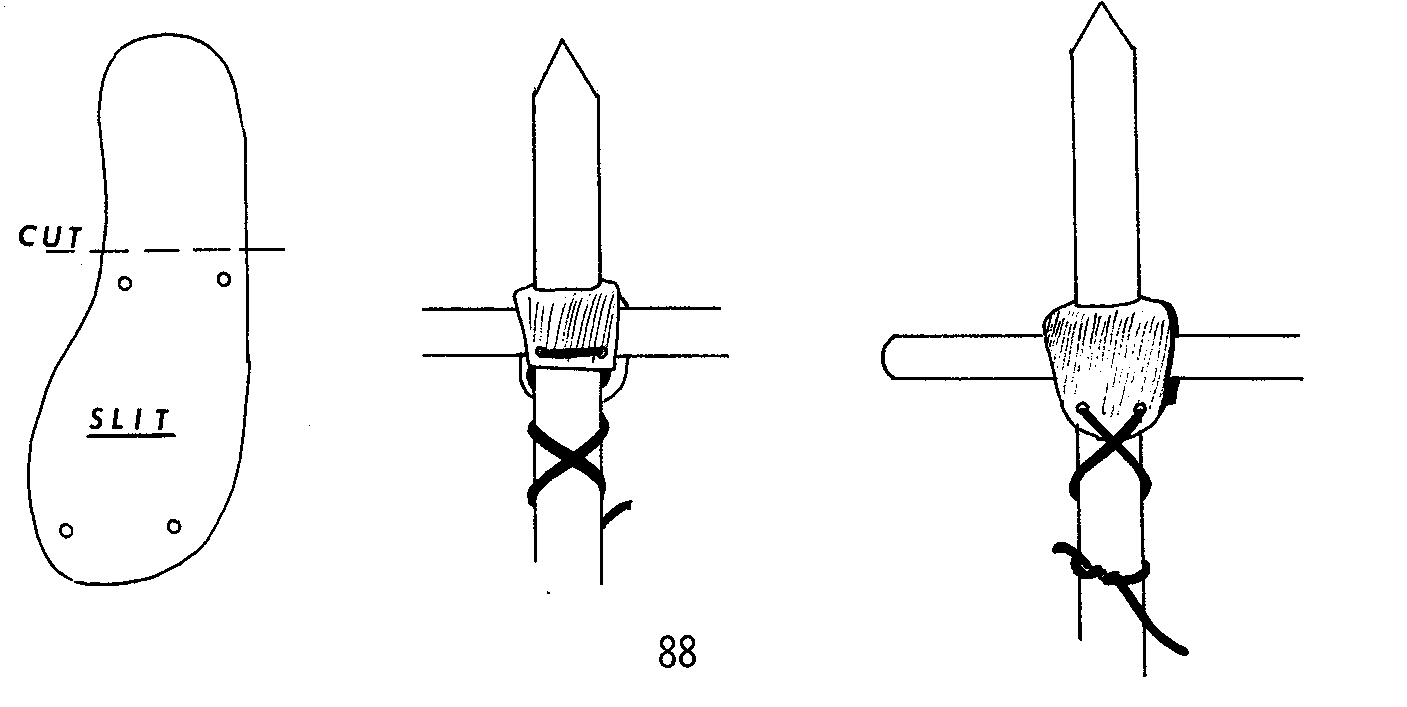
a) Tie arms of beater to rod as illustrated. A leather shoe sole may be used to create a simple hinge.
b) The beater should swing freely at the same height as the top edge of the cloth beam. <see picture>
IV. THE COMB
A. Materials Needed:
1. Four (4) pieces of lightweight wood - 0.2 x 0.8 x 100cm.
2. Reed - 220 pieces - 0.3 x 0.5 x 12cm for heavy two-ply warp.
OR
- 380 pieces - 0.15 x 0.5 x 12cm for medium cotton warp.
OR
- 500 pieces - 0.1 x 0.5 x 12cm for fine cotton warp.
NOTE: The size and number of reed pieces is determined by the diameter of the warp thread used. You may have to make adjustments in the above recommendations to suit your particular warp.
3. Two pieces of wood - 0.5 x 2 x 12cm
4. Cotton string, about 20 meters, and the same diameter as that of the warp to be used.
5. A sharp knife.
B. Construction
1. Take two of the pieces A and one piece C and place them together sandwich style as shown.
2. Securely knot the end of the cotton string around one piece A at the end as shown. A small notch can be made with the knife to prevent slipping if necessary.
3. Loop in and out of the two ends of pieces A in a figure eight about six time.
4. Bring the string parallel to piece A on one side past piece C.
5. Holding it in that position with one finger, bring the rest of the string under and up around the top of it.
6. When it meets the string being held by the finger thread it through the loop as shown.
7. Pull down and then up to tighten the loop. Knot should be on the side of the meter length.
8. Repeat Steps 1 through 7 with the other two (2) pieces of A, attaching them to the bottom of piece C.
Place one of the slivers of reed between the two sticks. Loop the string around as diagramed.
10. There should be a space of about 0.1cm to 0.2cm created by the string. If there is no space, or if the space is too small for your warp, either start over using the string doubled, or make a second loop as done in Step 9.
11. Repeat Step 9 at bottom, fastening the reed in place at both ends.
12. Place another sliver of reed in position. Repeat the knot as shown in Steps 9 through 11.
13. Continue, doing both top and bottom, until you are 3cm from the end. You may not be able to fit all the reed because of variation in the spacing, or for the same reason you may need a few more pieces to complete the length.
14. Place the remaining piece C at the end and tie off the string as You did in Step 3 with a figure eight, and a secure knot. At this point the string should hold all of the reeds securely enough so that they do not slip out.
The Comb Is Now Complete <see picture>
V. The Heddles (SEE ILLUSTRATION ON PAGE 85)
A. Materials Needed for two (2) Heddles.
Note: Both looms may use up to eight (8) heddles each.
Four (4) rods of strong wood 2-4cm in diameter, 130cm long.
One (1) kilo of strong cotton string divided into four equal balls.
A board similar to the rod in width, 15cm high and 60cm long, to serve as a form.
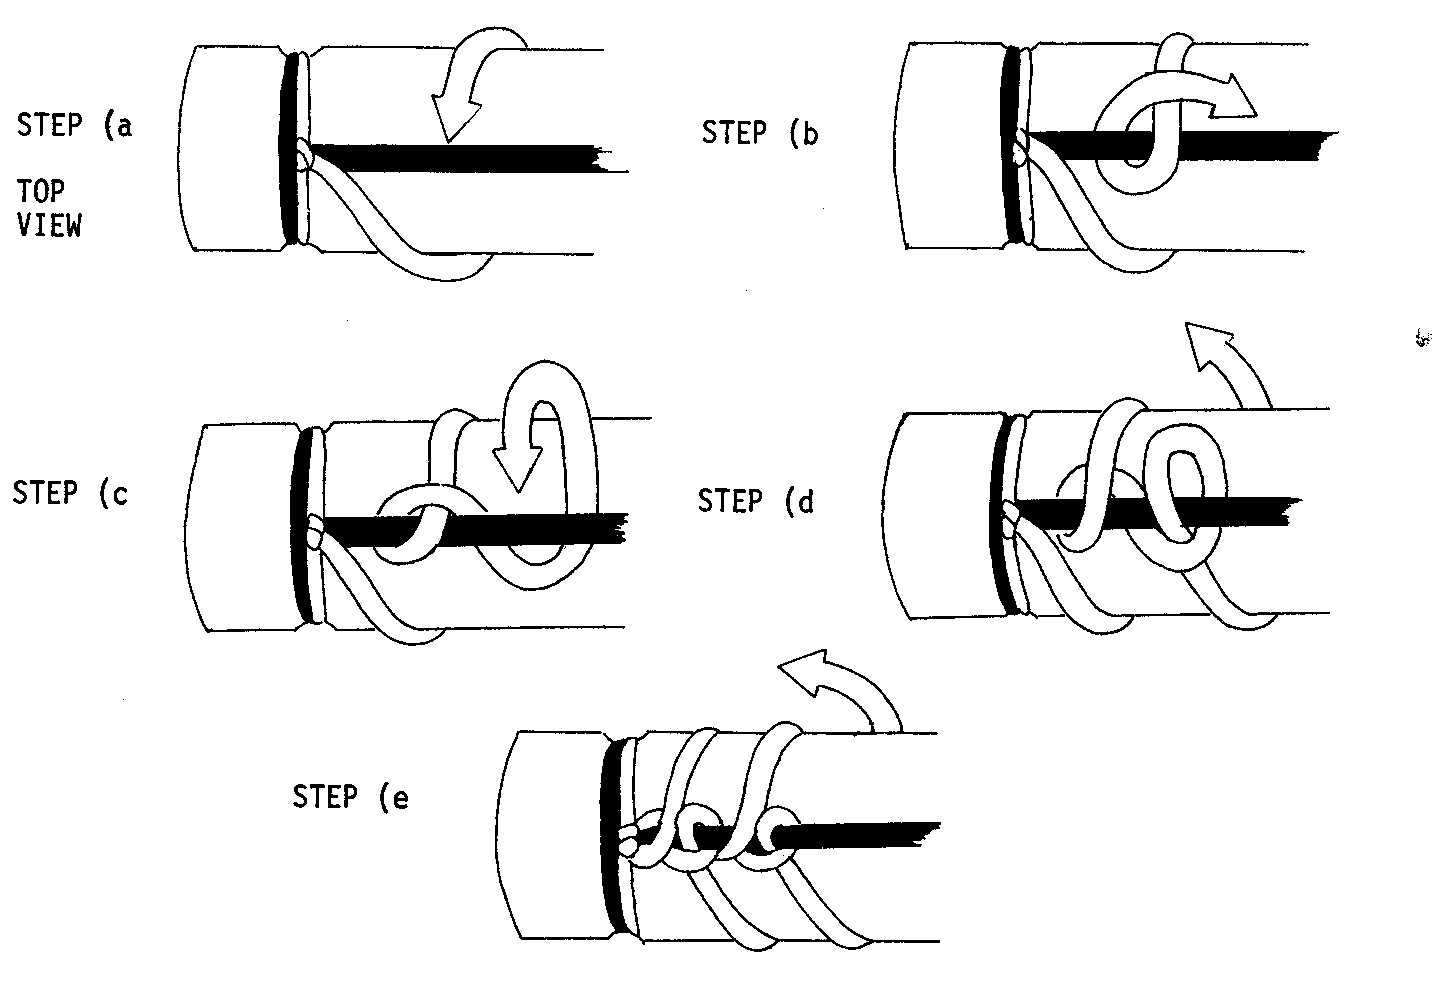
B. Construction
Cut a groove 3cm from the end of each rod.
2. Cut a piece of string 140cm long and tie it in the notch at one end.
3. Tie one end of a ball of string to the same notch.
4. Place the rod on top of the board.
5. Hold the shorter string taut along the top length of the rod. (This string is shown as black in the illustrations).
6. Steps a thru f show the "looping" process. Pass the ball of string under the board as shown in Step f.
Every ten loops pass the ball between the rod and the board to fasten it to the rod.
NOTE: The total number of loops made should be even and they should be double the number of spaces in your comb.
7. As the loops are made they are slipped off the board and the board is moved forward.
8. When the desired number of loops is reached, tie both strings in the groove at the other end.
9. Using the second rod, repeat the above except this time when each loop is passed under the board pick up a loop from the first rod and pass the ball of string through that as well.
10. When all the loops are picked up, one heddle is complete. Tie off in the grooved end.
11. Repeat all of the above directions for the second heddle.
The Heddles Are Now Complete
VI. Machinery for the Harnesses
A. Materials Needed:
1. Two (2) small pulleys.
2. Light rope, 1cm in diameter.
3. Four (4) hooks, either of heavy wire or appropriately shaped twigs.
4. Two (2) pieces of wood about 3cm x 8cm x 20cm.
5. Heavy rope, 2cm in diameter.
6. A piece of pipe, metal tubing or strong wood 30cm long, and about 1.5 - 2cm in diameter.
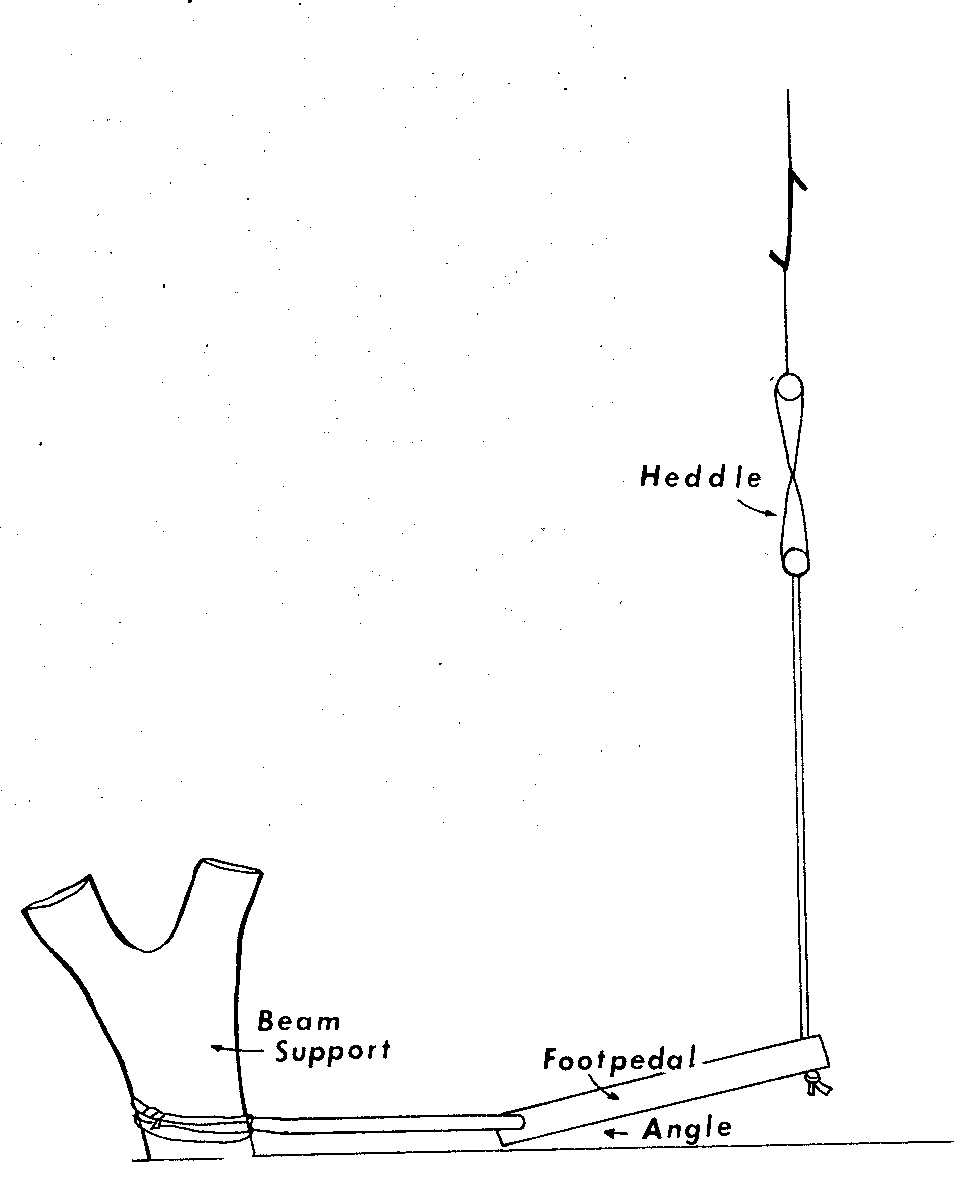
B. Foot Pedal Construction
1. Drill holes 2cm in diameter in the top of the two wooden pieces as shown.
2. Drill holes 2cm in diameter in the side of the same wooden pieces as shown.
C. Machinery Set Up
Tie a loop of light rope to each end of the heddles about 10cm in from the end on the top rod. 2. Tie a similar loop in the center of the heddle from the bottom rod.
Hang pulleys from the same rod the beater is attached to on the pit loom and to a separate rod laid across pieces N on the self-supporting loom.
Cut two pieces of light rope, Tie one end to a hook, thread it over the pulley wheel and tie the other end to another hook.
Hang heddles by loop from the hooks. They should hang evenly and at the same height or slightly higher than the beater and the comb.
Adjust lengths of ropes if necessary. <see picture>
6. Put a secure knot in the ends of two short pieces of heavy rope. Thread them through holes in drilled blocks of wood so that the knots are on the bottom.
7. Thread metal pipe, tube or stick through holes in the side of wooden blocks.
8. Tie two pieces of rope to the ends of the pipe.
9. Tie rope at front of the blocks to the loop in the bottom of the heddles.
10. Tie rope at back of blocks to the cloth beam supports.
The Harness Is Now Functional
NOTE: During warping, the
heddles are removed from the machinery for threading.
MACHINERY IN PLACE ON FRAME LOOM SIDE VIEW
MACHINERY IN PLACE ON CEILING-SUPPORTED LOOM
Warp the Foot-Powered Loom
NOTE: Before warping the loom, read Chapter 7: Weaves Patterns and Finishing Touches for help with selecting a weave and/or pattern for a first project. Plain weave, basket weave and/or a striped or plaid pattern are recommended for the first weaving. It is also necessary to have the raddle (p. 115) ready before beginning.
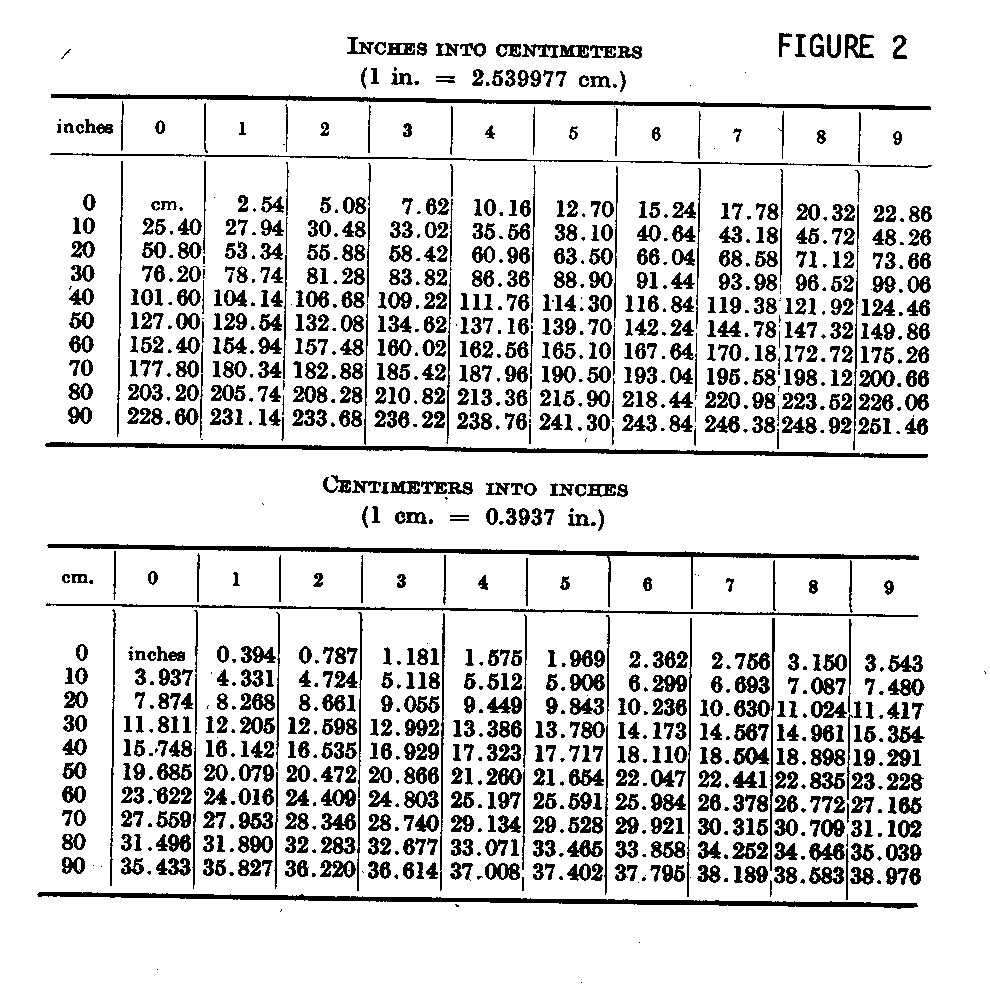
I. Measuring the Warp (See also Warping Board pp. 31 & 124.)
A. Equipment Needed:
Four wooden or metal stakes about 30cm high
B. Measuring Procedure:
1. Place two stakes in the ground: the total distance apart desired for the piece of weaving (2 to 36 meters).
2. Place two more stakes about 30cm inside the two stakes. 3. Tie the beginning of the warp (wound in a ball) to one of the outer stakes. Walk between the stakes wrapping the warp in the pattern illustrated.
4. Count each length. It helps to tie warp threads in groups of tens when working with a large number of threads. When desired number is reached, untie the beginning of the warp and tie it to the end.
5. Tie a string around the warp where it crosses between the stakes.
6. Ending: when the desired number of warp threads have been counted, untie the beginning end and tie in a weaver's knot to the other end.
7. Changing color: Warp colors can be changed as was cribed for the frame loom (page 38, Steps a-h).
C. Gather up Warp in a Warp Chain.
Slide the loop off at one end of the stakes.
Open the loop and put your hand through. Draw up a section of warp and bring it through the first loop to make a second loop.
Continue until end is reached. Pull the end through and pull snugly, but not tight.
To undo: Take the end out of the last loop and pull; chain will release.
II. Wind the Warp
A. Equipment Needed:
One (1) stick cut to fit the groove in the warp beam. One (1) stick that fits the hole in the end of the warp beam. Several thin sticks - 90cm long.
B. Procedure:
1. Place one of the open loops over the end of the warp beam. Slide to center.
2. Place warp beam on either of the beam supports of the loom. It does not matter which support or which direction the warp is going as long as it can be extended full length. This, of course, will depend on the location of the loom.
(If it is impossible to use the loom supports because of inadequate space, you can set up two forked posts similar to the beam supports on the pit loom (see page 97) in an open space. These can then be left in place permanently for future warping.
3. Prevent the warp from slipping as it is wound by: a) Cutting a stick to fit into the groove in the warp beam. b) Pushing the stick against the warp and into the groove. c) Turning the warp beam in a clockwise direction so that the stick is locked into place by the covering warp.
The following steps require two or three people:
a) One person inserts a stick in the hole in the warp beam and slowly turns the beam in a clockwise direction winding on the warp. Every turn or so, he or she inserts a thin stick between the layers of the warp.
b) Another person holds the end of the warp extended at full length, keeping it taut and straight as it is wound.
c) A third person opens the raddle and lays groups of warp threads between the nails. The raddle is closed and tied shut. Then, holding the raddle, he or she guides the warp as it is wound, making sure it is evenly spread. If no other person is available to assist, the raddle can be tied to the other beam. <see picture>
4. Place the lease sticks (two (2), one meter-lengths of reed or bamboo) in the positions shown just before winding the end of the warp on to the beam. Tie together as shown.
III. Thread the Heddles and Comb
The following process requires two people if it is to be done quickly and efficiently. (It is possible for one person to perform the task if he or she threads small sections of the warp - - first through the heddle and, then, reversing his or her position, threading the warp through the comb.)
A. Equipment Needed:
Small size crochet hook or bent piece of wire or sharp knife.
B. Threading Procedure:
Two people sit facing one another with the two heddles (removed from the loom) and with the comb suspended between them from the backs of two chairs or from the beam supports.
One person holds the warp beam, warp and lease sticks in his or her lap, and faces the heddles. The other person faces the comb.
Cut the end loop of the warp after sliding the two lease sticks back to free about 30cm of warp.
Take one piece of warp at a time in order check order against lease sticks) and thread it through the heddles following the steps below:
In Plain Weave, every other thread is inserted through a twist in the near heddle. The alternate thread is inserted in a twist in the far heddle. (For other weaves, and in cases where more than two (2) heddles will be used, see Chapter 7).
Insert (second person) a crochet hook, needle or sharp knife edge through one of the dents of the comb after the thread is inserted.
Loop the thread over and pull it through. Take care not to miss any threads or spaces, nor should threads cross.
Tie every group of ten threads in an overhand knot to prevent them from slipping out of the comb.
Put two warp threads through the same heddle at both ends.
IV. Place the Warp on the Loom
1. Place the warp beam on its supports so that the warp extends out to the cloth beam, and unrolls from the top of the beam.
2. Use a pole such as a broomstick to wedge between the hole in the warp beam and the floor, to prevent it from turning.
3. Replace the heddles on the pulleys and attach the footpedals (see pages 96 & 97).
4. Open beater and insert the comb in the grooves. Close it snugly so that the comb is firmly caught and does not bend or move when the warp is pulled.
5. Place the cloth beam in position. Find a stick that fits the hole in the beam. Drill a small hole in the end of it and insert a strong piece of wood. Tie the beam in position as shown above.
V. Attach the Warp to the Cloth Beam
1. Tie a piece of cord to one end of the beam. Wrap it loosely around the beam twenty to thirty times. Tie off.
2. Sit down at the loom. Tie each group of ten (10) warp threads to the looped cord on the beam (do not undo the knots made during threading). Use the following knot to tie them.
4. Test the tension of the warp by running your finger across the warp threads.
5. If necessary, release the tension on the warp slightly and retie any loose bunches of warp.
6. Tighten the warp as much as possible.
You Are Now Ready to Weave
How to Weave on a Foot Powered Loom
You will need a shuttle and stretcher for weaving. Consult Chapter 6 The Weaver's Tools, for directions for making these and other helpful tools.
Steps in Weaving on Both Looms
To start or end weft: take end and bring through several opposing warps. After weaving several more rows cut off end even with weaving.
Wrap weft on the shuttle.
Depress right footpedal and feed weft through shed.
Place weft at oblique angle to the warp.
Depress left footpedal.
Push weft firmly into place using the beater. (below)
Feed weft through from opposite side with left foot still depressed.
Depress right footpedal. Beat weft into place.
Release tension on warp and adjust.
Repeat steps 2 to 7 until there is about 10cm of woven fabric.
Put the stretcher into place and continue weaving.
Release the warp beam and cloth beams and turn them forward one hole when there is no more space between the fabric and the beater. Refasten and continue weaving.
Untie the warp from the beam and thread the cloth through the slot in the beam as shown
after 1/2 meter of cloth or more has been woven. Cross section of cloth beam showing cloth wrapped around.
As the warp shifts to the cloth beam on the free-standing loom, it may be necessary to balance the weight of the weaver and the cloth by placing a rock on a board at the back of the loom.
6 The Weaver's Tools
Each loom requires certain tools to help with the process of weaving. The following chart lists these tools as well as which looms require them. Instructions for making the tools follow.
TOOLS NEEDED FOR EACH LOOM
TOOL
FRAME LOOM INKLE LOOM FOOT-POWERED LOOM
Beater
yes yes no Raddle
no no yes
Shuttle carpet yes yes yes boat optional no optional Skeiner
yes yes yes Skein Winder
optional optional optional Stretcher
yes no yes Warping Board
no no optional
The Beater
While it is extremely important that the warp be kept taut during the weaving process, it is equally important that the weft threads be put in as close together as possible. In general, the more threads per centimeter of cloth, the more durable and long wearing the fabric will be.
A "beater" is used to push the weft
threads together. There is no set design for a beater for simple looms. It is usually a toothed tool which can be slipped between the warp threads and beaten against the weft. It should have some weight behind it, but at the same time not be so heavy as to tire the weaver's hand.
The frame loom and the inkle loom both require similar beaters. Beaters can be constructed specifically for the looms, or they can be made from objects found about the home.
A. Improvised Beaters
1. Forks: metal table forks make
suitable beaters, especially when used with a medium warp on a fairly narrow piece of weaving.
2. Metal Hair Comb: a metal toothed
hair comb can be used for weavings having rather fine warps.
B. Constructed Beaters.
1. Nail and Wood Beater: drive a
row of nails completely through a length of wood about 30cm long. The heads of the nails should project evenly. Sand and smooth the wood to make it easy on the hand.
2. Carved Wooden Beater: from a piece of well-seasoned, fine-grained wood, carve a toothed fork as illustrated.
3. Iron: if iron-working is done in your area, have a blacksmith fashion a beater as illustrated.
The Raddle
The "raddle" is used to guide the warp evenly onto the warp beam during the warping of the foot-powered loom.
Materials Needed:
2 pieces of wood about 3 x 3 x 100cm Nails Chisel Hammer
Construction:
1. Hammer nails 5cm apart, in an even row into one of
the pieces of wood.
2. Chisel a groove in the other pieces about 1/3 the depth of the projecting nail heads.
3. Grooved piece should fit snuggly over the nail heads.
Use:
1. Place the piece with the nails upright under the warp. 2. Put even amounts of warp in the spaces between the nai1s.
3. Place grooved piece on top.
4. Tie pieces together with string or strips of cloth.
The Shuttle
A shuttle is often used to thread the weft through the warp. Stiff fibers, such as cane,
reed, straw and leaves, can probably be pushed through the shed by hand and no shuttle is needed. Coarse, but flexible fibers such as goathair, jute, old rags and plastic strips as well as some finer threads can be put into place using a "Carpet Shuttle."
Very fine wefts such as linen, cotton and silk can be put into place using a "boat shuttle."
The Carpet Shuttle
Materials Needed:
Flat pieces of wood 60cm long or smaller if your loom is smaller (You will probably require one for each color weft).
Knife
Sandpaper
Oil for wood
Construction:
1. Sand the wood as smooth as possible.
2. Cut a notch at each end of the stick as shown.
3. In the notch at one end, make a small cut to hold the end of the weft.
4. Oil wood to prevent splitting.
5. Wrap weft around shuttle as shown.
The Boat Shuttle
Materials Needed:
One piece of light, easily carved wood about 5 x 8 x 20cm
Carving knife
Small, hollow tubes 7cm long such as bamboo or plastic tubing.
Piece of wire 15cm long
Construction:
1. Shape the wood so that the two ends come to a graceful taper, like the bow of a boat.
2. Sand smooth.
3. Carve out a retangular hole in the center, 4x8cm.
4. Using the knife point, drill a small hole in the front side opening.
5. Dig a groove about 5cm long at back opening.
Use:
1. Wind yarn on to the tube - or bobbin.
2. Slide the wire through the tube.
3. Place bobbin in hole in shuttle, putting one end of the wire in the hole and the other in the groove.
In almost all weaving, there are times when yarn has to be measured. The "skeiner" will help you measure continuous strands of yarn and also make skeins to prevent the thread from tangling.
Materials Needed:
A tree branch 60cm long which has two smaller branches projecting from the same side which are at least 40cm apart.
Construction:
1. Trim off any other branches and cut the two selected ones so that they project 5 to 10cm.
2. Remove bark and sand and oil wood.
Use:
1. Yarn is wound onto the skeiner, looping it around the two projecting branches. If necessary, the thumb holds bottom Toops in place.
2. To determine the length of yarn:
a. Measure the distance between the two projecting branches. b. As you wind the yarn count the number of turns you make (T). c. Multiply the number of turns by the distance (D) between the two projections.
T x D = length of yarn
3. Before removing a completed skein, tie at top and bottom as shown.
The Skein Winder
The "skein winder" is used to hold and turn skeins of yarn as they are unwound either into balls for warping, or onto shuttles and bobbins. The skein is opened up and placed over the top, so that there is no chance of it tangling, and then rotated so that the weaver can stay seated at the loom as the yarn is unwound.
Although it is not an essential tool, it is an extremely useful one, and well worth the effort of construction. It will save many hours of untangling skeins of yarn.
Materials Needed:
Two (2) pieces of wood (A) 1 x 4 x 30cm
Two (2) pieces of wood (B) 1 x 4 x 50cm
Four (4) pieces of wood (C) 1 x 4 x 60cm
One (1) length of pipe 2-3cm in diameter, 120cm long
One (1) old bucket or gallon can with lid removed
Cement, saw, hammer, drill, nails
Construction:
1. Place pipe in center of bucket or can. Make sure it is perpendicular.
2. Pour cement around pipe until container is full. Let set.
3. Take pieces of wood (A). Drill a hole in the center of one piece, the diameter of the pipe.
4. Overlap both pieces (A) at right angles so that they form an X. Nail together.
Take pieces of wood (B). Drill a hole through the midpoints of both pieces. The hole should be slightly larger than the diameter of the pipe.
Overlap both pieces (B) at right angles so that the holes line up and the pieces form an X. Nail together.
Nail pieces (C) from the ends of cross-pieces (A) to the ends of the crosspieces (B) as shown.
When cement is set, slide frame over pipe. Pipe should
pass through bottom hole and rest in the top hole. The wood frame should spin freely.
Use:
Open the skein into a circular shape and drop over the frame. Untie the strings holding the skein together and find the outside end. Pull on the end to rotate the winder.
The Stretcher
You may add the weft in one of two ways. (1) Each length of weft can be a single strip slightly longer than the width of the loom. Each length is put in individually and the ends hang freely on each side and later become a fringe on the finished piece. This technique
is often used with mats. (2) Or you can wrap a much longer weft on a shuttle and pass it through the shed. When it reaches the other side, the shed is changed and the shuttle is turned and put through the shed in the opposite direction. This technique produces a finished edge called the Selvedge,
which makes the cloth much stronger. However, there is a tendency for the edges of the cloth to pull in slightly as the weaving progresses.
You can make a "stretcher," described below, to keep
the edges parallel.
A - Cloth with non-parallel selvedges. B - Cloth with parallel selvedges.
Materials Needed:
Two (2) very strong straight pieces of wood of the same diameter. Together, their combined length should be slightly wider than the weaving.
Piece of string or leather.
Sandpaper, knife.
Construction:
Sand both pieces of wood.
Cut three deep teeth in one end of each piece of wood.
Use:
1. After weaving progresses about 10cm from the beginning, hook the teeth of each stick into the selvedge or end warp threads just below the last row of weft.
2. Push downward on both sticks until the edges are parallel.
3. Bind the sticks together where they overlap, using the string or leather.
4. Where the two ends meet, make a mark with a pencil or a light scratch in the wood to facilitate resetting the stretcher when it must be moved up.
5. After every 5cm of weaving, move the stretcher up to the new edge of the weaving.
NOTE: A similar stretcher can be made of iron by an iron worker. Design is shown in the illustration.
The Warping Board for a Foot-Powered Loom
If it is inconvenient because of climate, or space to measure the warp outside on the ground (as described on page 99), the following tool can be used. It may be made of wood or built directly into the wall of a house.
Materials Needed:
Two (2) pieces of wood 0.5 x 4 x 60cm (A).
Two (2) pieces of wood 0.5 x 4 x 100cm (B).
Eighteen (18) dowels or rounded pieces of wood, 2cm in diameter by 15cm long.
Nails or screws or four (4) bolts and wing nuts if the warping board will be taken apart for storage.
Drill, hammer, sandpaper.
Construction:
1. Nail, screw or bolt pieces (A) and (B) together to make a rectangle that measures about 50 x 90cm on the inside.
2. Drill holes in the positions shown on the illustration.
3. Sand and smooth all wood.
4. Place the dowels in the drilled holes()
Note: If the warping "board" is built into a wall, all that is necessary is to put dowels or sticks into the wall in the pattern shown.
Use:
Determine the length the warp will be.
Measure a piece of yarn or string the length of the warp.
Wrap it around the posts on the board to determine how many posts will be used. Follow the pattern of wrapping shown in the diagram.
Tie warp end to first post A. Follow pattern set by string. When you reach last post reverse and retrace your steps back to A.
Continue wrapping, counting each length. Tie into bundles of ten (10) or twenty (20), to prevent losing count.
When done, tie the end of the warp to the beginning of the warp.
Tie a piece of contrasting string where the warp crosses between A and B and R and Q.
Remove from board by chaining as described on pages 99-100.
7 Weaves, Patterns and Finishing Touches
Planning the Fabric
Before warping the loom, it is necessary to decide:
-- Width -- Length -- Amount of warp and weft needed -- Weave to be used -- Pattern -- Finishing needed or desired
Determining Length and Width
Cloth Width: The width of the loom frame limits the maximum width of the cloth, but the same loom can be used to make narrower cloth. It is wise to use an uneven number of warp threads; in this way both edge warps are in the same position and patterns can be more easily centered.
Cloth Length: The ranges of warp lengths for each loom are listed on page 19. The cloth cannot be the maximum length because it is necessary to leave some warp at the beginning and end for fringe or ending off. However, weaving several articles on the same warp is possible, if you make articles less than the maximum length; for example, on a warp of 3,000cm, you could weave ten rugs 270cm long with a 10cm fringe at each end.
Determining Amount of Warp and Weft
It is not easy to determine the exact quantity of thread needed for weaving a particular article. A formula for making rough estimates of the warp and weft needed was given on page 119. The formula is summarized below:
Number of vertical threads per [cm.sup.2] x width x length = warp needed Number of horizontal threads per [cm.sup.2] x width x length = weft needed
There are several adjustments which can be used to get a more accurate result from this formula.
Fringe Allowance: Make an allowance for fringe at both ends of each article woven. Even if the edge will be hemmed, leave at least 10cm for tying off the warp before hemming. Very elaborate fringes will, of course, require much more than 10cm of warp at each end.
Fiber Allowance: If using more than one type of fiber for the weft, adjust the amount of thread needed to take into account the different diameters of weft being used:
1. Determine the number of horizontal threads per cm for each fiber.
2. Determine the length of cloth containing each fiber.
3. Multiply the result of step 1 by the result of step 2 for each fiber.
4. Multiply the result of step 3 by the total width of the cloth.
EXAMPLE: The total length of this piece of fabric is 30cm; the width is 9cm. The warp is a 2 ply wool, the weft a 2 ply wool with three stripes each of heavy goathair 3cm wide. The number of threads per cm2 for the wool is 3 and for the goathair 2.
SOLUTION:
1. Wool threads per cm = 3 Goathair threads per cm = 2
2. Length of wool weft = 30 - 9 = 21 Length of goathair weft = 3 x 3 = 9
3. Number of wool threads needed = 3 x 21 = 63 Number of goathair threads needed = 2 x 9 = 18
4. Total length of wool needed = 63 x 9 = 577cm Total length of goathair needed = 18 x 9 = 162cm
Keeping Records
It is hard to remember all the different threadings, yarns, patterns, etc. that are used in weaving a piece of cloth. Keep a record (as illustrated) of this information on a card or in a notebook. Then it will be possible to make the same cloth again without doing the calculations over again each time. If there is a small piece of the fabric left, attach that to the record as well.
SAMPLE WEAVING RECORD
Article:
Dates Woven:
Warp:
Type - Per cm:
Total Length:
Weft:
Type - per cm
Total Length:
Threading:
Pattern:
Finishing:
Sample:
Types of Weaves
Interesting textural patterns can be created by varying the ways in which the warp and weft interlock. In this section a number of different weaves will be described. The following chart lists these weaves and the looms for which they are best suited.
After chosing a weave or pattern, the warp is threaded through the heddles in the proper order to produce that weave. The diagram shows the order in which the warp will be threaded. This order, or pattern, is called the draft of the weave or pattern.
The long rectangle or bar represents the heddle rod. Each square represents one heddle eye or hole. A black square means a warp thread passes through that hole. The white squares represent a thread that does not pass through the heddle.
In all drafts two squares at each end will either be black or white. This is because two warps should be threaded together at each end to strengthen the selvedge and to make the cloth longer wearing.
The pattern is indicated between the double selvedge squares. Some patterns will require an even number of warp threads; others require an odd number of warps.
The Inkle and Frame looms have only one heddle rod - so only one draft will be shown.
The foot-powered loom, on the other hand, has two or more heddle rods. Every thread must pass through one, and only one, heddle. Drafts for this loom will show two or more bars.
The lowest bar on the page represents the rod closest to the weaver. The numbers represent the foot pedals running left to right (make sure the foot pedals are tied in this order.
Plain Weave
In plain weave the weft crosses over and under alternate warp threads.
Drafts of Threading for Plain Weave
Basket Weave
In basket weave two or more adjacent warp threads are lifted together and two or more weft threads are inserted together, in other words, 2 warp/2 weft or 4 warp/2 weft.
Drafts of Threading for Basket Weave
Rib Weave
In rib weave, different numbers of warp are lifted alternately; for example 3 warp/1 warp or 4 warp/2 warp.
Drafts of Threading for Rib Weave
Twill Weave (Foot-Powered Loom only)
Twill can only be woven on a four-heddle loom. Twills are very sturdy and durable and this weave is suitable for heavy woolen fabric used in pants, jackets and suits.
Draft of Threading for Basic Twill
Draft of Threading for Herringbone Twill
After a twill is threaded, different twill weaves can be created by pressing the foot pedals in a different order. For example, if the loom is threaded in the herringbone twill above, a diamond twill can be produced by pressing the foot pedals in the following order: A basic twill threading treadled in a different order might produce the following:
1/3 Broken Twill:
1 2 4 3 1 2 4 3, etc.
Two foot pedals can be pressed together. For example: (1-2) (2-3) (3-4) (4-1) will produce a 2/2 twill.
Color Pattern Weaves
Use different colored warps and/or wefts in the same article to make attractive patterns. Because it is important to know what kind of facing--warp or weft--the finished cloth will have when planning a color pattern, facings are discussed first. If this step is overlooked it is possible that warp or weft threads may hide some of the pattern.
Facings
Balanced weave: Both the warp and
weft show equally: most looms produce this kind of weave when the warp and the weft are the same diameter and evenly spaced
Warp-faced weave: Only the warp shows
on the finished cloth: usually produced when the warp is thicker than the weft, or if the weft is more widely spaced than the warp. The Inkle loom usually produces a warp-faced cloth.
Weft-faced: Only the weft shows
on the finished cloth: it is usually produced when the weft is thicker than the warp and the warp is more widely spaced than the weft.
Color Pattern Weaves
Stripes: Thread the loom for
plain weave but alternate the color of either the warp or weft. The facing can be either warp or weft-faced. If the warp varies in color, the result will be vertical stripes; if the weft varies in color, horizontal stripes will result.
Broken Stripes: On warp or weft-faced
cloth, one thread of a contrasting color placed between groups of another color produces a broken or dotted line.
Simple Check: On warp or weft-faced
cloth, alternating single threads of two different colors produce a feathery check design.
These three stripe patterns presented above can be combined to
produce a great variety of attractive designs.
Plaids: When the color of
both the warp and the weft is varied, and the facing is balanced a plaid will result. Threading as for plain weave.
True Checks: Checks are most
suitable for balanced weave cloth: use the same type of warp and weft in two contrasting colors. Thread as for plain weave.
Tapestry Weave
Tapestry weave is used to create designs or pictures in the cloth as it is woven. The loom is threaded for plain weave. The cloth must be weft-faced (thin warp, thick weft).
In plain weaving, the weft is threaded back and forth across the entire width of the warp. In tapestry weave, wefts of different colors are woven within selected areas of the planned design.
1. Planning the Design:
Draw the design on paper and lay it beneath the warp threads. Using a water soluble material, draw the design directly on the warp. This will help guide the weaver.
Putting in the Weft:
a. Shuttles are not used in tapestry weaving. Rather, lengths of colored weft are tied in "butterflies" (see illustration) and
worked in the area needed.
b. In tapestry weaving, all the colors of the pattern are put in row by row. In other words, if the row has part of a red flower, a green leaf and a yellow background, then you must put in red, yellow and green weft for that row before you change the heddle position (see illustration.
c. Within the row the adjacent colored wefts can be interlocked in one of several ways.
Slit Method: This method creates
a slit between the two colors. Although this method produces a clean definition line between areas of the design, it weakens the fabric and should, therefore, not be used where weakened strength or slits in the cloth would be undesirable--as in sacks or in blankets. It is a useful method for rugs or decorated bags, where the slits do not extend more than 8cm.
Interlocking over Common Warp:
Produces a strong, continuous fabric; the edges between the different colors of the design are feathery or saw-toothed in effect and not as sharp as in the slit method.
Interlocking Wefts: Produces a
strong, continuous fabric; the edges between the design are sharp, but a slight raised bump may show at the join.
Knotted Weaves
Knotted weaves produce a pile or shag-faced cloth. Thread the loom for plain weave. Knot short lengths of weft around two warp threads, as shown. The knots are illustrated below. After a row of knots,
several rows of plain weave are woven to strengthen the cloth. Then the tails of the knots are trimmed to produce the pile or are left long to produce a shag.
Knotted weaves are used generally for heavy rugs and carpets. They can also be used for Jackets and blankets. When worn with the shag on the inside, an insulating effect results and the garments are extra warm.
Varieties of Knotted Weaves
a. Velvet Pile: The velvet
finish of oriental type rugs is produced by using a good wool for the knotting and by tying about 40-150 knots per square centimeter. After several rows of knots are tied and two to three rows of plain weave are in place, the pile is cut very short--about 0.5 to 1.0cm.
b. Shag Finish: A shaggy finish
does not require as many knots per cm2 as does the pile. A good range is from 4 to 5 per cm2. Wool, mohair and soft synthetic mixes produce attractive shags. Tails of knots should be about 5 to 8cm.
c. Looped Shag: A shag can also be produced by putting a weft through the warp and then pulling the loops out of the weft (as shown left). This row is alternated
with several rows of very tightly woven plain weave. The tightly woven plain weave is necessary because there is no knot to hold the loops of weft in place.
Cutting the Weft for Knotted Weaves
In order to cut uniform lengths of yarn for knotting, make a gauge from a piece of wood or heavy cardboard. Wrap yarn around so no loop overlaps another and slice off with a knife as shown.
3. Placement of Knots
a. Knots can be alternated to avoid small openings on the back as shown (left).
b. At the selvedge, take the yarn over
and under the two outside warp threads. Do not make a knot. This will give you a smooth edge.
Finishing Touches
This section describes techniques for finishing off woven articles. After an article is woven, it is necessary to secure the weft at both ends to prevent it from unraveling. Several methods of tying off the warp are presented here. You will also find directions for joining two woven pieces of cloth as well as suggestions for bag handles.
Overhand Knotted Fringe
Cut the warp at both ends; leave about 15cm.
Separate the warp into groups each having the same number of threads in each. Groups should not be wider than 1cm.
Take one group and make a loop as shown below.
Pull ends through loop.
Push knot as close as possible to the end of the cloth as you tighten it.
Repeat for each group until all warp is tied.
Make sure all knots are made in the same direction.
Simple Hemming
Cut the warp at both ends, leaving about 8cm in length.
Separate the warp into groups having the same number of threads in each.
Tie each group with an overhand knot.
Fold over the edge to the back.
Tuck under the tied warp.
Hem with an overcast stitch.
Variations on Overhand Knotted Fringe
The following illustrations show some of the many possibilities
Cut a piece of weft six times the width of the cloth.
Mark the center of this length and wind each end into a butterfly.
Place midpoint of yarn around the first 4 warp threads at right edge.
Bring end on top of the warp under the next group of four.
Bring end below warp, up and over the same 4 warp threads.
Repeat steps 4 and 5 until the left edge is reached. Turn and return to right end continuing twining the warp.
Philippine Tie
Separate warp into groups of eight.
Begin at left edge.
Take the fifth and sixth ends of the first group and wrap around the first to fourth ends making a half-hitch as illustrated (right).
Take the seventh and eighth ends and wrap over and back the third to sixth ends.
Repeat for each group of eight warp.
Square Knotted Fringes (Macrame)
Secure the weft using twining or the Philippine Tie.
Separate the warp into groups of four, or multiples of four.
The following illustrations show how to make a square knot.
After the first row of knots, divide the warp from each knot into halves and make a knot using the half from two adjacent knots.
Square knots can be used in patterns similar to these shown for the overhand knot.
More patterns and techniques for macrame can be found in some of the sources listed at the end of this manual.
Finger Woven Edges
This technique, although time-consuming, produces a strong, durable edge very suitable for bags where the warp edge forms the opening of the bag.
Leave about 8cm of warp on each end.
Lay fabric on flat surface and separate the first 5 or 7 warp threads.
Take the first thread and weave it in and out of the next four threads.
Pull end down toward the fabric.
Pick up next warp thread, so that you continue to have an odd number of threads.
Weave second thread through the next four. Pull down toward fabric.
Repeat steps 3 to 6 picking up a new thread each time one is woven and pulled down.
With this technique the warp lays against the fabric. It can be braided and tacked down to produce an attractive edge.
Adding Fringe
Sometimes you may want to put a fringe on the selvedges, or you may wish to make a fringe of yarn different from the warp threads.
To Add Fringe to Warp Ends.
a. Hem edge as described under hemming (page 146) b. Cut yarn for fringe twice as long as desired. c. Using a needle, insert each piece of yarn into edge from front to back, and then through front again as shown (below).
d. Fold ends over and pull through loop. e. Repeat for each piece of fringe desired.
To Add to Selvedge.
a. Skip step 1 above, and continue as described in steps 2-5.
Handles
Handles for bags of all kinds can be made in many ways. A handle should meet the following requirements.
Support the weight of what will be carried in the bag.
Be attached well.
Match the yarn and colors used in the bag.
Monk's Cord
This is the easiest and quickest way to make a handle. Use a strong but flexible fiber that will stand heavy use - such as 4 ply carpet wool, heavy linen or cotton.
a. Determine how many strands you need, by taking two or more pieces of yarn and twisting them together tightly to see how thick a handle it makes.
b. Cut the desired number of strands three times the finished length.
c. Put an overhand knot in one end and place on a hook on a wall or stake in the ground. <see picture>
d. Twist as tightly as possible for the entire length.
e. Take the end you are holding and fold it back to the end on hook.
f. Remove hooked end and let the two pieces twist together. <see picture>
g. Whip stitch the ends (see below).
Braids
a. Select a number of strands to make the handle the thickness desired.
b. Cut into lengths twice as long as desired handle.
c. Separate into 3 groups for a three-strand braid, or into 4 groups for a four-strand braid.
d. Braid as illustrated. (It is helpful
J. Attaching the Handles
Attach the handles securely to the body of the bag. The following method offers the most strength, plus the option of quickly adding a new handle if the original breaks or becomes worn.
1. Detachable Handle.
a. After bag has been sewn together and all edges finished, take a piece of cord and with a heavy needle insert it into the right corner of the bag opening. Go through both front and back of bag, several times making a loose ring.
b. Tie into ring.
c. Select a sturdy yarn that matches the bag and tie end around cord.
d. Draw end of yarn through cord ring and then back through its own loop making a half-hitch.
e. Repeat, making half-hitches completely around the cord until it is completely covered. <see picture>
f. Repeat steps 1 to 5 on the left corner.
g. Tie handle to loops.
Permanent Handles
Other methods involve sewing the handle to the bag. Use very heavy thread and a large eye needle. A 3" shoemaker's needle is helpful on heavy woven fabrics. The styles
of handle attachment presented here are in order of strength.
Joining Two Pieces of Woven Fabric
Most looms make cloth of only limited width; therefore, it is sometimes necessary to join woven pieces together for larger articles such as rugs, bedspreads, sheets, or tablecloths.
When joining two or more pieces, weave each section so that the pattern and weave match on the edges being Joined. Use strong thread or yarn in a color that either matches or contrasts with the fabric, depending upon the effect desired.
Ball Stitch
Butt the selvedges of the pieces to be joined together so that the pattern matches.
Baste lightly with large stitches to keep
the pieces in place.
Fasten thread on right selvedge at top.
Bring needle diagonally across left to right.
Go under left selvedge and push needle from back to front 2-3 threads lower than beginning stitch.
Repeat steps 4 and 5 going from right to left.
Stagger the stitches so no stitch is opposite one on the other selvedge.
Continue steps 4 to 6 until bottom is reached. Tie off Joining thread.
8 Where to Find More Information
Books
Bress, Helene. Inkle Weaving. New York: Charles Scribner's Sons, 1975. Complete information for creating all kinds of patterns using the Inkle loom. Contains plans for a floor model Inkle loom that weaves longer strips than the loom in this manual. An invaluable tool for anyone interested in all the possibilities of the Inkle loom.
Channing, Marion L. The Magic of Spinning. New Bedford, Mass.: Reynolds-DeWalt, 4th edition 1971.
Directions for spinning with an emphasis on wool and its preparation. Information on using traditional English and American spinning wheels.
Davenport, Elsie G. Your Handspinning. Tarzana, California: Select Books, 4th edition, 1971.
Most comprehensive book on spinning. Covers a wide variety of wheels and their use. Describes several methods of spinning, with an excellent section on spinning fibers from rabbit, camel, angora goat, silk, cotton, jute, hemp, sisal and flax.
Duncan, Molly. Spin, Dye and Weave Your Own Wool. New York: Sterling Publishing Co., Inc., 1973.
Very good description of preparing wool for spinning. There is also a discussion of spinning wheels and handspinning. Weaving section gives plans for an inkle loom of unusual design made from plywood, and tells how to weave on a small commercial table loom. Warping section is well-illustrated and pictures some useful tools for winding and measuring the warp.
Garrat, Cay. Warping
All By Yourself, Santa Rosa, California: Thresh Publications, 1974.
Describes how to warp a two- or four-harness loom with just one person. Uses more elaborate technology than presented in this manual, but it is clearly illustrated and written and may prove helpful to those attempting to warp a large loom by themselves.
Gilly, Myriam. Free-Weaving. New York: Charles Scribner's Sons, 1976.
Describes history of loom design and construction and gives directions for techniques used in contemporary style wall-hangings.
Gonsalves, Alyson Smith ed. Weaving Techniques and Projects. Menlo Park, California: Lane Books, 1975.
Good discussion of weaving problems and techniques, with plans for a very simple loom. There is a large section of patterns and projects usable with the looms presented in this manual.
Harvey, Virginia I. Macrame: The Art of Creative Knotting. New York: Van Nostrand Reinhold, 1967.
Complete information on macrame, with many suggestions for fringes.
Hope, Elizabeth, Estine Ostlund and Lisa Melen. Free Weaving on Frame and Loom. New York: Van Nostrand Reinhold,
Mainly deals with tapestry weave techniques. Many color illustrations.
Ingers, Gertrud. Flemish Weaving. New York: Van Nostrand Reinhold, 1967.
Guide to techniques and patterns for pictorial tapestries.
Innes, R. A. Non-European Looms. Halifax, England: Halifax Museum, 1959.
Catalog of African and Oriental looms should interest those looking for other styles of looms that are basic in design and simple to construct. Not all looms are illustrated; however, many details such as pulleys, heddles, reeds and beaters are pictured. The Mende Tripod Loom from Sierra Leone and the Egba Narrow Loom from Nigeria are interesting versions of the foot-powered loom presented here.
Kluger, Marion. The Joy of Spinning. New York: Simon and Schuster, 1971.
Emphasis is on preparing and spinning wool. Includes directions for spinning with a drop spindle and a treadle spinning wheel. Brief section on other fibers - flax, cotton, dog hair, quivit.
Marlin, Shirley. Off the Loom: Creating with Fiber. New York: Viking Press, 1973.
Directions for using the Inkle Loom; plans for a simple frame loom and techniques using macrame.
Mosely, Spencer, Pauline Johnson and Hazel Koenig. Crafts Design. Belmont, California: Wadsworth Publishing Co., Inc. 1962, 1967.
Chapter 4 offers clear, well-illustrated directions for building very simple looms. Good section on weaves and patterns for the Inkle loom. Weaves for two- and four-harness foot-powered looms are well-diagramed. Knotted weaves and tapestry weaves are also discussed. Sections on decorated textiles and leatherworking may also be of use to weavers. Well-illustrated.
Murray, Rosemary. Practical Modern Weaving. New York: Van Nostrand Reinhold, 1975.
Well-illustrated collection of patterns and weaves for all types of looms.
Parker, Xenia Ley. Creative Handweaving. New York: Dial Press, 1976.
Techniques and patterns suitable for the Frame, Inkle and Foot-Powered Looms.
Pendleton, Mary. Navajo and Hopi Weaving Techniques. New York: Macmillan, 1974.
Describes Navajo and Hopi rug weaving techniques. Special attention paid to techniques of putting in the weft in creating tapestry patterns. Patterns presented for the belt loom can also be used on the Inkle Loom.
Plath, Iona. The Craft of Handweaving. New York: Charles Scribner's Sons, 1972.
Patterns and weaves intended for use on a jack harness loom. Some are suitable for use on a four-harness, foot-powered loom.
Redwood. Backstrap Weaving of Northern Ecuador. Redwood, 1974.
A limited edition of a very beautiful book giving complete and easy to follow direction for building and weaving on a backstrap loom. (Available from The Unicorn)
Regensteiner, Else. The Art of Weaving. New York: Van Nostrand Reinhold, 1970.
Covers all aspects of weaving. Brief discussion of animal, vegetable and mineral fibers and their use in weaving. Most looms discussed are commercially made, although there are rather complicated plans to make a backstrap loom in the Appendix. Deals extensively with types of weaves and patterns with a good section on tapestries and rugs.
Reed, Tim. Loom Book. New York: Charles Scribner's Sons, 1973.
Directions for building a foot-powered loom slightly more complex in design than the one presented in this manual.
Reichard, Gladys A. Weaving a Navajo Blanket. New York: Dover, 1974.
Directions for building a Navajo loom with patterns and techniques for weaving Navajo rugs and blankets.
Rubenstone, Jessica. Weaving for Beginners. New York; J. B. Lippincott, Inc., 1975.
Describes construction of a very simple loom - a rigid heddle backstrap type loom using tongue depressors.
Schery, Robert W. Plants for Man. Englewood, New Jersey: Prentice-Hall, Inc., 1972.
Chapter 7 discusses a wide variety of vegetable fibers and their potential for use in weaving. Good source of information for those looking for new sources of fiber from domestic and wild plants throughout the world.
Scabey, Joan. Rugs and Wall Hangings. New York: Dial Press, 1974.
Excellent section on the historical significance of tapestry weaving throughout the world. Many illustrations. Contains techniques and patterns for rugs based on traditional designs.
Svinicki, Eunice. Step-By-Step Spinning and Dyeing. Racine, Wisconsin: Western Publishing Co. (Golden Press), 1974.
Very clearly illustrated methods of spinning using several types of drop spindles. Includes section on dyeing fibers and a very brief section on simple weaving techniques.
Swanson, Karen. Rigid Heddle Weaving. New York: Watson-Guptill, 1975.
Describes construction of a rigid heddle loom of the backstrap type (similar to Rubenstone's) but on a larger scale. The patterns and techniques presented, however, are suitable to any loom and may interest those constructing any of the looms in this manual.
Tacks, Harold and Sylvia. Band Weaving. New York: Van Nostrand Reinhold, 1974.
Techniques and patterns for weaving strips of cloth such as those produced by the inkle loom.
Tidball, Harriet. The Weaver's Book. New York: Collier, 1977 (soft-bound).
Instructions for weaving on a multiple harness loom. Some techniques may be useful on the Foot-Powered Loom presented in this manual.
Weir, Shelagh. Spinning and Weaving in Palestine. London: British Museum, 1970.
Looms described here are similar to the Frame Loom in this manual. Those interested in constructing it may find the photographs of the looms in use very helpful. A Foot-Powered Pit Loom is also illustrated. (Available from The Unicorn)
West, Virginia M. Finishing Touches for the Handweaver. Newton, Mass.: Charles Branford, 1968.
Directions for making fringes and handles and for Joining woven fabrics together.
Wigginton, Eliot, ed. Foxfire 2, Garden City, New York: Doubleday, 1970.
"From Raising Sheep to Weaving Cloth" describes the preparation of wool for spinning, the spinning of the wool on a wool wheel, and gives plan for building a skein winder (vertical), a spool rack, a boat shuttle similar in design to the one in this manual, and a warping board. Photographs and drawings are of a foot-powered loom slightly more complex in design than the one in this manual. Brief directions for warping and weaving may interest builders of the foot-powered loom.
Wilson, Jean. Weaving is Fun. New York: Van Nostrand Reinhold, 1971.
Excellent section on fibers, especially animal sources, and their preparation. Geared toward teaching children to weave with Simple looms. Interesting section on basketry.
Wilson, Jean. The Pile Weaves. New York: Van Nostrand Reinhold, 1974.
Detailed descriptions for making and using twenty-six different pile weaves. Very useful for anyone considering making pile rugs.
Worst, Edward. Foot Treadle Loom Weaving. Mayne Island, British Colombia, Canada: Cloudburst Press, 1976.
Collection of traditional weaves and patterns, many suitable for use with the Foot-Powered Loom in this manual.
Zielinski, Stanislaw. Encyclopedia of Handweaving. New York: Funck and Wagnalls, 1959. (Soft-bound)
Definitions and illustrations of the many confusing terms used in describing weaving.
Znamierowski, Nell. Step-By-Step Weaving. New York: Golden Press, 1967.
Very complete book which includes plan for a frame loom (different in design from the one in this manual), directions for warping, planning a fabric, dyeing yarns and directions for many types of weaves. Contains suggested projects for the frame loom and for a four-harness, foot-powered loom.
Book Distributors
Most of the books listed, plus a great many more, can be obtained from the following Craft Book Distributors.
Earth Guild, Inc.
15 Tudor Street, Cambridge, Massachusetts. (Catalog $2.00)
The Mannings
R. D. 2, East Berlin, Pennsylvania 17316 (Catalog $.50)
The Unicorn
Box 645, Rockville, Maryland 20851 (Catalog $.50)
Periodicals
The following periodicals often contain articles of interest to weavers.
The Mother Earth News, P.O. Box 70, Hendersonville, North Carolina 28739 (One year $12.00)
Back issues can be ordered. Articles of interest are listed below.
Lindeman, Joan. "A Very Primitive Loom" Mother Earth News. No. 22, July 1973, p. 49-51.
Describes the construction of a very simple loom, built into the ground, suitable particularly for weaving mats of heavy fibers.
Lichtenstein, Bernie. "We Built A Spinning Wheel for $2.50" Mother Earth News. No. 39, May 1976, p. 106.
Describes construction of a spinning wheel (wool wheel type) using a bicycle wheel. Very rough design, but may get a creative person thinking of other possibilities.
Shuttle, Spindle and Dyepot. Published by the Handweavers Guild of America, Membership includes subscription. 998 Farmington Avenue, West Hartford, Connecticut 06107. ($12.50 in U.S., $12.50 outside)
LENGTH CONVERSION
The chart in Figure 3 is useful
for quick conversion from meters and centimeters to feet and inches, or vice versa. For more accurate results and for distances greater than 3 meters, use either the tables in Figure 2 or
the equations.
The chart in Figure 3 has metric divisions of one centimeter to three meters, and English units in inches and feet to ten feet. It is accurate to about plus or minus one centimeter.
Example:
An example will explain how to use the tables. Suppose you wish to find how many inches are equal to 66cm. On the "Centimeters into Inches" table look down the leftmost column to 60cm and then right to the column headed 6cm. This gives the result, 25.984 inches.