Ceramic kilns that burn waste oil from automobiles and other industries have been operating in Tanzania, Haiti, and several other developing countries for several years. These kilns offer the advantages of good operational control that is easily achieved with fuel oil, but lower fuel cost because waste oil is used.
The waste oil fired system presented here (Figure 1) was designed by Ali Sheriff

and his assistant, Bashir Lalji, in Tanzania for Mr. Sheriff pottery plant. Mr. Sheriff also helped entrepreneurs in Djibouti build and operate kilns for use in their brick making and pottery businesses.
Cost Advantage of Waste Oil
Originally, waste oil was collected free from auto service stations and industries, but by 1983 $0.35 (US) per liter was charged. At these rates, it cost Mr. Sheriff US$105 for each firing of his six-burner kiln, compared with $165 for fresh oil.
Some alternative fuels such as electricity are too expensive in developing countries to be economically feasible for kilns. One alternative, wood, may be less costly than waste oil in some countries, but wood supplies are being reduced rapidly and costs are rising.
Design of Kiln and Fire Box
The kiln shown in Figure 1 is a down draft type with three fireboxes on each side. The height of the chimney is determined by the intensity of the heat required. The hotter the fire, the higher the chimney. Other kiln designs may have more or fewer fireboxes depending on the size.
Fuel and water are metered by gate valves connected to the distribution pipes from their respective tanks. A ratio of about 75 percent waste oil and 25 percent water is about optimum.
*** CAUTION ***
Use only crankcase oil.
Under no circumstances should lubricating oils from electrical transformers be used for any purpose. They may contain PCB compounds.
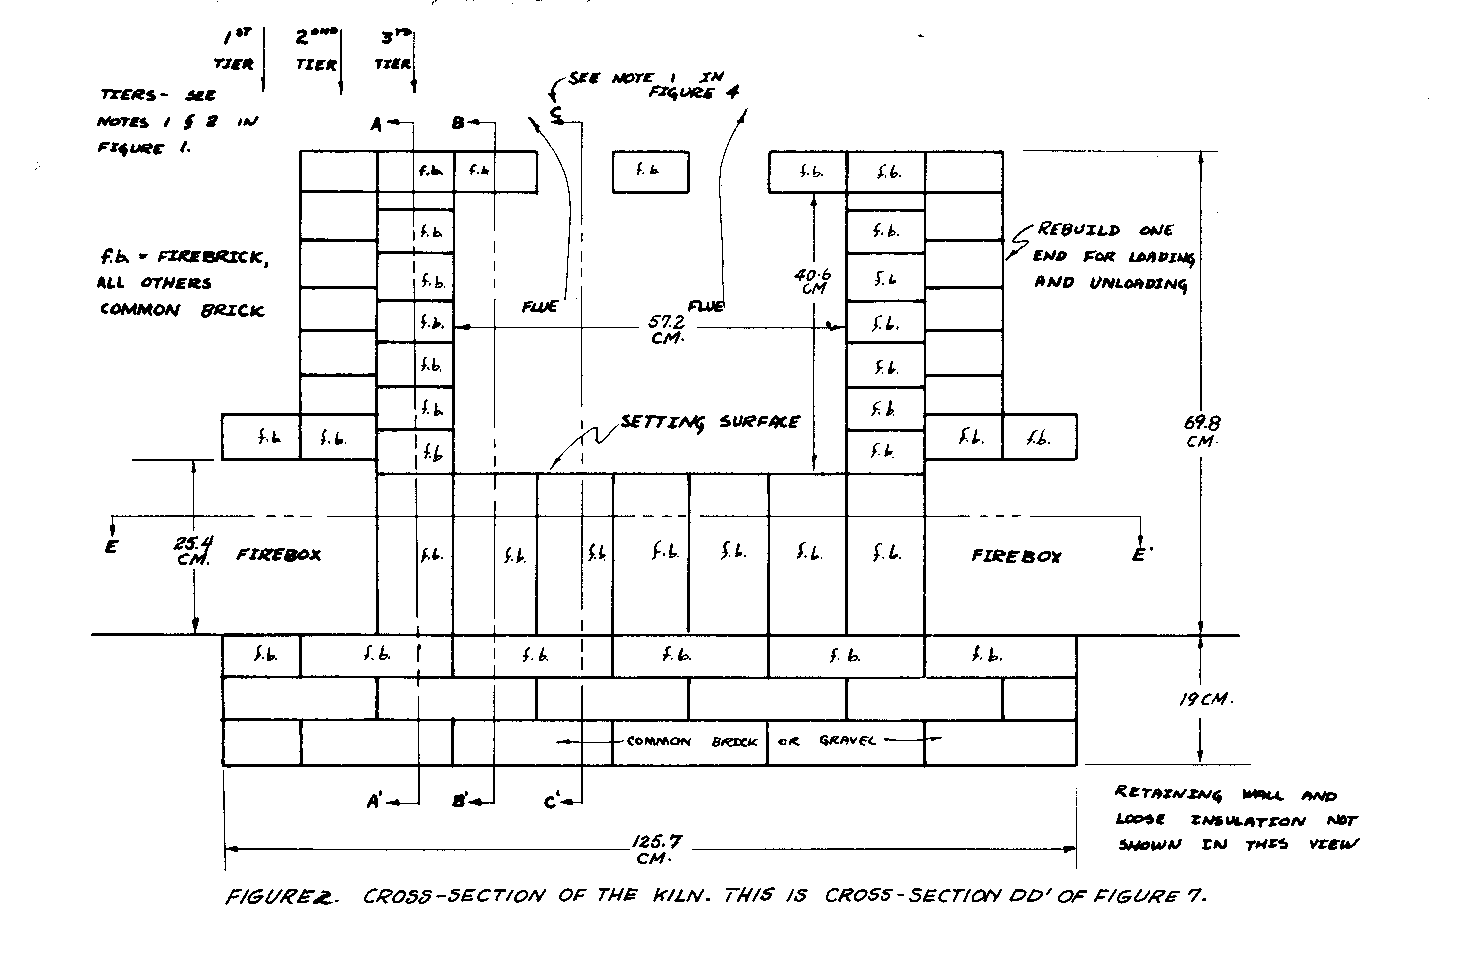
Preheated splash plates serve as a grate to ignite the oil-water mixture. The grates, made of pieces of sheet steel (Figure 2), slope down so that any fuel not

burned on the upper grate will spill off onto the lower grates for combustion.
The waste oil must be treated before it can be used as fuel. The oil is first filtered through a screen of 60 mesh or finer to remove solid particles. It is then allowed to stand in a drum for a few minutes to let the water settle to the bottom. A tap at the bottom of the drum allows water to be removed.
Operating the Kiln
The first step is to preheat the splash plates using a wood or charcoal fire. This should take about one half hour. The vents on top of the kiln are then closed with brick and clay. The oil and water valves are opened and the mixture should ignite on the hot splash plates.
Workers must continually check the fuel-water flows. For ceramics, the fuel burning rate should be regulated to provide a temperature rise in the kiln of about 100[degrees]C (212[degrees]F) per hour. A steady rise prevents the pottery from cracking.
In Mr. Sheriff's kiln, peak temperature is reached in about 18 hours. At this time, all entrances to the kiln, including the chimney, are closed and the kiln is allowed to cool slowly.
Source:
Sheriff, A. and Lalji, B. Waste Oil Fired Kiln. VITA Technical Bulletin. Arlington, Virginia: Volunteers in Technical Assistance, 1983
"Ceramic Kiln Burns Waste Oil," VITA News, April 1983, pp. 3-6.
SMALL RECTANGULAR KILN
The small rectangular kiln was designed for both bisque and glaze firing of small pottery pieces. In bisque firing, pottery is cured but not glazed. It can be glazed either in the first firing or in subsequent firings. The kiln can be larger or smaller than the dimensions given here. Its capacity depends on the size of the base.
Materials
Common (pressed) brick Firebrick (Note: Sandstone blocks were used before the invention of firebrick) Clay or mortar The dimensions shown in Figures 4 to 6 are based on the 23cm x 11.5cm x 6.5cm

(9" x 4 1/2" x 2 1/2") straight brick commonly found in the United States. The dimensions can be changed to suit the size of locally available brick.
Construction
The joints in the kiln, except for those in the loading area, should be mortared. The preferable mortar is a refractory cement; that is, one that is highly resistant to the action of heat. If there is a brick plant in the area, find out what material is used there. If refractory cement is not available, make it by mixing crushed firebrick with your purest clay, which will be white or light in color. As a last resort, use clay alone. In any case, have the mortar fill as much of the joint as possible. Each time the temporary door for loading is rebuilt it should be mortared with the purest clay available.
In laying the brickwork, stagger the joints in each layer to cut heat loss.
Dig a hole 76cm x 126cm and 19cm deep (30" x 49 1/2" x 7 1/2")--or whatever base size is needed for available brick-in level ground. Note in Figures 4, 5, and 7 that the first three horizontal courses are: first, gravel or common brick; second, common brick; and third, firebrick. This foundation is under the firebox. The firebox, with its end open for loading, is built with firebrick. If charcoal, coke, or coal are used as a fuel, the firebox should have grates. <see figure 2>
The firebox is a long rectangular chamber, fired from both ends so that the hot gases flow inward and upward (see Figure 1). Between and above the fires is the
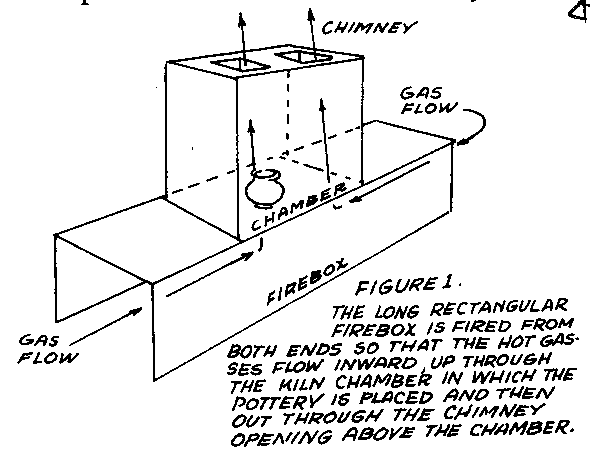
kiln chamber in which the pottery is placed. The hot gases rise through the chamber and go out the chimney opening at the top. Both the chamber and the firebox are surrounded by a layer of common brick. Figures 4 through 6 show how the bricks should be arranged. Note the staggering of joints in alternate courses.
When the kiln is built, its sides should be insulated with dry loose sand and/or crushed brick (see Figures 3 and 4).

If the kiln is outdoors, cover the loose insulation and brickwork to keep it from getting wet. Sheet metal is suitable. If large pieces are not available, use flattened tin cans to build a shingle-type cover.
In building up the temporary door after the kiln is loaded (see Figures 3 and 4), be sure to leave a peephole to watch the inside of the kiln.
Firing
The first time the kiln is fired, heat-up will take longer and require more fuel than usual because the kiln must be dried out.
Sunbake the pottery before firing it, to be sure that it is completely dry. Load the sun-dried pottery on the shelves of the kiln, leaving enough space for adequate ventilation.
After the kiln has heated up somewhat, you can save fuel by cutting down on the draft. Do this by partly covering the top flue openings with bricks. The pottery begins to shrink at about 870[degrees]C (1600[degrees]F). To measure temperature, the ceramic industry uses pyrometric cones.
If no temperature-measuring devices are available, the color of the glow in the inner mass of the kiln can indicate the approximate temperature of the kiln. See Table 1.
The kiln should be heated slowly to 870[degrees]C (1600[degrees]F). This process should take about eight hours. Chemical and physical changes caused during the heating of the
TABLE 1 COLOR/TEMPERATURE GUIDE
475 C ... Lowest visible red . . . . . . . . . . . . . . 885[degrees]F. 475 - 650 C...Lowest visible red to dark red . . . . . 885 - 1200[degrees]F. 650 - 750 C...Dark red to cherry red . . . . . . . . . 1200 - 1380[degrees]F. 750 - 815 C...Cherry red to bright cherry red . . . . 1380 - 1500[degrees]F. 815 - 900 C...Bright cherry red to orange . . . . . . 1500 - 1650[degrees]F. 900 - 1095 C...Orange to yellow . . . . . . . . . . . . 1650 - 2000[degrees]F. 1095 - 1315 C...Yellow to light yellow . . . . . . . . . 2000 - 2400[degrees]F.
The glow of the inner mass of the kiln gives a rough indication of temperature.
kiln can destroy the pottery if they take place too quickly. For example, dehydration of clay and other minerals takes place throughout the whole temperature range, but particularly between 480[degrees]C (900[degrees]F) and 815[degrees]C (1500[degrees]F); organics and sulfides are oxidized between 595[degrees]C (1100[degrees]F) and 980degrees.
Several hours at 870[degrees]C (1600[degrees]F) and higher are needed to complete the firing.
When the firing is completed and the fire is out, block the flue and firebox openings so that the kiln will cool slowly. Let the kiln stand this way overnight. When the temperature of the kiln has dropped, open the flue and firebox openings. This slow cooling keeps the pottery from being cracked by thermal stresses. Slow cooling through the dark red heat range is most critical.
The time and temperature required to fire an unknown clay can be learned only be experimenting. Heating and firing times may vary from those given here.
Source:
Irwin M. Lachman, VITA Volunteer, Corning, New York
Suppliers of temperature cones are:
The Edward Orton (Jr.) Ceramic Foundation 144 Summit Street, Columbus, Ohio USA
Bell Research, Inc. Box 757, East Liverpool, Ohio USA
Bell Clay Co. Gleason, Tennessee USA
SALT GLAZE FOR POTTERY
This method can be used for applying a very thin, transparent glaze to pottery such as clayware and stoneware. Examples are: brick, sewer-pipe, stoneware shapes, and containers.
Open pieces, such as bowls, will become glazed inside and out. Narrow-necked pieces must be glazed inside by a slip-glaze method in which the pottery is dipped into the glaw.
Considerations
Some ceramic articles will take a salt glaze. Others, under certain conditions, will not. Experimentation is the best way to discover how to glaze an unknown clay.
Common salt (NaCl) may be used alone, and this is common practice. Boric acid or borax may be added to the salt to improve the glaze and lower the firing temperature.
Salt glazing can be done in a wide range of temperatures, 670[degrees]C to 1360[degrees]C (1230[degrees]F to 2470[degrees]F); the more usual range is 1200[degrees]C to 1300[degrees]C (2185[degrees]F to 2375[degrees]F).
How to Fire the Pottery
Place the pottery on the shelves of the kiln. The pieces should not touch so that there is plenty of room for ventilation.
Mix 9 parts salt with 1 part borax or boric acid. This mixture can be dampened with water: 5 to 10 percent by weight of the mixture. For ordinary fire-clay pottery, about 285 to 570gm (10 to 20 ounces) of salt is needed for 0.028 cubic meter (1 cubic foot) of kiln capacity.
When the kiln is as hot as it will get, throw the mixture into the fire heating the kiln.
This step may be repeated several times when the temperature gets back up to the hottest point. The kiln is then gradually cooled.
The sodium (Na) separates from the heated salt and combines with the clay body to form a very thin, uniform glaze that shows the colors of the ceramic body.
Sources:
Dr. Louis Navias, VITA Volunteer, Schenectady, New York
Parmalee, Cullen W. Ceramic Glazes. Chicago: Cahners Publishing Company.