Moving soil for irrigation and road-building is important to good farming. Careful preparation of land for irrigation and good water usage saves water, labor, and soil, and improves crop yields. Improved roads make communication easier between farmers, their suppliers, and their markets.
Although modern heavy equipment is often sought for such work, it is not necessary. Land can be prepared effectively with small equipment that can be made by farmers or small manufacturers and can be pulled by animals or farm tractors. Descriptions of yokes and harnesses are given in Animal Traction, by Peter R. Watson, published by Peace Corps and TransCentury Corporation (1981).
The following seven entries describe such small equipment:
- Drag Grader + Fresno Scraper() + Barrel Fresno Scraper + Float with adjustable blade + Buck Scraper() + V-Drag(*) + Multiple Hitches
(*) The fresno scraper, buck scraper, and V-drag are designed for use with large horses.
DRAG GRADER
This simple metal-edged wooden grader is designed for two medium-sized work horses or oxen. The grader can be scaled down for use with one horse or with smaller animals.
Road-building does not require giant tractors and earth movers. The grader described here was used for dirt and gravel roads in the midwestern United States in the 1920s. Similar graders were used in the original construction of U.S. Highway No. 1 from Maine to Florida.
Tools and Materials
Lumber: 7.5cm x 30.5cm (3" x 12") 2 pieces: 243cm (8') long 1 piece: 152cm (5') long 2 pieces: 30.5cm (1') long Lumber: 7.5cm x 15cm (3" x 6") 1 piece: 37 cm (4 1/2") long 4 Metal edges: 6mm to 12.5mm (1/4" to 1/2") thick, 10cm (4") wide, 243cm (8') long 17 Lag screws: 16mm (5/8") in diameter, 18cm (7") long 2 Eye bolts, 7.5cm (3") diameter, and large lock washers Heavy chain: 3.7m (12') 32 Flathead steel wood screws, 7.5cm (3") long. (Carriage bolts with lock washers would strengthen the grader.)
Construction details for the grader are shown in Figure 1. The metal edge overhangs
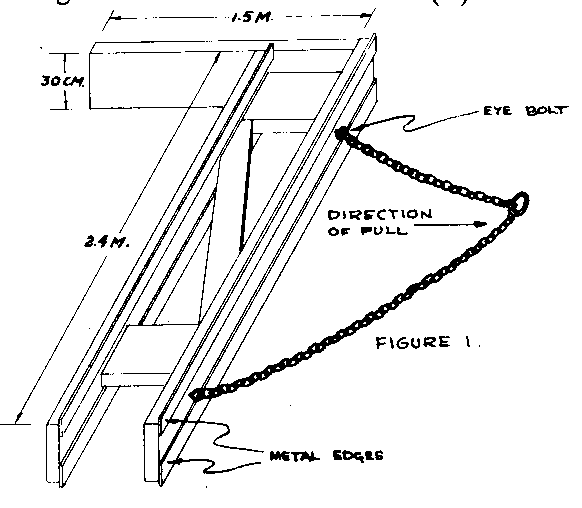
the surfaces of the 243cm (8') beam by 2.5cm (1"). Each edge is attached with eight large wood screws or carriage bolts. Lock washers should be used throughout to keep strains and tensions from loosening the nuts. The metal edges are attached to both top and bottom so the grader can be turned over to reverse the direction in which the soil is cast.
If the grader is to be used for cleaning ditches, the angle between the 152cm (5') and 243cm (8') beams should be 30 degrees.
The drawing position of the grader is adjusted by changing the hitching point on the chain. The hitch link should be such that when the small end is put over a link it will not slide. Reverse the hitch ring to slide it along the chain.
If welding equipment is available, the same design can be used for making steel road graders, with cutting edges hard-surfaced to make them last longer.
Source:
Richard Hunger, John McCarthy and John Rediger, VITA Volunteers, Peoria, Illinois.
Vernon E. Moore, VITA Volunteer, Washington, D.C.
FRESNO SCRAPER
This scraper is used for moving larger amounts of earth from higher spots to low areas. It can be made at low cost by farmers or small manufacturers, if materials and a well-equipped blacksmith shop are available. The scraper can do the work of larger, more expensive equipment. <see figure 1>
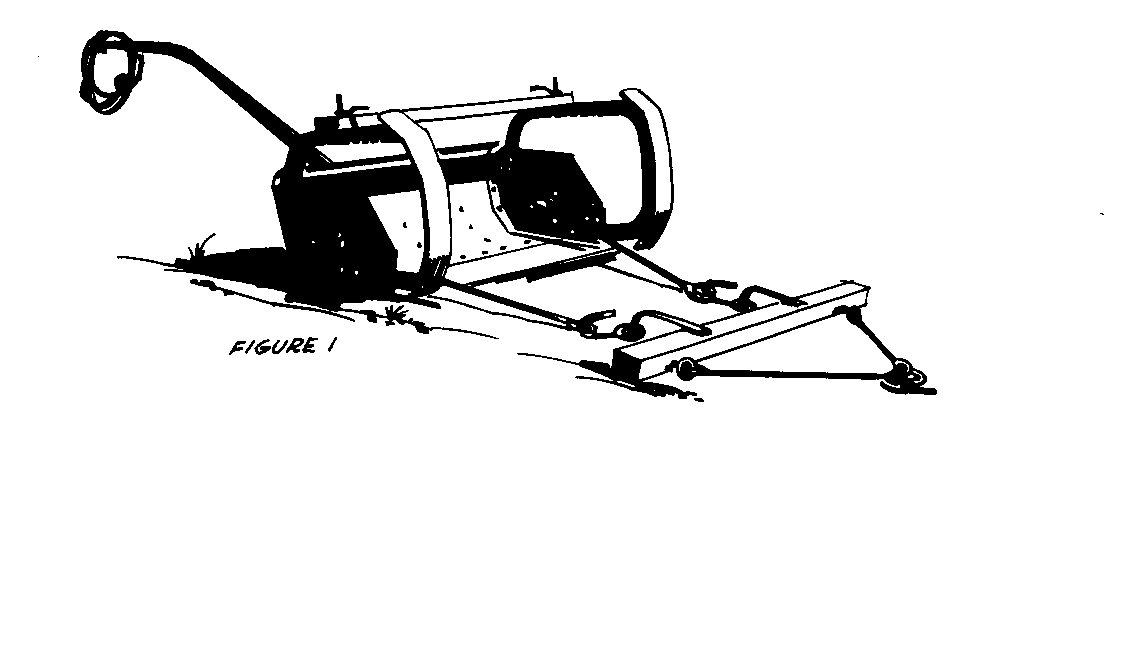
Implements that slide soil on soil are inefficient. They require a large amount of power to move a small amount of soil. The fresno scraper can move soil more easily because it slides on its metal bottom. It is a large metal scoop that can be built in a number of sizes, depending on the number of animals that can be used to pull it. Good results will be obtained by using the size described here with two oxen or two to four horses. Construction details are given in Figures 2 to 5.
To use the scraper, first plow the high spots that you want to remove. This will make it easier to load the fresno and save a great deal of power.
The fresno is made so that the power used to pull it will also help in loading and unloading. The rope in the handle is used for pulling the scoop into position for loading and to spread the soil evenly when unloading.
Always be careful when operating the fresno. Do not have any part of your body directly above the handle. Always keep a firm grip on the handle, while loading or getting ready to unload. A sudden jerk or unseen rough spot may cause the handle bar to fly up and strike you.
To load the fresno, simply lift the handle until the front of the bit goes into the ground at a depth the animals can pull. Do not try to make too deep a cut or the fresno will be pulled over or the animals pulled to a stop. You will soon learn how to hold the handle for the proper cut and smooth loading.
When the fresno is full, push down on the handle and it will go forward without touching the ground until you are ready to unload it. Lift the handle when you are ready to unload and the pull of the animals will turn it into the dumping or spreading position. The stop bar across the top of the fresno can be moved to change the depth of the spreading of soil. Move it forward for a shallow depth or back for a deeper spread.
After it has been emptied and returned to the point of loading give the rope a hard pull and the fresno will fall back into position for loading.
Usual hitches for animals pulling the fresno are:
- two horses + two oxen + three horses
Two lines are used. Each outside horse is tied back to the hame or collar of the center horse. The center horse is then guided by the inside strap from the lines.
Tools and Materials
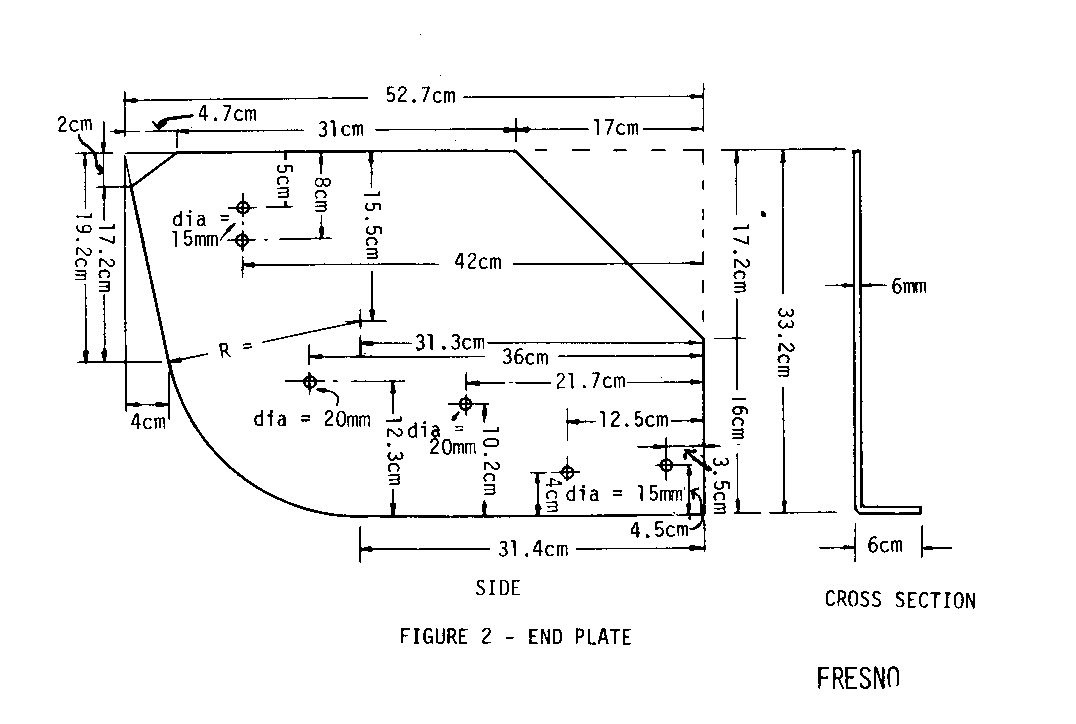
2 steel plates for sides: 2 draft bar rod stock: 6mm x 40cm x 60cm 20mm x 1.2 meters (1/4" x 15 3/4" x 23 5/8") (25/32" x 47 1/4")
1 steel plate for blade: 2 draft bar rod stock: 6mm x 35cm x 1.24 meters 20mm x 95cm (1/4" x 13 3/4" x 48 7/8") (25/32" x 37 3/8")
1 steel plate for backplate: 2 draft bar loop stock: 6mm x 52cm x 1.24 meters 20mm x 45cm (1/4" X 20 1/2" X 48 7/8") (25/32" X 17 3/4")
4 steel plates for stiffener plates: 2 draft bar loop stock: 6mm x 10cm x 18cm 20mm x 38cm (1/4" x 4" x 7 1/8") (25/32" x 15")
1 steel plate for stiffener plate: 2 eye bolts with nuts and washers: 6mm x 10cm x 28cm 20mm x 25cm (1/4" x 4" x 11") (25/32" x 9 7/8")
75 flathead rivets: 2 strap iron clevis stock: 15mm x 3cm (19/32" x 1 1/8") 10mm x 4cm x 60cm (3/8" x 1 9/16" x 23 5/8") 12 flathead rivets: 20mm x 3cm (25/32" x 1 1/8") 2 machine bolts with nuts & washers: 13mm x 10cm (1/2" X 4")
2 angle irons for runner: 6mm x 45mm x 45mm x 1.57 meters (1/4" x 1 3/4" x 1 3/4" x 62 13/16") 1 oak draft bar: 6cm x 15cm x 1.52m 2 steel plates for shoes: (2 3/8" x 6" x 59 7/8") 6mm x 12.5cm x 66cm (1/4" x 5" x 26") 4 machine bolts with nuts & washers: 13mm x 6cm 2 strap irons for bar brace: (1/2" x 2 3/8") 10mm x 4cm x 32cm (3/8" x 1 9/16" x 12 5/8") 8 machine bolts with nuts & washers: 13mm x 4cm 1 iron bar for handlebar (1/2" x 1 9/16") 15mm x 5cm x 1.6 meters (9/16" x 2" x 63") 1 oak stop bar: 4cm x 8cm x 1.45 meters 1 rope: (1 9/16" x 3 1/8" x 57 1/8") 13mm x 2 meters (1/2" x 78 3/4") 2 stop bar stock: threaded one end 2 side plates, draft clamp stock: 20mm x 21cm 2 stop bar ball nuts & washer: (25/32" x 8 1/4") 13mm (1/2")
2 machine bolts with nut and washer: 13mm x 4cm (1/2" x 1 9/16")
Source:
Forsberg, Carl M., Metzger, James D. and Steele, John C. Construction and Use of Small Equipment for Farm Irrigation. USOM/Turkey, in cooperation with the Turkish Ministry of Agriculture.
BARREL FRESNO SCRAPER
The barrel fresno scraper (Figure 1) is a lighter, simpler version of the fresno
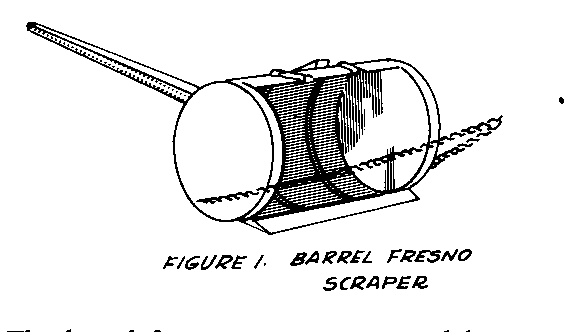
scraper described in the preceding entry. It is a low-cost implement to move soil efficiently. It can be pulled by a team of bullocks and is operated by one person.
The scraper, which is well-adapted to production by a village blacksmith, is made from an old barrel and scrap metal. The scraper can be adapted for heavy duty use.
The barrel fresno scraper presented here was built and tested in Afghanistan. It was found that it could move approximately twice as much soil as the shovel board normally used by the Afghan farmer. The scraper worked better when the high spots were plowed with a mold-board plow, which breaks up the soil, making it easier to pick up. Using the local wooden plow was satisfactory but it left the soil cloddy.
It is estimated that it could be used for 8 to 10 years under normal farm use on. Under other conditions, particularly where the soil is sandy or where the scraper is used for road or terrace construction, its life would be much shorter.
Tools and Materials
Heavy hammer Chisel - for cutting barrel Punch - for making holes in barrel Saw - for cutting wood Drill - for boring holes in wood Pliers Welder or access to the services of a welder Barrel, 208-liter (55-U.S. gallon) as new and strong as possible. Rust weakens the metal and a rusty barrel should not be used. Blade, metal, 1 piece, 5 to 8mm (3/16" to 5/16") thick, 88cm (34 5/8") long. Have a blacksmith taper the blade until it has this shape ==\ when viewed from the end. The blade should be sharp. Old truck springs make good blades. Blade holder, metal, 2 pieces, 5 to 8mm (3/16" to 5/16") thick Handle, wood, 1 piece, if soft wood 4 by 8cm (1 9/16" x 3 1/8") or pole 8cm (3 1/8") in diameter at large end, 3m (9'10") Handle brace, wood, 1 piece, 3cm by 8cm by 150cm (1 3/16" x 3 1/8" x 59") Block wood, 1 piece, 3cm by 8cm by 12cm (1 3/16" x 3 1/8" x 4 3/4") Bolt, 1 piece, 1cm diameter by 10cm (3/8" x 4") Nails, 5 pieces, 9cm (3 1/2") long Wire, heavy - at least 3mm (1/8") thick, 12m (39') long Chain, 4m (13'), made from 7mm (9/32") rod, with hook at each end. See Figure 1. Rope, 12mm (1/2") diameter, 3m (9'10") long
Construction
Cut the barrel, starting next to the welded seam, as shown in Figure 3 below
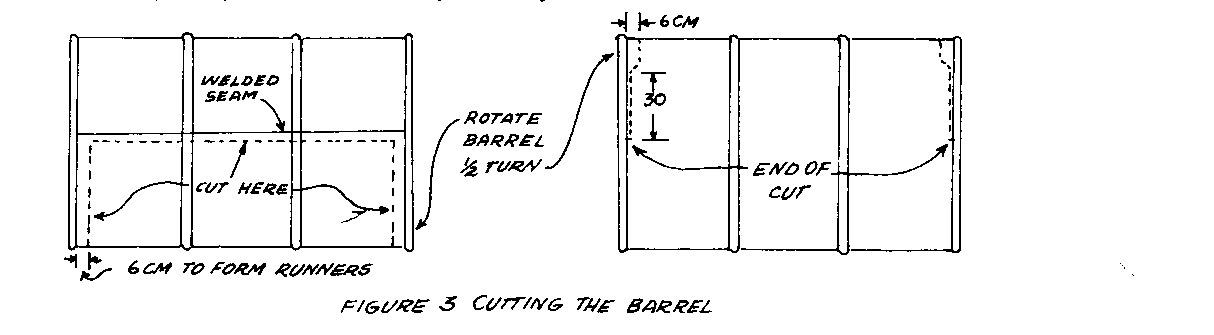
(also see Figure 1). The cut is exactly half way around the barrel.
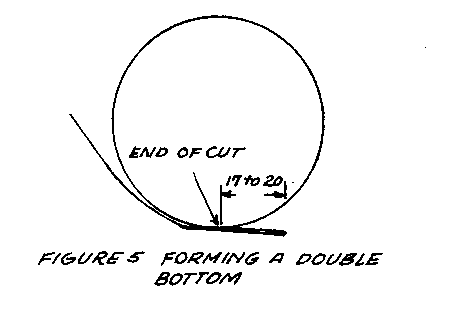
Pull the cut-out section forward and flatten it with a hammer (Figure 4). Fold the
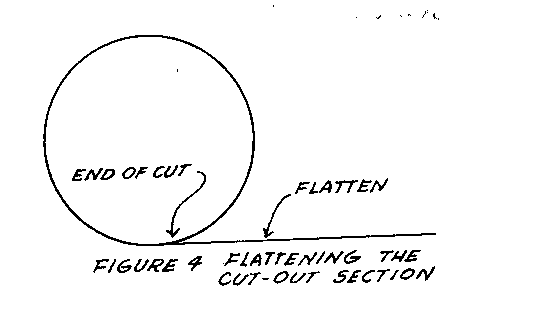
cut-out section back 17 to 20 cm (6 3/4" to 7 7/8") from the end of the cut, depending on the width of the blade, to form a double bottom (see Figure 5).
The blade can be installed by welding or by riveting.
To install the blade by welding (see Figure 1):
- Butt the blade (see Tools and Materials) against the barrel fold and spot weld it. Five spots of welding 3cm (1 3/16") long, evenly spaced, are enough.
- The lower tip of the blade holder (see Tools and Materials) should be even with the end of the cut).
- Weld the blade holder at the outside of the barrel to the heavy rim.
- Weld the blade to the bottom of the blade holder.
To install the blade by riveting:
- No blade holder is required.
- The metal for the blade should be 5 to 8mm (3/16" to 5/16") thick, 8 to 12cm (3 1/8" to 4 3/4") wide and 164cm (64 1/2") long. Taper and sharpen the blade before bending.
- Bend the blade up at right angles 40cm (15 3/4") from each end. This will leave the main part of the blade 86cm (33 7/8") long to fit inside the barrel.
- Insert the blade.
- Drill holes and rivet as shown in Figure 6.
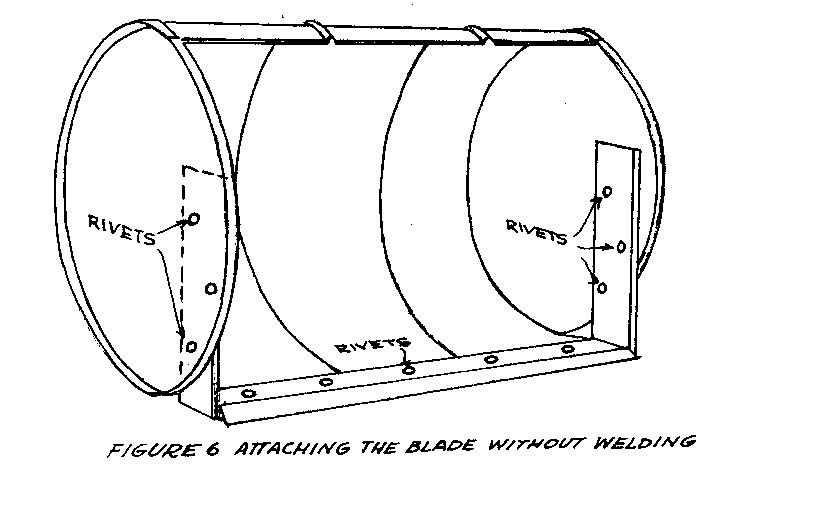
- The folded part of the barrel bottom should extend 3cm (1 3/16") under the blade and be riveted to the bottom of the blade.
Install the handle and handle brace (Figure 7):
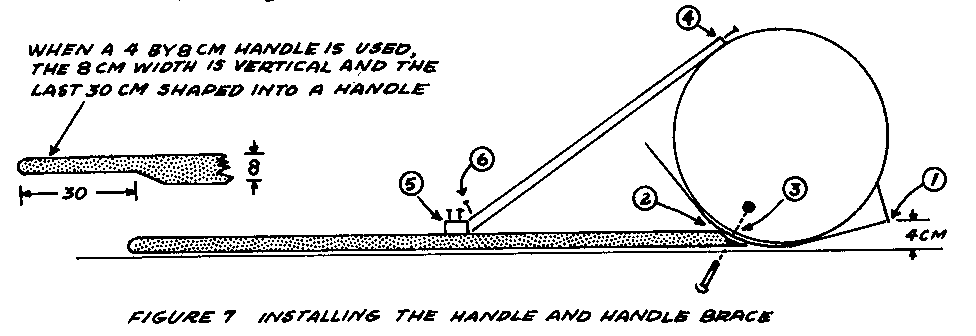
- Position the barrel so the edge of the blade is exactly 4cm above the floor.
- Taper the end of the handle and place it in the position shown in the sketch, making sure it is in the center of the barrel.
- Punch a hole through the bottom of the barrel, drill a hole through the end of the handle, and bolt the handle to the barrel.
- Bend 2 1/2cm of the edge of the barrel metal up as shown in Figure 1. Punch 2 small holes in the metal and drive 2 nails through the holes into the end of the wooden brace.
- Making sure the blade is still 4cm from the floor, nail the wooden block against the end of the wooden brace.
- Drive a nail through the end of the brace into the handle.
Install the brace wires and rope (Figure 8):
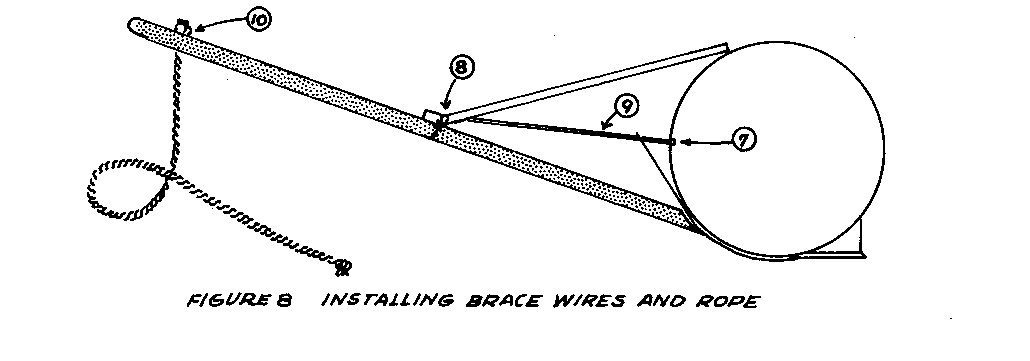
- Punch holes through the side and end of the barrel halfway between the bolt and brace end.
- Fix 4 strands of wire through the holes and around the brace and handle.
- Twist the wires with a small stick to tighten the wire braces, making sure the handle is at right angles to the barrel.
- Drill a 1 1/2cm hole, 20cm from the end of the handle. Thread the end of the rope through the hole and make a knot at each end.
Make holes for installing chain (Figure 9).
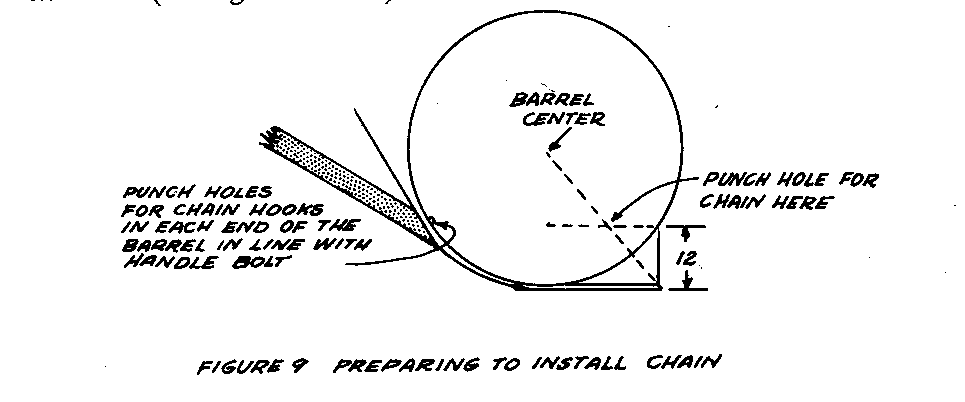
Install chain (see Figures 1 and 2).
Operation
When operating the barrel fresno scraper, always be careful not to have any part of your body directly above the handle.
Keep a firm grip on the handle while loading, during operation, and getting ready to unload. An unseen rough spot may cause a sudden jerk, which will make the handle fly up and strike you.
Before using the scraper, plow the high spots that you want to remove. This will make it easier to load the soil.
The power used to pull the scraper will also help in loading and unloading. Use the rope in the handle to pull the scraper into position for loading and for spreading the soil evenly when unloading.
To load the scraper, simply lift the handle to let the blade go into the soil. Do not make too deep a cut: this would either pull the scraper over or pull the animals to a stop.
You will learn by experience how to hold the handle for a proper cut and smooth handling.
When the scraper is full, push down on the handle to let the loaded scraper slide forward without picking up more soil to where you want to unload it.
To unload, lift the handle. The pull of the animals will move the scraper into dumping position. To spread the soil evenly, hold the rope tight. To dump the soil in a pile, let the rope go.
Repairing the Barrel Fresno Scraper
To repair the scraper when the bottom starts to wear through, cut off the unworn part of the cut-out section of the barrel and weld or rivet it over the old bottom. When the rims of the barrel, which serve as runners, start to show wear, weld or rivet old truck springs or similar heavy strap iron over their entire length.
Adapting for Heavy Duty
To adapt the barrel fresno scraper for heavy duty, the two wearing points, the bottom and the runners, must be reinforced. To reinforce the scraper bottom, cover it with a heavy iron plate 4 to 6mm (5/32" to 1/4") thick from the rear of the blade to the bolt that holds the handle. Weld or rivet the plate in place. Reinforce the runners by welding or riveting old truck springs or other heavy strap iron as described in the paragraph on repairing the scraper.
Source:
Dale Fritz, VITA Volunteer, Schenectady, New York FLOAT WITH ADJUSTABLE BLADE
The float is very useful for leveling a field before planting a crop. It can be made by a small manufacturer or a carpenter-blacksmith with locally-available materials (Figure 1).
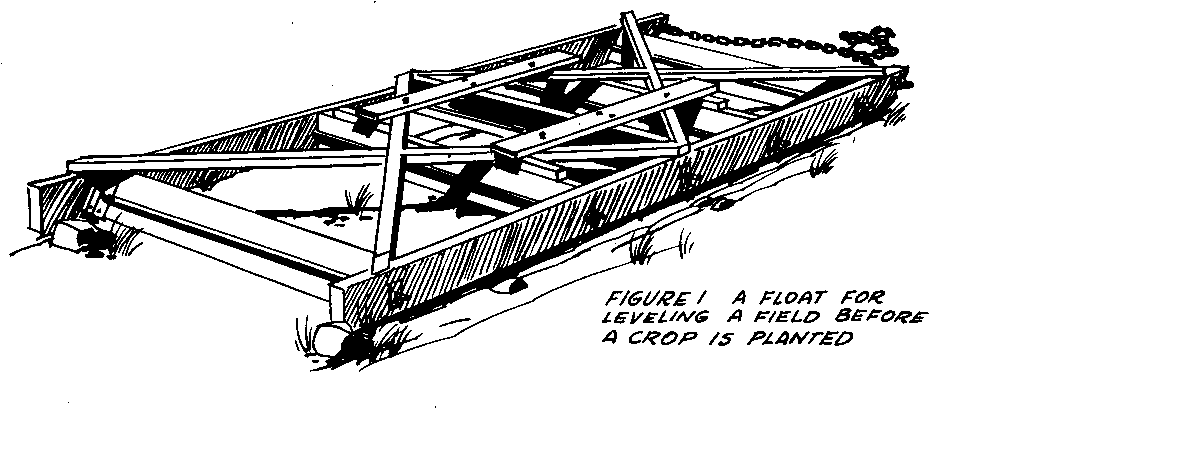
All earth moving operations, where any quantity of soil is moved, leave the land surface in an uneven condition. The float is the best piece of equipment for obtaining a smooth, even surface. It is difficult to do a perfect job of leveling the first season after earth has been moved. The areas from which the soil has been removed are usually hard and the areas to which it has been moved are soft so that uneven settling results. Also, general tillage and plowing operations sometimes roughen the land surface. Using the float over the entire field each season before planting the crop will help answer these problems. Best results may be obtained by floating the field in both directions (at 90 degrees), going back and forth. The last floating should be in the direction of the irrigation flow.
When borders are built in a field for border irrigation it is usually best to use the float over the entire area between the borders before seeding.
The float can be built in various widths according to the available power. It is necessary, however, that the float be at least 5 meters (16") long to ensure a good job of leveling the earth. The adjustable blade is optional but it is often desirable if a buck scraper is not available. Common hitches for the float are the same as used with the fresno. <see figure 2>
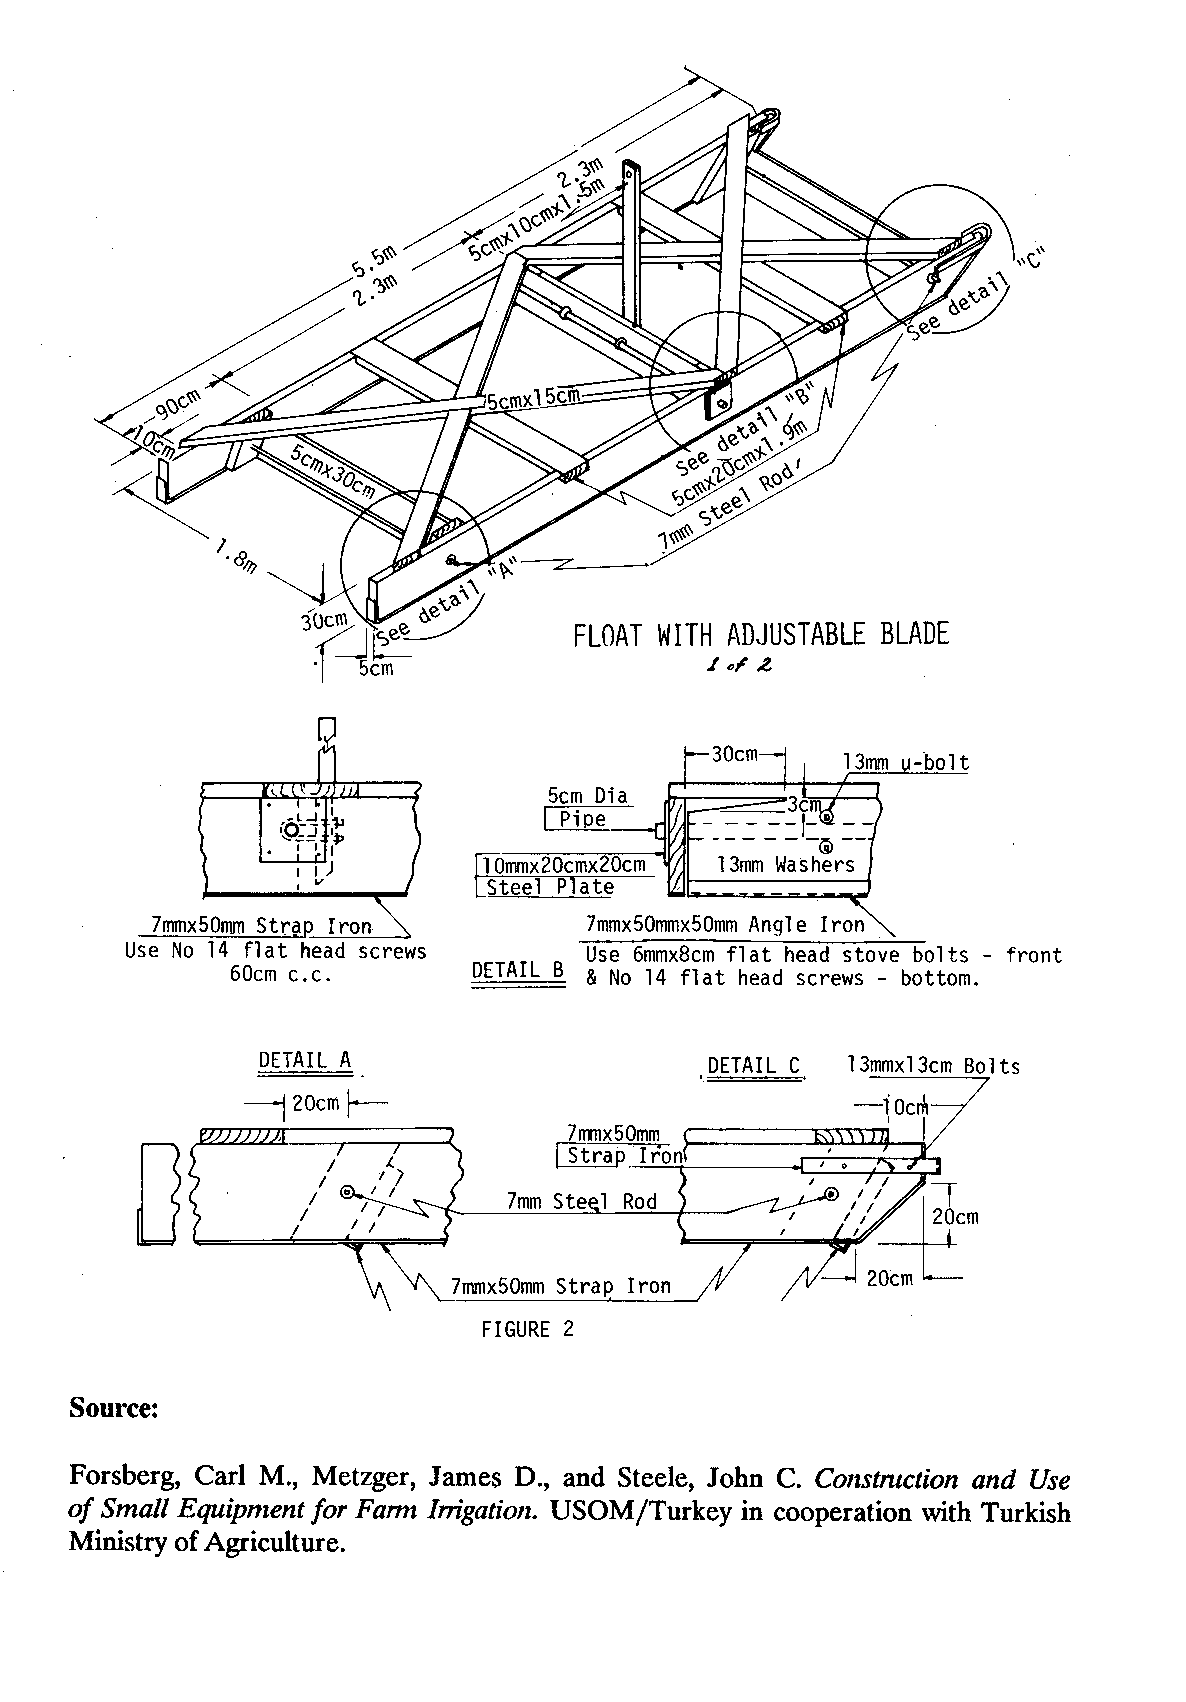
Tools and Materials
Wood: 2 runners, 5cm x 30cm x 5.5 meters (2" x 12" x 18') 3 blades, 5cm x 30cm x 1.8 meters (2" x 12" x 70 7/8") 2 cross braces, 5cm x 20cm x 1.9 meters (2" x 7 7/8" x 74 13/16") 2 diagonal braces, 5cm x 15cm x 3.75 meters (2" x 5 7/8" x 12'4") 2 diagonal braces, 5cm x 15cm x 3 meters (2" x 5 7/8" x 9'9") 4 side blocks, 5cm x 30cm x 45cm (2" x 12" x 17 3/4") 1 lever, 5cm x 10cm x 1.5 meters (2" x 4" x 59") 2 strap iron runner plates, 7mm x 50mm x 6 meters (9/32" x 2" x 19'7") 3 angle iron cutting edges, 7mm x 50mm x 1.8 meters (9/32" x 2" x 70 7/8") 2 steel tie rods (threaded both ends), 7mm x 2 meters (9/32" x 78 3/4") 4 nuts, 7mm (9/32") 8 washers, 7mm (9/32") 1 pipe axle, 5cm (2") diameter x 2 meters (78 3/4") 2 steel plates, 10mm x 20cm x 20cm (3/8" x 7 7/8" x 7 7/8") 3 u-bolts, with nuts and washers, 13mm x 20cm (1/2" x 7 7/8") 2 hitch stocks, 7mm x 50mm x 70mm (9/32" x 2" x 27 9/16") 50 flat head screws, 4cm (1 9/16") (No. 14) 15 flat head stove bolts, with nuts and washers, 6mm x 8cm (1/4" x 3 5/32") 4 carriage bolts, with nuts and washers, 13mm x 13cm (1/2" x 5 1/8") 1.5kg nails, 13cm (40d) (5 1/8") 1.5kg nails, 10cm (20d) (4") 1 rope, 10mm x 4 meters (3/8" x 13') 1 chain or cable hitch, 5 meters (16'5")
BUCK SCRAPER
This buck scraper, <see figure 1> which has been designed for use with large horses or oxen,
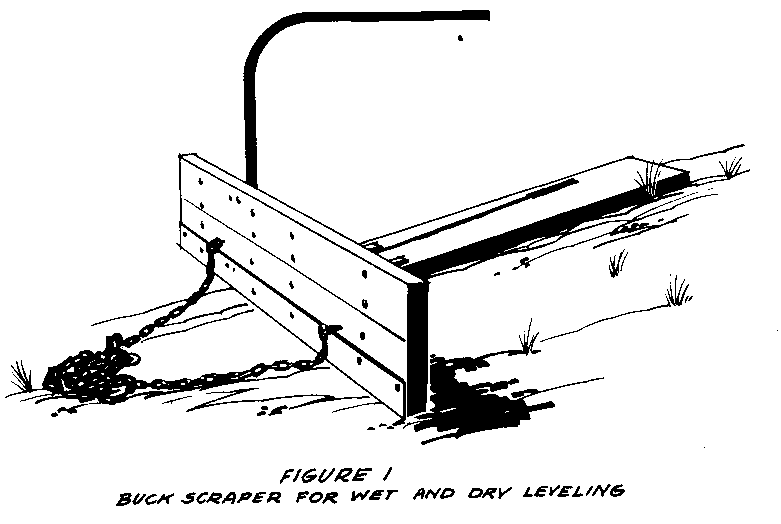
may be used for leveling small humps of earth where the haul distance is short. It can be made by a small manufacturer or by a carpenter-blacksmith if equipment and materials are available.
After using the fresno to move large amounts of soil from high spots to low spots, the surface of the cut and fill areas will usually be rough. The buck scraper is useful for smoothing out the uneven spots caused by the fresno. It can be used for filling ditches or for smoothing border irrigation systems. After the border levee has been made, it is very important to smooth the area between and close to the levees. The buck scraper can be used very effectively for this purpose by shortening the hitch on one side and allowing the blade of the scraper to run at an angle, thus shoving the soil into the the rough areas around the newly-built levee.
Earth moving may be aided by loosening the soil to be moved by plowing before using the buck scraper.
The buck scraper is loaded by pushing down on the handle as the equipment moves forward. The handle must be held down while the soil is being transported. The scraper is unloaded by lifting up on the handle. A shallow spread is made by lifting the handle slightly and a deeper spread by pushing the handle farther forward.
The most common hitches with the buck scraper are:
- 2 oxen + 2 horses + 3 horses
The buck scraper may be made in different sizes according to the available power. <see figure 2>
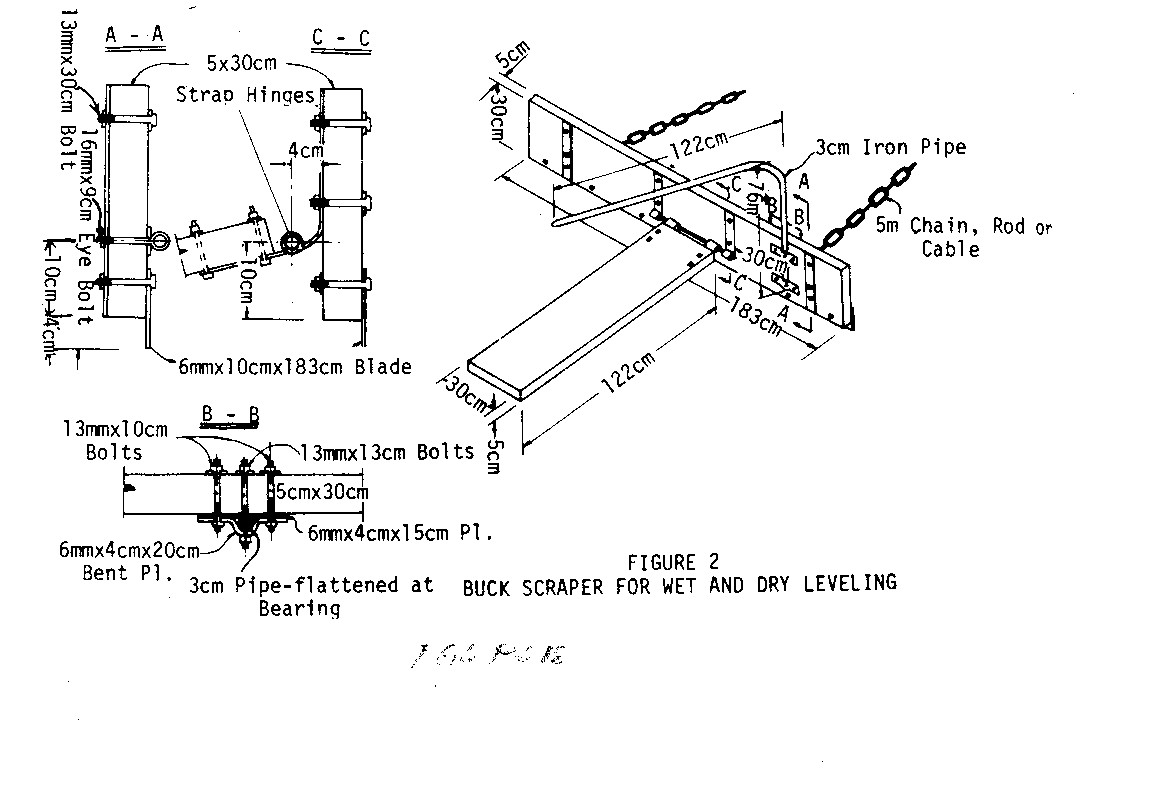
Tools and Materials
1 buck board, 5cm x 30cm x 183cm (2" x 12" x 6') 1 trailer board, 5cm x 30cm x 122cm (2" x 12" x 4') 1 iron pipe handle, 3cm x 2cm (1 3/16" x 3/4") 1 strap iron cutting edge, 6mm x 10cm x 183cm (1/4" x 4" x 6') 4 strap iron hinges, 6mm x 4cm x 30cm (1/4" x 1 9/16" x 12") 2 strap iron, 6mm x 4cm x 30cm (1/4" x 1 9/16" x 12") 2 strap iron pipe clamps, 6mm x 4cm x 15cm (1/4" x 1 9/16" x 6") 2 band strap iron pipe clamps, 6mm x 4cm x 20cm (1/4" x 1 9/16" x 7 7/8") 1 bolt for hinge, 16mm x 46cm (5/8" x 18 1/8") 2 eye bolts, 16mm x 9cm (5/8" x 3 1/2") 2 carriage bolts, 13mm x 13cm (1/2" x 5 1/8") 4 carriage bolts, 13mm x 10cm (1/2" x 4") 22 carriage bolts, 13mm x 8cm (1/2" x 3 1/8") 2 washers, 16mm (5/8") 28 washers, 13mm (1/2") 1 chain or cable hitch, 5mm (3/16")
Source:
Forsberg, Carl M., Metager, James D., and Steele, John C. Construction and Use of Small Equipment for Farm Irrigation. USOM/Turkey in cooperation with Turkish Ministry of Agriculture.
V-DRAG
The V-Drag (Figure 1) is used for making ditches for irrigation and drainage of
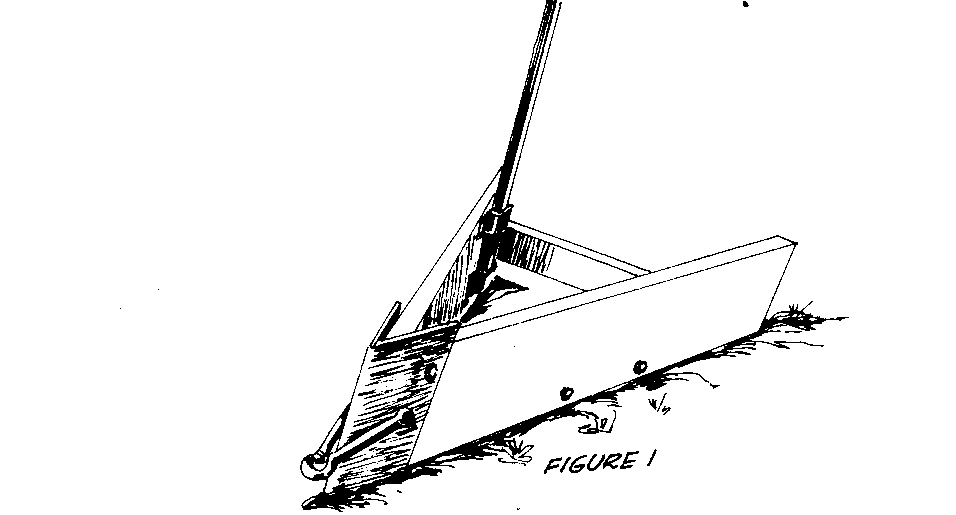
fields and roads. It can also be used to make levees (banks) or borders for border irrigation. The V-Drag can be made locally by carpenter-blacksmiths or small manufacturers if materials are available. (See Figure 2 for list of materials and
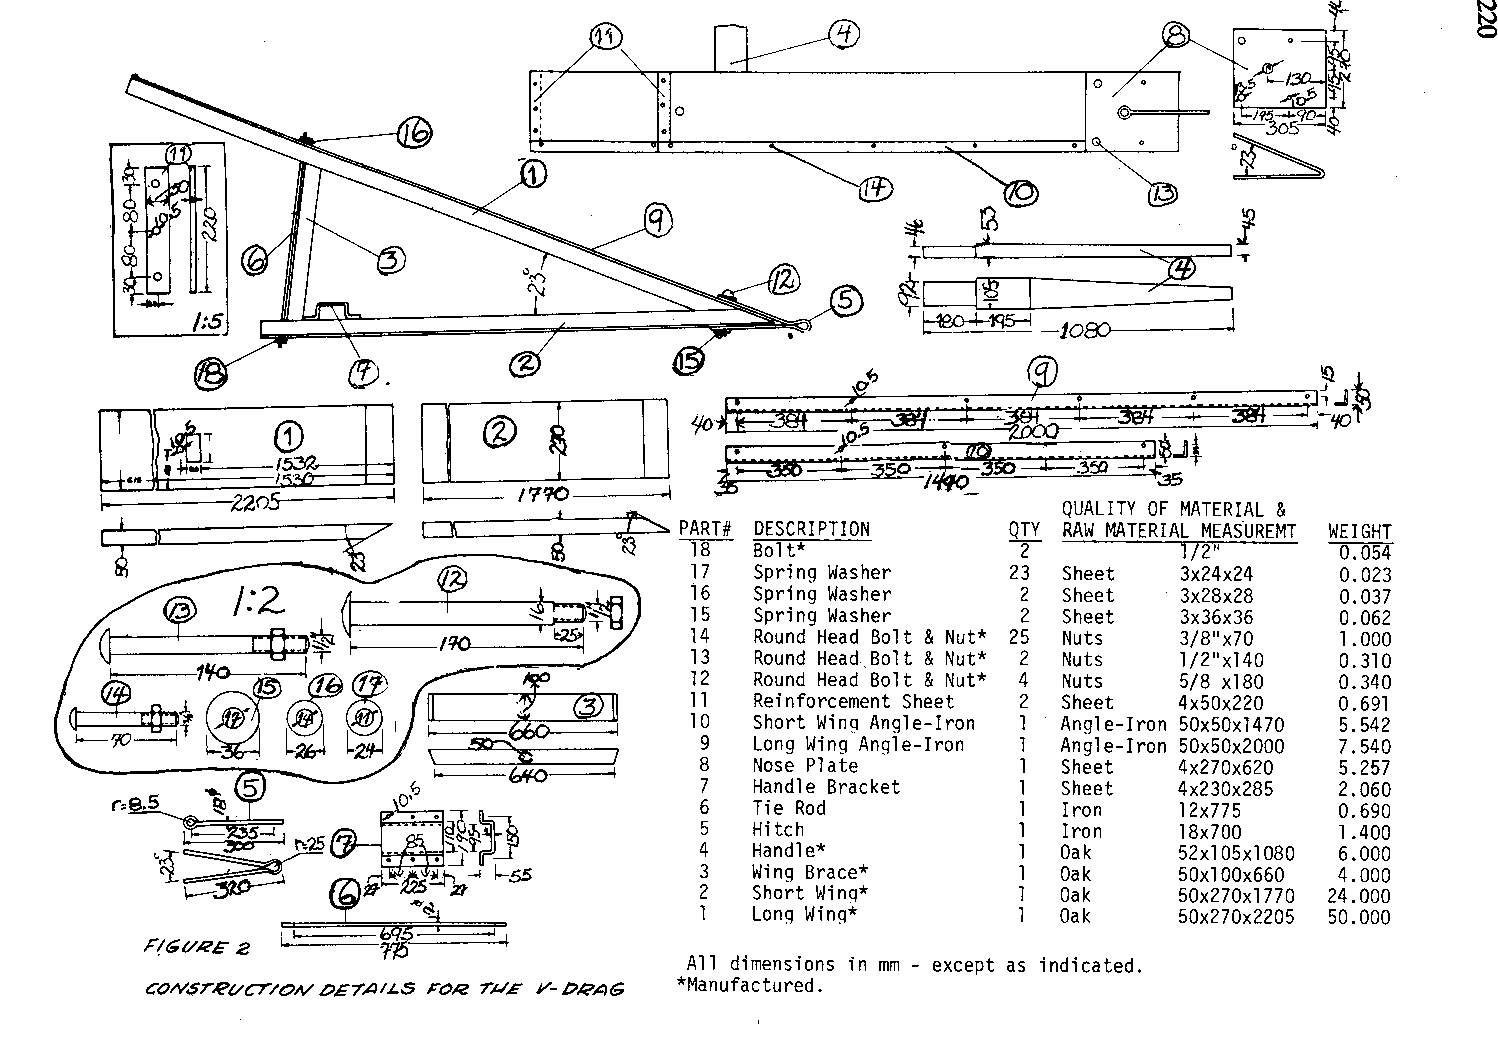
construction details.)
Plowing Ditches
After the desired ditch line has been established by means of a level or transit, the plow may be used to make a furrow where the line has been staked. Plow along the line one way, then turn and plow back again in the same furrow but throwing the soil the other way.
When the furrow has been plowed, use the V-Drag to move the soil out of the furrow. By making a complete round (down and back) the soil can be thrown out on both sides of the ditch. By alternately plowing and using the V-Drag to throw the soil out, any desired depth of ditch can be obtained.
The method of hitching the animals is important. If two horses are used, it is necessary to hitch them far enough apart so that both can walk outside the ditch. If two oxen are used it is important that the yoke be long enough to permit each animal to walk on the outside of the ditch.
If the soil is hard and more power is required, three horses can be used and one horse can walk in the ditch and one on each side.
The depth of cut made by the V-Drag can be adjusted to the available power. Shortening the hitch will reduce the depth of cut as will shifting your weight to the back of the drag.
Either lengthening the hitch or shifting your weight to the front will increase the depth of cut.
The handle of the V-Drag can be used to vary the width of the ditch. Pressing down will widen it while lifting up will narrow the width.
Building Levees or Borders for Border Irrigation Systems
After the desired location has been selected for constructing a levee, or border, the plow may be used to plow down and back twice and throw the soil into the border line. The V-Drag can then be used to crowd the soil into a ridge.
When a border irrigation system is constructed in this manner it is necessary to smooth around the border with a buck scraper (see page 217). If the hitch on the scraper is shortened on one side it will roll the dirt into the border.
The Hitch
The hitch on the V-Drag is the same for construction of a ditch or a border. Two horses, two oxen, or three horses are usually satisfactory.
Source:
Forsberg, Carl M., Metzger, James D., and Steele, John C. Construction and Use of Small Equipment for Farm Irrigation. USOM/Turkey in cooperation with Turkish Ministry of Agriculture.
MULTIPLE HITCHES
Multiple hitches or load eveners are necessary when more than one animal is used for pulling equipment to adapt the proper power to the load and the job. Correctly-made hitches enable each animal to do its share of the work and exert an even pull on a piece of equipment.
Various combinations of hitches may be used, according to the job. The most common hitches are:
- double trees, or 2-horse evener + 3-horse evener + 4-horse evener + 6-horse evener
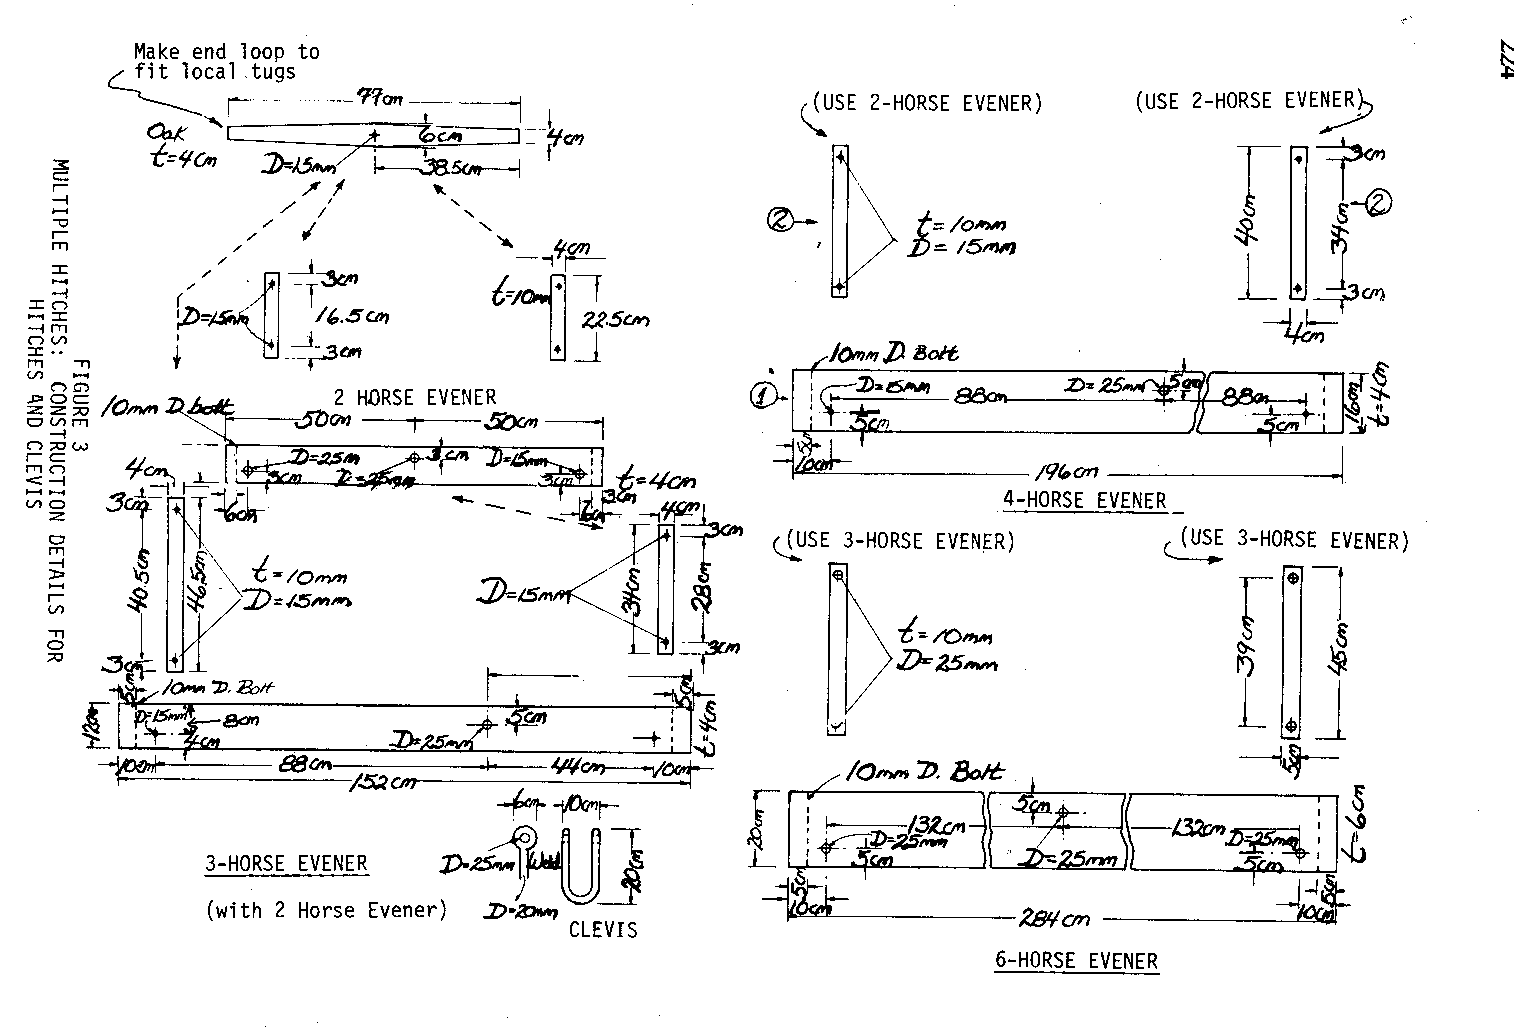
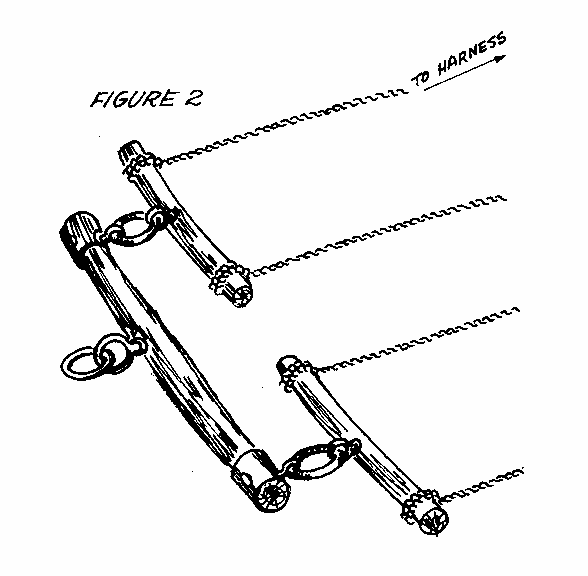
Figure 1 shows a four-horse evener and a three-horse evener. This illustration is
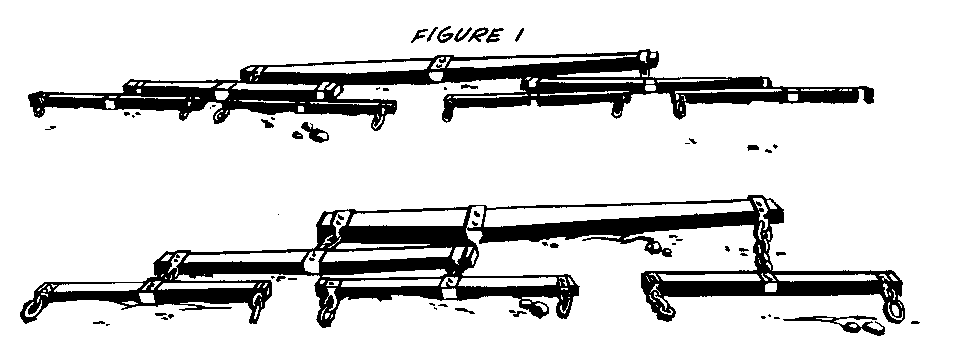
helpful in reading the construction details in Figure 3.
The major parts of the hitches can be adapted for use with oxen or bullocks. Figure 2 shows simpler eveners that can be used with horses, oxen, or bullocks.
Sources:
Hoffen, H.J. Farm Implements for Arid and Tropical Regions. Rome: Food and Agriculture Organization of the United Nations, 1960.
Forsberg, Carl M., Metzger, James D., and Steele, John C. Construction and Use of Small Equipment for Farm Irrigation. USOM/Turkey, in cooperation with the Turkish Ministry of Agriculture.
Watson, Peter R. Animal Traction. Washington, D.C.: Peace Corps and TransCentury Corporation, 1981.
Tools and Materials
2-horse evener:
1 oak plank, 4cm x 10cm x 1 meter (1 9/16" x 4" x 39 3/8") 2 oak bars, 4cm x 6cm x 77cm (1 9/16" x 2 3/8" x 30 5/16") 4 strap irons, 10mm x 4cm x 22.5cm (3/8" x 1 19/16" x 8 7/8") 4 machine bolts with nuts and washers, 13mm x 8cm (1/2" x 3 1/8") 2 carriage bolts with nuts and washers, 10mm x 12cm (3/8" x 4 3/4")
3-horse evener:
1 oak plank, 4cm x 12cm x 1.52 meters (1 9/16" x 4 3/4" x 59 7/8") 1 oak bar, 4cm x 6cm x 77cm (1 9/16" x 2 3/8" x 30 15/16") 2 strap iron, 10mm x 4cm x 46.5cm (3/8" x 1 9/16" x 18 5/16") 2 strap iron, 10mm x 4cm x 34cm (3/8" x 1 9/16" x 13 3/8") 4 machine bolts with nuts and washers, 13mm x 8cm (1/2" x 3 1/8") 2 carriage bolts with nuts and washers, 10mm x 14cm (3/8" x 5 1/2") Plus material for one 2-horse evener
4-horse evener:
1 oak plank, 4cm x 16cm x 1.96 meters (1 9/16" x 6 5/16" x 78") 4 strap iron, 10mm x 4cm x 40cm (3/8" x 1 9/16" x 15 3/4" 4 machine bolts with nuts and washers, 13mm x 8cm (1/2" x 3 1/8") 2 carriage bolts with nuts and washers, 10mm x 18cm (3/8" x 7 1/16") Plus materials for two 2-horse eveners
6-horse evener:
1 oak plank, 6cm x 20cm x 2.84 meters (2 3/8" x 7 7/8" x 9' 3 3/4") 4 strap iron, 10mm x 5cm x .45cm (3/8" x 12.5cm x 5/32") 2 machine bolts with nuts and washers, 20mm x 8cm (3/4" x 3 1/8") 2 machine bolts with nuts and washers, 20mm x 10cm (3/4" x 4") 2 carriage bolts with nuts and washers, 10mm x 22cm (3/8" x 8 5/8") Plus materials for two 3-horse eveners
Clevis (U-shaped piece by which draft animal is connected to hitch):
1 clevis stock, 20mm x 70cm (3/4" x 27 1/2") 1 machine bolt with nut and washers, 20mm x 12cm (3/4" x 4 3/4") (one clevis is needed for each horse)