
Asia makes up less than one third (30%) of the world’s land area and yet carries over half (56%) of the world’s
population. Moreover, the average population density of Asia becomes a significant long-term problem when food production is considered. Some countries in Asia have a population density of up to eight people per hectare. In addition, the Food and Agriculture Organization (FAO) of the United Nations predicts that the world have to double its food production by the year 2030 to feed its exploding population. However, Asia, when compared to the rest of the world, has very little land that is suitable for cultivation that has not already been exploited.
To compound the problem, much of the land now under cultivation in Asia has been classified as degraded or as having undergone moderate-to-severe erosion. According to FAO, many Asian countries now have 20% or more of their lands considered “degraded,” with some countries approaching 50%.
The problem: Deforestation leading to soil erosion
One problem of the region is the rapid depletion of its forest cover. Mass deforestation for economic reasons is carried out in a reckless way. Shifting cultivators, due to population pressures, move into newly opened areas and begin to practice swidden (slash and burn) agriculture. Then the forest areas of generally fragile, sloping soils, are subject to intensive agriculture practices, which rapidly degrade the land.
The Philippines Experience
An example of what has happened in terms of deforestation and land degradation is that which has taken place during one generation in the Philippines. The Philippines has almost 30 million ha. In the 1950’s almost half of that (about 16 million ha) was classified as natural forest. Today, less than 1 million ha of the natural forest remains. In the same time period, the population has almost doubled and the marginal or “fragile” lands have increased from 2 million ha to 12 million.
Soil Erosion
The greatest problem man will encounter when forest trees are extensively cut without replanting, combined with improper farming of fragile, sloping lands is soil erosion. The erosion of topsoil–the thin upper crust on the earth’s surface in which man plants his food crops–is an extremely serious problem in Asia.
Importance of Topsoil
Soil is the result of gradual weathering of plants, rock, and minerals. Its formation is a very slow process that in some estimates takes place at the rate of 2.5 cm per century. Topsoil is rich and fertile because of its organic matter content. Plants and animals die, decay, and are incorporated into the soil, making it fertile and capable of supporting the growth of food crops.
Function of Topsoil
Topsoil stores plant nutrients, air, and moisture. It is a virtual factory of intense biological activity; innumerable fungi and bacteria in topsoil break down organic matter and make the soil richer. It is, therefore, essential to agricultural production. The nutrients in topsoil are crucial, as they are the food of plants. So if the topsoil is lost, you cannot get a good harvest from your land unless you use expensive commercial fertilizer. The best thing you can do, therefore, is to protect your hilly land from soil erosion. Bear in mind that poor soil makes a farmer poor.
Controlling Erosion
There are several traditional ways of controlling soil erosion such as reforestation, terracing, multiple cropping, contouring and cover cropping. The Asian Rural Life Development Foundation (ARLDF) promotes an erosion control technique that is both easier and less expensive to implement than the traditional methods. This technology is known as SALT or ”Sloping Agricultural Land Technology.”
Introduction to SALT
SALT is a package technology of soil conservation and food production, integrating differing soil conservation measures in just one setting. Basically, SALT is a method of growing field and permanent crops in 3-5 m wide bands between contoured rows of nitrogen fixing trees. The nitrogen fixing trees are thickly planted in double rows to make hedgerows. When a hedge is 1.5-2 m tall, it is cut down to about 75 cm and the cuttings (tops) are placed in the alleyways to serve as organic fertilizer.
SALT, An Agroforestry Scheme: SALT is a diversified farming system which can be considered agroforestry since rows of permanent shrubs like coffee, cacao, citrus and other fruit trees are dispersed throughout the farm plot. The strips not occupied by permanent crops, however, are planted alternately to cereals (corn, upland rice, sorghum, etc.) or other crops (sweet potato, melon, pineapple, castor bean, etc.) and legumes (soybean, mung bean, peanut, etc.). This cyclical cropping provides the farmer some harvest throughout the year. SALT also includes the planting of trees for timber and firewood on surrounding boundaries. Examples of tree species for “boundary forest” in SALT are mahogany, Casuarina, Sesbania, Cashew, etc.
History of SALT: The Mindanao Baptist Rural Life Center (MBRLC) developed SALT on a marginal site in Kinuskusan, Bansalan, Davao del Sur. Dialogues with local farmers acquainted the MBRLC staff with farm problems and needs which gave them the impetus to work out a relevant and appropriate farming system.
From testing different intercropping schemes and observing ipil-ipil ( Leucaena leucocephala ) based farming systems in Hawaii, SALT was finalized, verified and set up as an initial model in 1978. While it was still in the developing stage, the following guidelines were considered essential. The system must:
- adequately control erosion
- help restore soil structure and fertility
- be efficient in food crop production
- be applicable to at least 50% of hillside farms
- be easily duplicated by upland farmers
- be culturally acceptable
- have the small farmer as the focus and food production top priority
- be workable in a relatively short amount of time
- require minimum labor
- be economically feasible
In 1978, a hectare of land was selected as a test site at the MBRLC. It was typical of the surrounding farms in that it had a slope steeper than 30%, had been farmed for 5 years or more, and had soils similar to those of most farms in the area. Contour lines were carefully established with the aid of an A-frame, and the planting of hedgerows and permanent crops began. In the early 1980s, SALT began spreading to surrounding farms and villages as well as the rest of Asia.
Advantages of SALT:
The advantages of SALT are that it is a simple, applicable, low-cost and timely method of upland farming. It is a technology developed for Asian farmers with few tools, little capital, and little formal education in agriculture. Contour lines are determined by using an A-frame transit that any farmer can learn to make and use. A farmer can grow varieties of crops he is familiar with and old farming patterns can be utilized in the SALT system.
If farmers leave the SALT farm, like some tribal groups do, the nitrogen-fixing trees and shrubs (NFTS) will continue to grow and overshadow the crop area. By the time the land is reverted to cultivation, the soil has been enriched already by the large amount of NFTS leaves and there is no erosion to contend with. In addition, the trees may be harvested for firewood or charcoal.
Various Forms of SALT:
There are several forms of SALT and a farmer may wish to use the SALT system in several variations. Simple Agro-Livestock Technology (SALT 2), Sustainable Agroforestry Land Technology (SALT 3), and Small Agrofruit Livelihood Technology (SALT 4) are three variations of SALT that have been developed at the MBRLC based on the original SALT ideas.
SALT 2 (Simple Agro-Livestock Land Technology) is a small, livestock-based agroforestry system (preferably with dairy goats) and has a land use of 40% for agriculture, 20% for forestry and 40% for livestock. As in a conventional SALT project, hedgerows of different nitrogen fixing trees and shrubs are established on the contour lines. The manure from the animals is utilized as fertilizer both for food and forage crops.
SALT 3 (Sustainable Agroforest Land Technology) is a cropping system in which a farmer can incorporate food production, fruit production and forest trees that can be marketed. The farmer first develops a conventional SALT project to produce food for his family and possibly for livestock. On another portion of land, he can plant fruit trees such as rambutan, durian, and lanzones between the contour lines. The plants in the hedgerows should be cut and piled around the fruit trees for fertilizer and soil conservation purposes. A small forest of about 1 ha will be developed in which trees of different species are grown for short-range production of firewood and charcoal. Other species that would produce wood and building materials may be grown for medium and long-range production. In some areas where the soil is too steep for row crops, contour lines may be established two or three meters apart and planted with Flemingia or some other suitable hedgerow species. In between the hedgerows, coffee, cacao, calamansi or other permanent crops could be planted.
SALT 4 (Small Agrofruit Livelihood Technology) is based on a half-hectare piece of sloping land with two-thirds of it developed in fruit trees and one-third intended for food crops. Hedgerows of different nitrogen-fixing trees and shrubs are planted along the contours of the farm. For more information on these SALT farming systems, see the individual manuals on SALT 2, SALT 3 and SALT 4 produced by the MBRLC and ARLDF.
The ten steps of SALT
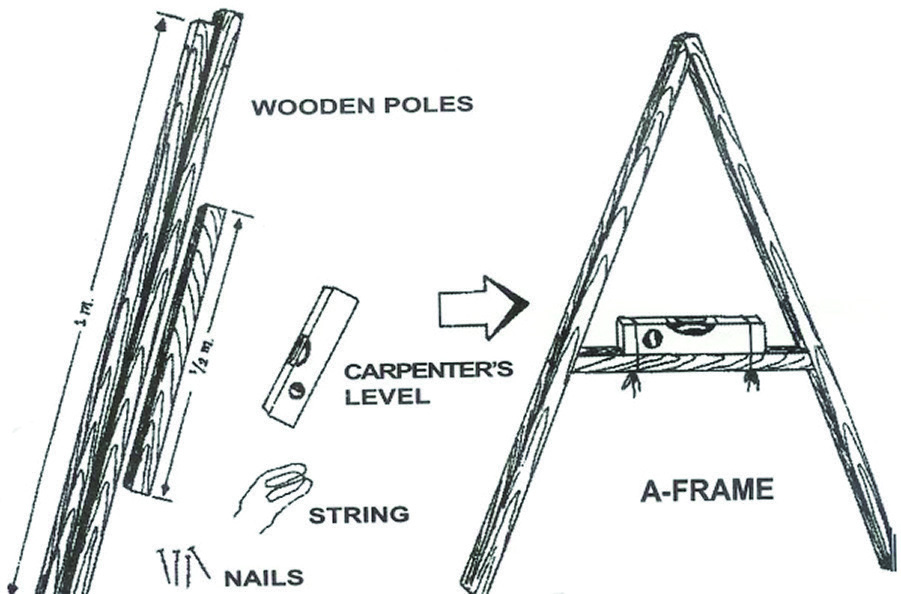
Step 1: Make an A-frame
The first step is to make an instrument to locate the contour lines of your field. The ARLDF recommends using an A-frame (Fig 2.12). This is a simple yet effective tool that looks like the letter A, hence its name.
The A-frame is so simple that you can make your own using materials generally found on farms. To make it, you will need three sturdy wooden or bamboo poles, a saw or bolo, an ordinary carpenter’s level, and string or rope. Cut two wooden poles at least 1 m to serve as the legs of the A-frame. Cut the third piece at least 0.5 m long to be used as the cross bar of the frame.
Tie together the upper ends of the longer poles. Let the lower ends of the legs stand on the level ground. Spread the legs about 1 m apart to form a perfect angle. Brace horizontally the shorter pole to become a crossbar between the two legs. Tie carpenter’s level on the top of the crossbar.
Use the A-frame to find the contour lines of the land. Plowing and planting following the contour lines can prevent soil erosion. The contour line is a level line from one end of the field to the other and is found around the hill or mountain
Other instruments for finding contour lines: Many other instruments can be used to find the contour lines of your field. One is the variation of the A-frame mentioned earlier which uses a string and rock as a plumb bob instead of the carpenters level (diagram on right hand side of Fig 1). When done right, this possibly the most simple, economic and accurate method of locating contour lines.
Other farmers have chosen to use “O-rings”, water levels, homemade transits and even professional transits to locate the contour lines. Your method of locating contour lines should be one that is acceptable to your local area.

Step 2: Locate and mark the contour lines

Figure 2: Laying out a contour line.
The next step is to use your instrument of choice to locate contour lines in the field. Cut tall grasses or remove any obstruction so that you can move easily and mark lines. When using the A-frame, the task is much easier and faster with two people working together. One operates the A-frame while the other marks the located contour lines with stakes (Fig 2).
Make a study of the area for which contour lines are to be determined. Begin marking contour lines near the highest point. Let the A-frame stand on the ground. Without moving the rear leg, then put the front leg down on the ground that is on the same level with the rear leg.
The two legs of the A-frame are on the same level when the air space in the carpenter’s level stops in the middle. When this happens, it means that you have found the contour line which is a level line between the two legs of the A-frame. Mark with a stick the spot where the rear leg stands.

Figure 3: Plowing contour lines on a hillside
Move the A-frame forward by placing the rear leg on the spot where the front leg stood before. Adjust the front leg again until it levels with the rear leg. For every 2-3 m of contour line you find, mark it with a stake. Follow this procedure until you reach the entire length of the contour line, which is the other side of the mountain or hill.
Try to locate as many contour lines as possible. Remember, the farther the contour lines are from each other, the more potential erosion occurs. Also, closer contour lines mean more nutrient-rich biomass produced and made available to the crops growing in the alley.
There are two criteria for determining the distance between contour lines: vertical drop and surface distance. Generally, no more than a 1 m vertical drop is desirable for effective erosion control (Figs 3 and 4). Therefore, the steeper the slope, the closer the contour hedgerows should be; conversely, the flatter the slope, the wider the spacing of hedges. However, on the flatter slopes, it is recommended that contour hedgerows be spaced no farther apart than 5 m in order to maximize the benefits of the NFTS on soil fertility management.
In determining a 1 m vertical drop, the “eye-hand” method is a simple procedure to use. If using a transit or home-made transit, the 1 m vertical drop can be obtained very quickly.
Step 3: Prepare the contour lines

Figure 4: Determining distance between contours.
After you have found and marked the contour lines, prepare them by plowing and harrowing until ready for planting (Fig 4). The width of each area to be prepared should be 1 m. The stakes will serve as your guide during plowing.
Step 4: Plant seeds of nitrogen-fixing trees and shrubs (NFTS)
On each prepared contour line make two furrows at a distance of 0.5 m apart. Sow the seeds in each furrow to allow for a good, thick stand of seed lings. Cover seeds lightly and firmly with soil.
The ability of NFTS to grow on poor soils and in areas with long dry seasons makes them good plants for restoring forest cover to watersheds, slopes and other lands that have been denuded of trees. Through natural leaf drop they enrich and fertilize the soil. In addition, they compete vigorously with coarse grasses, a common feature of many degraded areas that have been deforested or depleted by excessive agriculture.
Flemingia macrophylla, Desmodium resonii, Gliricidia sepium, and Indigofera anil are good examples of NFTS for hedge rows on the SALT farm. Others include Calliandra spp, Luecaena luecocephala, and Luecaena diversofilia. Members of the Cassia genus such as spectabilis and siamea are not mentioned here because of their doubtful fixing of nitrogen. Remember, you must select the species that grows best in your climate and particular soils.
Step 5: Cultivate alternate strips
The spaces between the thick rows of NFTS where the crops are planted is called a strip (Fig 5). Other names for the strips are alleyways or avenues.
If you wish to prepare the soil for planting before the NFTS are fully grown, do it alternately on strips 2, 4, 6, 8, (those plowed) and so on. Alternate cultivation will prevent erosion because the unplowed strips will hold the soil in place. When the NFTS are fully grown, you can proceed with cultivation on every strip.

Figure 5: Alternating plowed and unplowed strips.

Figure 6: Permanent crops planted in every third strip
Step 6: Plant permanent crops
Plant permanent crops in every third strip (Fig 6). They may be planted at the same time the seeds of NFTS are sown. Only the planting holes are cleared and dug; later, ring weeding is employed until the NFTS are large enough to hold the soil.
Examples of permanent crops include durian, lanzones, rambutan, coffee, banana, citrus, cacao, and others of the same height. Tall crops are planted at the bottom of the hill while the short ones are planted at the top. Shade-tolerant permanent crops can be intercropped with the tall crops.
Step 7: Plant short and medium-term crops
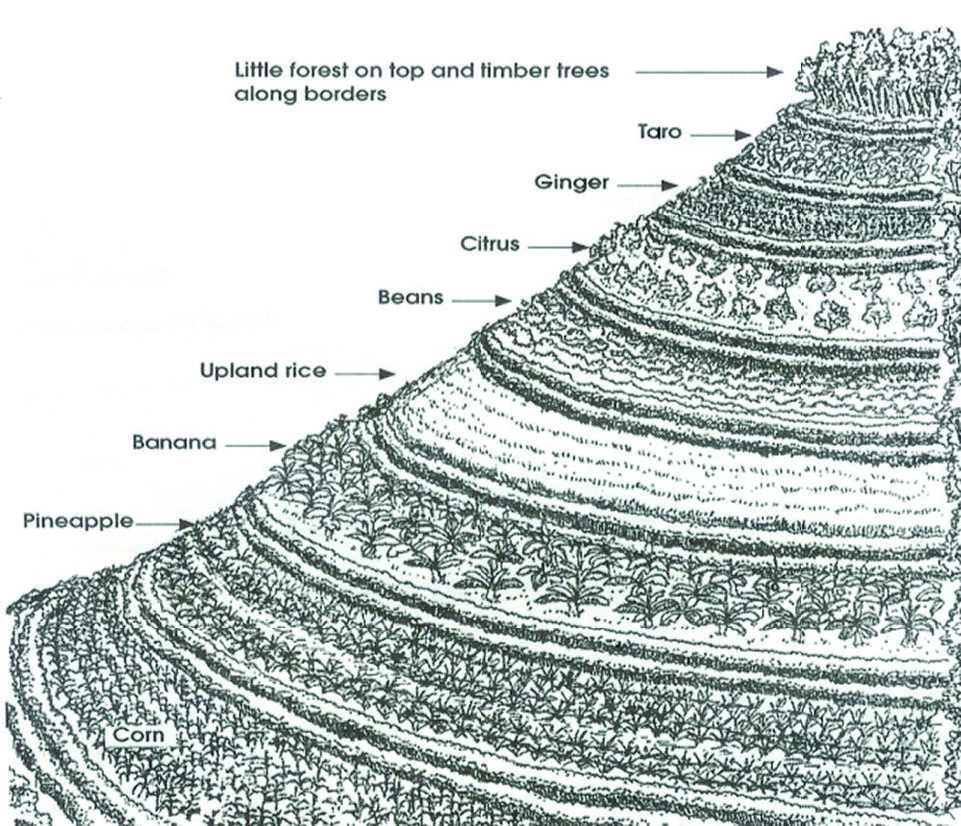
Figure 7: Strips of short- and medium-term plants, in between strips of long-term crops in SALT.
You can plant short and medium-term crops between and among strips of permanent crops (Fig 7). They are your source of food and regular income while waiting for the permanent crops to bear fruit. Suggested short and medium-term crops are pineapple, ginger, gabi, castor bean, camote, peanut, mung bean, melon, sorghum, corn, upland rice, etc. To avoid shading, plant shorter plants away from tall ones.
Step 8: Regularly trim the NFTS
About once a month, the continuously growing NFTS are cut back to a height of 0.5-1 m from the ground. Pruned leaves and twigs should always be piled at the base of the crops. They serve as soil cover to minimize the impact of raindrops on the bare soil. They also act as excellent organic fertilizer for both the permanent and short-term crops. In this way, only a minimal amount of commercial fertilizer (about one-fourth of the total requirement) is necessary.
Step 9: Practice crop rotation
A good way of rotating non-permanent crops is to plant grains (corn, upland rice, sorghum, etc.), tubers (camote, cassava, gabi, etc) and other crops (pineapple, castor bean, etc) on strips where legumes (mung bean, bush sitao, peanut, etc) were planted previously, and vice versa. This practice will help maintain the fertility and good condition of your soil. Other management practices in crop growing, like weeding and pest control, should be done regularly.
Step 10: Build and maintain green terraces
Apart from providing you with adequate food and sufficient income, another important benefit of using SALT is the control of soil erosion. This is done by the double-thick rows of nitrogen-fixing trees and the natural terraces being formed along the contour lines of the hill. As you go on farming the sloping land, keep gathering and piling up straw, stalks, twigs, branches, leaves, rocks, and stones at the base of the rows of nitrogen fixing trees. By doing this regularly, and as the years go by, you can build strong, sustainable, and beautiful green terraces which will reliably anchor precious soil in place (Fig 8).

Figure 8: Build-up of terraces over time with the SALT system.
Advantages of SALT farming
As a proven system of upland farming, SALT has certain good qualities over both the traditional techniques of slash-andburn and conventional terrace farming.
- The SALT system protects the soil from erosion.
- SALT helps restore soil fertility and structure.
- SALT is efficient in food crop production.
- SALT is applicable to at least 50% of hillside farm.
- SALT is easily replicated by hillside farmers.
- SALT is culturally acceptable because the farming techniques are in harmony with Asian beliefs and traditional practices.
- SALT has the small family as its focus, and food production as the top priority–fruit trees, forest and other crops are secondary priority.
- SALT is workable in a relatively short time.
- SALT is economically feasible.
- SALT is ecologically sound.
- The SALT farm can easily revert back to forestland if left unfarmed.
In the Philippines, SALT fits into the framework of the government’s rain-fed resources development strategy for the uplands.
Conclusion
The ARLDF recognizes that SALT is not a perfect farming system. There is not and never will be one system for all farmers. SALT is not a miracle farming system or a panacea for all the upland problems. To establish a 1 ha SALT farm requires much hard work and discipline–there is no easy way. It takes 3-10 years to deplete the soil of nutrients and to lose the topsoil; no system can bring depleted, eroded soil back into production in a few short years. Soil loss leads to low yields and poverty, but land can be restored to a reasonable level of productivity by using SALT.
Cite this article as:
Mindinao Baptist Rural Life Center 2012. Sloping Agricultural Land Technology (SALT). ECHO Technical Note no. 72.