SEED CLEANER
This seed cleaner was developed in Afghanistan to remove round seeds of weeds from wheat grains. The round seeds could not be separated by a sieve because they were the same size as the wheat grains. The cleaner described here takes advantage of the round shape of the weed seeds to separate them from the wheat. The wheat grains, which roll down the chute slowly, collect at the base of the inclined platform ("x" in Figure 1); while the round seeds roll faster and fall off

the side opposite the chute ("y" in Figure 1).
Tools and Materials
Hammer, Saw, Nails, or Screws
Inclined Platform:
Galvanized iron sheet: 70cm x 70cm (2'3"x 2'3") Wood: 2cm x 4cm x 68cm (4 pieces) (3/4" x 1 1/2" x 2'2 3/4") Wood: 2cm x 4cm x 25cm (1 piece) (3/4" x 1 1/2" x 10") Attached to platform to support chute Wood: 2cm x 8m x 34cm (2 pieces) (3/4" x 3" x 1'3 1/2") Legs for platform
Chute:
Galvanized iron sheet: 24cm x 140cm (9 1/2" x 4'7") Wood: 2cm x 8cm x 80cm (1 piece) (3/4" x 3" x 2'7") Wood: 2cm x 8cm x 80cm (1 piece) (3/4" x 3" x 12")
As shown in Figure 1, the chute is attached at the top of the 80cm (2'7") support by nails whose heads have been removed. This makes it easy to remove the chute when it is not being used. The chute's lower end sits on the 2cm x 4cm x 25cm (3/4" x 1 1/2" x 10") support attached to the platform.
The seed should first be cleaned with sieves to remove as much dirt and chaff as possible. To use the seed cleaner, drop the seed very slowly onto the top of the chute.
Source: Dale Fritz, VITA Volunteer, Schenectady, New York
SEED CLEANING SIEVES
An important step for improving crop production is the effective cleaning of crop seeds. The sieves described here have been found effective in many countries. <see figure 1>

Tools and Materials
Wood: 12 pieces: 2.5cm x 5cm x 46cm (1" x 2" x 18") Wood strips: 12: 1cm x 2.5cm x 43.5cm (1/2" x 1" x 17") Galvanized screen: 6mm (1/4" mesh: 46cm (18") square 5mm (3/16") mesh: 46cm (18") square 3mm (1/8") mesh: 46cm (18") square
Hammer, Saw, Nails
The exact size of these sieves is not important, but 3mm (1/8"), 5mm (3/16"), and 6mm (1/4") mesh make convenient sizes for cleaning wheat, barley, corn, and seeds of similar size. The sieves are also useful for grading certain seeds. Grading consists of removing the small, weak seeds, which will produce small weak plants or will not grow at all. Less seed can be planted per acre, if it is properly cleaned and graded, and still produce a good crop.
Source:
Dale Fritz, VITA Volunteer, Schenectdy, New York
DRYING GRAIN WITH WOODEN BLOCKS
Small blocks of wood treated with calcium chloride, a low-cost chemical, can be used to dry grain to be used as seed. The blocks, which absorb moisture from the grain, can be used repeatedly by drying them in an oven after use. The blocks can absorb water up to one-fourth their weight.
In a test using balsa blocks, the moisture content of grain dropped from 17 percent to 12 percent in three days. The blocks were not dried at this point; in the next five days, moisture content did not change. The blocks were then dried in an oven and put back in with the grain. Three more days of drying brought the moisture content down to 10 percent, at which grain resists mold and insects.
Tools and Materials
- Balsa or cedar: Cedar absorbs water and is durable. Balsa absorbs more water, but it breaks easily. Other wood can also be used.
- Calcium chloride ([CaCI.sub.2]): Add enough to a liter of water to make the solution weigh 1/2kg (or to a quart of water to make the solution weigh 2.5 pounds).
- Waterproof chest that will keep out vapor, to dry and store the grain. A steel drum or sheet metal cabinet would be good. A wooden chest can be used if it is vapor-proof, as in Figures 1, 2, and 3.
o Coarse Screen: 2.5cm (1") mesh
Preparing the Blocks
- Cut the wooden blocks so that as much as possible of the surface is end grain. A good size is 3cm x 3cm x 0.75cm (1" x 1" x 1/2").
- Dry the blocks in a 90-100[degrees]C (194-212[degrees]F) oven or double boiler to remove all moisture (see Figures 4 and 5).
- Cook the blocks in the calcium chloride solution for four hours at a temperature just below the boiling point, 100[degrees]C (212[degrees]F).
- Let the solution cool; let the blocks soak in the solution for 24 hours.
- Dry the blocks again.
- When the blocks are dry, wipe off any calcium chloride on their surface before putting them in the grain.
Using the Blocks
- Mix the blocks with grain in a container. The blocks should be spaced throughout the container so that the grain will dry evenly in the shortest time possible. The blocks should not take up more than 10 percent of the container's space. Small containers (see Figure 1) are helpful when there are several kinds of grain to dry. They also make it easier to remove and replace the blocks. These containers are placed in the waterproof chest.
- After three to five days, remove the blocks. They can be separated from the grain easily with a coarse screen. Dry the blocks again.
- Continue re-drying the blocks in an oven or double boiler and placing them back in the grain until the blocks no longer absorb moisture. To find out when this point is reached, weigh the blocks after three or four days in the grain: if they weigh the same as dry blocks, the grain is dry.
Source:
Ives, Norton C. Grain Drying and Storage for Warm, Humid Climates. Turrialba, Costa Rica: Inter-American Institute of Agricultural Sciences, 1951.
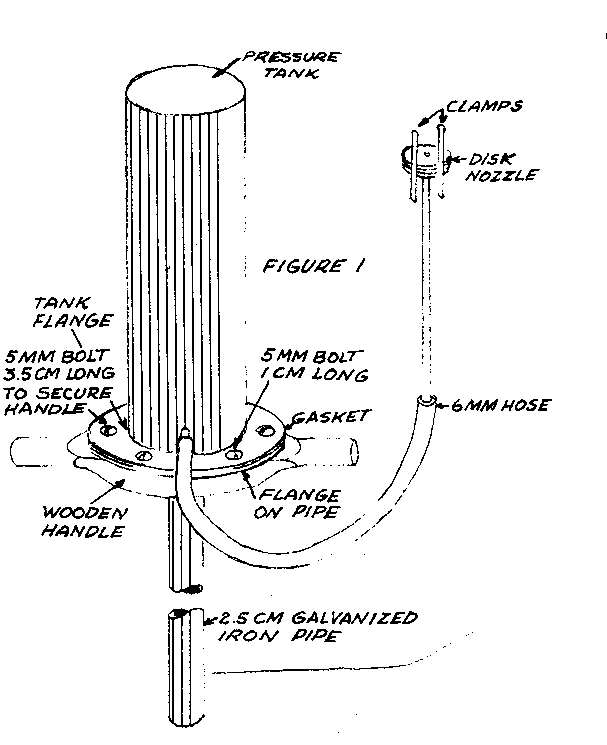
BUCKET SPRAYER
The bucket sprayer-described here has been designed primarily to meet the need for a sprayer that can be built in an area where production facilities are limited. This sprayer, which can be made by the local artisans, is intended only for water solutions of insecticides or fungicides.
Two people operate it; one sprays while the other pumps.
Tools and Materials
Galvanized iron: 30cm x 30cm (1' x 1') plus 10cm x 20cm (4" x 8") Barrel metal: 10cm x 20cm (4" x 8") 6mm (1/4") hose (high pressure) 4m (13') long 6mm (1/4") pipe (truck brake line may be used) 50cm (19 5/8") long Wood for handle: 2cm x 15cm x 30cm (3/4" x 6" x 12") 2.5cm (1") Galvanized iron pipe (thin-walled) 120cm (4') long 4mm (5/32") wire: 20cm (8") Truck inner-tube material: 10cm x 20cm (4" x 8") 1mm (1/32") Galvanized wire, 30cm (12") long 4 - 5mm (3/16") bolts x 1cm (3/8") 2 - 5cm (3/16") bolts x 3.5cm (1 3/8")
The sprayer pump operates on the same principle as the Inertia Pump (see page 101). The top of the 2.5cm (1") iron pipe is plugged and a simple valve is located 8cm (3 1/8") from the top. The valve is a piece of truck inner-tube rubber wrapped around the pipe and held in place by wire. One corner of the rubber is over a hole in the pipe. Some careful adjustment is necessary when placing the rubber to make sure it works properly and does not leak.
The pressure tank encloses the valve assembly and, as the liquid is pumped into the tank, builds up pressure sufficient to operate the simple disk type spray nozzle. The tank is built so that it can be removed in order to service the valve.
The length of the hose can be determined by the maker of the sprayer but it should be about 4m (13') to allow the worker doing the spraying to cover quite a large area before having to move the bucket. Also, the length of the small pipe and the angle of the spray nozzle will be determined by the kind of crops being sprayed.
At times it will be necessary to "prime" the sprayer pump: if the valve rubber is too tight and the air cannot be forced through the valve, or if the rubber is stuck to the pipe. To prime the pump turn it upside-down and fill the pipe with water. Holding your thumb over the pipe, turn the pump over, lower it into the bucket of liquid and start pumping in the usual manner. If priming does not start the pump it will then be necessary to remove the pressure tank to inspect and repair the valve.
Only very clean water should be used to make the mixture for spraying. It should be strained through a cloth after mixing to remove any particles that might cause the nozzle to plug. If a very fine brass screen is available, it should be put in the nozzle to keep the dirt from plugging the holes. <see figures 1 to 3>
Source:
Dale Fritz, VITA Volunteer, Schenectady, New York
BACKPACK CROP DUSTER
The backpack duster described here, designed so that it can be easily made by tinsmiths, has been used by Afghan farmers to dust sulfur on their grapes to control powdery mildew. The duster is made from easily available materials. Its feed rate is adjustable (see Figure 1).

The springs needed for the duster can be made with the simple Spring Winder shown on p. 251.
Tools and Materials
Soldering equipment Sheet-metal working tools Carpentry tools
Part Name Material Description No.
1 Bellows Wood 38cm x 7cm x 2cm (15" x 2 3/4" x 3/4"). Support
2 Screws 4cm (1 9/16") long.
3 Bellows Plug Wood 22cm (8 5/8") in diameter, 2.5cm (1") thick.
4 Valve Rubber 4cm x 5cm (1 9/16" x 2"). See Figure 2.

5 Screws 2cm (3/4") long.
6 Feeder Rod Barrel See Figure 3.
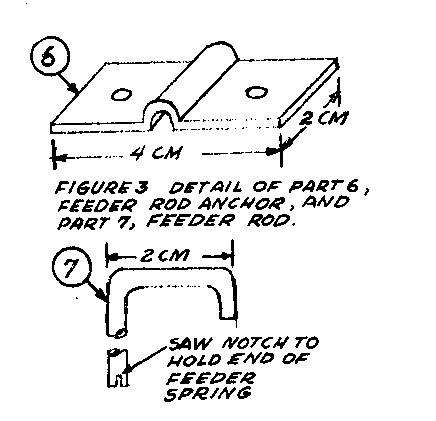
Anchor Metal
7 Feeder Rod 6mm (1/4") rod See Figure 3. Total length 50cm (19 3/4").
8 Bellows Truck inner- 30cm (12") long on long side. Tube measures tube rubber 29cm (11 3/8") from edge when laid flat.
9 Bellows Barrel metal 20cm (8") long. See Figure 4.

Support
10 Brace Galvanized 33cm (13") long. See Figure 4. tin
11 Nails 3cm (1 3/16") long.
12 Rivets
13 Bolt 6mm (1/4") rod See Figure 5.
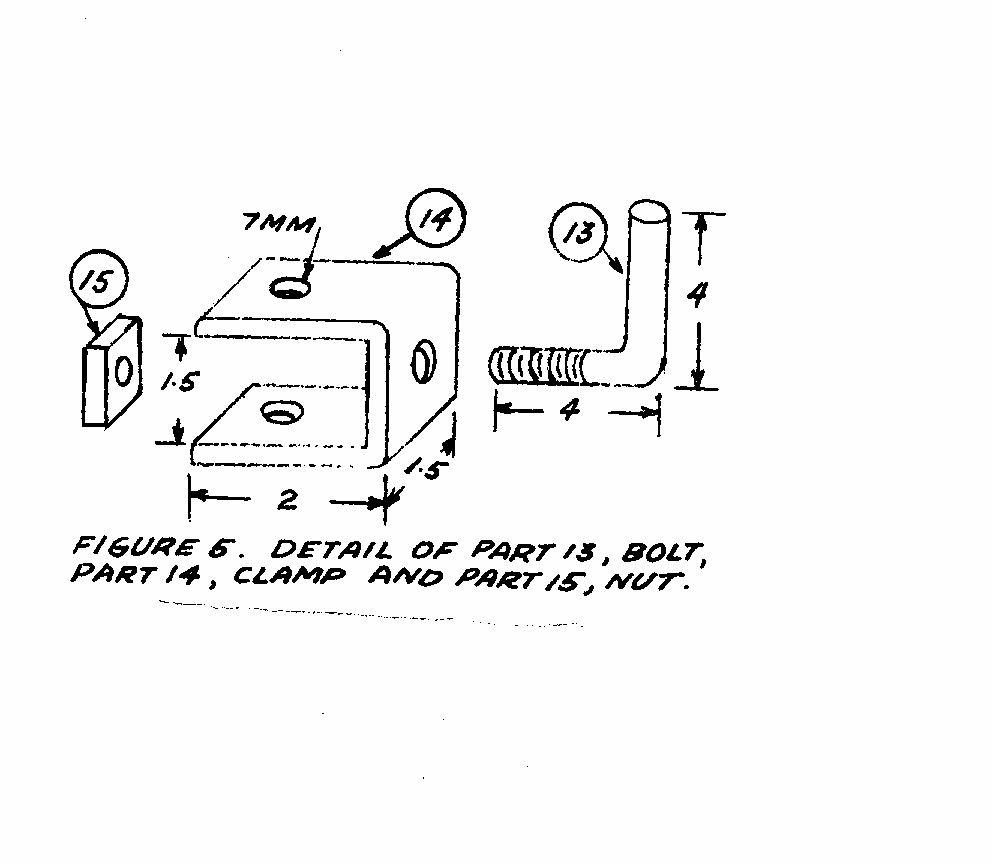
14 Clamp Barrel metal See Figure 5.
15 Nut 6mm (1/4") nut See Figure 5.
16 Agitator Tire bead 3.5cm (1 3/4") diameter. See Figure 6.
Spring wire
17 Feeder Tire bead 9mm (11/32") diameter. See Figure 3.
Spring wire
18 Pipe Galvanized 3.5cm (1 3/4") diameter, 71cm (28") long. tin See Figures 6 and 7.
19 Hopper Galvanized tin 22cm (8 5/8") diameter, 48cm (18 7/8") high. See Figure 7.
20 Floor Galvanized tin Make to fit. See Figure 7.
21 Strap Galvanized 4mm (5/32") diameter. Holder wire Soldered to hopper.
22 Strap Webbing 6cm (2 3/8") wide, 3m (9'10") long. Tied at waist.
23 Handle 8mm (5/16") Total length 1 meter rod (39 3/8").
24 Pipe Galvanized 3.5cm (1 3/4") diameter, tin 140cm (55 1/4") long. See Figure 1, 6 and 8.
How the Duster Operates
In operating the duster, the rod (23) is used to pump the inner-tube bellows, which pivots about point A (see Figure 1).
Air is admitted to the bellows through valve (4), also made of innertube rubber, and passes down the pipe (18). A measured amount of dust is injected into pipe (18) at point B. The feed mechanism consists of a 6mm (1/4") rod (7) covered by a spring (17). As the bellows is worked up and down, the rod and spring go in and out of the hole (at point B) in the delivery pipe (18). The dust lodges between the loops of the spring and is carried into the pipe. The amount of dust delivered is controlled by stretching the spring on the rod so that there is more space between the loops. The greater the space between the loops, the greater the amount of dust carried into the pipe. An easily adjustable clamp (13) and (14) is provided on the rod to regulate the amount of dust applied to the plants. The air-dust mixture is blown out the delivery pipe at (24).
The bellows of the duster is made from truck innertube rubber. There are several sizes of innertubes. If the size shown in the list of parts is not used, the diameter of the hopper must be adjusted to the size of the tubes available. The hopper is made from galvanized tin, from 24 to 28 gauge.
In the illustrations, the feeder rod (7) is shown as being straight. However, it is necessary to bend the rod to allow it to work in and out of the hole in the delivery pipe without binding.
To fill the duster, slip the bellows off of the top of the hopper. The hopper must not be filled above the top of the delivery pipe. The top of the delivery pipe (18) is cut so as to prevent dust from spilling in the tube during filling, and to provide a means for fastening it to the hopper (19).
Adjusting the Duster
To increase the amount of dust being applied:
- Slip the bellows (8) off of the top of the hopper (19).
- Loosen the bolt (13).
- Pull up on the clamp (14) stretching the spring (17).
- Tighten the bolt (13).
- Replace the bellows and test the amount of dust delivered to see if it is satisfactory.
To decrease the amount of dust, the procedure is the same except that the clamp is pushed down on the rod.
Filling the Duster
Before filling the duster, make sure that all lumps of dust have been broken up. Putting the dust through a piece of window screen is a good way to break up the lumps. This will also remove any foreign matter.
Source:
Dale Fritz, VITA Volunteer, Schenectady, New York
Making Springs for the Duster
This method for winding springs can be used to make springs of any size. Figures 1 and 2
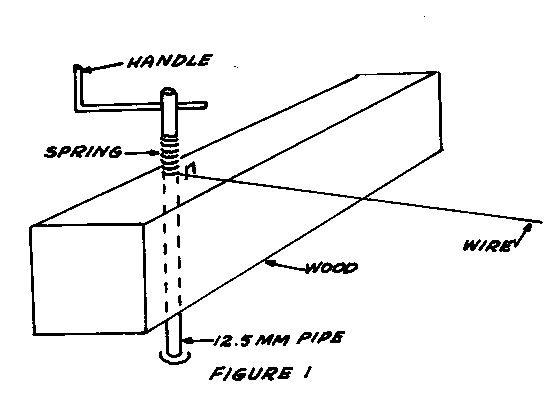
show spring winders for springs that will be the right size for use in the Backpack Crop Duster described in the preceding entry.
Tools and Materials
Drill Drill bit: 2mm (1/12") Drill bit: 6mm (1/4") Drill bit: 12.5mm (1/2") Wood: 10cm x 10cm x 1m (4"x 4"x 39") Metal rod: 6mm (1/4") by 1m (39") long Metal pipe: 12.5mm (1/2") by 30cm (12") long 4 small nails Steel spring wire
A good source of spring wire is from the bead of an old tire. The rubber should not be burned off as this destroys the spring-strength of the wire.
One winder is made of the 6mm (1/4") rod. The other winder is made from the 12.5mm (1/2") pipe with a section of the rod used as a handle. Cut a piece of the 6mm (1/4") rod about 30cm long. Bend to form handle shown in Figure 1; set aside. Bend remaining piece as shown in Figure 2.
Drill a 6mm (1/4") hole in one end of the wood block and a 12.5mm (1/2") hole in the other end. Drill a 2mm (1/12) hole through the longer section of 6mm (1/4") rod and through the 12.5mm (1/2") pipe to insert the end of the wire. Drill a 6mm (1/4") hole through the 12.5mm (1/2") pipe to hold the length of the rod to be used as a winding handle. Drive two nails close together, about 1.5mm to 2mm (1/12" to 1/16") from each hole in the wood block. Put the pieces together as shown in Figures 1 and 2.
The wire is fed through the nail wire guide and then through the 1/12 inch hole in the rod or pipe spool. The spool is then turned in a clockwise direction until the desired length of spring is wound. The springs for the backpack duster are 9mm (11/32") from the 6mm (1/4") spool and 3.5cm (1 3/8") from the 12.5mm (1/2") spool.
Source:
Dale Fritz, VITA Volunteer, Schenectady, New York